This the multi-page printable view of this section. Click here to print.
Administration
- 1: Basics
- 1.1: Installation Guide
- 1.2: Superuser registration
- 1.3: Social auth configuration
- 1.4: AWS-Deployment Guide
- 1.5: REST API guide
- 2: Advanced
- 2.1: CVAT deployment on Kubernetes with Helm
- 2.2: Semi-automatic and Automatic Annotation
- 2.3: Installation Analytics
- 2.4: Mounting cloud storage
- 2.5: LDAP Backed Authentication
- 2.6: Backup guide
- 2.7: Upgrade guide
- 2.8: IAM: system roles
- 2.9: Webhooks
1 - Basics
1.1 - Installation Guide
Quick installation guide
Before you can use CVAT, you’ll need to get it installed. The document below contains instructions for the most popular operating systems. If your system is not covered by the document it should be relatively straight forward to adapt the instructions below for other systems.
Probably you need to modify the instructions below in case you are behind a proxy server. Proxy is an advanced topic and it is not covered by the guide.
For access from China, read sources for users from China section.
Ubuntu 18.04 (x86_64/amd64)
-
Open a terminal window. If you don’t know how to open a terminal window on Ubuntu please read the answer.
-
Type commands below into the terminal window to install
docker. More instructions can be found here.sudo apt-get update sudo apt-get --no-install-recommends install -y \ apt-transport-https \ ca-certificates \ curl \ gnupg-agent \ software-properties-common curl -fsSL https://download.docker.com/linux/ubuntu/gpg | sudo apt-key add - sudo add-apt-repository \ "deb [arch=amd64] https://download.docker.com/linux/ubuntu \ $(lsb_release -cs) \ stable" sudo apt-get update sudo apt-get --no-install-recommends install -y docker-ce docker-ce-cli containerd.io -
Perform post-installation steps to run docker without root permissions.
sudo groupadd docker
sudo usermod -aG docker $USER
Log out and log back in (or reboot) so that your group membership is re-evaluated. You can type
groupscommand in a terminal window after that and check ifdockergroup is in its output. -
Install docker-compose (1.19.0 or newer). Compose is a tool for defining and running multi-container docker applications.
sudo apt-get --no-install-recommends install -y python3-pip python3-setuptools sudo python3 -m pip install setuptools docker-compose -
Clone CVAT source code from the GitHub repository with Git.
Following command will clone latest develop branch:
git clone https://github.com/opencv/cvat
cd cvat
See alternatives if you want to download one of the release versions or use the
wgetorcurltools. -
To access CVAT over a network or through a different system, export
CVAT_HOSTenvironment variableexport CVAT_HOST=your-ip-address -
Run docker containers. It will take some time to download the latest CVAT release and other required images like postgres, redis, etc. from DockerHub and create containers.
docker-compose up -d -
(Optional) Use
CVAT_VERSIONenvironment variable to specify the version of CVAT you want to install specific version (e.gv2.1.0,dev). Default behavior:devimages will be pulled for develop branch, and corresponding release images for release versions.CVAT_VERSION=dev docker-compose up -d -
Alternative: if you want to build the images locally with unreleased changes see How to pull/build/update CVAT images section
-
You can register a user but by default it will not have rights even to view list of tasks. Thus you should create a superuser. A superuser can use an admin panel to assign correct groups to the user. Please use the command below:
docker exec -it cvat_server bash -ic 'python3 ~/manage.py createsuperuser'Choose a username and a password for your admin account. For more information please read Django documentation.
-
Google Chrome is the only browser which is supported by CVAT. You need to install it as well. Type commands below in a terminal window:
curl https://dl-ssl.google.com/linux/linux_signing_key.pub | sudo apt-key add - sudo sh -c 'echo "deb [arch=amd64] http://dl.google.com/linux/chrome/deb/ stable main" >> /etc/apt/sources.list.d/google-chrome.list' sudo apt-get update sudo apt-get --no-install-recommends install -y google-chrome-stable -
Open the installed Google Chrome browser and go to localhost:8080. Type your login/password for the superuser on the login page and press the Login button. Now you should be able to create a new annotation task. Please read the CVAT manual for more details.
Windows 10
-
Install WSL2 (Windows subsystem for Linux) refer to this official guide. WSL2 requires Windows 10, version 2004 or higher. Note: You may not have to install a Linux distribution unless needed.
-
Download and install Docker Desktop for Windows. Double-click
Docker for Windows Installerto run the installer. More instructions can be found here. Official guide for docker WSL2 backend can be found here. Note: Check that you are specifically using WSL2 backend for Docker. -
Download and install Git for Windows. When installing the package please keep all options by default. More information about the package can be found here.
-
Download and install Google Chrome. It is the only browser which is supported by CVAT.
-
Go to windows menu, find
Git Bashapplication and run it. You should see a terminal window. -
Clone CVAT source code from the GitHub repository.
The following command will clone the latest develop branch:
git clone https://github.com/opencv/cvat
cd cvat
See alternatives if you want to download one of the release versions.
-
Run docker containers. It will take some time to download the latest CVAT release and other required images like postgres, redis, etc. from DockerHub and create containers.
docker-compose up -d -
(Optional) Use
CVAT_VERSIONenvironment variable to specify the version of CVAT you want to install specific version (e.gv2.1.0,dev). Default behavior:devimages will be pulled for develop branch, and corresponding release images for release versions.CVAT_VERSION=dev docker-compose up -d -
Alternative: if you want to build the images locally with unreleased changes see How to pull/build/update CVAT images section
-
You can register a user but by default it will not have rights even to view list of tasks. Thus you should create a superuser. A superuser can use an admin panel to assign correct groups to other users. Please use the command below:
winpty docker exec -it cvat_server bash -ic 'python3 ~/manage.py createsuperuser'If you don’t have winpty installed or the above command does not work, you may also try the following:
# enter docker image first
docker exec -it cvat_server /bin/bash
# then run
python3 ~/manage.py createsuperuser
Choose a username and a password for your admin account. For more information please read Django documentation.
-
Open the installed Google Chrome browser and go to localhost:8080. Type your login/password for the superuser on the login page and press the Login button. Now you should be able to create a new annotation task. Please read the CVAT manual for more details.
Mac OS Mojave
-
Download Docker for Mac. Double-click Docker.dmg to open the installer, then drag Moby the whale to the Applications folder. Double-click Docker.app in the Applications folder to start Docker. More instructions can be found here.
-
There are several ways to install Git on a Mac. The easiest is probably to install the Xcode Command Line Tools. On Mavericks (10.9) or above you can do this simply by trying to run git from the Terminal the very first time.
git --versionIf you don’t have it installed already, it will prompt you to install it. More instructions can be found here.
-
Download and install Google Chrome. It is the only browser which is supported by CVAT.
-
Open a terminal window. The terminal app is in the Utilities folder in Applications. To open it, either open your Applications folder, then open Utilities and double-click on Terminal, or press Command - spacebar to launch Spotlight and type “Terminal,” then double-click the search result.
-
Clone CVAT source code from the GitHub repository with Git.
The following command will clone the latest develop branch:
git clone https://github.com/opencv/cvat
cd cvat
See alternatives if you want to download one of the release versions or use the
wgetorcurltools. -
Run docker containers. It will take some time to download the latest CVAT release and other required images like postgres, redis, etc. from DockerHub and create containers.
docker-compose up -d -
(Optional) Use
CVAT_VERSIONenvironment variable to specify the version of CVAT you want to install specific version (e.gv2.1.0,dev). Default behavior:devimages will be pulled for develop branch, and corresponding release images for release versions.CVAT_VERSION=dev docker-compose up -d -
Alternative: if you want to build the images locally with unreleased changes see How to pull/build/update CVAT images section
-
You can register a user but by default it will not have rights even to view list of tasks. Thus you should create a superuser. A superuser can use an admin panel to assign correct groups to other users. Please use the command below:
docker exec -it cvat_server bash -ic 'python3 ~/manage.py createsuperuser'Choose a username and a password for your admin account. For more information please read Django documentation.
-
Open the installed Google Chrome browser and go to localhost:8080. Type your login/password for the superuser on the login page and press the Login button. Now you should be able to create a new annotation task. Please read the CVAT manual for more details.
Advanced Topics
How to get CVAT source code
Git (Linux, Mac, Windows)
-
Install Git on your system if it’s not already installed
- Ubuntu:
sudo apt-get --no-install-recommends install -y git- Windows: Follow instructions from https://git-scm.com/download/win
-
Clone CVAT source code from the GitHub repository.
The command below will clone the default branch (develop):
git clone https://github.com/opencv/cvat
cd cvat
To clone specific tag, e.g. v2.1.0:
git clone -b v2.1.0 https://github.com/opencv/cvat
cd cvat
Wget (Linux, Mac)
To download latest develop branch:
wget https://github.com/opencv/cvat/archive/refs/heads/develop.zip
unzip develop.zip && mv cvat-develop cvat
cd cvat
To download specific tag:
wget https://github.com/opencv/cvat/archive/refs/tags/v1.7.0.zip
unzip v1.7.0.zip && mv cvat-1.7.0 cvat
cd cvat
Curl (Linux, Mac)
To download latest develop branch:
curl -LO https://github.com/opencv/cvat/archive/refs/heads/develop.zip
unzip develop.zip && mv cvat-develop cvat
cd cvat
To download specific tag:
curl -LO https://github.com/opencv/cvat/archive/refs/tags/v1.7.0.zip
unzip v1.7.0.zip && mv cvat-1.7.0 cvat
cd cvat
CVAT healthcheck command
The following command allows to test the CVAT container to make sure it works.
docker exec -t cvat_server python manage.py health_check
Expected output of a healthy CVAT container:
Cache backend: default   ... working
DatabaseBackend          ... working
DiskUsage                ... working
MemoryUsage              ... working
MigrationsHealthCheck    ... working
OPAHealthCheck           ... working
Deploying CVAT behind a proxy
If you deploy CVAT behind a proxy and do not plan to use any of serverless functions
for automatic annotation, the exported environment variables
http_proxy, https_proxy and no_proxy should be enough to build images.
Otherwise please create or edit the file ~/.docker/config.json in the home directory of the user
which starts containers and add JSON such as the following:
{
  "proxies": {
    "default": {
      "httpProxy": "http://proxy_server:port",
      "httpsProxy": "http://proxy_server:port",
      "noProxy": "*.test.example.com,.example2.com"
    }
  }
}
These environment variables are set automatically within any container. Please see the Docker documentation for more details.
Using the Traefik dashboard
If you are customizing the docker compose files and you come upon some unexpected issues, using the Traefik dashboard might be very useful to see if the problem is with Traefik configuration, or with some of the services.
You can enable the Traefik dashboard by uncommenting the following lines from docker-compose.yml
services:
  traefik:
    # Uncomment to get Traefik dashboard
    #   - "--entryPoints.dashboard.address=:8090"
    #   - "--api.dashboard=true"
    # labels:
    #   - traefik.enable=true
    #   - traefik.http.routers.dashboard.entrypoints=dashboard
    #   - traefik.http.routers.dashboard.service=api@internal
    #   - traefik.http.routers.dashboard.rule=Host(`${CVAT_HOST:-localhost}`)
and if you are using docker-compose.https.yml, also uncomment these lines
services:
  traefik:
    command:
      # Uncomment to get Traefik dashboard
      # - "--entryPoints.dashboard.address=:8090"
      # - "--api.dashboard=true"
Note that this “insecure” dashboard is not recommended in production (and if your instance is publicly available); if you want to keep the dashboard in production you should read Traefik’s documentation on how to properly secure it.
Additional components
# Build and run containers with Analytics component support:
docker-compose -f docker-compose.yml \
  -f components/analytics/docker-compose.analytics.yml up -d --build
Semi-automatic and automatic annotation
Please follow this guide.
Stop all containers
The command below stops and removes containers and networks created by up.
docker-compose down
Use your own domain
If you want to access your instance of CVAT outside of your localhost (on another domain),
you should specify the CVAT_HOST environment variable, like this:
export CVAT_HOST=<YOUR_DOMAIN>
Share path
You can use a share storage for data uploading during you are creating a task. To do that you can mount it to CVAT docker container. Example of docker-compose.override.yml for this purpose:
version: '3.3'

services:
  cvat_server:
    volumes:
      - cvat_share:/home/django/share:ro
  cvat_worker_default:
    volumes:
      - cvat_share:/home/django/share:ro

volumes:
  cvat_share:
    driver_opts:
      type: none
      device: /mnt/share
      o: bind
You can change the share device path to your actual share.
You can mount your cloud storage as a FUSE and use it later as a share.
Email verification
You can enable email verification for newly registered users. Specify these options in the settings file to configure Django allauth to enable email verification (ACCOUNT_EMAIL_VERIFICATION = ‘mandatory’). Access is denied until the user’s email address is verified.
ACCOUNT_AUTHENTICATION_METHOD = 'username_email'
ACCOUNT_CONFIRM_EMAIL_ON_GET = True
ACCOUNT_EMAIL_REQUIRED = True
ACCOUNT_EMAIL_VERIFICATION = 'mandatory'

# Email backend settings for Django
EMAIL_BACKEND = 'django.core.mail.backends.smtp.EmailBackend'
Also you need to configure the Django email backend to send emails. This depends on the email server you are using and is not covered in this tutorial, please see Django SMTP backend configuration for details.
Deploy CVAT on the Scaleway public cloud
Please follow this tutorial to install and set up remote access to CVAT on a Scaleway cloud instance with data in a mounted object storage bucket.
Deploy secure CVAT instance with HTTPS
Using Traefik, you can automatically obtain TLS certificate for your domain from Let’s Encrypt, enabling you to use HTTPS protocol to access your website.
To enable this, first set the the CVAT_HOST (the domain of your website) and ACME_EMAIL
(contact email for Let’s Encrypt) environment variables:
export CVAT_HOST=<YOUR_DOMAIN>
export ACME_EMAIL=<YOUR_EMAIL>
Then, use the docker-compose.https.yml file to override the base docker-compose.yml file:
docker-compose -f docker-compose.yml -f docker-compose.https.yml up -d
In firewall, ports 80 and 443 must be open for inbound connections from any
Then, the CVAT instance will be available at your domain on ports 443 (HTTPS) and 80 (HTTP, redirects to 443).
How to pull/build/update CVAT images
-
For a CVAT version lower or equal to 2.1.0, you need to pull images using docker because the compose configuration always points to the latest image tag, e.g.
docker pull cvat/server:v1.7.0
docker tag cvat/server:v1.7.0 openvino/cvat_server:latest

docker pull cvat/ui:v1.7.0
docker tag cvat/ui:v1.7.0 openvino/cvat_ui:latest
For CVAT version more than v2.1.0 it’s possible to pull specific version of prebuilt images from DockerHub using
CVAT_VERSIONenvironment variable to specify the version (e.g.dev):CVAT_VERSION=dev docker-compose pull -
To build images yourself include
docker-compose.dev.ymlcompose config file todocker-composecommand. This can be useful if you want to build a CVAT with some source code changes.docker-compose -f docker-compose.yml -f docker-compose.dev.yml build -
To update local images to
latestordevtags run:CVAT_VERSION=dev docker-compose pullor
CVAT_VERSION=latest docker-compose pull
Troubleshooting
Sources for users from China
If you stay in China, for installation you need to override the following sources.
-
For use
apt updateusing:Pre-compiled packages:
deb https://mirrors.tuna.tsinghua.edu.cn/ubuntu/ focal main restricted universe multiverse
deb https://mirrors.tuna.tsinghua.edu.cn/ubuntu/ focal-updates main restricted universe multiverse
deb https://mirrors.tuna.tsinghua.edu.cn/ubuntu/ focal-backports main restricted universe multiverse
deb https://mirrors.tuna.tsinghua.edu.cn/ubuntu/ focal-security main restricted universe multiverse
Or source packages:
deb-src https://mirrors.tuna.tsinghua.edu.cn/ubuntu/ focal main restricted universe multiverse deb-src https://mirrors.tuna.tsinghua.edu.cn/ubuntu/ focal-updates main restricted universe multiverse deb-src https://mirrors.tuna.tsinghua.edu.cn/ubuntu/ focal-backports main restricted universe multiverse deb-src https://mirrors.tuna.tsinghua.edu.cn/ubuntu/ focal-security main restricted universe multiverse -
Add registry mirrors into
daemon.jsonfile:{ "registry-mirrors": [ "http://f1361db2.m.daocloud.io", "https://docker.mirrors.ustc.edu.cn", "https://hub-mirror.c.163.com", "https://https://mirror.ccs.tencentyun.com", "https://mirror.ccs.tencentyun.com", ] } -
For using
pip:pip config set global.index-url https://pypi.tuna.tsinghua.edu.cn/simple -
For using
npm:npm config set registry https://registry.npm.taobao.org/ -
Instead of
gitusinggitee: -
For replace acceleration source
docker.comrun:curl -fsSL https://download.docker.com/linux/ubuntu/gpg | sudo apt-key add - sudo add-apt-repository \ "deb [arch=amd64] https://download.docker.com/linux/ubuntu \ $(lsb_release -cs) \ -
For replace acceleration source
google.comrun:curl https://dl-ssl.google.com/linux/linux_signing_key.pub | sudo apt-key add -
HTTPS is not working because of a certificate
If you’re having trouble with SSL connection, to find the cause, you’ll need to get the logs from traefik by running:
docker logs traefik
The logs will help you find out the problem.
If the error is related to a firewall, then:
- Open ports 80 and 443 for inbound connections from any.
- Delete
acme.json. The location should be something like:/var/lib/docker/volumes/cvat_cvat_letsencrypt/_data/acme.json.
After acme.json is removed, stop all cvat docker containers:
docker-compose -f docker-compose.yml -f docker-compose.https.yml down
Make sure variables set (with your values):
export CVAT_HOST=<YOUR_DOMAIN>
export ACME_EMAIL=<YOUR_EMAIL>
and restart docker:
docker-compose -f docker-compose.yml -f docker-compose.https.yml up -d
1.2 - Superuser registration
This section is for users who whant to be a bit more flexible with CVAT use.
The user you register by default does not have full permissions on the instance,
so you must create a superuser.
The superuser can use Django administration panel
to assign groups (roles) to other users.
Available roles are: user (default), admin, business, worker.
Prerequisites
Before you register an admin account (superuser), you need to install CVAT locally, see Installation Guide.
Steps of installation are partly different, depending on the type of operation system (OS).
This section starts with Create superuser step that is common for all OS.
Register as a superuser
In the process of installation you need to create a superuser:
- In a terminal run the following command:
docker exec -it cvat_server bash -ic 'python3 ~/manage.py createsuperuser'
- Set up username, email address, and password.
- Go to
localhost:8080, and log in with credentials from step 2. - (Optional) Go to Django administration panel panel to:
- Create/edit/delete users
- Control permissions of users and access to the tool.
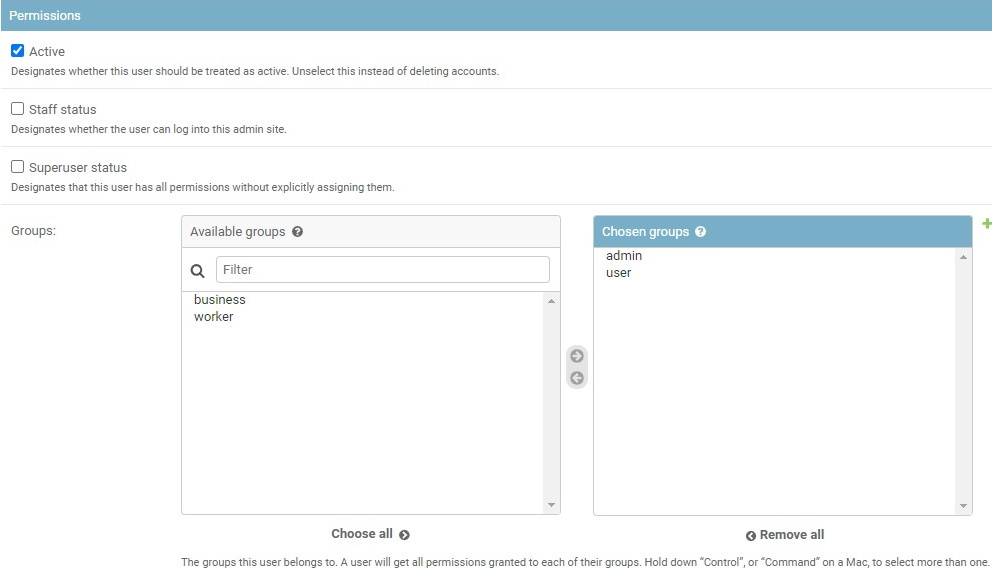
To manage users' permission, in the Django administration panel:
- On the left menu click Users.
- On the main pane click Admin and scroll down to Permissions section.
- Select user groups and add/remove permissions.
1.3 - Social auth configuration
Enable authentication with a Google account
To enable authentication, do the following:
-
Log in to the Google Cloud console
-
Create a project, and go to APIs & Services
-
On the left menu, select OAuth consent, then select User type (Internal or External), and click Create.
-
On the OAuth consent screen fill all required fields, and click Save and Continue.
-
On the Scopes screen, click Add or remove scopes and select
auth/userinfo.email,auth/userinfo.profile, andopenid. Click Update, and Save and Continue.
For more information, see Configure Auth Consent. -
On the left menu, click Credentials, on the top menu click + Create credentials, and select OAuth client ID.
-
From the Application Type select Web application and configure: Application name, Authorized JavaScript origins, Authorized redirect URIs.
For example, if you plan to deploy CVAT instance onhttps://localhost:8080, addhttps://localhost:8080to authorized JS origins andhttps://localhost:8080/api/auth/google/login/callback/to redirect URIs.
Please make sure this URL matchesGOOGLE_CALLBACK_URLsettings variable on the server. -
Set environment variables in CVAT:
- Create
docker-compose.override.ymlwith the following code:
version: '3.3' services: cvat_server: environment: USE_ALLAUTH_SOCIAL_ACCOUNTS: 'True' SOCIAL_AUTH_GOOGLE_CLIENT_ID: '<YOUR_GOOGLE_CLIENT_ID>' SOCIAL_AUTH_GOOGLE_CLIENT_SECRET: '<YOUR_GOOGLE_CLIENT_SECRET>'- In a terminal, run the following command:
docker-compose -f docker-compose.yml -f docker-compose.override.yml up -d - Create
Enable authentication with a Github account
There are 2 basic steps to enable Github account authentication.
-
Open Github settings page.
-
On the left menu, click <> Developer settings > OAuth Apps > Register new application.
For more information, see Creating an OAuth App -
Fill in the name field, set the homepage URL (for example:
https://localhost:8080), and authorization callback URL (for example:https://localhost:8080/api/auth/github/login/callback/).
Please make sure this URL matchesGITHUB_CALLBACK_URLsettings variable on the server. -
Set environment variables in CVAT:
- Create
docker-compose.override.ymlwith the following code:
version: '3.3' services: cvat_server: environment: USE_ALLAUTH_SOCIAL_ACCOUNTS: 'True' SOCIAL_AUTH_GITHUB_CLIENT_ID: '<YOUR_GITHUB_CLIENT_ID>' SOCIAL_AUTH_GITHUB_CLIENT_SECRET: '<YOUR_GITHUB_CLIENT_SECRET>'- In a terminal, run the following command:
docker-compose -f docker-compose.yml -f docker-compose.override.yml up -d - Create
Note: You can also configure Github App, but don’t forget to add required permissions.
In the Permission > Account permissions > Email addresses must be set to read-only.
You can also configure OAuth with other services, see Social Auth with Django services
1.4 - AWS-Deployment Guide
There are two ways of deploying the CVAT.
-
On Nvidia GPU Machine: Tensorflow annotation feature is dependent on GPU hardware. One of the easy ways to launch CVAT with the tf-annotation app is to use AWS P3 instances, which provides the NVIDIA GPU. Read more about P3 instances here. Overall setup instruction is explained in main readme file, except Installing Nvidia drivers. So we need to download the drivers and install it. For Amazon P3 instances, download the Nvidia Drivers from Nvidia website. For more check Installing the NVIDIA Driver on Linux Instances link.
-
On Any other AWS Machine: We can follow the same instruction guide mentioned in the installation instructions. The additional step is to add a security group and rule to allow incoming connections.
For any of above, don’t forget to set the CVAT_HOST environemnt variable to the exposed
AWS public IP address or hostname:
export CVAT_HOST=your-instance.amazonaws.com
In case of problems with using hostname, you can also use the public IPV4 instead of hostname.
For AWS or any cloud based machines where the instances need to be terminated or stopped,
the public IPV4 and hostname changes with every stop and reboot.
To address this efficiently, avoid using spot instances that cannot be stopped,
since copying the EBS to an AMI and restarting it throws problems.
On the other hand, when a regular instance is stopped and restarted,
the new hostname/IPV4 can be used to set the CVAT_HOST environment variable.
1.5 - REST API guide
To access swagger documentation you need to be authorized.
Automatically generated Swagger documentation for Django REST API is available
on <cvat_origin>/api/swagger(default: localhost:8080/api/swagger).
Swagger documentation is visible on allowed hosts, Update environment
variable in docker-compose.yml file with cvat hosted machine IP or domain
name. Example - ALLOWED_HOSTS: 'localhost, 127.0.0.1'.
Make a request to a resource stored on a server and the server will respond with the requested information. The HTTP protocol is used to transport a data. Requests are divided into groups:
auth- user authorization queriescomments- requests to post/delete comments to issuesissues- update, delete and view problem commentsjobs-requests to manage the joblambda- requests to work with lambda functionprojects- project management queriesreviews-adding and removing the review of the jobserver- server information requeststasks- requests to manage tasksusers- user management queries
Besides it contains Models.
Models - the data type is described using a
schema object.
Each group contains queries related to a different types of HTTP methods such as: GET, POST, PATCH, DELETE, etc.
Different methods are highlighted in different color. Each item has a name and description.
Clicking on an element opens a form with a name, description and settings input field or an example of json values.
To find out more, read swagger specification.
To try to send a request, click Try it now and type Execute.
You’ll get a response in the form of Curl, Request URL and Server response.
2 - Advanced
2.1 - CVAT deployment on Kubernetes with Helm
- Prerequisites
- Configuration
- Deployment
- Post-deployment configuration
- FAQ
- What is kubernetes and how it is working?
- What is helm and how it is working?
- How to setup Minikube
- How to understand what diff will be inflicted by ‘helm upgrade’?
- I want to use my own postgresql/redis with your chart.
- I want to override some settings in values.yaml.
- Why you used external charts to provide redis and postgres?
Prerequisites
- Installed and configured kubernetes cluster. If you do not already have a cluster, you can create one by using Minikube. How to setup Minikube.
- Installed kubectl
- Installed Helm.
- Installed dependencies
Installing dependencies
To install and/or update run:
helm dependency update
Optional steps
-
Ingress configuration for the Traefik ingress controller is enabled by default.
Note for Minikube use:
- because the Traefik creates its main service with
Loadbalansertype, which involve the assignment of externalIP by Cloud, what never happens on Minikube, you need to explicitly set the externalIP address for the traefic service. Add the following tovalues.override.yamlfile:traefik: service: externalIPs: - "your minikube IP (can be obtained with `minikube ip` command)" - Also ensure that your CVAT ingress appears on your hosts file (/etc/hosts).
You can do this by running this command:
cvat.localis default domainname, you can override it viavalues.override.yaml.echo "$(minikube ip) cvat.local" | sudo tee -a /etc/hosts
- because the Traefik creates its main service with
Configuration
- Create
values.override.yamlfile insidehelm-chartdirectory. - Fill
values.override.yamlwith new parameters for chart. - Override postgresql password
Postgresql password?
Put below into your values.override.yaml
postgresql:
  secret:
    password: <insert_password>
    postgres_password: <insert_postgres_password>
    replication_password: <insert_replication_password>
Or create your own secret and use it with:
postgresql:
   global:
     postgresql:
       existingSecret: <secret>
(Optional) Enable Auto annotation feature
Before starting, ensure that the following prerequisites are met:
- The Nuclio CLI (nuctl) is installed. To install the CLI, simply download the appropriate CLI version to your installation machine.
-
Set
nuclio.enabled: truein yourvalues.override.yaml -
Run
helm dependency updateinhelm-chartdirectory -
Because Nuclio functions are images that need to be pushed and pulled to/from the registry, you need to configure credentials to pull from your preferable registry with the following settings: Options:
-
values.override.yamlfile:registry: loginUrl: someurl credentials: username: someuser password: somepass -
Or you can create a secret with credentials as described in the guide and set
registry.secretName=your-registry-credentials-secret-namein thevalues.override.yamlfile. -
In the case of using Minikube, you can run a local unsecured registry with minikube add-ons:
minikube addons enable registry
minikube addons enable registry-aliases
Before Docker container images can be pushed to your newly created unsecure registry, you need to add its address (
$(minikube ip):5000) to the list of unsecure registries to instruct Docker to accept working against it: follow the instructions in the Docker documentation
You might also need to log into your registry account (docker login) on the installation machine before running the deployment command.
-
-
Create cvat project:
nuctl --namespace <your cvat namespace> create project cvat -
Finaly deploy the fuction, i.e.:
- using minikube registry:
nuctl deploy --project-name cvat --path serverless/tensorflow/faster_rcnn_inception_v2_coco/nuclio --registry $(minikube ip):5000 --run-registry registry.minikube - using Docker hub:
nuctl deploy --project-name cvat --path serverless/tensorflow/faster_rcnn_inception_v2_coco/nuclio --registry docker.io/your_username
- using minikube registry:
(Optional) Enable Analytics
-
Set
analytics.enabled: truein yourvalues.override.yaml -
Run
helm dependency updateinhelm-chartdirectory -
Since custom images are required here, you will need to create them yourself and push them to your preferred docker registry. You might also need to log into your registry account (docker login) on the installation machine before running the push command. How to set up local registry when using Minikube see previous section
-
Let’s build custom elasticsearch, logstash and kibana images with the following command
docker-compose -f docker-compose.yml -f components/analytics/docker-compose.analytics.yml build -
Tag images:
docker tag cvat_kibana:latest <your registry>/cvat_kibana:latest docker tag cvat_elasticsearch:latest <your registry>/cvat_elasticsearch:latest docker tag cvat_logstash:latest <your registry>/cvat_logstash:latest -
Push to registry
docker push <your registry>/cvat_kibana:latest docker push <your registry>/cvat_elasticsearch:latest docker push <your registry>/cvat_logstash:latest -
Add corresponding settings into
values.override.yaml, i.e. for minikube registry:logstash: image: "registry.minikube/cvat_logstash" imageTag: "latest" elasticsearch: image: "registry.minikube/cvat_elasticsearch" imageTag: "latest" kibana: image: "registry.minikube/cvat_kibana" imageTag: "latest" -
Deploy
helm upgrade <release_name> --namespace <desired namespace> --install ./helm-chart -f ./helm-chart/values.yaml -f values.override.yaml
-
Deployment
Make sure you are using correct kubernetes context. You can check it with kubectl config current-context.
Warning: The k8s service name of Open Policy Agent is fixed to opa by default. This is done to be compatible with CVAT 2.0 but limits this helm chart to a single release per namespace. The OPA url currently can´t be set as an environment variable. As soon as this is possible you can set cvat.opa.composeCompatibleServiceName to false in your value.override.yaml and configure the opa url as additional env.
Execute following command from repo root directory
With overrides:
helm upgrade -n <desired_namespace> <release_name> -i --create-namespace ./helm-chart -f ./helm-chart/values.yaml -f ./helm-chart/values.override.yaml
Without overrides:
helm upgrade -n <desired_namespace> <release_name> -i --create-namespace ./helm-chart -f ./helm-chart/values.yaml
Post-deployment configuration
- Create super user
How to create superuser?
HELM_RELEASE_NAMESPACE="<desired_namespace>" &&\
HELM_RELEASE_NAME="<release_name>" &&\
BACKEND_POD_NAME=$(kubectl get pod --namespace $HELM_RELEASE_NAMESPACE -l tier=backend,app.kubernetes.io/instance=$HELM_RELEASE_NAME -o jsonpath='{.items[0].metadata.name}') &&\
kubectl exec -it --namespace $HELM_RELEASE_NAMESPACE $BACKEND_POD_NAME -c cvat-backend-app-container -- python manage.py createsuperuser
FAQ
What is kubernetes and how it is working?
What is helm and how it is working?
See https://helm.sh/
How to setup Minikube
- Please follow the official Minikube installation guide
-
minikube start --addons registry,registry-aliases
How to understand what diff will be inflicted by ‘helm upgrade’?
You can use https://github.com/databus23/helm-diff#install for that
I want to use my own postgresql/redis with your chart.
Just set postgresql.enabled or redis.enabled to false, as described below.
Then - put your instance params to “external” field
I want to override some settings in values.yaml.
Just create file values.override.yaml and place your changes here, using same structure as in values.yaml.
Then reference it in helm update/install command using -f flag
Why you used external charts to provide redis and postgres?
Because they definitely know what they do better then we are, so we are getting more quality and less support
How to use custom domain name with k8s deployment:
The default value cvat.local may be overriden with --set ingress.hosts[0].host option like this:
helm upgrade -n default cvat -i --create-namespace helm-chart -f helm-chart/values.yaml -f helm-chart/values.override.yaml --set ingress.hosts[0].host=YOUR_FQDN
How to fix fail of helm upgrade due label field is immutable reason?
If an error message like this:
Error: UPGRADE FAILED:cannot patch "cvat-backend-server" with kind Deployment: Deployment.apps "cvat-backend-server" is invalid: spec.selector: Invalid value: v1.LabelSelector{MatchLabels:map[string]string{"app":"cvat-app", "app.kubernetes.io/instance":"cvat", "app.kubernetes.io/managed-by":"Helm", "app.kubernetes.io/name":"cvat", "app.kubernetes.io/version":"latest", "component":"server", "helm.sh/chart":"cvat", "tier":"backend"}, MatchExpressions:[]v1.LabelSelectorRequirement(nil)}: field is immutable
To fix that, delete CVAT Deployments before upgrading
kubectl delete deployments --namespace=foo -l app=cvat-app
How to use existing PersistentVolume to store CVAT data instead of default storage
It is assumed that you have created a PersistentVolumeClaim named my-claim-name
and a PersistentVolume that backing the claim.
Claims must exist in the same namespace as the Pod using the claim.
For details see.
Add these values in the values.override.yaml:
cvat:
  backend:
    permissionFix:
      enabled: false
    defaultStorage:
      enabled: false
    server:
      additionalVolumes:
        - name: cvat-backend-data
          persistentVolumeClaim:
            claimName: my-claim-name
    worker:
      default:
        additionalVolumes:
          - name: cvat-backend-data
            persistentVolumeClaim:
              claimName: my-claim-name
      low:
        additionalVolumes:
          - name: cvat-backend-data
            persistentVolumeClaim:
              claimName: my-claim-name
    utils:
      additionalVolumes:
        - name: cvat-backend-data
          persistentVolumeClaim:
            claimName: my-claim-name
2.2 - Semi-automatic and Automatic Annotation
⚠ WARNING: Do not use
docker-compose upIf you did, make sure all containers are stopped bydocker-compose down.
-
To bring up cvat with auto annotation tool, from cvat root directory, you need to run:
docker-compose -f docker-compose.yml -f components/serverless/docker-compose.serverless.yml up -dIf you did any changes to the docker-compose files, make sure to add
--buildat the end.To stop the containers, simply run:
docker-compose -f docker-compose.yml -f components/serverless/docker-compose.serverless.yml down -
You have to install
nuctlcommand line tool to build and deploy serverless functions. Download version 1.8.14. It is important that the version you download matches the version in docker-compose.serverless.yml. For example, using wget.wget https://github.com/nuclio/nuclio/releases/download/<version>/nuctl-<version>-linux-amd64After downloading the nuclio, give it a proper permission and do a softlink.
sudo chmod +x nuctl-<version>-linux-amd64 sudo ln -sf $(pwd)/nuctl-<version>-linux-amd64 /usr/local/bin/nuctl -
Create
cvatproject inside nuclio dashboard where you will deploy new serverless functions and deploy a couple of DL models. Commands below should be run only after CVAT has been installed usingdocker-composebecause it runs nuclio dashboard which manages all serverless functions.nuctl create project cvatnuctl deploy --project-name cvat \ --path serverless/openvino/dextr/nuclio \ --volume `pwd`/serverless/common:/opt/nuclio/common \ --platform localnuctl deploy --project-name cvat \ --path serverless/openvino/omz/public/yolo-v3-tf/nuclio \ --volume `pwd`/serverless/common:/opt/nuclio/common \ --platform localNote:
- See deploy_cpu.sh for more examples.
GPU Support
You will need to install Nvidia Container Toolkit. Also you will need to add
--resource-limit nvidia.com/gpu=1 --triggers '{"myHttpTrigger": {"maxWorkers": 1}}'to the nuclio deployment command. You can increase the maxWorker if you have enough GPU memory. As an example, below will run on the GPU:nuctl deploy --project-name cvat \ --path serverless/tensorflow/matterport/mask_rcnn/nuclio \ --platform local --base-image tensorflow/tensorflow:1.15.5-gpu-py3 \ --desc "GPU based implementation of Mask RCNN on Python 3, Keras, and TensorFlow." \ --image cvat/tf.matterport.mask_rcnn_gpu \ --triggers '{"myHttpTrigger": {"maxWorkers": 1}}' \ --resource-limit nvidia.com/gpu=1Note:
- The number of GPU deployed functions will be limited to your GPU memory.
- See deploy_gpu.sh script for more examples.
- For some models (namely SiamMask) you need an Nvidia driver version greater than or equal to 450.80.02.
Note for Windows users:
If you want to use nuclio under Windows CVAT installation you should install Nvidia drivers for WSL according to this instruction and follow the steps up to “2.3 Installing Nvidia drivers”. Important requirement: you should have the latest versions of Docker Desktop, Nvidia drivers for WSL, and the latest updates from the Windows Insider Preview Dev channel.
Troubleshooting Nuclio Functions:
-
You can open nuclio dashboard at localhost:8070. Make sure status of your functions are up and running without any error.
-
Test your deployed DL model as a serverless function. The command below should work on Linux and Mac OS.
image=$(curl https://upload.wikimedia.org/wikipedia/en/7/7d/Lenna_%28test_image%29.png --output - | base64 | tr -d '\n')
cat << EOF > /tmp/input.json
{"image": "$image"}
EOF
cat /tmp/input.json | nuctl invoke openvino.omz.public.yolo-v3-tf -c 'application/json'
20.07.17 12:07:44.519 nuctl.platform.invoker (I) Executing function {"method": "POST", "url": "http://:57308", "headers": {"Content-Type":["application/json"],"X-Nuclio-Log-Level":["info"],"X-Nuclio-Target":["openvino.omz.public.yolo-v3-tf"]}} 20.07.17 12:07:45.275 nuctl.platform.invoker (I) Got response {"status": "200 OK"} 20.07.17 12:07:45.275 nuctl (I) >>> Start of function logs 20.07.17 12:07:45.275 ino.omz.public.yolo-v3-tf (I) Run yolo-v3-tf model {"worker_id": "0", "time": 1594976864570.9353} 20.07.17 12:07:45.275 nuctl (I) <<< End of function logs > Response headers: Date = Fri, 17 Jul 2020 09:07:45 GMT Content-Type = application/json Content-Length = 100 Server = nuclio > Response body: [ { "confidence": "0.9992254", "label": "person", "points": [ 39, 124, 408, 512 ], "type": "rectangle" } ] -
To check for internal server errors, run
docker ps -ato see the list of containers. Find the container that you are interested, e.g.,nuclio-nuclio-tf-faster-rcnn-inception-v2-coco-gpu. Then check its logs bydocker logs <name of your container>e.g.,docker logs nuclio-nuclio-tf-faster-rcnn-inception-v2-coco-gpu -
To debug a code inside a container, you can use vscode to attach to a container instructions. To apply your changes, make sure to restart the container.
docker restart <name_of_the_container>
2.3 - Installation Analytics

It is possible to proxy annotation logs from client to ELK. To do that run the following command below:
Build docker image
# From project root directory
docker-compose -f docker-compose.yml -f components/analytics/docker-compose.analytics.yml build
Run docker container
# From project root directory
docker-compose -f docker-compose.yml -f components/analytics/docker-compose.analytics.yml up -d
At the moment it is not possible to save advanced settings. Below values should be specified manually.
Time picker default
{
"from": "now/d",
"to": "now/d",
"display": "Today",
"section": 0
}
Time picker quick ranges
[
  {
    "from": "now/d",
    "to": "now/d",
    "display": "Today",
    "section": 0
  },
  {
    "from": "now/w",
    "to": "now/w",
    "display": "This week",
    "section": 0
  },
  {
    "from": "now/M",
    "to": "now/M",
    "display": "This month",
    "section": 0
  },
  {
    "from": "now/y",
    "to": "now/y",
    "display": "This year",
    "section": 0
  },
  {
    "from": "now/d",
    "to": "now",
    "display": "Today so far",
    "section": 2
  },
  {
    "from": "now/w",
    "to": "now",
    "display": "Week to date",
    "section": 2
  },
  {
    "from": "now/M",
    "to": "now",
    "display": "Month to date",
    "section": 2
  },
  {
    "from": "now/y",
    "to": "now",
    "display": "Year to date",
    "section": 2
  },
  {
    "from": "now-1d/d",
    "to": "now-1d/d",
    "display": "Yesterday",
    "section": 1
  },
  {
    "from": "now-1w/w",
    "to": "now-1w/w",
    "display": "Previous week",
    "section": 1
  },
  {
    "from": "now-1m/m",
    "to": "now-1m/m",
    "display": "Previous month",
    "section": 1
  },
  {
    "from": "now-1y/y",
    "to": "now-1y/y",
    "display": "Previous year",
    "section": 1
  }
]
2.4 - Mounting cloud storage
AWS S3 bucket as filesystem
Ubuntu 20.04
Mount
-
Install s3fs:
sudo apt install s3fs -
Enter your credentials in a file
${HOME}/.passwd-s3fsand set owner-only permissions:echo ACCESS_KEY_ID:SECRET_ACCESS_KEY > ${HOME}/.passwd-s3fs chmod 600 ${HOME}/.passwd-s3fs -
Uncomment
user_allow_otherin the/etc/fuse.conffile:sudo nano /etc/fuse.conf -
Run s3fs, replace
bucket_name,mount_point:s3fs <bucket_name> <mount_point> -o allow_other -o passwd_file=${HOME}/.passwd-s3fs
For more details see here.
Automatically mount
Follow the first 3 mounting steps above.
Using fstab
-
Create a bash script named aws_s3_fuse(e.g in /usr/bin, as root) with this content (replace
user_nameon whose behalf the disk will be mounted,backet_name,mount_point,/path/to/.passwd-s3fs):#!/bin/bash sudo -u <user_name> s3fs <backet_name> <mount_point> -o passwd_file=/path/to/.passwd-s3fs -o allow_other exit 0 -
Give it the execution permission:
sudo chmod +x /usr/bin/aws_s3_fuse -
Edit
/etc/fstabadding a line like this, replacemount_point):/absolute/path/to/aws_s3_fuse <mount_point> fuse allow_other,user,_netdev 0 0
Using systemd
-
Create unit file
sudo nano /etc/systemd/system/s3fs.service(replaceuser_name,bucket_name,mount_point,/path/to/.passwd-s3fs):[Unit] Description=FUSE filesystem over AWS S3 bucket After=network.target [Service] Environment="MOUNT_POINT=<mount_point>" User=<user_name> Group=<user_name> ExecStart=s3fs <bucket_name> ${MOUNT_POINT} -o passwd_file=/path/to/.passwd-s3fs -o allow_other ExecStop=fusermount -u ${MOUNT_POINT} Restart=always Type=forking [Install] WantedBy=multi-user.target -
Update the system configurations, enable unit autorun when the system boots, mount the bucket:
sudo systemctl daemon-reload
sudo systemctl enable s3fs.service
sudo systemctl start s3fs.service
Check
A file /etc/mtab contains records of currently mounted filesystems.
cat /etc/mtab | grep 's3fs'
Unmount filesystem
fusermount -u <mount_point>
If you used systemd to mount a bucket:
sudo systemctl stop s3fs.service
sudo systemctl disable s3fs.service
Microsoft Azure container as filesystem
Ubuntu 20.04
Mount
-
Set up the Microsoft package repository.(More here)
wget https://packages.microsoft.com/config/ubuntu/20.04/packages-microsoft-prod.deb sudo dpkg -i packages-microsoft-prod.deb sudo apt-get update -
Install
blobfuseandfuse:sudo apt-get install blobfuse fuseFor more details see here
-
Create environments (replace
account_name,account_key,mount_point):export AZURE_STORAGE_ACCOUNT=<account_name> export AZURE_STORAGE_ACCESS_KEY=<account_key> MOUNT_POINT=<mount_point> -
Create a folder for cache:
sudo mkdir -p /mnt/blobfusetmp -
Make sure the file must be owned by the user who mounts the container:
sudo chown <user> /mnt/blobfusetmp -
Create the mount point, if it doesn’t exists:
mkdir -p ${MOUNT_POINT} -
Uncomment
user_allow_otherin the/etc/fuse.conffile:sudo nano /etc/fuse.conf -
Mount container(replace
your_container):blobfuse ${MOUNT_POINT} --container-name=<your_container> --tmp-path=/mnt/blobfusetmp -o allow_other
Automatically mount
Follow the first 7 mounting steps above.
Using fstab
-
Create configuration file
connection.cfgwith same content, change accountName, select one from accountKey or sasToken and replace with your value:accountName <account-name-here> # Please provide either an account key or a SAS token, and delete the other line. accountKey <account-key-here-delete-next-line> #change authType to specify only 1 sasToken <shared-access-token-here-delete-previous-line> authType <MSI/SAS/SPN/Key/empty> containerName <insert-container-name-here> -
Create a bash script named
azure_fuse(e.g in /usr/bin, as root) with content below (replaceuser_nameon whose behalf the disk will be mounted,mount_point,/path/to/blobfusetmp,/path/to/connection.cfg):#!/bin/bash sudo -u <user_name> blobfuse <mount_point> --tmp-path=/path/to/blobfusetmp --config-file=/path/to/connection.cfg -o allow_other exit 0 -
Give it the execution permission:
sudo chmod +x /usr/bin/azure_fuse -
Edit
/etc/fstabwith the blobfuse script. Add the following line(replace paths):/absolute/path/to/azure_fuse </path/to/desired/mountpoint> fuse allow_other,user,_netdev
Using systemd
-
Create unit file
sudo nano /etc/systemd/system/blobfuse.service. (replaceuser_name,mount_point,container_name,/path/to/connection.cfg):[Unit] Description=FUSE filesystem over Azure container After=network.target [Service] Environment="MOUNT_POINT=<mount_point>" User=<user_name> Group=<user_name> ExecStart=blobfuse ${MOUNT_POINT} --container-name=<container_name> --tmp-path=/mnt/blobfusetmp --config-file=/path/to/connection.cfg -o allow_other ExecStop=fusermount -u ${MOUNT_POINT} Restart=always Type=forking [Install] WantedBy=multi-user.target -
Update the system configurations, enable unit autorun when the system boots, mount the container:
sudo systemctl daemon-reload
sudo systemctl enable blobfuse.service
sudo systemctl start blobfuse.service
Or for more detail see here
Check
A file /etc/mtab contains records of currently mounted filesystems.
cat /etc/mtab | grep 'blobfuse'
Unmount filesystem
fusermount -u <mount_point>
If you used systemd to mount a container:
sudo systemctl stop blobfuse.service
sudo systemctl disable blobfuse.service
If you have any mounting problems, check out the answers to common problems
Google Drive as filesystem
Ubuntu 20.04
Mount
To mount a google drive as a filesystem in user space(FUSE) you can use google-drive-ocamlfuse To do this follow the instructions below:
-
Install google-drive-ocamlfuse:
sudo add-apt-repository ppa:alessandro-strada/ppa sudo apt-get update sudo apt-get install google-drive-ocamlfuse -
Run
google-drive-ocamlfusewithout parameters:google-drive-ocamlfuseThis command will create the default application directory (~/.gdfuse/default), containing the configuration file config (see the wiki page for more details about configuration). And it will start a web browser to obtain authorization to access your Google Drive. This will let you modify default configuration before mounting the filesystem.
Then you can choose a local directory to mount your Google Drive (e.g.: ~/GoogleDrive).
-
Create the mount point, if it doesn’t exist(replace mount_point):
mountpoint="<mount_point>" mkdir -p $mountpoint -
Uncomment
user_allow_otherin the/etc/fuse.conffile:sudo nano /etc/fuse.conf -
Mount the filesystem:
google-drive-ocamlfuse -o allow_other $mountpoint
Automatically mount
Follow the first 4 mounting steps above.
Using fstab
-
Create a bash script named gdfuse(e.g in /usr/bin, as root) with this content (replace
user_nameon whose behalf the disk will be mounted,label,mount_point):#!/bin/bash sudo -u <user_name> google-drive-ocamlfuse -o allow_other -label <label> <mount_point> exit 0 -
Give it the execution permission:
sudo chmod +x /usr/bin/gdfuse -
Edit
/etc/fstabadding a line like this, replacemount_point):/absolute/path/to/gdfuse <mount_point> fuse allow_other,user,_netdev 0 0For more details see here
Using systemd
-
Create unit file
sudo nano /etc/systemd/system/google-drive-ocamlfuse.service. (replaceuser_name,label(defaultlabel=default),mount_point):[Unit] Description=FUSE filesystem over Google Drive After=network.target [Service] Environment="MOUNT_POINT=<mount_point>" User=<user_name> Group=<user_name> ExecStart=google-drive-ocamlfuse -label <label> ${MOUNT_POINT} ExecStop=fusermount -u ${MOUNT_POINT} Restart=always Type=forking [Install] WantedBy=multi-user.target -
Update the system configurations, enable unit autorun when the system boots, mount the drive:
sudo systemctl daemon-reload
sudo systemctl enable google-drive-ocamlfuse.service
sudo systemctl start google-drive-ocamlfuse.service
For more details see here
Check
A file /etc/mtab contains records of currently mounted filesystems.
cat /etc/mtab | grep 'google-drive-ocamlfuse'
Unmount filesystem
fusermount -u <mount_point>
If you used systemd to mount a drive:
sudo systemctl stop google-drive-ocamlfuse.service
sudo systemctl disable google-drive-ocamlfuse.service
2.5 - LDAP Backed Authentication
The creation of settings.py
When integrating LDAP login, we need to create an overlay to the default CVAT settings located in cvat/settings/production.py. This overlay is where we will configure Django to connect to the LDAP server.
The main issue with using LDAP is that different LDAP implementations have different parameters. So the options used for Active Directory backed authentication will differ if you were to be using FreeIPA.
Update docker-compose.override.yml
In your override config you need to passthrough your settings and tell CVAT to
use them by setting the DJANGO_SETTINGS_MODULE variable.
version: '3.3'

services:
  cvat:
    environment:
      DJANGO_SETTINGS_MODULE: settings
    volumes:
      - ./settings.py:/home/django/settings.py:ro
Active Directory Example
The following example should allow for users to authenticate themselves against
Active Directory. This example requires a dummy user named cvat_bind. The
configuration for the bind account does not need any special permissions.
When updating AUTH_LDAP_BIND_DN, you can write out the account info in two
ways. Both are documented in the config below.
This config is known to work with Windows Server 2022, but should work for older versions and Samba’s implementation of Active Directory.
# We are overlaying production
from cvat.settings.production import *

# Custom code below
import ldap
from django_auth_ldap.config import LDAPSearch
from django_auth_ldap.config import NestedActiveDirectoryGroupType

# Notify CVAT that we are using LDAP authentication
IAM_TYPE = 'LDAP'

# Talking to the LDAP server
AUTH_LDAP_SERVER_URI = "ldap://ad.example.com" # IP Addresses also work
ldap.set_option(ldap.OPT_REFERRALS, 0)

_BASE_DN = "CN=Users,DC=ad,DC=example,DC=com"

# Authenticating with the LDAP server
AUTH_LDAP_BIND_DN = "CN=cvat_bind,%s" % _BASE_DN
# AUTH_LDAP_BIND_DN = "cvat_bind@ad.example.com"
AUTH_LDAP_BIND_PASSWORD = "SuperSecurePassword^21"

AUTH_LDAP_USER_SEARCH = LDAPSearch(
    _BASE_DN,
    ldap.SCOPE_SUBTREE,
    "(sAMAccountName=%(user)s)"
)

AUTH_LDAP_GROUP_SEARCH = LDAPSearch(
    _BASE_DN,
    ldap.SCOPE_SUBTREE,
    "(objectClass=group)"
)

# Mapping Django field names to Active Directory attributes
AUTH_LDAP_USER_ATTR_MAP = {
    "user_name": "sAMAccountName",
    "first_name": "givenName",
    "last_name": "sn",
    "email": "mail",
}

# Group Management
AUTH_LDAP_GROUP_TYPE = NestedActiveDirectoryGroupType()

# Register Django LDAP backend
AUTHENTICATION_BACKENDS += ['django_auth_ldap.backend.LDAPBackend']

# Map Active Directory groups to Django/CVAT groups.
AUTH_LDAP_ADMIN_GROUPS = [
    'CN=CVAT Admins,%s' % _BASE_DN,
]
AUTH_LDAP_BUSINESS_GROUPS = [
    'CN=CVAT Managers,%s' % _BASE_DN,
]
AUTH_LDAP_WORKER_GROUPS = [
    'CN=CVAT Workers,%s' % _BASE_DN,
]
AUTH_LDAP_USER_GROUPS = [
    'CN=CVAT Users,%s' % _BASE_DN,
]

DJANGO_AUTH_LDAP_GROUPS = {
    "admin": AUTH_LDAP_ADMIN_GROUPS,
    "business": AUTH_LDAP_BUSINESS_GROUPS,
    "user": AUTH_LDAP_USER_GROUPS,
    "worker": AUTH_LDAP_WORKER_GROUPS,
}
FreeIPA Example
The following example should allow for users to authenticate themselves against
FreeIPA. This example requires a dummy user named cvat_bind. The configuration
for the bind account does not need any special permissions.
When updating AUTH_LDAP_BIND_DN, you can only write the user info in one way,
unlike with Active Directory
This config is known to work with AlmaLinux 8, but may work for other versions and flavors of Enterprise Linux.
# We are overlaying production
from cvat.settings.production import *

# Custom code below
import ldap
from django_auth_ldap.config import LDAPSearch
from django_auth_ldap.config import GroupOfNamesType

# Notify CVAT that we are using LDAP authentication
IAM_TYPE = 'LDAP'

_BASE_DN = "CN=Accounts,DC=ipa,DC=example,DC=com"

# Talking to the LDAP server
AUTH_LDAP_SERVER_URI = "ldap://ipa.example.com" # IP Addresses also work
ldap.set_option(ldap.OPT_REFERRALS, 0)

# Authenticating with the LDAP server
AUTH_LDAP_BIND_DN = "UID=cvat_bind,CN=Users,%s" % _BASE_DN
AUTH_LDAP_BIND_PASSWORD = "SuperSecurePassword^21"

AUTH_LDAP_USER_SEARCH = LDAPSearch(
    "CN=Users,%s" % _BASE_DN,
    ldap.SCOPE_SUBTREE,
    "(uid=%(user)s)"
)

AUTH_LDAP_GROUP_SEARCH = LDAPSearch(
    "CN=Groups,%s" % _BASE_DN,
    ldap.SCOPE_SUBTREE,
    "(objectClass=groupOfNames)"
)

# Mapping Django field names to FreeIPA attributes
AUTH_LDAP_USER_ATTR_MAP = {
    "user_name": "uid",
    "first_name": "givenName",
    "last_name": "sn",
    "email": "mail",
}

# Group Management
AUTH_LDAP_GROUP_TYPE = GroupOfNamesType()

# Register Django LDAP backend
AUTHENTICATION_BACKENDS += ['django_auth_ldap.backend.LDAPBackend']

# Map FreeIPA groups to Django/CVAT groups.
AUTH_LDAP_ADMIN_GROUPS = [
    'CN=cvat_admins,CN=Groups,%s' % _BASE_DN,
]
AUTH_LDAP_BUSINESS_GROUPS = [
    'CN=cvat_managers,CN=Groups,%s' % _BASE_DN,
]
AUTH_LDAP_WORKER_GROUPS = [
    'CN=cvat_workers,CN=Groups,%s' % _BASE_DN,
]
AUTH_LDAP_USER_GROUPS = [
    'CN=cvat_users,CN=Groups,%s' % _BASE_DN,
]

DJANGO_AUTH_LDAP_GROUPS = {
    "admin": AUTH_LDAP_ADMIN_GROUPS,
    "business": AUTH_LDAP_BUSINESS_GROUPS,
    "user": AUTH_LDAP_USER_GROUPS,
    "worker": AUTH_LDAP_WORKER_GROUPS,
}
Resources
- Microsoft - LDAP Distinguished Names
- Elements that make up a distinguished name. Used with user/group searches.
- Django LDAP Reference Manual
- Other options that can be used for LDAP authentication in Django.
- Django LDAP guide using Active Directory (Unofficial)
- This is not specific to CVAT but can provide insight about firewall rules.
2.6 - Backup guide
About CVAT data volumes
Docker volumes are used to store all CVAT data:
-
cvat_db: PostgreSQL database files, used to store information about users, tasks, projects, annotations, etc. Mounted intocvat_dbcontainer by/var/lib/postgresql/datapath. -
cvat_data: used to store uploaded and prepared media data. Mounted intocvatcontainer by/home/django/datapath. -
cvat_keys: used to store user ssh keys needed for synchronization with a remote Git repository. Mounted intocvatcontainer by/home/django/keyspath. -
cvat_logs: used to store logs of CVAT backend processes managed by supevisord. Mounted intocvatcontainer by/home/django/logspath. -
cvat_events: this is an optional volume that is used only when Analytics component is enabled and is used to store Elasticsearch database files. Mounted intocvat_elasticsearchcontainer by/usr/share/elasticsearch/datapath.
How to backup all CVAT data
All CVAT containers should be stopped before backup:
docker-compose stop
Please don’t forget to include all the compose config files that were used in the docker-compose command
using the -f parameter.
Backup data:
mkdir backup
docker run --rm --name temp_backup --volumes-from cvat_db -v $(pwd)/backup:/backup ubuntu tar -czvf /backup/cvat_db.tar.gz /var/lib/postgresql/data
docker run --rm --name temp_backup --volumes-from cvat_server -v $(pwd)/backup:/backup ubuntu tar -czvf /backup/cvat_data.tar.gz /home/django/data
# [optional]
docker run --rm --name temp_backup --volumes-from cvat_elasticsearch -v $(pwd)/backup:/backup ubuntu tar -czvf /backup/cvat_events.tar.gz /usr/share/elasticsearch/data
Make sure the backup archives have been created, the output of ls backup command should look like this:
ls backup
cvat_data.tar.gz  cvat_db.tar.gz  cvat_events.tar.gz
How to restore CVAT from backup
Warning: use exactly the same CVAT version to restore DB. Otherwise it will not work because between CVAT releases the layout of DB can be changed. You always can upgrade CVAT later. It will take care to migrate your data properly internally.
Note: CVAT containers must exist (if no, please follow the installation guide). Stop all CVAT containers:
docker-compose stop
Restore data:
cd <path_to_backup_folder>
docker run --rm --name temp_backup --volumes-from cvat_db -v $(pwd):/backup ubuntu bash -c "cd /var/lib/postgresql/data && tar -xvf /backup/cvat_db.tar.gz --strip 4"
docker run --rm --name temp_backup --volumes-from cvat_server -v $(pwd):/backup ubuntu bash -c "cd /home/django/data && tar -xvf /backup/cvat_data.tar.gz --strip 3"
# [optional]
docker run --rm --name temp_backup --volumes-from cvat_elasticsearch -v $(pwd):/backup ubuntu bash -c "cd /usr/share/elasticsearch/data && tar -xvf /backup/cvat_events.tar.gz --strip 4"
After that run CVAT as usual:
docker-compose up -d
Additional resources
2.7 - Upgrade guide
Upgrade guide
Note: updating CVAT from version 2.2.0 to version 2.3.0 requires additional manual actions with database data due to upgrading PostgreSQL base image major version. See details here
To upgrade CVAT, follow these steps:
-
It is highly recommended backup all CVAT data before updating, follow the backup guide and backup all CVAT volumes.
-
Go to the previously cloned CVAT directory and stop all CVAT containers with:
docker-compose downIf you have included additional components, include all compose configuration files that are used, e.g.:
docker-compose -f docker-compose.yml -f components/analytics/docker-compose.analytics.yml down -
Update CVAT source code by any preferable way: clone with git or download zip file from GitHub. Note that you need to download the entire source code, not just the
docker-composeconfiguration file. Check the installation guide for details. -
Verify settings: The installation process is changed/modified from version to version and you may need to export some environment variables, for example CVAT_HOST.
-
Update local CVAT images. Pull or build new CVAT images, see How to pull/build/update CVAT images section for details.
-
Start CVAT with:
docker-compose up -dWhen CVAT starts, it will upgrade its DB in accordance with the latest schema. It can take time especially if you have a lot of data. Please do not terminate the migration and wait till the process is complete. You can monitor the startup process with the following command:
docker logs cvat_server -f
How to udgrade CVAT from v1.7.0 to v2.1.0.
Step by step commands how to udgrade CVAT from v1.7.0 to v2.1.0. Let’s assume that you have CVAT v1.7.0 working.
cd cvat
docker-compose down
cd ..
mv cvat cvat_old
wget https://github.com/opencv/cvat/archive/refs/tags/v2.1.0.zip
unzip v2.1.0.zip && mv cvat-2.1.0 cvat
cd cvat
docker pull cvat/server:v2.1.0
docker tag cvat/server:v2.1.0 openvino/cvat_server:latest
docker pull cvat/ui:v2.1.0
docker tag cvat/ui:v2.1.0 openvino/cvat_ui:latest
docker-compose up -d
How to upgrade PostgreSQL database base image
-
It is highly recommended backup all CVAT data before updating, follow the backup guide and backup CVAT database volume.
-
Run previosly used CVAT version as usual
-
Backup current database with
pg_dumpalltool:docker exec -it cvat_db pg_dumpall > cvat.db.dump -
Stop CVAT:
docker-compose down -
Delete current PostrgeSQL’s volume, that’s why it’s important to have a backup:
docker volume rm cvat_cvat_db -
Update CVAT source code by any preferable way: clone with git or download zip file from GitHub. Check the installation guide for details.
-
Start database container only:
docker-compose up -d cvat_db -
Import PostgreSQL dump into new DB container:
docker exec -i cvat_db psql -q -d postgres < cvat.db.dump -
Start CVAT:
docker-compose up -d
2.8 - IAM: system roles
System roles
TBD
2.9 - Webhooks
Create Webhook
In CVAT you can create webhook for project or for organization. For creation, you can use our user interface or direct API calls.
In order to create webhook via an API call, see the swagger documentation. And also see examples of creating webhooks in our REST API tests.
Create Webhook for project
To create webhook for CVAT project, follow the steps:
Project -> Actions -> Setup Webhooks
Create Webhook for organization
To create webhook for CVAT organization, follow the steps:
Organization -> Settings -> Actions -> Setup Webhooks
List of available events
| Resource | Create | Update | Delete |
|---|---|---|---|
| Organization | ✅ | ||
| Membership | ✅ | ✅ | |
| Invitation | ✅ | ✅ | |
| Project | ✅ | ✅ | ✅ |
| Task | ✅ | ✅ | ✅ |
| Job | ✅ | ||
| Issue | ✅ | ✅ | ✅ |
| Comment | ✅ | ✅ | ✅ |
Payloads
Create event
Webhook payload object for create:<resource> events:
| Key | Type | Description |
|---|---|---|
event |
string |
Name of event that triggered webhook with pattern create:<resource> |
<resource> |
object |
Full information about created resource. See the swagger docs for each separate resource |
webhook_id |
integer |
Identifier of webhook that sent payload |
sender |
object |
Information about user that triggered webhook |
Here is example of payload for create:task event:
{
    "event": "create:task",
    "task": {
        "url": "<http://localhost:8080/api/tasks/15>",
        "id": 15,
        "name": "task",
        "project_id": 7,
        "mode": "",
        "owner": {
            "url": "<http://localhost:8080/api/users/1>",
            "id": 1,
            "username": "admin1",
            "first_name": "Admin",
            "last_name": "First"
        },
        "assignee": null,
        "bug_tracker": "",
        "created_date": "2022-10-04T08:05:50.419259Z",
        "updated_date": "2022-10-04T08:05:50.422917Z",
        "overlap": null,
        "segment_size": 0,
        "status": "annotation",
        "labels": \[
            {
                "id": 28,
                "name": "label_0",
                "color": "#bde94a",
                "attributes": [],
                "type": "any",
                "sublabels": [],
                "has_parent": false
            }
        \],
        "segments": [],
        "dimension": "2d",
        "subset": "",
        "organization": null,
        "target_storage": {
            "id": 14,
            "location": "local",
            "cloud_storage_id": null
        },
        "source_storage": {
            "id": 13,
            "location": "local",
            "cloud_storage_id": null
        }
    },
    "webhook_id": 7,
    "sender": {
        "url": "<http://localhost:8080/api/users/1>",
        "id": 1,
        "username": "admin1",
        "first_name": "Admin",
        "last_name": "First"
    }
}
Update event
Webhook payload object for update:<resource> events:
| Key | Type | Description |
|---|---|---|
event |
string |
Name of event that triggered webhook with pattern update:<resource> |
<resource> |
object |
Full information about updated resource. See the swagger docs for each separate resource |
before_update |
object |
Keys of <resource> that was updated with theirs old values |
webhook_id |
integer |
Identifier of webhook that sent payload |
sender |
object |
Information about user that triggered webhook |
{
    "event": "update:task",
    "task": {
        "url": "<http://localhost:8080/api/tasks/15>",
        "id": 15,
        "name": "new task name",
        "project_id": 7,
        "mode": "annotation",
        "owner": {
            "url": "<http://localhost:8080/api/users/1>",
            "id": 1,
            "username": "admin1",
            "first_name": "Admin",
            "last_name": "First"
        },
        "assignee": null,
        "bug_tracker": "",
        "created_date": "2022-10-04T08:05:50.419259Z",
        "updated_date": "2022-10-04T11:04:51.451681Z",
        "overlap": 0,
        "segment_size": 1,
        "status": "annotation",
        "labels": \[
            {
                "id": 28,
                "name": "label_0",
                "color": "#bde94a",
                "attributes": [],
                "type": "any",
                "sublabels": [],
                "has_parent": false
            }
        \],
        "segments": \[
            {
                "start_frame": 0,
                "stop_frame": 0,
                "jobs": \[
                    {
                        "url": "<http://localhost:8080/api/jobs/19>",
                        "id": 19,
                        "assignee": null,
                        "status": "annotation",
                        "stage": "annotation",
                        "state": "new"
                    }
                \]
            }
        \],
        "data_chunk_size": 14,
        "data_compressed_chunk_type": "imageset",
        "data_original_chunk_type": "imageset",
        "size": 1,
        "image_quality": 70,
        "data": 14,
        "dimension": "2d",
        "subset": "",
        "organization": null,
        "target_storage": {
            "id": 14,
            "location": "local",
            "cloud_storage_id": null
        },
        "source_storage": {
            "id": 13,
            "location": "local",
            "cloud_storage_id": null
        }
    },
    "before_update": {
        "name": "task"
    },
    "webhook_id": 7,
    "sender": {
        "url": "<http://localhost:8080/api/users/1>",
        "id": 1,
        "username": "admin1",
        "first_name": "Admin",
        "last_name": "First"
    }
}
Delete event
Webhook payload object for delete:<resource> events:
| Key | Type | Description |
|---|---|---|
event |
string |
Name of event that triggered webhook with pattern delete:<resource> |
<resource> |
object |
Full information about deleted resource. See the swagger docs for each separate resource |
webhook_id |
integer |
Identifier of webhook that sent payload |
sender |
object |
Information about user that triggered webhook |
Here is example of payload for delete:task event:
{
    "event": "delete:task",
    "task": {
        "url": "<http://localhost:8080/api/tasks/15>",
        "id": 15,
        "name": "task",
        "project_id": 7,
        "mode": "",
        "owner": {
            "url": "<http://localhost:8080/api/users/1>",
            "id": 1,
            "username": "admin1",
            "first_name": "Admin",
            "last_name": "First"
        },
        "assignee": null,
        "bug_tracker": "",
        "created_date": "2022-10-04T08:05:50.419259Z",
        "updated_date": "2022-10-04T08:05:50.422917Z",
        "overlap": null,
        "segment_size": 0,
        "status": "annotation",
        "labels": \[
            {
                "id": 28,
                "name": "label_0",
                "color": "#bde94a",
                "attributes": [],
                "type": "any",
                "sublabels": [],
                "has_parent": false
            }
        \],
        "segments": [],
        "dimension": "2d",
        "subset": "",
        "organization": null,
        "target_storage": {
            "id": 14,
            "location": "local",
            "cloud_storage_id": null
        },
        "source_storage": {
            "id": 13,
            "location": "local",
            "cloud_storage_id": null
        }
    },
    "webhook_id": 7,
    "sender": {
        "url": "<http://localhost:8080/api/users/1>",
        "id": 1,
        "username": "admin1",
        "first_name": "Admin",
        "last_name": "First"
    }
}
Webhook secret
To be ensure that webhooks come from CVAT you can specify secret when creating a webhook.
If you specified secret value for webhook, then CVAT will sent webhook with X-Signature-256 in
request header.
CVAT encode request body for webhook using SHA256 hash function and put the result into the header.
Webhook receiver can check that request came from CVAT by comparison received value of X-Signature-256 with expected.
Example of header value for empty request body and secret = mykey:
X-Signature-256: e1b24265bf2e0b20c81837993b4f1415f7b68c503114d100a40601eca6a2745f
Ping Webhook
To check that webhook configured well and CVAT can connect with target URL you can use ping webhook.
After pressing Ping bottom on UI (or sending POST /webhooks/{id}/ping request) CVAT will sent webhook
to the target url with general information about webhook.
Ping webhook payload:
| Key | Type | Description |
|---|---|---|
event |
string |
Value always equals ping |
webhook |
object |
Full information about webhook. See the full description of webhook`s fields in swagger docs |
sender |
object |
Information about user that called ping webhook |
{
    "event": "ping",
    "webhook": {
        "id": 7,
        "url": "<http://localhost:8080/api/webhooks/7>",
        "target_url": "<https://example.com>",
        "description": "",
        "type": "project",
        "content_type": "application/json",
        "is_active": true,
        "enable_ssl": true,
        "created_date": "2022-10-04T08:05:23.007381Z",
        "updated_date": "2022-10-04T08:05:23.007395Z",
        "owner": {
            "url": "<http://localhost:8080/api/users/1>",
            "id": 1,
            "username": "admin1",
            "first_name": "Admin",
            "last_name": "First"
        },
        "project": 7,
        "organization": null,
        "events": \[
            "create:comment",
            "create:issue",
            "create:task",
            "delete:comment",
            "delete:issue",
            "delete:task",
            "update:comment",
            "update:issue",
            "update:job",
            "update:project",
            "update:task"
        \],
        "last_status": 200,
        "last_delivery_date": "2022-10-04T11:04:52.538638Z"
    },
    "sender": {
        "url": "<http://localhost:8080/api/users/1>",
        "id": 1,
        "username": "admin1",
        "first_name": "Admin",
        "last_name": "First"
    }
}