AI Tools
The tool is designed for semi-automatic and automatic annotation using DL models. The tool is available only if there is a corresponding model. For more details about DL models read the Models section.
Interactors
Interactors are used to create a polygon semi-automatically. Supported DL models are not bound to the label and can be used for any objects. To create a polygon usually you need to use regular or positive points. For some kinds of segmentation negative points are available. Positive points are the points related to the object. Negative points should be placed outside the boundary of the object. In most cases specifying positive points alone is enough to build a polygon. A list of available out-of-the-box interactors is placed below.
-
Before you start, select the
magic wandon the controls sidebar and go to theInteractorstab. Then select a label for the polygon and a required DL model. To view help about each of the models, you can click theQuestion markicon.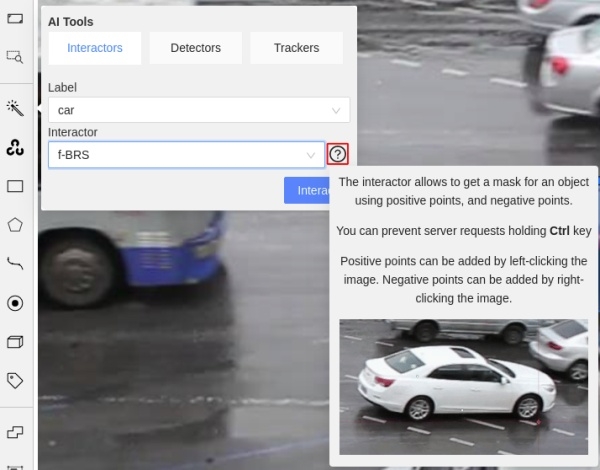
-
Click
Interactto enter the interaction mode. Depending on the selected model, the method of markup will also differ. Now you can place positive and/or negative points. The IOG model also uses a rectangle. Left click creates a positive point and right click creates a negative point. After placing the required number of points (the number is different depending on the model), the request will be sent to the server and when the process is complete a polygon will be created. If you are not satisfied with the result, you can set additional points or remove points. To delete a point, hover over the point you want to delete, if the point can be deleted, it will enlarge and the cursor will turn into a cross, then left-click on the point. If you want to postpone the request and create a few more points, hold downCtrland continue (theBlockbutton on the top panel will turn blue), the request will be sent after the key is released.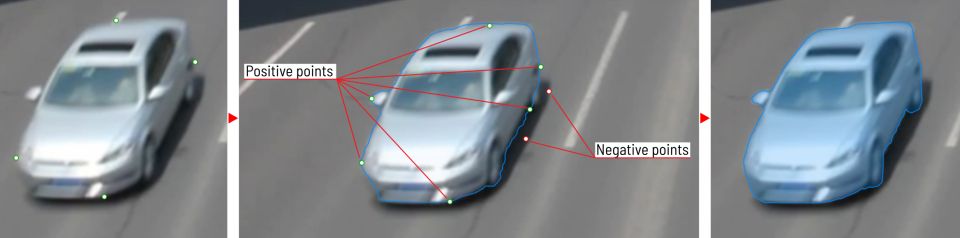
-
In the process of drawing, you can select the number of points in the polygon using the switch.

-
You can use the
Selected opacityslider in theObjects sidebarto change the opacity of the polygon. You can read more in the Objects sidebar section. -
To finish interaction, click on the
Donebutton on the top panel or pressNon your keyboard. -
When the object is finished, you can edit it like a polygon. You can read about editing polygons in the Annotation with polygons section.
Deep extreme cut (DEXTR)
This is an optimized version of the original model, introduced at the end of 2017. It uses the information about extreme points of an object to get its mask. The mask then converted to a polygon. For now this is the fastest interactor on CPU.

Feature backpropagating refinement scheme (f-BRS)
The model allows to get a mask for an object using positive points (should be left-clicked on the foreground), and negative points (should be right-clicked on the background, if necessary). It is recommended to run the model on GPU, if possible.

Inside-Outside-Guidance
The model uses a bounding box and inside/outside points to create a mask. First of all, you need to create a bounding box, wrapping the object. Then you need to use positive and negative points to say the model where is a foreground, and where is a background. Negative points are optional.

Detectors
Detectors are used to automatically annotate one frame. Supported DL models are suitable only for certain labels.
-
Before you start, click the magic wand on the controls sidebar and select the Detectors icon tab. You need to match the labels of the DL model (left column) with the labels in your task (right column). Then click
Annotate.
-
This action will automatically annotates one frame. In the Automatic annotation section you can read how to make automatic annotation of all frames.