This is the multi-page printable view of this section. Click here to print.
Advanced
- 1: CVAT Architecture
- 2: CVAT deployment on Kubernetes with Helm
- 3: Semi-automatic and Automatic Annotation
- 4: CVAT Analytics and monitoring
- 5: Mounting cloud storage
- 6: LDAP Backed Authentication
- 7: Backup guide
- 8: Upgrade guide
- 9: Webhooks
1 - CVAT Architecture
This guide is designed to provide a comprehensive overview of the architecture and components of the CVAT and to illustrate how each component interacts within the system.
| Domain | Component | Functionality | Description |
|---|---|---|---|
| Analytics | Vector | Event processing | There are several components that process events (backend, frontend, web UI). All events are sent to a single point - Vector, where they are processed and then redirected to ClickHouse. For more information, see Analytics. |
| ClickHouse | Event database | Stores events. For more information, see Analytics. | |
| Grafana | Dashboards | Data based on the web interface. For more information, see Analytics. | |
| Data storage NFS | RVVX access mode storage is required in case of multi-node deployment. Available with different types of storages: |
Contains data required for CVAT operations | It is necessary to have the capability for multiple mounting (across several nodes) in RWX mode. For more information, see K8 Deployment with Helm |
| Data cache | Apache kvrocks | Used for data caching (queries and search). Suitable for environments that require frequent database queries. | Apache Kvrocks |
| Job queue | Redis | Queue manager | |
| Database | PostgreSQL | Database | A database where data is stored in a structured form. |
| CVAT.ai Components | Ingress Controller (can be disabled) | Routing traffic. | CVAT deployment on Kubernetes with Helm |
| Authorization | Authorization service based on Open Policy Agent. | ||
| Backend CVAT | Backend | Main framework | Main engine, uses Django + Django DRF. |
| Workers | Import Worker | Everything related to loading data - creating tasks, uploading annotations, etc. | |
| Export Worker | Everything related to exporting data - exporting results, creating dumps, etc. | ||
| Annotation Worker | Auto-annotation tasks. | ||
| Utils Worker | Responsible for tracking various file changes and more. | ||
| Analytics Report | Reports and analytics that are displayed in the CVAT interface. | ||
| Quality Report | Analysis and reports on data quality. | ||
| Webhook Worker | Manages webhooks. | ||
| Auto annotation | Auto Annotation Nucio | Microservice application, used for auto annotation. | How to enable auto annotation feature. |
2 - CVAT deployment on Kubernetes with Helm
- Prerequisites
- Configuration
- Deployment
- Post-deployment configuration
- FAQ
- What is kubernetes and how it is working?
- What is helm and how it is working?
- How to setup Minikube
- How to understand what diff will be inflicted by ‘helm upgrade’?
- I want to use my own postgresql/redis with your chart.
- I want to override some settings in values.yaml.
- Why you used external charts to provide redis and postgres?
Prerequisites
- Installed and configured kubernetes cluster. If you do not already have a cluster, you can create one by using Minikube. How to setup Minikube.
- Installed kubectl
- Installed Helm.
- Installed dependencies
Installing dependencies
To install and/or update run:
helm dependency update
Optional steps
-
Ingress configuration for the Traefik ingress controller is enabled by default.
Note for Minikube use:
- because the Traefik creates its main service with
Loadbalansertype, which involve the assignment of externalIP by Cloud, what never happens on Minikube, you need to explicitly set the externalIP address for the traefic service. Add the following tovalues.override.yamlfile:traefik: service: externalIPs: - "your minikube IP (can be obtained with `minikube ip` command)" - Also ensure that your CVAT ingress appears on your hosts file (/etc/hosts).
You can do this by running this command:
cvat.localis default domainname, you can override it viavalues.override.yaml.echo "$(minikube ip) cvat.local" | sudo tee -a /etc/hosts
- because the Traefik creates its main service with
Configuration
- Create
values.override.yamlfile insidehelm-chartdirectory. - Fill
values.override.yamlwith new parameters for chart. - Override postgresql password
Postgresql password?
Put below into your values.override.yaml
postgresql:
  secret:
    password: <insert_password>
    postgres_password: <insert_postgres_password>
    replication_password: <insert_replication_password>
Or create your own secret and use it with:
postgresql:
   global:
     postgresql:
       existingSecret: <secret>
(Optional) Enable Auto annotation feature
Before starting, ensure that the following prerequisites are met:
- The Nuclio CLI (nuctl) is installed. To install the CLI, simply download the appropriate CLI version to your installation machine.
-
Set
nuclio.enabled: truein yourvalues.override.yaml -
Run
helm dependency updateinhelm-chartdirectory -
Because Nuclio functions are images that need to be pushed and pulled to/from the registry, you need to configure credentials to pull from your preferable registry with the following settings: Options:
-
values.override.yamlfile:registry: loginUrl: someurl credentials: username: someuser password: somepass -
Or you can create a secret with credentials as described in the guide and set
registry.secretName=your-registry-credentials-secret-namein thevalues.override.yamlfile. -
In the case of using Minikube, you can run a local unsecured registry with minikube add-ons:
minikube addons enable registry
minikube addons enable registry-aliases
Before Docker container images can be pushed to your newly created insecure registry, you need to add its address (
$(minikube ip):5000) to the list of insecure registries to instruct Docker to accept working against it: follow the instructions in the Docker documentation
You might also need to log into your registry account (docker login) on the installation machine before running the deployment command.
-
-
Create cvat project:
nuctl --namespace <your cvat namespace> create project cvat -
Finally deploy the function, i.e.:
- using minikube registry:
nuctl deploy --project-name cvat --path serverless/tensorflow/faster_rcnn_inception_v2_coco/nuclio --registry $(minikube ip):5000 --run-registry registry.minikube - using Docker hub:
nuctl deploy --project-name cvat --path serverless/tensorflow/faster_rcnn_inception_v2_coco/nuclio --registry docker.io/your_username
- using minikube registry:
Analytics
Analytics is enabled by default, to disable set analytics.enabled: false in your values.override.yaml
Deployment
Make sure you are using correct kubernetes context. You can check it with kubectl config current-context.
Warning: The k8s service name of Open Policy Agent is fixed to opa by default. This is done to be compatible with CVAT 2.0 but limits this helm chart to a single release per namespace. The OPA url currently can´t be set as an environment variable. As soon as this is possible you can set cvat.opa.composeCompatibleServiceName to false in your value.override.yaml and configure the opa url as additional env.
Execute following command from repo root directory
With overrides:
helm upgrade -n <desired_namespace> <release_name> -i --create-namespace ./helm-chart -f ./helm-chart/values.yaml -f ./helm-chart/values.override.yaml
Without overrides:
helm upgrade -n <desired_namespace> <release_name> -i --create-namespace ./helm-chart -f ./helm-chart/values.yaml
Post-deployment configuration
- Create super user
How to create superuser?
HELM_RELEASE_NAMESPACE="<desired_namespace>" &&\
HELM_RELEASE_NAME="<release_name>" &&\
BACKEND_POD_NAME=$(kubectl get pod --namespace $HELM_RELEASE_NAMESPACE -l tier=backend,app.kubernetes.io/instance=$HELM_RELEASE_NAME,component=server -o jsonpath='{.items[0].metadata.name}') &&\
kubectl exec -it --namespace $HELM_RELEASE_NAMESPACE $BACKEND_POD_NAME -c cvat-backend -- python manage.py createsuperuser
FAQ
What is kubernetes and how it is working?
What is helm and how it is working?
See https://helm.sh/
How to setup Minikube
- Please follow the official Minikube installation guide
-
minikube start --addons registry,registry-aliases
How to understand what diff will be inflicted by ‘helm upgrade’?
You can use https://github.com/databus23/helm-diff#install for that
I want to use my own postgresql with your chart.
Just set postgresql.enabled to false in the override file, then put the parameters of your database
instance in the external field.
You may also need to configure username, database and password fields
to connect to your own database:
postgresql:
  enabled: false
  external:
    host: postgresql.default.svc.cluster.local
    port: 5432
  auth:
    username: cvat
    database: cvat
  secret:
    password: cvat_postgresql
In example above corresponding secret will be created automatically, but if you want to use existing secret change secret.create to false and set name of existing secret:
postgresql:
  enabled: false
  external:
    host: postgresql.default.svc.cluster.local
    port: 5432
  secret:
    create: false
    name: "my-postgresql-secret"
The secret must contain the database, username and password
keys to access to the database
like:
apiVersion: v1
kind: Secret
metadata:
  name: "my-postgresql-secret"
  namespace: default
type: generic
stringData:
  database: cvat
  username: cvat
  password: secretpassword
I want to use my own redis with your chart.
Just set redis.enabled to false in the override file, then put the parameters of your Redis
instance in the external field.
You may also need to configure password field to connect to your own Redis:
redis:
  enabled: false
  external:
    host: redis.hostname.local
  secret:
    password: cvat_redis
In the above example the corresponding secret will be created automatically, but if you want to use an existing secret
change secret.create to false and set name of the existing secret:
redis:
  enabled: false
  external:
    host: redis.hostname.local
  secret:
    create: false
    name: "my-redis-secret"
The secret must contain the redis-password key like:
apiVersion: v1
kind: Secret
metadata:
  name: "my-redis-secret"
  namespace: default
type: generic
stringData:
  redis-password: secretpassword
I want to override some settings in values.yaml.
Just create file values.override.yaml and place your changes here, using same structure as in values.yaml.
Then reference it in helm update/install command using -f flag
Why you used external charts to provide redis and postgres?
Because they definitely know what they do better then we are, so we are getting more quality and less support
How to use custom domain name with k8s deployment:
The default value cvat.local may be overridden with --set ingress.hosts[0].host option like this:
helm upgrade -n default cvat -i --create-namespace helm-chart -f helm-chart/values.yaml -f helm-chart/values.override.yaml --set ingress.hosts[0].host=YOUR_FQDN
How to fix fail of helm upgrade due label field is immutable reason?
If an error message like this:
Error: UPGRADE FAILED:cannot patch "cvat-backend-server" with kind Deployment: Deployment.apps "cvat-backend-server" is invalid: spec.selector: Invalid value: v1.LabelSelector{MatchLabels:map[string]string{"app":"cvat-app", "app.kubernetes.io/instance":"cvat", "app.kubernetes.io/managed-by":"Helm", "app.kubernetes.io/name":"cvat", "app.kubernetes.io/version":"latest", "component":"server", "helm.sh/chart":"cvat", "tier":"backend"}, MatchExpressions:[]v1.LabelSelectorRequirement(nil)}: field is immutable
To fix that, delete CVAT Deployments before upgrading
kubectl delete deployments --namespace=foo -l app=cvat-app
How to use existing PersistentVolume to store CVAT data instead of default storage
It is assumed that you have created a PersistentVolumeClaim named my-claim-name
and a PersistentVolume that backing the claim.
Claims must exist in the same namespace as the Pod using the claim.
For details see.
Add these values in the values.override.yaml:
cvat:
  backend:
    permissionFix:
      enabled: false
    defaultStorage:
      enabled: false
    server:
      additionalVolumes:
        - name: cvat-backend-data
          persistentVolumeClaim:
            claimName: my-claim-name
    worker:
      export:
        additionalVolumes:
          - name: cvat-backend-data
            persistentVolumeClaim:
              claimName: my-claim-name
      import:
        additionalVolumes:
          - name: cvat-backend-data
            persistentVolumeClaim:
              claimName: my-claim-name
      annotation:
        additionalVolumes:
          - name: cvat-backend-data
            persistentVolumeClaim:
              claimName: my-claim-name
    utils:
      additionalVolumes:
        - name: cvat-backend-data
          persistentVolumeClaim:
            claimName: my-claim-name
3 - Semi-automatic and Automatic Annotation
⚠ WARNING: Do not use
docker compose upIf you did, make sure all containers are stopped bydocker compose down.
-
To bring up cvat with auto annotation tool, from cvat root directory, you need to run:
docker compose -f docker-compose.yml -f components/serverless/docker-compose.serverless.yml up -dIf you did any changes to the Docker Compose files, make sure to add
--buildat the end.To stop the containers, simply run:
docker compose -f docker-compose.yml -f components/serverless/docker-compose.serverless.yml down -
You have to install
nuctlcommand line tool to build and deploy serverless functions. Download version 1.11.24. It is important that the version you download matches the version in docker-compose.serverless.yml. For example, using wget.wget https://github.com/nuclio/nuclio/releases/download/<version>/nuctl-<version>-linux-amd64After downloading the nuclio, give it a proper permission and do a softlink.
sudo chmod +x nuctl-<version>-linux-amd64 sudo ln -sf $(pwd)/nuctl-<version>-linux-amd64 /usr/local/bin/nuctl -
Deploy a couple of functions. This will automatically create a
cvatNuclio project to contain the functions. Commands below should be run only after CVAT has been installed usingdocker composebecause it runs nuclio dashboard which manages all serverless functions../serverless/deploy_cpu.sh serverless/openvino/dextr ./serverless/deploy_cpu.sh serverless/openvino/omz/public/yolo-v3-tfGPU Support
You will need to install Nvidia Container Toolkit. Also you will need to add
--resource-limit nvidia.com/gpu=1 --triggers '{"myHttpTrigger": {"maxWorkers": 1}}'to the nuclio deployment command. You can increase the maxWorker if you have enough GPU memory. As an example, below will run on the GPU:nuctl deploy --project-name cvat \ --path serverless/tensorflow/matterport/mask_rcnn/nuclio \ --platform local --base-image tensorflow/tensorflow:1.15.5-gpu-py3 \ --desc "GPU based implementation of Mask RCNN on Python 3, Keras, and TensorFlow." \ --image cvat/tf.matterport.mask_rcnn_gpu \ --triggers '{"myHttpTrigger": {"maxWorkers": 1}}' \ --resource-limit nvidia.com/gpu=1Note:
- The number of GPU deployed functions will be limited to your GPU memory.
- See deploy_gpu.sh script for more examples.
- For some models (namely SiamMask) you need an Nvidia driver version greater than or equal to 450.80.02.
Note for Windows users:
If you want to use nuclio under Windows CVAT installation you should install Nvidia drivers for WSL according to this instruction and follow the steps up to “2.3 Installing Nvidia drivers”. Important requirement: you should have the latest versions of Docker Desktop, Nvidia drivers for WSL, and the latest updates from the Windows Insider Preview Dev channel.
Troubleshooting Nuclio Functions:
-
You can open nuclio dashboard at localhost:8070. Make sure status of your functions are up and running without any error.
-
Test your deployed DL model as a serverless function. The command below should work on Linux and Mac OS.
image=$(curl https://upload.wikimedia.org/wikipedia/en/7/7d/Lenna_%28test_image%29.png --output - | base64 | tr -d '\n')
cat << EOF > /tmp/input.json
{"image": "$image"}
EOF
cat /tmp/input.json | nuctl invoke openvino-omz-public-yolo-v3-tf -c 'application/json'
20.07.17 12:07:44.519 nuctl.platform.invoker (I) Executing function {"method": "POST", "url": "http://:57308", "headers": {"Content-Type":["application/json"],"X-Nuclio-Log-Level":["info"],"X-Nuclio-Target":["openvino-omz-public-yolo-v3-tf"]}} 20.07.17 12:07:45.275 nuctl.platform.invoker (I) Got response {"status": "200 OK"} 20.07.17 12:07:45.275 nuctl (I) >>> Start of function logs 20.07.17 12:07:45.275 ino-omz-public-yolo-v3-tf (I) Run yolo-v3-tf model {"worker_id": "0", "time": 1594976864570.9353} 20.07.17 12:07:45.275 nuctl (I) <<< End of function logs > Response headers: Date = Fri, 17 Jul 2020 09:07:45 GMT Content-Type = application/json Content-Length = 100 Server = nuclio > Response body: [ { "confidence": "0.9992254", "label": "person", "points": [ 39, 124, 408, 512 ], "type": "rectangle" } ] -
To check for internal server errors, run
docker ps -ato see the list of containers. Find the container that you are interested, e.g.,nuclio-nuclio-tf-faster-rcnn-inception-v2-coco-gpu. Then check its logs bydocker logs <name of your container>e.g.,docker logs nuclio-nuclio-tf-faster-rcnn-inception-v2-coco-gpu -
To debug a code inside a container, you can use vscode to attach to a container instructions. To apply your changes, make sure to restart the container.
docker restart <name_of_the_container>
4 - CVAT Analytics and monitoring
CVAT Analytics suite of tools is designed to track and understand users’ behavior, system performance, and for identifying potential issues in your application.
You can also visualize user activity through Grafana, and aggregate user working time by the jobs.
Gathered logs can be additionally filtered for efficient debugging.
By using analytics, you’ll gain valuable insights to optimize your system and enhance user satisfaction.
CVAT analytics are available from the top menu.

Note: CVAT analytics and monitoring are available only for on-prem solution.
See:
High-level architecture
The CVAT analytics is based on Vector, ClickHouse, and Grafana.

CVAT Analytics
CVAT and its analytics module can be set up locally, for self-hosted solution analytics are enabled by default.
For detailed CVAT installation instructions, see Installation Guide or refer to the CVAT Course for installation videos.
All analytics-related features will be launched when you start CVAT containers with the following command:
docker compose up -d
Ports settings
If you cannot access analytics on development environnement, see Analytics Ports
Events log structure
Relational database schema with the following fields:
| Field | Description |
|---|---|
| scope | Scope of the event (e.g., zoomin:image, add:annotations, delete:image, update:assignee). |
| obj_name | Object name or None (e.g., task, job, cloudstorage, model, organization). |
| obj_id | Object identifier as in DB or None. |
| obj_val | Value for the event as string or None (e.g., frame number, number of added annotations). |
| source | Who generates the log event (e.g., server, ui). |
| timestamp | Local event time (in general for UI and server, the time is different). |
| count | How many times in the row it occurs. |
| duration | How much time does it take (it can be 0 for events without duration). |
| project_id | Project ID or None. |
| task_id | Task ID or None. |
| job_id | Job ID or None. |
| user_id | User ID or None. |
| user_name | User name or None. |
| user_email | User email or None. |
| org_id | Organization ID or None. |
| org_slug | Organization slug or None. |
| payload | JSON payload or None. Extra fields can be added to the JSON blob. |
Types of supported events
Supported events change the scope of information displayed in Grafana.
Server events:
-
create:project,update:project,delete:project -
create:task,update:task,delete:task -
create:job,update:job,delete:job -
create:organization,update:organization,delete:organization -
create:user,update:user,delete:user -
create:cloudstorage,update:cloudstorage,delete:cloudstorage -
create:issue,update:issue,delete:issue -
create:comment,update:comment,delete:comment -
create:annotations,update:annotations,delete:annotations -
create:label,update:label,delete:label -
export:dataset,import:dataset
Client events:
-
load:cvat -
load:job,save:job,restore:job -
upload:annotations -
send:exception -
send:task_info -
draw:object,paste:object,copy:object,propagate:object,drag:object,resize:object,delete:object,lock:object,merge:objects,split:objects,group:objects,slice:object,join:objects -
change:attribute -
change:label -
change:frame -
zoom:image,fit:image,rotate:image -
action:undo,action:redo -
run:annotations_action -
click:element -
debug:info
Working time calculation
Here is a short overview of how CVAT deals with the user’s working time:
-
The user interface collects events when a user interacts with the interface (resizing canvas, drawing objects, clicking buttons, etc) The structure of one single event is described here.
-
The user interface sends these events in bulk to the server. Currently, it uses the following triggers to send events:
- Periodical timer (~90 seconds)
- A user clicks the “Save” button on the annotation view
- A user opens the annotation view
- A user closes the annotation view (but not the tab/browser)
- A user clicks Logout button
-
When events reach the server, it calculates working time based on timestamps of the events.
-
The working time for an event is computed as the sum of the following:
- The difference between the start time of the event and the end time of the previous event, if it is not more than 100 seconds.
- The duration of the event, for events of type
change:frame.
-
After calculation, the server generates
send:working_timeevents with time value in payload. These events may or may not be bound to a certain job/task/project, depending on the client-side events that were used to generate them. -
CVAT saves the event in the database and later these events are used to compute metrics for analytics.
Request id for tracking
Note, that every response to an API request made to the
the server includes a header named X-Request-Id,
for example: X-Request-Id: 6a2b7102-c4b9-4d57-8754-5658132ba37d.
This identifier is also recorded in all server events that occur as a result of the respective request.
For example, when an operation to create a task is performed, other related entities such as labels and attributes are generated on the server in addition to the Task object.
All events associated with this operation will have the same request_id in
the payload field.
Fetching event data as CSV from the /api/events endpoint
The /api/events endpoint allows the fetching of
event data with filtering parameters such as
org_id, project_id, task_id, job_id, and user_id.
For more details, see Swagger API Documentation.
For example, to fetch all events associated with a specific job,
the following curl command can be used:
curl --user 'user:pass' https://app.cvat.ai/api/events?job_id=123
In the response, you will receive a query ID:
{ "query_id": "150cac1f-09f1-4d73-b6a5-5f47aa5d0031" }
As this process may take some time to complete,
the status of the request can be checked by
adding the query parameter query_id to the request:
curl -I --user 'user:pass' https://app.cvat.ai/api/events?job_id=123&query_id=150cac1f-09f1-4d73-b6a5-5f47aa5d0031
Upon successful creation, the server will return a 201 Created status:
HTTP/2 201
allow: GET, POST, HEAD, OPTIONS
date: Tue, 16 May 2023 13:38:42 GMT
referrer-policy: same-origin
server: Apache
vary: Accept,Origin,Cookie
x-content-type-options: nosniff
x-frame-options: DENY
x-request-id: 4631f5fa-a4f0-42a8-b77b-7426fc298a85
The CSV file can be downloaded by
adding the action=download query parameter to the request:
curl --user 'user:pass' https://app.cvat.ai/api/events?job_id=123&query_id=150cac1f-09f1-4d73-b6a5-5f47aa5d0031&action=download > /tmp/events.csv
This will download and save the file to /tmp/events.csv
on your local machine.
Dashboards
By default, three dashboards are available in CVAT.
To access them, click General, you will be forwarded to the page with available dashboards.
| Dashboard | Description |
|---|---|
| All Events | Dashboard that shows all event logs, timestamps, and source. |
| Management | Dashboard with information about user activities such as working time by job and so on. |
| Monitoring | Dashboard showing server logs, including errors. |
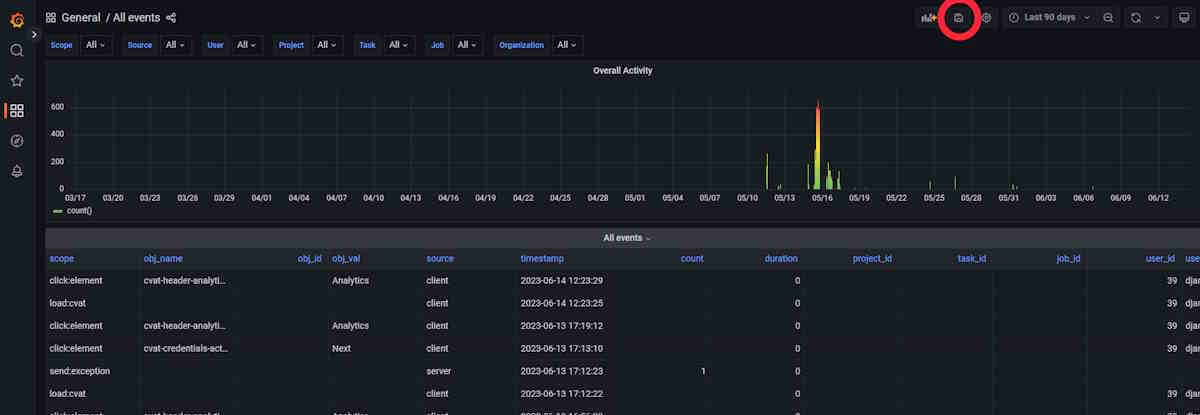
Dashboard: All Events
The dashboard shows all events, their timestamps, and their source.
| Element | Description |
|---|---|
| Filters | Can be used as drop-down lists or search fields. Click on the arrow to activate. |
| Overall activity | Graph that shows the overall activity by the selected filters. |
| Scope | Users’ activity, see Types of supported events. |
| obj_name | Object or item related to the Scope. |
| obj_id | Object’s id. Might be empty. |
| source | Source of the event, can be client or server. |
| timestamp | Time when the event happened. |
| count | Common field for all events, not null where it makes sense, for example, the number of saved objects in an annotation. |
| duration | Duration in milliseconds. |
| project_id | Id of the project. |
| project_id | Id of the project. |
| task_id | ID of the task. |
| job_id | ID of the job. |
There are two fields with statistics at the bottom of the dashboard, about browser and OS users use.
Click on the column name to enable a filter.
If you want to inspect the value, hover over it and click on the eye icon.
Dashboard: Management
The dashboard shows user activity.
| Element | Description |
|---|---|
| Filters | Can be used as drop-down lists or search fields. Click on the arrow to activate. |
| User activity | Graph that shows when the user was active (data and time), click on the user id below, to see the graph for the dedicated user. |
| Overall activity | Graph shows common activity for all users. |
| User | User ID. |
| Project | Project ID. Might be empty. |
| Task | Task ID. Might be empty. |
| Job | Job ID. Might be empty. |
| Working time(h) | Time spent on task in hours. |
| Activity | Number of events for each user. |
Click on the column name to enable a filter.
If you want to inspect the value, hover over it and click on the eye icon.
Dashboard: Monitoring
The dashboard shows server logs, helps handle errors, and shows user activity.
| Element | Description |
|---|---|
| Filters | Can be used as drop-down lists or search fields. Click on the arrow to activate. |
| Active users (now) | Number of active users on an instance. |
| Overall activity | Graph that shows the number of active users. |
| Exceptions | Graph that shows the number of errors that happened in the instance. |
| timestamp | Time when the error happened. |
| user_id | User ID. |
| user_name | User nickname. |
| project_id | Id of the project. Might be empty. |
| task_id | Task ID. Might be empty. |
| job_id | Job ID. Might be empty. |
| error | Error description |
| stack | Error description |
| payload | Error description |
| stack | Stack trace, which is a report of the active stack frames at a certain point in time during the execution. This information is typically used for debugging purposes to locate where an issue occurred. |
| payload | JSON that describes the entire object, which contains several properties. This data in the payload is related to an event that was created as a result of a failed API request. The payload contains information about this event. |
Click on the column name to enable a filter.
If you want to inspect the value, hover over it and click on the eye icon.
Dashboards setup
You can adjust the dashboards. To do this, click on the graph or table name and from the drop-down menu select Edit.
Adjust the query in the editor.
Example of query:
SELECT
    time,
    uniqExact(user_id) Users
FROM
(
    SELECT
      user_id,
      toStartOfInterval(timestamp, INTERVAL 15 minute) as time
    FROM cvat.events
    WHERE
      user_id IS NOT NULL
    GROUP BY
      user_id,
      time
    ORDER BY time ASC WITH FILL STEP toIntervalMinute(15)
)
GROUP BY time
ORDER BY time
Note, that by default the updated configuration will not be saved and will be reset to the default parameters after you restart the container.
To save the updated configuration, do the following:
-
Update Configuration: Start by making your desired changes in the query.
-
Apply Changes: Once you’ve made your changes, click the Apply button to ensure the changes are implemented.
-
Save Configuration: To save your applied changes, on the top of the dashboard, click the Save button.
-
Replace Configuration File: After saving, replace the existing Grafana dashboard configuration file is located at
components/analytics/grafana/dashboardswith the new JSON configuration file.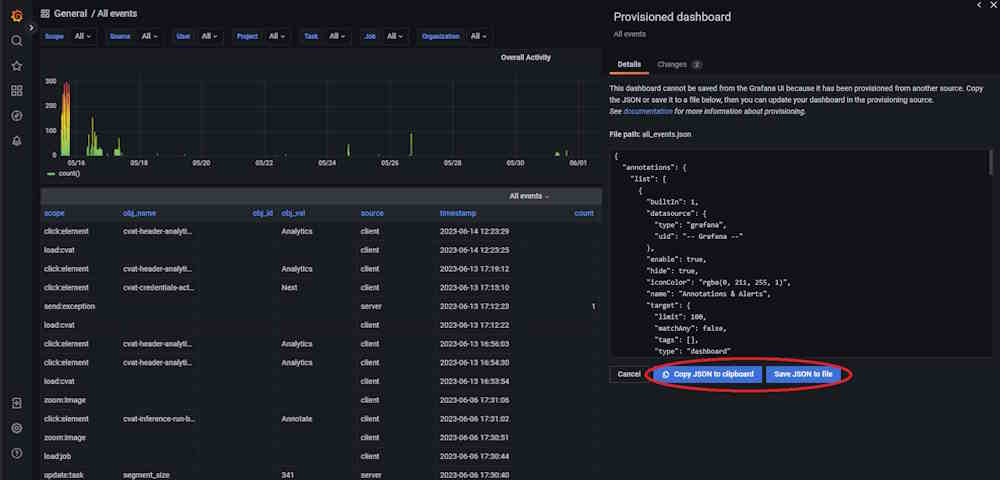
-
Restart Grafana Service: To ensure, that all changes take effect, restart the Grafana service. If you’re using Docker Compose, execute the following command:
docker compose restart cvat_grafana.
For more information, see Grafana Dashboards.
Example of use
This video demonstrates available by default CVAT analytics features.
5 - Mounting cloud storage
AWS S3 bucket as filesystem
Ubuntu 20.04
Mount
-
Install s3fs:
sudo apt install s3fs -
Enter your credentials in a file
${HOME}/.passwd-s3fsand set owner-only permissions:echo ACCESS_KEY_ID:SECRET_ACCESS_KEY > ${HOME}/.passwd-s3fs chmod 600 ${HOME}/.passwd-s3fs -
Uncomment
user_allow_otherin the/etc/fuse.conffile:sudo nano /etc/fuse.conf -
Run s3fs, replace
bucket_name,mount_point:s3fs <bucket_name> <mount_point> -o allow_other -o passwd_file=${HOME}/.passwd-s3fs
For more details see here.
Automatically mount
Follow the first 3 mounting steps above.
Using fstab
-
Create a bash script named aws_s3_fuse(e.g in /usr/bin, as root) with this content (replace
user_nameon whose behalf the disk will be mounted,backet_name,mount_point,/path/to/.passwd-s3fs):#!/bin/bash sudo -u <user_name> s3fs <backet_name> <mount_point> -o passwd_file=/path/to/.passwd-s3fs -o allow_other exit 0 -
Give it the execution permission:
sudo chmod +x /usr/bin/aws_s3_fuse -
Edit
/etc/fstabadding a line like this, replacemount_point):/absolute/path/to/aws_s3_fuse <mount_point> fuse allow_other,user,_netdev 0 0
Using systemd
-
Create unit file
sudo nano /etc/systemd/system/s3fs.service(replaceuser_name,bucket_name,mount_point,/path/to/.passwd-s3fs):[Unit] Description=FUSE filesystem over AWS S3 bucket After=network.target [Service] Environment="MOUNT_POINT=<mount_point>" User=<user_name> Group=<user_name> ExecStart=s3fs <bucket_name> ${MOUNT_POINT} -o passwd_file=/path/to/.passwd-s3fs -o allow_other ExecStop=fusermount -u ${MOUNT_POINT} Restart=always Type=forking [Install] WantedBy=multi-user.target -
Update the system configurations, enable unit autorun when the system boots, mount the bucket:
sudo systemctl daemon-reload
sudo systemctl enable s3fs.service
sudo systemctl start s3fs.service
Check
A file /etc/mtab contains records of currently mounted filesystems.
cat /etc/mtab | grep 's3fs'
Unmount filesystem
fusermount -u <mount_point>
If you used systemd to mount a bucket:
sudo systemctl stop s3fs.service
sudo systemctl disable s3fs.service
Microsoft Azure container as filesystem
Ubuntu 20.04
Mount
-
Set up the Microsoft package repository.(More here)
wget https://packages.microsoft.com/config/ubuntu/20.04/packages-microsoft-prod.deb sudo dpkg -i packages-microsoft-prod.deb sudo apt-get update -
Install
blobfuseandfuse:sudo apt-get install blobfuse fuseFor more details see here
-
Create environments (replace
account_name,account_key,mount_point):export AZURE_STORAGE_ACCOUNT=<account_name> export AZURE_STORAGE_ACCESS_KEY=<account_key> MOUNT_POINT=<mount_point> -
Create a folder for cache:
sudo mkdir -p /mnt/blobfusetmp -
Make sure the file must be owned by the user who mounts the container:
sudo chown <user> /mnt/blobfusetmp -
Create the mount point, if it doesn’t exists:
mkdir -p ${MOUNT_POINT} -
Uncomment
user_allow_otherin the/etc/fuse.conffile:sudo nano /etc/fuse.conf -
Mount container(replace
your_container):blobfuse ${MOUNT_POINT} --container-name=<your_container> --tmp-path=/mnt/blobfusetmp -o allow_other
Automatically mount
Follow the first 7 mounting steps above.
Using fstab
-
Create configuration file
connection.cfgwith same content, change accountName, select one from accountKey or sasToken and replace with your value:accountName <account-name-here> # Please provide either an account key or a SAS token, and delete the other line. accountKey <account-key-here-delete-next-line> #change authType to specify only 1 sasToken <shared-access-token-here-delete-previous-line> authType <MSI/SAS/SPN/Key/empty> containerName <insert-container-name-here> -
Create a bash script named
azure_fuse(e.g in /usr/bin, as root) with content below (replaceuser_nameon whose behalf the disk will be mounted,mount_point,/path/to/blobfusetmp,/path/to/connection.cfg):#!/bin/bash sudo -u <user_name> blobfuse <mount_point> --tmp-path=/path/to/blobfusetmp --config-file=/path/to/connection.cfg -o allow_other exit 0 -
Give it the execution permission:
sudo chmod +x /usr/bin/azure_fuse -
Edit
/etc/fstabwith the blobfuse script. Add the following line(replace paths):/absolute/path/to/azure_fuse </path/to/desired/mountpoint> fuse allow_other,user,_netdev
Using systemd
-
Create unit file
sudo nano /etc/systemd/system/blobfuse.service. (replaceuser_name,mount_point,container_name,/path/to/connection.cfg):[Unit] Description=FUSE filesystem over Azure container After=network.target [Service] Environment="MOUNT_POINT=<mount_point>" User=<user_name> Group=<user_name> ExecStart=blobfuse ${MOUNT_POINT} --container-name=<container_name> --tmp-path=/mnt/blobfusetmp --config-file=/path/to/connection.cfg -o allow_other ExecStop=fusermount -u ${MOUNT_POINT} Restart=always Type=forking [Install] WantedBy=multi-user.target -
Update the system configurations, enable unit autorun when the system boots, mount the container:
sudo systemctl daemon-reload
sudo systemctl enable blobfuse.service
sudo systemctl start blobfuse.service
Or for more detail see here
Check
A file /etc/mtab contains records of currently mounted filesystems.
cat /etc/mtab | grep 'blobfuse'
Unmount filesystem
fusermount -u <mount_point>
If you used systemd to mount a container:
sudo systemctl stop blobfuse.service
sudo systemctl disable blobfuse.service
If you have any mounting problems, check out the answers to common problems
Google Drive as filesystem
Ubuntu 20.04
Mount
To mount a google drive as a filesystem in user space(FUSE) you can use google-drive-ocamlfuse To do this follow the instructions below:
-
Install google-drive-ocamlfuse:
sudo add-apt-repository ppa:alessandro-strada/ppa sudo apt-get update sudo apt-get install google-drive-ocamlfuse -
Run
google-drive-ocamlfusewithout parameters:google-drive-ocamlfuseThis command will create the default application directory (~/.gdfuse/default), containing the configuration file config (see the wiki page for more details about configuration). And it will start a web browser to obtain authorization to access your Google Drive. This will let you modify default configuration before mounting the filesystem.
Then you can choose a local directory to mount your Google Drive (e.g.: ~/GoogleDrive).
-
Create the mount point, if it doesn’t exist(replace mount_point):
mountpoint="<mount_point>" mkdir -p $mountpoint -
Uncomment
user_allow_otherin the/etc/fuse.conffile:sudo nano /etc/fuse.conf -
Mount the filesystem:
google-drive-ocamlfuse -o allow_other $mountpoint
Automatically mount
Follow the first 4 mounting steps above.
Using fstab
-
Create a bash script named gdfuse(e.g in /usr/bin, as root) with this content (replace
user_nameon whose behalf the disk will be mounted,label,mount_point):#!/bin/bash sudo -u <user_name> google-drive-ocamlfuse -o allow_other -label <label> <mount_point> exit 0 -
Give it the execution permission:
sudo chmod +x /usr/bin/gdfuse -
Edit
/etc/fstabadding a line like this, replacemount_point):/absolute/path/to/gdfuse <mount_point> fuse allow_other,user,_netdev 0 0For more details see here
Using systemd
-
Create unit file
sudo nano /etc/systemd/system/google-drive-ocamlfuse.service. (replaceuser_name,label(defaultlabel=default),mount_point):[Unit] Description=FUSE filesystem over Google Drive After=network.target [Service] Environment="MOUNT_POINT=<mount_point>" User=<user_name> Group=<user_name> ExecStart=google-drive-ocamlfuse -label <label> ${MOUNT_POINT} ExecStop=fusermount -u ${MOUNT_POINT} Restart=always Type=forking [Install] WantedBy=multi-user.target -
Update the system configurations, enable unit autorun when the system boots, mount the drive:
sudo systemctl daemon-reload
sudo systemctl enable google-drive-ocamlfuse.service
sudo systemctl start google-drive-ocamlfuse.service
For more details see here
Check
A file /etc/mtab contains records of currently mounted filesystems.
cat /etc/mtab | grep 'google-drive-ocamlfuse'
Unmount filesystem
fusermount -u <mount_point>
If you used systemd to mount a drive:
sudo systemctl stop google-drive-ocamlfuse.service
sudo systemctl disable google-drive-ocamlfuse.service
6 - LDAP Backed Authentication
The creation of settings.py
When integrating LDAP login, we need to create an overlay to the default CVAT settings located in cvat/settings/production.py. This overlay is where we will configure Django to connect to the LDAP server.
The main issue with using LDAP is that different LDAP implementations have different parameters. So the options used for Active Directory backed authentication will differ if you were to be using FreeIPA.
Update docker-compose.override.yml
In your override config you need to passthrough your settings and tell CVAT to
use them by setting the DJANGO_SETTINGS_MODULE variable.
services:
  cvat_server:
    environment:
      DJANGO_SETTINGS_MODULE: settings
    volumes:
      - ./settings.py:/home/django/settings.py:ro
Active Directory Example
The following example should allow for users to authenticate themselves against
Active Directory. This example requires a dummy user named cvat_bind. The
configuration for the bind account does not need any special permissions.
When updating AUTH_LDAP_BIND_DN, you can write out the account info in two
ways. Both are documented in the config below.
This config is known to work with Windows Server 2022, but should work for older versions and Samba’s implementation of Active Directory.
# We are overlaying production
from cvat.settings.production import *

# Custom code below
import ldap
from django_auth_ldap.config import LDAPSearch
from django_auth_ldap.config import NestedActiveDirectoryGroupType

# Notify CVAT that we are using LDAP authentication
IAM_TYPE = 'LDAP'

# Talking to the LDAP server
AUTH_LDAP_SERVER_URI = "ldap://ad.example.com" # IP Addresses also work
ldap.set_option(ldap.OPT_REFERRALS, 0)

_BASE_DN = "CN=Users,DC=ad,DC=example,DC=com"

# Authenticating with the LDAP server
AUTH_LDAP_BIND_DN = "CN=cvat_bind,%s" % _BASE_DN
# AUTH_LDAP_BIND_DN = "cvat_bind@ad.example.com"
AUTH_LDAP_BIND_PASSWORD = "SuperSecurePassword^21"

AUTH_LDAP_USER_SEARCH = LDAPSearch(
    _BASE_DN,
    ldap.SCOPE_SUBTREE,
    "(sAMAccountName=%(user)s)"
)

AUTH_LDAP_GROUP_SEARCH = LDAPSearch(
    _BASE_DN,
    ldap.SCOPE_SUBTREE,
    "(objectClass=group)"
)

# Mapping Django field names to Active Directory attributes
AUTH_LDAP_USER_ATTR_MAP = {
    "user_name": "sAMAccountName",
    "first_name": "givenName",
    "last_name": "sn",
    "email": "mail",
}

# Group Management
AUTH_LDAP_GROUP_TYPE = NestedActiveDirectoryGroupType()

# Register Django LDAP backend
AUTHENTICATION_BACKENDS += ['django_auth_ldap.backend.LDAPBackend']

# Map Active Directory groups to Django/CVAT groups.
AUTH_LDAP_ADMIN_GROUPS = [
    'CN=CVAT Admins,%s' % _BASE_DN,
]
AUTH_LDAP_BUSINESS_GROUPS = [
    'CN=CVAT Managers,%s' % _BASE_DN,
]
AUTH_LDAP_WORKER_GROUPS = [
    'CN=CVAT Workers,%s' % _BASE_DN,
]
AUTH_LDAP_USER_GROUPS = [
    'CN=CVAT Users,%s' % _BASE_DN,
]

DJANGO_AUTH_LDAP_GROUPS = {
    "admin": AUTH_LDAP_ADMIN_GROUPS,
    "business": AUTH_LDAP_BUSINESS_GROUPS,
    "user": AUTH_LDAP_USER_GROUPS,
    "worker": AUTH_LDAP_WORKER_GROUPS,
}
FreeIPA Example
The following example should allow for users to authenticate themselves against
FreeIPA. This example requires a dummy user named cvat_bind. The configuration
for the bind account does not need any special permissions.
When updating AUTH_LDAP_BIND_DN, you can only write the user info in one way,
unlike with Active Directory
This config is known to work with AlmaLinux 8, but may work for other versions and flavors of Enterprise Linux.
# We are overlaying production
from cvat.settings.production import *

# Custom code below
import ldap
from django_auth_ldap.config import LDAPSearch
from django_auth_ldap.config import GroupOfNamesType

# Notify CVAT that we are using LDAP authentication
IAM_TYPE = 'LDAP'

_BASE_DN = "CN=Accounts,DC=ipa,DC=example,DC=com"

# Talking to the LDAP server
AUTH_LDAP_SERVER_URI = "ldap://ipa.example.com" # IP Addresses also work
ldap.set_option(ldap.OPT_REFERRALS, 0)

# Authenticating with the LDAP server
AUTH_LDAP_BIND_DN = "UID=cvat_bind,CN=Users,%s" % _BASE_DN
AUTH_LDAP_BIND_PASSWORD = "SuperSecurePassword^21"

AUTH_LDAP_USER_SEARCH = LDAPSearch(
    "CN=Users,%s" % _BASE_DN,
    ldap.SCOPE_SUBTREE,
    "(uid=%(user)s)"
)

AUTH_LDAP_GROUP_SEARCH = LDAPSearch(
    "CN=Groups,%s" % _BASE_DN,
    ldap.SCOPE_SUBTREE,
    "(objectClass=groupOfNames)"
)

# Mapping Django field names to FreeIPA attributes
AUTH_LDAP_USER_ATTR_MAP = {
    "user_name": "uid",
    "first_name": "givenName",
    "last_name": "sn",
    "email": "mail",
}

# Group Management
AUTH_LDAP_GROUP_TYPE = GroupOfNamesType()

# Register Django LDAP backend
AUTHENTICATION_BACKENDS += ['django_auth_ldap.backend.LDAPBackend']

# Map FreeIPA groups to Django/CVAT groups.
AUTH_LDAP_ADMIN_GROUPS = [
    'CN=cvat_admins,CN=Groups,%s' % _BASE_DN,
]
AUTH_LDAP_BUSINESS_GROUPS = [
    'CN=cvat_managers,CN=Groups,%s' % _BASE_DN,
]
AUTH_LDAP_WORKER_GROUPS = [
    'CN=cvat_workers,CN=Groups,%s' % _BASE_DN,
]
AUTH_LDAP_USER_GROUPS = [
    'CN=cvat_users,CN=Groups,%s' % _BASE_DN,
]

DJANGO_AUTH_LDAP_GROUPS = {
    "admin": AUTH_LDAP_ADMIN_GROUPS,
    "business": AUTH_LDAP_BUSINESS_GROUPS,
    "user": AUTH_LDAP_USER_GROUPS,
    "worker": AUTH_LDAP_WORKER_GROUPS,
}
Resources
- Microsoft - LDAP Distinguished Names
- Elements that make up a distinguished name. Used with user/group searches.
- Django LDAP Reference Manual
- Other options that can be used for LDAP authentication in Django.
- Django LDAP guide using Active Directory (Unofficial)
- This is not specific to CVAT but can provide insight about firewall rules.
7 - Backup guide
About CVAT data volumes
Docker volumes are used to store all CVAT data:
-
cvat_db: PostgreSQL database files, used to store information about users, tasks, projects, annotations, etc. Mounted intocvat_dbcontainer by/var/lib/postgresql/datapath. -
cvat_data: used to store uploaded and prepared media data. Mounted intocvatcontainer by/home/django/datapath. -
cvat_keys: used to store the Django secret key. Mounted intocvatcontainer by/home/django/keyspath. -
cvat_logs: used to store logs of CVAT backend processes managed by supevisord. Mounted intocvatcontainer by/home/django/logspath. -
cvat_events: this is an optional volume that is used only when Analytics component is enabled and is used to store Elasticsearch database files. Mounted intocvat_elasticsearchcontainer by/usr/share/elasticsearch/datapath.
How to backup all CVAT data
All CVAT containers should be stopped before backup:
docker compose stop
Please don’t forget to include all the compose config files that were used in the docker compose command
using the -f parameter.
Backup data:
mkdir backup
docker run --rm --name temp_backup --volumes-from cvat_db -v $(pwd)/backup:/backup ubuntu tar -czvf /backup/cvat_db.tar.gz /var/lib/postgresql/data
docker run --rm --name temp_backup --volumes-from cvat_server -v $(pwd)/backup:/backup ubuntu tar -czvf /backup/cvat_data.tar.gz /home/django/data
# [optional]
docker run --rm --name temp_backup --volumes-from cvat_elasticsearch -v $(pwd)/backup:/backup ubuntu tar -czvf /backup/cvat_events.tar.gz /usr/share/elasticsearch/data
Make sure the backup archives have been created, the output of ls backup command should look like this:
ls backup
cvat_data.tar.gz  cvat_db.tar.gz  cvat_events.tar.gz
How to restore CVAT from backup
Warning: use exactly the same CVAT version to restore DB. Otherwise it will not work because between CVAT releases the layout of DB can be changed. You always can upgrade CVAT later. It will take care to migrate your data properly internally.
Note: CVAT containers must exist (if no, please follow the installation guide). Stop all CVAT containers:
docker compose stop
Restore data:
cd <path_to_backup_folder>
docker run --rm --name temp_backup --volumes-from cvat_db -v $(pwd):/backup ubuntu bash -c "cd /var/lib/postgresql/data && tar -xvf /backup/cvat_db.tar.gz --strip 4"
docker run --rm --name temp_backup --volumes-from cvat_server -v $(pwd):/backup ubuntu bash -c "cd /home/django/data && tar -xvf /backup/cvat_data.tar.gz --strip 3"
# [optional]
docker run --rm --name temp_backup --volumes-from cvat_elasticsearch -v $(pwd):/backup ubuntu bash -c "cd /usr/share/elasticsearch/data && tar -xvf /backup/cvat_events.tar.gz --strip 4"
After that run CVAT as usual:
docker compose up -d
Additional resources
8 - Upgrade guide
Upgrade guide
Note: updating CVAT from version 2.2.0 to version 2.3.0 requires additional manual actions with database data due to upgrading PostgreSQL base image major version. See details here
To upgrade CVAT, follow these steps:
-
It is highly recommended backup all CVAT data before updating, follow the backup guide and backup all CVAT volumes.
-
Go to the previously cloned CVAT directory and stop all CVAT containers with:
docker compose downIf you have included additional components, include all compose configuration files that are used, e.g.:
docker compose -f docker-compose.yml -f components/serverless/docker-compose.serverless.yml down -
Update CVAT source code by any preferable way: clone with git or download zip file from GitHub. Note that you need to download the entire source code, not just the Docker Compose configuration file. Check the installation guide for details.
-
Verify settings: The installation process is changed/modified from version to version and you may need to export some environment variables, for example CVAT_HOST.
-
Update local CVAT images. Pull or build new CVAT images, see How to pull/build/update CVAT images section for details.
-
Start CVAT with:
docker compose up -dWhen CVAT starts, it will upgrade its DB in accordance with the latest schema. It can take time especially if you have a lot of data. Please do not terminate the migration and wait till the process is complete. You can monitor the startup process with the following command:
docker logs cvat_server -f
How to upgrade CVAT from v2.2.0 to v2.3.0.
Step by step commands how to upgrade CVAT from v2.2.0 to v2.3.0. Let’s assume that you have CVAT v2.2.0 working.
docker exec -it cvat_db pg_dumpall > cvat.db.dump
cd cvat
docker compose down
docker volume rm cvat_cvat_db
export CVAT_VERSION="v2.3.0"
cd ..
mv cvat cvat_220
wget https://github.com/cvat-ai/cvat/archive/refs/tags/${CVAT_VERSION}.zip
unzip ${CVAT_VERSION}.zip && mv cvat-${CVAT_VERSION:1} cvat
unset CVAT_VERSION
cd cvat
export CVAT_HOST=cvat.example.com
export ACME_EMAIL=example@example.com
docker compose pull
docker compose up -d cvat_db
docker exec -i cvat_db psql -q -d postgres < ../cvat.db.dump
docker compose -f docker-compose.yml -f docker-compose.dev.yml -f docker-compose.https.yml up -d
How to upgrade CVAT from v1.7.0 to v2.2.0.
Step by step commands how to upgrade CVAT from v1.7.0 to v2.2.0. Let’s assume that you have CVAT v1.7.0 working.
export CVAT_VERSION="v2.2.0"
cd cvat
docker compose down
cd ..
mv cvat cvat_170
wget https://github.com/cvat-ai/cvat/archive/refs/tags/${CVAT_VERSION}.zip
unzip ${CVAT_VERSION}.zip && mv cvat-${CVAT_VERSION:1} cvat
cd cvat
docker pull cvat/server:${CVAT_VERSION}
docker tag cvat/server:${CVAT_VERSION} openvino/cvat_server:latest
docker pull cvat/ui:${CVAT_VERSION}
docker tag cvat/ui:${CVAT_VERSION} openvino/cvat_ui:latest
docker compose up -d
How to upgrade PostgreSQL database base image
-
It is highly recommended backup all CVAT data before updating, follow the backup guide and backup CVAT database volume.
-
Run previously used CVAT version as usual
-
Backup current database with
pg_dumpalltool:docker exec -it cvat_db pg_dumpall > cvat.db.dump -
Stop CVAT:
docker compose down -
Delete current PostgreSQL’s volume, that’s why it’s important to have a backup:
docker volume rm cvat_cvat_db -
Update CVAT source code by any preferable way: clone with git or download zip file from GitHub. Check the installation guide for details.
-
Start database container only:
docker compose up -d cvat_db -
Import PostgreSQL dump into new DB container:
docker exec -i cvat_db psql -q -d postgres < cvat.db.dump -
Start CVAT:
docker compose up -d
9 - Webhooks
Webhooks are user-defined HTTP callbacks that are triggered by specific events. When an event that triggers a webhook occurs, CVAT makes an HTTP request to the URL configured for the webhook. The request will include a payload with information about the event.
CVAT, webhooks can be triggered by a variety of events, such as the creation, deletion, or modification of tasks, jobs, and so on. This makes it easy to set up automated processes that respond to changes made in CVAT.
For example, you can set up webhooks to alert you when a job’s assignee is changed or when a job/task’s status is updated, for instance, when a job is completed and ready for review or has been reviewed. New task creation can also trigger notifications.
These capabilities allow you to keep track of progress and changes in your CVAT workflow instantly.
In CVAT you can create a webhook for a project or organization. You can use CVAT GUI or direct API calls.
See:
- Create Webhook
- Payloads
- Webhook secret
- Ping Webhook
- Webhooks with API calls
- Example of setup and use
Create Webhook
For project
To create a webhook for Project, do the following:
-
Go to the Projects and click on the project’s widget.
-
In the top right corner, click Actions > Setup Webhooks.
-
In the top right corner click +

-
Fill in the Setup webhook form and click Submit.
For organization
To create a webhook for Organization, do the following:
- Create Organization
- Go to the Organization > Settings > Actions > Setup Webhooks.
- In the top right corner click +

- Fill in the Setup webhook form and click Submit.
Webhooks forms
The Setup a webhook forms look like the following.
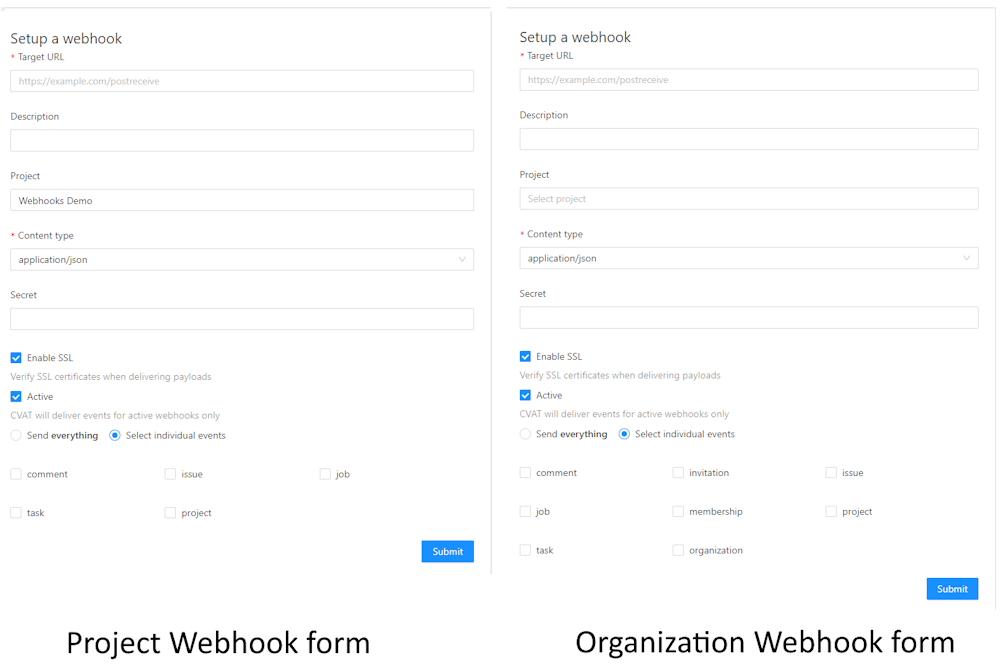
Forms have the following fields:
| Field | Description |
|---|---|
| Target URL | The URL where the event data will be sent. |
| Description | Provides a brief summary of the webhook’s purpose. |
| Project | A drop-down list that lets you select from available projects. |
| Content type | Defines the data type for the payload in the webhook request via the HTTP Content-Type field. |
| Secret | A unique key for verifying the webhook’s origin, ensuring it’s genuinely from CVAT. For more information, see Webhook secret |
| Enable SSL | A checkbox for enabling or disabling SSL verification. |
| Active | Uncheck this box if you want to stop the delivery of specific webhook payloads. |
| Send everything | Check this box to send all event types through the webhook. |
| Specify individual events | Choose this option to send only certain event types. Refer to the List of available events for more information on event types. |
List of events
The following events are available for webhook alerts.
| Resource | Create | Update | Delete | Description |
|---|---|---|---|---|
| Organization | ✅ | Alerts for changes made to an Organization. | ||
| Membership | ✅ | ✅ | Alerts when a member is added to or removed from an organization. | |
| Invitation | ✅ | ✅ | Alerts when an invitation to an Organization is issued or revoked. | |
| Project | ✅ | ✅ | ✅ | Alerts for any actions taken within a project. |
| Task | ✅ | ✅ | ✅ | Alerts for actions related to a task, such as status changes, assignments, etc. |
| Job | ✅ | Alerts for any updates made to a job. | ||
| Issue | ✅ | ✅ | ✅ | Alerts for any activities involving issues. |
| Comment | ✅ | ✅ | ✅ | Alerts for actions involving comments, such as creation, deletion, or modification. |
Payloads
Create event
Webhook payload object for create:<resource> events:
| Key | Type | Description |
|---|---|---|
event |
string |
Identifies the event that triggered the webhook, following the create:<resource> pattern. |
<resource> |
object |
Complete information about the created resource. Refer to the Swagger docs for individual resource details. |
webhook_id |
integer |
The identifier for the webhook that sends the payload. |
sender |
object |
Details about the user that triggered the webhook. |
An example of payload for the create:task event:
{
 "event": "create:task",
    "task": {
        "url": "<http://localhost:8080/api/tasks/15>",
        "id": 15,
        "name": "task",
        "project_id": 7,
        "mode": "",
        "owner": {
            "url": "<http://localhost:8080/api/users/1>",
            "id": 1,
            "username": "admin1",
            "first_name": "Admin",
            "last_name": "First"
        },
        "assignee": null,
        "bug_tracker": "",
        "created_date": "2022-10-04T08:05:50.419259Z",
        "updated_date": "2022-10-04T08:05:50.422917Z",
        "overlap": null,
        "segment_size": 0,
        "status": "annotation",
        "labels": \[
            {
                "id": 28,
                "name": "label_0",
                "color": "#bde94a",
                "attributes": [],
                "type": "any",
                "sublabels": [],
                "has_parent": false
            }
        \],
        "segments": [],
        "dimension": "2d",
        "subset": "",
        "organization": null,
        "target_storage": {
            "id": 14,
            "location": "local",
            "cloud_storage_id": null
        },
        "source_storage": {
            "id": 13,
            "location": "local",
            "cloud_storage_id": null
        }
    },
    "webhook_id": 7,
    "sender": {
        "url": "<http://localhost:8080/api/users/1>",
        "id": 1,
        "username": "admin1",
        "first_name": "Admin",
        "last_name": "First"
    }
}
Update event
Webhook payload object for update:<resource> events:
| Key | Type | Description |
|---|---|---|
event |
string |
Identifies the event that triggered the webhook, following the update:<resource> pattern. |
<resource> |
object |
Provides complete information about the updated resource. See the Swagger docs for resource details. |
before_update |
object |
Contains keys of <resource> that were updated, along with their old values. |
webhook_id |
integer |
The identifier for the webhook that dispatched the payload. |
sender |
object |
Details about the user that triggered the webhook. |
An example of update:<resource> event:
{
    "event": "update:task",
    "task": {
        "url": "<http://localhost:8080/api/tasks/15>",
        "id": 15,
        "name": "new task name",
        "project_id": 7,
        "mode": "annotation",
        "owner": {
            "url": "<http://localhost:8080/api/users/1>",
            "id": 1,
            "username": "admin1",
            "first_name": "Admin",
            "last_name": "First"
        },
        "assignee": null,
        "bug_tracker": "",
        "created_date": "2022-10-04T08:05:50.419259Z",
        "updated_date": "2022-10-04T11:04:51.451681Z",
        "overlap": 0,
        "segment_size": 1,
        "status": "annotation",
        "labels": \[
            {
                "id": 28,
                "name": "label_0",
                "color": "#bde94a",
                "attributes": [],
                "type": "any",
                "sublabels": [],
                "has_parent": false
            }
        \],
        "segments": \[
            {
                "start_frame": 0,
                "stop_frame": 0,
                "jobs": \[
                    {
                        "url": "<http://localhost:8080/api/jobs/19>",
                        "id": 19,
                        "assignee": null,
                        "status": "annotation",
                        "stage": "annotation",
                        "state": "new"
                    }
                \]
            }
        \],
        "data_chunk_size": 14,
        "data_compressed_chunk_type": "imageset",
        "data_original_chunk_type": "imageset",
        "size": 1,
        "image_quality": 70,
        "data": 14,
        "dimension": "2d",
        "subset": "",
        "organization": null,
        "target_storage": {
            "id": 14,
            "location": "local",
            "cloud_storage_id": null
        },
        "source_storage": {
            "id": 13,
            "location": "local",
            "cloud_storage_id": null
        }
    },
    "before_update": {
        "name": "task"
    },
    "webhook_id": 7,
    "sender": {
        "url": "<http://localhost:8080/api/users/1>",
        "id": 1,
        "username": "admin1",
        "first_name": "Admin",
        "last_name": "First"
    }
}
Delete event
Webhook payload object for delete:<resource> events:
| Key | Type | Description |
|---|---|---|
event |
string |
Identifies the event that triggered the webhook, following the delete:<resource> pattern. |
<resource> |
object |
Provides complete information about the deleted resource. See the Swagger docs for resource details. |
webhook_id |
integer |
The identifier for the webhook that dispatched the payload. |
sender |
object |
Details about the user that triggered the webhook. |
Here is an example of the payload for the delete:task event:
{
    "event": "delete:task",
    "task": {
        "url": "<http://localhost:8080/api/tasks/15>",
        "id": 15,
        "name": "task",
        "project_id": 7,
        "mode": "",
        "owner": {
            "url": "<http://localhost:8080/api/users/1>",
            "id": 1,
            "username": "admin1",
            "first_name": "Admin",
            "last_name": "First"
        },
        "assignee": null,
        "bug_tracker": "",
        "created_date": "2022-10-04T08:05:50.419259Z",
        "updated_date": "2022-10-04T08:05:50.422917Z",
        "overlap": null,
        "segment_size": 0,
        "status": "annotation",
        "labels": \[
            {
                "id": 28,
                "name": "label_0",
                "color": "#bde94a",
                "attributes": [],
                "type": "any",
                "sublabels": [],
                "has_parent": false
            }
        \],
        "segments": [],
        "dimension": "2d",
        "subset": "",
        "organization": null,
        "target_storage": {
            "id": 14,
            "location": "local",
            "cloud_storage_id": null
        },
        "source_storage": {
            "id": 13,
            "location": "local",
            "cloud_storage_id": null
        }
    },
    "webhook_id": 7,
    "sender": {
        "url": "<http://localhost:8080/api/users/1>",
        "id": 1,
        "username": "admin1",
        "first_name": "Admin",
        "last_name": "First"
    }
}
Webhook secret
To validate that the webhook requests originate from CVAT, include a secret during the webhook creation process.
When a secret is provided for the webhook, CVAT includes an X-Signature-256 in the request header of the webhook.
CVAT uses the SHA256 hash function to encode the request body for the webhook and places the resulting hash into the header.
The webhook recipient can verify the source of the request
by comparing the received X-Signature-256 value with the expected value.
Here’s an example of a header value for a request with an empty body and secret = mykey:
X-Signature-256: e1b24265bf2e0b20c81837993b4f1415f7b68c503114d100a40601eca6a2745f
Here is an example of how you can verify a webhook signature in your webhook receiver service:
# webhook_receiver.py

import hmac
from hashlib import sha256
from flask import Flask, request

app = Flask(__name__)

@app.route("/webhook", methods=["POST"])
def webhook():
    signature = (
        "sha256="
        + hmac.new("mykey".encode("utf-8"), request.data, digestmod=sha256).hexdigest()
    )

    if hmac.compare_digest(request.headers["X-Signature-256"], signature):
        return app.response_class(status=200)

    raise app.response_class(status=500, response="Signatures didn't match!")
Ping Webhook
To confirm the proper configuration of your webhook and ensure that CVAT can establish a connection with the target URL, use the Ping webhook feature.
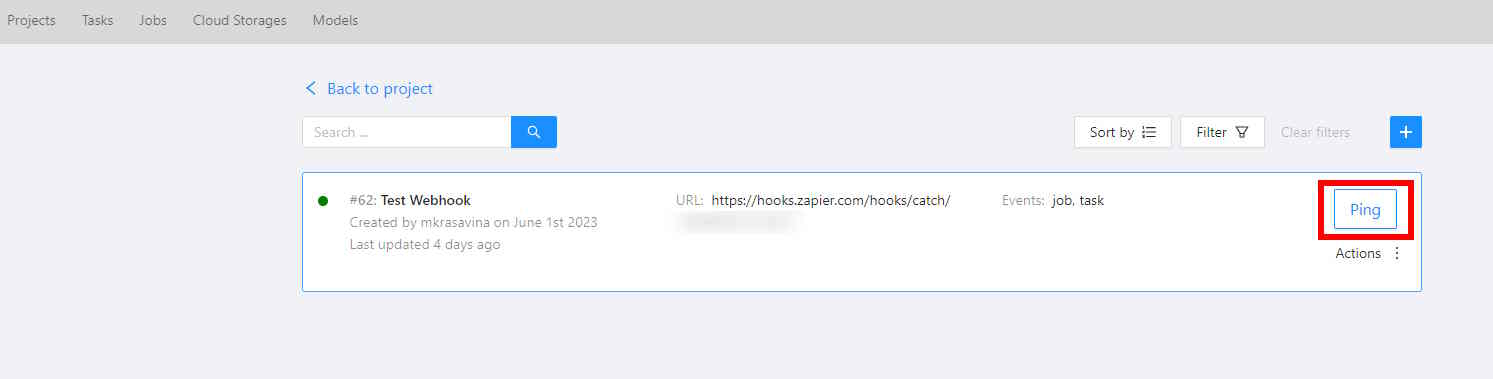
- Click the Ping button in the user interface (or send a
POST /webhooks/{id}/pingrequest through API). - CVAT will send a webhook alert to the specified target URL with basic information about the webhook.
Ping webhook payload:
| Key | Type | Description |
|---|---|---|
event |
string |
The value is always ping. |
webhook |
object |
Complete information about the webhook. See the Swagger docs for a detailed description of fields. |
sender |
object |
Information about the user who initiated the ping on the webhook. |
Here is an example of a payload for the ping event:
{
   "event": "ping",
    "webhook": {
        "id": 7,
        "url": "<http://localhost:8080/api/webhooks/7>",
        "target_url": "<https://example.com>",
        "description": "",
        "type": "project",
        "content_type": "application/json",
        "is_active": true,
        "enable_ssl": true,
        "created_date": "2022-10-04T08:05:23.007381Z",
        "updated_date": "2022-10-04T08:05:23.007395Z",
        "owner": {
            "url": "<http://localhost:8080/api/users/1>",
            "id": 1,
            "username": "admin1",
            "first_name": "Admin",
            "last_name": "First"
        },
        "project": 7,
        "organization": null,
        "events": \[
            "create:comment",
            "create:issue",
            "create:task",
            "delete:comment",
            "delete:issue",
            "delete:task",
            "update:comment",
            "update:issue",
            "update:job",
            "update:project",
            "update:task"
        \],
        "last_status": 200,
        "last_delivery_date": "2022-10-04T11:04:52.538638Z"
    },
    "sender": {
        "url": "<http://localhost:8080/api/users/1>",
        "id": 1,
        "username": "admin1",
        "first_name": "Admin",
        "last_name": "First"
    }
}
Webhooks with API calls
To create webhook via an API call, see Swagger documentation.
For examples, see REST API tests.
Example of setup and use
This video demonstrates setting up email alerts for a project using Zapier and Gmail.