This is the multi-page printable view of this section. Click here to print.
Account Management
- 1: Registration & account access
- 2: User roles
- 3: Organization
- 4: Subscription management
- 5: SSO configuration
- 6: Social auth configuration
- 7: Disable registration or password-based login
1 - Registration & account access
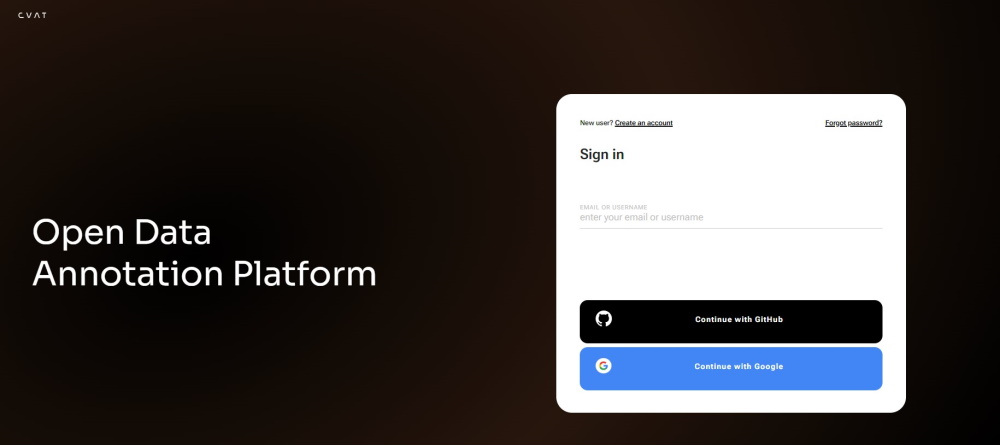
To start annotating in CVAT, you must create an account or log in to the existing one.
Check out:
- User registration
- User registration with social accounts
- Account access
- Password reset
- Change password
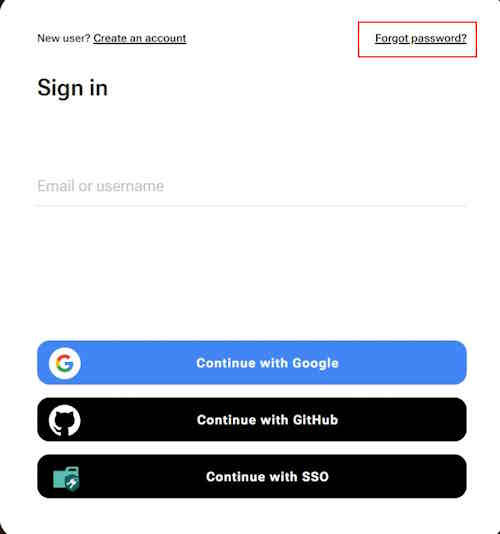
To create an account or log in, go to the CVAT Online login page:
Note
By default, authentication and registration with Google and GitHub work only for CVAT Online.If you want to use Google and GitHub authentication on a local installation, consult Social auth configuration.
User registration
To register:
-
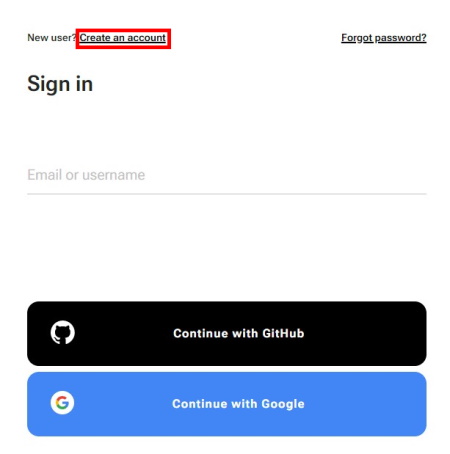
Select Create an account.
-
Fill in all blank fields, accept terms of use, and select Create an account.
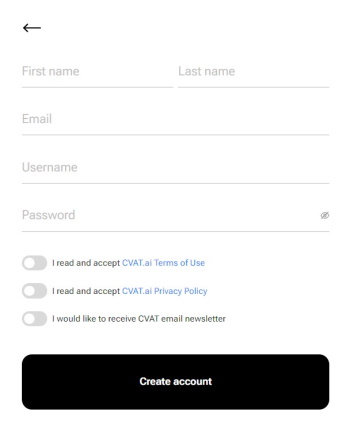
A username generates from the email automatically. You can edit it if needed.
User registration with social accounts
To register with Google or GitHub, select the button with the service name and follow the instructions.
Account access
To access your account:
- Go to the login page.
- Enter username or email. The password field will appear.
- Enter the password and click Next.
To log in with Google or GitHub, select the button with the service name.
Password reset
To reset password:
-
Go to the CVAT Online page and select Forgot password?
-
Enter email you used for registration and select Send.
-
Open email and select on the link from CVAT.
-
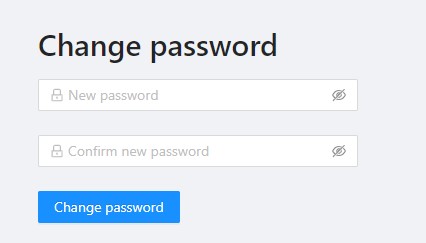
Enter new password in both fields and select Change password.
Change password
To change password:
-
Log in to your CVAT account.
-
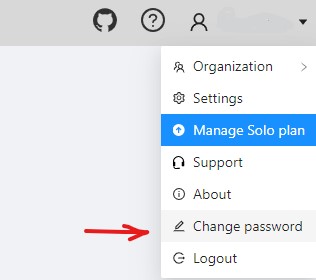
In the top right corner, select the username.
-
Select Change password.
-
Follow the instructions on the screen.
2 - User roles
CVAT offers two distinct types of roles:
- Global Roles: These are universal roles that apply to the entire system. Anyone who logs into the CVAT platform is automatically assigned a global role. It sets the basic permissions that every registered user has across CVAT, regardless of their specific tasks or responsibilities.
- Organization Roles: These roles determine what a user can do within the Organization, allowing for more tailored access based on the user’s specific duties and responsibilities.
Organization roles complement global roles by determining the visibility of different resources for example, tasks or jobs.
Limits: Limits are applicable to all users of CVAT Online using the Free plan and can be lifted upon choosing a subscription.
All roles are predefined and cannot be modified through the user interface.
However, within the self-hosted solution, roles can be adjusted using .rego
files stored in cvat/apps/*/rules/.
Rego is a declarative language employed for defining
OPA (Open Policy Agent) policies, and its syntax is detailed
in the OPA documentation.
Note
Once you’ve made changes to the.rego files, you must
rebuild and restart the Docker Compose for those changes to be applied.
In this scenario, be sure to include the docker-compose.dev.yml compose
configuration file when executing the Docker Compose command.
See:
Global roles in CVAT
Note
Global roles can be adjusted only on self-hosted solution.CVAT has implemented three Global roles, categorized as user Groups. These roles are:
| Role | Description |
|---|---|
| Administrator | An administrator possesses unrestricted access to the CVAT instance and all activities within this instance. The administrator has visibility over all tasks and projects, with the ability to modify or manage each comprehensively. This role is exclusive to self-hosted instances, ensuring comprehensive oversight and control. |
| User (default role) |
A User is a default role who is assigned to any user who is registered in CVAT*. Users can view and manage all tasks and projects within their registered accounts, but their activities are subject to specific limitations, see Free plan. * If a user, that did not have a CVAT account, has been invited to the organization by the organization owner or maintainer, it will be automatically assigned the Organization role and will be subject to the role’s limitations when operating within the Organization. |
| Worker | Workers are limited to specific functionalities and do not have the permissions to create tasks, assign roles, or perform other administrative actions. Their activities are primarily focused on viewing and interacting with the content within the boundaries of their designated roles (validation or annotation of the jobs). |
Organization roles in CVAT
Organization Roles are available only within the CVAT Organization.
Organization roles are assigned when users are invited to the Organization.
There are the following roles available in CVAT:
| Role | Description |
|---|---|
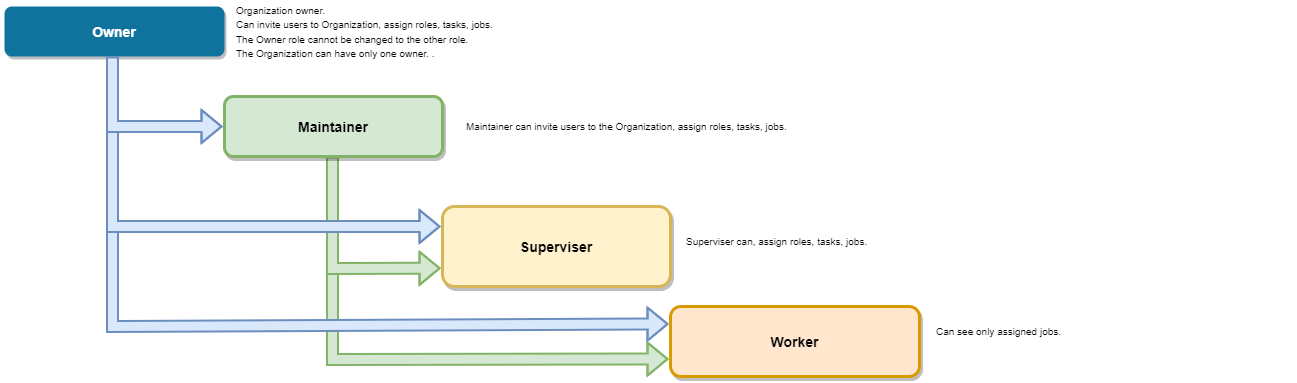
| Owner | The Owner is the person who created the Organization. The Owner role is assigned to the creator of the organization by default. This role has maximum capabilities and cannot be changed or assigned to the other user. The Owner has no extra restrictions in the organization and is only limited by the chosen organization plan (see Free and Team plans). Owners can invite other users to the Organization and assign roles to the invited users so the team can collaborate. |
| Maintainer | The maintainer is the person who can invite users to organization, create and update tasks and jobs, and see all tasks within the organization. Maintainer has complete access to Cloud Storages, and the ability to modify members and their roles. |
| Supervisor | The supervisor is a manager role. Supervisor can create and assign jobs, tasks, and projects to the Organization members. Supervisor cannot invite new members and modify members roles. |
| Worker | Workers’ primary focus is actual annotation and reviews. They are limited to specific functionalities and has access only to the jobs assigned to them. |
Job Stage
Job Stage can be assigned to any team member.
Stages are not roles.
Jobs can have an assigned user (with any role) and that Assignee will perform a Stage specific work which is to annotate, validate, or accept the job.
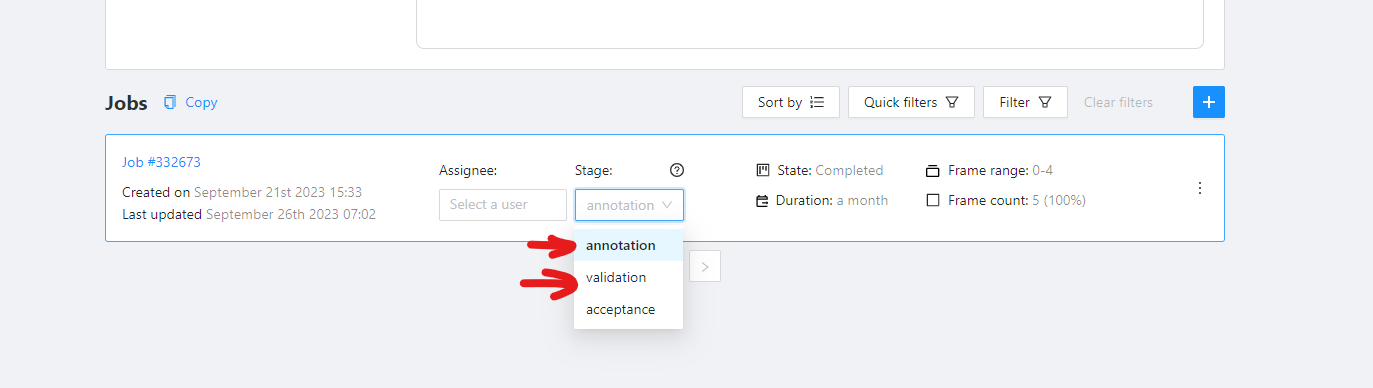
Job Stage can be:
| Stage | Description |
|---|---|
| Annotation | Provides access to annotation tools. Assignees will be able to see their assigned jobs and annotate them. By default, assignees with the Annotation stage cannot report annotation errors or issues. |
| Validation | Grants access to QA tools. Assignees will see their assigned jobs and can validate them while also reporting issues. By default, assignees with the Validation stage cannot correct errors or annotate datasets. |
| Acceptance | Does not grant any additional access or change the annotator’s interface. It just marks the job as done. |
Any Assignee can modify their assigned Stage specific functions via the annotation interface toolbar:

- Standard: switches interface to Annotation mode.
- Review: switches interface to the Validation mode.
3 - Organization
Organization is a feature for teams of several users who work together on projects and share tasks.
Create an Organization, invite your team members, and assign roles to make the team work better on shared tasks.
See:
- Personal workspace
- Create new organization
- Organization page
- Invite members into organization: menu and roles
- Delete organization
Personal workspace
The account’s default state is activated when no Organization is selected.
If you do not select an Organization, the system links all new resources directly to your personal account, that inhibits resource sharing with others.
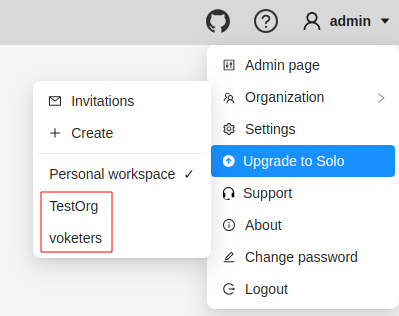
When Personal workspace is selected, it will be marked with a tick in the menu.
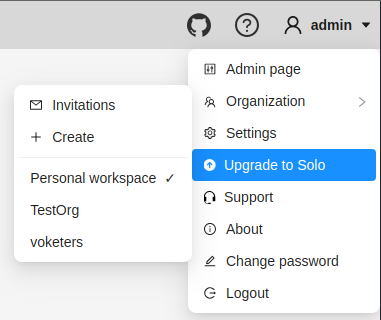
Create new organization
To create an organization, do the following:
-
Log in to the CVAT.
-
On the top menu, click your Username > Organization > + Create.

-
Fill in the following fields and click Submit.
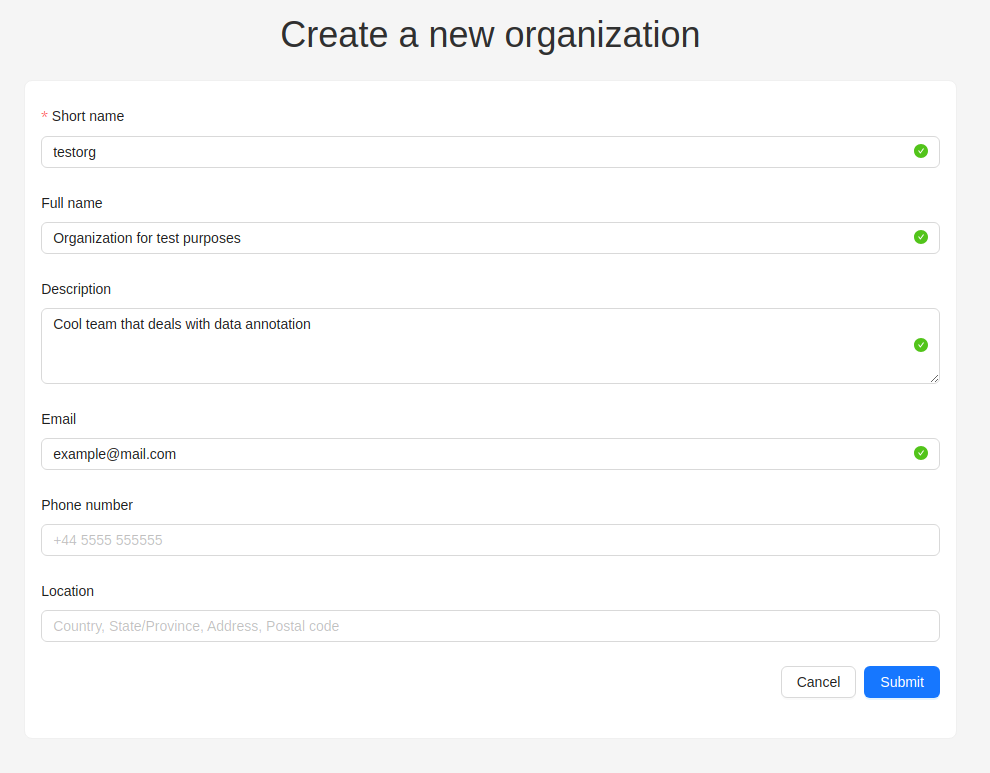
| Field | Description |
|---|---|
| Short name | A name of the organization that will be displayed in the CVAT menu. |
| Full name | Optional. Full name of the organization. |
| Description | Optional. Description of organization. |
| Optional. Your email. | |
| Phone number | Optional. Your phone number. |
| Location | Optional. Organization address. |
Upon creation, the organization page will open automatically.
For future access to your organization, navigate to Username > Organization
Switching between organizations
If you have more than one Organization, it is possible to switch between these Organizations at any given time.
Follow these steps:
- In the top menu, select your Username > Organization.
- From the drop-down menu, under the Personal space section, choose the desired Organization.
Note
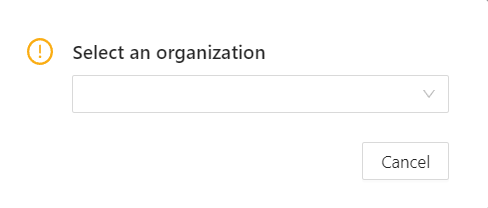
If you’ve created more than 10 organizations, a Switch organization line will appear in the drop-down menu.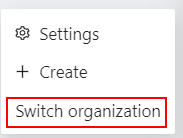
Click on it to see the Select organization dialog, and select organization from drop-down list.
Transfer tasks and projects between organizations
You can move high-level resources (projects and individual tasks) between organizations and the personal workspace.
To transfer a resource:
- Open the Actions menu of the corresponding task or project.
- In the Actions menu, select Organization (only visible if the resource can be transferred).
- Choose the destination workspace in the selector.
- A dialog will open. Confirm the transfer.
- If the resource has attached to a cloud storage, choose how CVAT should handle it:
- The current cloud storages will be detached anyway as they are not available in another workspace.
- Move & Detach: After transferring, you can set a new cloud storage manually (only applicable for data source cloud storage in a task). Source and target cloud storages cannot be setup this way.
- Move & Auto Match: During the transfer, CVAT will try finding a cloud storage, matching similar parameters in the target workspace. This option is only available if the resource has source or target cloud storage configured.
Organization page
Organization page is a place, where you can edit the Organization information and manage Organization members.
Note
In order to access the organization page, you must first activate the organization (see Switching between organizations). Without activation, the organization page will remain inaccessible.An organization is considered activated when it’s ticked in the drop-down menu and its name is visible in the top-right corner under the username.
To go to the Organization page, do the following:
- On the top menu, click your Username > Organization.
- In the drop-down menu, select Organization.
- In the drop-down menu, click Settings.

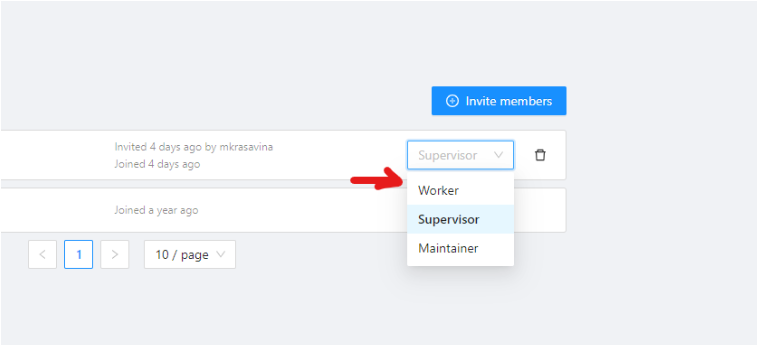
Invite members into organization: menu and roles
Invite members form is available from Organization page.
It has the following fields:
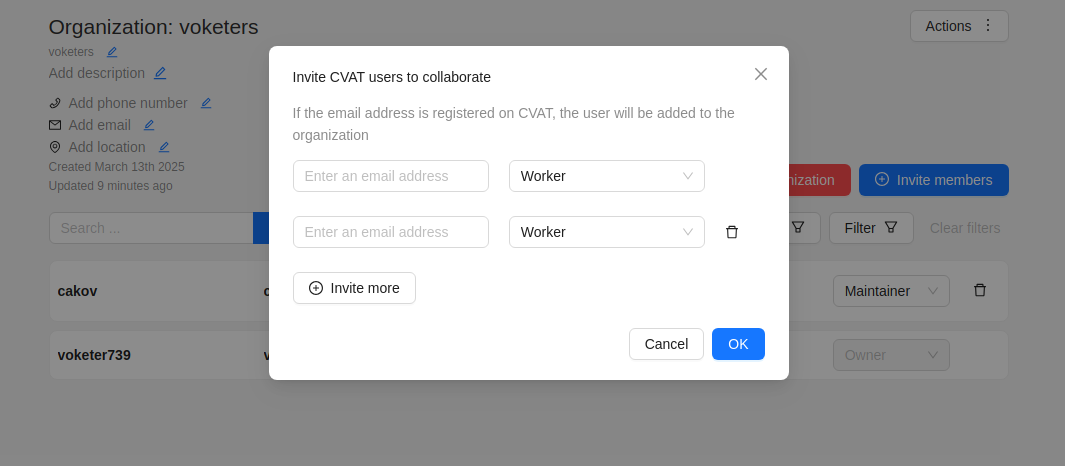
| Field | Description |
|---|---|
| Specifies the email address of the user who is being added to the Organization. | |
| Role drop-down list | Defines the role of the user which sets the level of access within the Organization: |
| Invite more | Button to add another user to the Organization. |
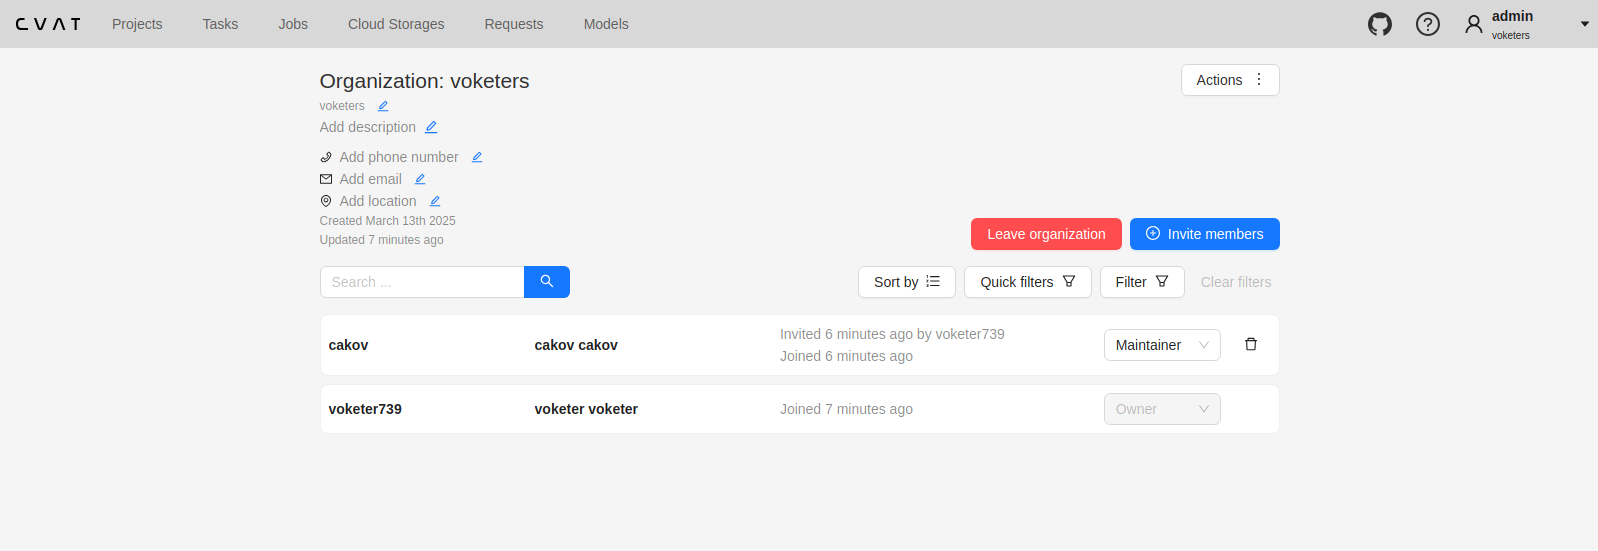
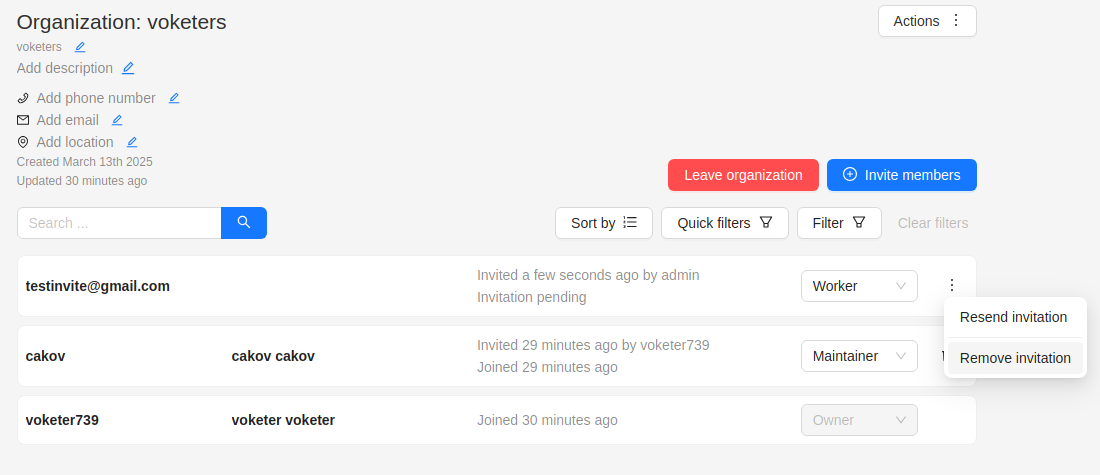
Members of Organization will appear on the Organization page:
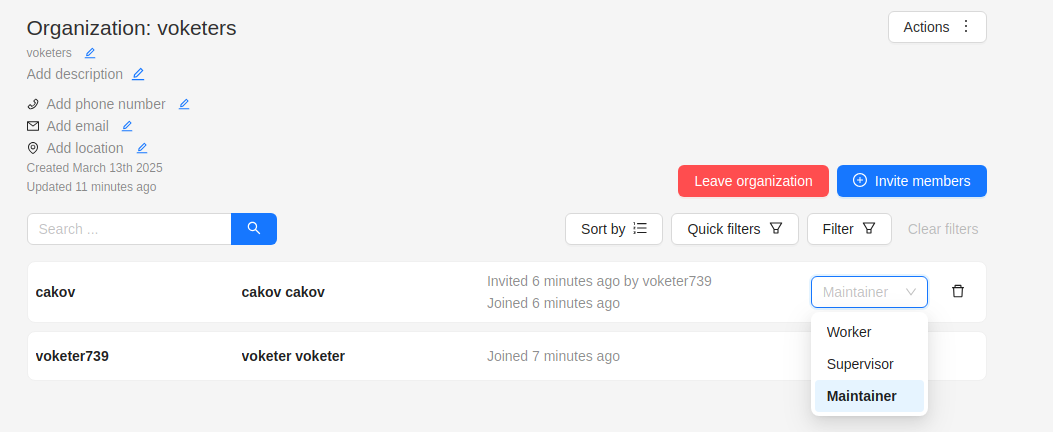
The member of the organization can leave the organization by going to Organization page > Leave organization.
The organization owner can remove members, by clicking on the Bin icon.
Inviting members to Organization
To invite members to Organization do the following:
-
Go to the Organization page, and click Invite members.
-
Fill in the form (see below).
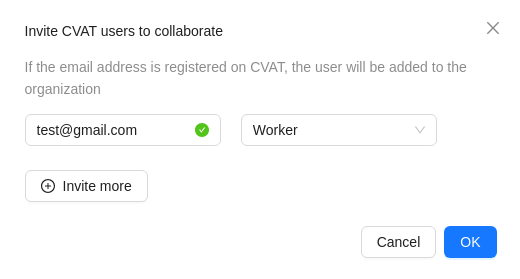
-
Click OK.
-
The person being invited will receive an email with the link.
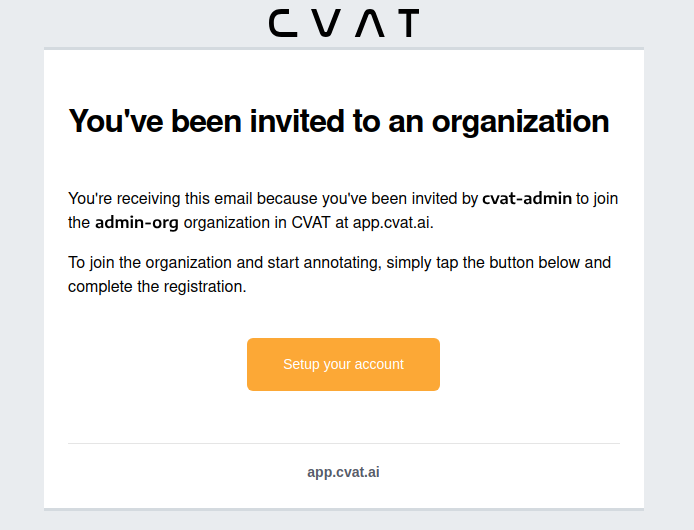
-
Person must click the link and:
- If the invitee does not have the CVAT account, then set up an account.
- If the invitee has a CVAT account, then log in to the account.
Invitations list
User can see the list of active invitations.
To see the list, Go to Username > Organization > Invitations.
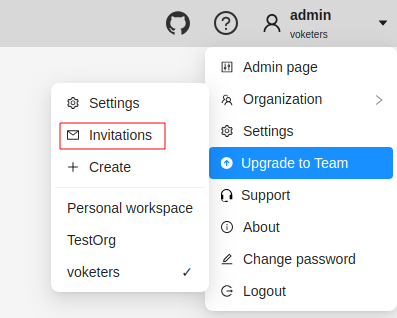
You will see the page with the list of invitations.
You will also see pop-up notification the link to the page with invitations list.
Resending and removing invitations
The organization owner and maintainers can remove members, by clicking on the three dots, and selecting Remove invitation
Delete organization
You can remove an organization that you created.
Note
Removing an organization will delete all related resources (annotations, jobs, tasks, projects, cloud storage, and so on).To remove an organization, do the following:
- Go to the Organization page.
- In the top-right corner click Actions > Remove organization.
- Enter the short name of the organization in the dialog field.
- Click Remove.
4 - Subscription management
This article provides tips on how to effectively manage your CVAT Online subscriptions, including tracking expenses and canceling unnecessary subscriptions, to optimize your finances and save time.
Whether you’re a business owner or an individual, you’ll learn how to take control of your subscriptions and manage them.
See:
- Available paid plans
- Billing
- How to add VAT/tax and other information to the CVAT Online invoice before the first payment?
- How to update VAT/tax information and other details for upcoming invoices from CVAT Online?
- Can a paid invoice be modified?
- How can I get a quote before I subscribe? How to add a PO number to my invoices?
- Can you sign an agreement before I subscribe?
- Can you handle a bank transfer with 30-day payment terms?
- Where can I find my invoices?
- I am a student, can I have a discount or free access?
- Payment methods
- Adding and removing team members
- Change plan
- Can I subscribe to several plans?
- Cancel plan
- Plan renewal
- Subscription management video tutorial
Available paid plans
This section outlines the paid plans available on CVAT Online.
Monthly plans
| Name | Description |
|---|---|
| Solo | The Solo plan has a fixed price and is designed for personal use only. It does not assume collaboration with team members and is not suitable for use within organizations, but it removes all other limitations of the Free plan. Note: Although it allows the creation of an organization and access for up to 2 members – it is for trial purposes only! Organization and members will have all the limitations of the Free plan. |
| Team | The Team is for collaboration, it removes limitations of the Free plan for the whole organization, allowing you to share paid benefits with your colleagues. The monthly payment for the plan depends on the number of team members you’ve added. All limits of the Free plan will be removed. Note: The organization owner is also part of the team. So, if you have two annotators working, you’ll need to pay for 3 seats (2 annotators + 1 organization owner). |
Annual plans
Whether you’re a new user, or have a subscription to Team or Solo plan, you can subscribe to our annual plan and save up to 30% on CVAT Online usage costs.
The annual subscription offers all the benefits of our paid plans but at a more affordable monthly rate.
For more information, see How to switch from monthly subscription to annual?
Billing
This section describes the billing model and gives short a description of limitations for each plan.
There are two types of subscriptions available for both the Solo and Team plans: monthly and annual.
For more information, see: Pricing Plans
How to add VAT/tax and other information to the CVAT Online invoice before the first payment?
To ensure VAT (tax) information and other relevant details are included on your CVAT Online invoices, it’s important to add this information before making the first payment.
Here’s how you can do it:
- Sign up for a CVAT Online account and log in.
- (Optional) If you add the VAT/tax number to the organization, first create an organization and switch to an Organization account.
- Navigate to the top right corner, next to the nickname, click on the arrow > upgrade to the plan.
- Switch on the I would like the invoice to include additional data (address, phone number, VAT information) toggle, select the best payment period for you, and click Get Started.
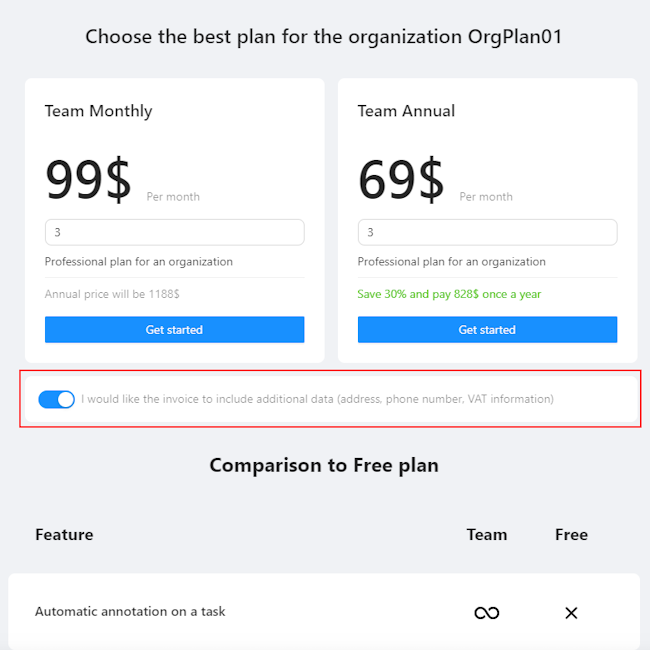
- You will see the billing page:
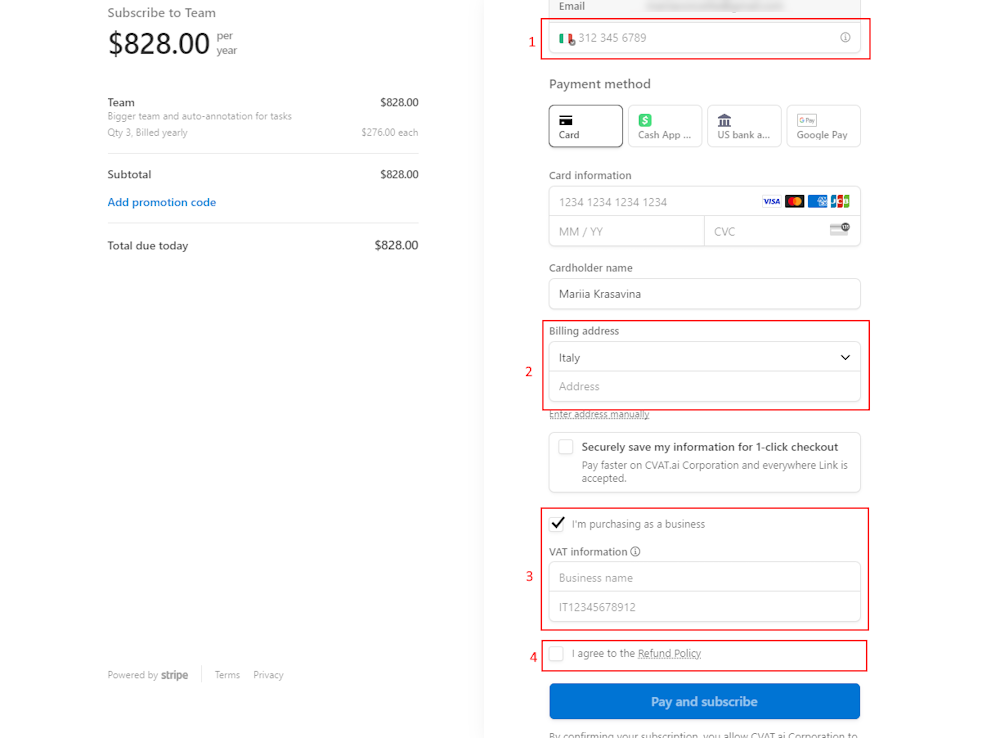
- Phone number (1).
- Billing Address: Enter the billing address you want to appear on the invoice in the address field (2).
- VAT Information and Business Name: Select the checkbox I am purchasing as a business and enter your VAT and business name information (3).
-
Select checkbox I agree to refund policy (4).
Note
Please read the Refund policy before selecting the checkbox. -
Click Pay & Subscribe.
All information you’ve added will appear on the billing page and in the invoice.
By following these steps, you can seamlessly add VAT and other crucial information to your invoices, making your financial transactions with CVAT Online transparent and compliant.
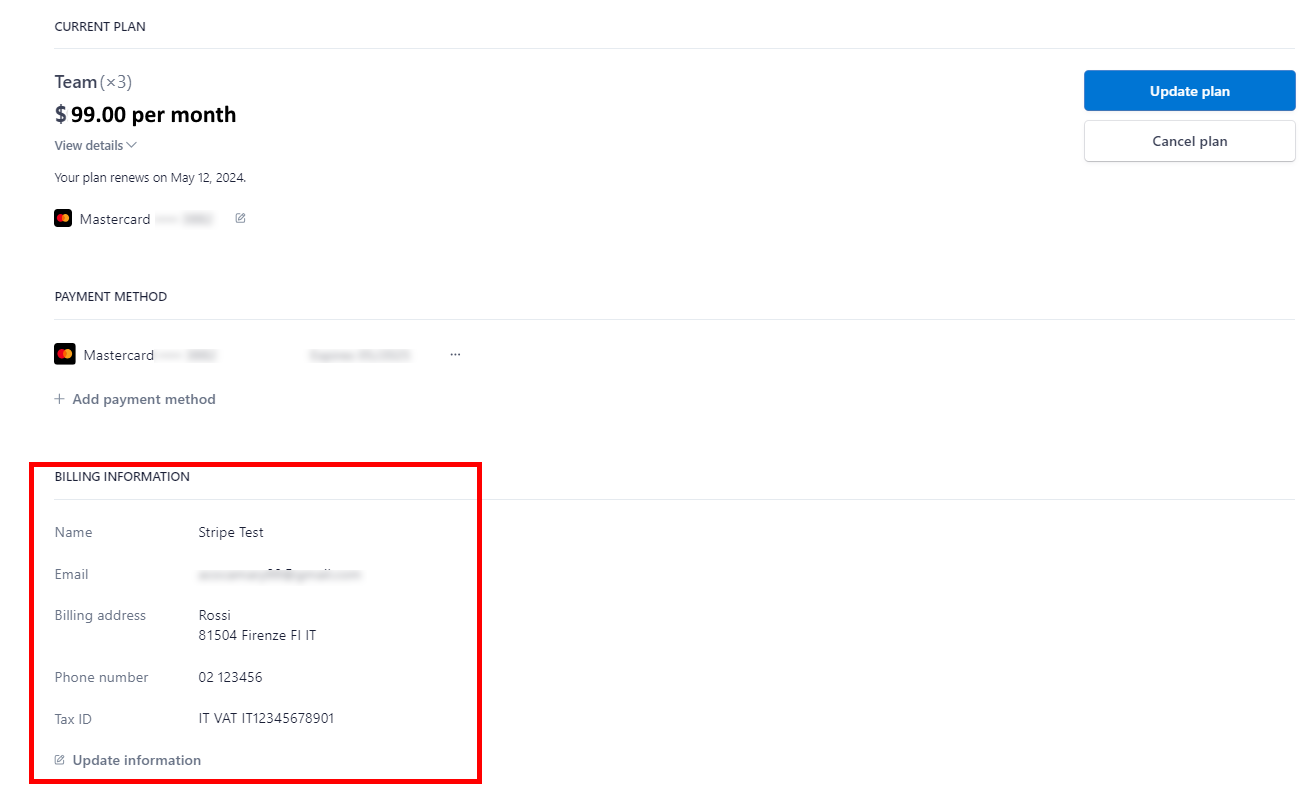
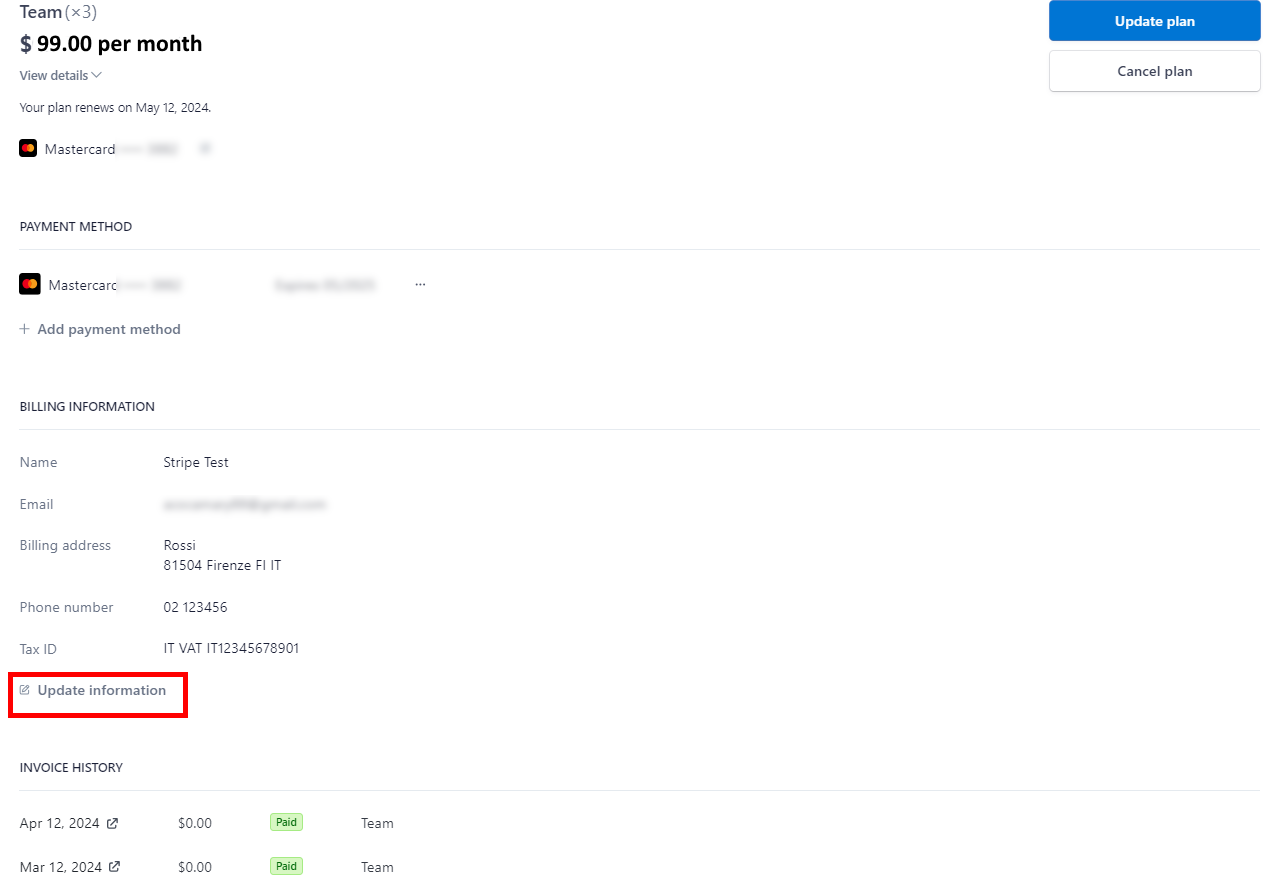
How to update VAT/tax information and other details for upcoming invoices from CVAT Online?
In the top right corner, near the nickname, click on the arrow > manage plan.
You will see the Stripe page. Go to the Billing Information > Update Information.

Can a paid invoice be modified?
Once an invoice has been paid, it is not possible to modify it. This restriction is due to the limitations of the payment processing platform used, which in the case of CVAT Online, is Stripe.
Stripe’s policy dictates that revisions to an invoice can only be made before payment. For more comprehensive information on this policy, please refer to Stripe’s official documentation on invoice edits at their website.
How can I get a quote before I subscribe? How to add a PO number to my invoices?
If you require a quote from CVAT Online for payment via bank transfer, certain criteria must be met:
- The total subscription cost must be $396 and up per year.
- Quotes are available exclusively for annual subscriptions.
Should you meet these requirements, please write to support@cvat.ai
Can you sign an agreement before I subscribe?
Sign of specific agreements and approvals are available if you meet specific criteria (the total subscription cost must be $10,000 and up per year), for more details contact support@cvat.ai
Can you handle a bank transfer with 30-day payment terms?
Yes, it is available if you fit the quota criteria, for details contact support@cvat.ai.
Where can I find my invoices?
In the top right corner, near the nickname, click on the arrow > manage plan.
You will see the Stripe page. At the bottom of the page, you will see the Invoice History section with all invoices.
Invoices are automatically sent to the account owner’s address used for the registration.
To see the invoice click on the Show Invoice Icon![]() icon.
icon.

I am a student, can I have a discount or free access?
To consider your request for a discount, we’d need a few details from you:
- A copy of your valid student ID or any document confirming your university affiliation.
- Your university advisor’s contact details.
- The name and contact information of the dean of your faculty.
- A brief outline of your project plan. This helps us understand how we might collaborate on a joint marketing statement highlighting your use of CVAT Online, and how it can benefit your project.
- We’d also appreciate a positive LinkedIn post about your experience using CVAT Online, making sure to tag @CVAT.ai.
All these details must be sent to support@cvat.ai. Once we have this information, we’ll gladly offer you a 50% discount for one year.
Payment methods
This section describes how to change or add payment methods.
Paying with bank transfer
Note
At the moment this method of payment works only with US banks.To pay with a bank transfer:
- Go to the Upgrade to Solo/Team plan> Get started.
- Click US Bank Transfer.
- Upon successful completion of the payment, you will receive a receipt via email.
Note
The completion of the payment process may take up to three banking days.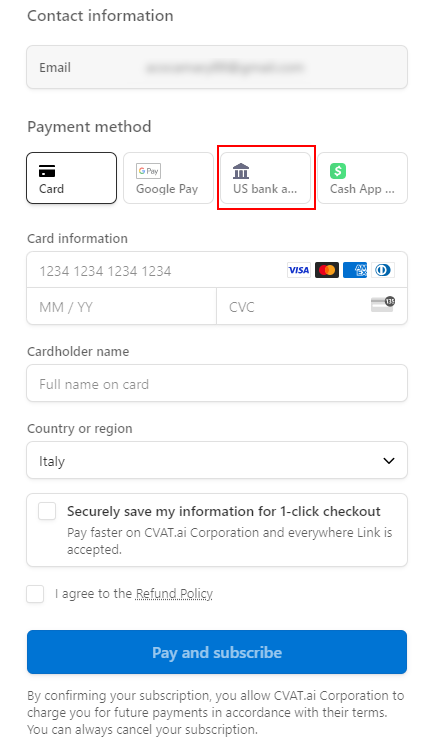
How to change the payment method?
In the top right corner, near the nickname, click on the arrow > manage plan > +Add Payment Method
Adding and removing team members
Note
Solo plan is for personal use only, you cannot add or remove team members.Team plan is for collaboration. To add members to your Organization, go to the Manage Team plan > Update quantity.
If you’ve added a user before the current billing period ends, the payment will be prorated for the remaining time until the next billing cycle begins. From the following month onward, the full payment will be charged.
In case you removed the user before the current billing period ends, funds will not be returned to your account, but next month you will pay less by the amount of unused funds.
Change plan
How to change the plan from Solo to Team?
The procedure is the same for both Solo and Team plans.
If for some reason you want to change your plan, you need to:
- Unsubscribe from the previous plan.
- If you need a refund, contact us at support@cvat.ai.
- Subscribe to a new plan.
How to switch from a monthly subscription to an annual one?
If you have monthly subscription, and wish to switch to the Annual plan, please follow these steps:
- In the top-right corner, near the nickname, click on the arrow.
- Select Manage Solo/Team Plan.
- On the Stripe page that appears, click Update Plan.
- Choose Yearly and then click Continue.
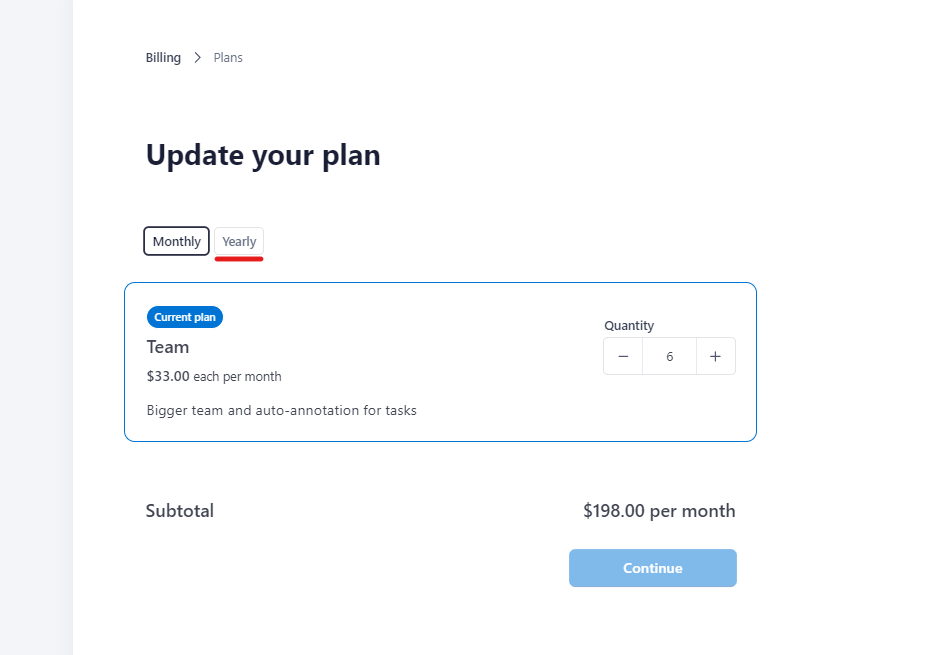
The price will be adjusted according to the number of members, selected in the Quantity field (if updated), taking into account the amount of money that was not spent in the current period.
Upon payment, your subscription will be renewed and the start date will be reset to the day you switch to the new plan.
Can I subscribe to several plans?
Paid plans are not mutually exclusive. You can have several active subscriptions, for example, the Solo plan and several Team plans for different organizations.
Cancel plan
This section describes how to cancel your CVAT subscription and what will happen to your data.
What will happen to my data?
Once you have terminated your subscription, your data will remain accessible within the system for a month. During this period, you will be unable to add new tasks and free plan limits will be applied.
In case you possess a substantial amount of data, it will be switched to read-only mode. It means you will not be able to save annotations, add any resources, and so on.
Following the one month, you will receive a notification requesting you to either remove the excess data or it will be deleted automatically.
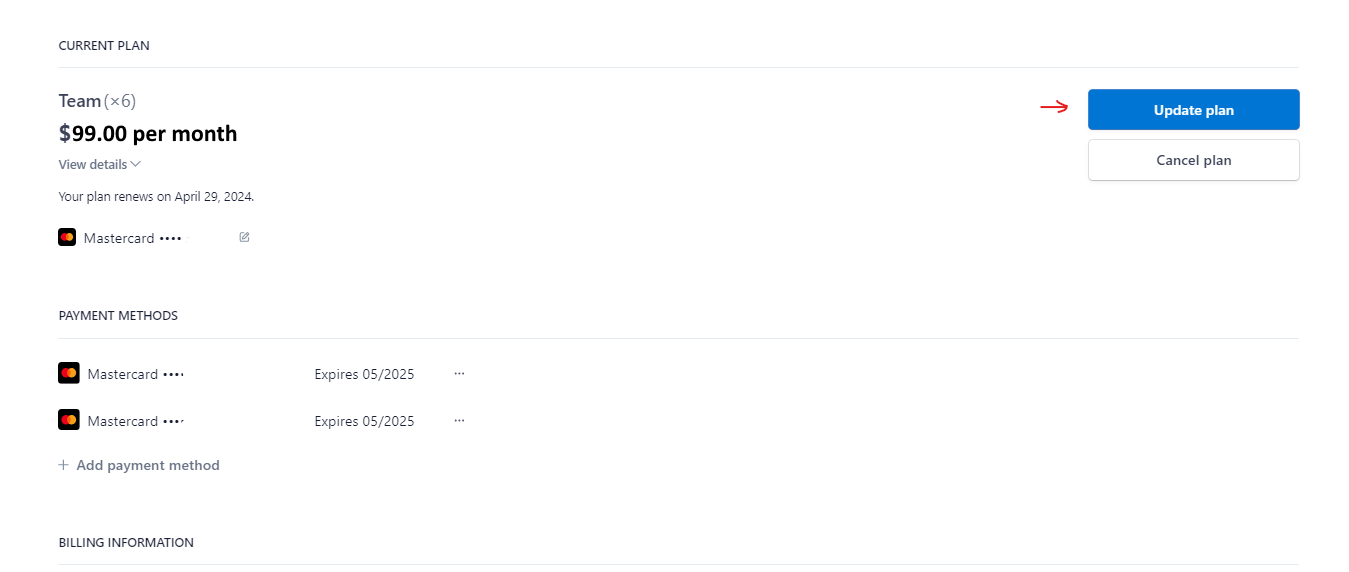
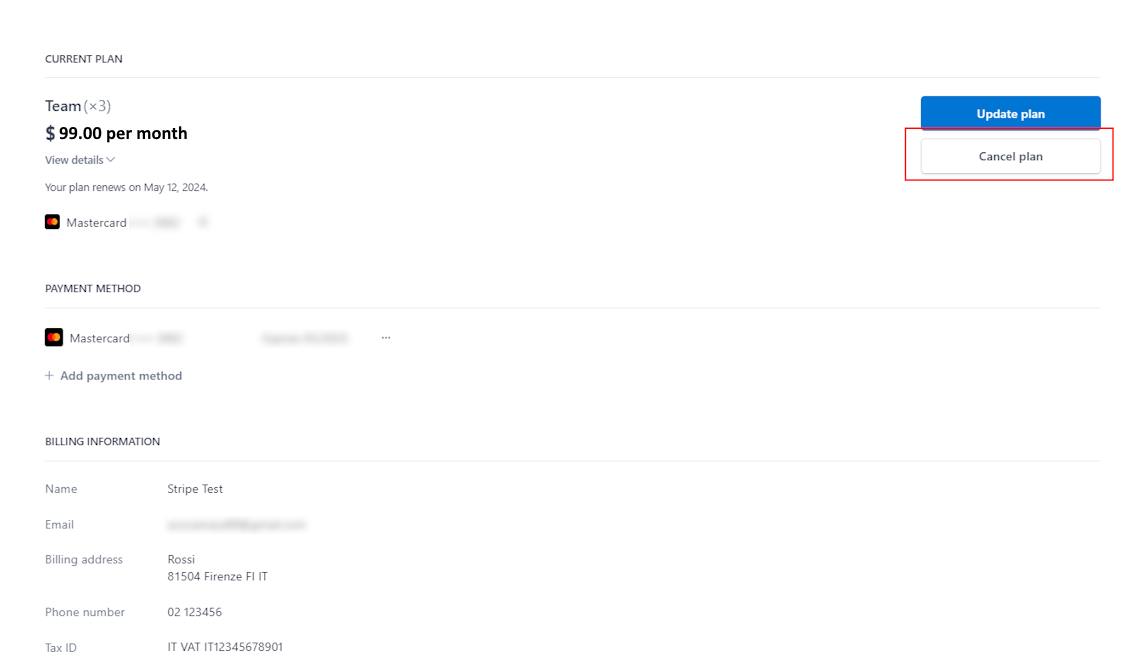
How to cancel any plan?
To cancel the plan, in the top right corner, near the nickname, click on the arrow> manage plan > Cancel plan
Please, fill out the feedback form, to help us improve our platform.
How can I get a refund?
To understand if you are eligible for a refund, see Refund policy.
- Cancel the subscription before asking for a refund.
- Contact our support team at support@cvat.ai or use the “Support” option in the app.cvat.ai interface.
- Provide your account details and a brief explanation of the reason for the refund:
- Send us your last invoice.
- Send us the username and e-mail address you’ve used to register in CVAT Online.
Our team will review your request. We may request additional information if needed. Once approved, the refund will be processed to your original payment method within 5-10 business days.
Plan renewal
To renew your CVAT Online subscription, in the top right corner, near the nickname, click on the arrow> manage plan > Renew plan.
Subscription management video tutorial
5 - SSO configuration
CVAT supports Single Sign-On (SSO) using both OpenID Connect (OIDC) and Security Assertion Markup Language (SAML) protocols.
To configure SSO, complete the following 2 main steps:
- Configure the Identity Provider (IdP) — set up an application on your IdP platform.
- Update the CVAT configuration — provide the necessary identity provider settings in the CVAT configuration file.
If the application is already configured, refer to the Configuring SSO in CVAT section. Otherwise, you may follow one of the detailed platform-specific guides to set up such an application:
Platform specific IdP configuration
Microsoft Azure
OpenID Connect
Follow these steps to configure an application on the Microsoft Azure platform and integrate it with CVAT:
Step 1: Register an OIDC-based application
To start, log into your Microsoft Azure Portal. Once you’re in:
-
Navigate to the
Microsoft Entra IDservice ->App registrationssection in the menu on the left. -
Click on the
+ New registrationbutton. -
Enter application name.
-
Select
Supported account typesbased on your needs. -
Add
Redirect URI: chooseWebplatform and set<scheme:cvat_domain>/api/auth/oidc/<idp-id:azure-oidc>/login/callback/to the value field.
-
Click on the
Registerbutton.
Note
More information on how to configure an OIDC-based application on the Azure platform can be found here.You’ve created an app, now you should configure the credentials for it.
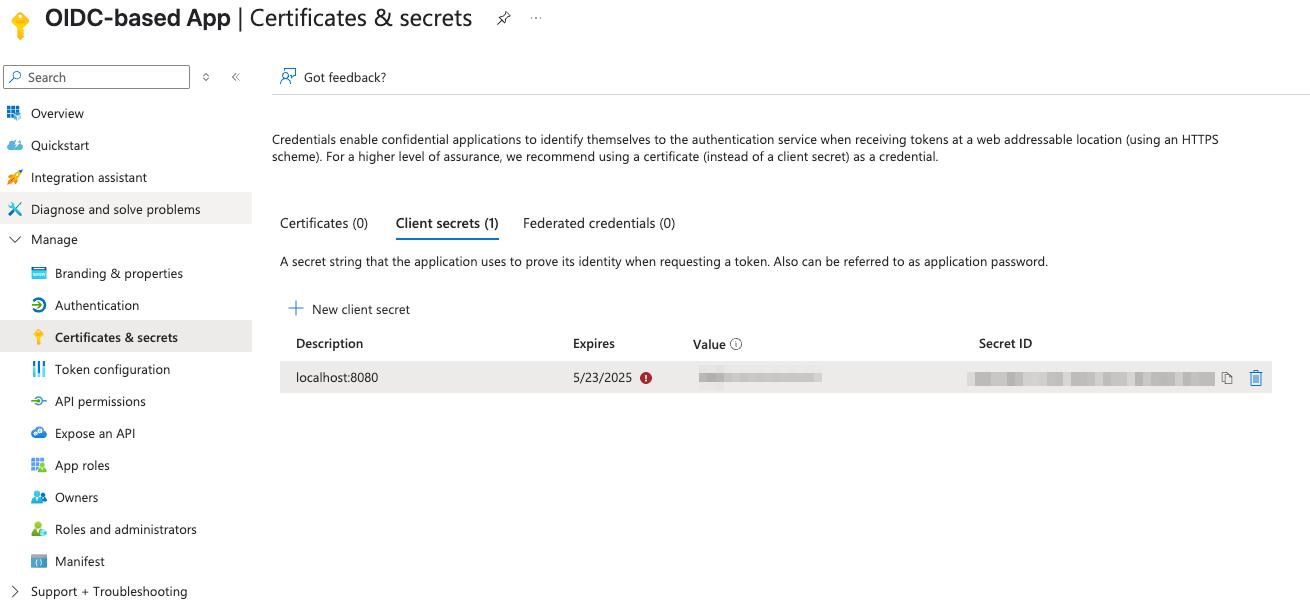
Step 2: Configure credentials
- Navigate to the
Overviewtab of your newly created application.
- In the
Client credentialssection, click theAdd a certificate or secretlink. This will take you to theCertificates & secretspage. - Click
+ New client secret. - In the popup form, enter a description and select an expiration period, then click
Add.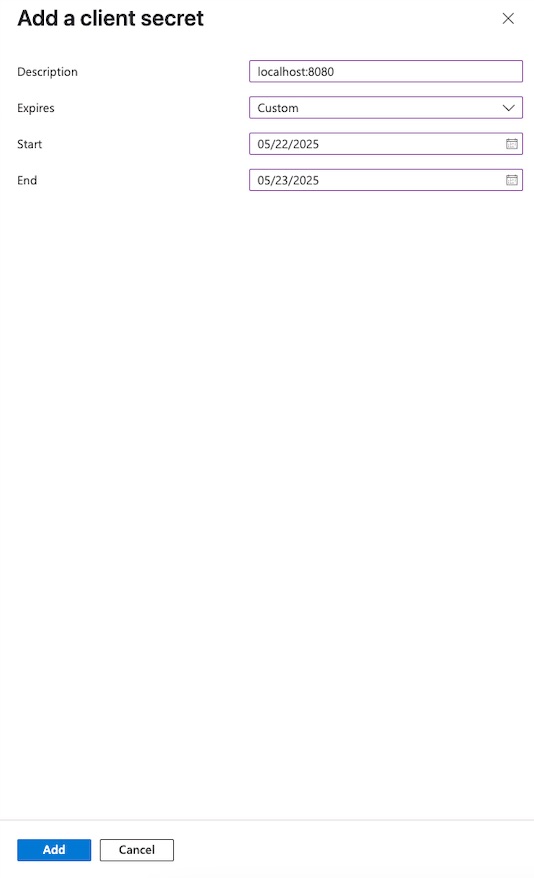
The newly created secret will appear in the list.
Make sure to copy the value now — you won’t be able to see it again later.
Step 3: Configure CVAT
Utilize the example below as a template for your configuration:
sso:
  enabled: true
  selection_mode: email_address
  identity_providers:
    - id: <idp-id:azure-oidc>
      protocol: OIDC
      name: Azure OIDC-based IdP
      server_url: https://<Directory (tenant) ID>/v2.0/
      client_id: <Secret ID>
      client_secret: <Secret Value>
      email_domain: <company_email_domain>
Tip
ActualSecret ID and Secret Value values may be found on Certificates & secrets tab of the application,
while Directory (tenant) ID - on the Overview tab.
You can now proceed to start CVAT. For additional CVAT configuration details, refer to Configuring SSO in CVAT.
SAML
Follow these steps to configure an application on the Microsoft Azure platform and integrate it with CVAT:
Step 1: Register an SAML-based application
To start, log into your Microsoft Azure Portal. Once you’re in:
- Navigate to the
Microsoft Entra IDservice ->Enterprise applicationssection in the menu on the left. - Click
+ New applicationand enter a name for the application in the popup window, then clickCreate.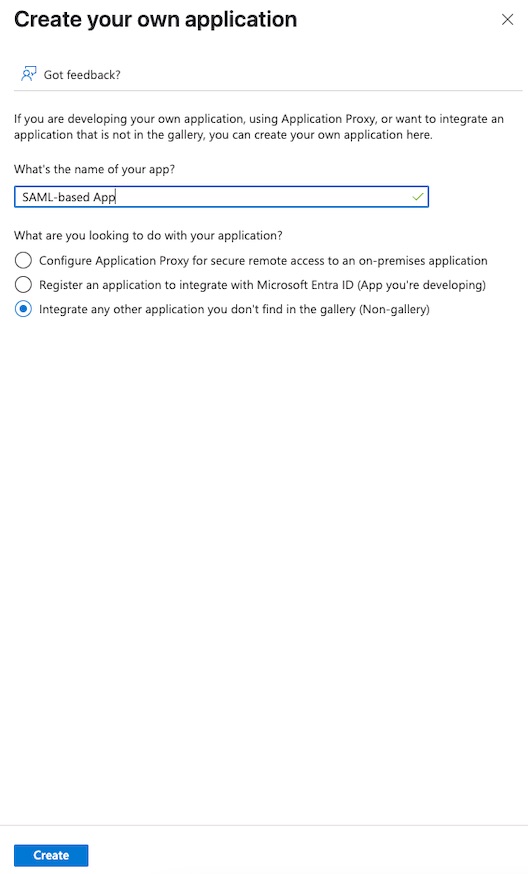
You’ve created an app, now you should finalize its configuration and assign users or groups.
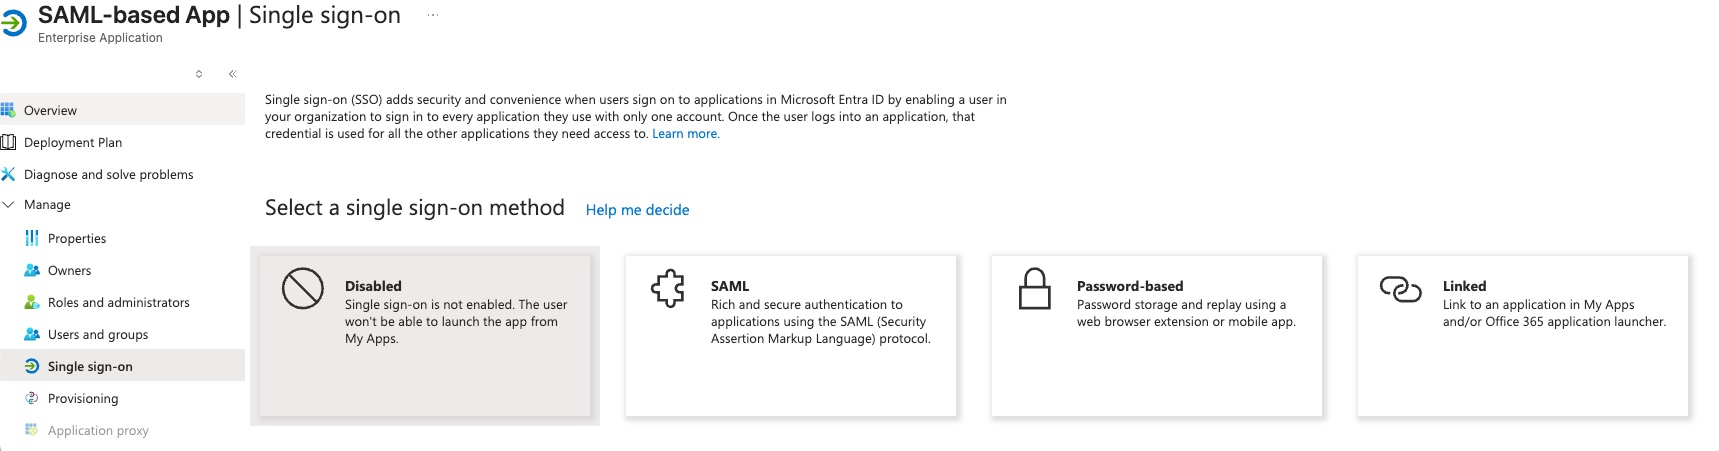
Step 2: Configure a created application
- Navigate to the
Single sign-onsection in the menu on the left. - Choose the SAML protocol as the single sign-on method.
- Edit
Basic SAML Configuration:Identifier (Entity ID):<scheme:cvat_domain>/api/auth/saml/<idp-id:azure-saml>/metadata/Reply URL (Assertion Consumer Service URL):<scheme:cvat_domain>/api/auth/saml/<idp-id:azure-saml>/acs/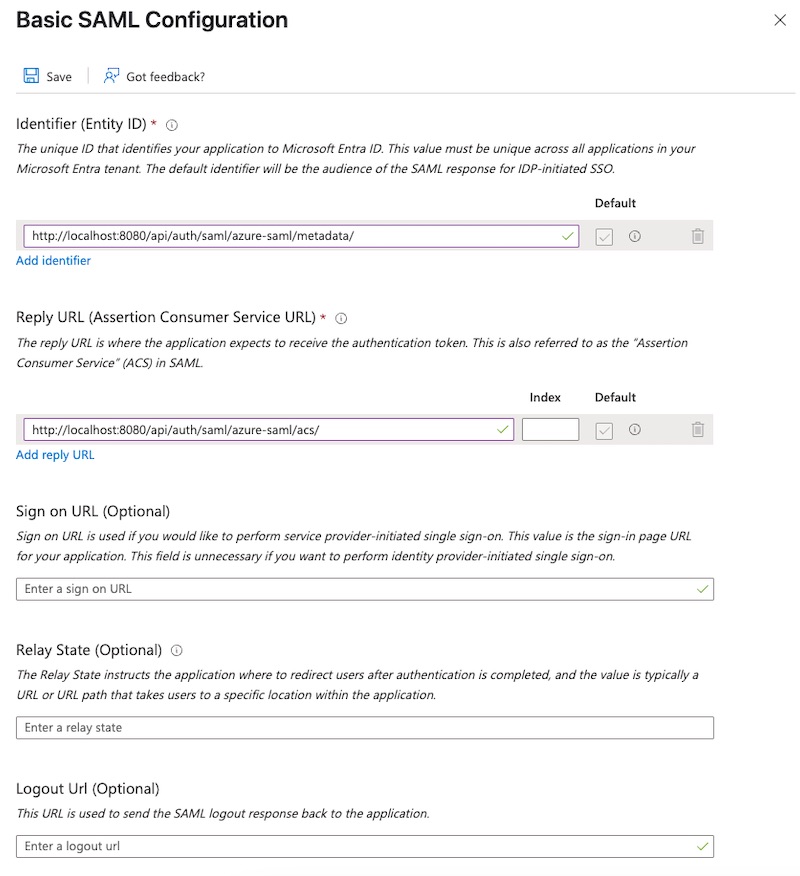
- Save changes
- Edit
Attributes & Claimsby adding a newuidclaim:- Name:
uid - Namespace:
http://schemas.xmlsoap.org/ws/2005/05/identity/claims - Source:
attribute - Source attribute:
user.objectid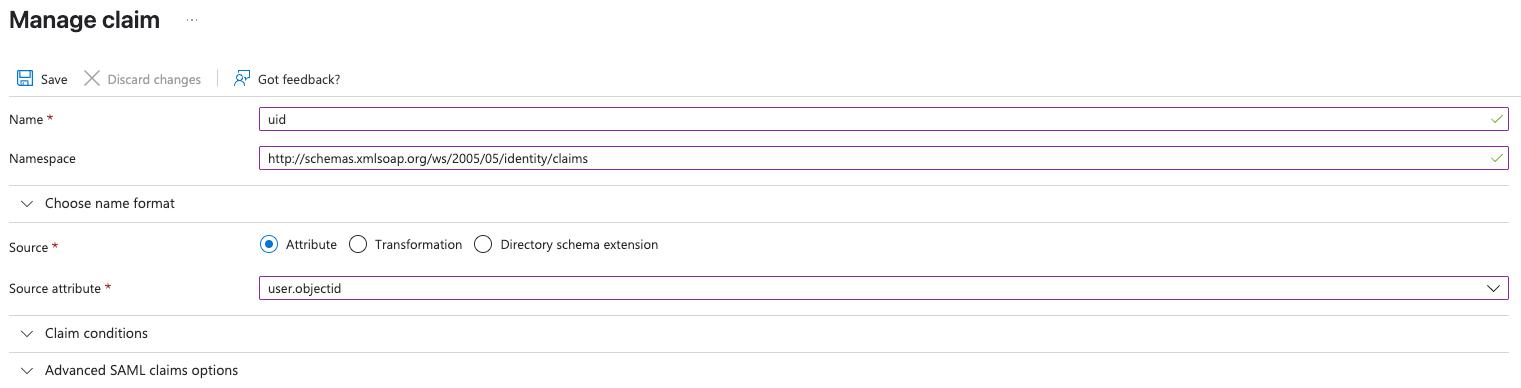
- Name:
Note
More information on how to configure an application on Azure platform can be found here.Step 3: Assign users and groups
At this point, no users or groups have been assigned to the application. To grant access:
- Navigate to the
Users and groupssection of the application. - Click the
+ Add user/groupbutton. - Select the users or groups you want to assign.
- Confirm selection.
The selected users or groups will now appear in the assignment list.
That’s it, now we can move on to the configuration in CVAT.
Step 4: Configure CVAT
Utilize the example below as a template for your configuration:
sso:
  enabled: true
  selection_mode: email_address
  identity_providers:
    - id: <idp-id:azure-saml>
      protocol: SAML
      name: Azure SAML-based IdP
      entity_id: <Microsoft Entra Identifier> (https://sts.windows.net/<tenantId>/)
      metadata_url: <App Federation Metadata Url>

      attribute_mapping:
        uid: http://schemas.xmlsoap.org/ws/2005/05/identity/claims/uid
        username: http://schemas.xmlsoap.org/ws/2005/05/identity/claims/nameidentifier
        email: http://schemas.xmlsoap.org/ws/2005/05/identity/claims/emailaddress
        first_name: http://schemas.xmlsoap.org/ws/2005/05/identity/claims/givenname
        last_name: http://schemas.xmlsoap.org/ws/2005/05/identity/claims/surname
        # email_verified: it is not possible to configure SAML-based application to send this claim to the SP

      email_domain: <company_email_domain>
Tip
Actual Microsoft Entra Identifier and App Federation Metadata Url values may be found
on the Single sign-on tab of the created application

You can now proceed to start CVAT. For additional CVAT configuration details, refer to Configuring SSO in CVAT.
Okta
OpenID Connect
Follow these steps to configure an application on the Okta platform and integrate it with CVAT:
Step 1: Register an OIDC-based application
To start, log into your Okta admin dashboard. Once you’re in:
-
Navigate to the
Applicationssection in the menu on the left. -
Click on the
Create App integrationbutton. -
Select
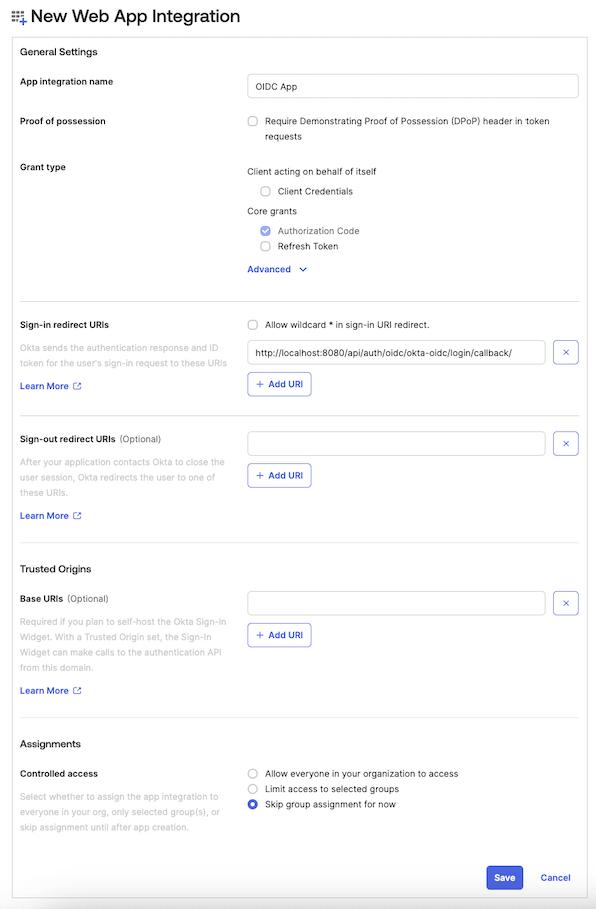
OIDC - OpenID Connectas a sign-in method andWeb Applicationtype.
-
Fill the form with the following content:
App integration name: enter a name for the applicationSign-in redirect URIs:<scheme:cvat_domain>/api/auth/oidc/<idp-id:okta-oidc>/login/callback/- Select option in the
Controlled accessto match your requirements. In this example, we’ll useSkip group assignment for now.
Note
More information on how to configure an OIDC-based application on the Okta platform can be found here.You’ve created and configured the app, now you should assign users or groups to the application.
Step 2: Assign users or groups
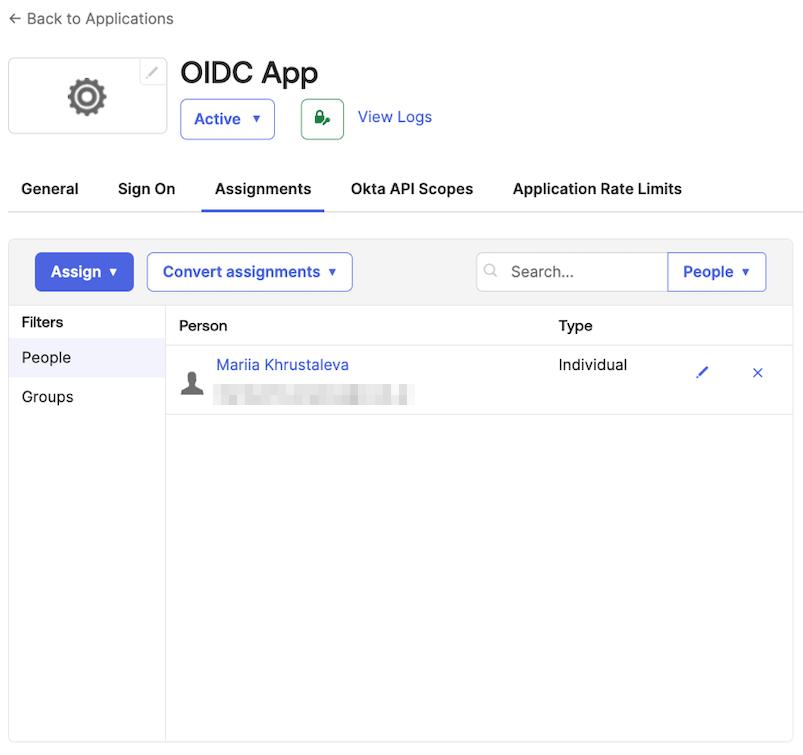
At this point, no users or groups have been assigned to the application. To grant access:
- Navigate to the
Assignmentstab of the application. - Click the
Assignbutton and selectAssign to PeopleorAssign to Groupsbased on your needs. - Identify the users or groups you want to assign, then click
assign.
The selected users or groups will now appear in the assignment list.
Step 3: Configure CVAT
Utilize the example below as a template for your configuration:
sso:
  enabled: true
  selection_mode: email_address
  identity_providers:
    - id: <idp-id:okta-oidc>
      protocol: OIDC
      name: Okta OIDC-based IdP
      server_url: https://<okta_domain>/
      client_id: <client_id>
      client_secret: <client_secret>
      email_domain: <company_email_domain>
Tip
ActualClient ID and Client secret key values may be found on the General tab of the created application
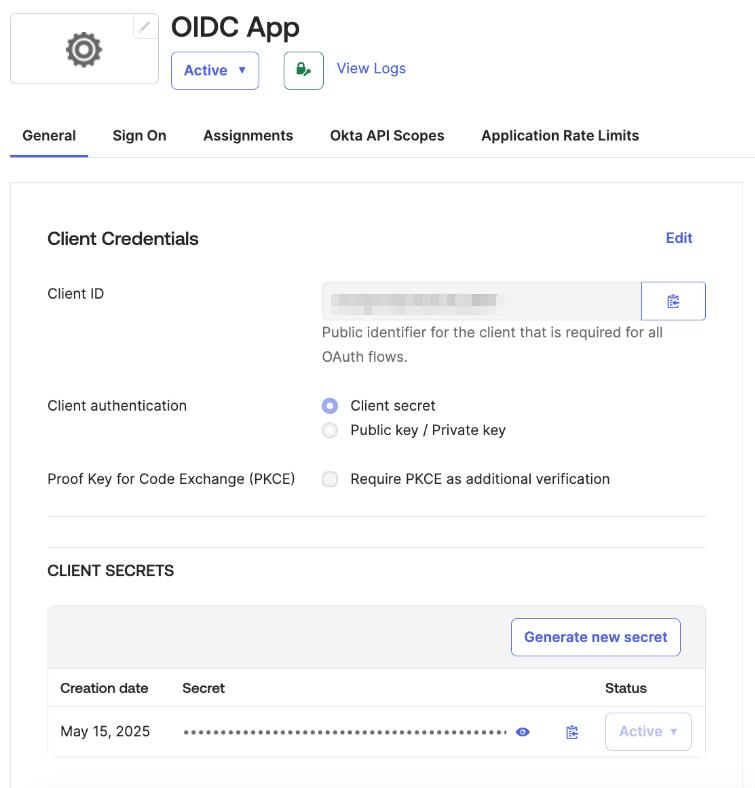
You can now proceed to start CVAT. For additional CVAT configuration details, refer to Configuring SSO in CVAT.
SAML
Follow these steps to configure an application on the Okta platform and integrate it with CVAT:
Step 1: Register an SAML-based application
To start, log into your Okta admin dashboard. Once you’re in:
-
Navigate to the
Applicationssection in the menu on the left. -
Click on the
Create App integrationbutton. -
Select
SAML 2.0as a sign-in method, then clickNext.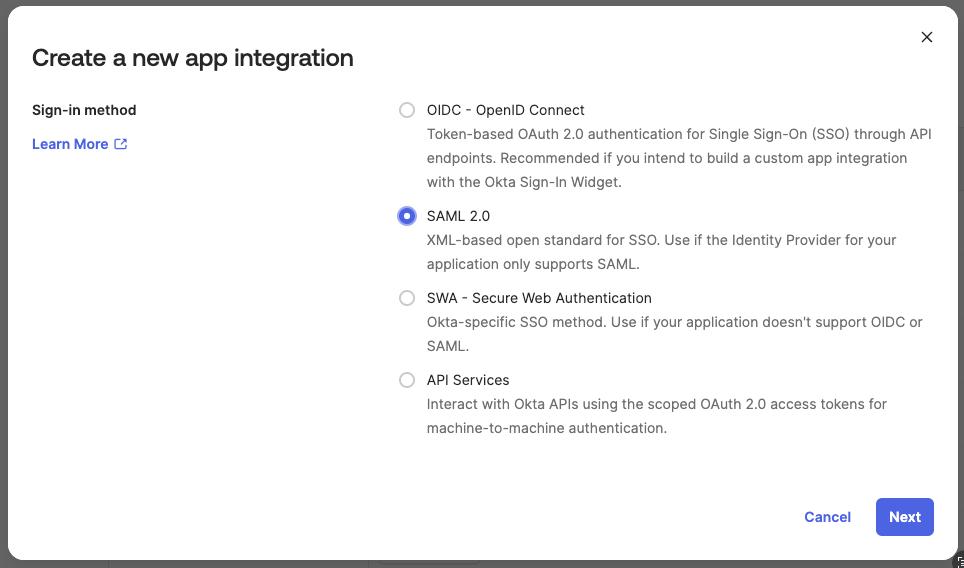
-
Fill the form with the general settings and go to the next configuration step.
-
On the
Configure SAMLform set the following fields:Single sign-on URL:<scheme:cvat_domain>/api/auth/saml/<idp-id:okta-saml>/acs/Audience URI (SP Entity ID:<scheme:cvat_domain>/api/auth/saml/<idp-id:okta-saml>/metadata/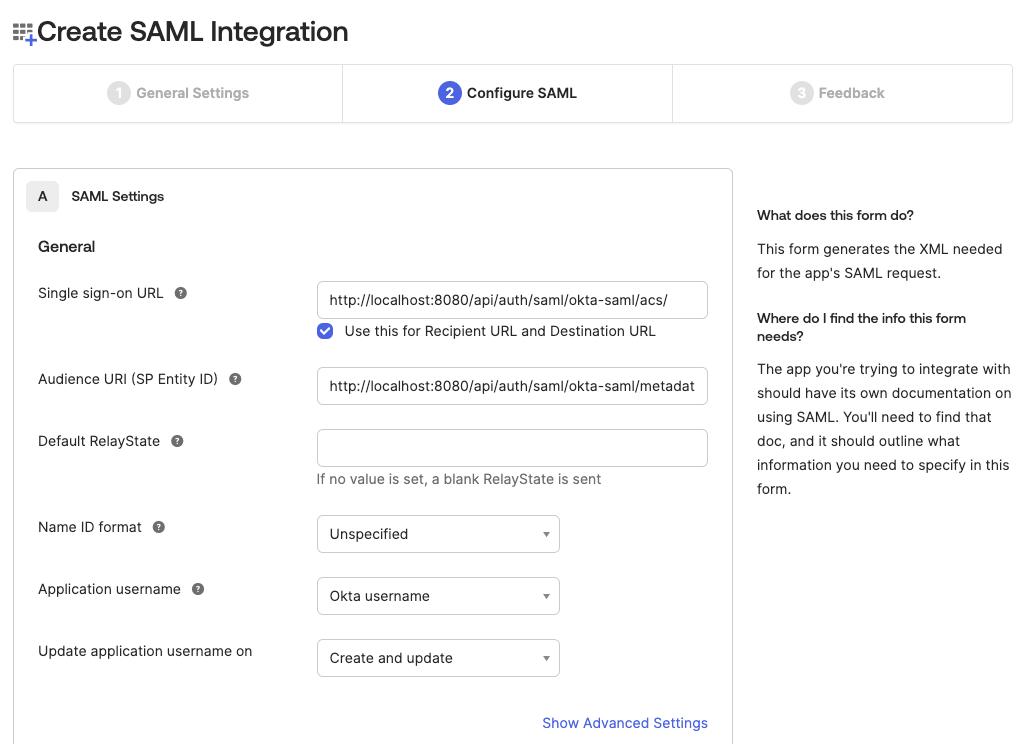
-
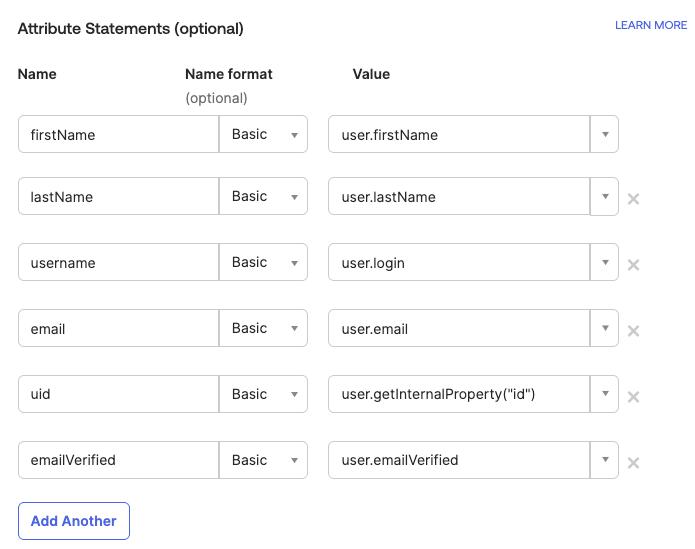
Define attribute statements that will be shared with CVAT. In our example we will use the
Basicattribute name format and set the mapping as shown below:firstName:user.firstNamelastName:user.lastNameusername:user.loginemail:user.emailuid:user.getInternalProperty("id")
Tip
If attribute mapping needs to be adapted, follow the official documentation on how to configureAttribute Statements -
Navigate to the next configuration step and fill the
Feedbackform.
You’ve created and configured the app. You can now either complete an optional step to simplify the login process in CVAT or proceed directly to the CVAT configuration step.
Step 2: Simplify login process
If CVAT is configured to require
email verification,
it expects the Identity Provider to include the email_verified claim. However, Okta does not send this claim
by default. As a result, users will receive a confirmation email with a verification link.
There is an option to include email verification claim on the sign-in step:
- Add one more mapping
emailVerified->user.emailVerifiedon SAML-based application configuration step:- Navigate to the
SAML Settingson theGeneraltab and clickEdit. - Add one more attribute mapping as it was described in the app configuration step.
- Navigate to the
- Add custom user attribute
emailVerified:- Navigate to the
Directorysection in the menu on the left ->Profile Editoritem - Select the default user profile from the list (
User (default)) - Click
+ Add Attribute - Fill out the form with your desired values, making sure to select the
booleandata type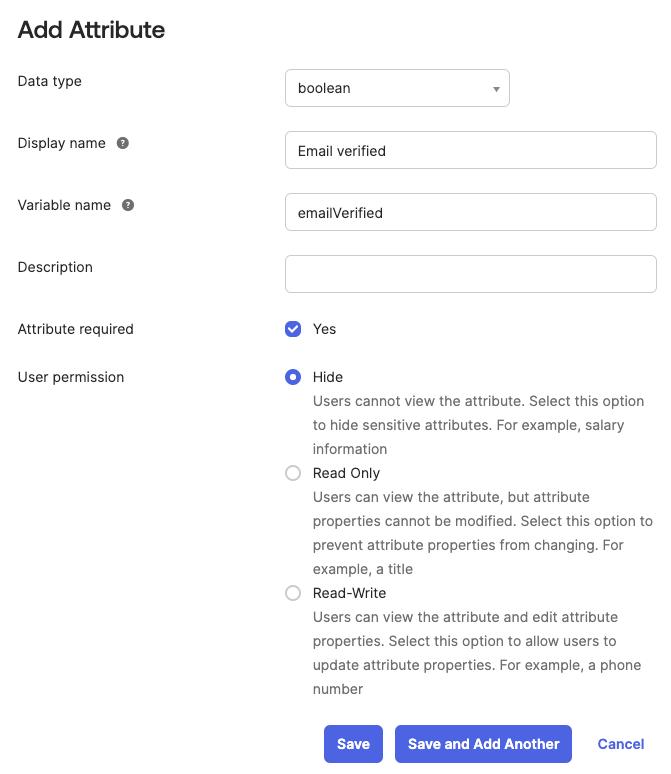
- Click
Save
- Navigate to the
- Update user profiles:
- Navigate to the
Peoplesection in the menu on the left - Set the value for the recently created attribute for each person
- Navigate to the
Step 3: Configure CVAT
Utilize the example below as a template for your configuration:
sso:
  enabled: true
  selection_mode: email_address
  identity_providers:
    - id: <idp-id:okta-saml>
      protocol: SAML
      name: Okta SAML-based Identity Provider
      entity_id: <Issuer>
      metadata_url: <Metadata URL>

      attribute_mapping:
        uid: uid
        username: username
        email: email
        first_name: firstName
        last_name: lastName
        email_verified: emailVerified # if configured

      email_domain: <company_email_domain>
Tip
Metadata URL and Issuer values may be found on the Sign On tab of the application setting

You can now proceed to start CVAT. For additional CVAT configuration details, refer to Configuring SSO in CVAT.
Auth0
OpenID Connect
Follow these steps to configure an application in the Auth0 platform and integrate it with CVAT:
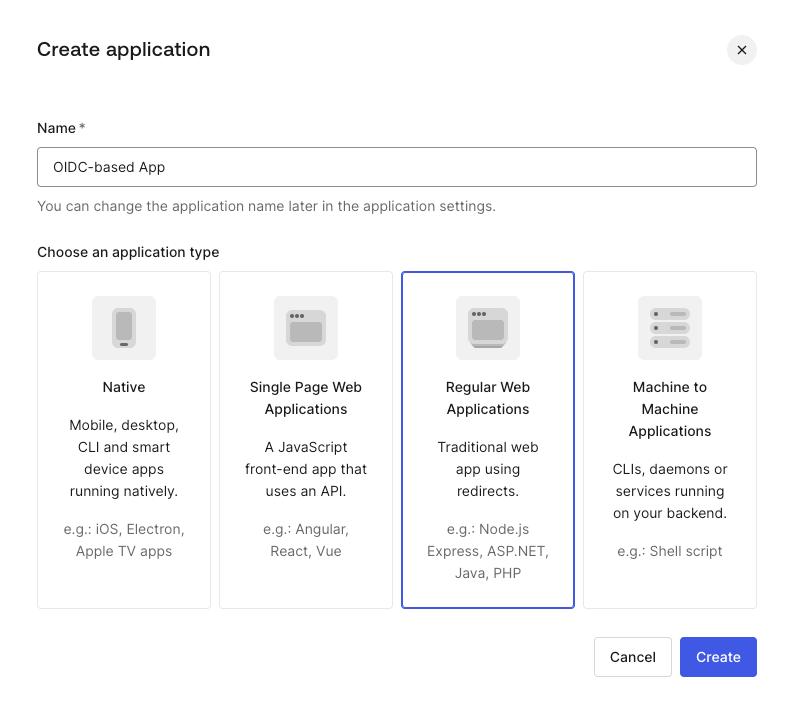
Step 1: Register an OIDC-based application
To start, log into your Auth0 dashboard. Once you’re in:
- Navigate to the
Applicationssection in the menu on the left, click+ Create Application. - Enter a name for the application and choose the
Regular Web Applicationstype, then clickCreate.
You’ve created an app, now you should finalize its configuration.
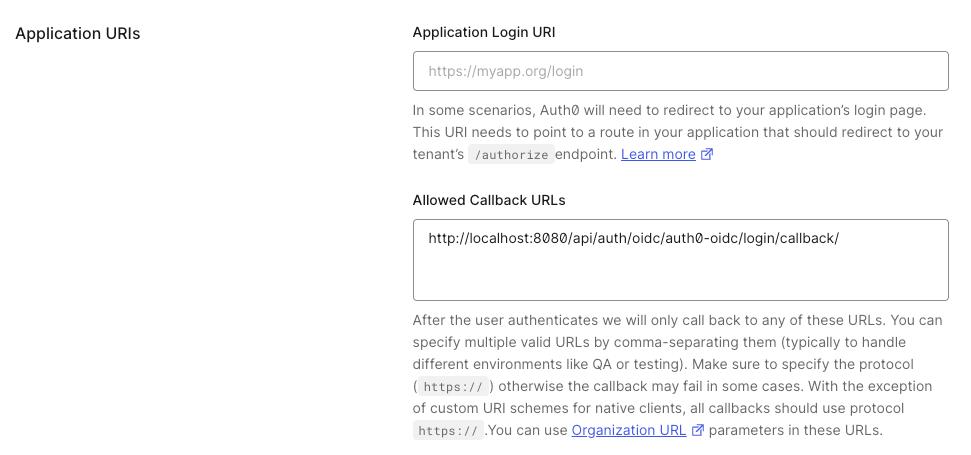
Step 2: Configure a created application
- In the
Settingstab of your new application, scroll down to theApplication URIssection. - Add
<scheme:cvat_domain>/api/auth/oidc/<idp-id:auth0-oidc>/login/callback/to theAllowed Callback URLs. - Save changes.
That’s it, now we can move on to the configuration in CVAT.
Step 3: Configure CVAT
Utilize the example below as a template for your configuration:
sso:
  enabled: true
  selection_mode: email_address
  identity_providers:
    - id: <idp-id:auth0-oidc>
      protocol: OIDC
      name: Auth0 OIDC-based IdP
      server_url: https://<auth0_domain>/
      client_id: <client_id>
      client_secret: <client_secret>
      email_domain: <company_email_domain>
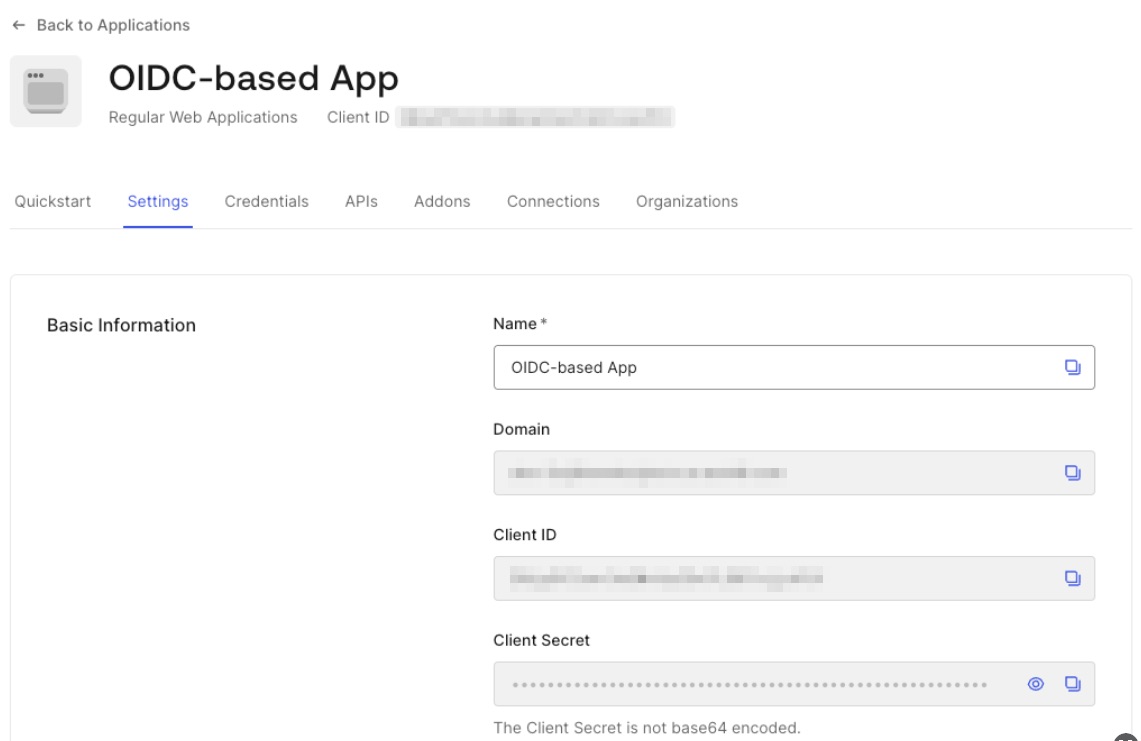
Tip
Client ID, Client Secret and Domain can be found in the Basic Information section of application settings
You can now proceed to start CVAT. For additional CVAT configuration details, refer to Configuring SSO in CVAT.
SAML
Follow these steps to configure an application in the Auth0 platform and integrate it with CVAT:
Step 1: Register an SAML-based application
To start, log into your Auth0 dashboard. Once you’re in:
- Navigate to the
Applicationssection in the menu on the left, click+ Create Application. - Enter a name for the application and choose the
Regular Web Applicationstype, then clickCreate.

You’ve created an app, now you should finalize its configuration.
Step 2: Configure a created application
-
Navigate to the
Addonstab of the created application and click on theSAML2 WEB APPbutton.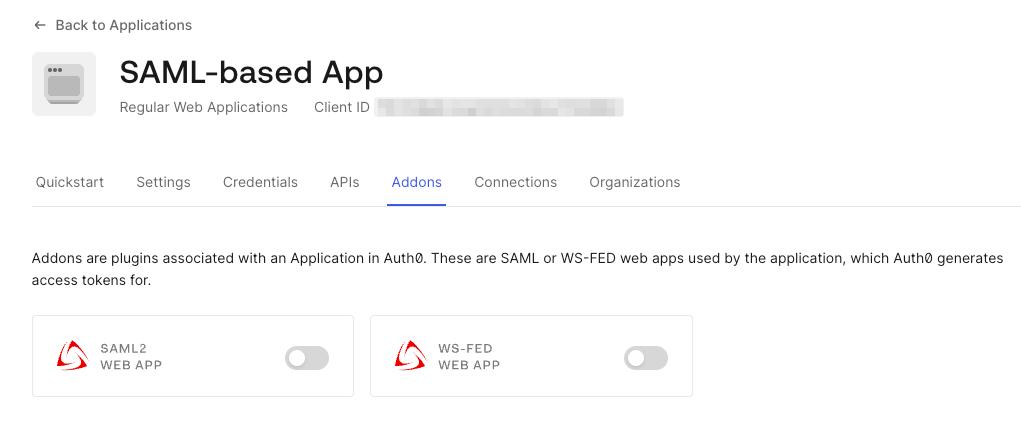
-
Open the
Settingstab in the popup window and set the following configuration: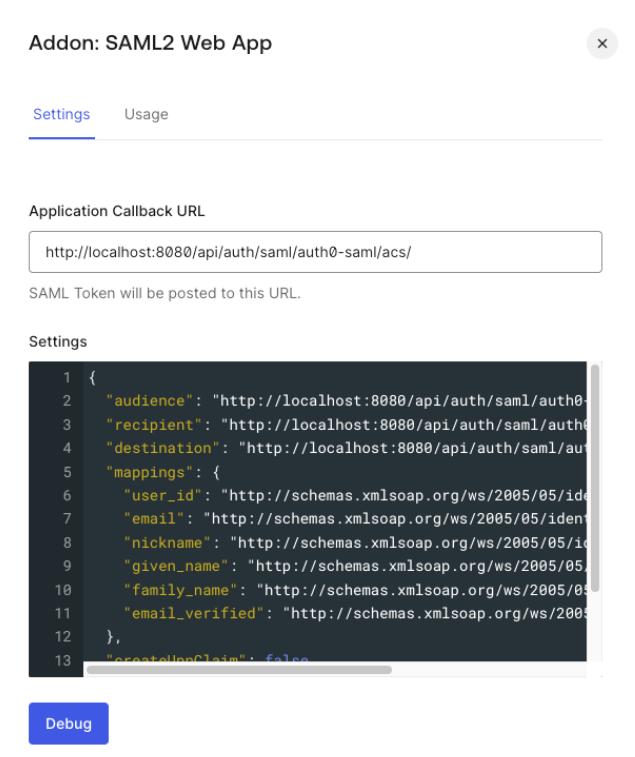
Application Callback URL:<scheme:cvat_domain>/api/auth/saml/<idp-id:auth0-saml>/acs/Settings: enter a JSON object like the following:
{ "audience": "<scheme:cvat_domain>/api/auth/saml/<idp-id:auth0-saml>/metadata/", "recipient": "<scheme:cvat_domain>/api/auth/saml/<idp-id:auth0-saml>/acs/", "destination": "<scheme:cvat_domain>/api/auth/saml/<idp-id:auth0-saml>/acs/", "mappings": { "user_id": "http://schemas.xmlsoap.org/ws/2005/05/identity/claims/nameidentifier", "email": "http://schemas.xmlsoap.org/ws/2005/05/identity/claims/emailaddress", "nickname": "http://schemas.xmlsoap.org/ws/2005/05/identity/claims/username", "given_name": "http://schemas.xmlsoap.org/ws/2005/05/identity/claims/givenname", "family_name": "http://schemas.xmlsoap.org/ws/2005/05/identity/claims/surname", "email_verified": "http://schemas.xmlsoap.org/ws/2005/05/identity/claims/emailverified" }, "createUpnClaim": false, "passthroughClaimsWithNoMapping": false, "mapIdentities": false } -
Scroll down and click
Enable.
Note
More information on how to configure an application on Auth0 platform can be found here.That’s it, now we can move on to the configuration in CVAT.
Step 3: Configure CVAT
Utilize the example below as a template for your configuration:
sso:
  enabled: true
  selection_mode: email_address
  identity_providers:
    - id: <idp-id:auth0-saml>
      protocol: SAML
      name: Auth0 SAML-based IdP
      entity_id: <Issuer>
      metadata_url: <Metadata URL>

      attribute_mapping:
        uid: http://schemas.xmlsoap.org/ws/2005/05/identity/claims/nameidentifier
        username: http://schemas.xmlsoap.org/ws/2005/05/identity/claims/username
        email: http://schemas.xmlsoap.org/ws/2005/05/identity/claims/emailaddress
        first_name: http://schemas.xmlsoap.org/ws/2005/05/identity/claims/givenname
        last_name: http://schemas.xmlsoap.org/ws/2005/05/identity/claims/surname
        email_verified: http://schemas.xmlsoap.org/ws/2005/05/identity/claims/emailverified

      email_domain: <company_email_domain>
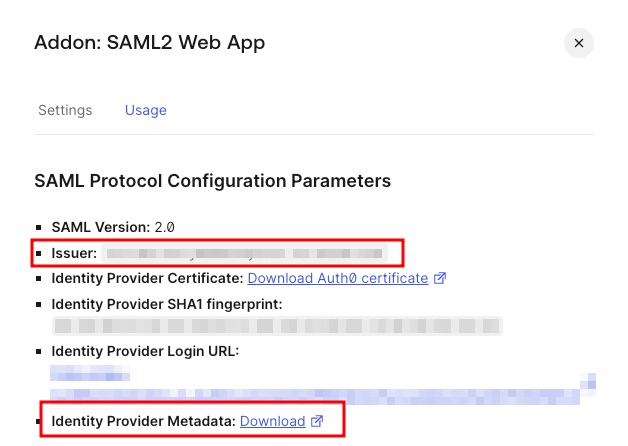
Tip
ActualMetadata URL and Issuer values may be found on the Usage tab of the SAML2 Web App plugin
You can now proceed to start CVAT. For additional CVAT configuration details, refer to Configuring SSO in CVAT.
Keycloak
To configure SSO in terms of Keycloak we need to create a client.
OpenID Connect
Follow these steps to do that:
Step 1: Register an OIDC-based client
To start, go to the Keycloak service (by default it is listening for HTTP and HTTPS requests using the ports 8080 and 8443, respectively) and log into your admin account. Once you’re in:
- Under the desired
realmnavigate to theClientssection and clickcreate client. - Fill out the general client settings:

Client type: OpenID ConnectClient ID: enter client identifier- Enter a name for the client, e.g. OIDC-based client
- In the next step, enable the
Client authenticationtoggle.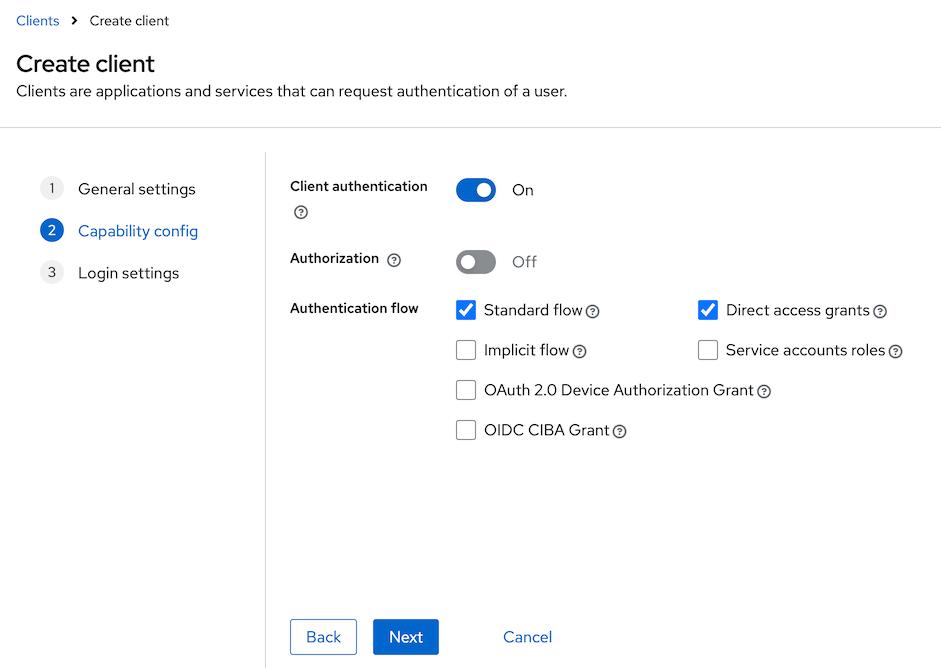
- In the
Login settingssection, provide the following values: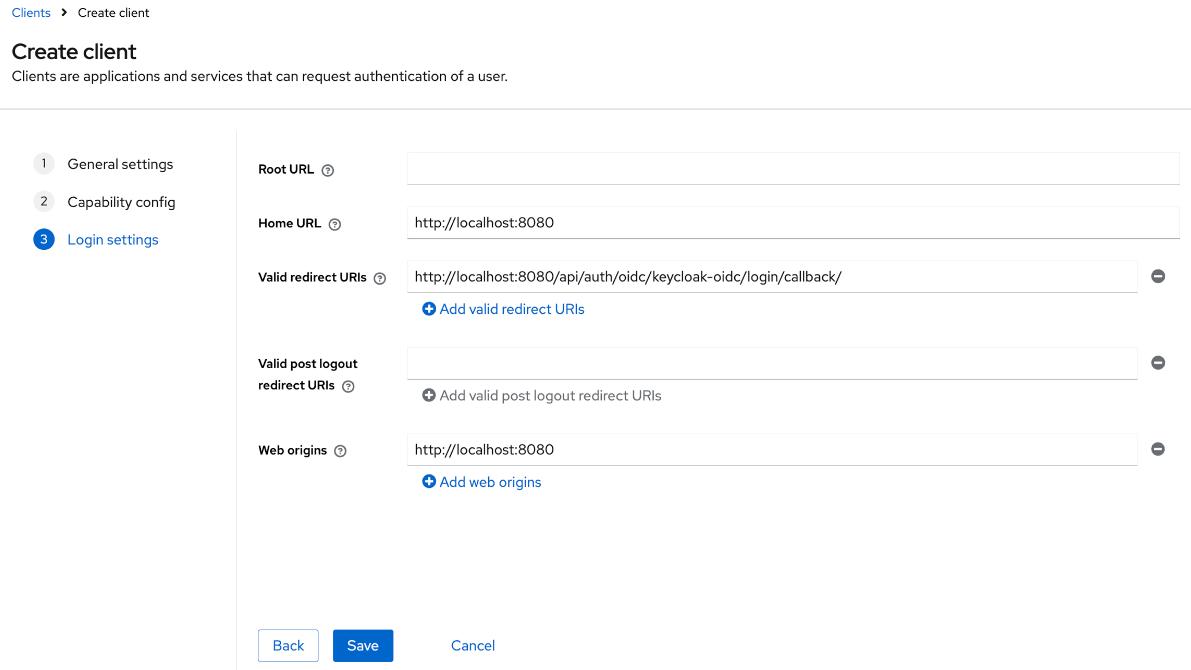
Home URL:<scheme:cvat_domain>Valid redirect URIs:<scheme:cvat_domain>/api/auth/oidc/<idp-id:keycloak-oidc>/login/callback/Web origins:<scheme:cvat_domain>
That’s it, now we can move on to the configuration in CVAT.
Step 2: Configure CVAT
Utilize the example below as a template for your configuration:
sso:
  enabled: true
  selection_mode: email_address
  identity_providers:
    - id: <idp-id:keycloak-oidc>
      protocol: OIDC
      name: Keycloak OIDC-based Identity Provider
      server_url: <scheme:keycloak_domain>/realms/<custom_realm>/.well-known/openid-configuration
      client_id: <Client ID>
      client_secret: <Client Secret>
      email_domain: <company_email_domain>
Tip
ActualClient Secret value can be found on the Credentials tab of the created OIDC client
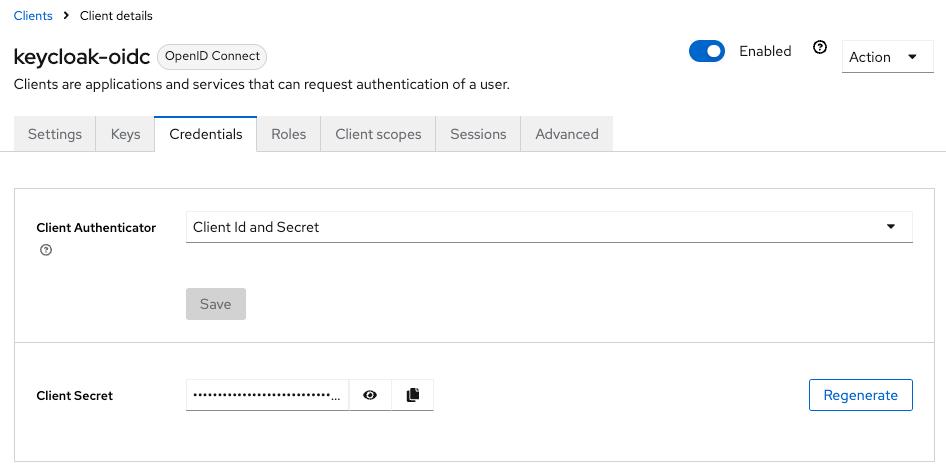
You can now proceed to start CVAT. For additional CVAT configuration details, refer to Configuring SSO in CVAT.
SAML
Follow these steps to configure a client:
Step 1: Register a SAML-based client
To start, go to the Keycloak service (by default it is listening for HTTP and HTTPS requests using the ports 8080 and 8443, respectively) and log into your admin account. Once you’re in:
- Under the desired
realmnavigate to theClientssection and clickcreate client. - Fill out the general client settings:
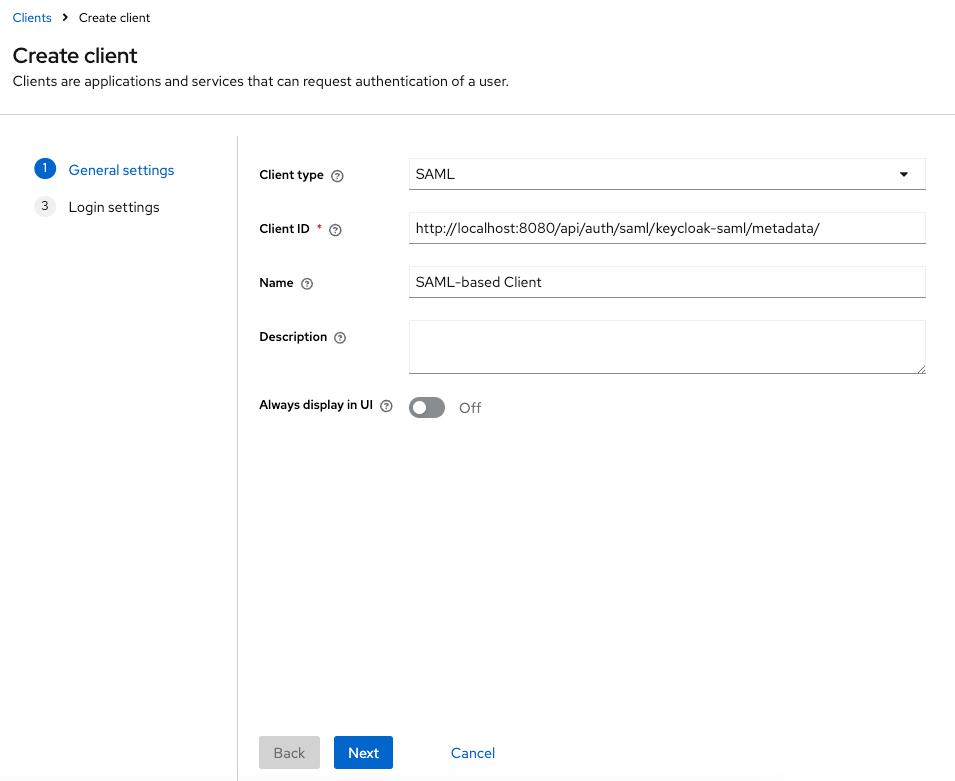
Client type: SAML- Set the
Clint IDthe URL:<scheme:cvat_domain>/api/auth/saml/<idp-id:keycloak-saml>/metadata/ - Enter a name for the client, e.g. SAML client
- In the
Login settingssection, provide the following values: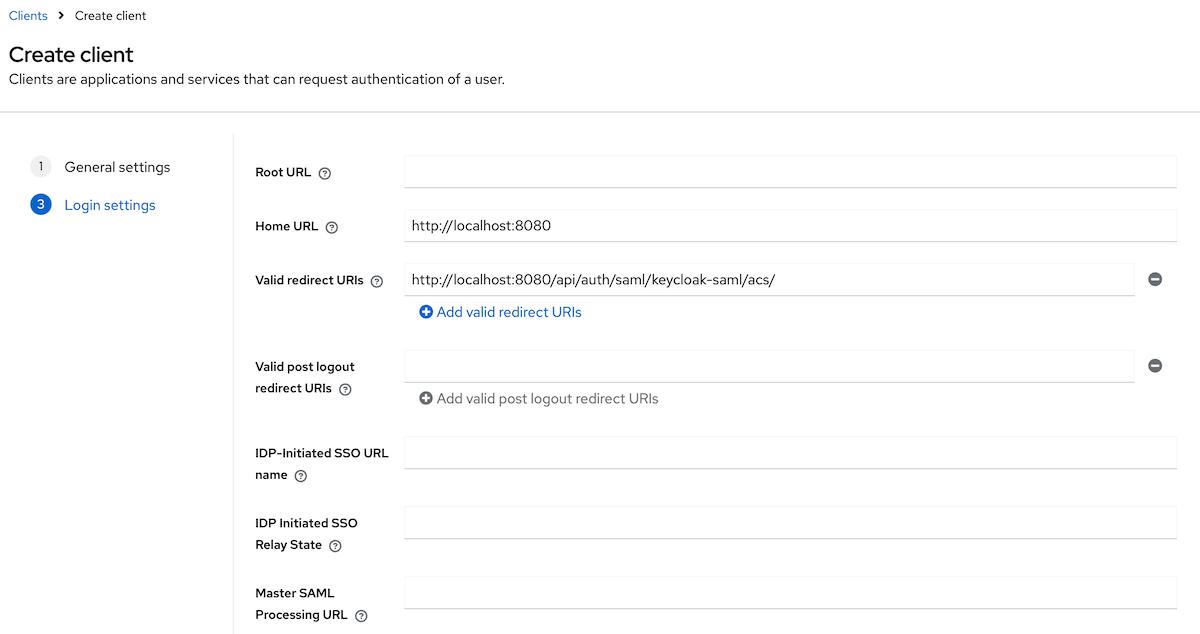
Home URL:<scheme:cvat_domain>Valid redirect URIs:<scheme:cvat_domain>/api/auth/saml/<idp-id:keycloak-saml>/acs/
You’ve created a client, now you should finalize its configuration.
Step 2: Configure a created client
- Navigate to the general settings of the created client, scroll down to the
SAML capabilitiessection. - Update the following parameters:
Name ID format: emailForce name ID format:On
- Navigate to the
Keystab and enable theClient signature requiredtoggle. - Configure attributes & claims:
-
Navigate to the
Client scopestab on the created client -> dedicated scopes for the client. You will see that there is no configured mappers.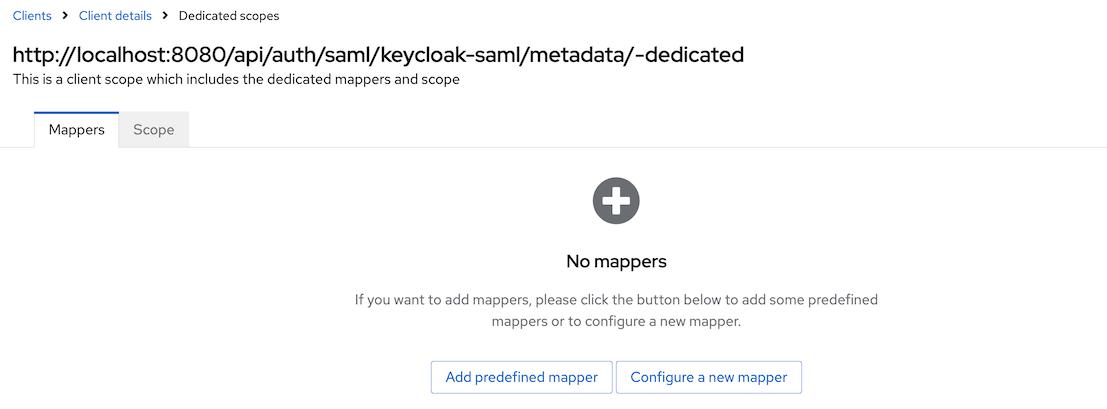
-
Set up mappers for the following attributes:
- uid
- first_name
- last_name
- username
For attributes like
email,first name, andlast name, you can either- Use the predefined mappers

- Or follow the manual configuration steps to create them yourself.
To configure other mappers click
Configure a new mapperif it is a first mapper orAdd mapper->By configurationand then selectUser Property.For instance, to configure a mapper for the
usernameattribute, fill in the form as it is done below:
Name: usernameProperty: usernameSAML Attribute Name: usernameAttribute
-
That’s it, now we can move on to the configuration in CVAT.
Step 3: Configure CVAT
Utilize the example below as a template for your configuration:
sso:
  enabled: true
  selection_mode: email_address
  identity_providers:
    - id: <idp-id:keycloak-saml>
      protocol: SAML
      name: Keycloak SAML-based Identity Provider
      entity_id: <scheme:keycloak_domain>/realms/<custom_realm>
      metadata_url: <scheme:keycloak_domain>/realms/<custom_realm>/protocol/saml/descriptor

      attribute_mapping:
        uid: uidAttribute
        email_verified: emailVerifiedAttribute
        email: emailAttribute
        last_name: lastNameAttribute
        first_name: firstNameAttribute
        username: usernameAttribute

      email_domain: <company_email_domain>
Tip
ActualMetadata URL may be found in the Realm settings on the General tab
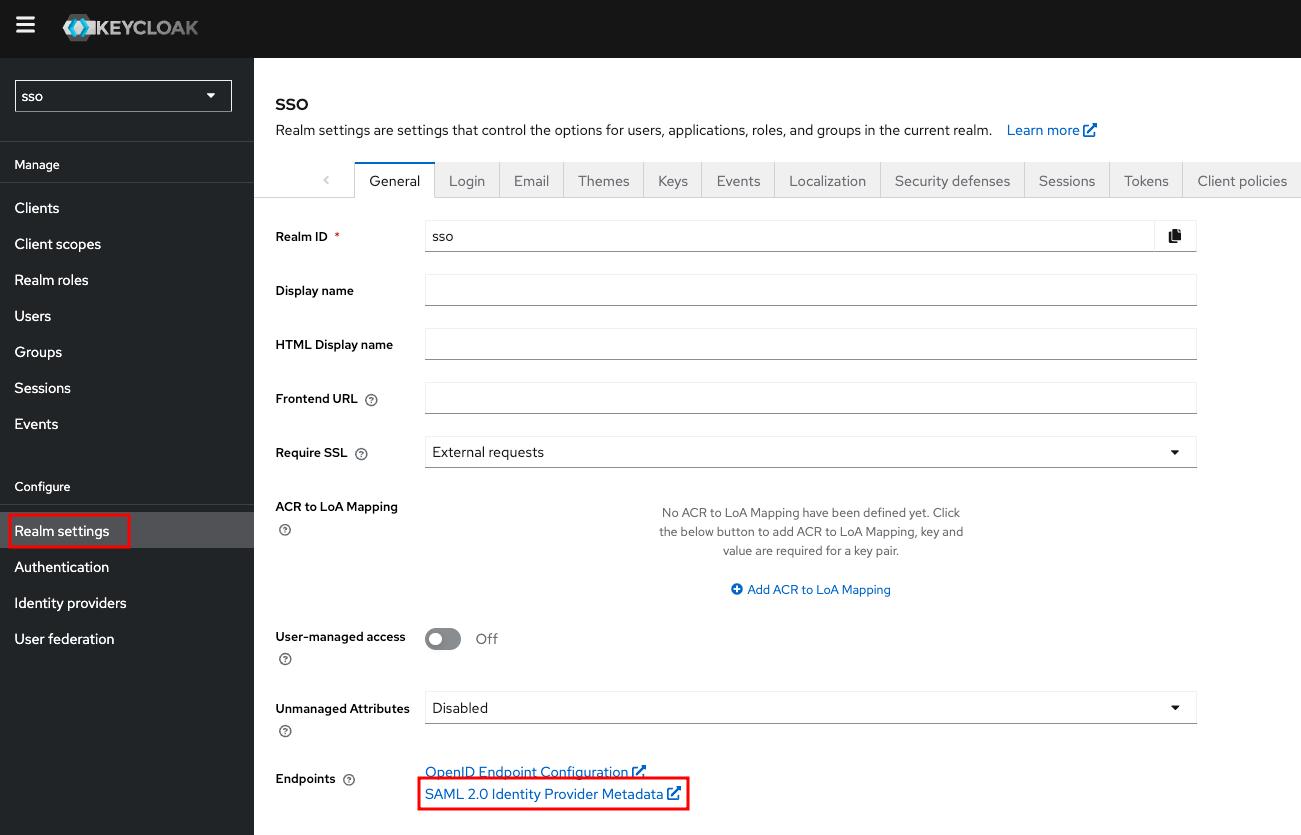
You can now proceed to start CVAT. For additional CVAT configuration details, refer to Configuring SSO in CVAT.
Configuring SSO in CVAT
CVAT provides a dedicated configuration file to customize the login and registration flow.
The sso section of this file specifies which external Identity Provider (IdP)
integrations are enabled. To set up SSO, you typically create a custom YAML configuration file
(e.g., auth_config.yml) and supply its path when starting CVAT.
SSO settings
| Setting | Description |
|---|---|
enabled |
Enables or disables Single Sign-On (SSO) functionality. |
selection_mode |
Defines how the Identity Provider (IdP) is selected for authenticating a given user. Available modes:
|
enable_pkce |
Controls whether Proof Key for Code Exchange (PKCE) is enabled for the authentication flow (disabled by default). This setting applies to all configured OIDC-based Identity Providers |
---
sso:
  enabled: true|false
  selection_mode: email_address|lowest_weight
  enable_pkce: true|false
  ...
IdP Configuration Structure
To integrate an Identity Provider, you must define its configuration block under the identity_providers section
in the CVAT config file. Each provider’s configuration includes both general and protocol-specific settings.
| Setting | Required | Description |
|---|---|---|
id |
required | A unique, URL-safe identifier for the IdP. Used in callback URLs. |
name |
required | A human-readable name for the IdP. |
protocol |
required | Authentication protocol (OIDC/SAML). |
email_domain |
optional | Company email domain (used with email_address selection mode). |
weight |
optional | Determines priority (used with lowest_weight selection mode). The default is 10. |
Additionally, each IdP configuration must include several protocol-specific parameters:
-
client_idandclient_secret(required): These values can be obtained from the configuration page of the specific provider. -
server_url(required): URL is used to obtain IdP OpenID Configuration Metadata.NOTE: How to check
server_urlcorrectness: server_url +/.well-known/openid-configurationAPI should exist and return OpenID Provider Metadata. Generally, each authentication platform provides a list of all endpoints. You need to find the corresponding endpoint and select the part in front of/.well-known/openid-configuration. For example, in the case of integrating an OIDC Microsoft Entry ID application, don’t forget to specify the second version of API (https://login.microsoftonline.com/<tenant_id>/v2.0). -
token_auth_method(optional): Token endpoint authentication method which can be one ofclient_secret_basic,client_secret_post. If this field is omitted, a method from the server’s token auth methods list will be used.
entity_id(required): IdP entity ID, should be equal to the corresponding setting in the IdP configuration.metadata_url(optional): SAML metadata URL. This can typically be found on the IdP configuration page.x509_cert(optional): The SAML X.509 certificate. Also could be found in the IdP’s configuration. If themetadata_urlis not specified, this parameter becomes required.sso_url(optional): SAML endpoint for the Single Sign-On service. Also could be found in the IdP’s configuration. If themetadata_urlis not specified, this parameter becomes required.attribute_mapping(required): A mapping between user account attributes and attributes sent by the Identity Provider.
Below are examples of SSO configuration file for both protocols:
---
sso:
  enabled: true
  selection_mode: email_address
  identity_providers:
    - id: oidc-idp
      protocol: OIDC
      name: OIDC-based IdP
      server_url: https://example.com
      client_id: xxx
      client_secret: xxx
      email_domain: example.com
 ---
 sso:
   enabled: true
   selection_mode: lowest_weight
   identity_providers:
     - id: saml-idp
       protocol: SAML
       name: SAML-based IdP
       entity_id: <idp-entity-id>
       weight: 1
       # specify only metadata_url or sso_url and x509_cert
       metadata_url: http://example.com/path/to/saml/metadata/
       sso_url: <Login URL>
       x509_cert: |
         -----BEGIN CERTIFICATE-----
         certificate content
         -----END CERTIFICATE-----

       attribute_mapping:
         uid: uidAttribute
         email_verified: emailVerifiedAttribute
         email: emailAttribute
         last_name: lastNameAttribute
         first_name: firstNameAttribute
         username: usernameAttribute
More information about OIDC-based and SAML-based IdP configuration expected by Django Allauth can be found here and here respectively.
Start CVAT
Restart required
If CVAT is already running, don’t forget to restart the containers to apply the SSO configurationOnce the configuration file is created, several environment variables must be exported before running CVAT:
export AUTH_CONFIG_PATH="<path_to_auth_config>"
export CVAT_HOST="<cvat_host>"
# cvat_port is optional
export CVAT_BASE_URL="<http|https>://${CVAT_HOST}:<cvat_port>"
Start the CVAT Enterprise instance as usual.
That’s it! The CVAT login page now should have the Continue with SSO option,
allowing users to authenticate using the configured Identity Provider.

6 - Social auth configuration
Note
This is a paid feature available for Enterprise clients.You can now easily set up authentication with popular social services, which opens doors to such benefits as:
- Convenience: you can use the existing social service credentials to sign in to CVAT.
- Time-saving: with just two clicks, you can sign in without the hassle of typing in credentials, saving time and effort.
- Security: social auth service providers have high-level security measures in place to protect your accounts.
Currently, we offer three options:
With more to come soon. Stay tuned!
Authentication with Google
To enable authentication, do the following:
-
Log in to the Google Cloud console
-
Create a project, and go to APIs & Services
-
On the left menu, select OAuth consent, then select User type (Internal or External), and click Create.
-
On the OAuth consent screen fill all required fields, and click Save and Continue.
-
On the Scopes screen, click Add or remove scopes and select
auth/userinfo.email,auth/userinfo.profile, andopenid. Click Update, and Save and Continue.
For more information, see Configure Auth Consent. -
On the left menu, click Credentials, on the top menu click + Create credentials, and select OAuth client ID.
-
From the Application Type select Web application and configure: Application name, Authorized JavaScript origins, Authorized redirect URIs.
For example, if you plan to deploy CVAT instance onhttps://localhost:8080, addhttps://localhost:8080to authorized JS origins andhttps://localhost:8080/api/auth/social/goolge/login/callback/to redirect URIs. -
Create configuration file in CVAT:
-
Create the
auth_config.ymlfile with the following content:--- social_account: enabled: true google: client_id: <some_client_id> client_secret: <some_client_secret> -
Set
AUTH_CONFIG_PATH="<path_to_auth_config>environment variable.
-
-
In a terminal, run the following command:
docker compose -f docker-compose.yml -f docker-compose.dev.yml -f docker-compose.override.yml up -d --build
Authentication with GitHub
There are 2 basic steps to enable GitHub account authentication.
-
Open the GitHub settings page.
-
On the left menu, click <> Developer settings > OAuth Apps > Register new application.
For more information, see Creating an OAuth App -
Fill in the name field, set the homepage URL (for example:
https://localhost:8080), and authentication callback URL (for example:https://localhost:8080/api/auth/social/github/login/callback/). -
Create configuration file in CVAT:
-
Create the
auth_config.ymlfile with the following content:--- social_account: enabled: true github: client_id: <some_client_id> client_secret: <some_client_secret> -
Set
AUTH_CONFIG_PATH="<path_to_auth_config>environment variable.
-
-
In a terminal, run the following command:
docker compose -f docker-compose.yml -f docker-compose.dev.yml -f docker-compose.override.yml up -d --build
Note
You can also configure GitHub App, but don’t forget to add required permissions.In the Permission > Account permissions > Email addresses must be set to read-only.
Authentication with Amazon Cognito
To enable authentication with Amazon Cognito for your CVAT instance, follow these steps:
- Create an Amazon Cognito pool (Optional)
- Set up a new app client
- Configure social authentication in CVAT
Now, let’s dive deeper into how to accomplish these steps.
Amazon Cognito pool creation
This step is optional and should only be performed if a user pool has not already been created. To create a user pool, follow these instructions:
- Go to the AWS Management Console
- Locate
Cognitoin the list of services - Click
Create user pool - Fill in the required fields
App client creation
To create a new app client, follow these steps:
- Go to the details page of the created user pool
- Find the
App clientsitem in the menu on the left - Click
Create app client - Fill out the form as shown bellow:
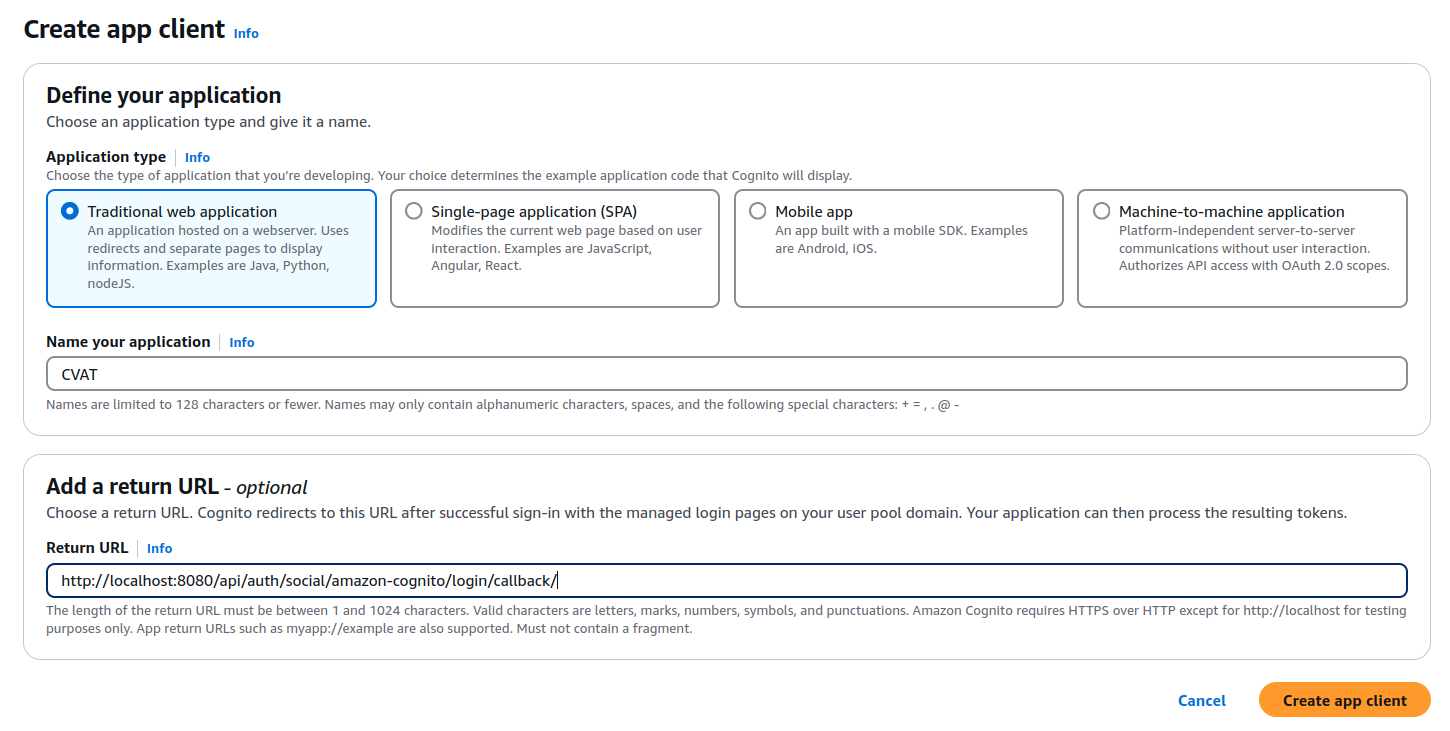
Application type:Traditional web applicationApplication name: Specify a desired name, or leave the autogenerated oneReturn URL(optional): Specify the CVAT redirect URL (<http|https>://<cvat_domain>/api/auth/social/amazon-cognito/login/callback/). This setting can also be updated or specified later after the app client is created.
- Navigate to the
Login pagestab of the created app client - Check the parameters in the
Managed login pages configurationsection and edit them if needed: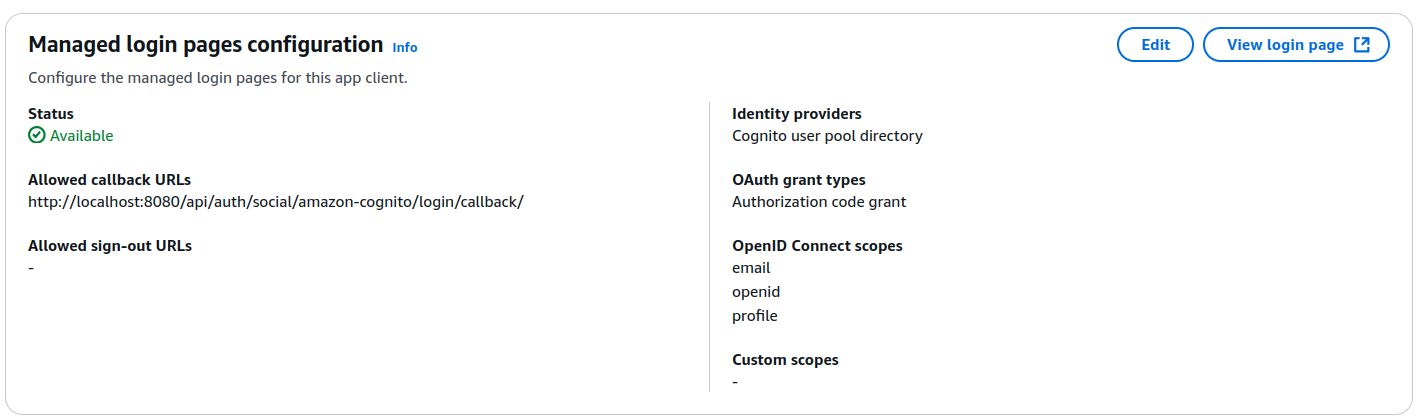
Allowed callback URLs: Must be set to the CVAT redirect URLIdentity providers: Must be specifiedOAuth grant types: TheAuthorization code grantmust be selectedOpenID Connect scopes:OpenID,Profile,Emailscopes must be selected
Setting up social authentication in CVAT
To configure social authentication in CVAT, create a configuration file
(auth_config.yml) with the following content:
---
social_account:
  enabled: true
  amazon_cognito:
    client_id: <client_id>
    client_secret: <client_secret>
    domain: <custom-domain> or
      https://<custom-cognito-prefix>.auth.us-east-1.amazoncognito.com
To find the client_id and client_secret values, navigate to the created app client page
and check the App client information section. To find domain, look for the Domain item in the list on the left.
Once the configuration file is updated, several environment variables must be exported before running CVAT:
export AUTH_CONFIG_PATH="<path_to_auth_config>"
export CVAT_HOST="<cvat_host>"
# cvat_port is optional
export CVAT_BASE_URL="<http|https>://${CVAT_HOST}:<cvat_port>"
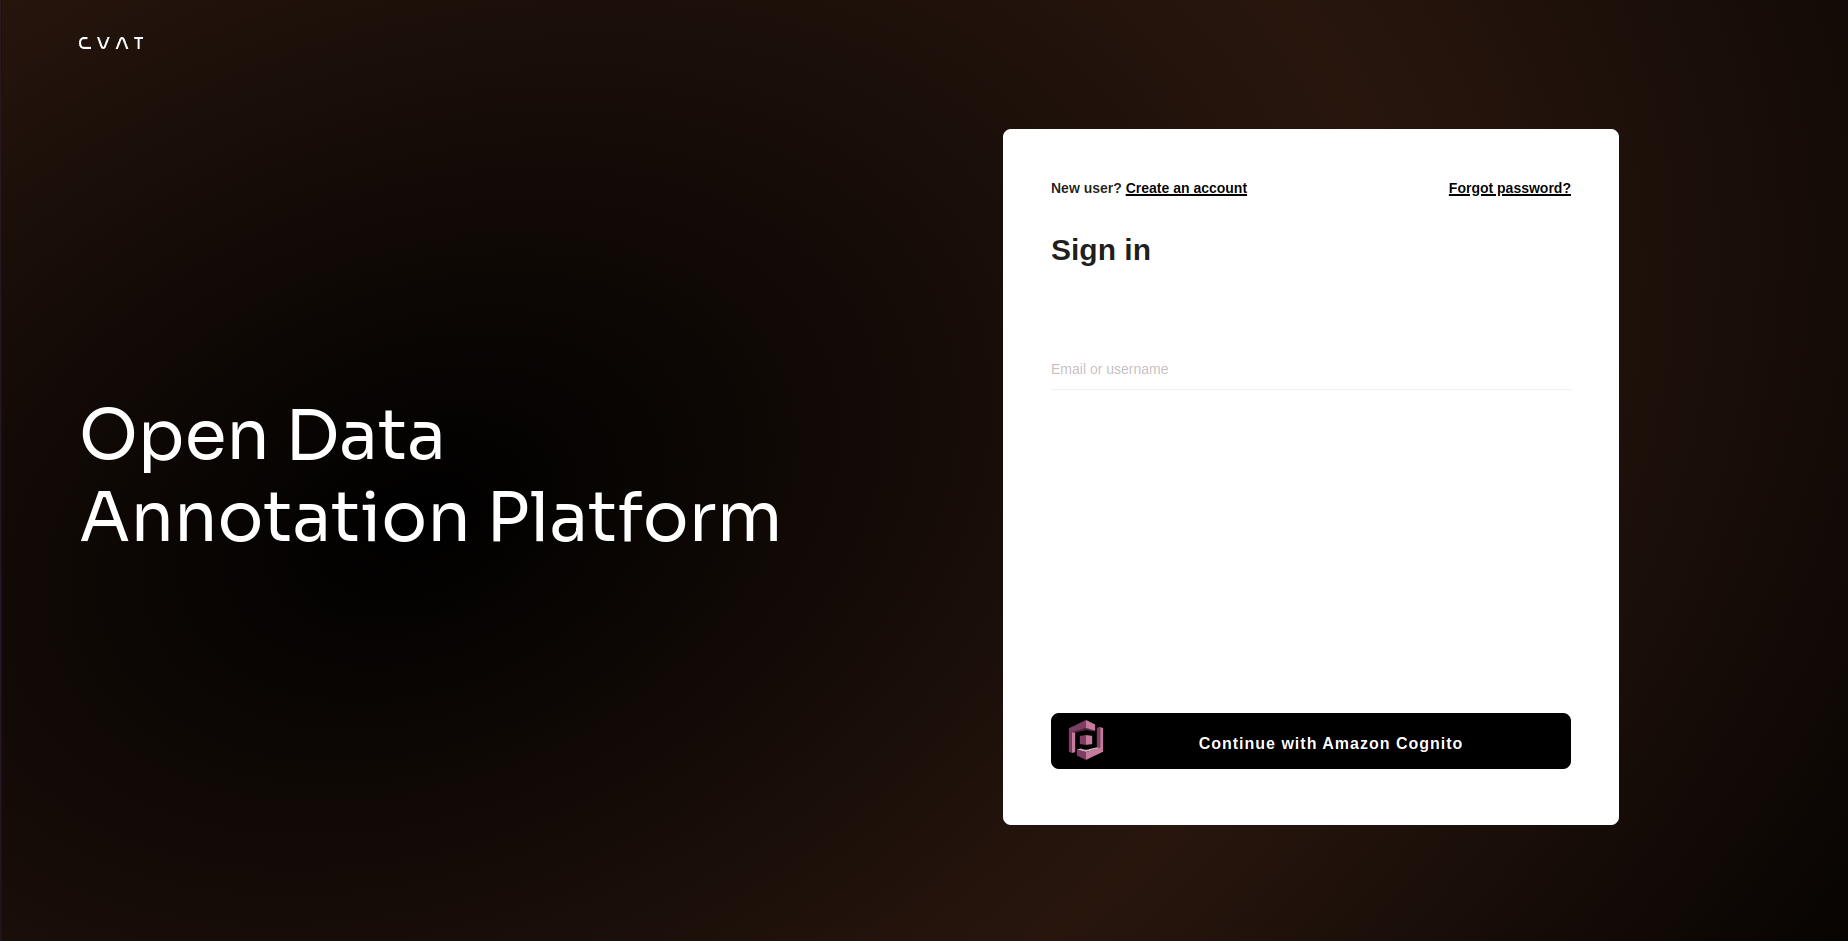
Start the CVAT enterprise instance as usual.
That’s it! On the CVAT login page, you should now see the option Continue with Amazon Cognito.
7 - Disable registration or password-based login
Note
This is a paid feature available for Enterprise clients.Update authentication config
Please add the following lines to your auth_config.yml (or create such file if it does not exist)
to prevent registering user accounts and disable password-based login:
basic:
  registration:
    enabled: false

  login:
    enabled: false
You may permit login, by changing the corresponding flag to true.
Start CVAT
Restart required
If CVAT is already running, don’t forget to restart the containers to apply authentication configuration.Once the configuration file is created/updated, export corresponding environment variable before running CVAT:
export AUTH_CONFIG_PATH="<path_to_auth_config>"