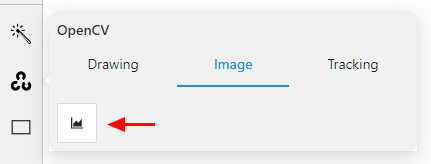
The Join tool ()
works with both polygon and mask annotations.
This tool is useful in scenarios where a single object
in an image is annotated with multiple shapes,
and there is a need to merge these shapes into a single one.
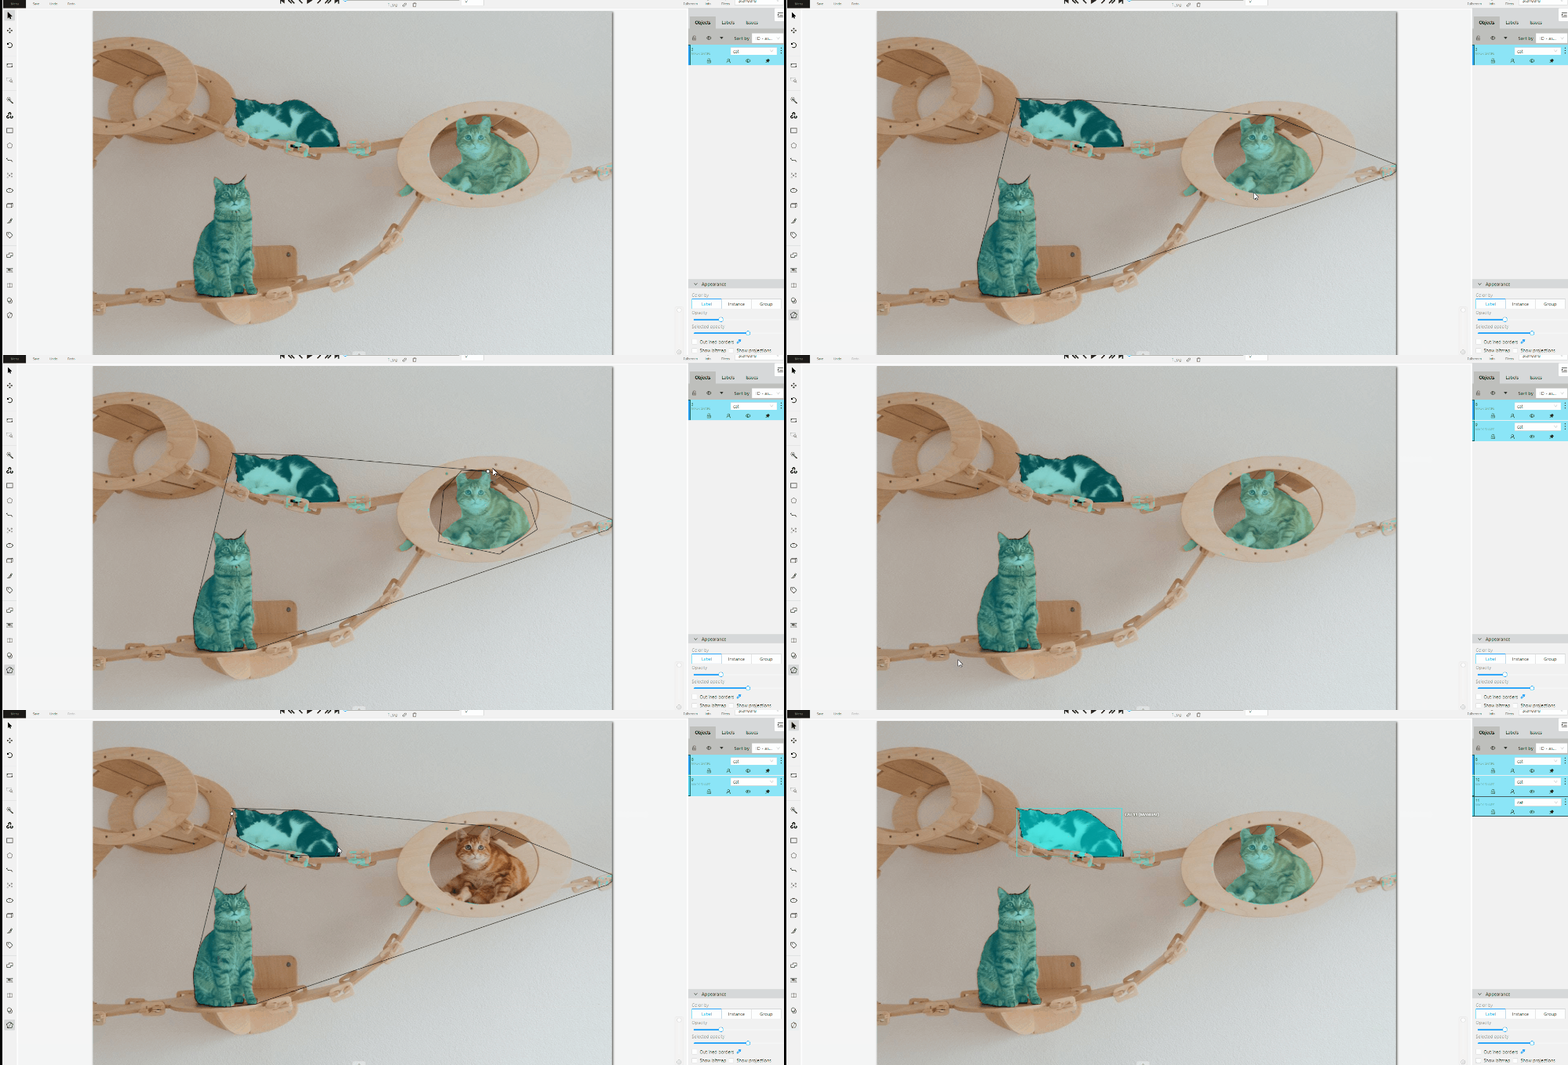
For polygons, you can join overlapping polygons or polygons that share at least one edge.
Click the shapes on the canvas that you want to join.
(Optional) To remove the selection, click the shape one more time.
Press J or click Join tool again to execute the join operation.
Upon completion, the selected shapes will be merged.
Notes about polygon merging:
For the merge operation to be successful, polygons must overlap or share at least one edge.
Disjoint polygons are kept as separate polygons.
Merge is not supported if the resulting polygon would create an enclosed empty region.
Self-intersecting polygons are excluded from the join operation.
Tip
The Snap tools
can help the join operation work best by making polygon borders and vertices align more precisely.
Slicing polygons and masks
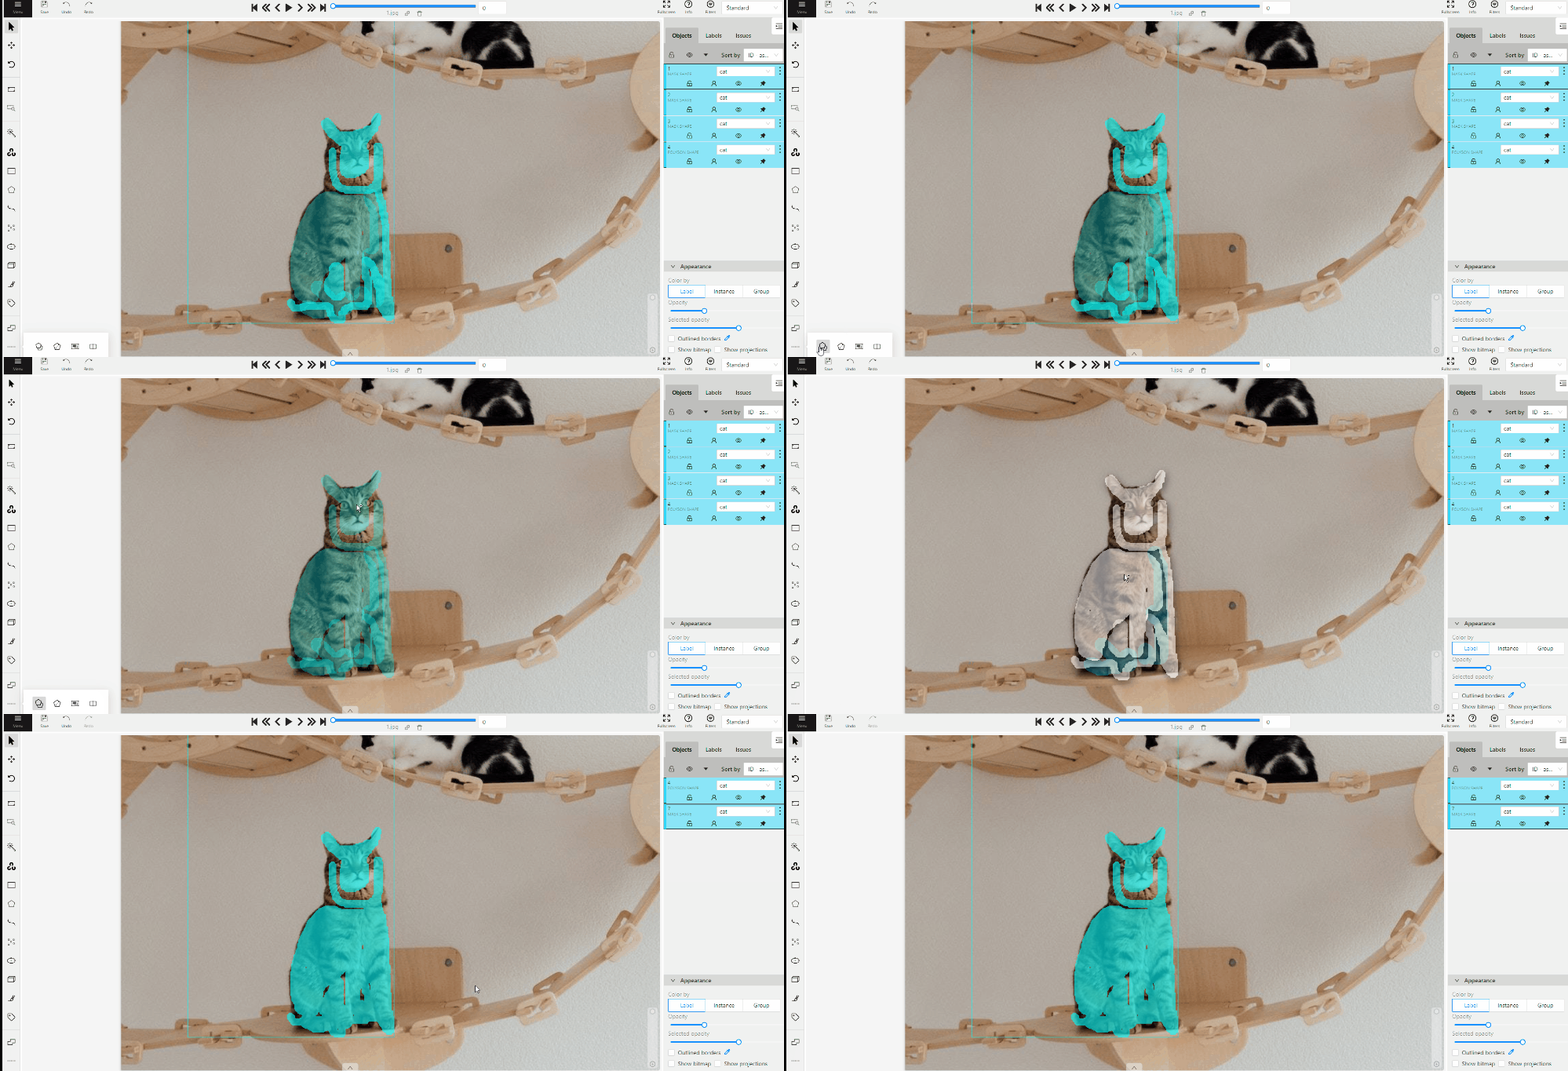
The Slice mask/polygon ()
is compatible with both mask and polygon annotations.
This tool is useful in scenarios where multiple objects in an image
are annotated with one shape,
and there is a need to slice this shape into multiple parts.
Note
The shape can be sliced only in two parts
at a time. Use the slice tool several times
to split a shape to as many parts as you need.
Click on the shape you intend to slice.
A black contour will appear around the selected shape.
Set an initial point for slicing by clicking on the contour.
Draw a line across the shape to define the slicing path.
Hold Shift to add points automatically on cursor movement.
Note: The line cannot cross itself.
Note: The line cannot cross the contour more than twice.
(Optional)> Right-click to cancel the latest point.
Click on the contour (Alt+J) (outside the contour) to finalize the slicing.
2 - Shapes converter
How to perform bulk actions on filtered shapes
The shapes converter is a feature that enables bulk actions on filtered shapes. It allows you to perform mutual
conversion between masks, polygons and rectangles.
Note
All shapes converter work only when the filter is set up.
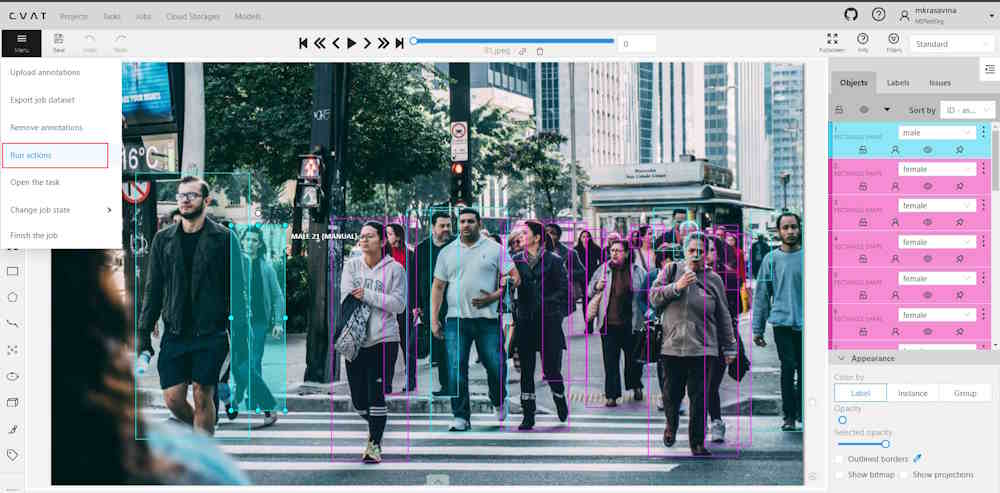
Annotations actions can be accessed from the annotation menu.
To access it, click on the burger icon
and then select Run actions.
Note
All Shapes converter functions work in alignment with set up filter.
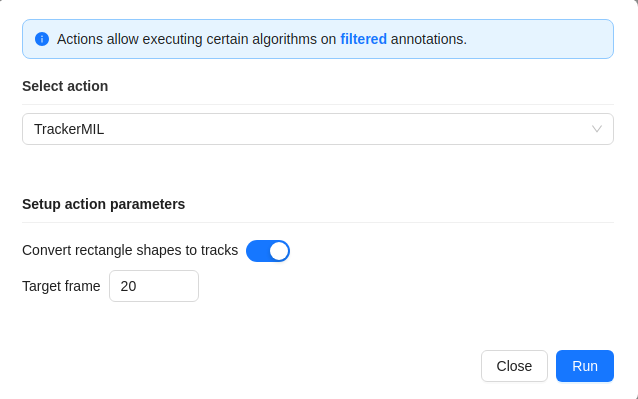
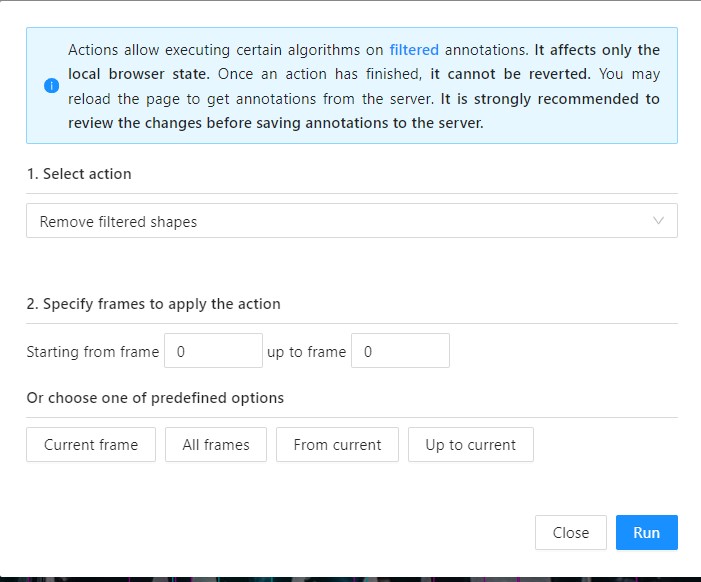
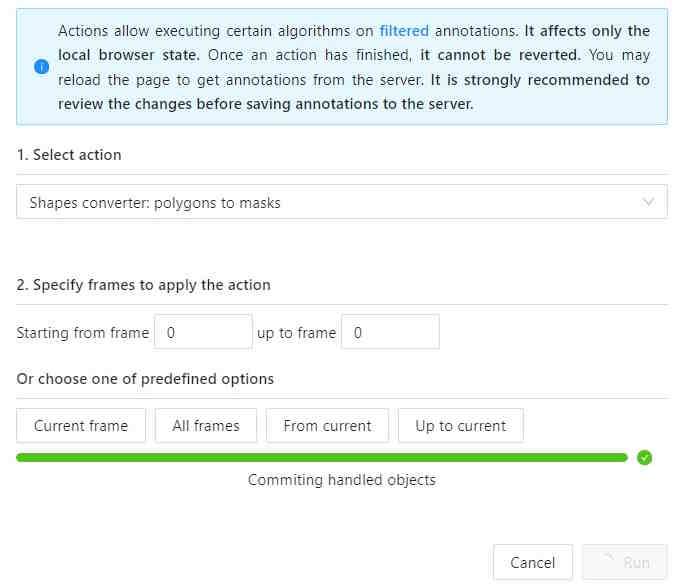
You will see the following dialog:
With the following fields:
Field
Description
Select action
Drop-down list with available actions:
Remove filtered shapes - removes all shapes in alignment with the set-up filter. Doesn’t work with tracks.
Propagate shapes - propagates all the filtered shapes from the current frame to the target frame.
Shapes converter: masks to polygons - converts all masks to polygons.
Shapes converter: masks to rectangles - converts all masks to rectangles in alignment with the set-up filter.
Shapes converter: polygon to masks - converts all polygons to masks.
Shapes converter: polygon to rectangles - converts all polygons to rectangles.
Shapes converter: rectangles to masks - converts all rectangles to masks.
Shapes converter: rectangles to polygons - converts all rectangles to polygons.
Note: only Propagate shapes and Remove filtered shapes is available in the community version.
Specify frames to run action
Field where you can specify the frame range for the selected action. Enter the starting frame in the Starting from frame: field, and the ending frame in the up to frame field.
If nothing is selected here or in Choose one of the predefined options section, the action will be applied to all fields.
Choose one of the predefined options
Predefined options to apply to frames. Selection here is mutually exclusive with Specify frames to run action.
If nothing is selected here or in Specify frames to run action section, the action will be applied to all fields.
Convert shapes
Recommended Precautions Before Running Annotation Actions
Saving changes: It is recommended to save all changes prior to initiating the annotation action.
If unsaved changes are detected, a prompt will advise to save these changes
to avoid any potential loss of data.
Disable auto-save: Prior to running the annotation action, disabling the auto-save feature
is advisable. A notification will suggest this action if auto-save is currently active.
Committing changes: Changes applied during the annotation session
will not be committed to the server until the saving process is manually
initiated. This can be done either by the user or through the
auto-save feature, should it be enabled.
Choose the action you need from the Select action drop-down list.
(Optional) In the Starting from frame field, enter the frame number where the action should begin,
and in the up to frame field, specify the frame number where the action should end.
(Optional) Select an option from Or choose one of the predefined options to apply the action.
Click Run. A progress bar will appear. You may abort the process by clicking Cancel until the process commits modified objects at the end of pipeline.
Note
Once the action is applied, it cannot be undone.
Convert shapes video tutorial
3 - Contextual images
Contextual images of the task
Contextual images (or related images) are additional images that provide
context or additional information related to the primary image.
Use them to add extra contextual about the object to improve the accuracy of annotation.
Contextual images are available for 2D and 3D tasks.
To add contextual images to the task, you need to organize the images folder into one of
the supported file layouts. A task with contextual images can be created both from an archive
or from raw files.
Example for 2D tasks:
In the folder with the images for annotation, create a folder: related_images.
Add to the related_images a subfolder with the same name
as the primary image to which it should be linked.
Place the contextual image(s) within the subfolder created in step 2.
Point clouds and related images are put into the same directory. Related files must have the same
names as the corresponding point clouds. This format is limited by only 1 related image
per point cloud.
Each point cloud is put into a separate directory with matching file name. Related images
are put next to the corresponding point cloud, the file names and extensions can be arbitrary.
Context images are placed in the image_00/, image_01/, image_N/ (N is any number)
directories. Their file names must correspond to the point cloud files in the data/ directory.
For more general information about 3D data formats,
see 3D data formats.
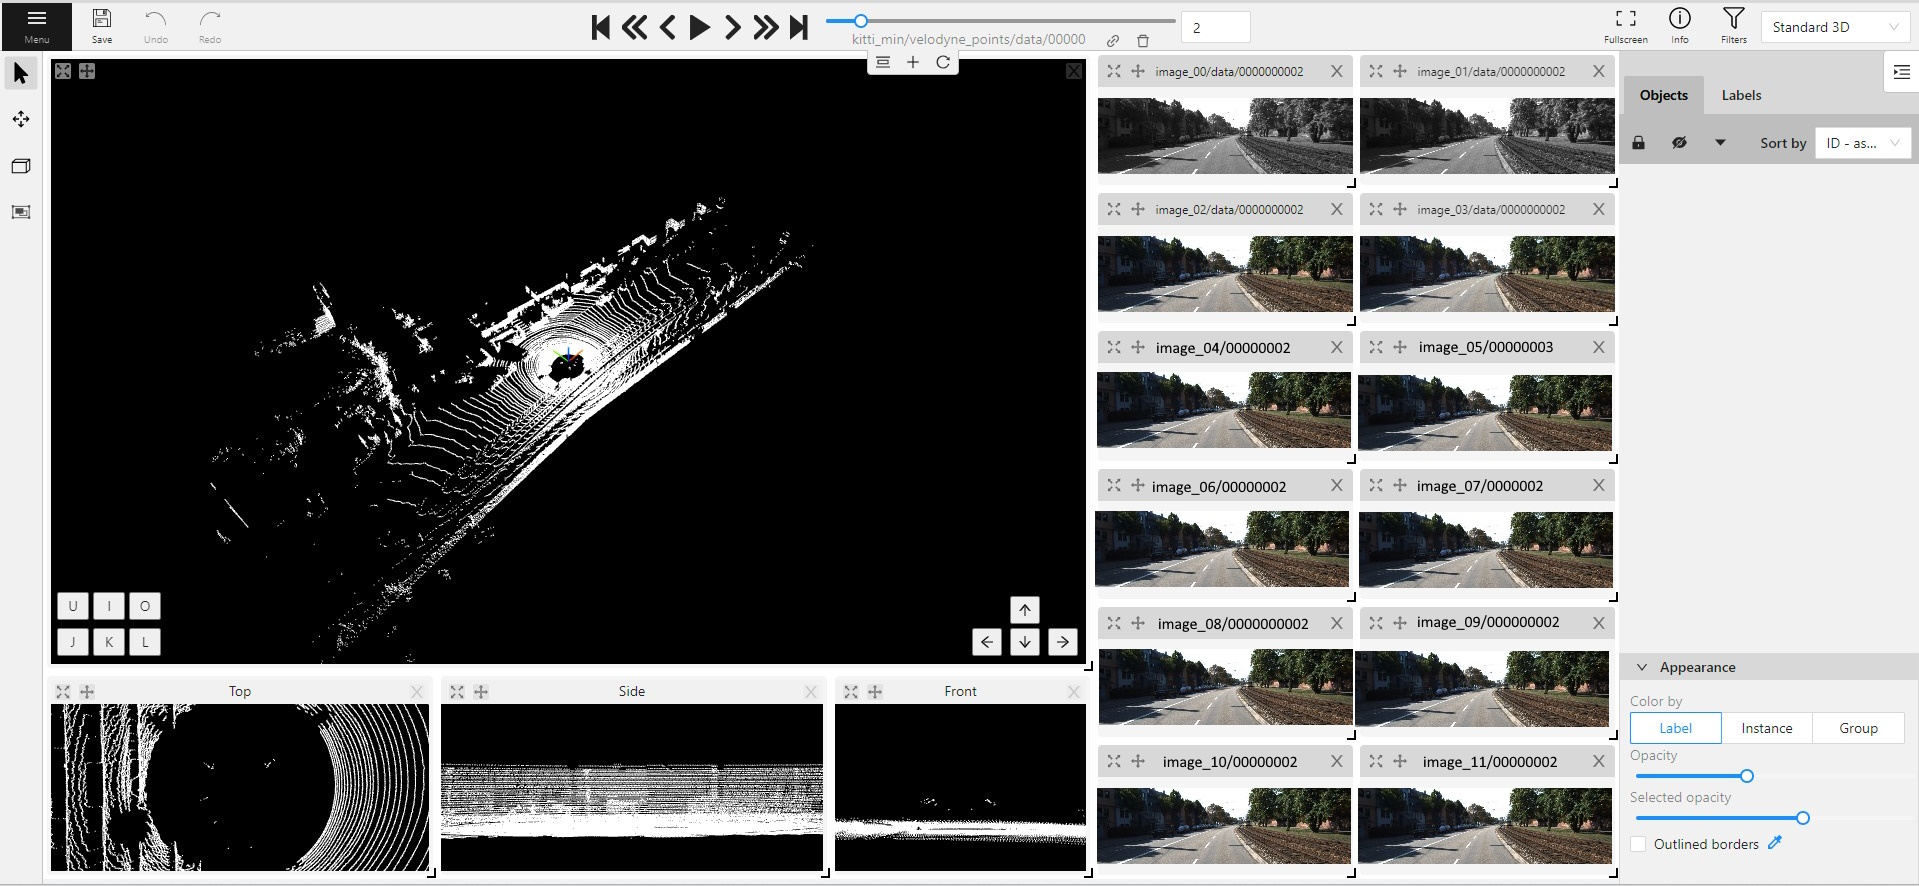
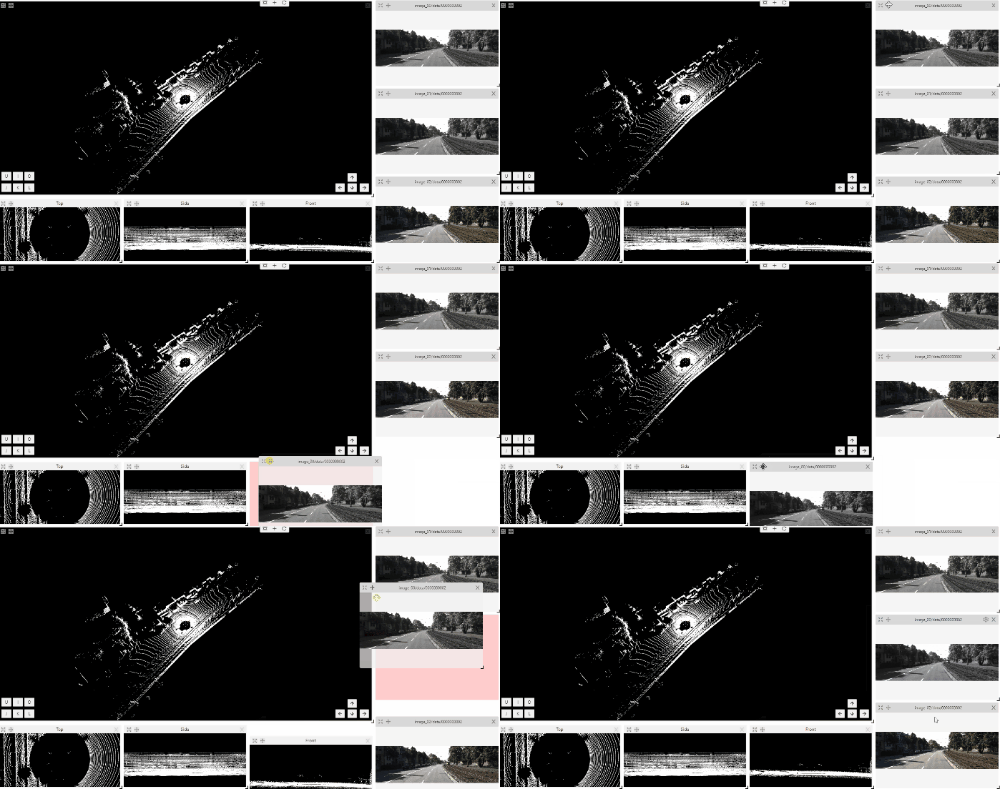
Contextual images
The maximum amount of contextual images is twelve.
By default they will be positioned on the right side of the main image.
Note
By default, only three contextual images will be visible.
When you add contextual images to the set,
small toolbar will appear on the top of the screen, with the following elements:
Element
Description
Fit views. Click to restore the layout to its original appearance.
If you’ve expanded any images in the layout, they will returned to their original size.
This won’t affect the number of context images on the screen.
Add new image. Click to add context image to the layout.
Reload layout. Click to reload layout to the default view.
Note, that this action can change the number of context images resetting them back to three.
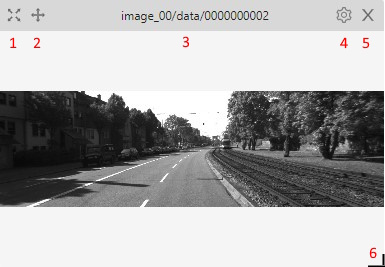
Each context image has the following elements:
Element
Description
1
Full screen. Click to expand the contextual image in to the full screen mode.
Click again to revert contextual image to windowed mode.
2
Move contextual image. Hold and move contextual image to the other place on the screen.
3
Name. Unique contextual image name
4
Select contextual image. Click to open a horizontal listview of all available contextual images.
Click on one to select.
5
Close. Click to remove image from contextual images menu.
6
Extend Hold and pull to extend the image.
4 - Filter
Guide to using the Filter feature in CVAT.
There are some reasons to use the feature:
When you use a filter, objects that don’t match the filter will be hidden.
The fast navigation between frames which have an object of interest.
Use the Left Arrow / Right Arrow keys for this purpose
or customize the UI buttons by right-clicking and select switching by filter.
If there are no objects which correspond to the filter,
you will go to the previous / next frame which contains any annotated objects.
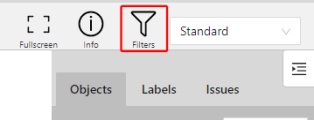
To apply filters you need to click on the button on the top panel.
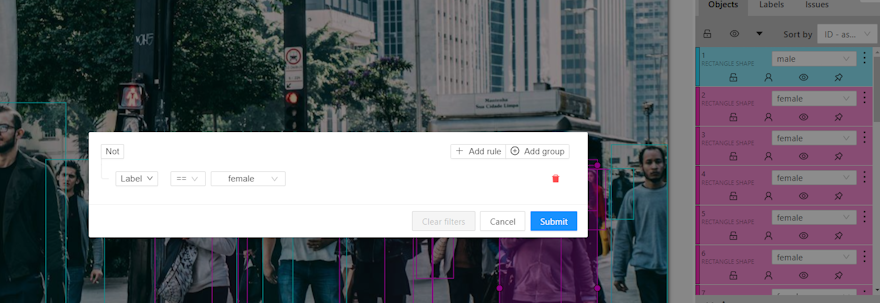
Create a filter
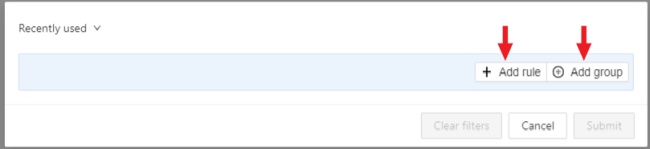
It will open a window for filter input. Here you will find two buttons: Add rule and Add group.
Rules
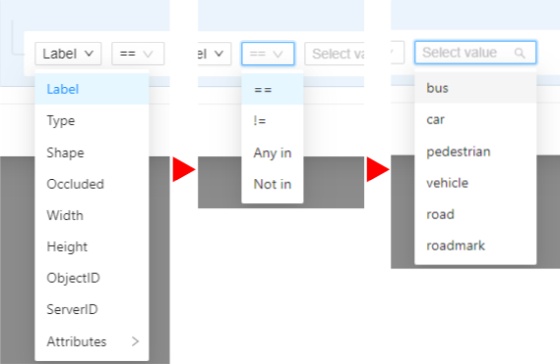
The Add rule button adds a rule for objects display. A rule may use the following properties:
== - Equally; != - Not equal; > - More; >= - More or equal; < - Less; <= - Less or equal;
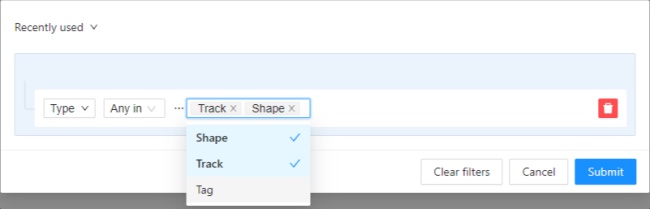
Any in; Not in - these operators allow you to set multiple values in one rule;
Is empty; is not empty – these operators don’t require to input a value.
Between; Not between – these operators allow you to choose a range between two values.
Like - this operator indicate that the property must contain a value.
Starts with; Ends with - filter by beginning or end.
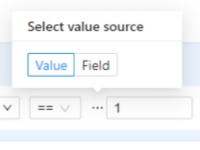
Some properties support two types of values that you can choose:
You can add multiple rules, to do so click the add rule button and set another rule.
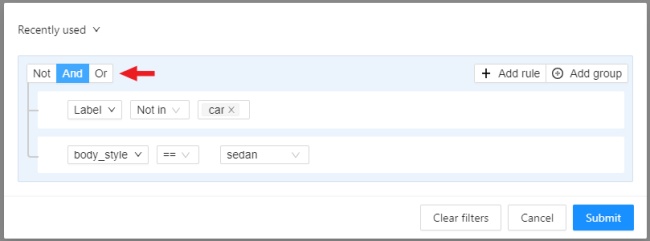
Once you’ve set a new rule, you’ll be able to choose which operator they will be connected by: And or Or.
All subsequent rules will be joined by the chosen operator.
Click Submit to apply the filter or if you want multiple rules to be connected by different operators, use groups.
Groups
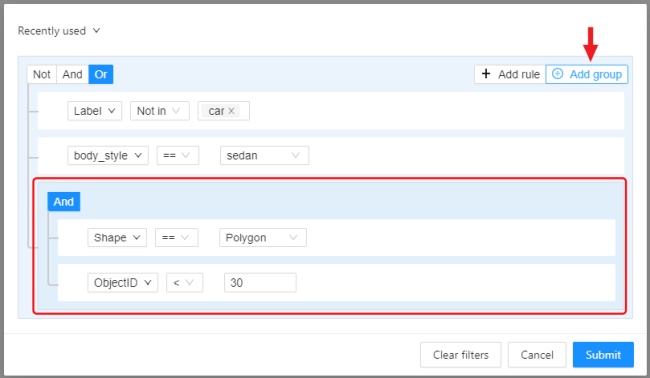
To add a group, click the Add group button. Inside the group you can create rules or groups.
If there is more than one rule in the group, they can be connected by And or Or operators.
The rule group will work as well as a separate rule outside the group and will be joined by an
operator outside the group.
You can create groups within other groups, to do so you need to click the add group button within the group.
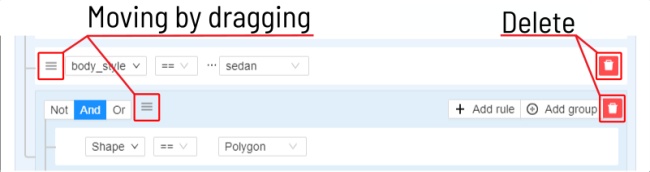
You can move rules and groups. To move the rule or group, drag it by the button.
To remove the rule or group, click on the Delete button.
If you activate the Not button, objects that don’t match the group will be filtered out.
Click Submit to apply the filter.
The Cancel button undoes the filter. The Clear filter button removes the filter.
Once applied filter automatically appears in Recent used list. Maximum length of the list is 10.
To apply sorting, drag the parameter to the top area above the horizontal bar.
The parameters below the horizontal line will not be applied.
By moving the parameters you can change the priority,
first of all sorting will occur according to the parameters that are above.
Pressing the Sort button switches Ascending sort/Descending sort.
Quick filters
Quick Filters contain several frequently used filters:
Assigned to me - show only those projects, tasks or jobs that are assigned to you.
Owned by me - show only those projects or tasks that are owned by you.
Not completed - show only those projects, tasks or jobs that have a status other than completed.
AWS storages - show only AWS cloud storages
Azure storages - show only Azure cloud storages
Google cloud storages - show only Google cloud storages
Date and time selection
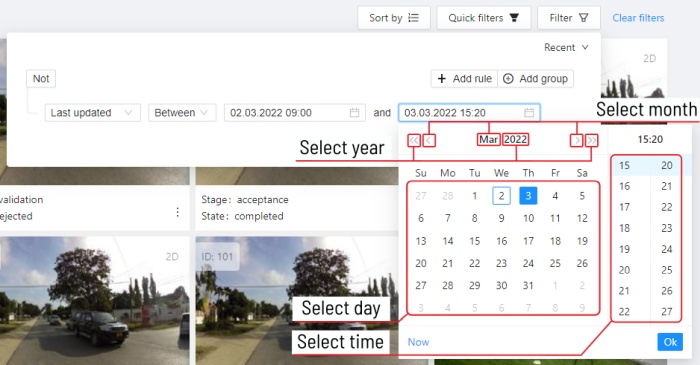
When creating a Last updated rule, you can select the date and time by using the selection window.
You can select the year and month using the arrows or by clicking on the year and month.
To select a day, click on it in the calendar,
To select the time, you can select the hours and minutes using the scrolling list.
Or you can select the current date and time by clicking the Now button.
To apply, click Ok.
Export filtered data
After applying filters and sorting to your lists, you can export the filtered data
to CSV format for further analysis or reporting.
Export to CSV
To export filtered data click Export as CSV download button on the filtering header. The CSV file will be
downloaded with the current filtered and sorted data
Note
The process might take a while as we export resources from all pages
CSV file contents
The exported CSV file includes the following parameters:
Some fields may be exported as empty values if you don’t have sufficient permissions
to view the related resources (e.g., project name, task name).
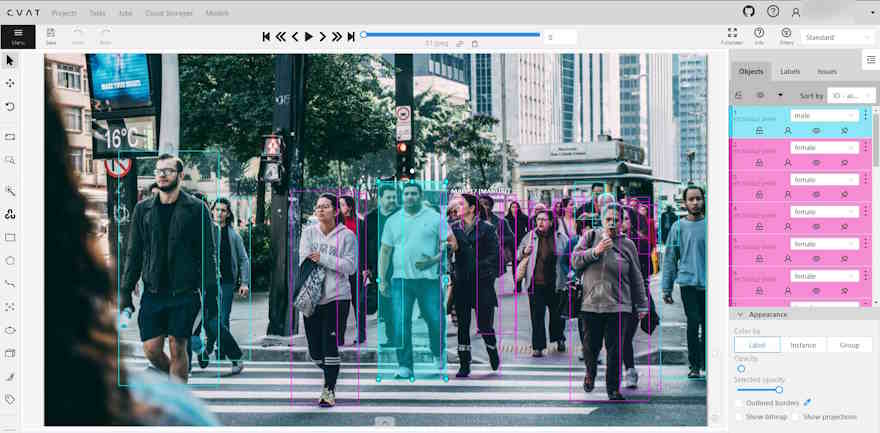
5 - Multi-object selection
Select and perform actions on multiple annotation objects.
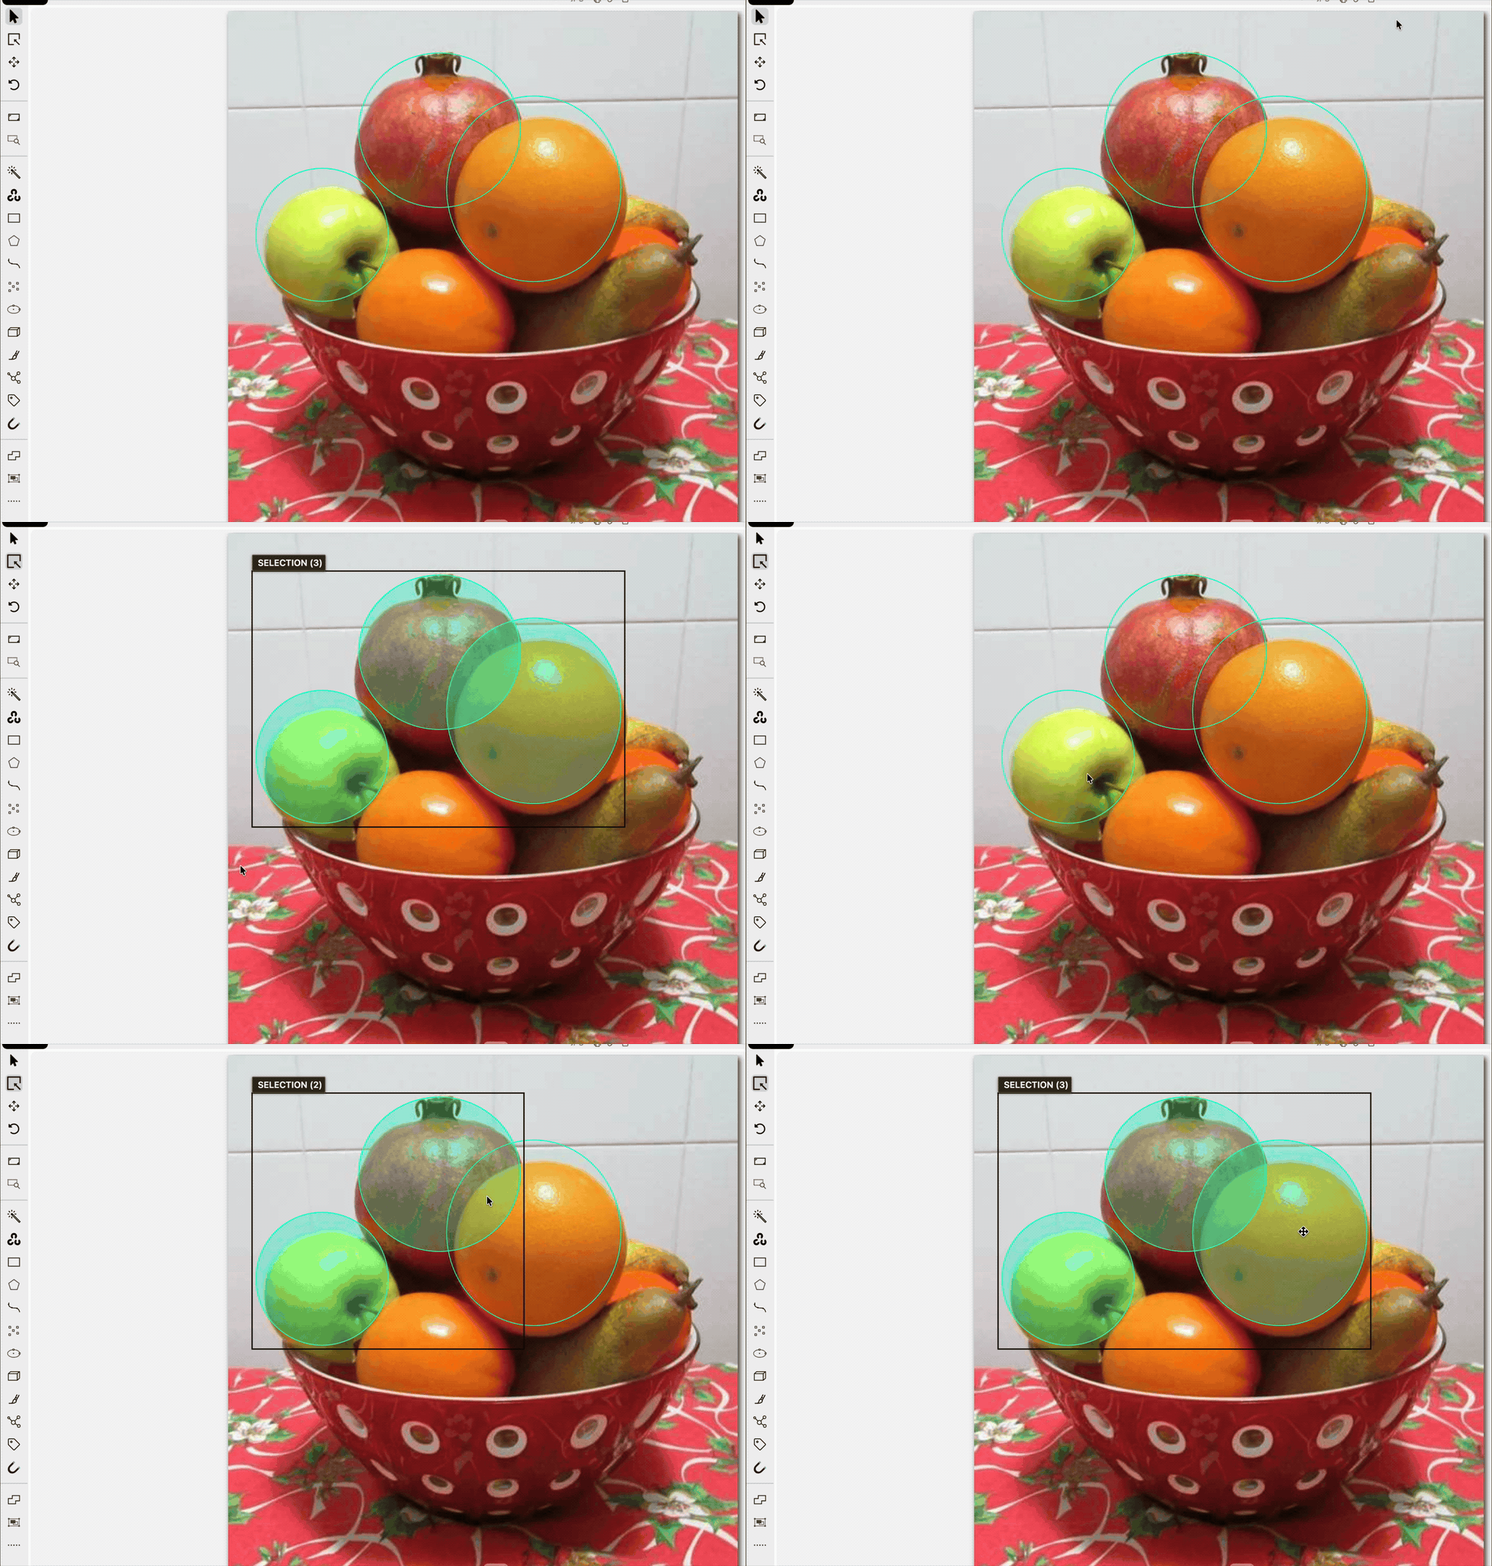
Multi-object selection allows you to select shapes and tracks in the 2D annotation workspace
and perform supported actions on all selected objects at once.
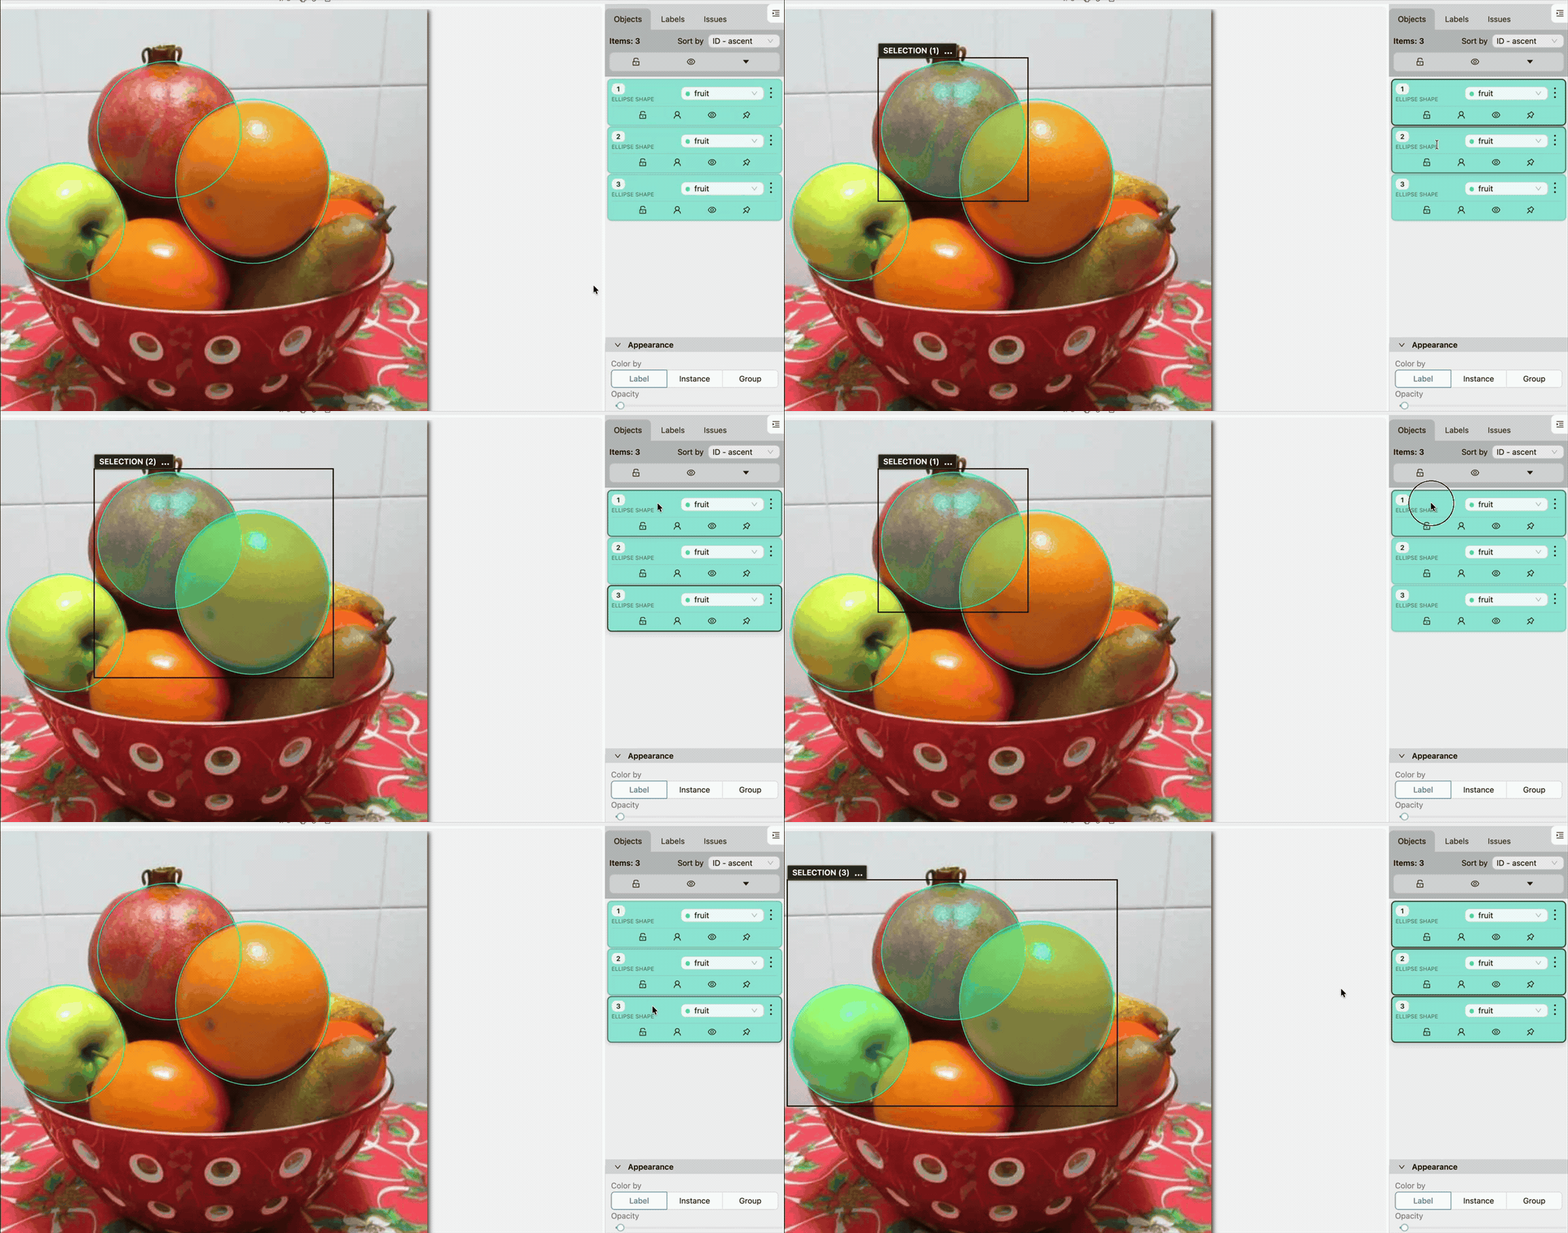
You can create a multi-object selection from the canvas or the objects sidebar.
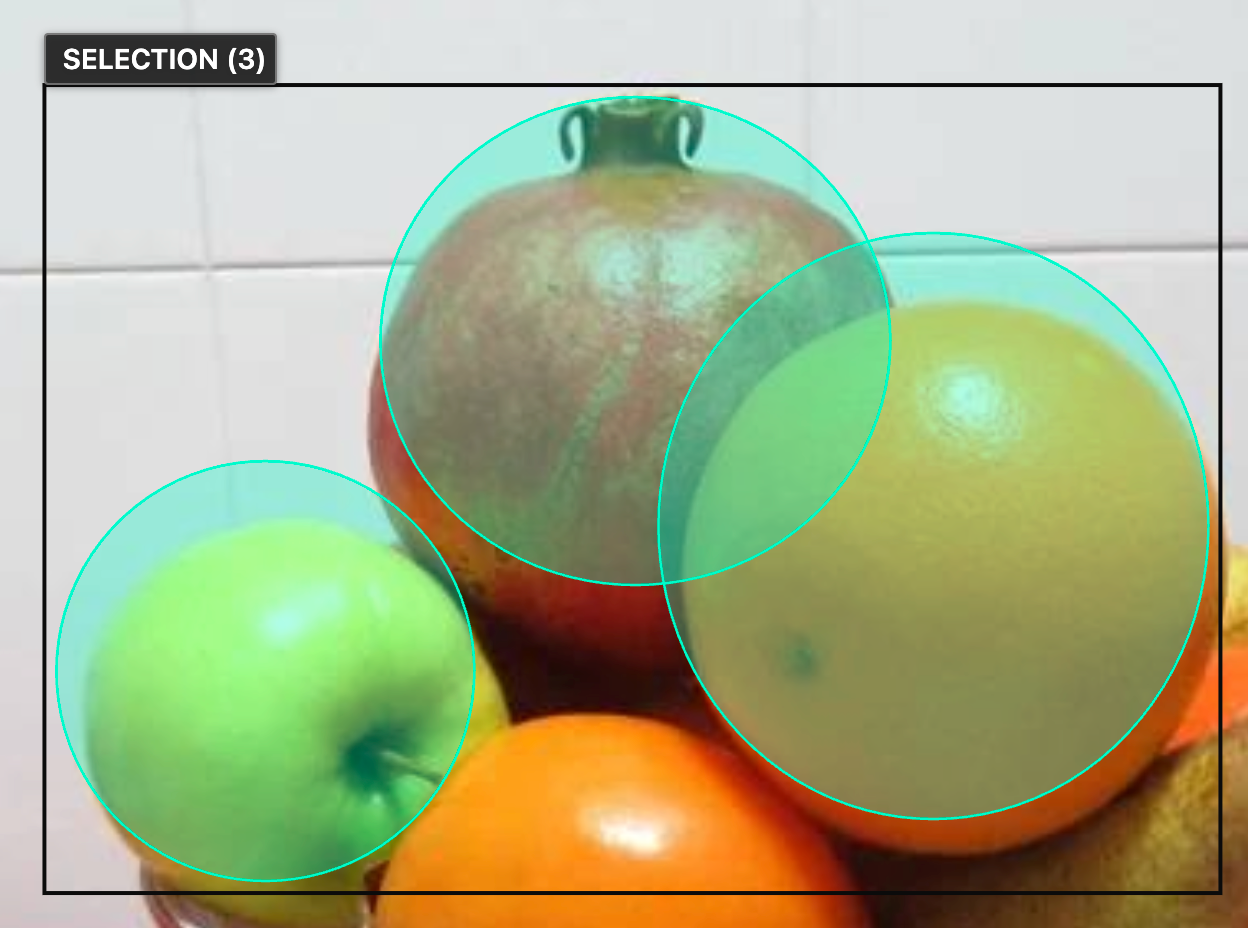
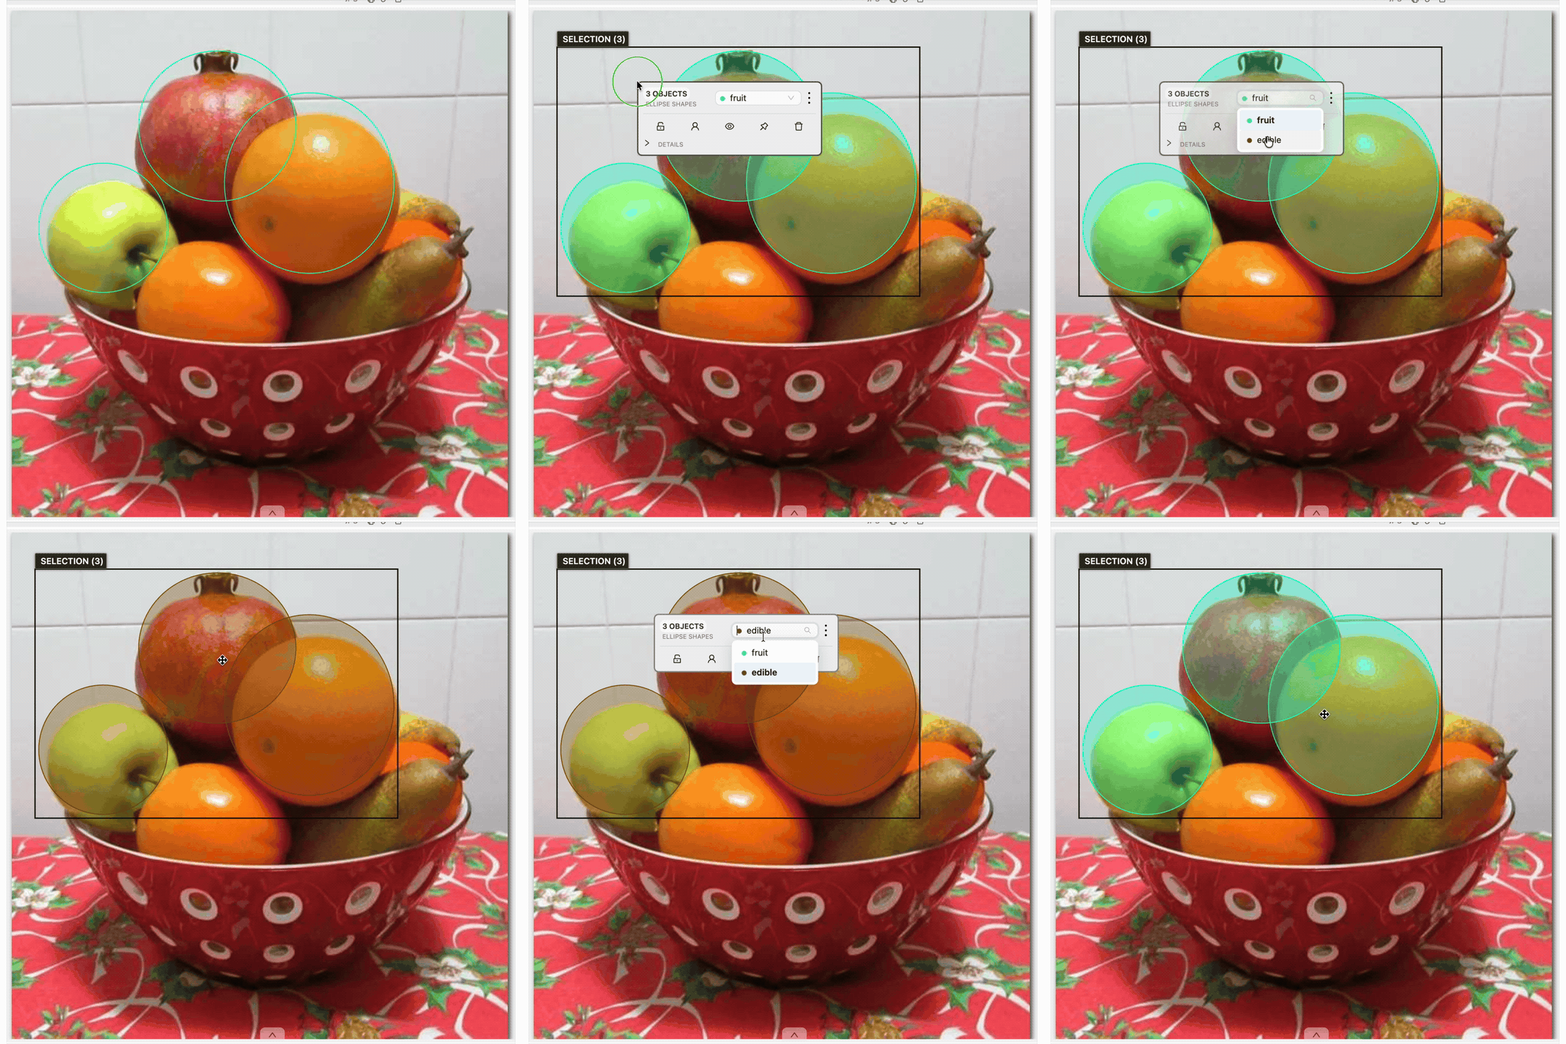
A selection can contain one or more objects. CVAT displays a bounding box around the selected objects
and a SELECTION (N) label, where N is the number of selected objects.
Selecting objects on the canvas
To select objects with a selection box, do the following:
Click an empty area of the canvas and drag a selection box around the objects.
Release the mouse button.
Only objects fully contained by the selection box are selected.
For rotated objects, CVAT uses the transformed object boundaries.
The Select objects tool remains active, so you can draw another selection box without selecting the tool again.
Each new selection box starts a new selection and replaces the previous one.
You can also hold Shift and start dragging from an empty canvas area while using the Cursor tool.
This activates Select objects and starts the selection box from the initial pointer position.
If the box selects at least one object, Select objects remains active after you release the mouse button.
If the box selects no objects, CVAT returns to the Cursor tool.
A Shift-drag also replaces objects previously selected with Ctrl/Command+Click.
Selecting individual objects
While the Select objects tool is active, click an object to add it to or remove it from the selection.
The same semantic hit-testing used for regular canvas interaction applies to overlapping objects,
Points objects, and skeletons.
While using the Cursor tool, hold the platform selection modifier and click an object:
On Windows and Linux, use Ctrl+Click.
On macOS, use Command+Click.
You can use the modifier on the canvas or on an object card in the Objects tab.
When objects overlap, CVAT uses the object under the pointer according to the regular canvas hit-testing rules.
Selecting objects from the sidebar
The objects sidebar provides the following selection options:
Location
Action
Result
Objects tab
Ctrl/Command+Click an object card
Adds the object to or removes it from the selection.
Objects tab
Shift+Click an object card
Selects the range between the last selected object and the clicked object using the current visible order.
Objects tab
Ctrl/Command+A
Selects all selectable objects visible on the canvas.
Labels tab
Ctrl/Command+Click a label
Adds or removes all selectable objects with that label.
Labels tab
Shift+Click a label
Selects objects for a continuous range of labels.
Layer Stack
Ctrl/Command+Click a layer header
Adds or removes all selectable objects on the layer.
Layer Stack
Shift+Click an object card
Selects an object range within that layer.
In the Layer Stack, object-card range selection is limited to one expanded layer.
Hidden, filtered, outside, and hidden-layer objects are not selected.
Tags and individual skeleton elements cannot be added to a multi-object selection.
A Points object is selected as one complete object rather than as separate points.
Changing a selection
To clear the selection, do one of the following:
Press Esc.
Click outside the selection while using the Cursor tool.
Click an unselected object without a selection modifier while using the Cursor tool
to return to regular single-object interaction.
Use Ctrl/Command+Click to remove individual objects without clearing the rest of the selection.
Hiding an object or its layer removes the object from the active selection.
Undoing the hide action restores both the object’s visibility and its previous selection membership.
Showing the object again manually does not add it back to the selection.
Moving selected objects
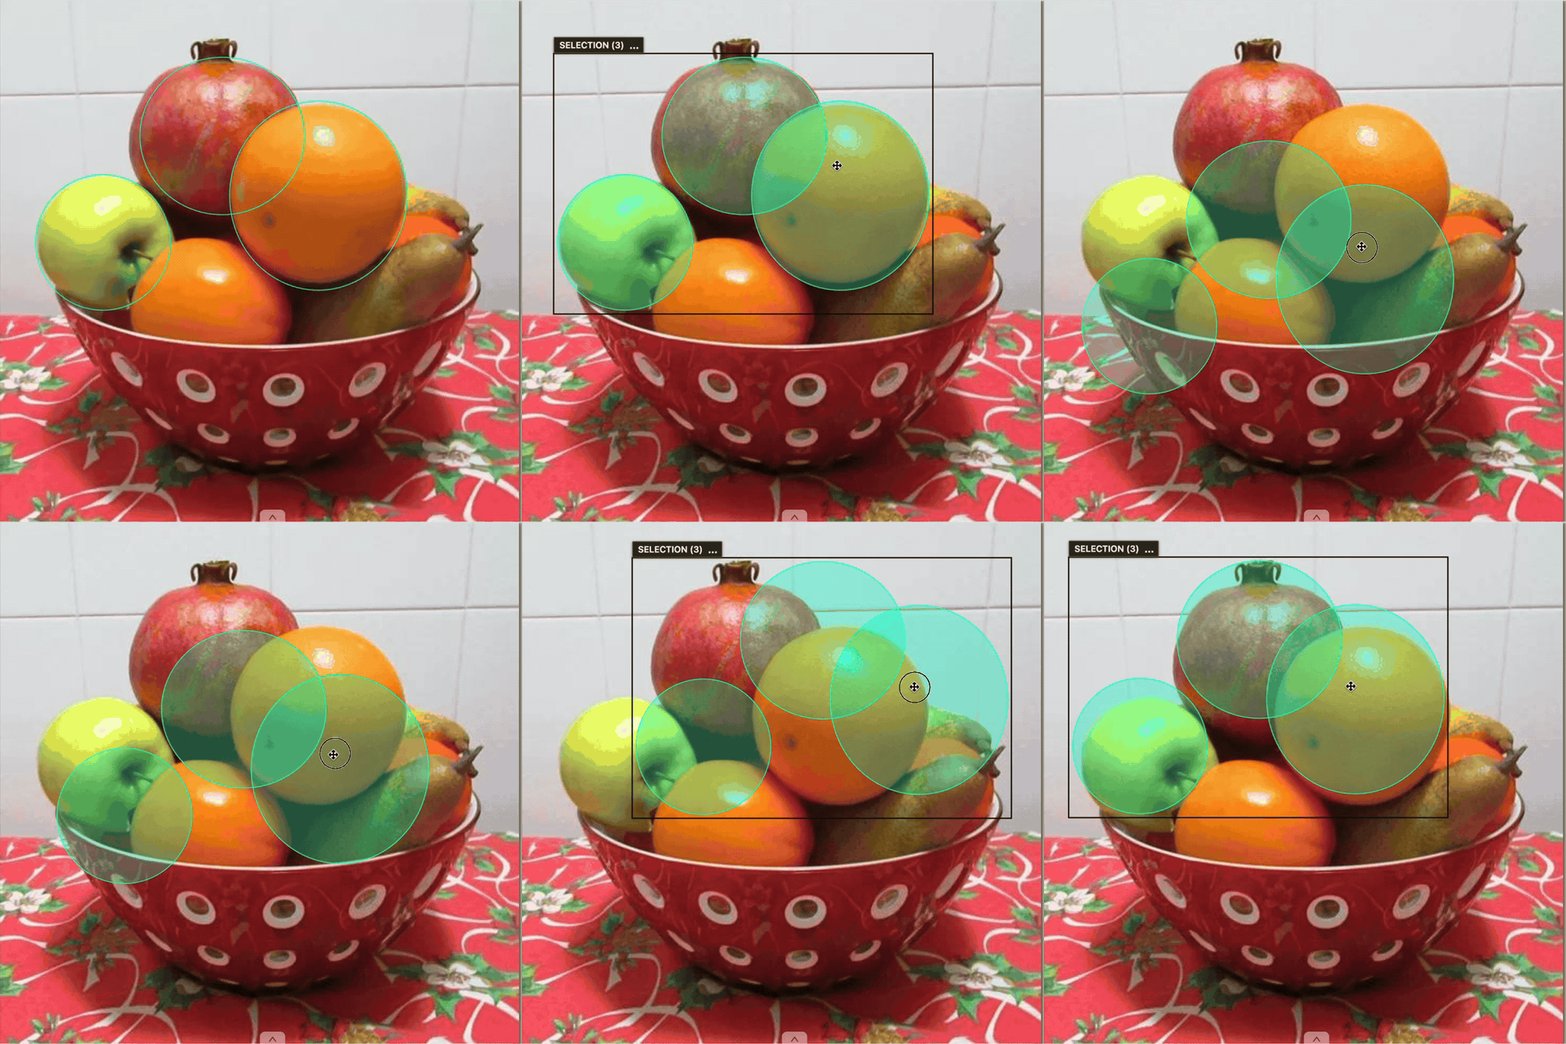
To move a selection, drag one of the following:
The selection bounding box.
The SELECTION (N) label.
A movable object that belongs to a selection containing multiple objects.
All movable objects are translated by the same distance, preserving their relative positions,
rotations, and layer order.
Locked, pinned, and ground-truth objects remain selected but do not move.
If the selection contains both movable and stationary objects, only the movable objects are translated.
A selection containing only stationary objects cannot be dragged.
Selection actions
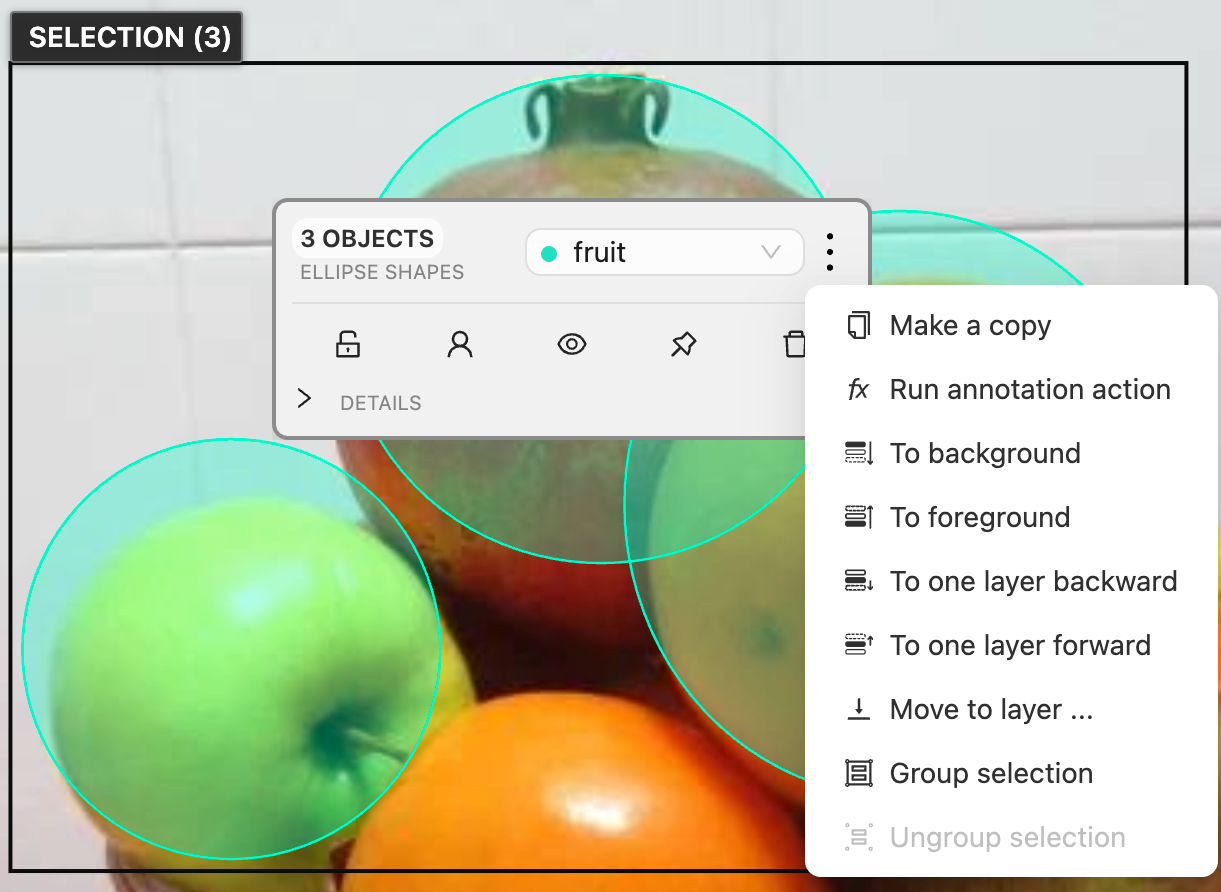
Open the selection action card by right-clicking the selection bounding box.
The card contains the label selector, frequently used actions represented by icons,
and a More selection actions (⋯) menu for additional operations.
It also displays the number of selected objects and a compact type summary.
Hover over the summary to see the number of objects of each type.
Unavailable actions are disabled when they cannot be applied safely to the selection.
Hover over a disabled action to see why it is unavailable.
Changing labels
Use the label selector at the top of the card to apply one label to the complete selection.
The selector contains only labels that are compatible with every selected object.
If the selected objects have different labels, the selector displays Multiple labels.
The selector is disabled when no common label is available or when the selection contains
a locked, ground-truth, or skeleton object.
Changing attributes
Expand Details to edit attributes for the complete selection.
This section is available when all selected objects have the same label and that label has attributes.
If an attribute has different values among the selected objects, its control indicates a mixed value.
Selecting a new value applies it to every selected object.
Attributes are read-only when the selection contains a locked or ground-truth object.
Locking and pinning
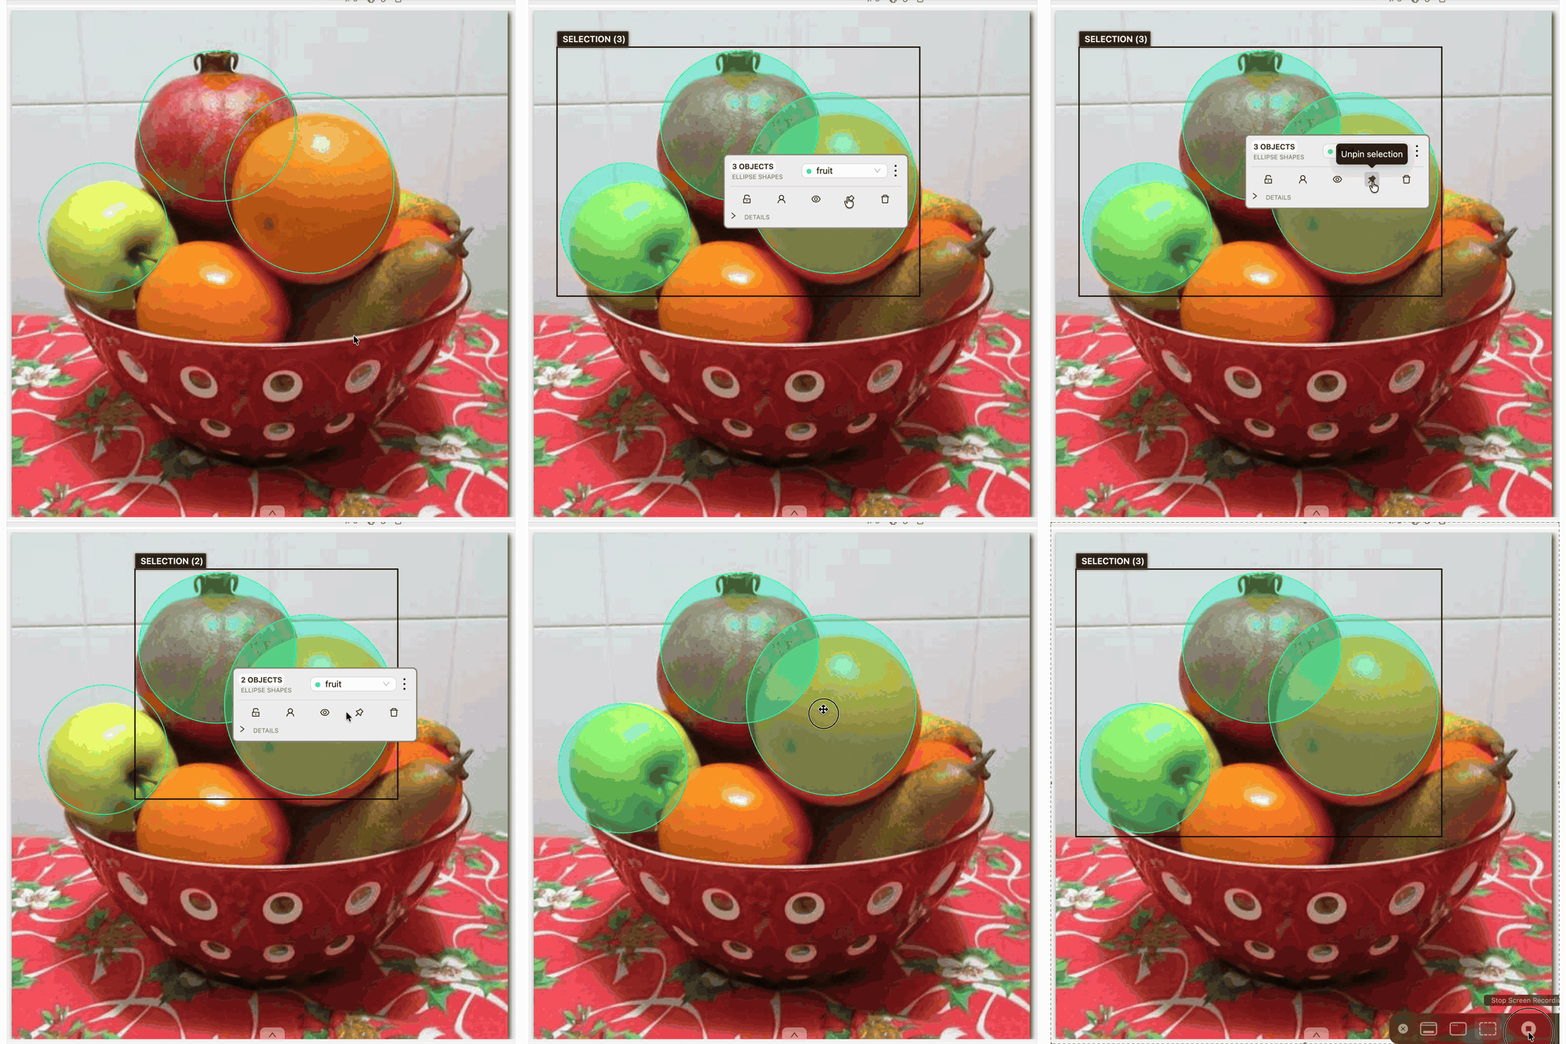
Use the lock icon to lock or unlock all selected objects.
Locking and unlocking are unavailable when the selection contains a ground-truth object.
Use the pin icon to pin or unpin all selected objects.
Pinning and unpinning are unavailable when the selection contains a locked or ground-truth object.
For a selection with mixed lock or pin states, the action changes only the objects needed
to bring the complete selection to the state shown by the action.
Occluding and hiding
Use the occluded icon or press Q or / to change the occluded state of every selected object.
Use the visibility icon or press H to hide the complete selection.
These actions are unavailable when the selection contains a locked or ground-truth object.
Hiding removes the hidden objects from the active selection. Undo restores both their visibility
and their selection membership as one history action.
Copying and running annotation actions
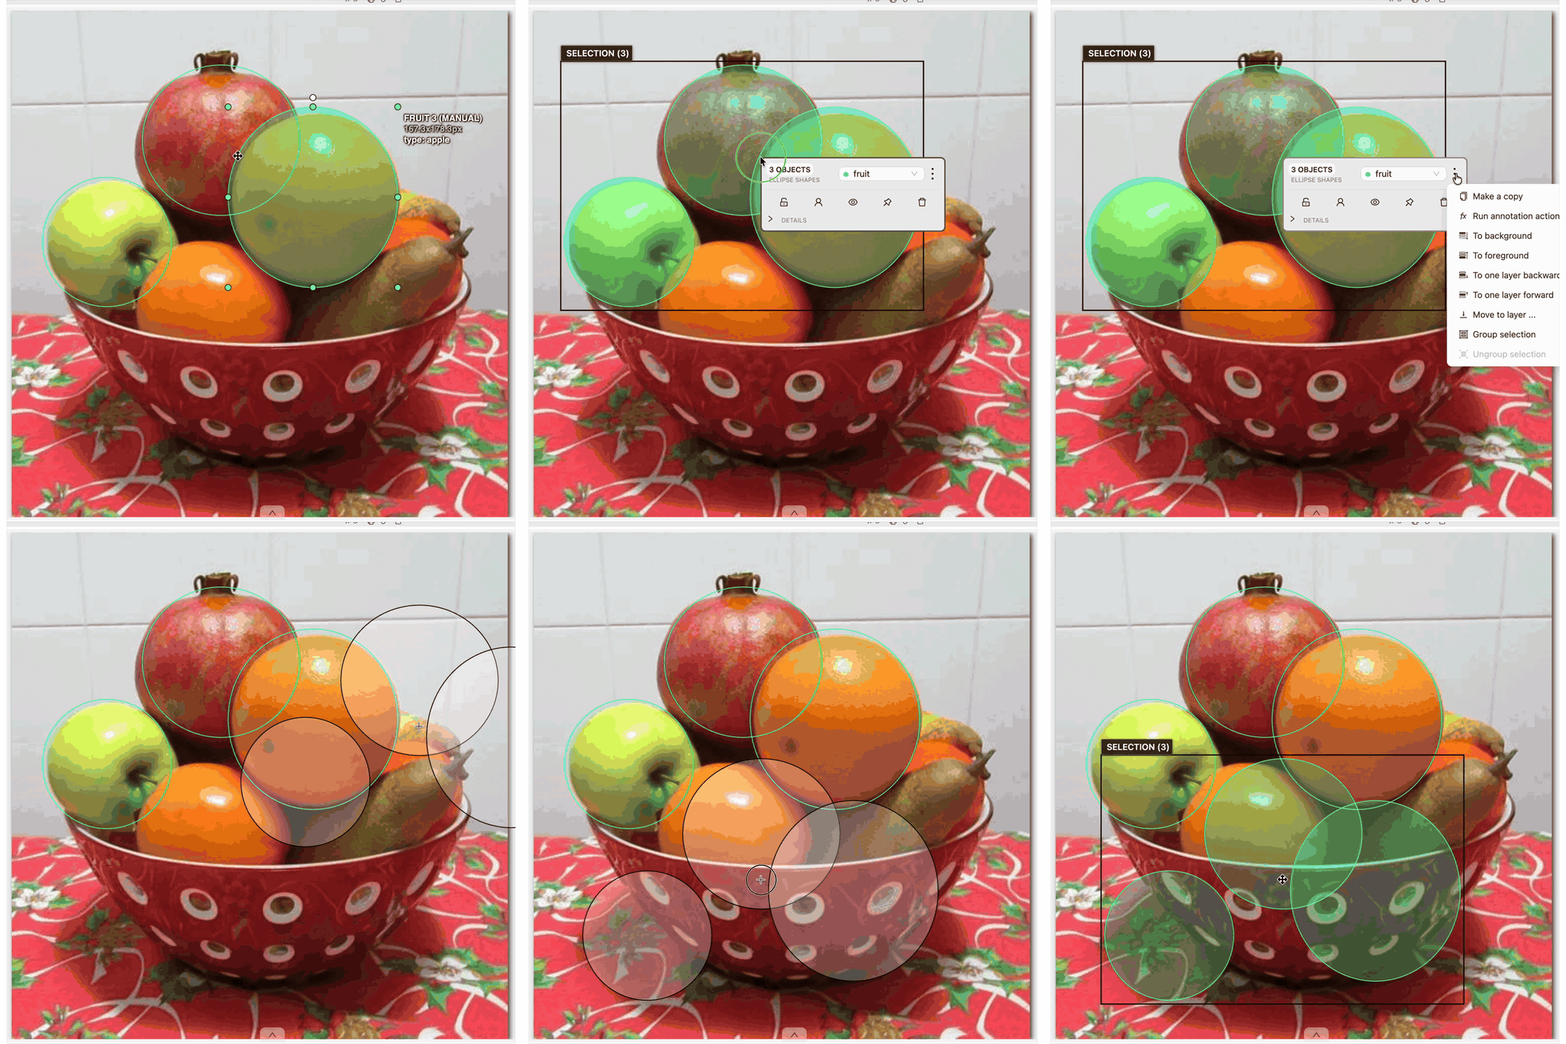
Open More selection actions (⋯), then select Make a copy to copy the selected objects
and start interactive placement.
For details, see Copying and pasting a selection.
In the same menu, select Run annotation action to open the annotation action dialog with
the selected objects as its input. The dialog provides actions that are compatible with the selected objects.
Changing the layer order
Open More selection actions (⋯), then use one of the following actions to change the layer order
of selected objects:
To background moves them behind the other objects.
To foreground moves them in front of the other objects.
To one layer backward moves each object one layer backward.
To one layer forward moves each object one layer forward.
Move to layer … moves them to a specified layer.
Layer actions apply only to unlocked, editable shapes and tracks in the selection.
Locked and ground-truth objects remain selected but keep their current layer.
Layer actions are disabled when the selection contains no editable objects.
Grouping and ungrouping
Open More selection actions (⋯), then select Group selection to place the selected objects in one group.
At least two objects must be selected, and the action is disabled if they already belong to the same group.
Select Ungroup selection from the same menu to remove selected objects from their groups.
This action is available when at least one selected object belongs to a group.
Grouping and ungrouping are unavailable when the selection contains a ground-truth object.
Deleting a selection
Use the delete icon to delete the eligible selected objects as one undoable operation.
Regular deletion skips locked objects, which remain selected.
Use Shift+Delete or Shift+Backspace to force-delete locked selected objects.
Ground-truth objects are always skipped and remain selected.
The regular object shortcuts also work with an active selection.
For example, press L to lock or unlock the selection, P to pin or unpin it,
and use a configured label shortcut to change the label when it is compatible with every selected object.
Copying and pasting a selection
Press Ctrl+C on Windows or Linux, or Command+C on macOS, to copy the selected objects.
Press Ctrl+V or Command+V to start interactive placement.
If one object is selected, copy and paste use the same placement behavior as Make a copy for a single object.
For two or more objects, CVAT displays transparent preview objects. Move the pointer to the required position
and click to place them. The new objects preserve their relative geometry, labels, attributes, object types,
rotations, and groups, and become the active selection.
Lock, visibility, pin, and instance color use the same defaults as single-object copies.
A copied selection can contain different geometry types, including rectangles, ellipses, polygons,
polylines, and Points objects, as well as shapes and tracks. When objects are placed near a frame boundary,
CVAT constrains or crops their geometry according to the object type.
Press Esc during interactive placement to cancel the paste without creating objects.
Canceling the paste also clears the active selection.
Undo, redo, and frame navigation
Selection membership changes and supported batch operations are recorded in annotation history.
Undo and redo restore selection changes, movement, deletion, paste, label and attribute changes,
lock, pin, occluded, and visibility changes, grouping, and layer changes.
When hiding selected objects, Undo restores both their visibility and selection membership.
This also applies to skeleton objects and their elements.
On Windows and Linux, use Ctrl+Z to undo and Ctrl+Shift+Z or Ctrl+Y to redo.
On macOS, use Command+Z to undo and Command+Shift+Z to redo.
When you change frames, selected frame-local shapes are removed from the selection.
Selected tracks remain selected if they are visible and available on the destination frame.
Outside, hidden, filtered, and hidden-layer tracks are removed from the selection.
6 - OpenCV tools
Use intelligent scissors, object tracking, and histogram equalization in CVAT.
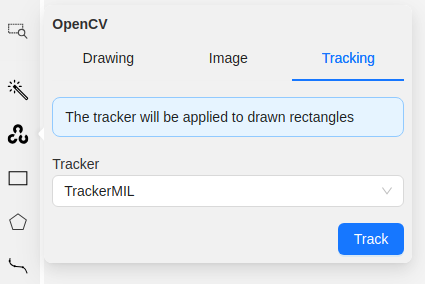
Open the OpenCV menu on the controls sidebar to draw polygons with intelligent scissors,
track objects across frames, or adjust image contrast.
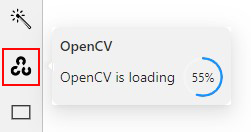
On the menu toolbar, click OpenCV and wait for the library to load.
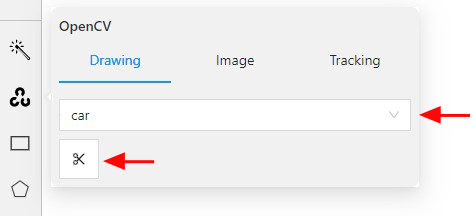
Go to the Drawing tab, select the label, and click on the Intelligent scissors button.
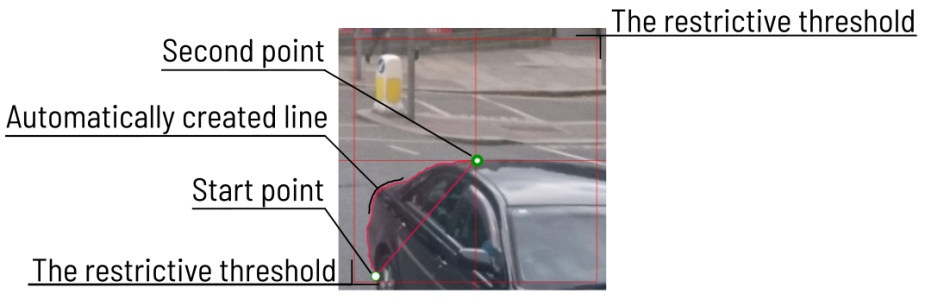
Add the first point on the boundary of the allocated object. You will see a line repeating the outline of the object.
Add the second point, so that the previous point is within the restrictive threshold.
After that a line repeating the object boundary will be automatically created between the points.
To finish placing points, on the top menu click Done (or N on the keyboard).
As a result, a polygon will be created.
You can change the number of points in the
polygon with the slider:
To increase or lower the action threshold, hold Ctrl and scroll the mouse wheel.
During the drawing process, you can remove the last point by clicking on it with the left mouse button.
 )
works with both polygon and mask annotations.
)
works with both polygon and mask annotations.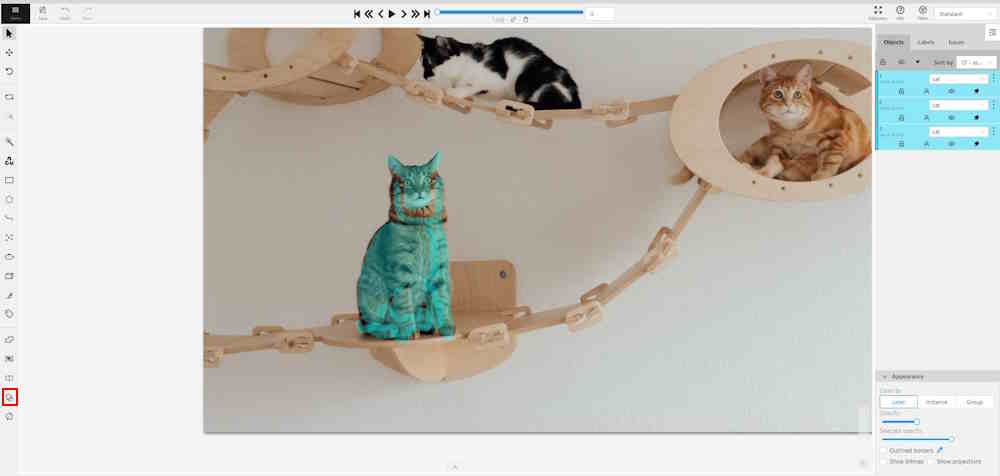

 )
is compatible with both mask and polygon annotations.
)
is compatible with both mask and polygon annotations.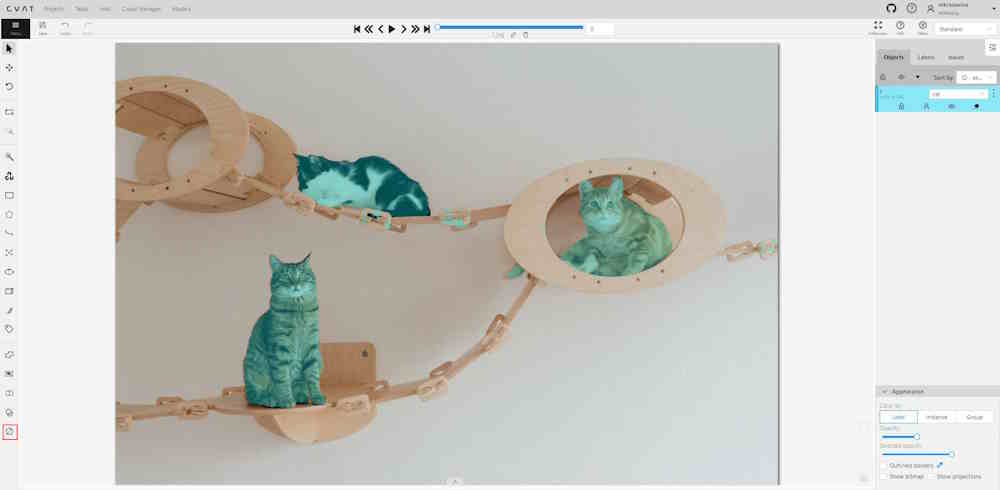



 and wait for the library to load.