This is the multi-page printable view of this section. Click here to print.
Dataset Management
- 1: Dataset formats
- 1.1: CVAT for image
- 1.2: Datumaro
- 1.3: LabelMe
- 1.4: MOT
- 1.5: MOTS
- 1.6: COCO
- 1.7: COCO Keypoints
- 1.8: Pascal VOC
- 1.9: Segmentation Mask
- 1.10: Ultralytics YOLO
- 1.11: Ultralytics-YOLO-Classification
- 1.12: YOLO
- 1.13: ImageNet
- 1.14: Wider Face
- 1.15: CamVid
- 1.16: VGGFace2
- 1.17: Market-1501
- 1.18: ICDAR13/15
- 1.19: Open Images
- 1.20: Cityscapes
- 1.21: KITTI
- 1.22: LFW
- 2: Import annotations and data to CVAT
- 3: Export annotations and data from CVAT
- 4: Backup Task and Project
- 5: Dataset Manifest
- 6: Data preparation on the fly
1 - Dataset formats
In CVAT, you have the option to export data in various formats. The choice of export format depends on the type of annotation as well as the intended future use of the dataset.
The table below outlines the available formats for data export in CVAT.
| Format | Type | Task | Models | Shapes | Attributes | Video Tracks |
|---|---|---|---|---|---|---|
| CamVid 1.0 | .txt .png |
Semantic Segmentation |
U-Net, SegNet, DeepLab, PSPNet, FCN, Mask R-CNN, ICNet, ERFNet, HRNet, V-Net, and others. |
Polygons, Masks | Not supported | Not supported |
| Cityscapes 1.0 | .txt .png |
Semantic Segmentation |
U-Net, SegNet, DeepLab, PSPNet, FCN, ERFNet, ICNet, Mask R-CNN, HRNet, ENet, and others. |
Polygons, Masks | Specific attributes | Not supported |
| COCO 1.0 | .json | Detection, Semantic Segmentation |
YOLO (You Only Look Once), Faster R-CNN, Mask R-CNN, SSD (Single Shot MultiBox Detector), RetinaNet, EfficientDet, UNet, DeepLabv3+, CenterNet, Cascade R-CNN, and others. |
Bounding Boxes, Oriented Bounding Boxes, Polygons, Masks | All attributes | Supported |
| COCO Keypoints 1.0 | .json | Keypoints | OpenPose, PoseNet, AlphaPose, SPM (Single Person Model), Mask R-CNN with Keypoint Detection:, and others. |
Skeletons | All attributes | Supported |
| CVAT for images 1.1 | .xml | Any in 2D except for Video Tracking | Any model that can decode the format. | Tags, Bounding Boxes, Oriented Bounding Boxes, Polygons, Polylines, Points, Cuboids, Skeletons, Ellipses, Masks |
All attributes | Supported |
| CVAT for video 1.1 | .xml | Any in 2D except for Classification | Any model that can decode the format. | Bounding Boxes, Oriented Bounding Boxes, Polygons, Polylines, Points, Cuboids, Skeletons, Ellipses, Masks |
All attributes | Supported |
| Datumaro 1.0 | .json | Any | Any model that can decode the format. Main format in Datumaro framework |
Tags, Bounding Boxes, Oriented Bounding Boxes, Polygons, Polylines, Points, Cuboids, Skeletons, Ellipses, Masks |
All attributes | Supported |
| ICDAR Includes ICDAR Recognition 1.0, ICDAR Detection 1.0, and ICDAR Segmentation 1.0 descriptions. |
.txt | Text recognition, Text detection, Text segmentation |
EAST: Efficient and Accurate Scene Text Detector, CRNN, Mask TextSpotter, TextSnake, and others. |
Tags, Bounding Boxes, Polygons, Masks | Specific attributes | Not supported |
| ImageNet 1.0 | .jpg .txt |
Semantic Segmentation, Classification, Detection |
VGG (VGG16, VGG19), Inception, YOLO, Faster R-CNN , U-Net, and others | Tags | No attributes | Not supported |
| KITTI 1.0 | .txt .png |
Semantic Segmentation, Detection, 3D | PointPillars, SECOND, AVOD, YOLO, DeepSORT, PWC-Net, ORB-SLAM, and others. | Bounding Boxes, Polygons, Masks | Specific attributes | Not supported |
| LabelMe 3.0 | .xml | Compatibility, Semantic Segmentation |
U-Net, Mask R-CNN, Fast R-CNN, Faster R-CNN, DeepLab, YOLO, and others. |
Bounding Boxes, Polygons, Masks | Supported (Polygons) | Not supported |
| LFW 1.0 | .txt | Verification, Face recognition |
OpenFace, VGGFace & VGGFace2, FaceNet, ArcFace, and others. |
Tags, Skeletons | Specific attributes | Not supported |
| Market-1501 1.0 | .txt | Re-identification | Triplet Loss Networks, Deep ReID models, and others. |
Bounding Boxes | Specific attributes | Not supported |
| MOT 1.0 | .txt | Video Tracking, Detection |
SORT, MOT-Net, IOU Tracker, and others. |
Bounding Boxes | Specific attributes | Supported |
| MOTS PNG 1.0 | .png .txt |
Video Tracking, Detection |
SORT, MOT-Net, IOU Tracker, and others. |
Bounding Boxes, Masks | Specific attributes | Supported |
| Open Images 1.0 | .csv | Detection, Classification, Semantic Segmentation |
Faster R-CNN, YOLO, U-Net, CornerNet, and others. |
Tags, Bounding Boxes, Polygons, Masks | Specific attributes | Not supported |
| PASCAL VOC 1.0 | .xml, .png | Classification, Detection | Faster R-CNN, SSD, YOLO, AlexNet, and others. |
Tags, Bounding Boxes, Polygons, Masks | Specific attributes | Not supported |
| Segmentation Mask 1.0 | .png | Semantic Segmentation | Faster R-CNN, SSD, YOLO, AlexNet, and others. |
Polygons, Masks | No attributes | Not supported |
| VGGFace2 1.0 | .csv | Face recognition | VGGFace, ResNet, Inception, and others. |
Bounding Boxes, Points | No attributes | Not supported |
| WIDER Face 1.0 | .txt | Detection | SSD (Single Shot MultiBox Detector), Faster R-CNN, YOLO, and others. |
Tags, Bounding Boxes | Specific attributes | Not supported |
| YOLO 1.0 | .txt | Detection | YOLOv1, YOLOv2 (YOLO9000), YOLOv3, YOLOv4, and others. |
Bounding Boxes | No attributes | Not supported |
| Ultralytics YOLO Detection 1.0 | .txt | Detection | YOLOv8 | Bounding Boxes | No attributes | Supported |
| Ultralytics YOLO Segmentation 1.0 | .txt | Instance Segmentation | YOLOv8 | Polygons, Masks | No attributes | Supported |
| Ultralytics YOLO Pose 1.0 | .txt | Keypoints | YOLOv8 | Skeletons | No attributes | Supported |
| Ultralytics YOLO Oriented Bounding Boxes 1.0 | .txt | Detection | YOLOv8 | Oriented Bounding Boxes | No attributes | Supported |
| Ultralytics YOLO Classification 1.0 | .jpg | Classification | YOLOv8 | Tags | No attributes | Not supported |
1.1 - CVAT for image
This is CVAT’s native annotation format, which fully supports all of CVAT’s annotation features. It is ideal for creating data backups.
For more information, see:
CVAT for image export
Applicable for all computer vision tasks in 2D except for Video Tracking.
- Supported annotations: Tags, Oriented Bounding Boxes, Bounding Boxes, Polygons, Polylines, Points, Cuboids, Ellipses, Skeletons, Masks.
- Attributes: Supported.
- Tracks: Supported (via the extra
track_idattribute).
The downloaded file is a .zip archive with following structure:
taskname.zip/
├── images/
|   ├── img1.png
|   └── img2.jpg
└── annotations.xml
CVAT for video export
Applicable for all computer vision tasks in 2D except for Classification
- Supported annotations: Bounding Boxes, Oriented Bounding Boxes, Polygons, Polylines, Points, Cuboids, Ellipses, Skeletons, Masks.
- Attributes: Supported.
- Tracks: Supported.
- Shapes are exported as single-frame tracks
Downloaded file is a .zip archive with following structure:
taskname.zip/
├── images/
|   ├── frame_000000.png
|   └── frame_000001.png
└── annotations.xml
CVAT for video import
Uploaded file: either an .xml file or a
.zip file with the contents described above.
Format specifications
Each format has X.Y version (e.g. 1.0). In general the major version (X) is incremented when the data format has incompatible changes and the minor version (Y) is incremented when the data format is slightly modified (e.g. it has one or several extra fields inside meta information). The document will describe all changes for all versions of XML annotation format.
Version 1.1
There are two different formats for images and video tasks at the moment.
The both formats have a common part which is described below. From the previous version flipped tag was added.
Also original_size tag was added for interpolation mode to specify frame size.
In annotation mode each image tag has width and height attributes for the same purpose.
For what is rle, see Run-length encoding
<?xml version="1.0" encoding="utf-8"?>
<annotations>
  <version>1.1</version>
  <meta>
    <task>
      <id>Number: id of the task</id>
      <name>String: some task name</name>
      <size>Number: count of frames/images in the task</size>
      <mode>String: interpolation or annotation</mode>
      <overlap>Number: number of overlapped frames between segments</overlap>
      <bugtracker>String: URL on an page which describe the task</bugtracker>
      <flipped>Boolean: were images of the task flipped? (True/False)</flipped>
      <created>String: date when the task was created</created>
      <updated>String: date when the task was updated</updated>
      <labels>
        <label>
          <name>String: name of the label (e.g. car, person)</name>
          <type>String: any, bbox, cuboid, ellipse, mask, polygon, polyline, points, skeleton, tag</type>
          <attributes>
            <attribute>
              <name>String: attribute name</name>
              <mutable>Boolean: mutable (allow different values between frames)</mutable>
              <input_type>String: select, checkbox, radio, number, text</input_type>
              <default_value>String: default value</default_value>
              <values>String: possible values, separated by newlines
ex. value 2
ex. value 3</values>
            </attribute>
          </attributes>
          <svg>String: label representation in svg, only for skeletons</svg>
          <parent>String: label parent name, only for skeletons</parent>
        </label>
      </labels>
      <segments>
        <segment>
          <id>Number: id of the segment</id>
          <start>Number: first frame</start>
          <stop>Number: last frame</stop>
          <url>String: URL (e.g. http://cvat.example.com/?id=213)</url>
        </segment>
      </segments>
      <owner>
        <username>String: the author of the task</username>
        <email>String: email of the author</email>
      </owner>
      <original_size>
        <width>Number: frame width</width>
        <height>Number: frame height</height>
      </original_size>
    </task>
    <dumped>String: date when the annotation was dumped</dumped>
  </meta>
  ...
</annotations>
Annotation
Below you can find description of the data format for images tasks.
On each image it is possible to have many different objects. Each object can have multiple attributes.
If an annotation task is created with z_order flag then each object will have z_order attribute which is used
to draw objects properly when they are intersected (if z_order is bigger the object is closer to camera).
In previous versions of the format only box shape was available.
In later releases mask, polygon, polyline, points, skeletons and tags were added.
Please see below for more details:
<?xml version="1.0" encoding="utf-8"?>
<annotations>
  ...
  <image id="Number: id of the image (the index in lexical order of images)" name="String: path to the image"
    width="Number: image width" height="Number: image height">
    <box label="String: the associated label" xtl="Number: float" ytl="Number: float" xbr="Number: float" ybr="Number: float" occluded="Number: 0 - False, 1 - True" z_order="Number: z-order of the object">
      <attribute name="String: an attribute name">String: the attribute value</attribute>
      ...
    </box>
    <polygon label="String: the associated label" points="x0,y0;x1,y1;..." occluded="Number: 0 - False, 1 - True"
    z_order="Number: z-order of the object">
      <attribute name="String: an attribute name">String: the attribute value</attribute>
      ...
    </polygon>
    <polyline label="String: the associated label" points="x0,y0;x1,y1;..." occluded="Number: 0 - False, 1 - True"
    z_order="Number: z-order of the object">
      <attribute name="String: an attribute name">String: the attribute value</attribute>
      ...
    </polyline>
    <polyline label="String: the associated label" points="x0,y0;x1,y1;..." occluded="Number: 0 - False, 1 - True"
    z_order="Number: z-order of the object">
      <attribute name="String: an attribute name">String: the attribute value</attribute>
      ...
    </polyline>
    <points label="String: the associated label" points="x0,y0;x1,y1;..." occluded="Number: 0 - False, 1 - True"
    z_order="Number: z-order of the object">
      <attribute name="String: an attribute name">String: the attribute value</attribute>
      ...
    </points>
    <tag label="String: the associated label" source="manual or auto">
      <attribute name="String: an attribute name">String: the attribute value</attribute>
      ...
    </tag>
    <skeleton label="String: the associated label" z_order="Number: z-order of the object">
      <points label="String: the associated label" occluded="Number: 0 - False, 1 - True" outside="Number: 0 - False, 1 - True" points="x0,y0;x1,y1">
        <attribute name="String: an attribute name">String: the attribute value</attribute>
      </points>
      ...
      <attribute name="String: an attribute name">String: the attribute value</attribute>
      ...
    </skeleton>
    <mask label="String: the associated label" source="manual or auto" occluded="Number: 0 - False, 1 - True" rle="RLE mask" left="Number: left coordinate of the image where the mask begins" top="Number: top coordinate of the image where the mask begins" width="Number: width of the mask" height="Number: height of the mask" z_order="Number: z-order of the object">
    </mask>
    ...
  </image>
  ...
</annotations>
Example:
<?xml version="1.0" encoding="utf-8"?>
<annotations>
<version>1.1</version>
<meta>
<task>
<id>4</id>
<name>segmentation</name>
<size>27</size>
<mode>annotation</mode>
<overlap>0</overlap>
<bugtracker></bugtracker>
<flipped>False</flipped>
<created>2018-09-25 11:34:24.617558+03:00</created>
<updated>2018-09-25 11:38:27.301183+03:00</updated>
<labels>
<label>
<name>car</name>
<attributes>
</attributes>
</label>
<label>
<name>traffic_line</name>
<attributes>
</attributes>
</label>
<label>
<name>wheel</name>
<attributes>
</attributes>
</label>
<label>
<name>plate</name>
<attributes>
</attributes>
</label>
<label>
<name>s1</name>
<type>skeleton</type>
<attributes>
</attributes>
<svg><line x1="36.87290954589844" y1="47.732025146484375" x2="86.87290954589844" y2="10.775501251220703" stroke="black" data-type="edge" data-node-from="2" stroke-width="0.5" data-node-to="3"></line><line x1="25.167224884033203" y1="22.64841079711914" x2="36.87290954589844" y2="47.732025146484375" stroke="black" data-type="edge" data-node-from="1" stroke-width="0.5" data-node-to="2"></line><circle r="1.5" stroke="black" fill="#b3b3b3" cx="25.167224884033203" cy="22.64841079711914" stroke-width="0.1" data-type="element node" data-element-id="1" data-node-id="1" data-label-name="1"></circle><circle r="1.5" stroke="black" fill="#b3b3b3" cx="36.87290954589844" cy="47.732025146484375" stroke-width="0.1" data-type="element node" data-element-id="2" data-node-id="2" data-label-name="2"></circle><circle r="1.5" stroke="black" fill="#b3b3b3" cx="86.87290954589844" cy="10.775501251220703" stroke-width="0.1" data-type="element node" data-element-id="3" data-node-id="3" data-label-name="3"></circle></svg>
</label>
<label>
<name>1</name>
<type>points</type>
<attributes>
</attributes>
<parent>s1</parent>
</label>
<label>
<name>2</name>
<type>points</type>
<attributes>
</attributes>
<parent>s1</parent>
</label>
<label>
<name>3</name>
<type>points</type>
<attributes>
</attributes>
<parent>s1</parent>
</label>
</labels>
<segments>
<segment>
<id>4</id>
<start>0</start>
<stop>26</stop>
<url>http://localhost:8080/?id=4</url>
</segment>
</segments>
<owner>
<username>admin</username>
<email></email>
</owner>
</task>
<dumped>2018-09-25 11:38:28.799808+03:00</dumped>
</meta>
<image id="0" name="filename000.jpg" width="1600" height="1200">
<box label="plate" xtl="797.33" ytl="870.92" xbr="965.52" ybr="928.94" occluded="0" z_order="4">
</box>
<polygon label="car" points="561.30,916.23;561.30,842.77;554.72,761.63;553.62,716.67;565.68,677.20;577.74,566.45;547.04,559.87;536.08,542.33;528.40,520.40;541.56,512.72;559.10,509.43;582.13,506.14;588.71,464.48;583.23,448.03;587.61,434.87;594.19,431.58;609.54,399.78;633.66,369.08;676.43,294.52;695.07,279.17;703.84,279.17;735.64,268.20;817.88,264.91;923.14,266.01;997.70,274.78;1047.04,283.55;1063.49,289.04;1090.90,330.70;1111.74,371.27;1135.86,397.59;1147.92,428.29;1155.60,435.97;1157.79,451.32;1156.69,462.28;1159.98,491.89;1163.27,522.59;1173.14,513.82;1199.46,516.01;1224.68,521.49;1225.77,544.52;1207.13,568.64;1181.91,576.32;1178.62,582.90;1177.53,619.08;1186.30,680.48;1199.46,711.19;1206.03,733.12;1203.84,760.53;1197.26,818.64;1199.46,840.57;1203.84,908.56;1192.88,930.49;1184.10,939.26;1162.17,944.74;1139.15,960.09;1058.01,976.54;1028.40,969.96;1002.09,972.15;931.91,974.35;844.19,972.15;772.92,972.15;729.06,967.77;713.71,971.06;685.20,973.25;659.98,968.86;644.63,984.21;623.80,983.12;588.71,985.31;560.20,966.67" occluded="0" z_order="1">
</polygon>
<polyline label="traffic_line" points="462.10,0.00;126.80,1200.00" occluded="0" z_order="3">
</polyline>
<polyline label="traffic_line" points="1212.40,0.00;1568.66,1200.00" occluded="0" z_order="2">
</polyline>
<points label="wheel" points="574.90,939.48;1170.16,907.90;1130.69,445.26;600.16,459.48" occluded="0" z_order="5">
</points>
<tag label="good_frame" source="manual">
</tag>
<skeleton label="s1" source="manual" z_order="0">
<points label="1" occluded="0" source="manual" outside="0" points="54.47,94.81">
</points>
<points label="2" occluded="0" source="manual" outside="0" points="68.02,162.34">
</points>
<points label="3" occluded="0" source="manual" outside="0" points="125.87,62.85">
</points>
</skeleton>
<mask label="car" source="manual" occluded="0" rle="3, 5, 7, 7, 5, 9, 3, 11, 2, 11, 2, 12, 1, 12, 1, 26, 1, 12, 1, 12, 2, 11, 3, 9, 5, 7, 7, 5, 3" left="707" top="888" width="13" height="15" z_order="0">
</mask>
</image>
</annotations>
Interpolation
Below you can find description of the data format for video tasks. The annotation contains tracks. Each track corresponds to an object which can be presented on multiple frames. The same object cannot be presented on the same frame in multiple locations. Each location of the object can have multiple attributes even if an attribute is immutable for the object it will be cloned for each location (a known redundancy).
<?xml version="1.0" encoding="utf-8"?>
<annotations>
  ...
  <track id="Number: id of the track (doesn't have any special meeting)" label="String: the associated label" source="manual or auto">
    <box frame="Number: frame" xtl="Number: float" ytl="Number: float" xbr="Number: float" ybr="Number: float" outside="Number: 0 - False, 1 - True" occluded="Number: 0 - False, 1 - True" keyframe="Number: 0 - False, 1 - True">
      <attribute name="String: an attribute name">String: the attribute value</attribute>
      ...
    </box>
    <polygon frame="Number: frame" points="x0,y0;x1,y1;..." outside="Number: 0 - False, 1 - True" occluded="Number: 0 - False, 1 - True" keyframe="Number: 0 - False, 1 - True">
      <attribute name="String: an attribute name">String: the attribute value</attribute>
    </polygon>
    <polyline frame="Number: frame" points="x0,y0;x1,y1;..." outside="Number: 0 - False, 1 - True" occluded="Number: 0 - False, 1 - True" keyframe="Number: 0 - False, 1 - True">
      <attribute name="String: an attribute name">String: the attribute value</attribute>
    </polyline>
    <points frame="Number: frame" points="x0,y0;x1,y1;..." outside="Number: 0 - False, 1 - True" occluded="Number: 0 - False, 1 - True" keyframe="Number: 0 - False, 1 - True">
      <attribute name="String: an attribute name">String: the attribute value</attribute>
    </points>
    <mask frame="Number: frame" outside="Number: 0 - False, 1 - True" occluded="Number: 0 - False, 1 - True" rle="RLE mask" left="Number: left coordinate of the image where the mask begins" top="Number: top coordinate of the image where the mask begins" width="Number: width of the mask" height="Number: height of the mask" z_order="Number: z-order of the object">
    </mask>
    ...
  </track>
  <track id="Number: id of the track (doesn't have any special meeting)" label="String: the associated label" source="manual or auto">
    <skeleton frame="Number: frame" keyframe="Number: 0 - False, 1 - True">
      <points label="String: the associated label" outside="Number: 0 - False, 1 - True" occluded="Number: 0 - False, 1 - True" keyframe="Number: 0 - False, 1 - True" points="x0,y0;x1,y1">
      </points>
      ...
    </skeleton>
    ...
  </track>
  ...
</annotations>
Example:
<?xml version="1.0" encoding="utf-8"?>
<annotations>
<version>1.1</version>
<meta>
<task>
<id>5</id>
<name>interpolation</name>
<size>4620</size>
<mode>interpolation</mode>
<overlap>5</overlap>
<bugtracker></bugtracker>
<flipped>False</flipped>
<created>2018-09-25 12:32:09.868194+03:00</created>
<updated>2018-09-25 16:05:05.619841+03:00</updated>
<labels>
<label>
<name>person</name>
<attributes>
</attributes>
</label>
<label>
<name>car</name>
<attributes>
</attributes>
</label>
<label>
<name>s1</name>
<type>skeleton</type>
<attributes>
</attributes>
<svg><line x1="36.87290954589844" y1="47.732025146484375" x2="86.87290954589844" y2="10.775501251220703" stroke="black" data-type="edge" data-node-from="2" stroke-width="0.5" data-node-to="3"></line><line x1="25.167224884033203" y1="22.64841079711914" x2="36.87290954589844" y2="47.732025146484375" stroke="black" data-type="edge" data-node-from="1" stroke-width="0.5" data-node-to="2"></line><circle r="1.5" stroke="black" fill="#b3b3b3" cx="25.167224884033203" cy="22.64841079711914" stroke-width="0.1" data-type="element node" data-element-id="1" data-node-id="1" data-label-name="1"></circle><circle r="1.5" stroke="black" fill="#b3b3b3" cx="36.87290954589844" cy="47.732025146484375" stroke-width="0.1" data-type="element node" data-element-id="2" data-node-id="2" data-label-name="2"></circle><circle r="1.5" stroke="black" fill="#b3b3b3" cx="86.87290954589844" cy="10.775501251220703" stroke-width="0.1" data-type="element node" data-element-id="3" data-node-id="3" data-label-name="3"></circle></svg>
</label>
<label>
<name>1</name>
<type>points</type>
<attributes>
</attributes>
<parent>s1</parent>
</label>
<label>
<name>2</name>
<type>points</type>
<attributes>
</attributes>
<parent>s1</parent>
</label>
<label>
<name>3</name>
<type>points</type>
<attributes>
</attributes>
<parent>s1</parent>
</label>
</labels>
<segments>
<segment>
<id>5</id>
<start>0</start>
<stop>4619</stop>
<url>http://localhost:8080/?id=5</url>
</segment>
</segments>
<owner>
<username>admin</username>
<email></email>
</owner>
<original_size>
<width>640</width>
<height>480</height>
</original_size>
</task>
<dumped>2018-09-25 16:05:07.134046+03:00</dumped>
</meta>
<track id="0" label="car">
<polygon frame="0" points="324.79,213.16;323.74,227.90;347.42,237.37;371.11,217.37;350.05,190.00;318.47,191.58" outside="0" occluded="0" keyframe="1">
</polygon>
<polygon frame="1" points="324.79,213.16;323.74,227.90;347.42,237.37;371.11,217.37;350.05,190.00;318.47,191.58" outside="1" occluded="0" keyframe="1">
</polygon>
<polygon frame="6" points="305.32,237.90;312.16,207.90;352.69,206.32;355.32,233.16;331.11,254.74" outside="0" occluded="0" keyframe="1">
</polygon>
<polygon frame="7" points="305.32,237.90;312.16,207.90;352.69,206.32;355.32,233.16;331.11,254.74" outside="1" occluded="0" keyframe="1">
</polygon>
<polygon frame="13" points="313.74,233.16;331.11,220.00;359.53,243.16;333.21,283.16;287.95,274.74" outside="0" occluded="0" keyframe="1">
</polygon>
<polygon frame="14" points="313.74,233.16;331.11,220.00;359.53,243.16;333.21,283.16;287.95,274.74" outside="1" occluded="0" keyframe="1">
</polygon>
</track>
<track id="1" label="s1" source="manual">
<skeleton frame="0" keyframe="1" z_order="0">
<points label="1" outside="0" occluded="0" keyframe="1" points="112.07,258.59">
</points>
<points label="2" outside="0" occluded="0" keyframe="1" points="127.87,333.23">
</points>
<points label="3" outside="0" occluded="0" keyframe="1" points="195.37,223.27">
</points>
</skeleton>
<skeleton frame="1" keyframe="1" z_order="0">
<points label="1" outside="1" occluded="0" keyframe="1" points="112.07,258.59">
</points>
<points label="2" outside="1" occluded="0" keyframe="1" points="127.87,333.23">
</points>
<points label="3" outside="1" occluded="0" keyframe="1" points="195.37,223.27">
</points>
</skeleton>
<skeleton frame="6" keyframe="1" z_order="0">
<points label="1" outside="0" occluded="0" keyframe="0" points="120.07,270.59">
</points>
<points label="2" outside="0" occluded="0" keyframe="0" points="140.87,350.23">
</points>
<points label="3" outside="0" occluded="0" keyframe="0" points="210.37,260.27">
</points>
</skeleton>
<skeleton frame="7" keyframe="1" z_order="0">
<points label="1" outside="1" occluded="0" keyframe="1" points="120.07,270.59">
</points>
<points label="2" outside="1" occluded="0" keyframe="1" points="140.87,350.23">
</points>
<points label="3" outside="1" occluded="0" keyframe="1" points="210.37,260.27">
</points>
</skeleton>
<skeleton frame="13" keyframe="0" z_order="0">
<points label="1" outside="0" occluded="0" keyframe="0" points="112.07,258.59">
</points>
<points label="2" outside="0" occluded="0" keyframe="0" points="127.87,333.23">
</points>
<points label="3" outside="0" occluded="0" keyframe="0" points="195.37,223.27">
</points>
</skeleton>
<skeleton frame="14" keyframe="1" z_order="0">
<points label="1" outside="1" occluded="0" keyframe="1" points="112.07,258.59">
</points>
<points label="2" outside="1" occluded="0" keyframe="1" points="127.87,333.23">
</points>
<points label="3" outside="1" occluded="0" keyframe="1" points="195.37,223.27">
</points>
</skeleton>
</track>
</annotations>
1.2 - Datumaro
The Datumaro format is a universal format, capable of handling arbitrary datasets and annotations. It is the native format of the Datumaro dataset framework.
The framework can be used for various dataset operations, such as dataset and annotation transformations, format conversions, computation of statistics, and dataset merging.
This framework is used in CVAT as the dataset support provider. It effectively means that anything you import in CVAT or export from CVAT, can be processed with Datumaro, allowing you to perform custom dataset operations easily.
For more information, see:
Datumaro export
- Supported annotations: Tags, Bounding Boxes, Oriented Bounding Boxes, Polygons, Polylines, Points, Cuboids, Ellipses, Masks, Skeletons.
- Attributes: Supported.
- Tracks: Supported (via the
track_idattribute).
The downloaded file is a .zip archive with the following structure:
taskname.zip/
├── annotations/
│   └── default.json
└── images/
    └── default/
        ├── image1.jpg
        ├── image2.jpg
        ├── ...
Datumaro import
- Supported annotations: Tags, Bounding Boxes, Polygons, Polylines, Points, Cuboids, Ellipses, Masks, Skeletons.
- Attributes: Supported.
- Tracks: Supported.
Uploaded file: a .json file with annotations or a .zip archive of the following structure:
archive.zip/
└── annotations/
    ├── subset1.json
    └── subset2.json
The .json annotations files in the annotations directory should have similar structure:
{
  "info": {},
  "categories": {
    "label": {
      "labels": [
        {
          "name": "label_0",
          "parent": "",
          "attributes": []
        },
        {
          "name": "label_1",
          "parent": "",
          "attributes": []
        }
      ],
      "attributes": []
    }
  },
  "items": [
    {
      "id": "img1",
      "annotations": [
        {
          "id": 0,
          "type": "polygon",
          "attributes": {},
          "group": 0,
          "label_id": 1,
          "points": [1.0, 2.0, 3.0, 4.0, 5.0, 6.0, 7.0, 8.0],
          "z_order": 0
        },
        {
          "id": 1,
          "type": "bbox",
          "attributes": {},
          "group": 1,
          "label_id": 0,
          "z_order": 0,
          "bbox": [1.0, 2.0, 3.0, 4.0]
        },
        {
          "id": 2,
          "type": "mask",
          "attributes": {},
          "group": 1,
          "label_id": 0,
          "rle": {
            "counts": "d0d0:F\\0",
            "size": [10, 10]
          },
          "z_order": 0
        }
      ]
    }
  ]
}
1.3 - LabelMe
The LabelMe format is often used for image segmentation tasks in computer vision. While it may not be specifically tied to any particular models, it’s designed to be versatile and can be easily converted to formats that are compatible with popular frameworks like TensorFlow or PyTorch.
For more information, see:
LabelMe export
For export of images:
- Supported annotations: Bounding Boxes, Polygons, Masks, Ellipses (as masks).
- Attributes: Supported for Polygons.
- Tracks: Not supported.
The downloaded file is a .zip archive with the following structure:
taskname.zip/
├── img1.jpg
└── img1.xml
LabelMe import
- Supported annotations: Rectangles, Polygons, Masks
Uploaded file: a .zip archive of the following structure:
taskname.zip/
├── Masks/
|   ├── img1_mask1.png
|   └── img1_mask2.png
├── img1.xml
├── img2.xml
└── img3.xml
1.4 - MOT
The MOT (Multiple Object Tracking) sequence format is widely used for evaluating multi-object tracking algorithms, particularly in the domains of pedestrian tracking, vehicle tracking, and more. The MOT sequence format essentially contains frames of video along with annotations that specify object locations and identities over time.
For more information, see:
MOT export
For export of images and videos:
- Supported annotations: Bounding Box tracks.
- Attributes:
visibility(number),ignored(checkbox) - Tracks: Supported.
The downloaded file is a .zip archive with the following structure:
taskname.zip/
├── img1/
|   ├── image1.jpg
|   └── image2.jpg
└── gt/
    ├── labels.txt
    └── gt.txt

# labels.txt
cat
dog
person
...

# gt.txt
# frame_id, track_id, x, y, w, h, "not ignored", class_id, visibility, <skipped>
1,1,1363,569,103,241,1,1,0.86014
...
MOT import
Uploaded file: a .zip archive of the structure above or:
archive.zip/
└── gt/
    └── gt.txt
    └── labels.txt # optional, mandatory for non-official labels
1.5 - MOTS
The MOT (Multiple Object Tracking) sequence format is widely used for evaluating multi-object tracking algorithms, particularly in the domains of pedestrian tracking, vehicle tracking, and more. The MOT sequence format essentially contains frames of video along with annotations that specify object locations and identities over time.
This version encoded as .png. Supports masks.
For more information, see:
MOTS PNG export
For export of images and videos:
- Supported annotations: Masks, Bounding Boxes (as masks), Polygons (as masks), Ellipses (as masks).
- Attributes:
visibility(number),ignored(checkbox). - Tracks: Supported. Only tracks are supported, shapes are ignored.
The downloaded file is a .zip archive with the following structure:
taskname.zip/
└── <any_subset_name>/
    |   images/
    |   ├── image1.jpg
    |   └── image2.jpg
    └── instances/
        ├── labels.txt
        ├── image1.png
        └── image2.png

# labels.txt
cat
dog
person
...
MOTS PNG import
- Supported annotations: Masks or Polygon tracks
Uploaded file: a .zip archive of the structure above
1.6 - COCO
The COCO dataset format is a popular format, designed for tasks involving object detection and instance segmentation. It’s supported by many annotation tools and model training frameworks, making it a safe default choice for typical object detection projects.
For more information, see:
COCO export
- Supported annotations: Bounding Boxes, Oriented Bounding Boxes, Polygons, Masks, Ellipses (as masks).
- Attributes:
is_crowdThis can either be a checkbox or an integer (with values of 0 or 1). It indicates whether the instance (a group of objects) should be represented as an RLE-encoded mask or a set of polygons in thesegmentationfield of the annotation file. The largest (by area) shape in the group sets the properties for the entire object group. If the attribute is not specified, the input shape type is used (polygon or mask). IfTrueor 1, all shapes within the group will be converted into a single mask. IfFalseor 0, all shapes within the group will be converted into polygons.- Arbitrary attributes: These will be stored within the custom
attributessection of the annotation.
- Tracks: Supported (via the
track_idcustom attribute).
The downloaded file is a .zip archive with the following structure:
taskname.zip/
├── images/
│   └── <subset_name>/
│       ├── <image_name1.ext>
│       ├── <image_name2.ext>
│       └── ...
└── annotations/
   ├── instances_<subset_name>.json
   └── ...
When exporting a dataset from a Project, subset names will mirror those used within the project itself. Otherwise, a singular default subset will be created to house all the dataset information.
COCO import
- Supported annotations: Bounding Boxes (if the
segmentationfield is empty), Polygons, Masks. - Attributes: Supported, as described in the export section
- Tracks: Supported (via the
track_idcustom attribute). - Supported tasks:
instances,person_keypoints(only segmentations will be imported),panoptic.
Upload format: a .json file with annotations
or a .zip archive with the structure described above or
here
(without images).
Note
Even thoughlicenses and info fields are required according to format specifications,
CVAT does not require them to import annotations.
How to create a task from MS COCO dataset
-
Download the MS COCO dataset.
For example
val imagesandinstancesannotations -
Create a CVAT task with the following labels:
person bicycle car motorcycle airplane bus train truck boat "traffic light" "fire hydrant" "stop sign" "parking meter" bench bird cat dog horse sheep cow elephant bear zebra giraffe backpack umbrella handbag tie suitcase frisbee skis snowboard "sports ball" kite "baseball bat" "baseball glove" skateboard surfboard "tennis racket" bottle "wine glass" cup fork knife spoon bowl banana apple sandwich orange broccoli carrot "hot dog" pizza donut cake chair couch "potted plant" bed "dining table" toilet tv laptop mouse remote keyboard "cell phone" microwave oven toaster sink refrigerator book clock vase scissors "teddy bear" "hair drier" toothbrush -
Select
val2017.zipas data (See Creating an annotation task guide for details) -
Unpack
annotations_trainval2017.zip -
click
Upload annotationbutton, chooseCOCO 1.1and selectinstances_val2017.jsonannotation file. It can take some time.
1.7 - COCO Keypoints
The COCO Keypoints format is designed specifically for human pose estimation tasks, where the objective is to identify and localize body joints or keypoints on a human figure within an image. This format is used with a variety of state-of-the-art models focused on pose estimation.
For more information, see:
COCO Keypoints export
- Supported annotations: Skeletons
- Attributes: Supported (stored in the custom
attributesfield of the annotation). - Tracks: Supported (via the
track_idcustom attribute).
Downloaded file is a .zip archive with the following structure:
├── images/
│   └── <subset_name>/
│       ├── <image_name1.ext>
│       ├── <image_name2.ext>
│       └── ...
└── annotations/
   ├── person_keypoints_<subset_name>.json
   └── ...
COCO Keypoints import
- Supported annotations: Skeletons
- Attributes: Supported (via the custom
attributesfield of the annotation). - Tracks: Supported (via the
track_idcustom attribute).
Uploaded file: a single unpacked .json or a .zip archive with the structure described above or
here
(without images).
1.8 - Pascal VOC
The Pascal VOC (Visual Object Classes) format is one of the earlier established benchmarks for object classification and detection, which provides a standardized image data set for object class recognition.
The export data format is XML-based and has been widely adopted in computer vision tasks.
For more information, see:
Pascal VOC export
For export of images:
- Supported annotations: Bounding Boxes (detection), Tags (classification), Polygons (segmentation), Masks (segmentation), Ellipses (segmentation, as masks).
- Attributes:
occludedas both UI option and a separate attribute.truncatedanddifficultmust be defined for labels ascheckbox.- Arbitrary attributes in the
attributessection of XML files.
- Tracks: Not supported.
The downloaded file is a .zip archive with the following structure:
taskname.zip/
├── JPEGImages/
│   ├── <image_name1>.jpg
│   ├── <image_name2>.jpg
│   └── <image_nameN>.jpg
├── Annotations/
│   ├── <image_name1>.xml
│   ├── <image_name2>.xml
│   └── <image_nameN>.xml
├── ImageSets/
│   └── Main/
│       └── default.txt
└── labelmap.txt

# labelmap.txt
# label : color_rgb : 'body' parts : actions
background:::
aeroplane:::
bicycle:::
bird:::
Pascal VOC import
- Supported attributes: action attributes (import only, should be defined as
checkbox-es)
Uploaded file: a .zip archive of the structure declared above or the following:
taskname.zip/
├── <image_name1>.xml
├── <image_name2>.xml
└── <image_nameN>.xml
It must be possible for CVAT to match the frame name and file name
from annotation .xml file (the filename tag, e. g.
<filename>2008_004457.jpg</filename> ).
There are 2 options:
-
full match between frame name and file name from annotation
.xml(in cases when task was created from images or image archive). -
match by frame number. File name should be
<number>.jpgorframe_000000.jpg. It should be used when task was created from video.
How to create a task from Pascal VOC dataset
-
Download the Pascal Voc dataset (Can be downloaded from the PASCAL VOC website)
-
Create a CVAT task with the following labels:
aeroplane bicycle bird boat bottle bus car cat chair cow diningtable
dog horse motorbike person pottedplant sheep sofa train tvmonitor
You can add
~checkbox=difficult:false ~checkbox=truncated:falseattributes for each label if you want to use them.Select interesting image files (See Creating an annotation task guide for details).
-
Zip the corresponding annotation files
-
Click
Upload annotationbutton, choosePascal VOC ZIP 1.1and select the zip file with annotations from previous step. It may take some time.
1.9 - Segmentation Mask
Segmentation Mask format is a simple format for image segmentation tasks like semantic segmentation, instance segmentation, and panoptic segmentation. It is a custom format based on the Pascal VOC segmentation format.
Segmentation Mask export
- Supported annotations: Masks, Bounding Boxes (as masks), Polygons (as masks), Ellipses (as masks).
- Attributes: Not supported.
- Tracks: Not supported (exported as separate shapes).
The downloaded file is a .zip archive with the following structure:
taskname.zip/
├── labelmap.txt # optional, required for non-Pascal VOC labels
├── ImageSets/
│   └── Segmentation/
│       └── default.txt # list of image names without extension
├── SegmentationClass/ # merged class masks
│   ├── image1.png
│   └── image2.png
└── SegmentationObject/ # merged instance masks
    ├── image1.png
    └── image2.png

# labelmap.txt
# label : color (RGB) : 'body' parts : actions
background:0,128,0::
aeroplane:10,10,128::
bicycle:10,128,0::
bird:0,108,128::
boat:108,0,100::
bottle:18,0,8::
bus:12,28,0::
A mask is a .png image that can have either 1 or 3 channels.
Each pixel in the image has a color that corresponds to a specific label.
The colors are generated according to the Pascal VOC
algorithm.
By default, the color (0, 0, 0) is used to represent the background.
Segmentation Mask import
- Supported annotations: Masks, Polygons (if Convert masks to polygons is enabled).
- Attributes: Not supported.
- Tracks: Not supported.
Uploaded file: a .zip archive of the following structure:
archive.zip/
├── labelmap.txt # optional, required for non-Pascal VOC labels
├── ImageSets/
│   └── Segmentation/
│       └── <any_subset_name>.txt
├── SegmentationClass/
│   ├── image1.png
│   └── image2.png
└── SegmentationObject/
    ├── image1.png
    └── image2.png
The format supports both 3-channel and grayscale (1-channel) PNG masks.
To import 3-channel masks, the labelmap.txt file should declare all the colors used in
the dataset:
# labelmap.txt
# label : color (RGB) : 'body' parts : actions
background:0,128,0::
aeroplane:10,10,128::
bicycle:10,128,0::
bird:0,108,128::
boat:108,0,100::
bottle:18,0,8::
bus:12,28,0::
To import 1-channel masks, the labelmap.txt file should declare all the indices used in
the dataset with no gaps. The number of lines must be equal
to the maximum color index on images. The lines must be in the right order
so that line index is equal to the color index. Lines can have arbitrary,
but different, colors. If there are gaps in the used color
indices in the annotations, they must be filled with arbitrary dummy labels.
# labelmap.txt
# label : color (RGB) : 'body' parts : actions
q:0,128,0:: # color index 0
aeroplane:10,10,128:: # color index 1
_dummy2:2,2,2:: # filler for color index 2
_dummy3:3,3,3:: # filler for color index 3
boat:108,0,100:: # color index 4
...
_dummy198:198,198,198:: # filler for color index 198
_dummy199:199,199,199:: # filler for color index 199
...
the last label:12,28,0:: # color index 200
1.10 - Ultralytics YOLO
Ultralytics YOLO is a format family which consists of four formats:
Dataset examples:
Ultralytics YOLO export
For export of images:
- Supported annotations
- Detection: Bounding Boxes
- Oriented bounding box: Oriented Bounding Boxes
- Segmentation: Polygons, Masks
- Pose: Skeletons
- Attributes: Not supported.
- Tracks: Supported.
The downloaded file is a .zip archive with the following structure:
archive.zip/
   ├── data.yaml  # configuration file
   ├── train.txt  # list of train subset image paths
   │
   ├── images/
   │   ├── train/  # directory with images for train subset
   │   │    ├── image1.jpg
   │   │    ├── image2.jpg
   │   │    ├── image3.jpg
   │   │    └── ...
   ├── labels/
   │   ├── train/  # directory with annotations for train subset
   │   │    ├── image1.txt
   │   │    ├── image2.txt
   │   │    ├── image3.txt
   │   │    └── ...

# train.txt:
images/<subset>/image1.jpg
images/<subset>/image2.jpg
...

# data.yaml:
path:  ./ # dataset root dir
train: train.txt  # train images (relative to 'path')

# Ultralytics YOLO Pose specific field
# First number is the number of points in a skeleton.
# If there are several skeletons with different number of points, it is the greatest number of points
# Second number defines the format of point info in annotation txt files
kpt_shape: [17, 3]

# Classes
names:
  0: person
  1: bicycle
  2: car
  # ...

# <image_name>.txt:
# content depends on format

# Ultralytics YOLO Detection:
# label_id - id from names field of data.yaml
# cx, cy - relative coordinates of the bbox center
# rw, rh - relative size of the bbox
# label_id cx cy rw rh
1 0.3 0.8 0.1 0.3
2 0.7 0.2 0.3 0.1

# Ultralytics YOLO Oriented Bounding Boxes:
# xn, yn - relative coordinates of the n-th point
# label_id x1 y1 x2 y2 x3 y3 x4 y4
1 0.3 0.8 0.1 0.3 0.4 0.5 0.7 0.5
2 0.7 0.2 0.3 0.1 0.4 0.5 0.5 0.6

# Ultralytics YOLO Segmentation:
# xn, yn - relative coordinates of the n-th point
# label_id x1 y1 x2 y2 x3 y3 ...
1 0.3 0.8 0.1 0.3 0.4 0.5
2 0.7 0.2 0.3 0.1 0.4 0.5 0.5 0.6 0.7 0.5

# Ultralytics YOLO Pose:
# cx, cy - relative coordinates of the bbox center
# rw, rh - relative size of the bbox
# xn, yn - relative coordinates of the n-th point
# vn - visibility of n-th point. 2 - visible, 1 - partially visible, 0 - not visible
# if second value in kpt_shape is 3:
# label_id cx cy rw rh x1 y1 v1 x2 y2 v2 x3 y3 v3 ...
1 0.3 0.8 0.1 0.3 0.3 0.8 2 0.1 0.3 2 0.4 0.5 2 0.0 0.0 0 0.0 0.0 0
2 0.3 0.8 0.1 0.3 0.7 0.2 2 0.3 0.1 1 0.4 0.5 0 0.5 0.6 2 0.7 0.5 2

# if second value in kpt_shape is 2:
# label_id cx cy rw rh x1 y1 x2 y2 x3 y3 ...
1 0.3 0.8 0.1 0.3 0.3 0.8 0.1 0.3 0.4 0.5 0.0 0.0 0.0 0.0
2 0.3 0.8 0.1 0.3 0.7 0.2 0.3 0.1 0.4 0.5 0.5 0.6 0.7 0.5

# Note, that if there are several skeletons with different number of points,
# smaller skeletons are padded with points with coordinates 0.0 0.0 and visibility = 0
All coordinates must be normalized. It can be achieved by dividing x coordinates and widths by image width, and y coordinates and heights by image height.
Note
In CVAT you can place an object or some parts of it outside the image, which will cause the coordinates to be outside the [0, 1] range. YOLOv8 framework ignores labels with such coordinates.Each annotation file, with the .txt extension,
is named to correspond with its associated image file.
For example, frame_000001.txt serves as the annotation for the
frame_000001.jpg image.
Track support
Tracks can be saved on export for Detection by using Ultralytics YOLO Detection Track format. It writes track ids to the end of corresponding annotations:
# label_id cx cy rw rh <optional track_id>
1 0.3 0.8 0.1 0.3 1
2 0.7 0.2 0.3 0.1
Ultralytics YOLO Import
Uploaded file: a .zip archive of the same structure as above.
For compatibility with other tools exporting in Ultralytics YOLO format
(e.g. roboflow),
CVAT supports datasets with the inverted directory order of subset and “images” or “labels”,
i.e. both train/images/, images/train/ are valid inputs.
archive.zip/
   ├── train/
   │   ├── images/  # directory with images for train subset
   │   │    ├── image1.jpg
   │   │    ├── image2.jpg
   │   │    └── ...
   │   ├── labels/  # directory with annotations for train subset
   │   │    ├── image1.txt
   │   │    ├── image2.txt
   │   │    └── ...
Track support
Import in each of the Ultralytics YOLO formats support tracking. Integer track id can be added to the end of any annotation, e.g. with Detection format:
# label_id cx cy rw rh <optional track_id>
1 0.3 0.8 0.1 0.3 1
2 0.7 0.2 0.3 0.1
1.11 - Ultralytics-YOLO-Classification
For more information, see:
Ultralytics YOLO Classification export
For export of images:
- Supported annotations: Tags.
- Attributes: Not supported.
- Tracks: Not supported.
The downloaded file is a .zip archive with the following structure:
archive.zip/
├── train
│    ├── labels.json  # CVAT extension. Contains original ids and labels
│    │                # is not needed when using dataset with YOLOv8 framework
│    │                # but is useful when importing it back to CVAT
│    ├── label_0
│    │      ├── <image_name_0>.jpg
│    │      ├── <image_name_1>.jpg
│    │      ├── <image_name_2>.jpg
│    │      ├── ...
│    ├── label_1
│    │      ├── <image_name_0>.jpg
│    │      ├── <image_name_1>.jpg
│    │      ├── <image_name_2>.jpg
│    │      ├── ...
├── ...
1.12 - YOLO
YOLO, which stands for “You Only Look Once,” is a renowned framework predominantly utilized for real-time object detection tasks. Its efficiency and speed make it an ideal choice for many applications. While YOLO has its unique data format, this format can be tailored to suit other object detection models as well.
For more information, see:
YOLO export
For export of images:
- Supported annotations: Bounding Boxes.
- Attributes: Not supported.
- Tracks: Not supported.
The downloaded file is a .zip archive with the following structure:
archive.zip/
├── obj.data
├── obj.names
├── obj_<subset>_data
│   ├── image1.txt
│   └── image2.txt
└── train.txt # list of subset image paths

# the only valid subsets are: train, valid
# train.txt and valid.txt:
obj_<subset>_data/image1.jpg
obj_<subset>_data/image2.jpg

# obj.data:
classes = 3 # optional
names = obj.names
train = train.txt
valid = valid.txt # optional
backup = backup/ # optional

# obj.names:
cat
dog
airplane

# image_name.txt:
# label_id - id from obj.names
# cx, cy - relative coordinates of the bbox center
# rw, rh - relative size of the bbox
# label_id cx cy rw rh
1 0.3 0.8 0.1 0.3
2 0.7 0.2 0.3 0.1
Each annotation file, with the .txt extension,
is named to correspond with its associated image file.
For example, frame_000001.txt serves as the annotation for the
frame_000001.jpg image.
The structure of the .txt file is as follows:
each line describes a label and a bounding box
in the format label_id cx cy w h.
The file obj.names contains an ordered list of label names.
YOLO import
Uploaded file: a .zip archive of the same structure as above
It must be possible to match the CVAT frame (image name)
and annotation file name. There are 2 options:
-
full match between image name and name of annotation
*.txtfile (in cases when a task was created from images or archive of images). -
match by frame number (if CVAT cannot match by name). File name should be in the following format
<number>.jpg. It should be used when task was created from a video.
How to create a task from YOLO formatted dataset (from VOC for example)
-
Follow the official guide (see Training YOLO on VOC section) and prepare the YOLO formatted annotation files.
-
Zip train images
zip images.zip -j -@ < train.txt -
Create a CVAT task with the following labels:
aeroplane bicycle bird boat bottle bus car cat chair cow diningtable dog
horse motorbike person pottedplant sheep sofa train tvmonitor
Select images. zip as data. Most likely you should use
sharefunctionality because size of images. zip is more than 500Mb. See Creating an annotation task guide for details. -
Create
obj.nameswith the following content:aeroplane bicycle bird boat bottle bus car cat chair cow diningtable dog horse motorbike person pottedplant sheep sofa train tvmonitor -
Zip all label files together (we need to add only label files that correspond to the train subset):
cat train.txt | while read p; do echo ${p%/*/*}/labels/${${p##*/}%%.*}.txt; done | zip labels.zip -j -@ obj.names -
Click
Upload annotationbutton, chooseYOLO 1.1and select the zip file with labels from the previous step.
1.13 - ImageNet
The ImageNet is typically used for a variety of computer vision tasks, including but not limited to image classification, object detection, and segmentation.
It is widely recognized and used in the training and benchmarking of various machine learning models.
For more information, see:
ImageNet export
For export of images:
- Supported annotations: Tags.
- Attributes: Not supported.
- Tracks: Not supported.
The downloaded file is a .zip archive with the following structure:
# if we save images:
taskname.zip/
├── label1/
|   ├── label1_image1.jpg
|   └── label1_image2.jpg
└── label2/
    ├── label2_image1.jpg
    ├── label2_image3.jpg
    └── label2_image4.jpg

# if we keep only annotation:
taskname.zip/
├── <any_subset_name>.txt
└── synsets.txt
ImageNet import
- Supported annotations: Tags.
Uploaded file: a .zip archive of the structure above
1.14 - Wider Face
The WIDER Face dataset is widely used for face detection tasks. Many popular models for object detection and face detection specifically are trained on this dataset for benchmarking and deployment.
For more information, see:
WIDER Face export
For export of images:
- Supported annotations: Bounding Boxes (with attributes), Tags.
- Attributes:
blur,expression,illumination,pose,invalidoccluded(both the annotation property & an attribute).
- Tracks: Not supported.
The downloaded file is a .zip archive with the following structure:
taskname.zip/
├── labels.txt # optional
├── wider_face_split/
│   └── wider_face_<any_subset_name>_bbx_gt.txt
└── WIDER_<any_subset_name>/
    └── images/
        ├── 0--label0/
        │   └── 0_label0_image1.jpg
        └── 1--label1/
            └── 1_label1_image2.jpg
WIDER Face import
- Supported annotations: Rectangles (with attributes), Labels
- supported attributes:
blur,expression,illumination,occluded,pose,invalid
Uploaded file: a .zip archive of the structure above
1.15 - CamVid
The CamVid (Cambridge-driving Labeled Video Database) format is most commonly used in the realm of semantic segmentation tasks. It is particularly useful for training and evaluating models for autonomous driving and other vision-based robotics applications.
For more information, see:
CamVid export
- Supported annotations: Masks, Bounding Boxes (as masks), Polygons (as masks), Ellipses (as masks).
- Attributes: Not supported.
- Tracks: Not supported (exported as separate shapes).
The downloaded file is a .zip archive with the following structure:
taskname.zip/
├── label_colors.txt # optional, required for non-CamVid labels
├── <any_subset_name>/
|   ├── image1.png
|   └── image2.png
├── <any_subset_name>annot/
|   ├── image1.png
|   └── image2.png
└── <any_subset_name>.txt

# label_colors.txt (with color value type)
# if you want to manually set the color for labels, configure label_colors.txt as follows:
# color (RGB) label
0 0 0 Void
64 128 64 Animal
192 0 128 Archway
0 128 192 Bicyclist
0 128 64 Bridge

# label_colors.txt (without color value type)
# if you do not manually set the color for labels, it will be set automatically:
# label
Void
Animal
Archway
Bicyclist
Bridge
A mask in the CamVid dataset is typically a .png
image with either one or three channels.
In this image, each pixel is assigned a specific color that corresponds to a particular label.
By default, the color (0, 0, 0) — or black — is used
to represent the background.
CamVid import
- Supported annotations: Masks, Polygons (if Convert masks to polygons is enabled).
- Attributes: Not supported.
- Tracks: Not supported.
Uploaded file: a .zip archive of the structure above
1.16 - VGGFace2
The VGGFace2 is primarily designed for face recognition tasks and is most commonly used with deep learning models specifically designed for face recognition, verification, and similar tasks.
For more information, see:
VGGFace2 export
For export of images:
- Supported annotations: Bounding Boxes, Points (landmarks - groups of 5 points).
- Attributes: Not supported.
- Tracks: Not supported.
The downloaded file is a .zip archive with the following structure:
taskname.zip/
├── labels.txt # optional
├── <any_subset_name>/
|   ├── label0/
|   |   └── image1.jpg
|   └── label1/
|       └── image2.jpg
└── bb_landmark/
    ├── loose_bb_<any_subset_name>.csv
    └── loose_landmark_<any_subset_name>.csv
# labels.txt
# n000001 car
label0 <class0>
label1 <class1>
VGGFace2 import
- Supported annotations: Rectangles, Points (landmarks - groups of 5 points)
Uploaded file: a .zip archive of the structure above
1.17 - Market-1501
The Market-1501 dataset is widely used for person re-identification tasks. It is a challenging dataset that has gained significant attention in the computer vision community.
For more information, see:
Market-1501 export
For export of images:
- Supported annotations: Bounding Boxes
- Attributes:
query(checkbox),person_id(number),camera_id(number). - Tracks: Not supported.
Th downloaded file is a .zip archive with the following structure:
taskname.zip/
├── bounding_box_<any_subset_name>/
│   └── image_name_1.jpg
└── query
    ├── image_name_2.jpg
    └── image_name_3.jpg
# if we keep only annotation:
taskname.zip/
└── images_<any_subset_name>.txt
# images_<any_subset_name>.txt
query/image_name_1.jpg
bounding_box_<any_subset_name>/image_name_2.jpg
bounding_box_<any_subset_name>/image_name_3.jpg
# image_name = 0001_c1s1_000015_00.jpg
0001 - person id
c1 - camera id (there are totally 6 cameras)
s1 - sequence
000015 - frame number in sequence
00 - means that this bounding box is the first one among the several
Market-1501 import
- Supported annotations: Label
market-1501with attributes (query,person_id,camera_id)
Uploaded file: a .zip archive of the structure above
1.18 - ICDAR13/15
ICDAR 13/15 formats are typically used for text detection and recognition tasks and OCR (Optical Character Recognition).
These formats are usually paired with specialized text detection and recognition models.
For more information, see:
ICDAR13/15 export
- ICDAR Recognition 1.0 (Text recognition):
- Supported annotations: Tags with the
icdarlabel - Attributes:
caption.
- Supported annotations: Tags with the
- ICDAR Detection 1.0 (Text detection):
- Supported annotations: Bounding Boxes, Polygons with the
icdarlabel - Attributes:
text.
- Supported annotations: Bounding Boxes, Polygons with the
- ICDAR Segmentation 1.0 (Text segmentation):
- Supported annotations: Masks, Bounding Boxes, Polygons, or Ellipses with the
icdarlabel - Attributes:
index,text,color,center
- Supported annotations: Masks, Bounding Boxes, Polygons, or Ellipses with the
- Tracks: Not supported.
The downloaded file is a .zip archive with the following structure:
# text recognition task
taskname.zip/
└── word_recognition/
    └── <any_subset_name>/
        ├── images
        |   ├── word1.png
        |   └── word2.png
        └── gt.txt
# text localization task
taskname.zip/
└── text_localization/
    └── <any_subset_name>/
        ├── images
        |   ├── img_1.png
        |   └── img_2.png
        ├── gt_img_1.txt
        └── gt_img_1.txt
#text segmentation task
taskname.zip/
└── text_localization/
    └── <any_subset_name>/
        ├── images
        |   ├── 1.png
        |   └── 2.png
        ├── 1_GT.bmp
        ├── 1_GT.txt
        ├── 2_GT.bmp
        └── 2_GT.txt
ICDAR13/15 import
Word recognition task:
- Supported annotations: Tags with the
icdarlabel andcaptionattribute
Text localization task:
- Supported annotations: Rectangles and Polygons with the
icdarlabel andtextattribute
Text segmentation task:
- Supported annotations: Masks or Polygons with the
icdarlabel andindex,text,color,centerattributes
Uploaded file: a .zip archive of the structure above
1.19 - Open Images
The Open Images format is based on a large-scale, diverse dataset that contains object detection, object segmentation, visual relationship, and localized narratives annotations.
Its export data format is compatible with many object detection and segmentation models.
For more information, see:
Open Images export
For export of images:
-
Supported annotations: Bounding Boxes (detection), Tags (classification), Polygons (segmentation), Masks (segmentation), Ellipses (segmentation, as masks).
-
Supported attributes:
- Tags:
scoremust be defined for labels astextornumber. The confidence level from 0 to 1. - Bounding boxes:
scoremust be defined for labels astextornumber. The confidence level from 0 to 1.
occludedas both UI option and a separate attribute. Whether the object is occluded by another object.truncatedmust be defined for labels ascheckbox. Whether the object extends beyond the boundary of the image.is_group_ofmust be defined for labels ascheckbox. Whether the object represents a group of objects of the same class.is_depictionmust be defined for labels ascheckbox. Whether the object is a depiction (such as a drawing) rather than a real object.is_insidemust be defined for labels ascheckbox. Whether the object is seen from the inside. - Masks:
box_idmust be defined for labels astext. An identifier for the bounding box associated with the mask.predicted_ioumust be defined for labels astextornumber. Predicted IoU value with respect to the ground truth.
- Tags:
-
Tracks: Not supported.
The downloaded file is a .zip archive with the following structure:
└─ taskname.zip/
    ├── annotations/
    │   ├── bbox_labels_600_hierarchy.json
    │   ├── class-descriptions.csv
    |   ├── images.meta  # additional file with information about image sizes
    │   ├── <subset_name>-image_ids_and_rotation.csv
    │   ├── <subset_name>-annotations-bbox.csv
    │   ├── <subset_name>-annotations-human-imagelabels.csv
    │   └── <subset_name>-annotations-object-segmentation.csv
    ├── images/
    │   ├── subset1/
    │   │   ├── <image_name101.jpg>
    │   │   ├── <image_name102.jpg>
    │   │   └── ...
    │   ├── subset2/
    │   │   ├── <image_name201.jpg>
    │   │   ├── <image_name202.jpg>
    │   │   └── ...
    |   ├── ...
    └── masks/
        ├── subset1/
        │   ├── <mask_name101.png>
        │   ├── <mask_name102.png>
        │   └── ...
        ├── subset2/
        │   ├── <mask_name201.png>
        │   ├── <mask_name202.png>
        │   └── ...
        ├── ...
Open Images import
Uploaded file: a .zip archive of the following structure:
└─ upload.zip/
    ├── annotations/
    │   ├── bbox_labels_600_hierarchy.json
    │   ├── class-descriptions.csv
    |   ├── images.meta  # optional, file with information about image sizes
    │   ├── <subset_name>-image_ids_and_rotation.csv
    │   ├── <subset_name>-annotations-bbox.csv
    │   ├── <subset_name>-annotations-human-imagelabels.csv
    │   └── <subset_name>-annotations-object-segmentation.csv
    └── masks/
        ├── subset1/
        │   ├── <mask_name101.png>
        │   ├── <mask_name102.png>
        │   └── ...
        ├── subset2/
        │   ├── <mask_name201.png>
        │   ├── <mask_name202.png>
        │   └── ...
        ├── ...
Image ids in the <subset_name>-image_ids_and_rotation.csv should match with
image names in the task.
1.20 - Cityscapes
The Cityscapes format is a widely-used standard in the field of computer vision, particularly for tasks involving semantic and instance segmentation in urban scenes. This dataset format typically comprises high-resolution images of cityscapes along with detailed pixel-level annotations.
Each pixel is labeled with a category such as “road,” “pedestrian,” or “vehicle,” making it a valuable resource for training and validating machine learning models aimed at understanding urban environments. It’s a go-to choice for researchers and professionals working on autonomous vehicles, robotics, and smart cities.
For more information, see:
Cityscapes export
- Supported annotations: Masks, Polygons (as masks), Bounding Boxes (as masks), Ellipses (as masks).
- Attributes:
is_crowdboolean, should be defined for labels ascheckbox. Specifies if the annotation label can distinguish between different instances. IfFalse, the exported annotation will include the instance id value.
- Tracks: Not supported (exported as separate shapes).
The downloaded file is a .zip archive with the following structure:
taskname.zip/
├── label_color.txt
├── gtFine
│   ├── <subset_name>
│   │   └── <city_name>
│   │       ├── image_0_gtFine_instanceIds.png
│   │       ├── image_0_gtFine_color.png
│   │       ├── image_0_gtFine_labelIds.png
│   │       ├── image_1_gtFine_instanceIds.png
│   │       ├── image_1_gtFine_color.png
│   │       ├── image_1_gtFine_labelIds.png
│   │       ├── ...
└── imgsFine  # if saving images was requested
    └── leftImg8bit
        ├── <subset_name>
        │   └── <city_name>
        │       ├── image_0_leftImg8bit.png
        │       ├── image_1_leftImg8bit.png
        │       ├── ...
label_color.txta file that describes the color for each label
# label_color.txt example
# r g b label_name
0 0 0 background
0 255 0 tree
...
*_gtFine_color.pngclass labels encoded by its color.*_gtFine_labelIds.pngclass labels are encoded by its index.*_gtFine_instanceIds.pngclass and instance labels encoded by an instance ID. The pixel values encode class and the individual instance: the integer part of a division by 1000 of each ID provides class ID, the remainder is the instance ID. If a certain annotation describes multiple instances, then the pixels have the regular ID of that class
Cityscapes import
- Supported annotations: Masks, Polygons (if Convert masks to polygons is enabled).
- Attributes:
is_crowdboolean, should be defined for labels ascheckbox.
- Tracks: Not supported.
Uploaded file: a .zip archive with the following structure:
archive.zip/
├── label_color.txt # optional
└── gtFine
    └── <city_name>
        ├── image_0_gtFine_instanceIds.png
        ├── image_1_gtFine_instanceIds.png
        ├── ...
Creating task for Cityscapes dataset
Create a task with the labels you need or you can use the labels and colors of the original dataset. To work with the Cityscapes format, you must have a black color label for the background.
Original Cityscapes color map:
[
    {"name": "unlabeled", "color": "#000000", "attributes": []},
    {"name": "egovehicle", "color": "#000000", "attributes": []},
    {"name": "rectificationborder", "color": "#000000", "attributes": []},
    {"name": "outofroi", "color": "#000000", "attributes": []},
    {"name": "static", "color": "#000000", "attributes": []},
    {"name": "dynamic", "color": "#6f4a00", "attributes": []},
    {"name": "ground", "color": "#510051", "attributes": []},
    {"name": "road", "color": "#804080", "attributes": []},
    {"name": "sidewalk", "color": "#f423e8", "attributes": []},
    {"name": "parking", "color": "#faaaa0", "attributes": []},
    {"name": "railtrack", "color": "#e6968c", "attributes": []},
    {"name": "building", "color": "#464646", "attributes": []},
    {"name": "wall", "color": "#66669c", "attributes": []},
    {"name": "fence", "color": "#be9999", "attributes": []},
    {"name": "guardrail", "color": "#b4a5b4", "attributes": []},
    {"name": "bridge", "color": "#966464", "attributes": []},
    {"name": "tunnel", "color": "#96785a", "attributes": []},
    {"name": "pole", "color": "#999999", "attributes": []},
    {"name": "polegroup", "color": "#999999", "attributes": []},
    {"name": "trafficlight", "color": "#faaa1e", "attributes": []},
    {"name": "trafficsign", "color": "#dcdc00", "attributes": []},
    {"name": "vegetation", "color": "#6b8e23", "attributes": []},
    {"name": "terrain", "color": "#98fb98", "attributes": []},
    {"name": "sky", "color": "#4682b4", "attributes": []},
    {"name": "person", "color": "#dc143c", "attributes": []},
    {"name": "rider", "color": "#ff0000", "attributes": []},
    {"name": "car", "color": "#00008e", "attributes": []},
    {"name": "truck", "color": "#000046", "attributes": []},
    {"name": "bus", "color": "#003c64", "attributes": []},
    {"name": "caravan", "color": "#00005a", "attributes": []},
    {"name": "trailer", "color": "#00006e", "attributes": []},
    {"name": "train", "color": "#005064", "attributes": []},
    {"name": "motorcycle", "color": "#0000e6", "attributes": []},
    {"name": "bicycle", "color": "#770b20", "attributes": []},
    {"name": "licenseplate", "color": "#00000e", "attributes": []}
]
Upload images when creating a task:
images.zip/
    ├── image_0.jpg
    ├── image_1.jpg
    ├── ...
After creating the task, upload the Cityscapes annotations as described in the previous section.
1.21 - KITTI
The KITTI format is widely used for a range of computer vision tasks related to autonomous driving, including but not limited to 3D object detection, multi-object tracking, and scene flow estimation. Given its special focus on automotive scenes, the KITTI format is generally used with models that are designed or adapted for these types of tasks.
For more information, see:
- KITTI site
- Format specification for KITTI detection
- Format specification for KITTI segmentation
- Dataset examples
KITTI export
For export of images:
- Supported annotations: Bounding Boxes (detection), Polygons (segmentation), Masks (segmentation), Ellipses (segmentation, as masks).
- Supported attributes:
occluded(Available both as a UI option and a separate attribute) Denotes that a major portion of the object within the bounding box is obstructed by another object.truncated(Only applicable to bounding boxes) Must be represented ascheckboxesfor labels. Suggests that the bounding box does not encompass the entire object; some part is cut off.is_crowd(Only valid for polygons). Should be indicated usingcheckboxesfor labels. Signifies that the annotation encapsulates multiple instances of the same object class.
- Tracks: Not supported (exported as separate shapes).
The downloaded file is a .zip archive with the following structure:
└─ annotations.zip/
    ├── label_colors.txt # list of pairs r g b label_name
    ├── labels.txt # list of labels
    └── default/
        ├── label_2/ # left color camera label files
        │   ├── <image_name_1>.txt
        │   ├── <image_name_2>.txt
        │   └── ...
        ├── instance/ # instance segmentation masks
        │   ├── <image_name_1>.png
        │   ├── <image_name_2>.png
        │   └── ...
        ├── semantic/ # semantic segmentation masks (labels are encoded by its id)
        │   ├── <image_name_1>.png
        │   ├── <image_name_2>.png
        │   └── ...
        └── semantic_rgb/ # semantic segmentation masks (labels are encoded by its color)
            ├── <image_name_1>.png
            ├── <image_name_2>.png
            └── ...
KITTI import
You can upload KITTI annotations in two ways: rectangles for the detection task and masks for the segmentation task.
For detection tasks the uploading archive should have the following structure:
└─ annotations.zip/
    ├── labels.txt # optional, labels list for non-original detection labels
    └── <subset_name>/
        ├── label_2/ # left color camera label files
        │   ├── <image_name_1>.txt
        │   ├── <image_name_2>.txt
        │   └── ...
For segmentation tasks the uploading archive should have the following structure:
└─ annotations.zip/
    ├── label_colors.txt # optional, color map for non-original segmentation labels
    └── <subset_name>/
        ├── instance/ # instance segmentation masks
        │   ├── <image_name_1>.png
        │   ├── <image_name_2>.png
        │   └── ...
        ├── semantic/ # optional, semantic segmentation masks (labels are encoded by its id)
        │   ├── <image_name_1>.png
        │   ├── <image_name_2>.png
        │   └── ...
        └── semantic_rgb/ # optional, semantic segmentation masks (labels are encoded by its color)
            ├── <image_name_1>.png
            ├── <image_name_2>.png
            └── ...
All annotation files and masks should have structures that are described in the original format specification.
1.22 - LFW
The Labeled Faces in the Wild (LFW) format is primarily used for face verification and face recognition tasks. The LFW format is designed to be straightforward and is compatible with a variety of machine learning and deep learning frameworks.
For more information, see:
LFW export
For export of images:
-
Supported annotations: Tags, Skeletons.
-
Attributes:
negative_pairs(should be defined for labels astext): list of image names with mismatched persons.positive_pairs(should be defined for labels astext): list of image names with matched persons.
-
Tracks: Not supported.
The downloaded file is a .zip archive with the following structure:
<archive_name>.zip/
    └── images/ # if the option save images was selected
    │    ├── name1/
    │    │   ├── name1_0001.jpg
    │    │   ├── name1_0002.jpg
    │    │   ├── ...
    │    ├── name2/
    │    │   ├── name2_0001.jpg
    │    │   ├── name2_0002.jpg
    │    │   ├── ...
    │    ├── ...
    ├── landmarks.txt
    ├── pairs.txt
    └── people.txt
LFW import
The uploaded annotations file should be a zip file with the following structure:
<archive_name>.zip/
    └── annotations/
        ├── landmarks.txt # list with landmark points for each image
        ├── pairs.txt # list of matched and mismatched pairs of person
        └── people.txt # optional file with a list of persons name
Full information about the content of annotation files is available here
Example: create task with images and upload LFW annotations into it
This is one of the possible ways to create a task and add LFW annotations for it.
- On the task creation page:
- Add labels that correspond to the names of the persons.
- For each label define
textattributes with namespositive_pairsandnegative_pairs - Add images using zip archive from local repository:
images.zip/
    ├── name1_0001.jpg
    ├── name1_0002.jpg
    ├── ...
    ├── name1_<N>.jpg
    ├── name2_0001.jpg
    ├── ...
- On the annotation page: Upload annotation -> LFW 1.0 -> choose archive with structure that described in the import section.
2 - Import annotations and data to CVAT
Importing a dataset into a project
You can import a dataset into a project. When you do this, CVAT:
- If the project has no defined labels, creates required labels based on the information available in the dataset. Only label names can be imported this way, colors, attributes, and skeleton labels must be defined manually.
- Creates new tasks inside the project. If there are several subsets in the imported dataset, each one is imported as a separate task with the corresponding subset name.
- Populates each imported task with the imported data and annotations (if the format contains annotations).
Note: Importing a dataset always creates a new task in the project.
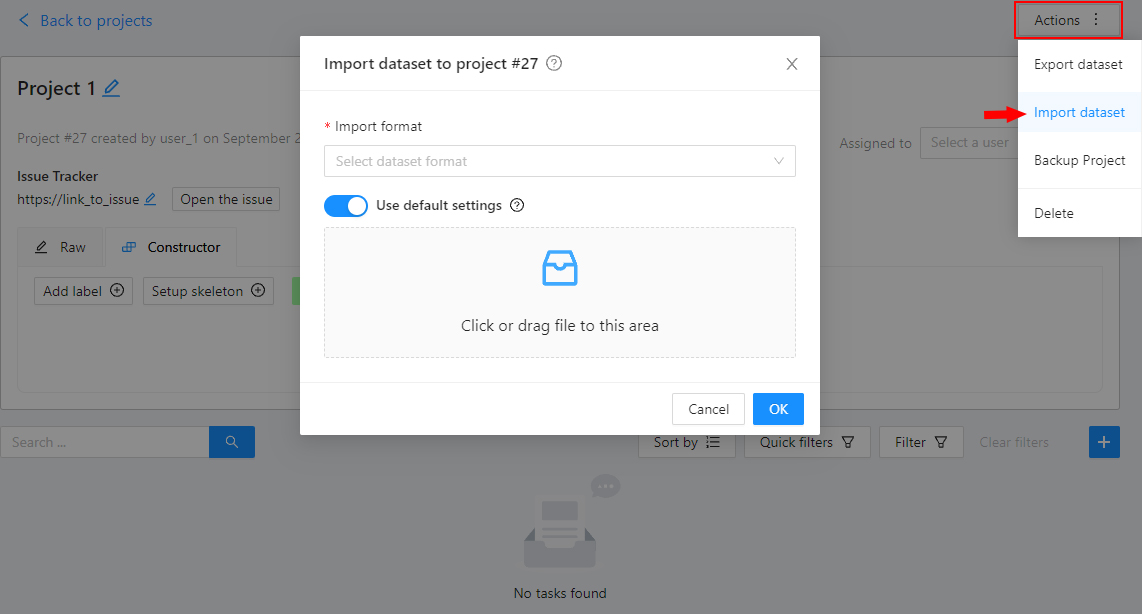
To import a dataset into a project:
- Open the project on the
Projects page. - Open the
Actionsmenu in the upper right corner. - Click
Import dataset. - Select the dataset format.
- Drag the file to the file upload area or click on the upload area to select the file through the explorer.
You can also import a dataset from attached cloud storage.
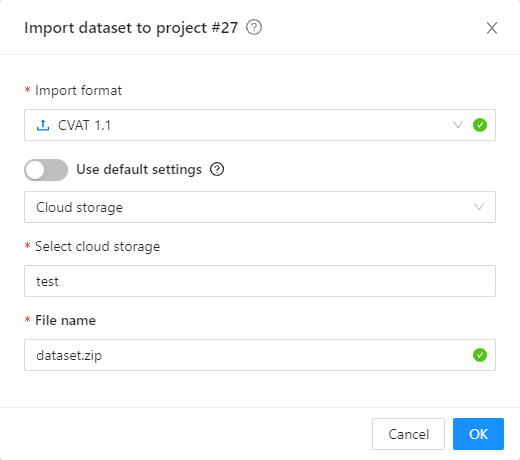
- First, select the annotation format.
- Then, select a cloud storage connection from the list or use the default one configured for the project.
- Specify the ZIP archive name in the
File namefield.
During the import process, you will be able to track the progress of the import on the Requests page.
Importing a dataset into a task
You can also add data when you create a task. A task can be:
- Inside a project (linked to that project), or
- Standalone.
After a task is created, you cannot add more data. To add extra data, create another task.
To learn more about creating a task in CVAT, see How to create and configure an annotation task.
Uploading annotations to tasks and jobs
If you already have a file with annotations or an annotated dataset, you can upload it to an entire task or to a single job.
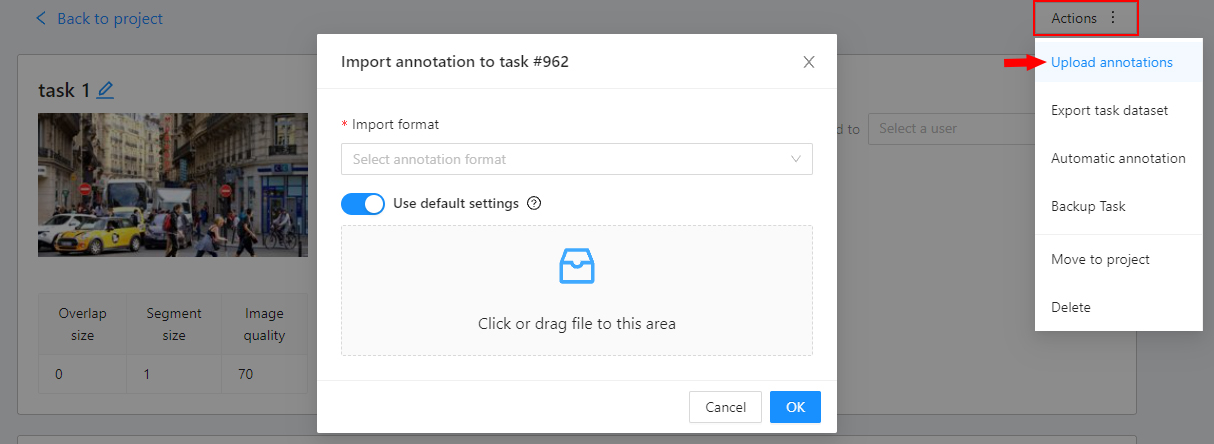
Warning
When you upload annotations, CVAT removes the existing ones.Uploading annotations to a task
- On the Tasks page, click the three dots next to the task.
- Or open the task and go to the
Actionsmenu. - Click
Upload annotations. - Select the annotation format.
- Upload the file from your computer or choose one from cloud storage.
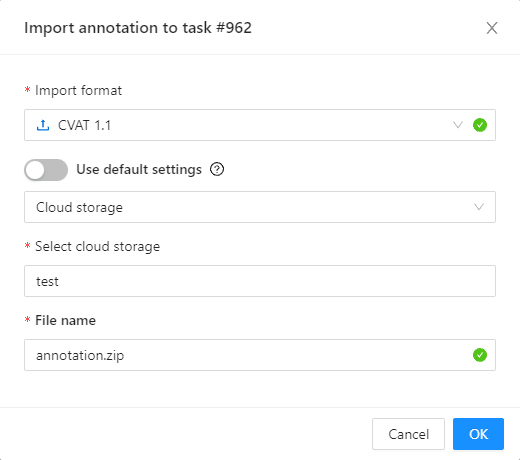
Uploading annotations to a job
- Open the task, and click the three dots next to the job.
- Click
Import annotations. - Select the annotation format.
- Upload the file from your computer or choose one from cloud storage.
3 - Export annotations and data from CVAT
Exporting dataset from a task
To export the dataset from the task, follow these steps:
-
Open Task.
-
Go to Actions > Export task dataset.
-
Choose the desired format from the list of available options.
-
(Optional) Toggle the Save images switch if you wish to include images in the export.
Note
The Save images option is a paid feature.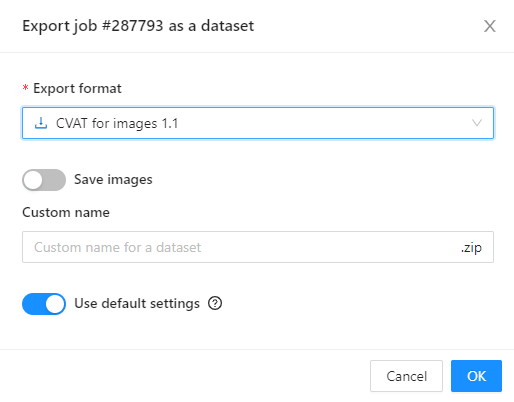
-
Input a name for the resulting
.ziparchive. -
Click OK to initiate the export.
Exporting dataset from a job
To export a dataset from Job follow these steps:
-
Navigate to Menu > Export job dataset.
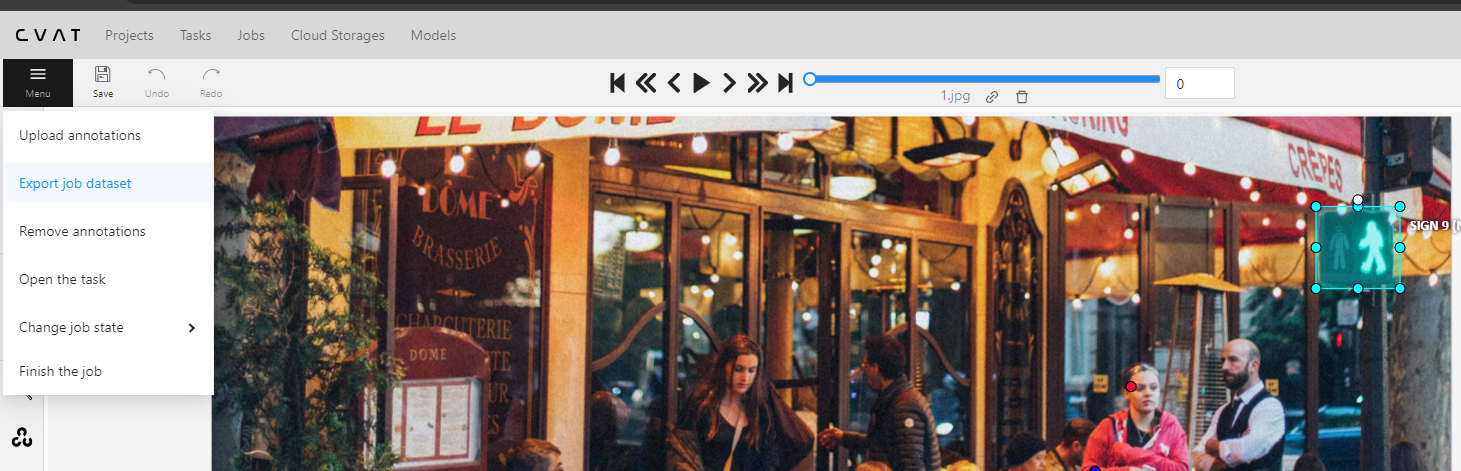
-
Choose the desired format from the list of available options.
-
(Optional) Toggle the Save images switch if you wish to include images in the export.
Note
The Save images option is a paid feature. -
Input a name for the resulting
.ziparchive. -
Click OK to initiate the export.
Data export video tutorial
For more information on the process, see the following tutorial:
4 - Backup Task and Project
Overview
In CVAT you can backup tasks and projects. This can be used to backup a task or project on your PC or to transfer to another server.
Create backup
To backup a task or project, open the action menu and select Backup Task or Backup Project.
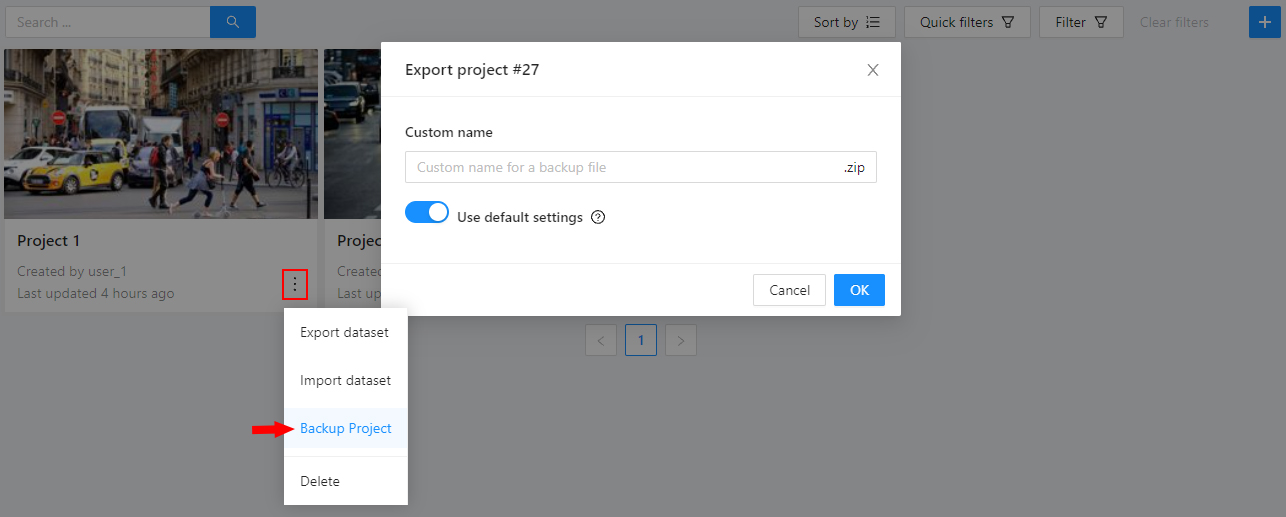
You can backup a project or a task locally on your PC or using an attached cloud storage.
The dialog includes a switch Use lightweight backup whenever possible.
When enabled, CVAT creates a lightweight backup for data that comes from attached cloud storage:
the backup stores task/project meta and annotations and does not copy raw media files.
This reduces backup size and time for cloud-backed data.
The switch has no effect on a tasks, whose data is located on CVAT.
The switch is enabled by default.
(Optional) Specify the name in the Custom name text field for backup, otherwise the file of backup name
will be given by the mask project_<project_name>_backup_<date>_<time>.zip for the projects
and task_<task_name>_backup_<date>_<time>.zip for the tasks.
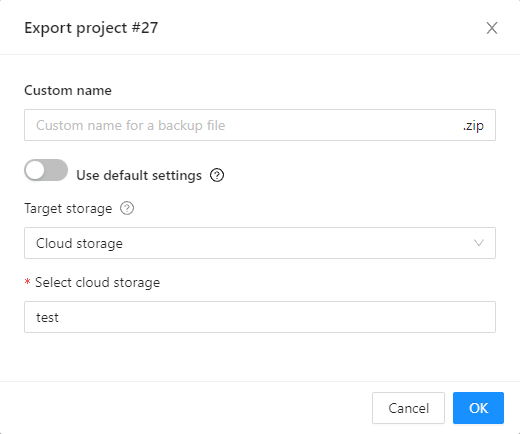
If you want to save a backup to a specific
attached cloud storage,
you should additionally turn off the switch Use default settings, select the Cloud storage value
in the Target storage and select this storage in the list of the attached cloud storages.
Create backup APIs
- endpoints:
/tasks/{id}/backup/projects/{id}/backup
- method:
GET - responses: 202, 201 with zip archive payload
Upload backup APIs
- endpoints:
/api/tasks/backup/api/projects/backup
- method:
POST - Content-Type:
multipart/form-data - responses: 202, 201 with json payload
Create from backup
To create a task or project from a backup, go to the tasks or projects page,
click the Create from backup button and select the archive you need.

As a result, you’ll get a task containing data, parameters, and annotations of the previously exported task.
Note: When restoring from a lightweight backup, CVAT creates a task which is not attached to cloud storage. Data cannot be fetched until cloud storage is attached on a Task page.
Backup file structure
As a result, you’ll get a zip archive containing data, task or project and task specification and annotations with the following structure:
    .
    ├── data
    │   └── {user uploaded data}
    ├── task.json
    └── annotations.json
    .
    ├── task_{id}
    │   ├── data
    │   │   └── {user uploaded data}
    │   ├── task.json
    │   └── annotations.json
    └── project.json
5 - Dataset Manifest
Overview
When we create a new task in CVAT, we need to specify where to get the input data from. CVAT allows to use different data sources, including local file uploads, a mounted file share on the server, cloud storages and remote URLs. In some cases CVAT needs to have extra information about the input data. This information can be provided in Dataset manifest files. They are mainly used when working with cloud storages to reduce the amount of network traffic used and speed up the task creation process. However, they can also be used in other cases, which will be explained below.
A dataset manifest file is a text file in the JSONL format. These files can be created automatically with the special command-line tool, or manually, following the manifest file format specification.
How and when to use manifest files
Manifest files can be used in the following cases:
- A video file or a set of images is used as the data source and the caching mode is enabled. Read more
- The data is located in a cloud storage. Read more
- The
predefinedfile sorting method is specified. Read more
The predefined sorting method
Independently of the file source being used, when the predefined
sorting method is selected in the task configuration, the source files will be
ordered according to the .jsonl manifest file, if it is found in the input list of files.
If a manifest is not found, the order provided in the input file list is used.
For image archives (e.g. .zip), a manifest file (*.jsonl) is required when using
the predefined file ordering. A manifest file must be provided next to the archive
in the input list of files, it must not be inside the archive.
If there are multiple manifest files in the input file list, an error will be raised.
How to generate manifest files
CVAT provides a dedicated Python tool to generate manifest files. The source code can be found here.
Using the tool is the recommended way to create manifest files for you data. The data must be available locally to the tool to generate manifest.
Usage
usage: create.py [-h] [--force] [--output-dir .] source

positional arguments:
  source                Source paths

optional arguments:
  -h, --help            show this help message and exit
  --force               Use this flag to prepare the manifest file for video data
                        if by default the video does not meet the requirements
                        and a manifest file is not prepared
  --output-dir OUTPUT_DIR
                        Directory where the manifest file will be saved
Use the script from a Docker image
This is the recommended way to use the tool.
The script can be used from the cvat/server image:
docker run -it --rm -u "$(id -u)":"$(id -g)" \
  -v "${PWD}":"/local" \
  --entrypoint python3 \
  cvat/server \
  utils/dataset_manifest/create.py --output-dir /local /local/<path/to/sources>
Make sure to adapt the command to your file locations.
Use the script directly
Ubuntu 20.04
Install dependencies:
# General
sudo apt-get update && sudo apt-get --no-install-recommends install -y \
    python3-dev python3-pip python3-venv pkg-config
# Library components
sudo apt-get install --no-install-recommends -y \
    libavformat-dev libavcodec-dev libavdevice-dev \
    libavutil-dev libswscale-dev libswresample-dev libavfilter-dev
Create an environment and install the necessary python modules:
python3 -m venv .env
. .env/bin/activate
pip install -U pip
pip install -r utils/dataset_manifest/requirements.in
Note
Please note that if used with video this way, the results may be different from what would the server decode. It is related to the ffmpeg library version. For this reason, using the Docker-based version of the tool is recommended.Examples
Create a dataset manifest in the current directory with video which contains enough keyframes:
python utils/dataset_manifest/create.py ~/Documents/video.mp4
Create a dataset manifest with video which does not contain enough keyframes:
python utils/dataset_manifest/create.py --force --output-dir ~/Documents ~/Documents/video.mp4
Create a dataset manifest with images:
python utils/dataset_manifest/create.py --output-dir ~/Documents ~/Documents/images/
Create a dataset manifest with pattern (may be used *, ?, []):
python utils/dataset_manifest/create.py --output-dir ~/Documents "/home/${USER}/Documents/**/image*.jpeg"
Create a dataset manifest using Docker image:
docker run -it --rm -u "$(id -u)":"$(id -g)" \
  -v ~/Documents/data/:${HOME}/manifest/:rw \
  --entrypoint '/usr/bin/bash' \
  cvat/server \
  utils/dataset_manifest/create.py --output-dir ~/manifest/ ~/manifest/images/
File format
The dataset manifest files are text files in JSONL format. These files have 2 sub-formats: for video and for images and 3d data.
Note
Each top-level entry enclosed in curly braces must use 1 string, no empty strings is allowed. The formatting in the descriptions below is only for demonstration.Dataset manifest for video
The file describes a single video.
pts - time at which the frame should be shown to the user
checksum - md5 hash sum for the specific image/frame decoded
{ "version": <string, version id> }
{ "type": "video" }
{ "properties": {
  "name": <string, filename>,
  "resolution": [<int, width>, <int, height>],
  "length": <int, frame count>
}}
{
  "number": <int, frame number>,
  "pts": <int, frame pts>,
  "checksum": <string, md5 frame hash>
} (repeatable)
Dataset manifest for images and other data types
The file describes an ordered set of images and 3d point clouds.
name - file basename and leading directories from the dataset root
checksum - md5 hash sum for the specific image/frame decoded
{ "version": <string, version id> }
{ "type": "images" }
{
  "name": <string, image filename>,
  "extension": <string, . + file extension>,
  "width": <int, width>,
  "height": <int, height>,
  "meta": <dict, optional>,
  "checksum": <string, md5 hash, optional>
} (repeatable)
Example files
Manifest for a video
{"version":"1.0"}
{"type":"video"}
{"properties":{"name":"video.mp4","resolution":[1280,720],"length":778}}
{"number":0,"pts":0,"checksum":"17bb40d76887b56fe8213c6fded3d540"}
{"number":135,"pts":486000,"checksum":"9da9b4d42c1206d71bf17a7070a05847"}
{"number":270,"pts":972000,"checksum":"a1c3a61814f9b58b00a795fa18bb6d3e"}
{"number":405,"pts":1458000,"checksum":"18c0803b3cc1aa62ac75b112439d2b62"}
{"number":540,"pts":1944000,"checksum":"4551ecea0f80e95a6c32c32e70cac59e"}
{"number":675,"pts":2430000,"checksum":"0e72faf67e5218c70b506445ac91cdd7"}
Manifest for a dataset with images
{"version":"1.0"}
{"type":"images"}
{"name":"image1","extension":".jpg","width":720,"height":405,"meta":{"related_images":[]},"checksum":"548918ec4b56132a5cff1d4acabe9947"}
{"name":"image2","extension":".jpg","width":183,"height":275,"meta":{"related_images":[]},"checksum":"4b4eefd03cc6a45c1c068b98477fb639"}
{"name":"image3","extension":".jpg","width":301,"height":167,"meta":{"related_images":[]},"checksum":"0e454a6f4a13d56c82890c98be063663"}
6 - Data preparation on the fly
Description
Data on the fly processing is a way of working with data, the main idea of which is as follows: when creating a task, the minimum necessary meta information is collected. This meta information allows in the future to create necessary chunks when receiving a request from a client.
Generated chunks are stored in a cache of the limited size with a policy of evicting less popular items.
When a request is received from a client, the required chunk is searched for in the cache. If the chunk does not exist yet, it is created using prepared meta information and then put into the cache.
This method of working with data allows:
- reduce the task creation time.
- store data in a cache of the limited size with a policy of evicting less popular items.
Unfortunately, this method has several drawbacks:
- The first access to the data will take more time.
- It will not work for some videos, even if they have a valid manifest file. If there are not enough keyframes in the video for smooth video decoding, the task data chunks will be created with the default method, i.e. during the task creation.
- If the data has not been cached yet, and is not reachable during the access time, it cannot be retrieved.
How to use
To enable or disable this feature for a new task, use the
Use Cache
toggle in the task configuration.
Uploading a manifest with data
When creating a task, you can upload a manifest.jsonl file along with the video or dataset with images.
You can see how to prepare it here.