This is the multi-page printable view of this section. Click here to print.
Workspace
- 1: Projects
- 2: Tasks
- 3: Jobs
- 4: Cloud storages
- 5: Attach cloud storage
- 6: Requests
- 7: Models
- 8: Bulk actions
- 9: Search
1 - Projects
Projects page
On this page, you can create a new project, create a project from a backup, and also see the created projects.
In the upper left corner there is a search bar, using which you can find the project by project name, assignee etc. In the upper right corner there are sorting, quick filters and filter.
Filter
Note
Applying a filter disables the quick filters.The filter works similarly to the filters for annotation, you can create rules from properties, operators and values and group rules into groups. For more details, see the filter section. Learn more about date and time selection.
To clear all filters, press Clear filters.
Supported properties for projects list
| Properties | Supported values | Description |
|---|---|---|
Assignee |
username | Assignee is the user who is working on the project, task or job. (is specified on task page) |
Owner |
username | The user who owns the project, task, or job |
Last updated |
last modified date and time (or value range) | The date can be entered in the dd.MM.yyyy HH:mm format or by selecting the date in the window that appears when you click on the input field |
ID |
number or range of job ID | |
Name |
name | On the tasks page - name of the task, on the project page - name of the project |
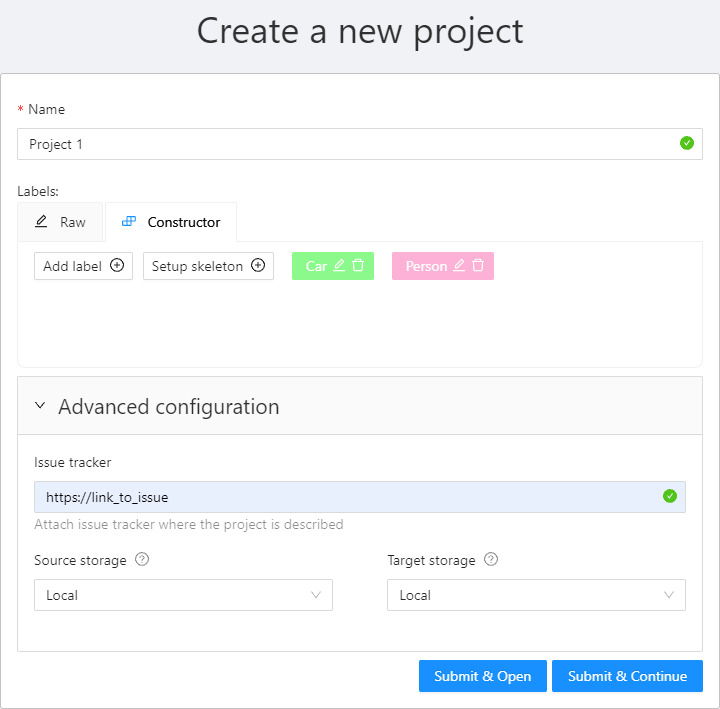
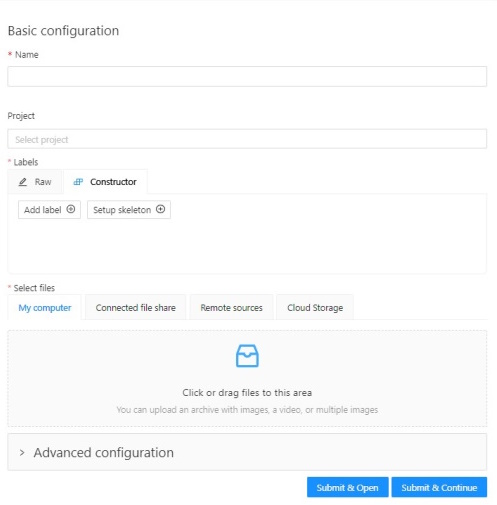
Create a project
In CVAT, you can create a project containing tasks of the same type. All tasks related to the project will inherit a list of labels.
To create a project, go to the projects section by clicking on the Projects item in the top menu.
On the projects page, you can see a list of projects, use a search,
or create a new project by clicking on the + button and select Create New Project.

Note
Note that the project will be created in the organization that you selected at the time of creation. Read more about organizations.You can change: the name of the project, the list of labels (which will be used for tasks created as parts of this project) and a skeleton if it’s necessary. In advanced configuration also you can specify: a link to the issue, source and target storages. Learn more about creating a label list, creating the skeleton and attach cloud storage.
To save and open a project, click on Submit & Open button. Also, you
can click on Submit & Continue button to create several projects in sequence.
Once created, the project will appear on the projects page. To open a project, just click on it.
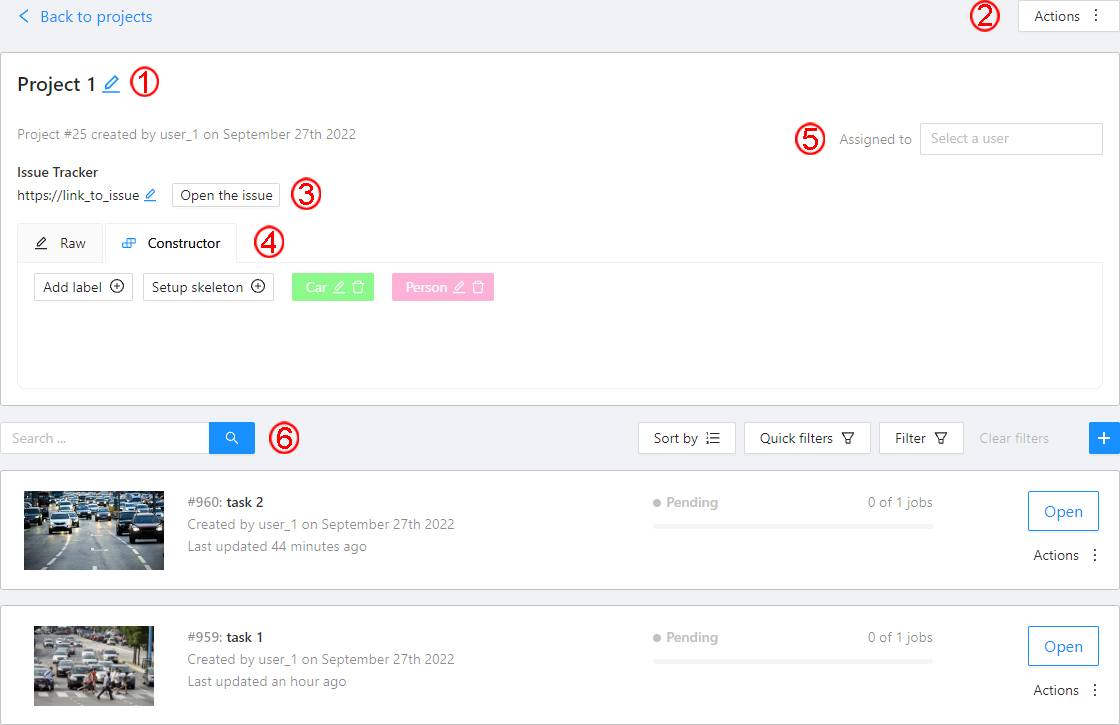
Here you can do the following:
-
Change the project’s title.
-
Open the
Actionsmenu. Each button is responsible for a specific function in theActionsmenu:Export dataset/Import dataset- download/upload annotations or annotations and images in a specific format. See more information at export/import datasets.Backup project- make a backup of the project read more in the backup section.Organization- move the project between your personal workspace or organizations. Please, refer to the Transfer between organizations section for details.Delete- remove the project and all related tasks.
-
Change issue tracker or open issue tracker if it is specified.
-
Change labels and skeleton. You can add new labels or add attributes for the existing labels in the
Rawmode or theConstructormode. You can also change the color for different labels. By clickingSetup skeletonyou can create a skeleton for this project. -
Assigned to — is used to assign a project to a person. Start typing an assignee’s name and/or choose the right person out of the dropdown list.
-
Tasks— is a list of all tasks for a particular project, with the ability to search, sort and filter for tasks in the project. Read more about search. Read more about sorting and filter It is possible to choose a subset for tasks in the project. You can use the available options (Train,Test,Validation) or set your own.
2 - Tasks
Overview

The Tasks page contains elements and each of them relates to a separate task. They are sorted in creation order.
Each element contains: the task name, preview, progress bar, button Open, and menu Actions.
Each button is responsible for a menu Actions specific function:
Export task dataset— download annotations or annotations and images in a specific format. More information is available in the export/import datasets section.Upload annotationupload annotations in a specific format. More information is available in the export/import datasets section.Automatic Annotation— automatic annotation with OpenVINO toolkit. Presence depends on how you build the CVAT instance.Backup task— make a backup of this task into a zip archive. Read more in the backup section.Move to project— Moving a task to a project (you can move only a task that does not belong to any project). In case of a label mismatch, you can create or delete necessary labels in the project/task. Some task labels can be matched with the target project labels.Organization- moving a task between your personal workspace or organizations. Only available for individual tasks (not tasks in a project). Please, refer to the Transfer between organizations section for details.Delete— delete task.
In the upper left corner, there is a search bar, using which you can find the task by assignee, task name etc. In the upper right corner, there are sorting, quick filters, and filter.
Filter
Note
Applying a filter disables the quick filter.The filter works similarly to the filters for annotation, you can create rules from properties, operators, and values and group rules into groups. For more details, consult the filter section. Learn more about date and time selection.
For clear all filters press Clear filters.
Supported properties for tasks list
| Properties | Supported values | Description |
|---|---|---|
Dimension |
2D or 3D |
Depends on the data format (read more in creating an annotation task) |
Status |
annotation, validation or completed |
|
Data |
video, images |
Depends on the data format (read more in creating an annotation task) |
Subset |
test, train, validation or custom subset |
learn more |
Assignee |
username | Assignee is the user who is working on the project, task or job (they are specified on task page) |
Owner |
username | The user who owns the project, task, or job |
Last updated |
last modified date and time (or value range) | The date can be entered in the dd.MM.yyyy HH:mm format or by selecting the date in the window that appears when you click on the input field |
ID |
number or range of job ID | |
Project ID |
number or range of project ID | |
Name |
name | On the tasks page: name of the task, on the project page: name of the project |
Project name |
project name | Specified when creating a project, can be changed on the (project section) |
Select Open to go to task details.
Task details page
Task details is a task page that contains a preview, a progress bar, the details of the task (specified when the task was created), and the Jobs section.
The next actions are available on this page:
-
Change the task’s title.
-
Open
Actionsmenu. -
Change the issue tracker or open it if specified.
-
Change labels (available only if the task is not related to the project).
You can add new labels or add attributes for the existing labels in the Raw mode or the Constructor mode. By selecting
Copyyou will copy the labels to the clipboard. -
Assigned to — is used to assign a task to a person. Start typing an assignee’s name and/or choose the right person out of the dropdown list. In the list of users, you will only see the users of the organization where the task is created.
-
Cloud storage — view the cloud storage attached to the task and change it to another attached storage if needed.
Jobs is a list of all jobs for a particular task. Here you can find the next data:
- Jobs name with a hyperlink to it.
- Frame range — the frame interval.
- A stage of the job. The stage is specified by a drop-down list.
There are three stages:
annotation,validation, oracceptance. This value affects the task progress bar. - A state of the job. The state can be changed by an assigned user in the menu inside the job.
There are several possible states:
new,in progress,rejected,completed. - Duration — is the amount of time the job is being worked.
- Assignee is the user who is working on the job (annotator, reviewer, or corrector). You can start typing an assignee’s name and/or choose the right person out of the dropdown list.
You can filter or sort jobs by status, assignee, and updated date using the filters panel.
Follow a link inside Jobs section to start the annotation process. In some cases, you can have several links. It depends on the size of your task and Overlap Size and Segment Size parameters. To improve UX, only the first chunk of several frames will be loaded and you will be able to annotate the first images. Other frames will be loaded in the background.
How to create and configure an annotation task
To start annotating in CVAT, you must create an annotation task and specify its parameters.
Create a task
To create a task:
- On the Tasks page, select +
- Select Create new task.

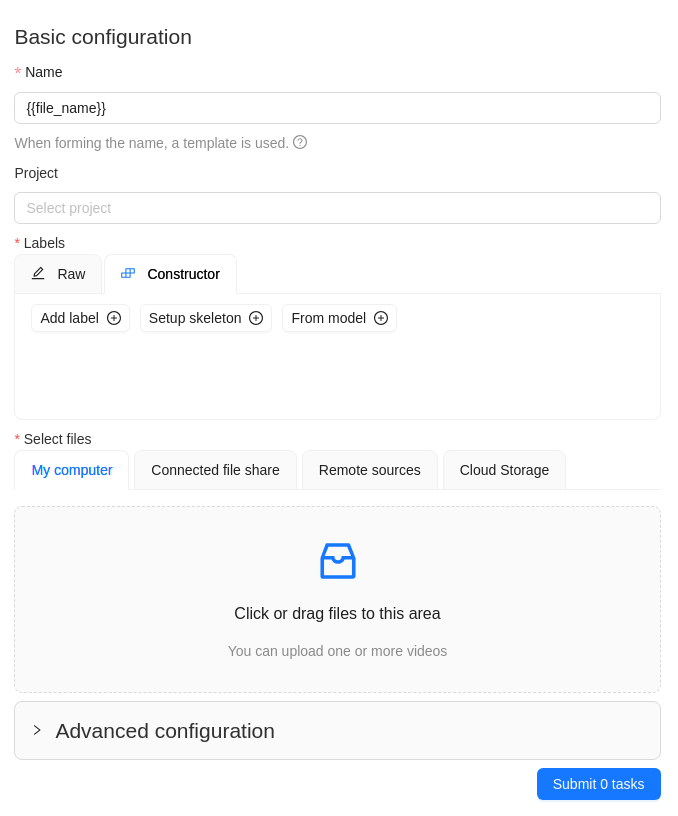
Next, specify the task parameters in the configurator:
-
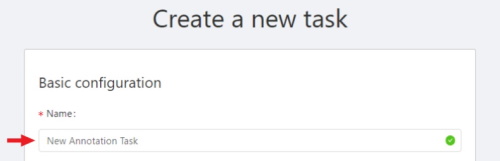
In the Name field, enter the name of the new task.
-
(Optional) From the Projects drop-down, select a project for the new task.
Leave this field empty if you do not want to assign the task to any project.
Note
Following steps are valid if the task does not belong to a project.
If the task has been assigned to a project, the project’s labels will be applied to the task. -
On the Constructor tab, select Add label.
The label constructor menu will open:
-
In the Label name field, enter the name of the label.
-
(Optional) To limit the use of the label to a certain shape tool, from the Label shape drop-down select the shape.
-
(Optional) Select the color for the label.

-
(Optional) Select Add an attribute and set up its properties.
-
Select Select files to upload files for annotation.
-
Select Continue to submit the label and start adding a new one
or Cancel to terminate the current label and return you to the labels list. -
Select Submit and open to submit the configuration and open the created task,
or Submit and continue, to submit the configuration and start a new task.
Label shape
Labels (or classes) are categories of objects that you can annotate.
Label shape limits the use of the label to certain shape tool.
Any is the default setting that does not limit the use of the
label to any particular shape tool.
For example, if you added:
- Label
sunwith the Label shape typeellipse - Label
carwith the Label shape typeany
As a result:
-
The
sunlabel will be available only for ellipse shape. -
The
carlabel will be available for all shapes.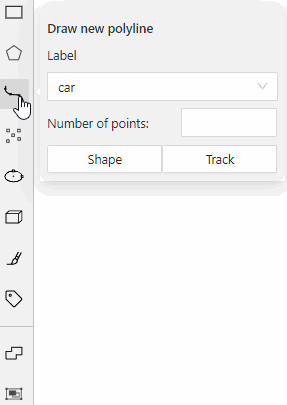
The tools on the Controls sidebar will be limited to the selected types of shapes.
For example, if you select Any,
all tools will be available,
but if you select Rectangle for all labels,
only the Rectangle tool will be
visible on the sidebar.
Note
You cannot apply the Label shape to the AI and OpenCV tools, these tools will always be available.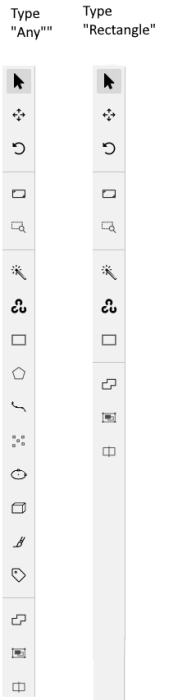
You can change the shape of the label as needed. This change will not affect the existing annotation.
For example, if you created objects using polygons and then changed the label shape to polylines, all previously created objects will remain polygons. However, you will not be able to add new polygon objects with the same label.
Note
You cannot change the shape of theskeleton label.
The Label shape field for the
skeleton label is disabled.
Add an attribute
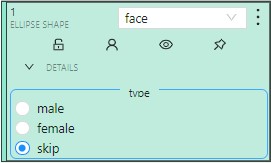
Attribute is a property of an annotated object, such as color, model, or other quality.
For example, you have a label for face and want to
specify the type of face. Instead of creating additional
labels for male and female, you can use attributes
to add this information.
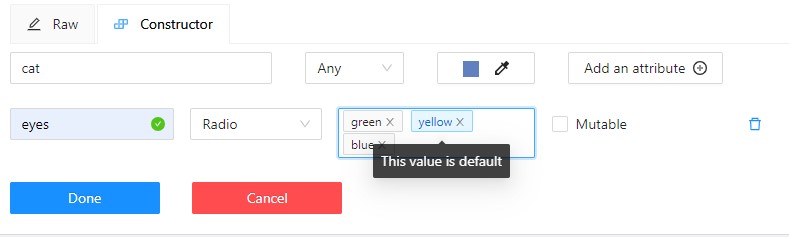
There are two types of attributes:
- Immutable attributes are unique and do not change from frame to frame.
For example,
age,gender, andcolor. - Mutable attributes are temporary and can change from frame to frame.
For example,
pose,quality, andtruncated.
Added attributes will be available from the Objects menu:
To add an attribute:
-
Go to the Constructor tab and select Add attribute.
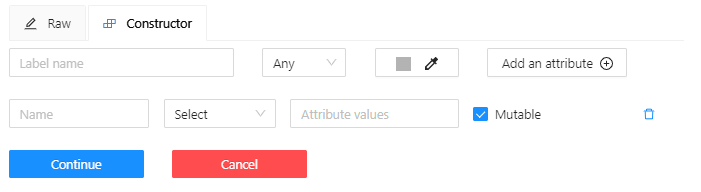
-
In the Name field, enter the attribute name.
-
In the drop-down menu, select the way to display the attribute in the Objects menu:
-
Selectenables a drop-down list, from which you can select an attribute.
If in the Attribute value field you add__undefined__, the drop-down list will have a blank value.
This is useful for cases where the attribute of the object cannot be clarified: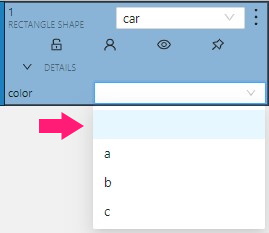
-
Radioenables the selection of one option from several options. -
Checkboxenables the selection of multiple options. -
Textsets the attribute to a text field. -
Numbersets the attribute to numerical field in the following format:min;max;step.
-
-
In the Attribute values field, add attribute values.
To separate values use Enter.
To delete value, use Backspace or click x next to the value name. -
(Optional) For mutable attributes, select Mutable.
-
(Optional) To set an attribute value as default, select it. The default value will change color to blue.
To delete an attribute, select Delete attribute.
Select files
There are several ways to upload files:
| Data source | Description |
|---|---|
| My computer | Use this option to select files from your laptop or PC. To select file: 1. Select Select files field:  . . 2. Select files to upload. |
| Connected file share | Advanced option. Upload files from a local or cloud shared folder. Note, that you need to mount a fileshare first. For more information, consult Share path |
| Remote source | Enter a list of URLs (one per line) in the field. |
| Cloud Storage | Advanced option. To upload files from cloud storage, type the cloud storage name, (optional) choose the manifest file, and select the required files. For more information, consult Attach cloud storage. Use the search feature to find a file (by file name) from the connected cloud storage. |
Editing labels in RAW format
The Raw is a way of working with labels for an advanced user.
It is useful when you need to copy labels from one independent task to another.
Note
Be careful with changing the raw specification of an existing task/project. Removing any “id” properties will lead to losing existing annotations. This property will be removed automatically from any text you insert to this field.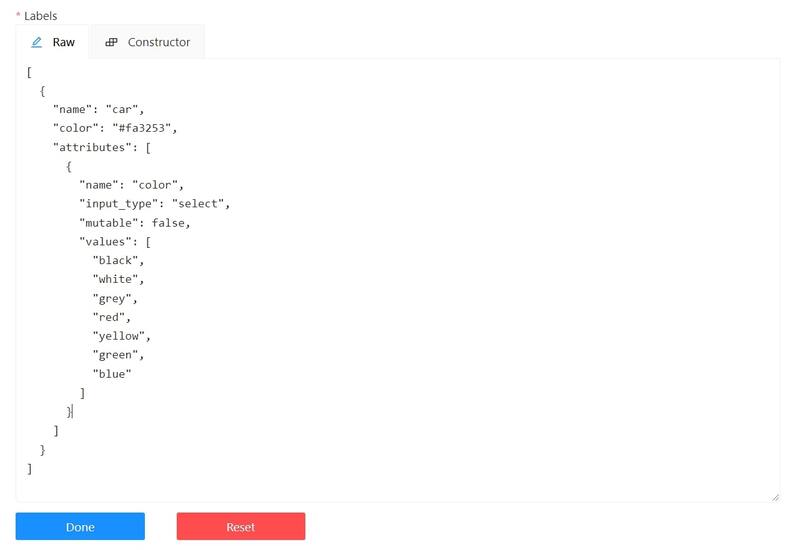
Raw presents label data in .json format with an option of editing and copying labels as text. The Done button applies the changes and the Reset button cancels the changes.
Data formats for a 3D task
To create a 3D task, you must prepare an archive with one of the following directory structures.
Note
You can’t mix 2D and 3D data in the same task. VELODYNE FORMAT
Structure:
velodyne_points/
data/
image_01.bin
IMAGE_00 # unknown dirname,
# generally image_01.png can be under IMAGE_00, IMAGE_01, IMAGE_02, IMAGE_03, etc
data/
image_01.png 3D POINTCLOUD DATA FORMAT
Structure:
pointcloud/
00001.pcd
related_images/
00001_pcd/
image_01.png # or any other image 3D, DEFAULT DATAFORMAT Option 1
Structure:
data/
image.pcd
image.png 3D, DEFAULT DATAFORMAT Option 2
Structure:
data/
image_1/
image_1.pcd
context_1.png # or any other name
context_2.jpgAdvanced configuration
Use advanced configuration to set additional parameters for the task and customize it to meet specific needs or requirements.
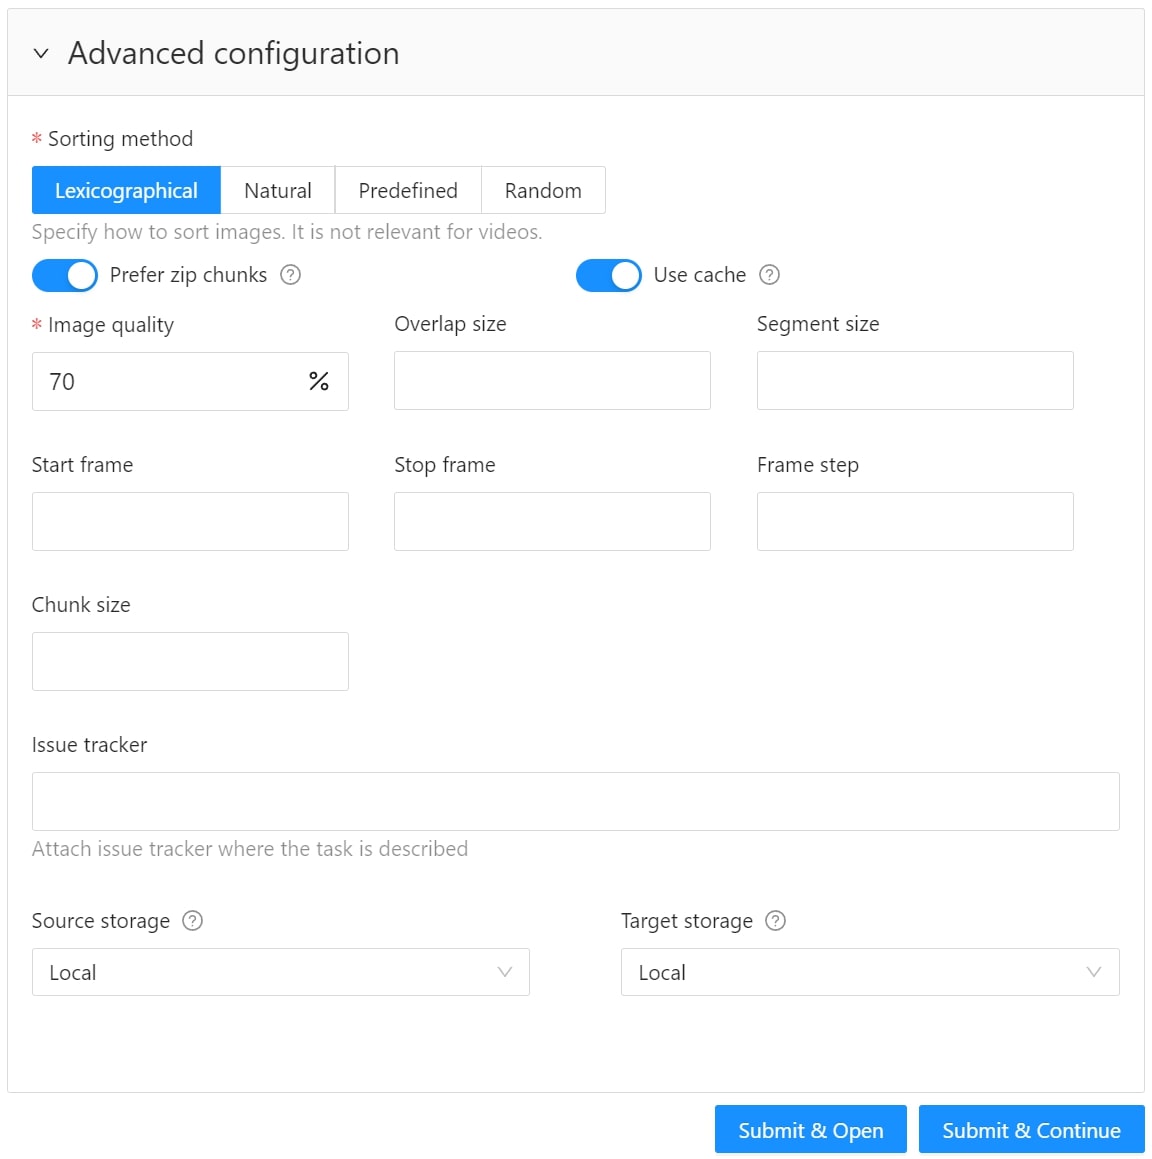
The following parameters are available:
| Element | Description |
|---|---|
| Sorting method | Note: Does not work for the video data. Several methods to sort the data. For example, the sequence 2.jpeg, 10.jpeg, 1.jpeg after sorting will be: 1.jpeg, 10.jpeg, 2.jpeg 1.jpeg, 2.jpeg, 10.jpeg 2.jpeg, 10.jpeg, 1.jpeg |
| Prefer zip chunks | Use this parameter to divide your video or image dataset for annotation into short video clips a zip file of frames. Zip files are larger but do not require decoding on the client side, and video clips are smaller but require decoding. It is recommended to turn off this parameter for video tasks to reduce traffic between the client side and the server. |
| Use cache | Select the checkbox to enable on-the-fly data processing to reduce task creation time and store data in a cache with a policy of evicting less popular items. For more information, see Data preparation on the fly. |
| Image quality | CVAT has two types of data: original quality and compressed. Original quality images are used for dataset export and automatic annotation. Compressed images are used only for annotations to reduce traffic between the server and client side. It is recommended to adjust the compression level only if the images contain small objects that are not visible in the original quality. Values range from 5 (highly compressed images) to 100 (not compressed). |
| Overlap size | Use this parameter to create overlapped segments, making tracking continuous from one segment to another. Note that this functionality only works for bounding boxes. This parameter has the following options: Interpolation task (video sequence). If you annotate with a bounding box on two adjacent segments, they will be merged into a single bounding box. In case the overlap is zero or the bounding box is inaccurate (not enclosing the object properly, misaligned or distorted) on the adjacent segments, it may be difficult to accurately interpolate the object’s movement between the segments. As a result, multiple tracks will be created for the same object. Annotation task (independent images). If an object exists on overlapped segments with overlap greater than zero, and the annotation of these segments is done properly, then the segments will be automatically merged into a single object. If the overlap is zero or the annotation is inaccurate (not enclosing the object properly, misaligned, distorted) on the adjacent segments, it may be difficult to accurately track the object. As a result, multiple bounding boxes will be created for the same object. If the annotations on different segments (on overlapped frames) are very different, you will have two shapes for the same object. To avoid this, accurately annotate the object on the first segment and the same object on the second segment to create a track between two annotations. |
| Segment size | Use this parameter to divide a dataset into smaller parts. For example, if you want to share a dataset among multiple annotators, you can split it into smaller sections and assign each section to a separate job. This allows annotators to work on the same dataset concurrently. |
| Start frame | Defines the first frame of the video. |
| Stop frame | Defines the last frame of the video. |
| Frame step | Use this parameter to filter video frames or images in a dataset. Specify frame step value to include only certain frames or images in the dataset. For example, if the frame step value is 25, the dataset will include every 25th frame or image. If a video has 100 frames, setting the frame step to 25 will include only frames 1, 26, 51, 76, and 100 in the dataset. This can be useful for reducing the size of the dataset, or for focusing on specific frames or images of particular interest. |
| Chunk size | Defines amount of frames to be packed in a chunk when send from client to server. The server defines automatically if the chunk is empty. Recommended values: |
| Issue tracker | Use this parameter to specify the issue tracker URL. |
| Source storage | Specify the source storage for importing resources like annotations and backups. If the task was assigned to the project, use the Use project source storage toggle to determine whether to use project values or specify new ones. |
| Target storage | Specify the target storage (local or cloud) for exporting resources like annotations and backups. If the task is created in the project, use the Use project target storage toggle to determine whether to use project values or specify new ones. |
To save and open the task, select Submit & Open .
To create several tasks in sequence, select Submit & Continue.
Created tasks will be displayed on the tasks page.
How to create and set up multiple tasks
Use Create multi tasks to create multiple video annotation tasks with the same configuration.
Note
The Create multi tasks feature is available for videos only.Check out:
Create multi tasks
To create the multi tasks:
- On the Tasks page select +.
- Select Create multi tasks.

Next, specify the parameters in the task configurator:
-
In the Name field, enter the name of the new task:
- Enter the name of the task
- (Optional)
{{index}}adds an index to the file in the set (starting from 0). - (Optional)
{{file_name}}adds the file’s name to the task’s name.
-
(Optional) From the Projects drop-down, select a project for the tasks.
Leave this field empty if you do not want to assign tasks to any project.
Note
Following steps are valid if the tasks do not belong to a project.
If the tasks have been assigned to a project, the project’s labels will be applied to the tasks. -
On the Constructor tab, select Add label.
-
In the Label name field, enter the name of the label.
-
(Optional) Select the color for the label.
-
(Optional) Select Add an attribute and set up its properties.
-
Select Select files to upload files for annotation.
Note
You cannot upload multiple tasks from the cloud storage. -
Select Submit
Ntasks
Example
A step-by-step example for creating the multiple tasks:
-
In the Name field, enter the
Create_multitask-{{index}}-{{file_name}}. -
Add labels.
-
Select files.
In case there are more than four files, only the total number of selected files will be displayed: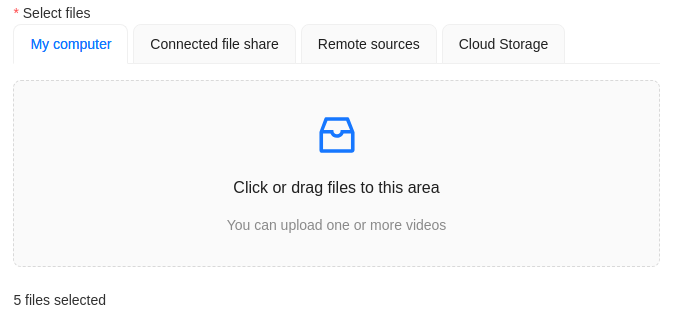
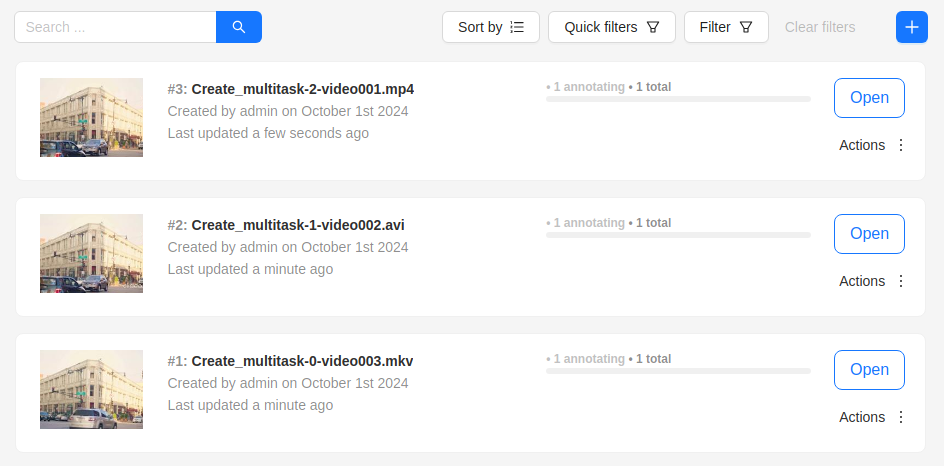
-
Select Submit
Ntasks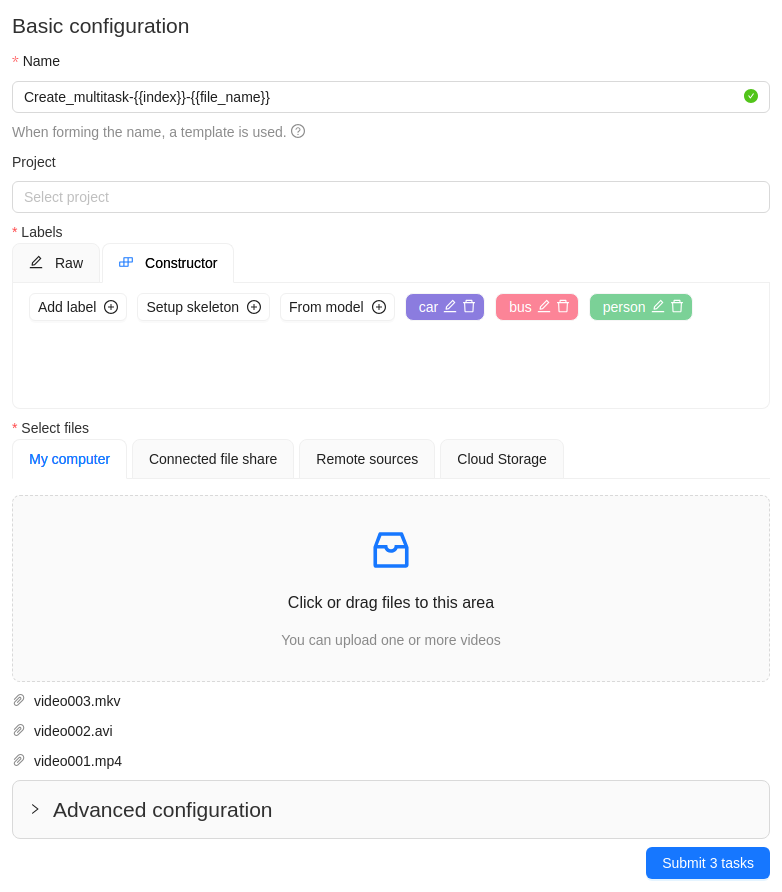
-
You will see a progress bar that shows the progress of the tasks being created:

-
Select Ok.

The result will look like the following:
Errors
During the process of adding multiple tasks, the following errors may occur:
| Error | Description |
|---|---|
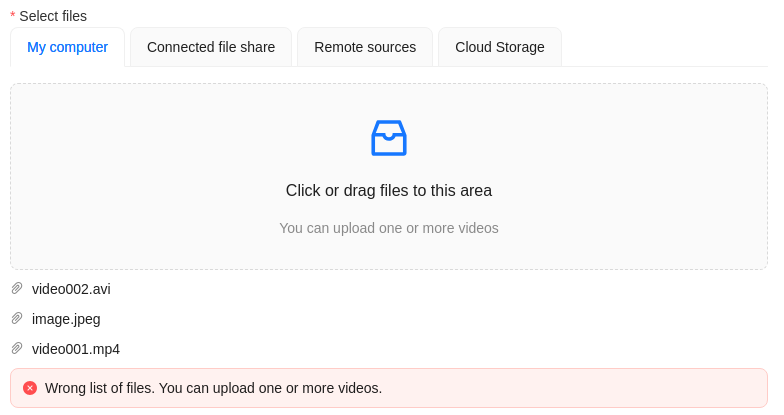 |
Wrong file format. You can add only video files. |
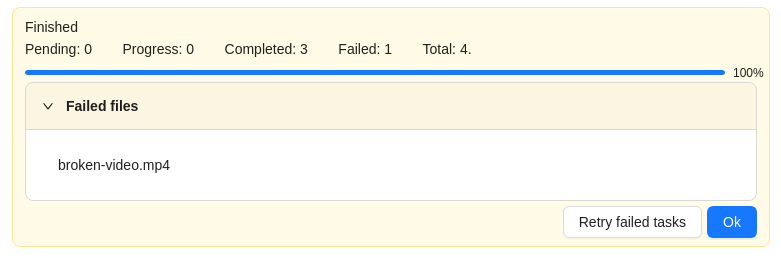 |
In the process of creating a task, CVAT was not able to process the video file. The name of the failed file will be displayed on the progress bar. To fix this issue: |
Advanced configuration
Use advanced configuration to set additional parameters for the task and customize it to meet specific needs or requirements.
For more information, consult Advanced configuration
How to delete a frame from a task
You can delete the current frame from a task. This frame will not be presented either in the UI or in the exported annotation. Thus, it is possible to mark corrupted frames that are not subject to annotation.
-
Go to the Job annotation view and click on the Delete frame button (Alt+Del).
Note
When you delete with the shortcut, the frame will be deleted immediately without additional confirmation.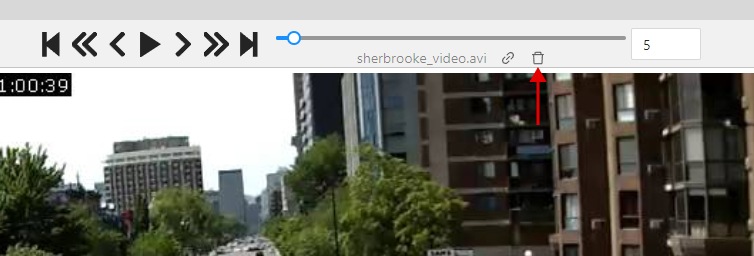
-
After that you will be asked to confirm frame deleting.
Note
all annotations from that frame will be deleted, unsaved annotations will be saved and the frame will be invisible in the annotation view (Until you make it visible in the settings). If there is some overlap in the task and the deleted frame falls within this interval, then this will cause this frame to become unavailable in another job as well. -
When you delete a frame in a job with tracks, you may need to adjust some tracks manually. Common adjustments are:
- Add keyframes at the edges of the deleted interval for the interpolation to look correct;
- Move the keyframe start or end keyframe to the correct side of the deleted interval.
Configure deleted frames visibility and navigation
If you need to enable showing the deleted frames, you can do it in the settings.
-
Go to the settings and chose Player settings.
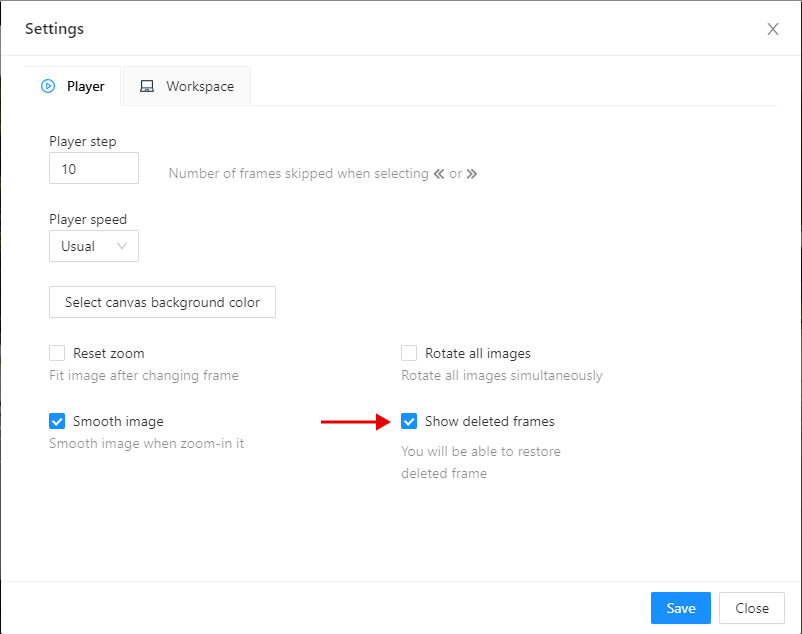
-
Click on the Show deleted frames checkbox. And close the settings dialog.

-
Then you will be able to navigate through deleted frames. But annotation tools will be unavailable. Deleted frames differ in the corresponding overlay.
-
There are ways to navigate through deleted frames without enabling this option:
- Go to the frame via direct navigation methods: navigation slider or frame input field,
- Go to the frame via the direct link, for example:
/api/tasks/{id}/jobs/{id}?frame={frame_id}.
-
Navigation with step will not count deleted frames.
Restore deleted frame
You can also restore deleted frames in the task.
-
Turn on deleted frames visibility, as it was told in the previous part, and go to the deleted frame you want to restore.
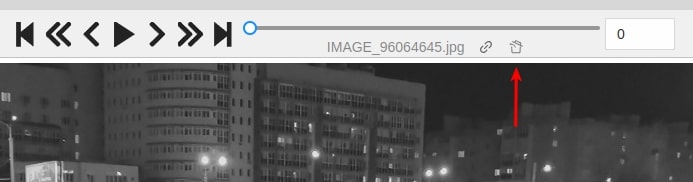
-
Click on the Restore icon. The frame will be restored immediately.
3 - Jobs
On the Jobs page, users (for example, with the worker role) can see the jobs that are assigned to them without having access to the task page, as well as track progress, sort, and apply filters to the job list.
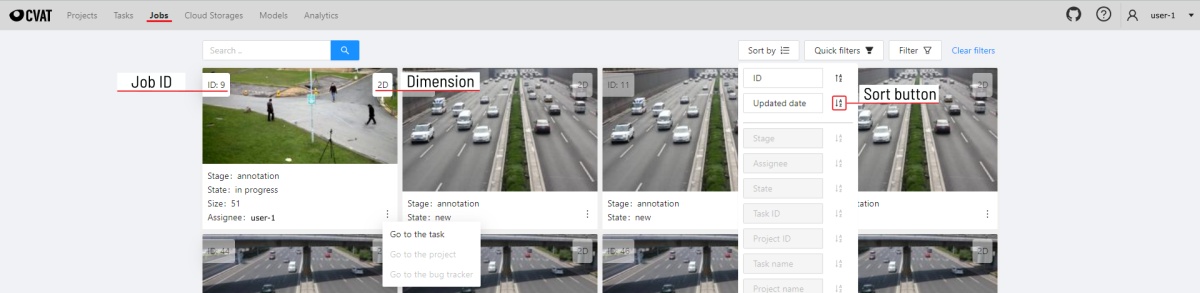
On the page, there is a list of jobs presented in the form of tiles, where each tile is one job. Each element contains:
- job ID
- dimension
2Dor3D - preview
- stage and state
- when hovering over an element, you can see:
- size
- assignee
- menu to navigate to a task, project, or bug tracker.
Note
To open the job in a new tab, click on the job by holdingCtrl.
In the upper left corner, there is a search bar, using which you can find the job by assignee, stage, state, etc. In the upper right corner, there are sorting, quick filters, and filter.
Filter
Note
Applying a filter disables the quick filter.The filter works similarly to the filters for annotation, you can create rules from properties, operators, and values and group rules into groups. For more details, consult the filter section. Learn more about date and time selection.
To clear all filters, select Clear filters.
Supported properties for jobs list
| Properties | Supported values | Description |
|---|---|---|
State |
all the state names | The state of the job (can be changed in the menu inside the job) |
Stage |
all the stage names | The stage of the job (is specified by a drop-down list on the task page) |
Dimension |
2D or 3D |
Depends on the data format (read more in creating an annotation task) |
Assignee |
username | Assignee is the user who is working on the job. (is specified on task page) |
Last updated |
last modified date and time (or value range) | The date can be entered in the dd.MM.yyyy HH:mm format or by selecting the date in the window that appears when you click on the input field |
ID |
number or range of job ID | |
Task ID |
number or range of task ID | |
Project ID |
number or range of project ID | |
Task name |
task name | Set when creating a task, can be changed on the (task page) |
Project name |
project name | Specified when creating a project, can be changed on the (project section) |
4 - Cloud storages
CVAT supports Amazon S3, Azure Blob Storage, Backblaze B2 (S3-compatible) and Google Cloud Storage for importing and exporting annotation datasets.
The cloud storages page contains elements, each of them relating to a separate cloud storage.
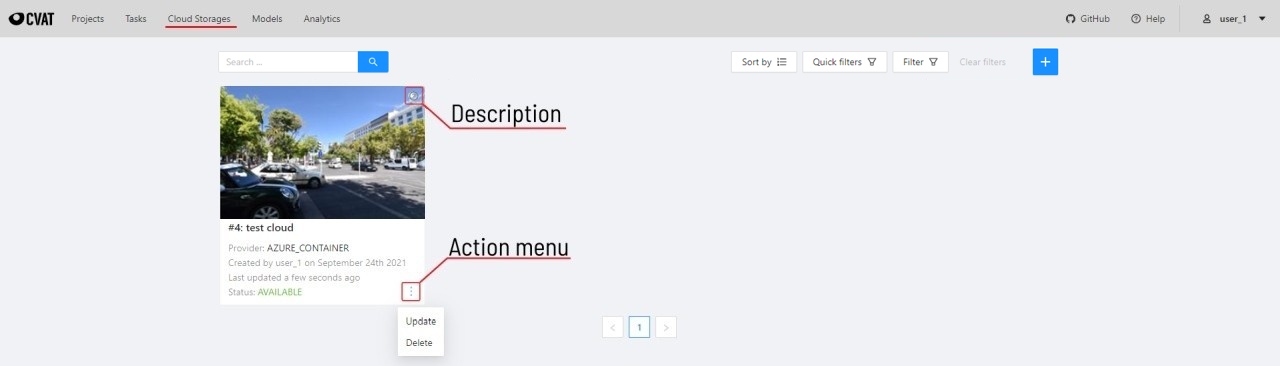
Each element contains: preview, cloud storage name, provider, creation and update info, status,
? button for displaying the description and the actions menu.
Each button in the action menu is responsible for a specific function:
Update— update this cloud storageDelete— delete cloud storage.
![]()
This preview will appear when it is impossible to get a real preview (e.g. storage is empty or invalid credentials were used).
In the upper left corner, there is a search bar, using which you can find the cloud storage by display name, provider, etc. In the upper right corner, there are sorting, quick filters, and filter.
Filter
Note
Applying the filter disables the quick filters.The filter works similarly to the filters for annotation, you can create rules from properties, operators, and values and group rules into groups. For more details, consult the filter section. Learn more about date and time selection.
To clear all filters, select Clear filters.
Supported properties for cloud storages list
| Properties | Supported values | Description |
|---|---|---|
ID |
number or range of task ID | |
Provider type |
Amazon S3, Azure Blob Storage, Google Cloud Storage |
|
Credentials type |
Key & secret key, Account name and token,Anonymous access, Key file |
|
Resource name |
Bucket name or container name |
|
Display name |
Set when creating cloud storage | |
Description |
Description of the cloud storage | |
Owner |
username | The user who owns the project, task, or job |
Last updated |
last modified date and time (or value range) | The date can be entered in the dd.MM.yyyy HH:mm format or by selecting the date in the window that appears when you select the input field |
Note: Backblaze B2 uses the
Amazon S3provider type (S3-compatible).
Select the + button to attach a new cloud storage.
5 - Attach cloud storage
In CVAT, you can use Amazon S3, Azure Blob Storage, Backblaze B2, and Google Cloud Storage storages to import and export image datasets for your tasks.
Check out:
Amazon S3
Create a bucket
To create bucket, do the following:
-
Create an AWS account.
-
Go to the Amazon S3 console, and select Create bucket.
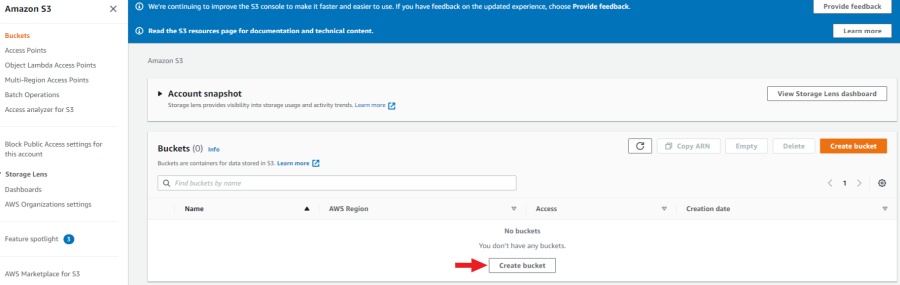
-
Specify the name and region of the bucket. You can also copy the settings of another bucket by selecting Choose bucket.
-
Enable Block all public access. For access, you will use access key ID and secret access key.
-
Select Create bucket.
A new bucket will appear on the list of buckets.
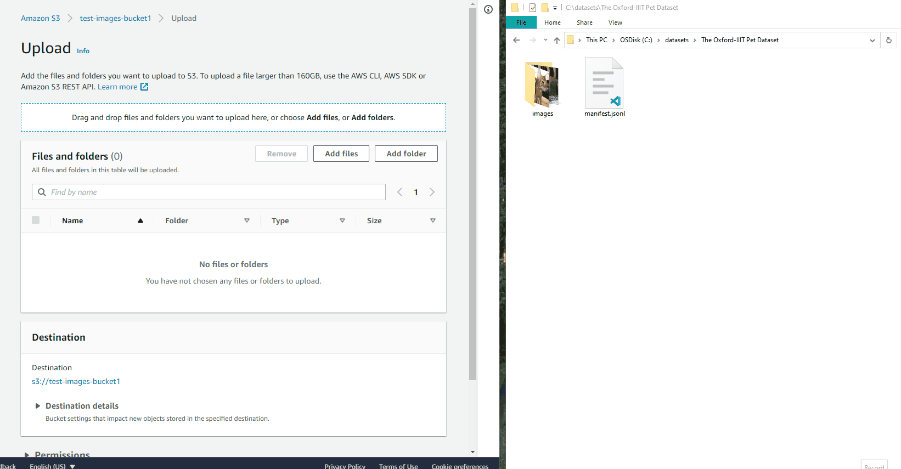
Upload data
Note
The manifest file is optional.You need to upload data for annotation and the manifest.jsonl file.
-
Prepare data. For more information, refer on how to prepare the dataset.
-
Open the bucket and select Upload.

-
Drag the manifest file and image folder on the page and select Upload:
Access permissions
Authenticated access
To add access permissions, do the following:
-
Go to IAM and select Add users.
-
Set User name and enable Access key - programmatic access.
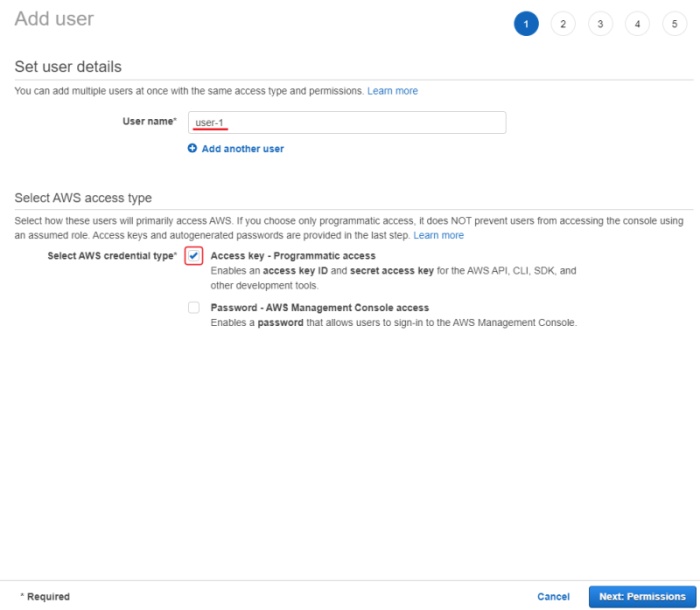
-
Select Next: Permissions.
-
Select Create group, enter the group name.
-
Use search to find and select:
- For read-only access: AmazonS3ReadOnlyAccess.
- For full access: AmazonS3FullAccess.
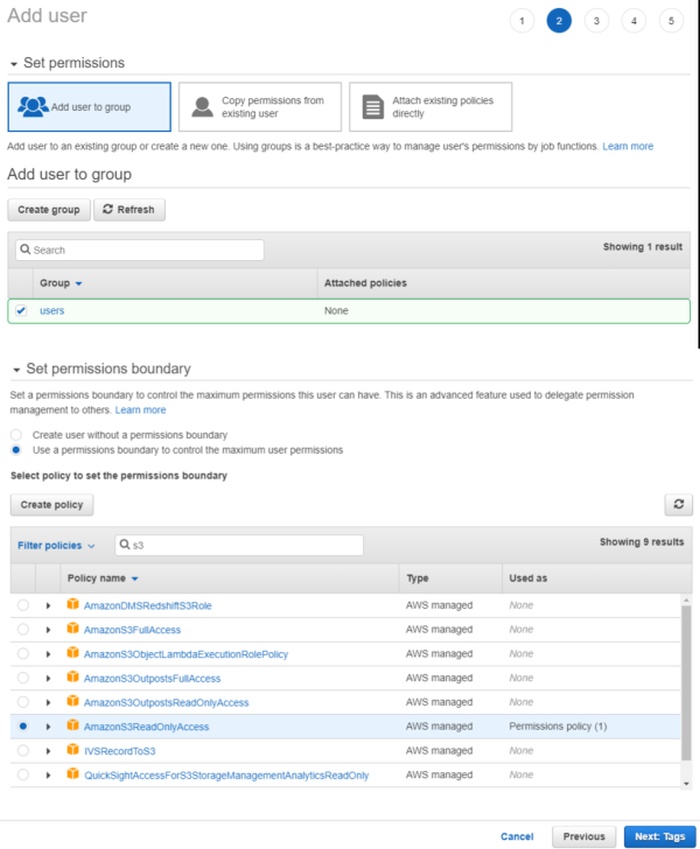
-
(Optional) Add tags for the user and go to the next page.
-
Save Access key ID and Secret access key.
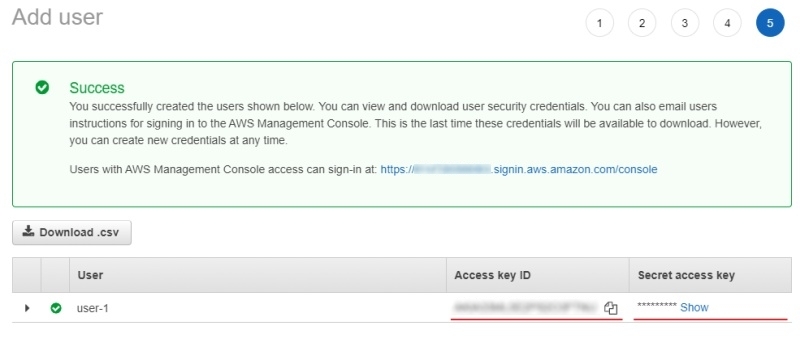
For more information, consult Creating an IAM user in your AWS account
Anonymous access
On how to grant public access to the bucket, consult Configuring block public access settings for your S3 buckets
Attach Amazon S3 storage
To attach storage, do the following:
- Log into CVAT and in the separate tab open your bucket page.
- In the CVAT, on the top menu select Cloud storages > on the opened page select +.
Fill in the following fields:
| CVAT | Amazon S3 |
|---|---|
| Display name | Preferred display name for your storage. |
| Description | (Optional) Add description of storage. |
| Provider | From drop-down list select Amazon S3. |
| Bucket name | Name of the Bucket. |
| Authentication type | Depends on the bucket setup: |
| Region | (Optional) Choose a region from the list or add a new one. For more information, consult Available locations. |
| Prefix | (Optional) Prefix is used to filter bucket content. By setting a default prefix, you ensure that only data from a specific folder in the cloud is used in CVAT. This will affect which files you see when creating a task with cloud data. |
| Manifests | (Optional) Select + Add manifest and enter the name of the manifest file with an extension. For example: manifest.jsonl. |
After filling in all the fields, select Submit.
Amazon S3 manifest file
Note
The manifest file is optional.To prepare the manifest file, do the following:
-
Go to AWS CLI and run script for prepare manifest file.
-
Perform the installation, following the aws-shell manual,
You can configure credentials by runningaws configure.
You will need to enterAccess Key IDandSecret Access Keyas well as the region.aws configure Access Key ID: <your Access Key ID> Secret Access Key: <your Secret Access Key> -
Copy the content of the bucket to a folder on your computer:
aws s3 cp <s3://bucket-name> <yourfolder> --recursive -
After copying the files, you can create a manifest file as described in prepare manifest file section:
python <cvat repository>/utils/dataset_manifest/create.py --output-dir <yourfolder> <yourfolder> -
When the manifest file is ready, upload it to the S3 bucket:
-
For read and write permissions when you created the user, run:
aws s3 cp <yourfolder>/manifest.jsonl <s3://bucket-name> -
For read-only permissions, use the download through the browser, select upload, drag the manifest file to the page and select upload.
-
Video tutorial: Add Amazon S3 as Cloud Storage in CVAT
Backblaze B2
Backblaze B2 is an S3-compatible cloud storage service. It can be used in CVAT by selecting Amazon S3 as the provider and specifying the Backblaze B2 endpoint (for example, https://s3.us-west-004.backblazeb2.com).
Create a bucket
To create a B2 bucket, do the following:
- Create a Backblaze account or log into an existing one.
- In the Backblaze console, go to B2 Cloud Storage > Buckets.
- Select Create a Bucket.
- Configure your bucket:
- Bucket Unique Name: Enter a globally unique name for your bucket.
- Files in Bucket: Select Private for secure access or Public for anonymous access.
- Default Encryption: (Optional) Enable server-side encryption for added security.
- Object Lock: (Optional) Enable if you need compliance features.
- Select Create a Bucket.
The new bucket will appear in your buckets list.
Upload data
Note
The manifest file is optional.You need to upload data for annotation and optionally the manifest.jsonl file.
- Prepare data. For more information, refer on how to prepare the dataset.
- Open the bucket and select Upload/Download.
- Drag and drop files or folders, or select Browse files to upload your data.
Alternatively, you can use the Backblaze CLI or any S3-compatible tool like the AWS CLI with B2 endpoints.
Access permissions
To access your B2 bucket from CVAT, you need to create Application Keys:
- In the Backblaze console, go to App Keys.
- Select Add a New Application Key.
- Configure the key:
- Name of Key: Enter a descriptive name (e.g., “CVAT Access”).
- Allow access to Bucket(s): Select the specific bucket you created, or choose All for access to all buckets.
- Type of Access: Select Read and Write for full access, or Read Only if you only need to import data.
- Allow List All Bucket Names: Enable if you want to list all buckets.
- File name prefix: (Optional) Restrict access to specific file prefixes.
- Duration: (Optional) Set an expiration time for the key.
- Select Create New Key.
- Important: Save the keyID and applicationKey immediately. The applicationKey is only shown once and cannot be retrieved later.
Warning
Store your applicationKey securely. It will only be displayed once during creation and cannot be recovered later.For more information, consult B2 Application Keys.
Attach Backblaze B2 storage
To attach B2 storage to CVAT, do the following:
- Log into CVAT.
- In CVAT, on the top menu select Cloud storages > on the opened page select +.
Fill in the following fields:
| CVAT field | Backblaze B2 value |
|---|---|
| Display name | Preferred display name for your storage. |
| Description | (Optional) Add a description of the storage. |
| Provider | From the drop-down list, select Amazon S3 (Backblaze B2 is S3-compatible). |
| Bucket name | Name of your B2 bucket. |
| Authentication type | Select Key ID and secret access key pair. |
| Access key ID | Enter the keyID from your B2 Application Key. |
| Secret access key | Enter the applicationKey from your B2 Application Key. |
| Endpoint URL | Required for B2: Enter your B2 S3 endpoint URL (for example, https://s3.us-west-004.backblazeb2.com). You can find the endpoint in your bucket details page. |
| Prefix | (Optional) Use to limit CVAT to a specific folder within the bucket. |
| Manifests | (Optional) Select + Add manifest and specify a manifest file name such as manifest.jsonl. |
Important
When using Backblaze B2, you must specify the Endpoint URL field with your B2 S3-compatible endpoint (e.g.,https://s3.us-west-004.backblazeb2.com).
This tells CVAT to connect to Backblaze instead of Amazon S3.
After filling in all the fields, select Submit.
Google Cloud Storage
Create a bucket
To create bucket, do the following:
-
Create Google account and log into it.
-
On the Google Cloud page, select Start Free, then enter the required data and accept the terms of service.
Note
Google requires to add payment, you will need a bank card to accomplish step 2. -
Create a Bucket with the following parameters:
- Name your bucket: Unique name.
- Choose where to store your data: Set up a location nearest to you.
- Choose a storage class for your data:
Set a default class>Standard. - Choose how to control access to objects:
Enforce public access prevention on this bucket>Uniform(default). - How to protect data:
None
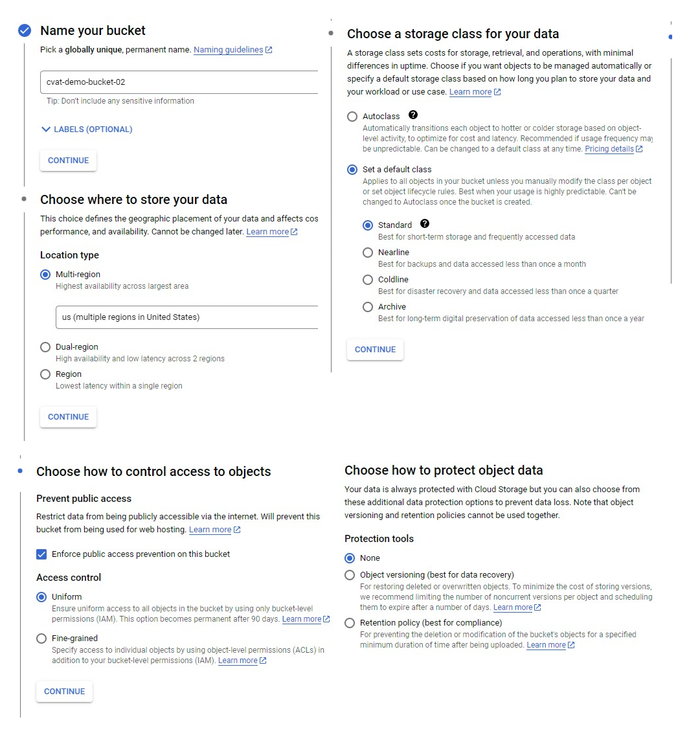
You will be forwarded to the bucket.
Upload data
Note
The manifest file is optional.You need to upload data for annotation and the manifest.jsonl file.
- Prepare data. For more information, consult prepare the dataset.
- Open the bucket and from the top menu select Upload files or Upload folder (depends on how your files are organized).
Access permissions
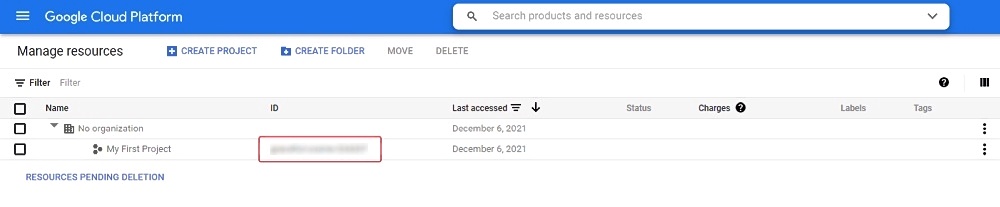
To access Google Cloud Storage get a Project ID from cloud resource manager page
And follow instructions below based on the preferable type of access.
Authenticated access
For authenticated access you need to create a service account and key file.
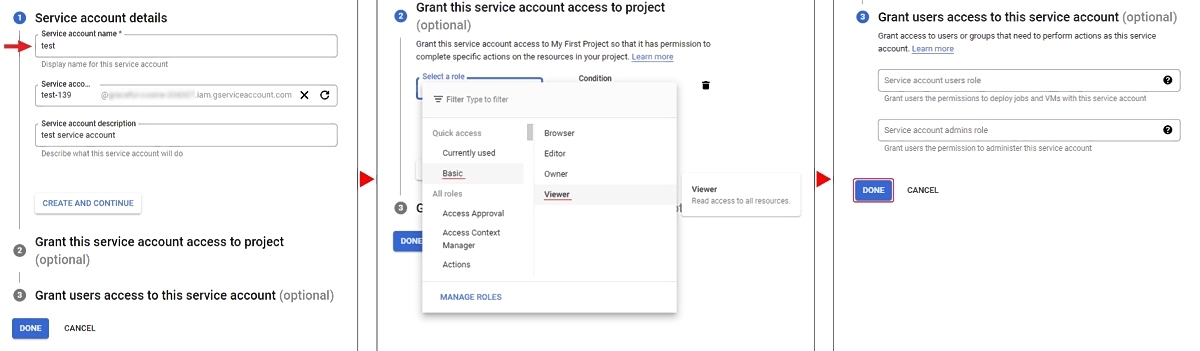
To create a service account:
- On the Google Cloud platform, go to IAM & Admin > Service Accounts and select +Create Service Account.
- Enter your account name and select Create And Continue.
- Select a role, for example Basic > Viewer, and select Continue.
- (Optional) Give access rights to the service account.
- Select Done.
To create a key:
- Go to IAM & Admin > Service Accounts > select on account name > Keys.
- Select Add key and select Create new key > JSON
- Select Create. The key file will be downloaded automatically.
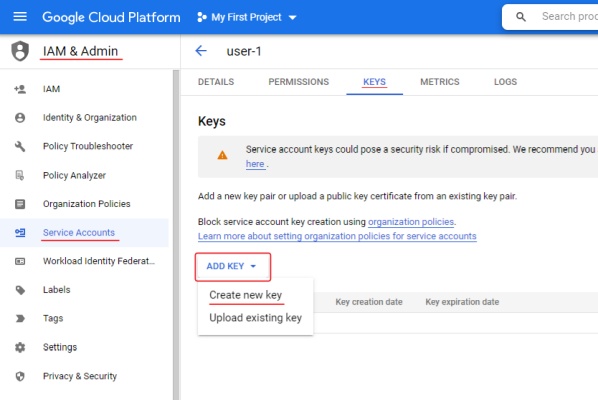
For more information about keys, consult Learn more about creating keys.
Anonymous access
To configure anonymous access:
- Open the bucket and go to the Permissions tab.
- Click + Grant access to add new principals.
- In the New principals field specify
allUsers, select roles:Cloud Storage Legacy>Storage Legacy Bucket Reader. - Select Save.
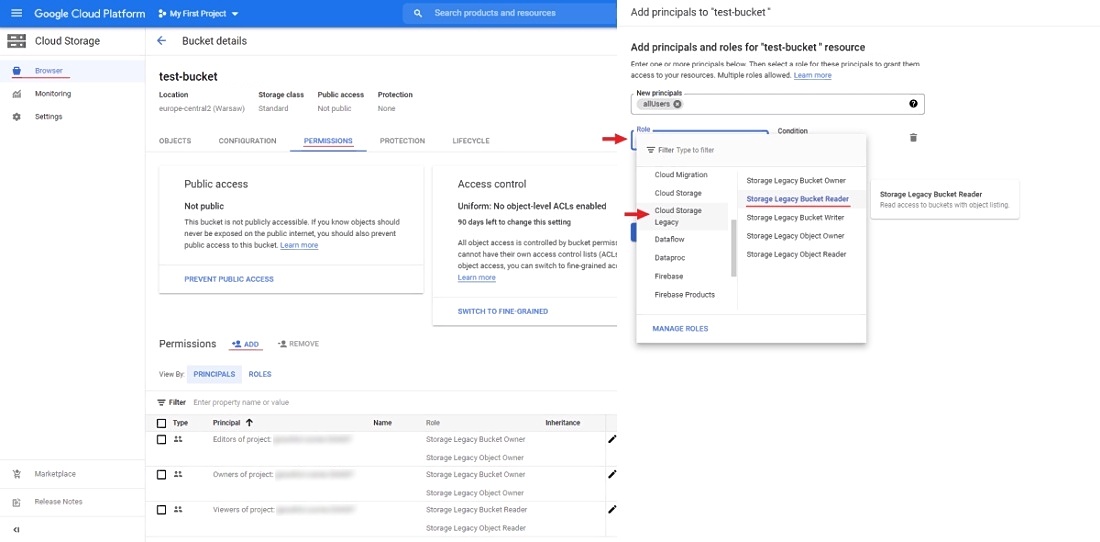
Now you can attach the Google Cloud Storage bucket to CVAT.
Attach Google Cloud Storage
To attach storage, do the following:
- Log into CVAT and in the separate tab open your bucket page.
- In the CVAT, on the top menu select Cloud storages > on the opened page select +.
Fill in the following fields:
| CVAT | Google Cloud Storage |
|---|---|
| Display name | Preferred display name for your storage. |
| Description | (Optional) Add description of storage. |
| Provider | From drop-down list select Google Cloud Storage. |
| Bucket name | Name of the bucket. You can find it on the storage browser page. |
| Authentication type | Depends on the bucket setup: Advanced: For self-hosted solution, if the key file was not attached, then environment variable GOOGLE_APPLICATION_CREDENTIALS that was specified for an environment will be used. For more information, consult Authenticate to Cloud services using client libraries. |
| Prefix | (Optional) Used to filter data from the bucket. By setting a default prefix, you ensure that only data from a specific folder in the cloud is used in CVAT. This will affect which files you see when creating a task with cloud data. |
| Project ID | Project ID. For more information, consult projects page and cloud resource manager page. Note: Project name does not match the project ID. |
| Location | (Optional) Choose a region from the list or add a new one. For more information, consult Available locations. |
| Manifests | (Optional) Select + Add manifest and enter the name of the manifest file with an extension. For example: manifest.jsonl. |
After filling in all the fields, select Submit.
Video tutorial: Add Google Cloud Storage as Cloud Storage in CVAT
Microsoft Azure Blob Storage
Create a bucket
To create bucket, do the following:
-
Create an Microsoft Azure account and log into it.
-
Go to Azure portal, hover over the resource , and in the pop-up window select Create.
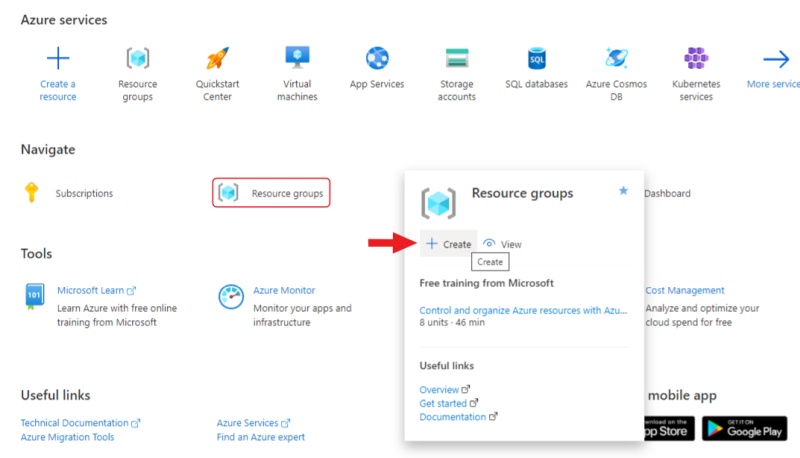
-
Enter a name for the group and select Review + create, check the entered data and select Create.
-
Go to the resource groups page, navigate to the group that you created and select Create resources.
-
On the marketplace page, use search to find Storage account.

-
Select on Storage account and on the next page select Create.
-
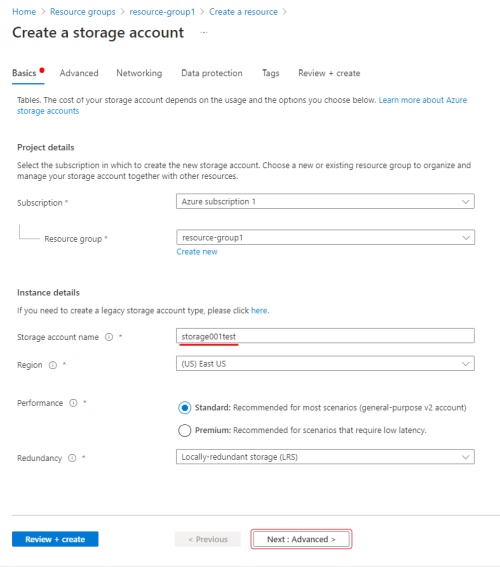
On the Basics tab, fill in the following fields:
- Storage account name: to access container from CVAT.
- Select a region closest to you.
- Select Performance > Standard.
- Select Local-redundancy storage (LRS).
- Select next: Advanced>.
-
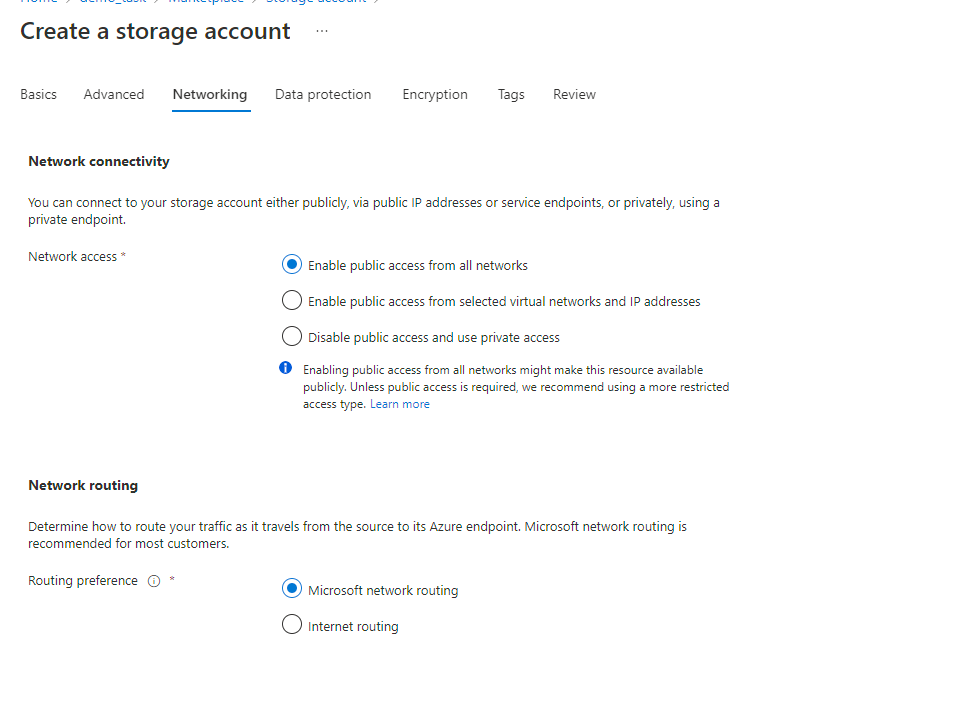
On the Advanced page, fill in the following fields:
- (Optional) Disable Allow enabling public access on containers to prohibit anonymous access to the container.
- Select Next > Networking.
-
On the Networking tab, fill in the following fields:
-
If you want to change public access, enable Public access from all networks.
-
Select Next>Data protection.
You do not need to change anything in other tabs until you need some specific setup.
-
-
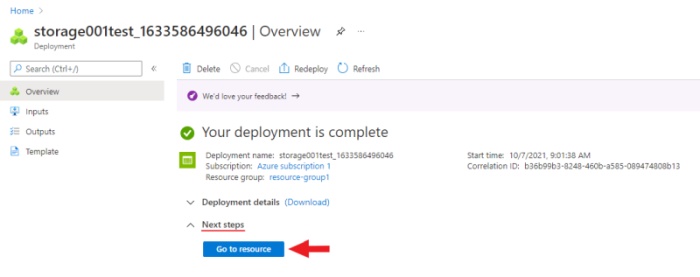
Select Review and wait for the data to load.
-
Select Create. Deployment will start.
-
After deployment is over, select Go to resource.
Create a container
To create container, do the following:
-
Go to the containers section and on the top menu select +Container
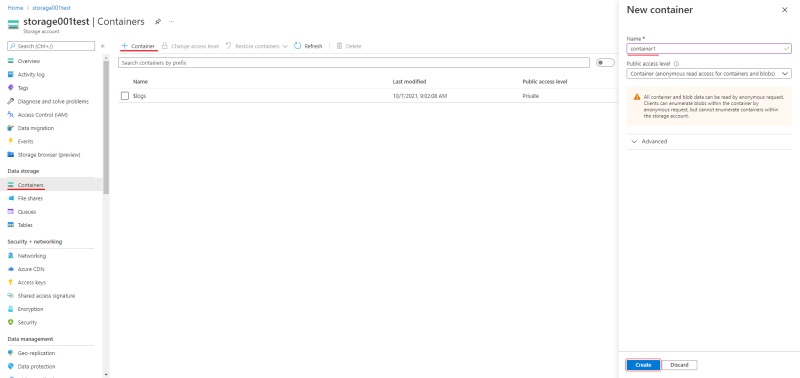
-
Enter the name of the container.
-
(Optional) In the Public access level drop-down, select type of the access.
Note: this field will inactive if you disabled Allow enabling public access on containers. -
Select Create.
Upload data
You need to upload data for annotation and the manifest.jsonl file.
-
Prepare data. For more information, refer on how to prepare the dataset.
-
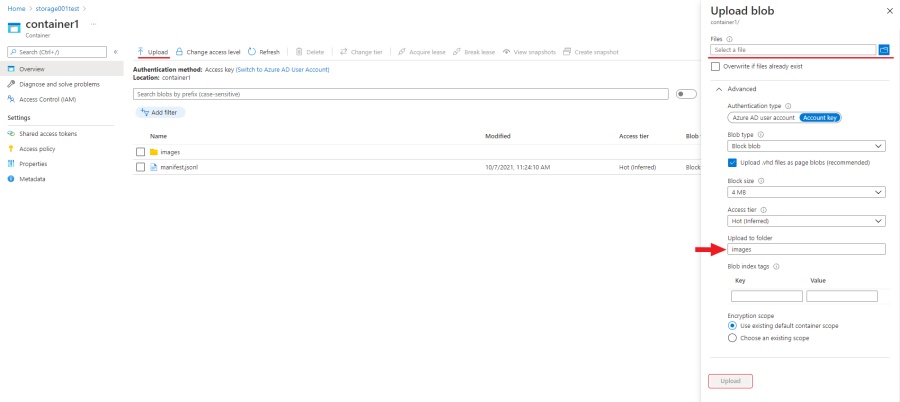
Go to container and select Upload.
-
Select Browse for files and select images.
Note
If images are in folder, specify folder in the Advanced settings > Upload to folder. -
Select Upload.
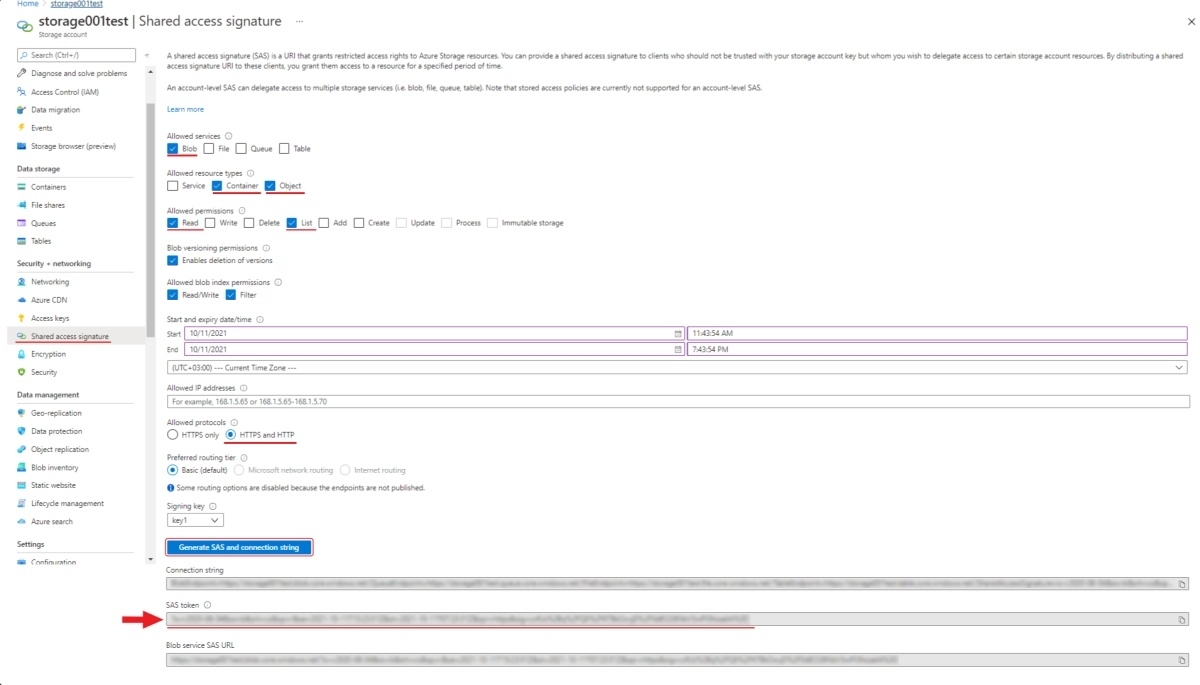
SAS token and connection string
Use the SAS token or connection string to grant secure access to the container.
To configure the credentials:
- Go to Home > Resource groups > You resource name > Your storage account.
- On the left menu, select Shared access signature.
- Change the following fields:
- Allowed services: Enable Blob . Disable all other fields.
- Allowed resource types: Enable Container and Object. Disable all other fields.
- Allowed permissions: Enable Read, Write, and List. Disable all other fields.
- Start and expiry date: Set up start and expiry dates.
- Allowed protocols: Select HTTPS and HTTP
- Leave all other fields with default parameters.
- Select Generate SAS and connection string and copy SAS token or Connection string.
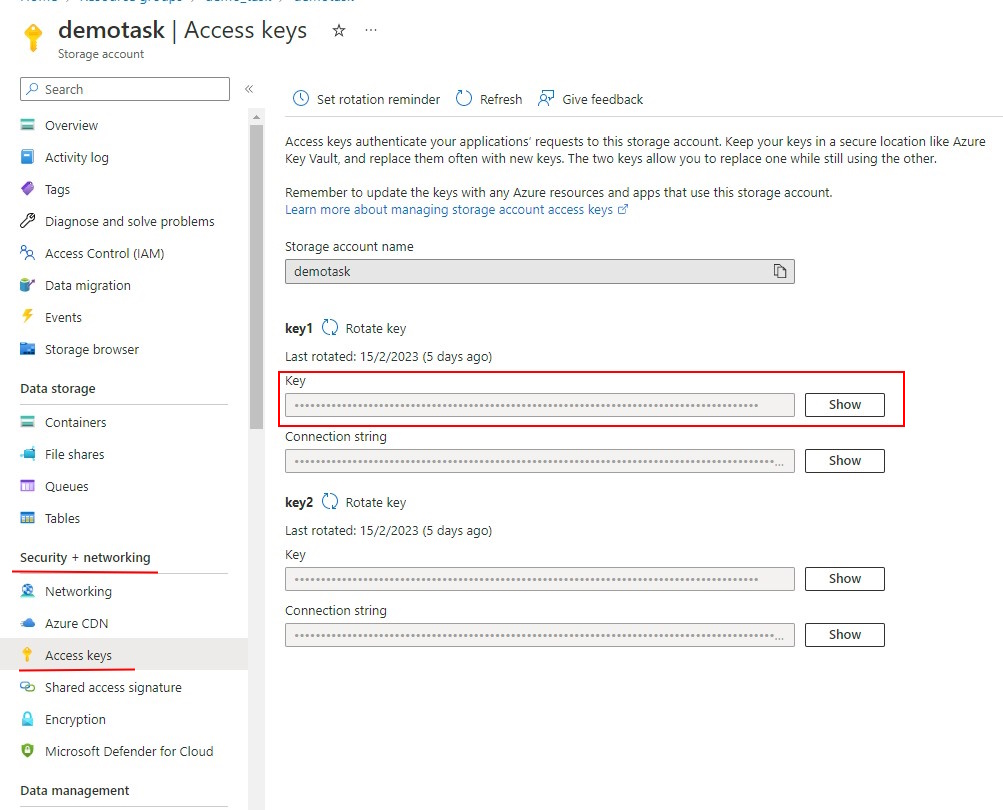
Personal use
For personal use, you can use the Access Key from your storage account in the CVAT SAS Token field.
To get the Access Key:
- In the Azure Portal, go to the Security + networking > Access Keys
- Select Show and copy the key.
Attach Azure Blob Storage
To attach storage, do the following:
- Log into CVAT and in the separate tab open your bucket page.
- In the CVAT, on the top menu select Cloud storages > on the opened page select +.
Fill in the following fields:
| CVAT | Azure |
|---|---|
| Display name | Preferred display name for your storage. |
| Description | (Optional) Add description of storage. |
| Provider | From drop-down list select Azure Blob Storage. |
| Container name` | Name of the cloud storage container. |
| Authentication type | Depends on the container setup. Account name and SAS token:
|
| Prefix | (Optional) Used to filter data from the bucket. By setting a default prefix, you ensure that only data from a specific folder in the cloud is used in CVAT. This will affect which files you see when creating a task with cloud data. |
| Manifests | (Optional) Select + Add manifest and enter the name of the manifest file with an extension. For example: manifest.jsonl. |
After filling in all the fields, select Submit.
Video tutorial: Add Microsoft Azure Blob Storage as Cloud Storage in CVAT
Prepare the dataset
For example, the dataset is The Oxford-IIIT Pet Dataset:
- Download the archive with images.
- Unpack the archive into the prepared folder.
- Create a manifest. For more information, consult Dataset manifest:
python <cvat repository>/utils/dataset_manifest/create.py --output-dir <your_folder> <your_folder>
6 - Requests
The Requests page allows users to track the status of data processing jobs (such as exporting annotations or importing datasets) and most of the background processes (such as task creation, quality calculation, report preparation with analytics, merge consensus jobs). Users can monitor progress, download results, and check for errors if they occur.
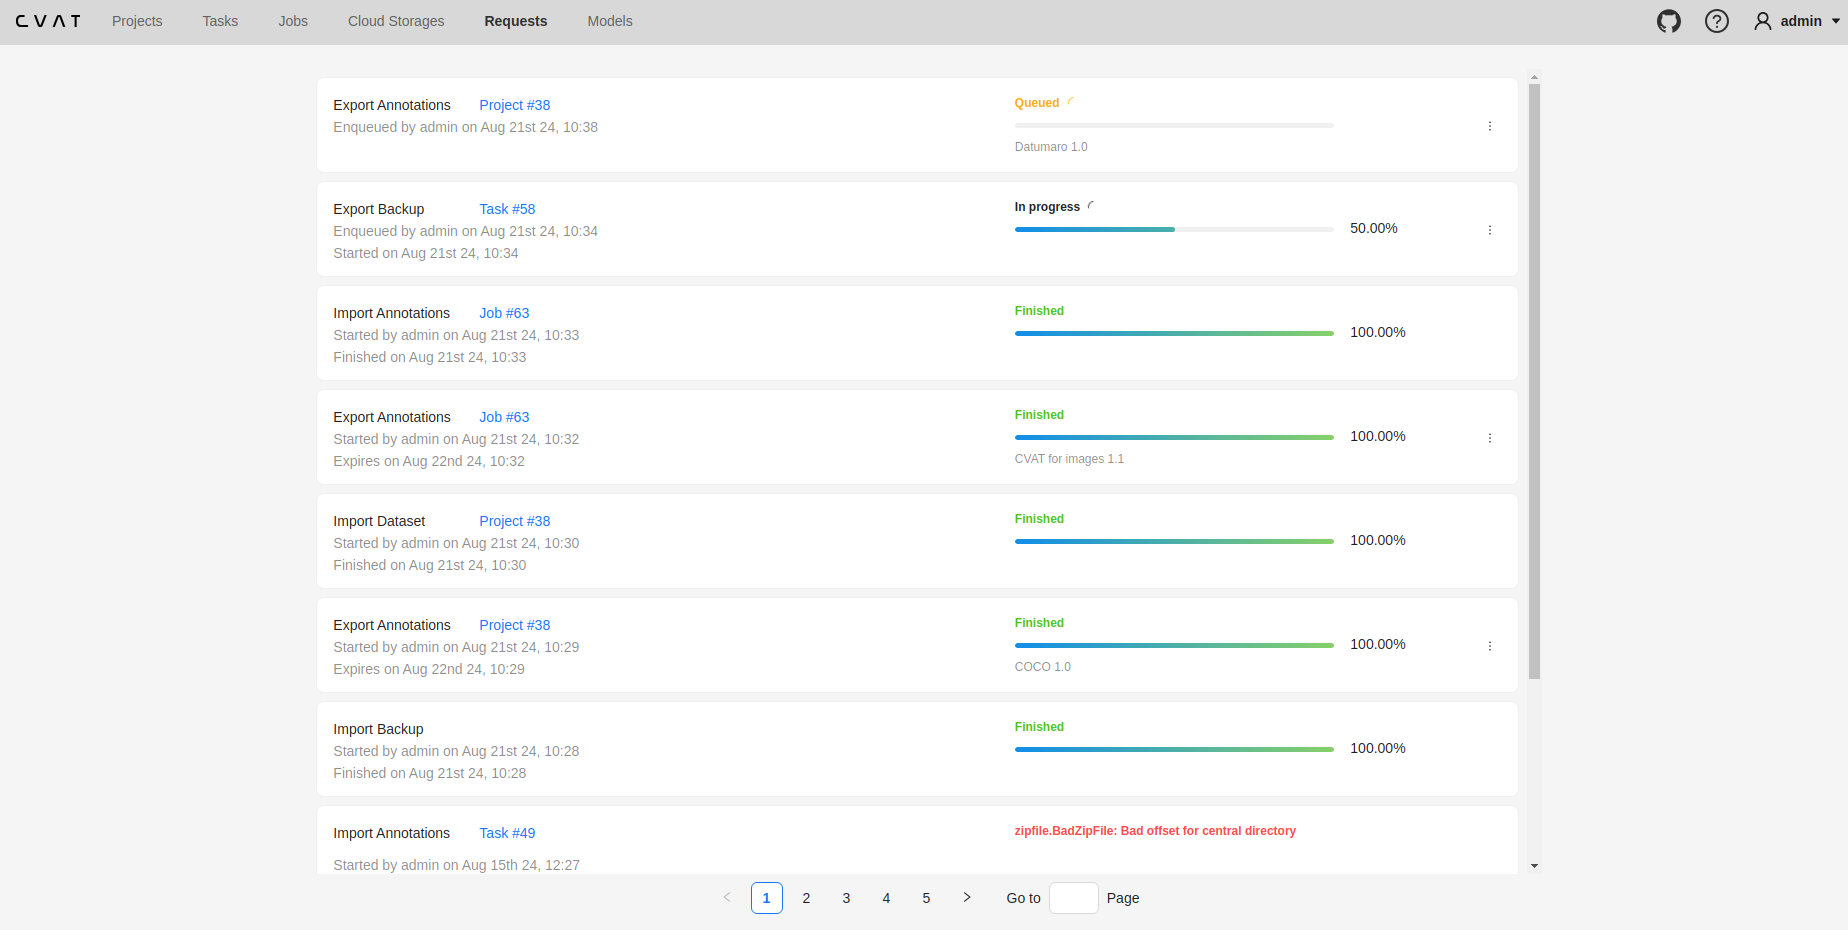
Requests List
On the Requests page, requests are displayed as cards. Each card contains the following details (if applicable):
- Operation Name
- Resource Link
- Status of the Request
- Timestamps:
- Enqueued Date
- Started Date
- Finished Date
- Result Expiration Date
- Annotations Format
- Lightweight backup (shown for backup requests created with the lightweight option)
- Menu to download the result or cancel a
Queuedjob
Note
Currently supported operations include creating tasks, importing/exporting annotations and datasets, and backups.Statuses for Requests List
The following statuses are used to indicate the state of each request:
| Status | Description |
|---|---|
In Progress |
The requested job is being executed. The progress percentage is shown. |
Queued |
The requested job is waiting to be picked up by a worker. |
Finished |
The requested job is finished. Downloading the result is available. |
Failed |
The requested job cannot be executed due to an unexpected error. The error description is available. |
7 - Models
To deploy the models, you will need to install the necessary components using Semi-automatic and Automatic Annotation guide. To learn how to deploy the model, read Serverless tutorial.
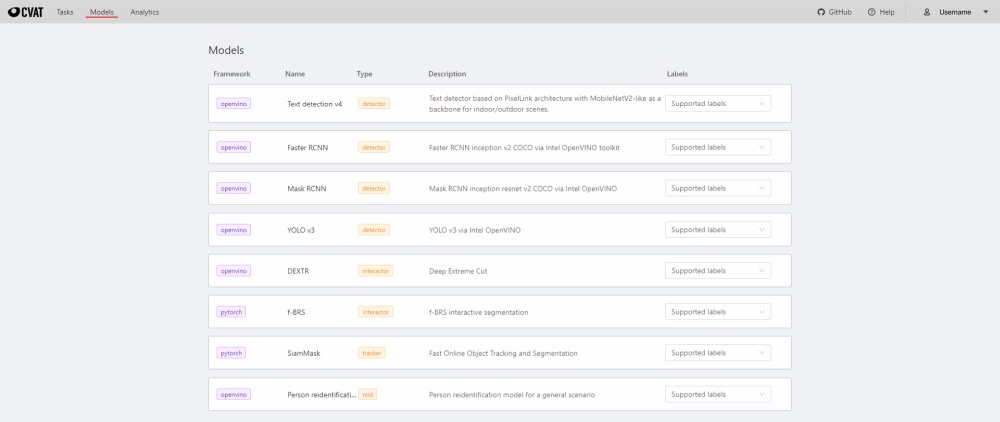
The Models page contains a list of deep learning (DL) models deployed for semi-automatic and automatic annotation. To open the Models page, click the Models button on the navigation bar. The list of models is presented in the form of a table. The parameters indicated for each model are the following:
Frameworkthe model is based on- model
Name - model
Type:detector- used for automatic annotation (available in detectors and automatic annotation)interactor- used for semi-automatic shape annotation (available in interactors)tracker- used for semi-automatic track annotation (available in trackers)reid- used to combine individual objects into a track (available in automatic annotation)
Description- brief description of the modelLabels- list of the supported labels (only for the models of thedetectorstype)
8 - Bulk actions
Overview
Bulk Actions allow you to select multiple resources (such as jobs, tasks, projects and more) and perform actions on all of them at once. This streamlines workflows by enabling mass updates, such as changing an assignee or state for a group of jobs, without needing to update each resource individually.
Supported Resources
- Jobs
- Tasks
- Projects
- Cloud storages
- Requests
- Models
- Webhooks
- Organization members
Typical Bulk Actions
- Update Assignee: Assign a new user to multiple jobs, tasks, or projects.
- Update State/Stage: Change the status or stage for a group of jobs.
- Delete: Remove multiple resources in one operation.
- Other field updates: Depending on resource type, other fields may be updated in bulk.
How It Works
- Selection: Select multiple resources using selection tools in the UI.
- Ctrl (Cmd for Mac) + Click: Select or deselect individual resources by holding the Ctrl key and clicking on them.
- Shift + Click: Select a range of resources by clicking the first item, holding Shift, and clicking the last item in the range.
- Select All Button: Use the “Select All” button in the top bar to select all resources on the current page.
- Click: Click anywhere outside the selected resources to reset the selection.
Note
Selection is limited to visible resources according to the current page size, filtering, and sorting options. It’s important to adjust filters or sorting before selection to bring them into view. Changing the page clears all selected resources.
- Action Menu: Once resources are selected, you can either right-click on any of them or left-click the actions menu of a selected resource. An actions appears, offering bulk operations relevant to that resource type.
- Execution: The chosen action is applied to all selected resources. Progress and status messages are shown for each item.
- Error Handling: If an operation fails for some items, the system provides feedback and allows retrying the failed items.

9 - Search
Search
Search within all fields (owner, assignee, task name, task status, task mode). To execute enter a search string in search field.
The search is case insensitive.
Note
The applied search will be displayed in the URL of your browser, Thus, you can share the page with applied parameters.