This is the multi-page printable view of this section. Click here to print.
Automated Annotation
- 1: Overview
- 2: Segment Anything 2 Tracker
- 3: AI assistance
- 4: AI models
1 - Overview
Automatic annotation in CVAT is a tool that you can use to automatically pre-annotate your data with pre-trained models.
To use automatic annotation, you must be able to access at least one AI model of type “detector” or “reidentifier” on the CVAT instance. Consult AI models for information on available sources of AI models.
To start automatic annotation, do the following:
-
On the top menu, click Tasks.
-
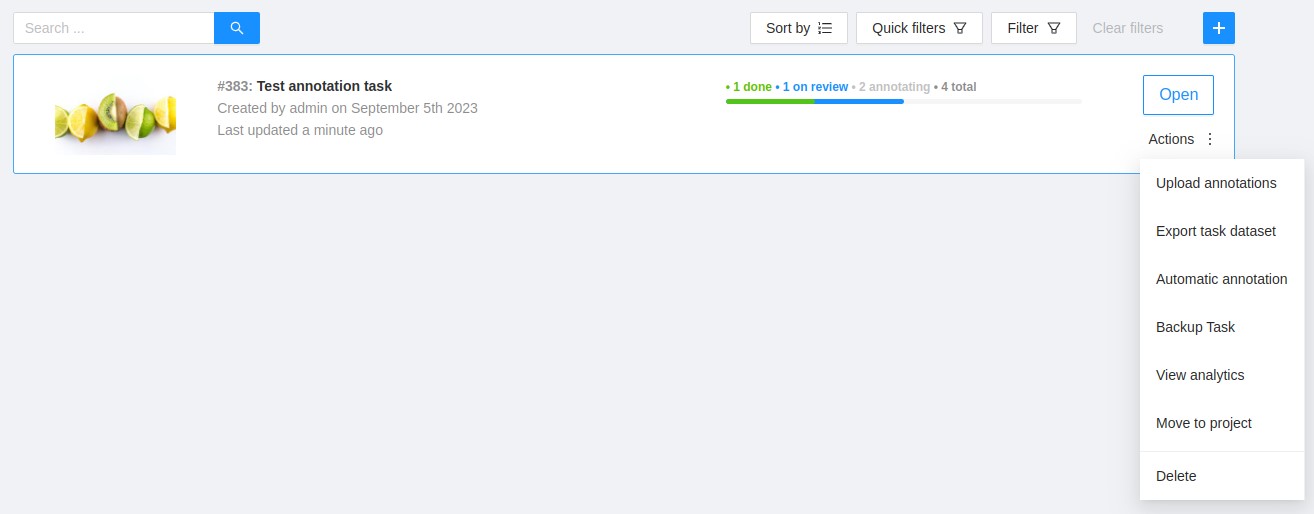
Find the task you want to annotate and click Action > Automatic annotation.
-
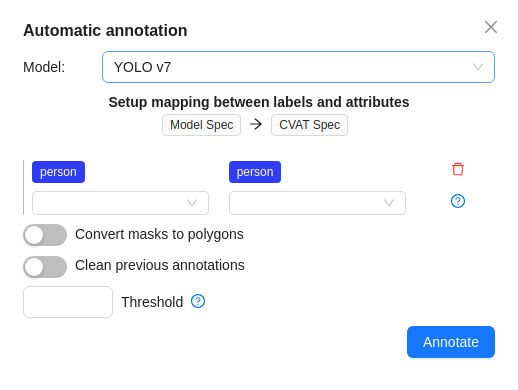
In the Automatic annotation dialog, from the drop-down list, select a model.
-
Match the labels of the model and the task.
-
(Optional) In case you need the model to return masks as polygons, switch toggle Return masks as polygons.
-
(Optional) In case you need to remove all previous annotations, switch toggle Clean old annotations.
-
(Optional) You can specify a Threshold for the model. If not provided, the default value from the model settings will be used.
-
(Optional) For detector models in 2D tasks, specify a Region of interest. This limits annotation to a selected image area.
-
Click Annotate.
CVAT will show the progress of annotation on the progress bar.

You can stop the automatic annotation at any moment by clicking cancel.
Limiting automatic annotation input to a region of interest
For detector models in 2D tasks, you can restrict automatic annotation to a selected image area.
To set the region, enter Region of interest values:
x, y, width, and height.
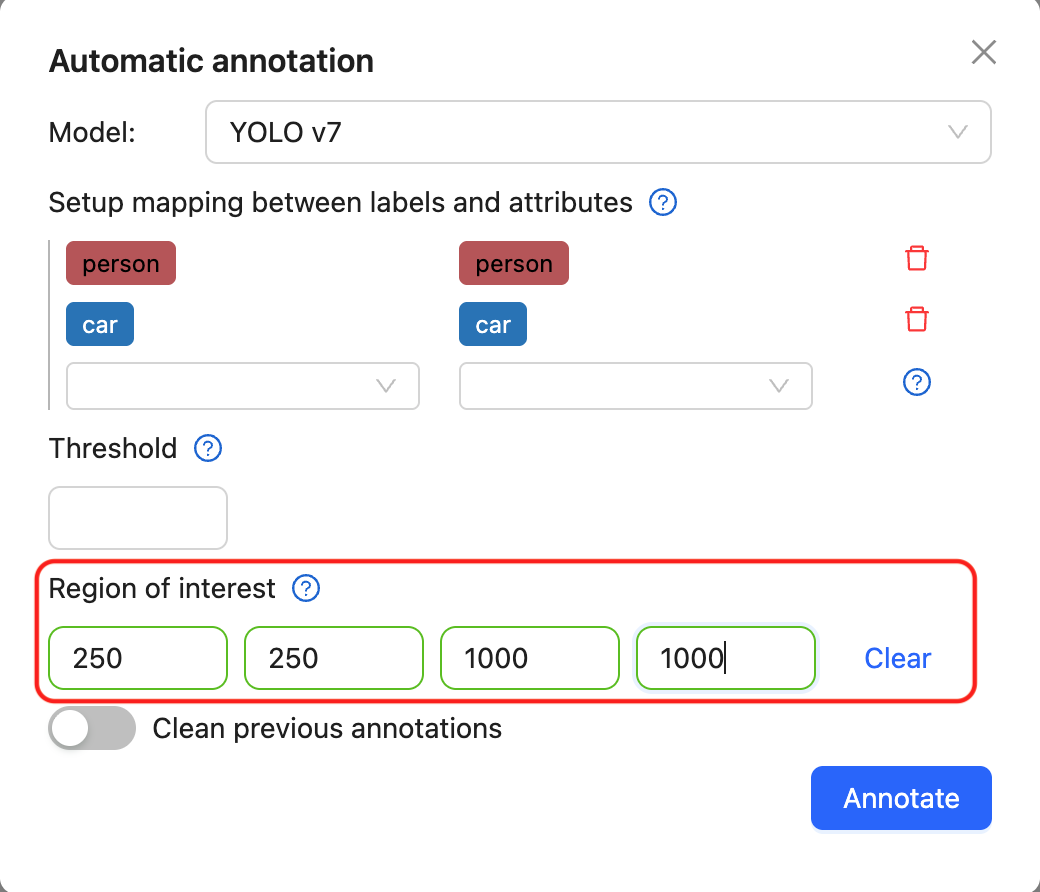
When a region of interest is set, CVAT sends only that image crop to the model. The resulting annotations are added back to the task in the correct full-frame coordinates.
Region of interest is supported for detector models, including Nuclio functions, Hugging Face and Roboflow models, and native AI-agent detector functions.
Region of interest is not supported for tracking or ReID functions. For task-level annotation, all processed frames must have the same resolution, and the selected region must fit inside every processed frame.
Labels matching
Each model is trained on a dataset and supports only the dataset’s labels.
For example:
- DL model has the label
car. - Your task (or project) has the label
vehicle.
To annotate, you need to match these two labels to give
CVAT a hint that, in this case, car = vehicle.
If you have a label that is not on the list of DL labels, you will not be able to match them.
For this reason, supported DL models are suitable only for certain labels.
To check the list of labels for each model, see Models papers and official documentation.
2 - Segment Anything 2 Tracker
Overview
Segment Anything 2 is a segmentation model that allows fast and precise selection of any object in videos or images. SAM2 tracking is available in two implementations:
-
Nuclio SAM2 Tracker: Available only for Enterprise deployments. This is implemented as a serverless function deployed via Nuclio framework.
-
AI Agent SAM2 Tracker: Available for CVAT Online and Enterprise via auto-annotation (AA) functions that run on user-side agents. This brings SAM2 tracking capabilities to CVAT Online users who previously couldn’t access this feature.
It is strongly recommended to deploy the model using a GPU. Although it is possible to use a CPU-based version, it generally performs much slower and is suitable only for handling a single parallel request. The AI agent variant runs on user hardware, providing flexibility for GPU usage without server configuration requirements.
Unlike a regular tracking model, both SAM2 tracker implementations are designed to be applied to existing objects (polygons and masks) to track them forward for a specified number of frames.
How to install
Choose the installation method based on your platform and deployment needs.
Note
Nuclio SAM2 Tracker is only available in the Enterprise version. The AI agent variant brings SAM2 tracking to CVAT Online and Enterprise.Note
Both tracker implementations require the enhanced actions UI plugin, which is enabled by default. Usually, no additional steps are necessary on this.Nuclio SAM2 Tracker (CVAT Enterprise)
Docker
You can use existing scripts from the community repository
(./serverless/deploy_cpu.sh or ./serverless/deploy_gpu.sh).
To deploy the feature, simply run:
./serverless/deploy_gpu.sh "path/to/the/function"
Kubernetes
- You need to deploy the Nuclio function manually.
Note that this function requires a Redis storage configured to keep the tracking state.
You may use the same storage as
cvat_redis_ondiskuses. When running thenuclio deploycommand, make sure to provide the necessary arguments. The minimal command is:
nuctl deploy "path/to/the/function"
  --env CVAT_FUNCTIONS_REDIS_HOST="<redis_host>"
  --env CVAT_FUNCTIONS_REDIS_PORT="<redis_port>"
  --env CVAT_FUNCTIONS_REDIS_PASSWORD="<redis_password>" # if applicable
AI Agent SAM2 Tracker (CVAT Online + Enterprise)
The AI agent implementation enables SAM2 tracking for CVAT Online users and provides an alternative deployment method for Enterprise customers. This approach runs the tracking model on user hardware via auto-annotation (AA) functions. Deploy SAM2 using Docker Compose with pre-built images for a quick and straightforward setup.
Prerequisites
- Docker and Docker Compose
- CVAT Online account or Enterprise instance
- Optional: NVIDIA GPU with CUDA support for faster inference
Setup Instructions
The easiest way to deploy SAM2 with pre-built images from Docker Hub.
-
Clone the CVAT repository and navigate to the SAM2 agent directory:
git clone https://github.com/cvat-ai/cvat.git cd cvat/ai-models/agents_deployment/sam2 -
Create or update the
.envfile with your configuration. For GPU deployment, setIMAGE_URL=cvat/sam2_agent:latest_GPUandCOMPOSE_PROFILES=gpu. For CPU-only deployment, setIMAGE_URL=cvat/sam2_agent:latestandCOMPOSE_PROFILES=cpu. Configure the remaining required variables (CVAT_BASE_URL,CVAT_ACCESS_TOKEN,FUNCTION_NAME, etc.) following the corresponding. -
Start the agent:
docker compose up -
Verify the agent is running in the CVAT interface. You should see a new function model named
<FUNCTION_NAME>in the list on the/modelspage and in the annotation actions list. -
To stop and clean up:
# Deregister the function from CVAT (must be called before volume removed)
# Alternatively, you can always remove the function from CVAT interface
docker compose run --rm cvat-function-deregister

# Stop the agent and remove volumes
docker compose down -v
For detailed configuration options and troubleshooting, see the Docker Compose agent guide.
Note
For enterprise deployments using Kubernetes, refer to the Docker Compose agent guide for Kubernetes deployment instructions and container orchestration examples.Agent Behavior and Resilience
The AI agent runs as a persistent process on your hardware, providing several advantages:
- Hardware Independence: Runs outside the CVAT server, enabling tracking without server-side GPU/Nuclio installation
- Isolation: Agent crashes don’t affect the server; requests are retried or reassigned automatically
- Resource Control: You control the computational resources (CPU/GPU) used for tracking
Important
Keep the agent process running to handle tracking requests. If the agent stops, active tracking operations will fail and need to be restarted.Version Requirements
- AI Agent SAM2 Tracker: Requires CVAT version 2.42.0 or later
- Classic SAM2 Tracker: Available in all Enterprise versions
- GPU Support: Optional but recommended for both implementations
Usage
Both SAM2 tracker implementations provide similar user experiences with slight differences in the UI labels.
Running the Nuclio SAM2 Tracker
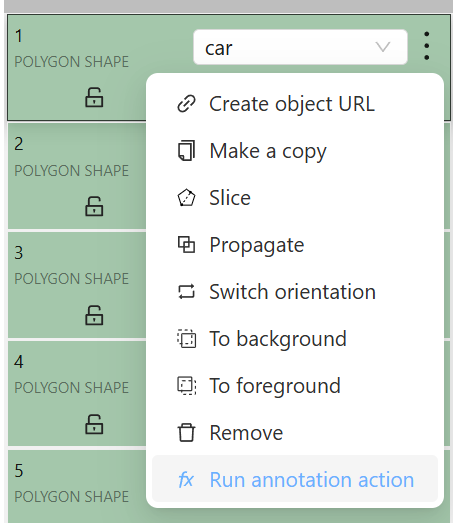
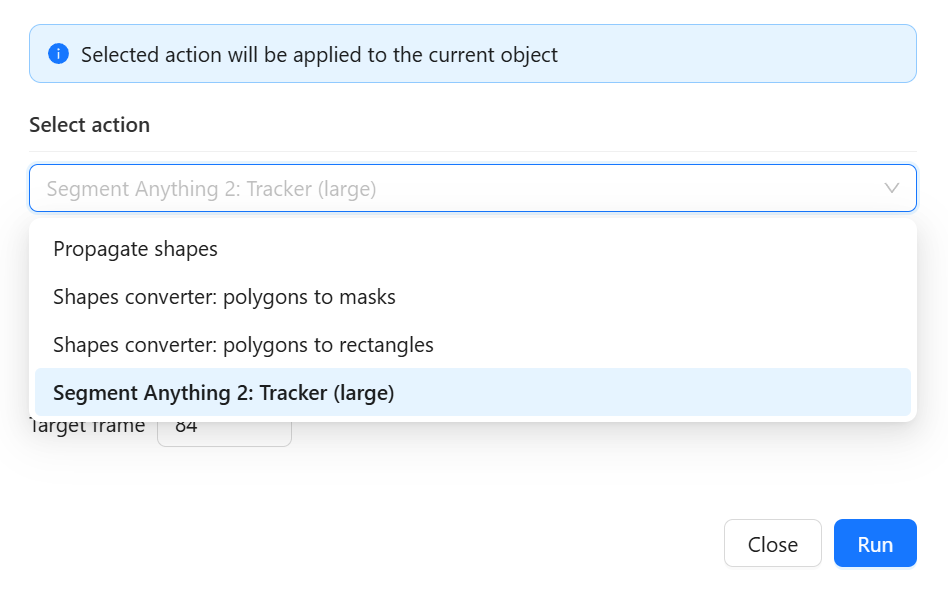
The nuclio tracker can be applied to any polygons and masks. To run the tracker on an object, open the object menu and click Run annotation action.
Alternatively, you can use a hotkey: select the object and press Ctrl + E (default shortcut). When the modal opened, in “Select action” list, choose Segment Anything 2: Tracker:
Running the AI Agent SAM2 Tracker
Once you have registered the SAM2 AI agent and it’s running, you’ll see “AI Tracker: SAM2” as an available action in the annotation UI for video shape tracking.
To use the AI agent tracker:
- Create or open a CVAT task from a video file or video-like sequence of images (all images must have the same dimensions)
- Open one of the jobs from the task
- Draw a mask or polygon around an object
- Right-click the object and choose “Run annotation action”
- Select “AI Tracker: SAM2” from the action list
- Specify the target frame and click Run
The usage flow parallels the existing annotation action interface but utilizes the remote AI agent rather than built-in serverless functions.
Tracking Process
Specify the target frame until which you want the object to be tracked, then click the Run button to start tracking. The process begins and may take some time to complete. The duration depends on the inference device, and the number of frames where the object will be tracked.
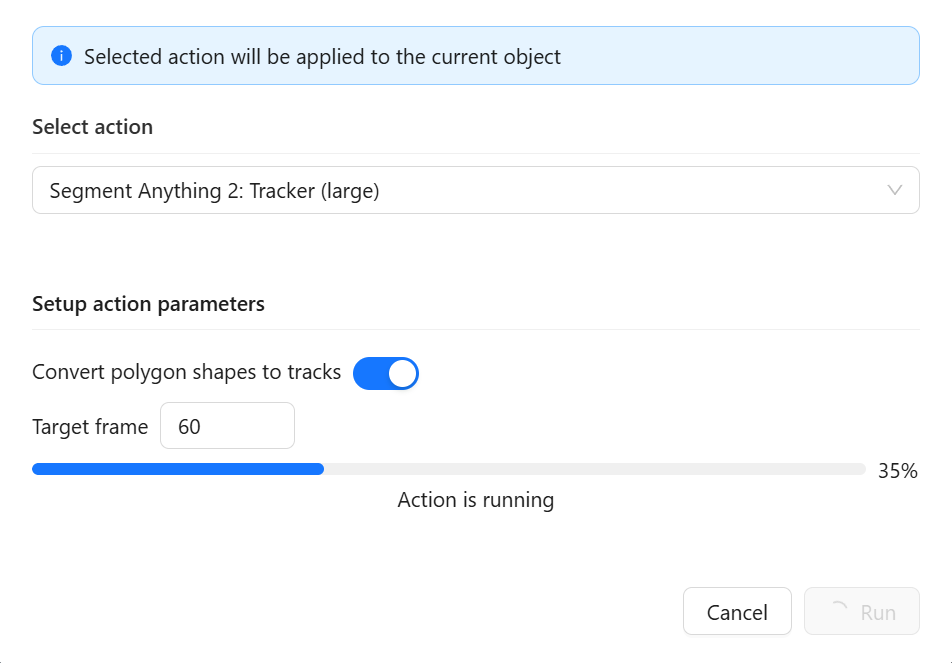
Once the process is complete, the modal window closes. You can review how the object was tracked. If you notice that the tracked shape deteriorates at some point, you can adjust the object coordinates and run the tracker again from that frame.
Running on multiple objects
Instead of tracking each object individually, you can track multiple objects simultaneously. To do this, click the Menu button in the annotation view and select the Run Actions option:
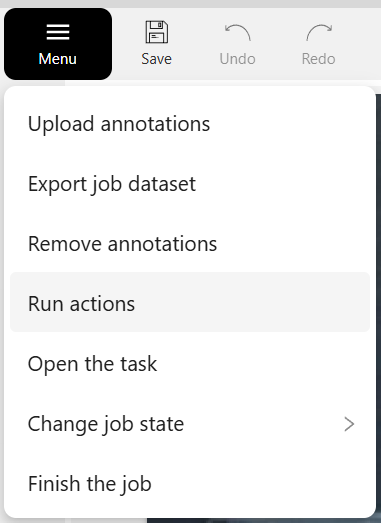
Alternatively, you can use a hotkey: just press Ctrl + E (default shortcut) when there are no objects selected. This opens the actions modal. In this case, the tracker will be applied to all visible objects of suitable types (polygons and masks). In the action list of the opened modal, select either:
- Segment Anything 2: Tracker (for the nuclio implementation)
- AI Tracker: SAM2 (for the AI agent implementation)
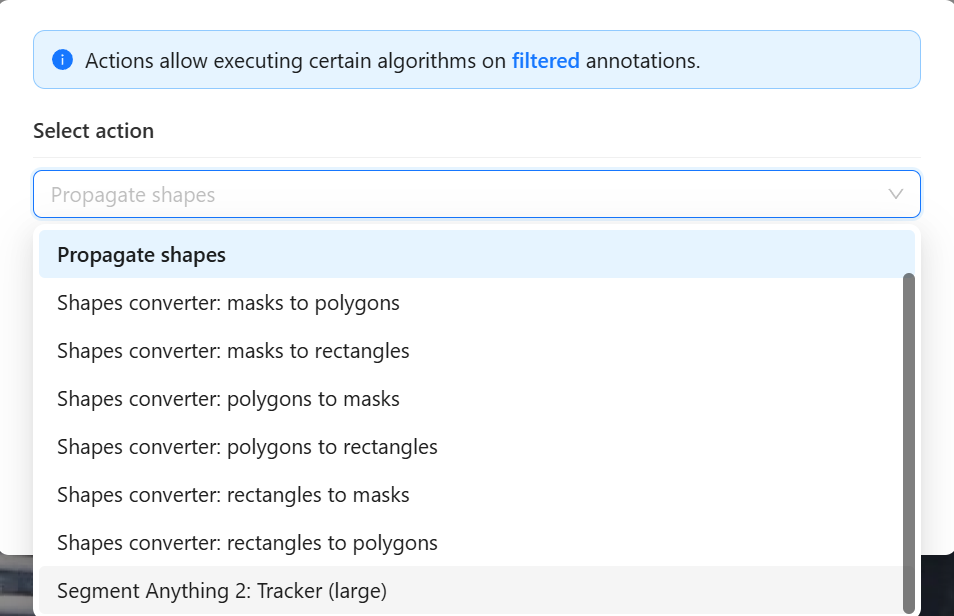
Specify the target frame until which you want the objects to be tracked, then click the Run button to start tracking. The process begins and may take some time to complete. The duration depends on the inference device, the number of simultaneously tracked objects, and the number of frames where the objects will be tracked.
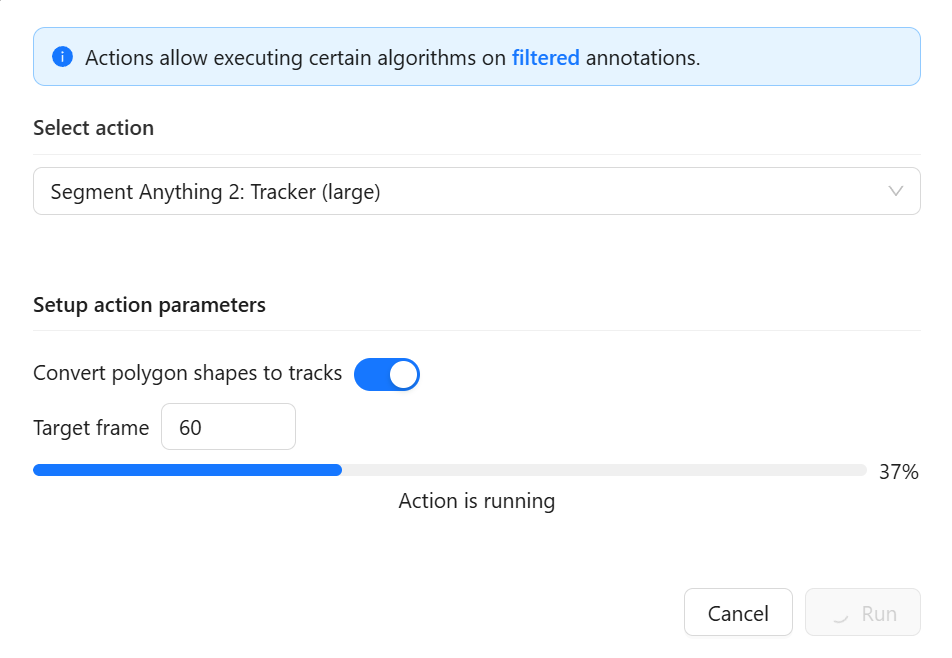
Once the process finishes, you may close the modal and review how the objects were tracked. If you notice that the tracked shapes deteriorate, you can adjust their coordinates and run the tracker again from that frame (for a single object or for many objects).
Limitations and Considerations
AI Agent Limitations
When using the AI agent implementation, keep in mind:
- Single Agent Constraint: Only one agent can run at a time for any given tracking function. Running multiple agents may cause random failures as they compete for tracking states.
- Memory-based State: Tracking states are kept in agent memory. If the agent crashes or is shut down, all tracking states are lost and active tracking processes will fail.
- Agent-only Usage: Tracking functions can only be used via agents.
There is no equivalent of the
cvat-cli task auto-annotatecommand for tracking. - Rectangle Limitation: When using the AI Tools dialog (sidebar), only tracking functions that support rectangles will be selectable. The SAM2 tracker supports polygons and masks but not rectangles.
- Skeleton Tracking: Skeletons cannot currently be tracked by either implementation.
Tracker parameters
- Target frame: Objects will be tracked up to this frame. Must be greater than the current frame
- Convert polygon shapes to tracks: When enabled, all visible polygon shapes in the current frame will be converted to tracks before tracking begins. Use this option if you need tracks as the final output but started with shapes, produced for example by interactors (e.g. SAM2 or another one).
See Also
- SAM2 Object Tracking via AI Agent (Blog, July 31, 2025) - Detailed implementation and background information
- Auto-annotation Functions Documentation - Reference for creating custom tracking functions
- CVAT CLI Examples - Additional CLI usage examples
3 - AI assistance
Use AI assistance to annotate images and videos with visual prompts, automatic models, and tracking.
The AI assistance dialog has three tabs: Prompting, Auto-labeling, and Tracking. In each tab, the Model drop-down includes Add your own model, which opens the AI agent setup instructions in a new browser tab.
See:
Prompting
Use Prompting to create masks or polygons from points or bounding boxes, depending on the model. These models are called interactors in the SDK.
For models that support point prompts:
- Positive points define the area in which the object is located.
- Negative points define the area in which the object is not located.

Annotate with visual prompts
To annotate with visual prompts, do the following:
-
Click Magic wand
 , and go to the Prompting tab.
 -
From the Model drop-down, select a model (see AI models).
Click the Question mark to see information about each model: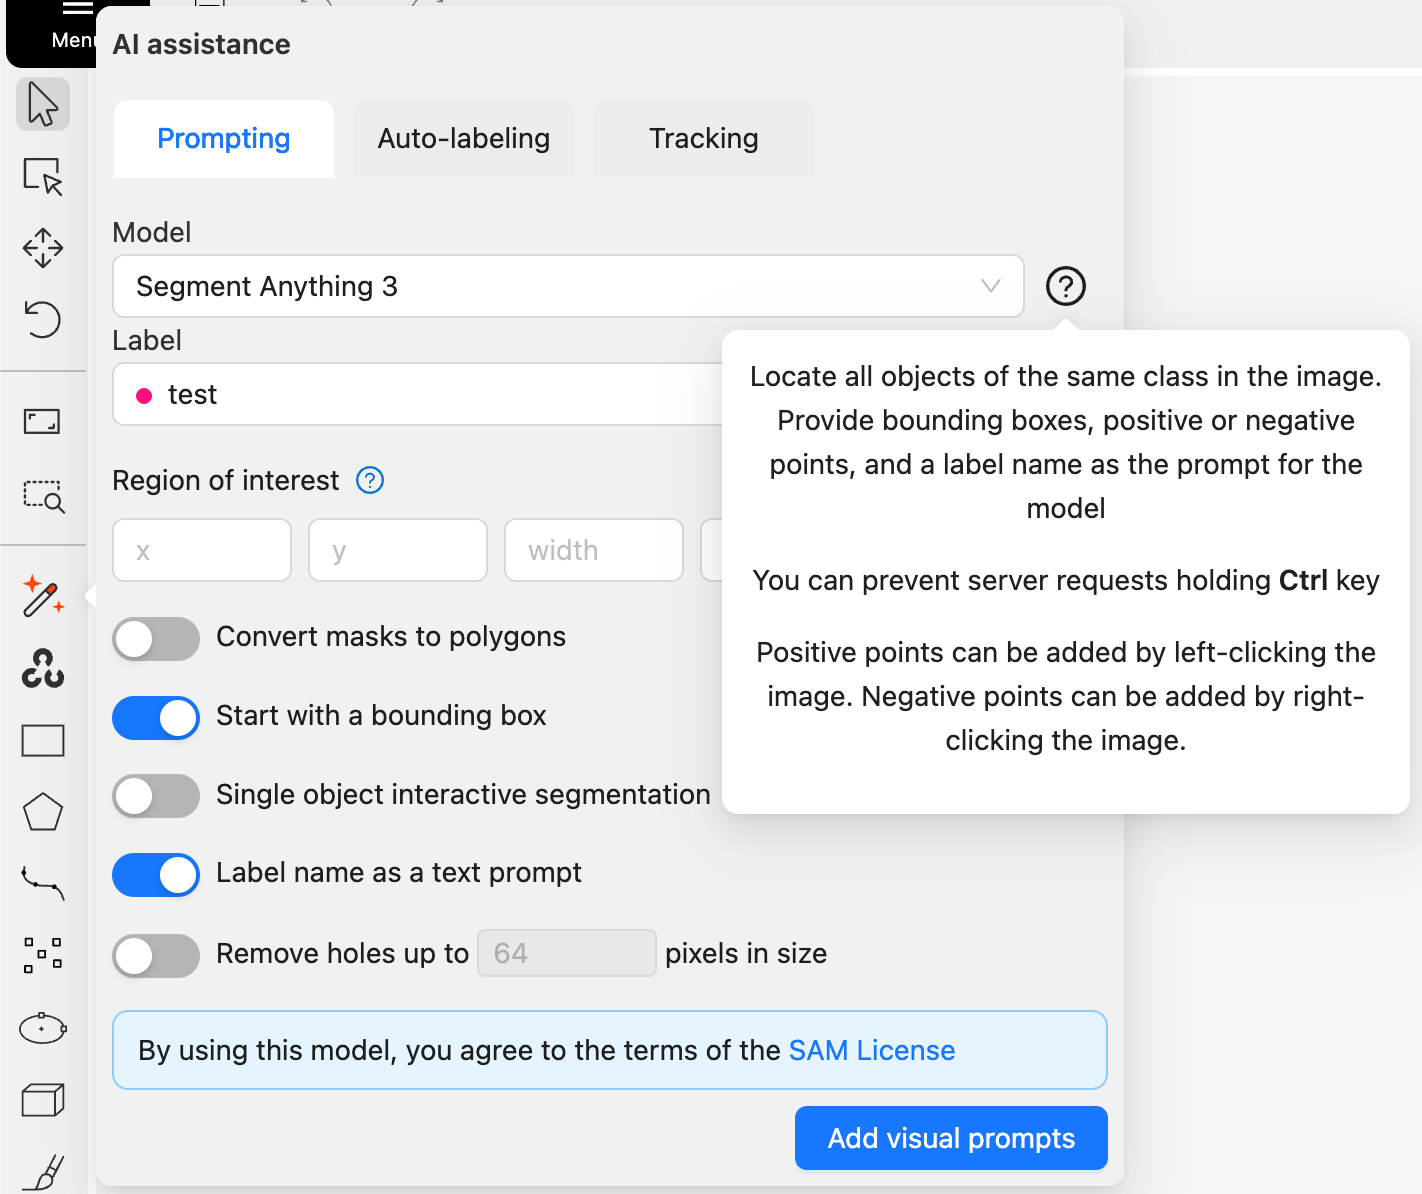
-
From the Label drop-down, select a label for the object.
-
(Optional) If the model returns masks, and you need to convert masks to polygons, use the Convert masks to polygons toggle.
-
Click Add visual prompts.
-
Use the left click to add positive points and the right click to add negative points.
Number of points you can add depends on the model. -
On the top menu, click Done (or Shift+N, N).
Limit visual prompts to a region of interest
For image/video jobs, you can restrict visual prompts to a selected image area. Use this when you want the model to segment only a specific part of the frame.
To set the region:
-
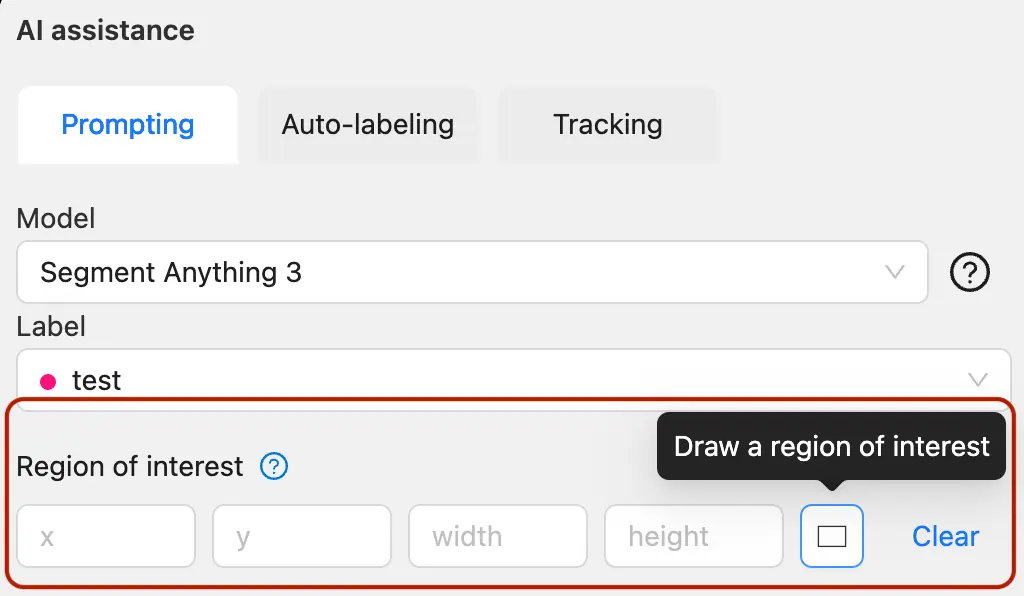
In the Prompting tab, specify Region of interest values:
x,y,width, andheight. -
Alternatively, click Draw a region of interest and draw the area on the canvas.
-
Click Add visual prompts and place points or boxes inside the selected region.
When a region of interest is set, CVAT sends only that image crop to the model, restricts visual prompts to the selected area, and adds the resulting shape back in the correct full-frame position.
Add extra points
Note
More points improve outline accuracy, but make shape editing harder. Fewer points make shape editing easier, but reduce outline accuracy.Each model has a minimum required number of points for annotation. Once the required number of points is reached, the request is automatically sent to the server. The server processes the request and adds a polygon to the frame.
For a more accurate outline, postpone request to finish adding extra points first:
- Hold down the Ctrl key.
On the top panel, the Block button will turn blue. - Add points to the image.
- Release the Ctrl key, when ready.
In case you used Mask to polygon when the object is finished, you can edit it like a polygon.
You can change the number of points in the polygon with the slider:

Delete points
To delete a point, do the following:
- With the cursor, hover over the point you want to delete.
- If the point can be deleted, it will enlarge and the cursor will turn into a cross.
- Left-click on the point.
Settings
-
On how to adjust the polygon, see Objects sidebar.
-
For more information about polygons in general, see Annotation with polygons.
Auto-labeling
Use Auto-labeling to annotate a frame automatically. Depending on the model, results can include bounding boxes, masks, tags, or poses.
Labels matching
Each model is trained on a dataset and supports only the dataset’s labels.
For example:
- DL model has the label
car. - Your task (or project) has the label
vehicle.
To annotate, you need to match these two labels to give
DL model a hint, that in this case car = vehicle.
If you have a label that is not on the list of DL labels, you will not be able to match them.
You can check each deployed model’s supported labels at the Models page.
Annotate automatically
To annotate automatically, do the following:
-
Click Magic wand
, and go to the Auto-labeling tab. -
From the Model drop-down, select model (see AI models).
-
From the left drop-down select the DL model label, from the right drop-down select the matching label of your task.
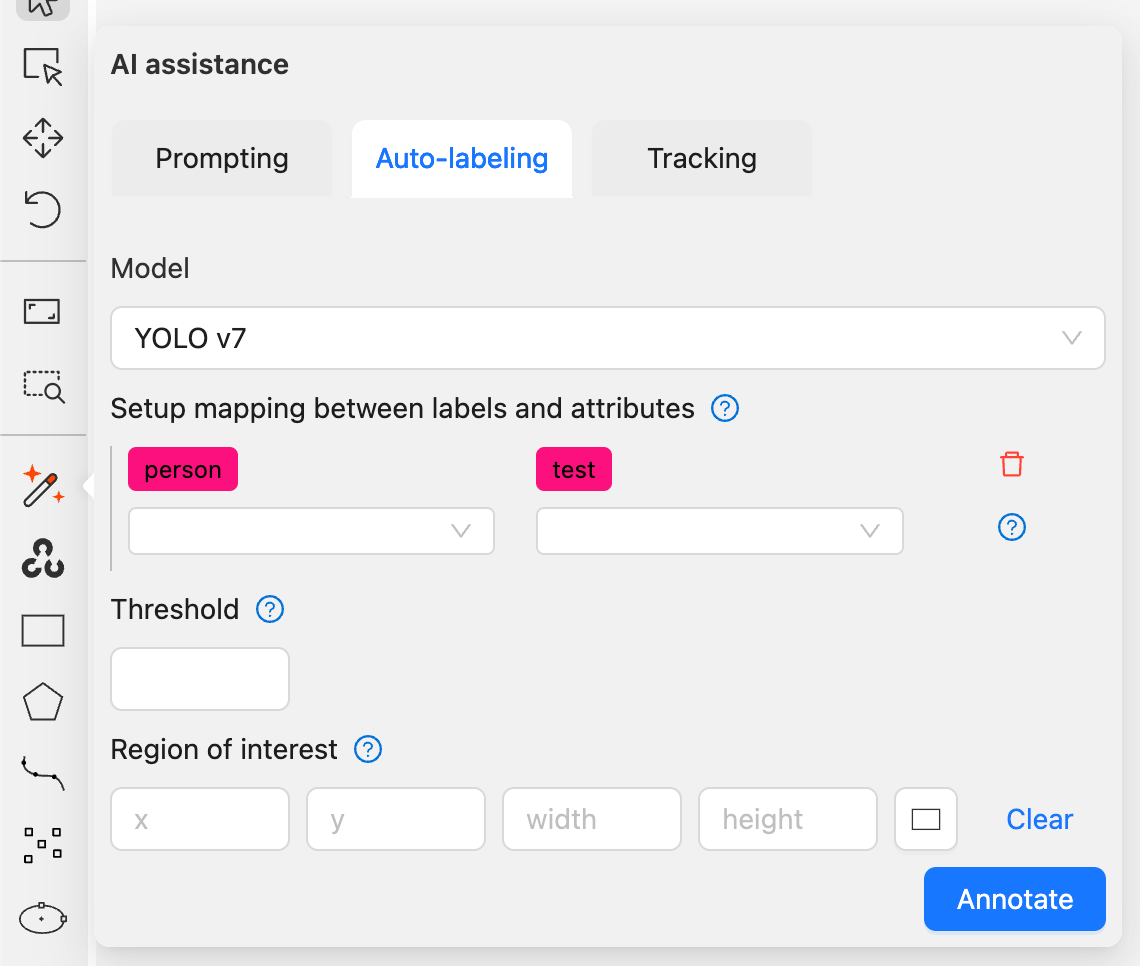
-
(Optional) If the model returns masks, and you need to convert masks to polygons, use the Convert masks to polygons toggle.
-
(Optional) You can specify a Threshold for the model. If not provided, the default value from the model settings will be used.
-
Click Annotate.
This action will automatically annotate one frame. For automatic annotation of multiple frames, see Automatic annotation.
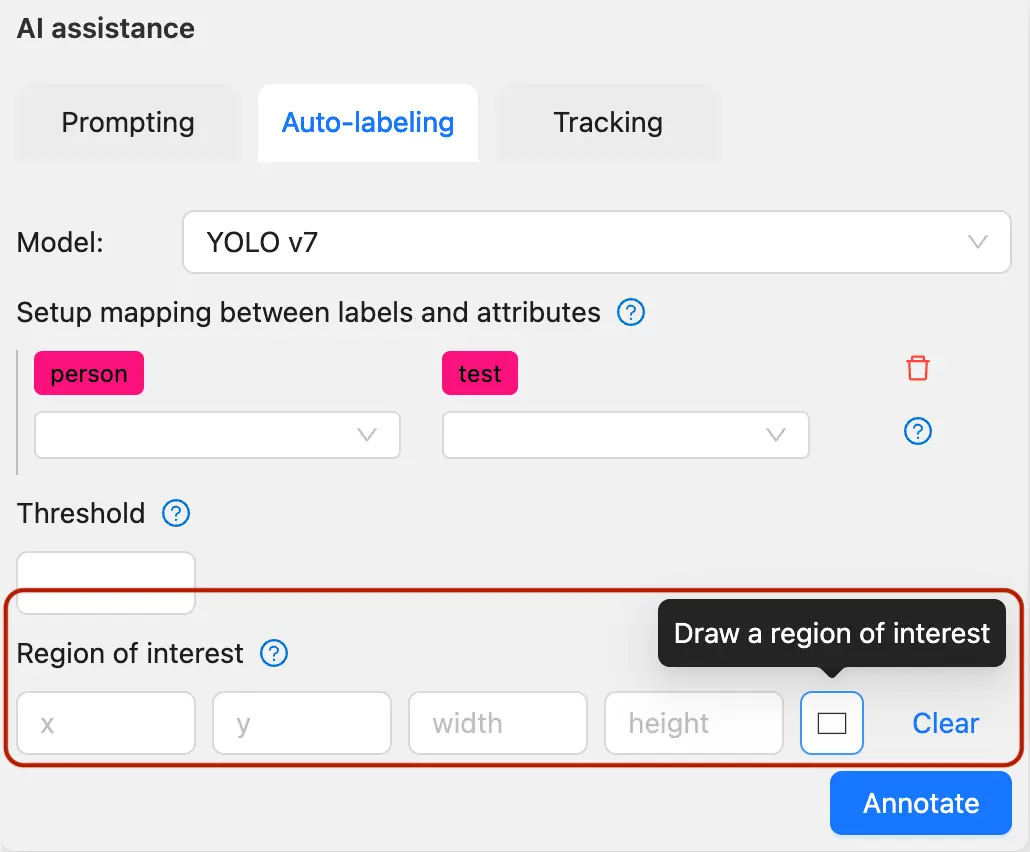
Limit automatic annotation to a region of interest
For image/video jobs, you can restrict automatic annotation to a selected image area. Use this when only part of the frame should be analyzed.
To set the region:
-
In the Auto-labeling tab, specify Region of interest values:
x,y,width, andheight. -
Alternatively, click Draw a region of interest and draw the area on the canvas.
-
Click Annotate.
CVAT sends only the selected image crop to the model and maps the returned annotations back to the correct full-frame coordinates.
Tracking
Use Tracking to follow objects across frames in a video or image sequence.
Track objects
To track objects, do the following:
-
Click Magic wand
, and go to the Tracking tab.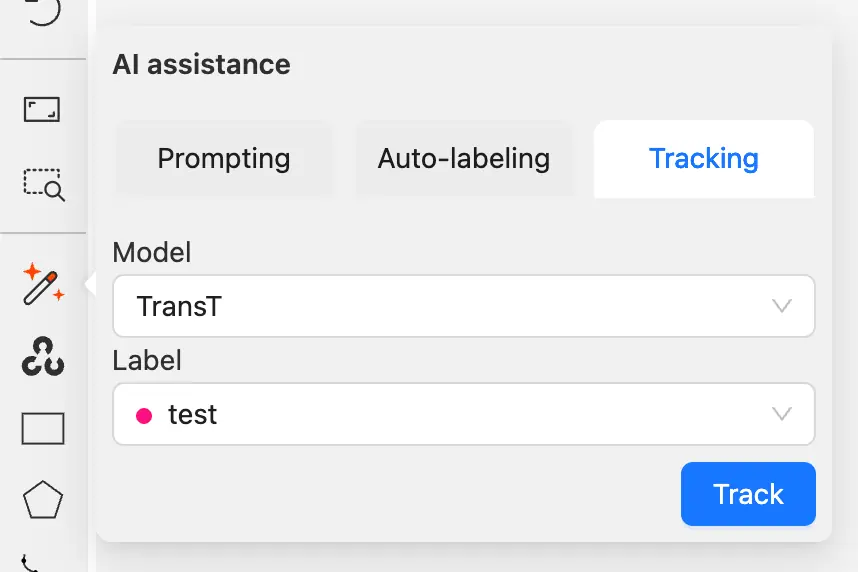
-
From the Model drop-down, select a tracker.
-
From the Label drop-down, select the label for the object.
-
Click Track, and annotate the objects with the bounding box in the first frame.
-
Go to the top menu and click Next (or the F on the keyboard) to move to the next frame.
All annotated objects will be automatically tracked.
When tracking
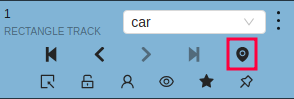
-
To enable/disable tracking, use Tracker switcher on the sidebar.
-
Trackable objects have an indication on canvas with a model name.
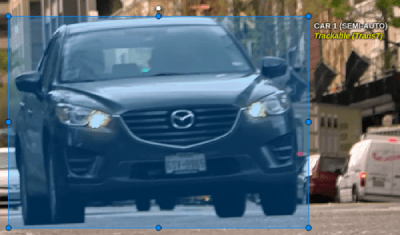
-
You can follow the tracking by the messages appearing at the top.

4 - AI models
CVAT’s AI features use AI models, which can be added via several methods, namely:
- Nuclio functions.
- Functions powered by third-party services (Hugging Face and Roboflow).
- Functions powered by CVAT AI agents (also known as native functions).
The following table shows the availability of each model deployment method across CVAT editions:
| Method | CVAT Community | CVAT Enterprise | CVAT Online |
|---|---|---|---|
| Nuclio functions | Yes | Yes | Certain functions only |
| Third-party functions | No | Yes | Yes |
| Native functions | No | Yes | Yes |
Each function has a certain kind, which determines the tools that can use it in the CVAT UI. The following kinds are defined:
| Kind | Used by |
|---|---|
| Detector | AI Tools (the “Detectors” tab), as well as automatic annotation |
| Interactor | AI Tools (the “Interactors” tab) |
| Reidentifier | Automatic annotation |
| Tracker | Depending on the shape types supported by the tracker, either AI Tools (the “Trackers” tab) or annotation actions |
Nuclio functions
A Nuclio function is a Docker container that runs on the same host or Kubernetes cluster as CVAT itself and processes inference requests that come from it. To add a Nuclio function to CVAT, a system administrator must build and deploy it. Consult the serverless tutorial for more information.
Once deployed, a Nuclio function is available to every user of the CVAT instance.
Nuclio functions can have any kind.
A Nuclio function can be built from custom source code and thus be internally implemented in any way that fits the interface expected by CVAT. However, the CVAT source repository also includes several predefined Nuclio functions in source code form, which can be used either directly or as examples for building custom functions. In addition, CVAT Enterprise customers gain access to additional predefined functions, including the SAM 2 Tracker. Consult Segment Anything 2 Tracker for more information.
Predefined Nuclio functions
The following predefined function implementations are available
in the serverless directory of the source repository.
Interactors
| Model | Description | Example |
|---|---|---|
| Inside-Outside Guidance (IOG) |
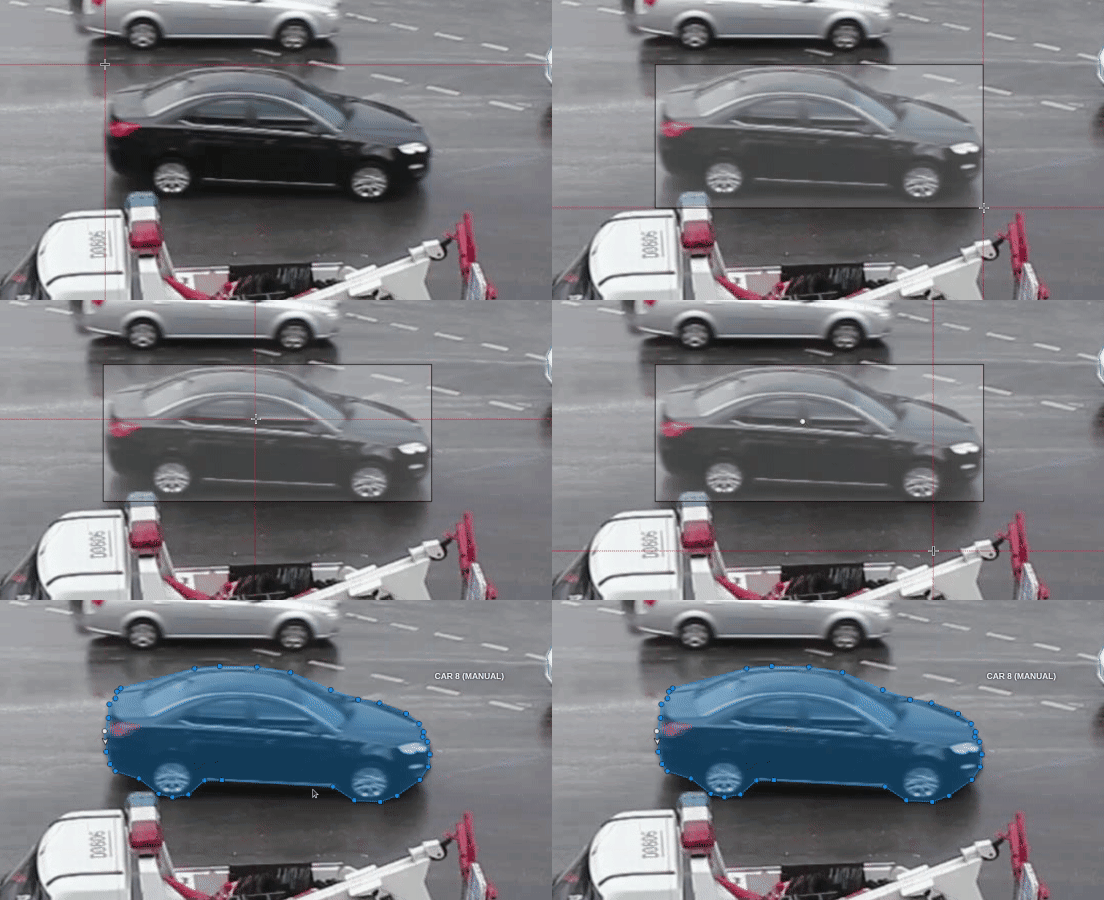
The model uses a bounding box and inside/outside points to create a mask. First of all, you need to create a bounding box, wrapping the object. Then you need to use positive and negative points to say the model where is a foreground, and where is a background. Negative points are optional. For more information, see: |
 |
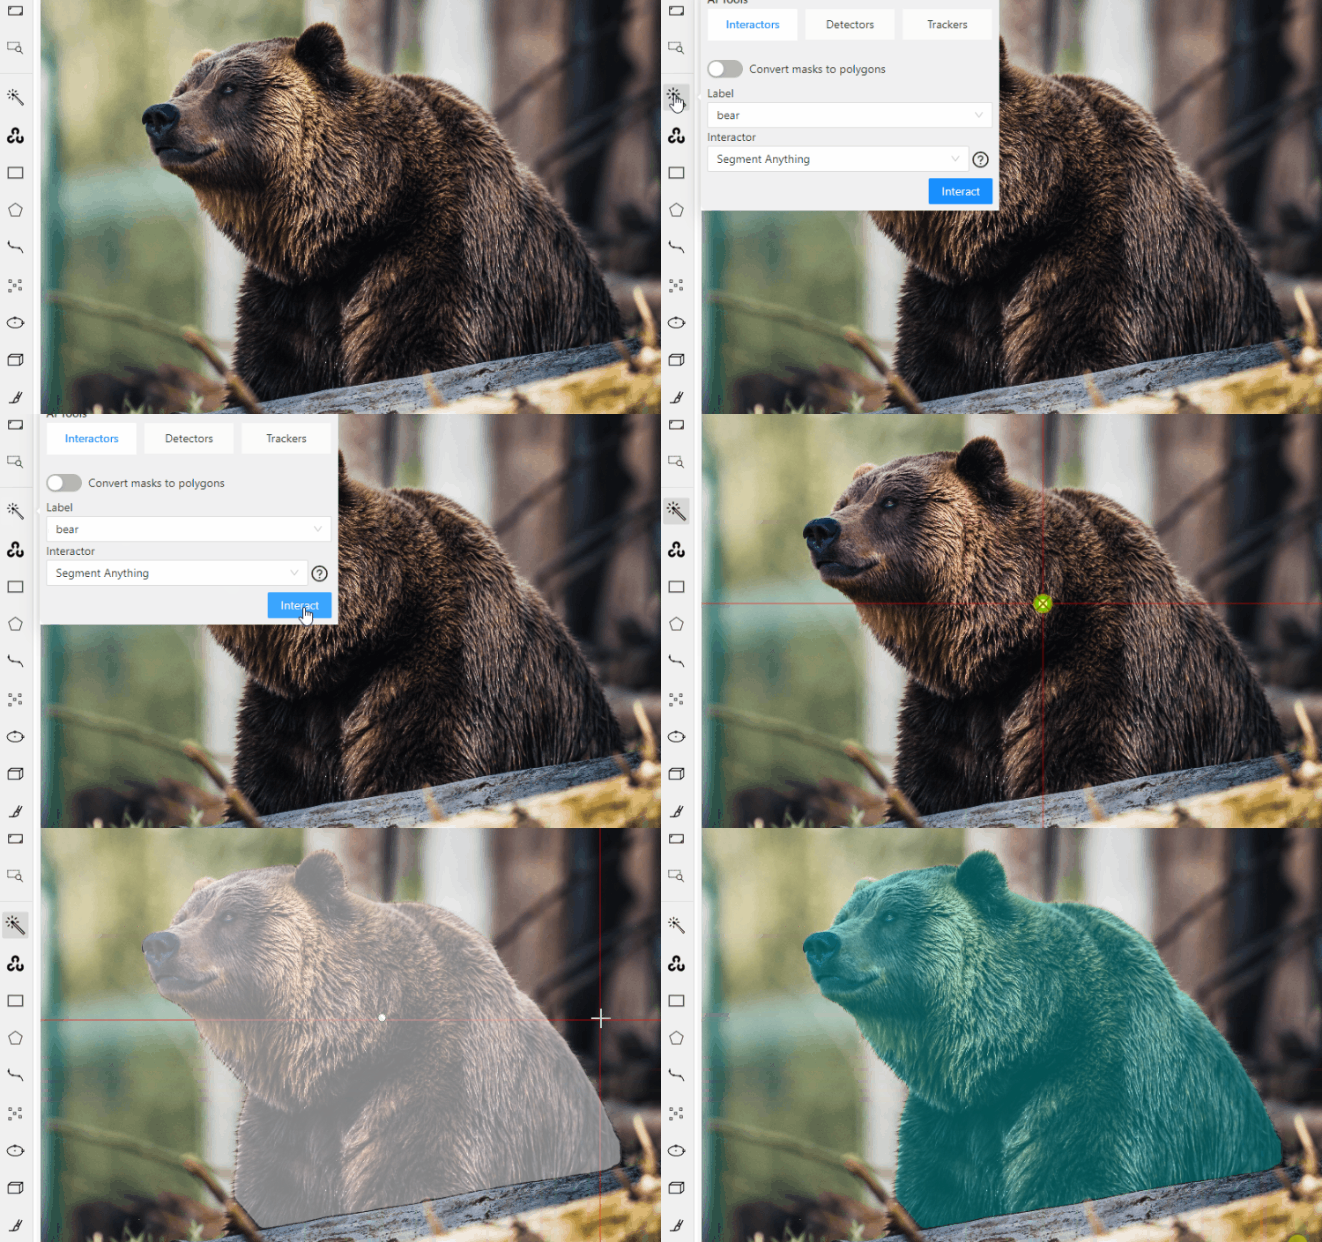
| Segment Anything Model (SAM) | The Segment Anything Model (SAM) produces high quality object masks, and it can be used to generate masks for all objects in an image. It has been trained on a dataset of 11 million images and 1.1 billion masks, and has strong zero-shot performance on a variety of segmentation tasks. For more information, see: |
 |
Detectors
| Model | Description |
|---|---|
| Face Detection | Face detector based on MobileNetV2 as a backbone for indoor and outdoor scenes shot by a front-facing camera. For more information, see: |
| Faster RCNN with Tensorflow | Faster RCNN version with Tensorflow. The model generates bounding boxes for each instance of an object in the image. In this model, RPN and Fast R-CNN are combined into a single network. For more information, see: |
| Mask RCNN | The model generates polygons for each instance of an object in the image. For more information, see: |
| RetinaNet | Pytorch implementation of RetinaNet object detection. For more information, see: |
| YOLO v7 | YOLOv7 is an advanced object detection model that outperforms other detectors in terms of both speed and accuracy. It can process frames at a rate ranging from 5 to 160 frames per second (FPS) and achieves the highest accuracy with 56.8% average precision (AP) among real-time object detectors running at 30 FPS or higher on the V100 graphics processing unit (GPU). For more information, see: |
Trackers
| Model | Description | Example |
|---|---|---|
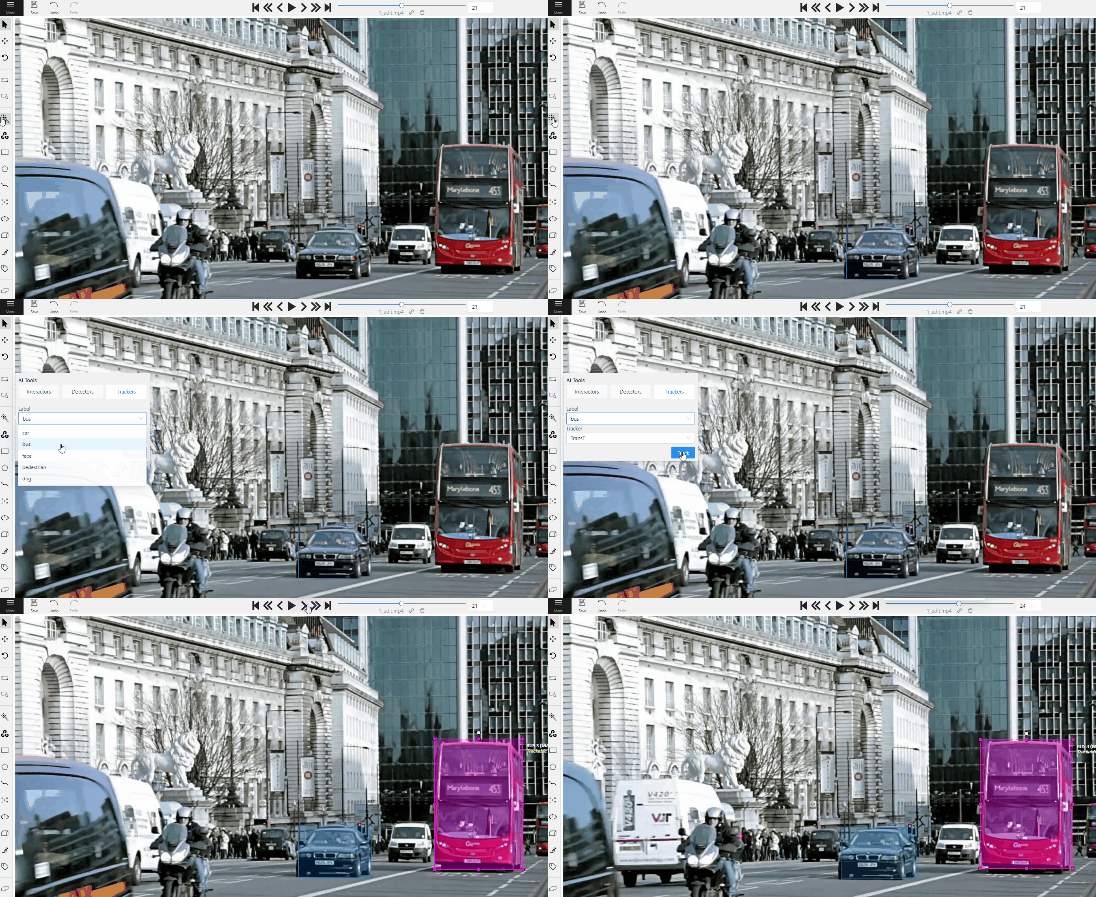
| Transformer Tracking (TransT) | Simple and efficient online tool for object tracking and segmentation. If the previous frame was the latest keyframe for the object, the trackable object will be tracked automatically. This is a modified version of the PyTracking Python framework based on Pytorch For more information, see: |
 |
Nuclio functions in CVAT Online
Since CVAT Online is administered by CVAT.ai Corporation, users may not add custom Nuclio functions to it. However, CVAT.ai makes several functions from the lists above available in CVAT Online. The exact set of available functions may vary over time at CVAT.ai’s discretion.
Third-party functions
Available in:CVAT OnlineCVAT EnterpriseA third-party function is a resource stored in CVAT that comprises a URL to a model in a third-party inference service and a credential used to access that service. This third-party service is called when the function is used as a model in the CVAT UI.
The following services are currently supported:
-
To be usable from CVAT, a model hosted in Hugging Face must support the Inference API, which can be verified by checking that the “Inference Providers” gadget on the model page lists “HF Inference API” as one of the providers. Additionally, the model’s task must be “Image Classification”, “Image Segmentation”, or “Object Detection”.
-
To be usable from CVAT, a model hosted in Roboflow must have task type “Classification”, “Instance Segmentation”, “Object Detection”, or “Semantic Segmentation”.
A third-party function can be created via the CVAT UI on the Models page.
Any user may create a third-party function to their personal workspace, in which case it will only be usable by them.
Alternatively, an organization maintainer may create a third-party function within the organization. In this case, the function will be usable by all other members of the organization.
Third-party functions always have kind “detector”.
For a walkthrough of this feature, see Streamline annotation by integrating Hugging Face and Roboflow models.
This video demonstrates the process:
Native functions
Available in:CVAT OnlineCVAT EnterpriseYou can connect your own model to CVAT using cvat-cli.
The model runs on your machine as an AI agent: it receives requests from CVAT and sends back annotations.
CVAT stores the model’s name, labels, and capabilities as a native function.
Agents support three kinds of functions:
- Detectors run automatically and produce boxes, masks, tags, or poses, depending on the model.
- Interactors use your prompts, such as points and bounding boxes, to annotate objects in AI assistance → Prompting.
- Trackers follow objects across frames, through Tracking or annotation actions depending on their shape types.
The setup has three steps:
- Prepare a Python function for your model, or choose a ready-to-use function below.
- Choose a deployment scope and register the model with
cvat-cli function create-native. - Start the agent with
cvat-cli function run-agentand keep it running while using the model in CVAT.
Set up CVAT CLI
Run these commands on the machine that will run the model. The examples use a Linux/macOS shell and require Git and a Python version supported by the model’s dependencies.
python3 -m venv .venv
source .venv/bin/activate
python -m pip install --upgrade pip cvat-cli
Create a Personal Access Token in CVAT, then configure your connection:
export CVAT_SERVER_URL="https://app.cvat.ai"
export CVAT_ACCESS_TOKEN="replace-with-your-token"
For Enterprise, use your instance URL instead of https://app.cvat.ai.
Choose a deployment scope
Choose one of these settings before running the examples.
Only you can use the model.
export CVAT_ORG=""
Organization members can use the model.
export CVAT_ORG="your-organization-slug"
Note
- Use the organization's slug, not its display name.
- Registering an organization model requires the owner or maintainer role.
CVAT Enterprise only. All users of the instance can use the model.
Use an instance administrator’s token and set:
export CVAT_ORG=""
Add --visibility=public to the create-native command in your chosen example.
The run-agent command does not need this option.
Ready-to-use models
The cvat-ai/cvat-models repository provides Python functions for supported models. You can use them directly without writing a wrapper:
| Example | What it does | Where to use it |
|---|---|---|
| YOLO | Detection, segmentation, or pose estimation | AI assistance → Auto-labeling |
| Hugging Face Transformers | Detection, segmentation, or classification | AI assistance → Auto-labeling |
| SAM2 tracking | Tracks an existing mask or polygon | Run annotation action |
| SAM2 interactor | Segments objects from points and boxes | AI assistance → Prompting |
Clone the repository and run the examples from its directory:
git clone https://github.com/cvat-ai/cvat-models.git
cd cvat-models
Choose an example below. After registration, replace <function_id> (including the angle brackets)
with the numeric ID shown in the command output.
For example, if the output says Created function #8, use 8.
Use the same model parameters and workspace when registering and starting the agent.
The examples use the CPU; for a GPU, install compatible CUDA-enabled PyTorch dependencies and change
-p device=str:cpu to -p device=str:cuda in both commands.
-
Install dependencies:
python -m pip install --upgrade -r detector/yolo/requirements.txt -
Register the model:
cvat-cli --server-host "$CVAT_SERVER_URL" --org "$CVAT_ORG" function create-native "YOLO" \ --function-file detector/yolo/func.py \ -p model=str:yolo26n.pt -p device=str:cpu -
Start the agent:
cvat-cli --server-host "$CVAT_SERVER_URL" --org "$CVAT_ORG" function run-agent <function_id> \
  --function-file detector/yolo/func.py \
  -p model=str:yolo26n.pt -p device=str:cpu
In a CVAT job, select AI assistance → Auto-labeling → Model → YOLO, map the model labels to task labels, and run it. You can also use the model for task automatic annotation.
The table shows example weights, not a complete list of supported models.
You can use other compatible numbered YOLO models, including newer versions supported by your installed
Ultralytics library and the CVAT YOLO function. These examples use
YOLO26.
See the Ultralytics model catalog for available weights and model capabilities.
YOLO-World and YOLOE are not supported by this CVAT function.
Use the same model value when registering the function and starting the agent.
| Purpose | Example model value |
|---|---|
| Detection | str:yolo26n.pt |
| Instance segmentation | str:yolo26n-seg.pt |
| Human pose estimation | str:yolo26n-pose.pt |
| Custom weights | str:/absolute/path/to/best.pt |
Pretrained weights are downloaded automatically. Pose models need a matching skeleton label in CVAT. For custom pose keypoint names and supported models, see the YOLO README, which also links to the Ultralytics licensing terms.
This example runs a DETR detector on your machine using the Transformers library.
-
Install dependencies:
python -m pip install -r detector/transformers/requirements.txt -
Register the model:
cvat-cli --server-host "$CVAT_SERVER_URL" --org "$CVAT_ORG" function create-native "DETR" \ --function-file detector/transformers/func.py \ -p task=str:object-detection -p model=str:facebook/detr-resnet-50 -p device=str:cpu -
Start the agent:
cvat-cli --server-host "$CVAT_SERVER_URL" --org "$CVAT_ORG" function run-agent <function_id> \
  --function-file detector/transformers/func.py \
  -p task=str:object-detection -p model=str:facebook/detr-resnet-50 -p device=str:cpu
Select AI assistance → Auto-labeling → Model → DETR, map the labels, and run it.
For segmentation or classification, use the corresponding task and model values below in both commands.
Register each model as a separate function with a descriptive name.
| Purpose | task value |
Example model value |
Output |
|---|---|---|---|
| Object detection | str:object-detection |
str:facebook/detr-resnet-50 |
Boxes |
| Panoptic segmentation | str:image-segmentation |
str:facebook/detr-resnet-50-panoptic |
Masks |
| Semantic segmentation | str:image-segmentation |
str:nvidia/segformer-b0-finetuned-ade-512-512 |
Masks |
| Image classification | str:image-classification |
str:google/vit-base-patch16-224 |
Tags |
Where to find more models
- Check the CVAT agent’s expected-compatible model architectures. This lists architecture classes, not model IDs; it is not a guarantee that every checkpoint will work.
- Browse Hugging Face models filtered by object detection, image segmentation, or image classification. Choose a model supported by the corresponding Transformers pipeline and check its model card for dependencies.
The model ID is the owner/model-name shown on its Hugging Face page.
See the Transformers function README
for supported parameters. These agents run locally; a hosted Hugging Face inference provider is not required.
Use points and bounding boxes to segment an object in the current frame.
-
Install dependencies:
python -m pip install -r interactor/sam2/requirements.txt -
Register the interactor:
cvat-cli --server-host "$CVAT_SERVER_URL" --org "$CVAT_ORG" function create-native "SAM2 interactor" \ --function-file interactor/sam2/func.py \ -p model_id=str:facebook/sam2.1-hiera-tiny -p device=str:cpu -
Start the agent:
cvat-cli --server-host "$CVAT_SERVER_URL" --org "$CVAT_ORG" function run-agent <function_id> \
  --function-file interactor/sam2/func.py \
  -p model_id=str:facebook/sam2.1-hiera-tiny -p device=str:cpu
In a job, open AI assistance → Prompting, select SAM2 interactor and the annotation label, then click Add visual prompts. Add points or a bounding box around the object, refine the mask with positive and negative points, and finish the interaction to create the annotation.
In older CVAT versions, use AI Tools → Interactors → Interact. See the SAM2 interactor README for model options.
-
Install dependencies:
python -m pip install -r tracker/sam2/requirements.txt -
Register the tracker:
cvat-cli --server-host "$CVAT_SERVER_URL" --org "$CVAT_ORG" function create-native "SAM2 Tracker" \ --function-file tracker/sam2/func.py \ -p model_id=str:facebook/sam2.1-hiera-tiny -p device=str:cpu -
Start the agent:
cvat-cli --server-host "$CVAT_SERVER_URL" --org "$CVAT_ORG" function run-agent <function_id> \
  --function-file tracker/sam2/func.py \
  -p model_id=str:facebook/sam2.1-hiera-tiny -p device=str:cpu
In a video job, draw a mask or polygon, open its menu, and choose Run annotation action → AI Tracker: SAM2. Set the target frame, click Run, and review the results. A GPU is recommended for practical tracking.
SAM2 tracks masks and polygons through annotation actions, not the sidebar’s rectangle-based Tracking selector. See SAM2 tracking for the full workflow and required enhanced actions plugin.
After setup
Keep the agent terminal open while using the model. Ctrl+C stops the agent but leaves the model registered;
run the same run-agent command to restart it. To remove the model after stopping the agent:
cvat-cli --server-host "$CVAT_SERVER_URL" --org "$CVAT_ORG" function delete <function_id>
If the model is missing, check the selected server and workspace. If requests wait without results, check the agent’s terminal and function ID. In older CVAT versions, AI assistance → Auto-labeling is named AI Tools → Detectors.
Use another model
For a model without a ready-to-use function, implement the CVAT SDK function interface. Start with the Python detection function example, which shows how to load a model, define its labels, and return predictions in CVAT format. For prompt-based models or trackers, see the interaction protocol or tracking protocol.
The CLI function-loading examples
explain how to expose a function through a Python file or a create factory and pass parameters with -p.
Then use the same registration and agent commands with your Python file and its parameters.
Native functions can be detectors, interactors, or trackers.
For container deployment, see the Docker Compose guide or Helm guide.