Filter
There are some reasons to use the feature:
- When you use a filter, objects that don’t match the filter will be hidden.
- The fast navigation between frames which have an object of interest.
Use the
Left Arrow/Right Arrowkeys for this purpose or customize the UI buttons by right-clicking and selectswitching by filter. If there are no objects which correspond to the filter, you will go to the previous / next frame which contains any annotated objects.
To apply filters you need to click on the button on the top panel.

Create a filter
It will open a window for filter input. Here you will find two buttons: Add rule and Add group.

Rules
The Add rule button adds a rule for objects display. A rule may use the following properties:

Supported properties for annotation
| Properties | Supported values | Description |
|---|---|---|
Label |
all the label names that are in the task | label name |
Type |
shape, track or tag | type of object |
Shape |
all shape types | type of shape |
Occluded |
true or false | occluded (read more) |
Width |
number of px or field | shape width |
Height |
number of px or field | shape height |
ServerID |
number or field | ID of the object on the server (You can find out by forming a link to the object through the Action menu) |
ObjectID |
number or field | ID of the object in your client (indicated on the objects sidebar) |
Attributes |
some other fields including attributes with a similar type or a specific attribute value |
any fields specified by a label |
- Supported properties for projects list
- Supported properties for tasks list
- Supported properties for jobs list
- Supported properties for cloud storages list
Supported operators for properties
== - Equally; != - Not equal; > - More; >= - More or equal; < - Less; <= - Less or equal;
Any in; Not in - these operators allow you to set multiple values in one rule;

Is empty; is not empty – these operators don’t require to input a value.
Between; Not between – these operators allow you to choose a range between two values.
Like - this operator indicate that the property must contain a value.
Starts with; Ends with - filter by beginning or end.
Some properties support two types of values that you can choose:

You can add multiple rules, to do so click the add rule button and set another rule.
Once you’ve set a new rule, you’ll be able to choose which operator they will be connected by: And or Or.

All subsequent rules will be joined by the chosen operator.
Click Submit to apply the filter or if you want multiple rules to be connected by different operators, use groups.
Groups
To add a group, click the Add group button. Inside the group you can create rules or groups.

If there is more than one rule in the group, they can be connected by And or Or operators.
The rule group will work as well as a separate rule outside the group and will be joined by an
operator outside the group.
You can create groups within other groups, to do so you need to click the add group button within the group.
You can move rules and groups. To move the rule or group, drag it by the button.
To remove the rule or group, click on the Delete button.

If you activate the Not button, objects that don’t match the group will be filtered out.
Click Submit to apply the filter.
The Cancel button undoes the filter. The Clear filter button removes the filter.
Once applied filter automatically appears in Recent used list. Maximum length of the list is 10.
Sort and filter lists
On the projects, task list on the project page, tasks, jobs, and cloud storage pages, you can use sorting and filters.
The applied filter and sorting will be displayed in the URL of your browser, Thus, you can share the page with sorting and filter applied.
Sort by
You can sort by the following parameters:
- Jobs list: ID, assignee, updated date, stage, state, task ID, project ID, task name, project name.
- Tasks list or tasks list on project page: ID, owner, status, assignee, updated date, subset, mode, dimension, project ID, name, project name.
- Projects list: ID, assignee, owner, status, name, updated date.
- Cloud storages list: ID, provider type, updated date, display name, resource, credentials, owner, description.
To apply sorting, drag the parameter to the top area above the horizontal bar. The parameters below the horizontal line will not be applied. By moving the parameters you can change the priority, first of all sorting will occur according to the parameters that are above.
Pressing the Sort button switches Ascending sort/Descending sort.
Quick filters
Quick Filters contain several frequently used filters:
Assigned to me- show only those projects, tasks or jobs that are assigned to you.Owned by me- show only those projects or tasks that are owned by you.Not completed- show only those projects, tasks or jobs that have a status other than completed.AWS storages- show only AWS cloud storagesAzure storages- show only Azure cloud storagesGoogle cloud storages- show only Google cloud storages
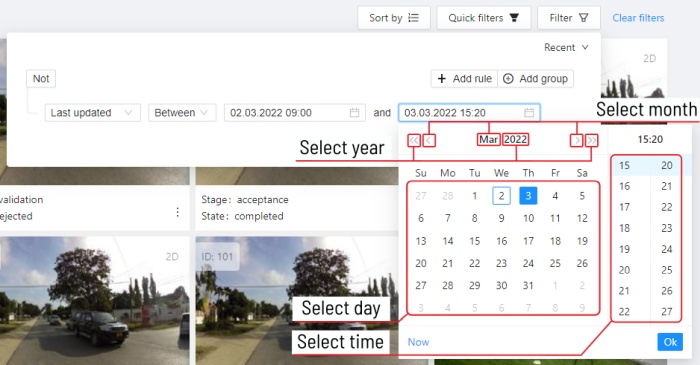
Date and time selection
When creating a Last updated rule, you can select the date and time by using the selection window.

You can select the year and month using the arrows or by clicking on the year and month.
To select a day, click on it in the calendar,
To select the time, you can select the hours and minutes using the scrolling list.
Or you can select the current date and time by clicking the Now button.
To apply, click Ok.