SSO configuration
Note: This is a paid feature available only to Enterprise clients.
CVAT supports Single Sign-On (SSO) using both OpenID Connect (OIDC) and Security Assertion Markup Language (SAML) protocols.
To configure SSO, complete the following 2 main steps:
- Configure the Identity Provider (IdP) — set up an application on your IdP platform.
- Update the CVAT configuration — provide the necessary identity provider settings in the CVAT configuration file.
If the application is already configured, refer to the Configuring SSO in CVAT section. Otherwise, you may follow one of the detailed platform-specific guides to set up such an application:
Platform specific IdP configuration
Microsoft Azure
OpenID Connect
Follow these steps to configure an application on the Microsoft Azure platform and integrate it with CVAT:
Step 1: Register an OIDC-based application
To start, log into your Microsoft Azure Portal. Once you’re in:
-
Navigate to the
Microsoft Entra IDservice ->App registrationssection in the menu on the left. -
Click on the
+ New registrationbutton. -
Enter application name.
-
Select
Supported account typesbased on your needs. -
Add
Redirect URI: chooseWebplatform and set<scheme:cvat_domain>/api/auth/oidc/<idp-id:azure-oidc>/login/callback/to the value field.
-
Click on the
Registerbutton.
Note
More information on how to configure an OIDC-based application on the Azure platform can be found here.You’ve created an app, now you should configure the credentials for it.
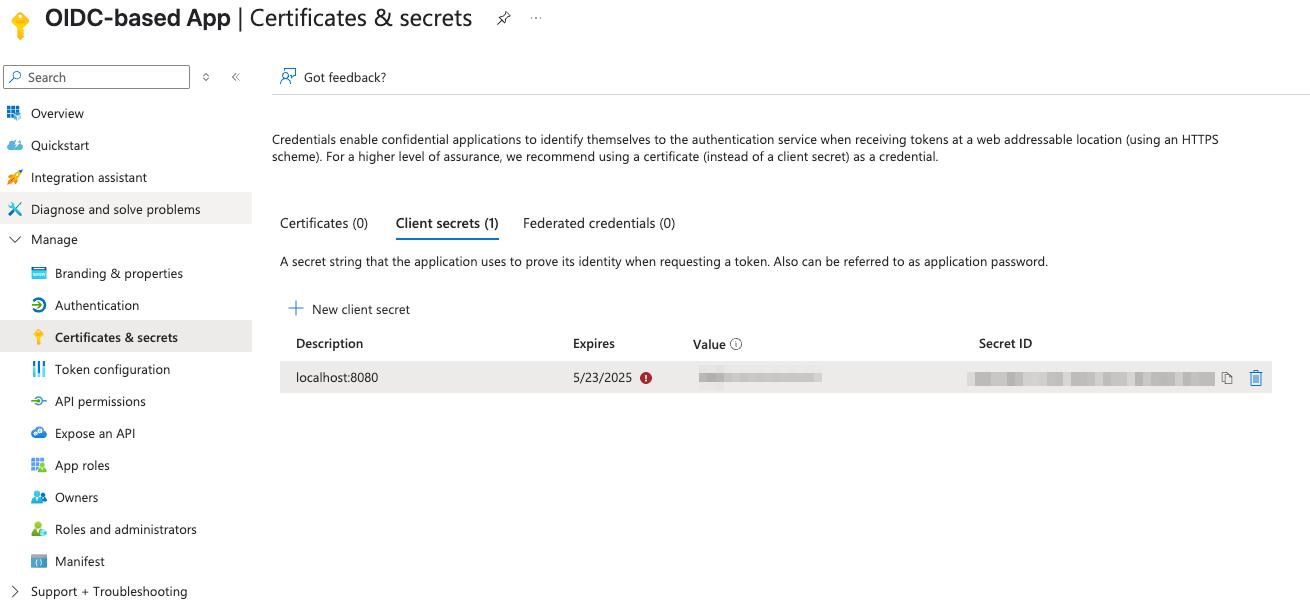
Step 2: Configure credentials
- Navigate to the
Overviewtab of your newly created application.
- In the
Client credentialssection, click theAdd a certificate or secretlink. This will take you to theCertificates & secretspage. - Click
+ New client secret. - In the popup form, enter a description and select an expiration period, then click
Add.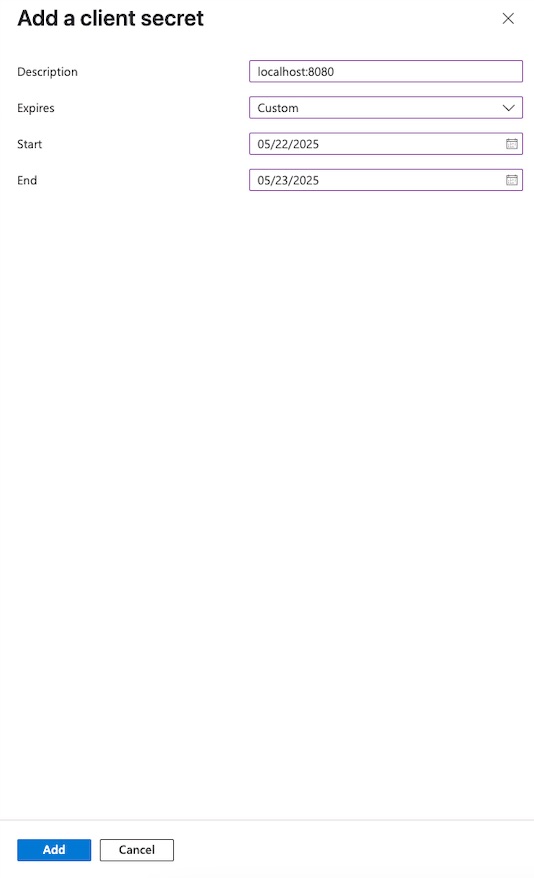
The newly created secret will appear in the list.
Make sure to copy the value now — you won’t be able to see it again later.
Step 3: Configure CVAT
Utilize the example below as a template for your configuration:
sso:
  enabled: true
  selection_mode: email_address
  identity_providers:
    - id: <idp-id:azure-oidc>
      protocol: OIDC
      name: Azure OIDC-based IdP
      server_url: https://<Directory (tenant) ID>/v2.0/
      client_id: <Secret ID>
      client_secret: <Secret Value>
      email_domain: <company_email_domain>
Tip
ActualSecret ID and Secret Value values may be found on Certificates & secrets tab of the application,
while Directory (tenant) ID - on the Overview tab.
You can now proceed to start CVAT. For additional CVAT configuration details, refer to Configuring SSO in CVAT.
SAML
Follow these steps to configure an application on the Microsoft Azure platform and integrate it with CVAT:
Step 1: Register an SAML-based application
To start, log into your Microsoft Azure Portal. Once you’re in:
- Navigate to the
Microsoft Entra IDservice ->Enterprise applicationssection in the menu on the left. - Click
+ New applicationand enter a name for the application in the popup window, then clickCreate.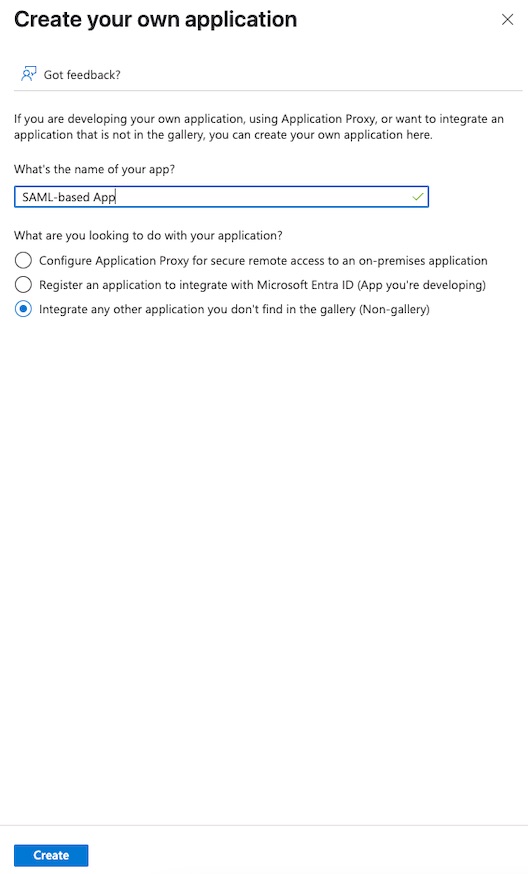
You’ve created an app, now you should finalize its configuration and assign users or groups.
Step 2: Configure a created application
- Navigate to the
Single sign-onsection in the menu on the left. - Choose the SAML protocol as the single sign-on method.
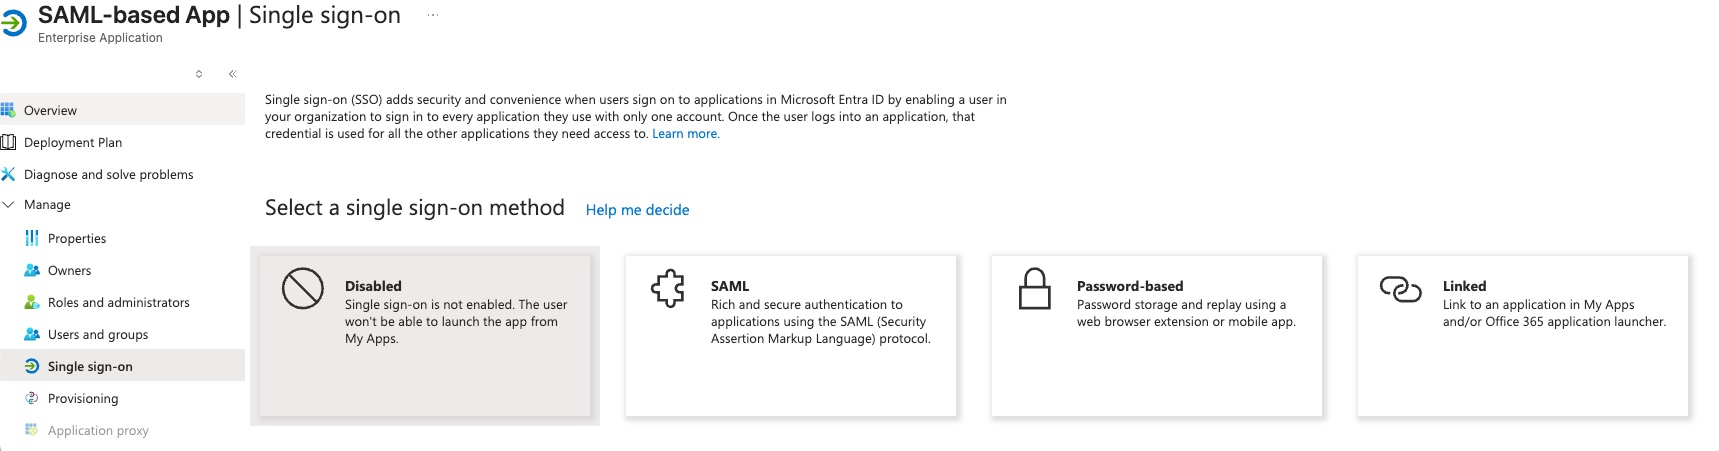
- Edit
Basic SAML Configuration:Identifier (Entity ID):<scheme:cvat_domain>/api/auth/saml/<idp-id:azure-saml>/metadata/Reply URL (Assertion Consumer Service URL):<scheme:cvat_domain>/api/auth/saml/<idp-id:azure-saml>/acs/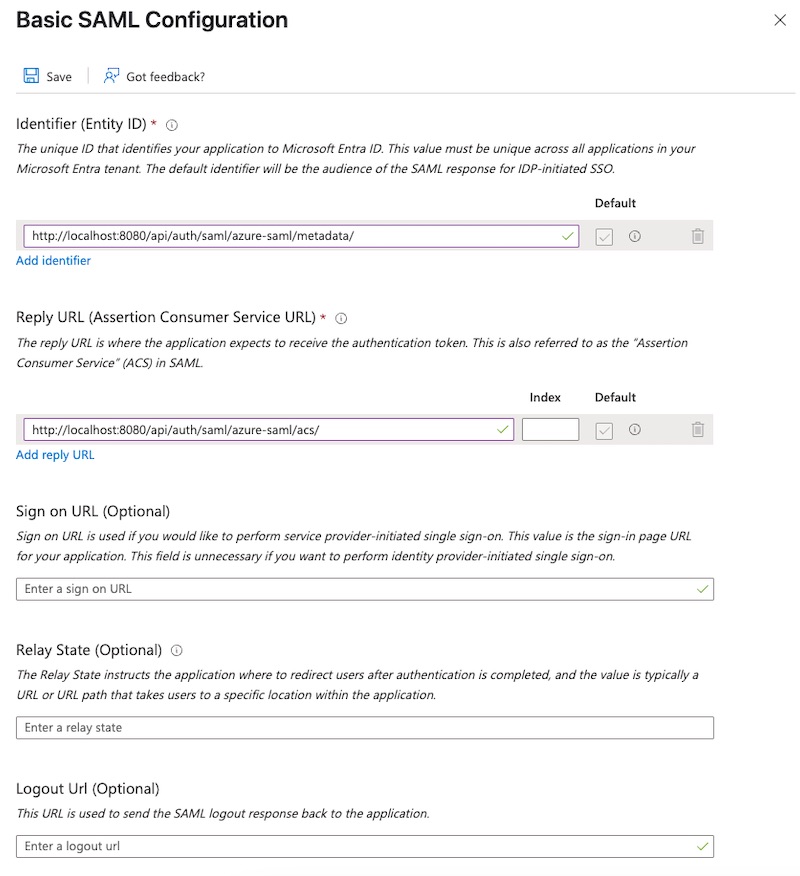
- Save changes
- Edit
Attributes & Claimsby adding a newuidclaim:- Name:
uid - Namespace:
http://schemas.xmlsoap.org/ws/2005/05/identity/claims - Source:
attribute - Source attribute:
user.objectid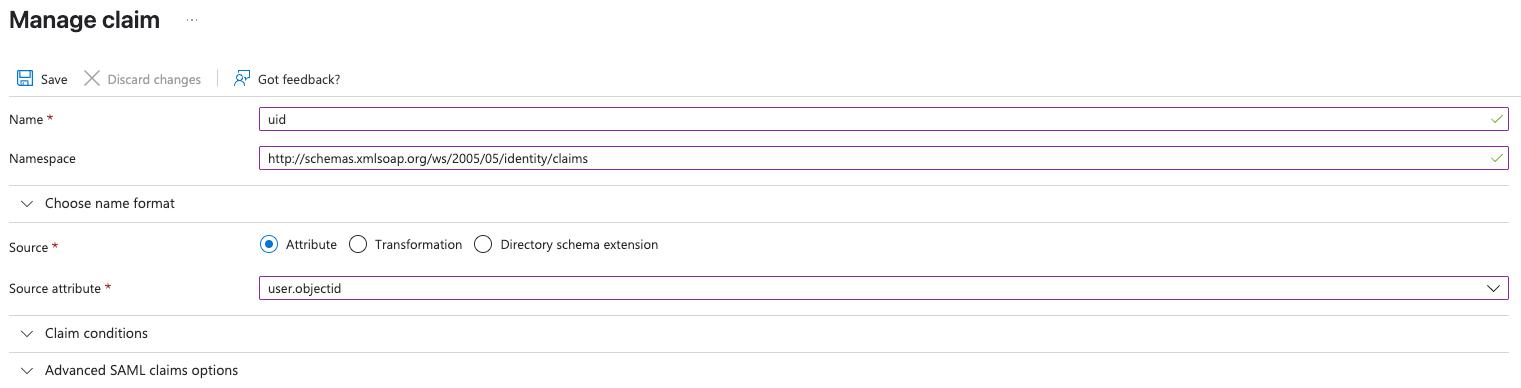
- Name:
Note
More information on how to configure an application on Azure platform can be found here.Step 3: Assign users and groups
At this point, no users or groups have been assigned to the application. To grant access:
- Navigate to the
Users and groupssection of the application. - Click the
+ Add user/groupbutton. - Select the users or groups you want to assign.
- Confirm selection.
The selected users or groups will now appear in the assignment list.
That’s it, now we can move on to the configuration in CVAT.
Step 4: Configure CVAT
Utilize the example below as a template for your configuration:
sso:
  enabled: true
  selection_mode: email_address
  identity_providers:
    - id: <idp-id:azure-saml>
      protocol: SAML
      name: Azure SAML-based IdP
      entity_id: <Microsoft Entra Identifier> (https://sts.windows.net/<tenantId>/)
      metadata_url: <App Federation Metadata Url>

      attribute_mapping:
        uid: http://schemas.xmlsoap.org/ws/2005/05/identity/claims/uid
        username: http://schemas.xmlsoap.org/ws/2005/05/identity/claims/nameidentifier
        email: http://schemas.xmlsoap.org/ws/2005/05/identity/claims/emailaddress
        first_name: http://schemas.xmlsoap.org/ws/2005/05/identity/claims/givenname
        last_name: http://schemas.xmlsoap.org/ws/2005/05/identity/claims/surname
        # email_verified: it is not possible to configure SAML-based application to send this claim to the SP

      email_domain: <company_email_domain>
Tip
Actual Microsoft Entra Identifier and App Federation Metadata Url values may be found
on the Single sign-on tab of the created application

You can now proceed to start CVAT. For additional CVAT configuration details, refer to Configuring SSO in CVAT.
Okta
OpenID Connect
Follow these steps to configure an application on the Okta platform and integrate it with CVAT:
Step 1: Register an OIDC-based application
To start, log into your Okta admin dashboard. Once you’re in:
-
Navigate to the
Applicationssection in the menu on the left. -
Click on the
Create App integrationbutton. -
Select
OIDC - OpenID Connectas a sign-in method andWeb Applicationtype.
-
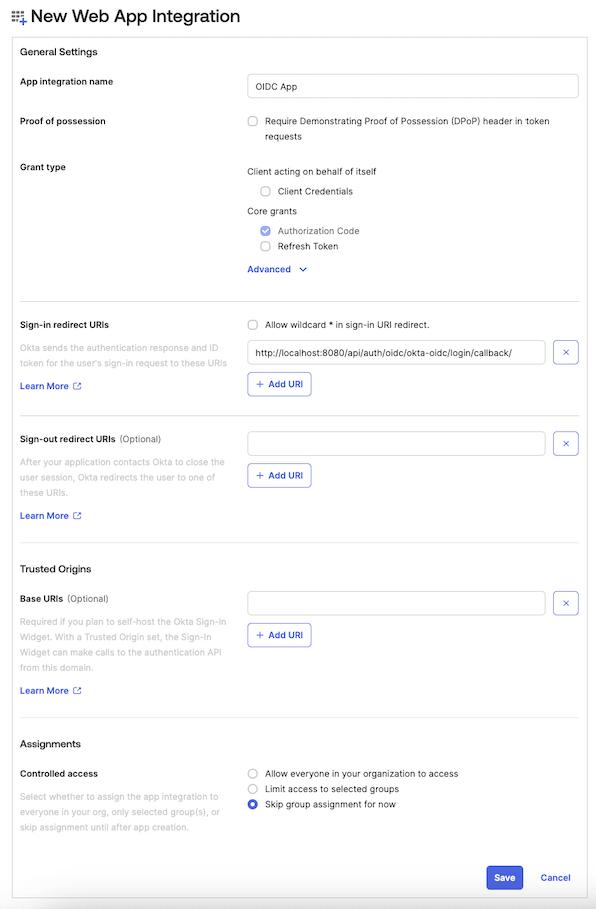
Fill the form with the following content:
App integration name: enter a name for the applicationSign-in redirect URIs:<scheme:cvat_domain>/api/auth/oidc/<idp-id:okta-oidc>/login/callback/- Select option in the
Controlled accessto match your requirements. In this example, we’ll useSkip group assignment for now.
Note
More information on how to configure an OIDC-based application on the Okta platform can be found here.You’ve created and configured the app, now you should assign users or groups to the application.
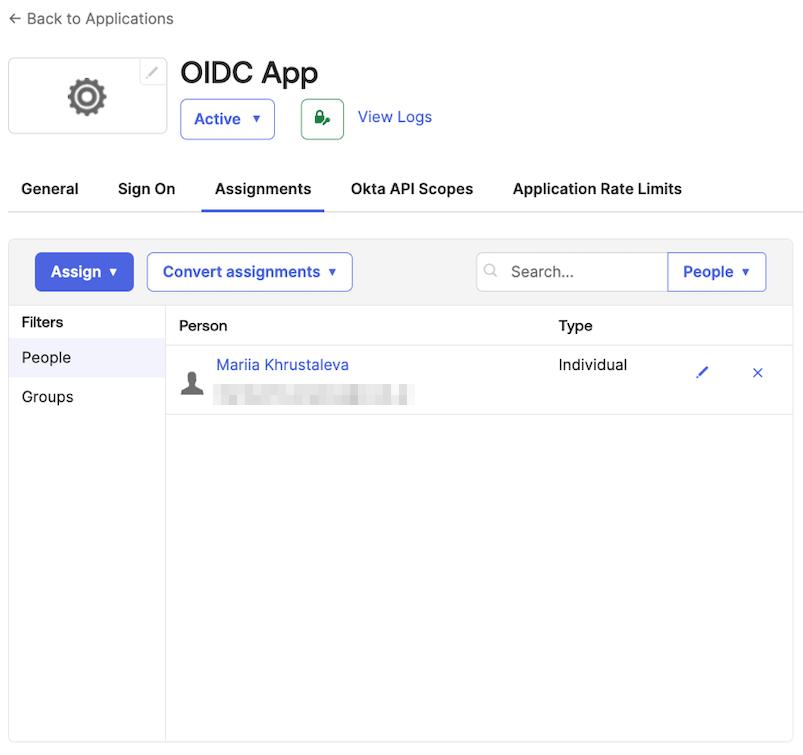
Step 2: Assign users or groups
At this point, no users or groups have been assigned to the application. To grant access:
- Navigate to the
Assignmentstab of the application. - Click the
Assignbutton and selectAssign to PeopleorAssign to Groupsbased on your needs. - Identify the users or groups you want to assign, then click
assign.
The selected users or groups will now appear in the assignment list.
Step 3: Configure CVAT
Utilize the example below as a template for your configuration:
sso:
  enabled: true
  selection_mode: email_address
  identity_providers:
    - id: <idp-id:okta-oidc>
      protocol: OIDC
      name: Okta OIDC-based IdP
      server_url: https://<okta_domain>/
      client_id: <client_id>
      client_secret: <client_secret>
      email_domain: <company_email_domain>
Tip
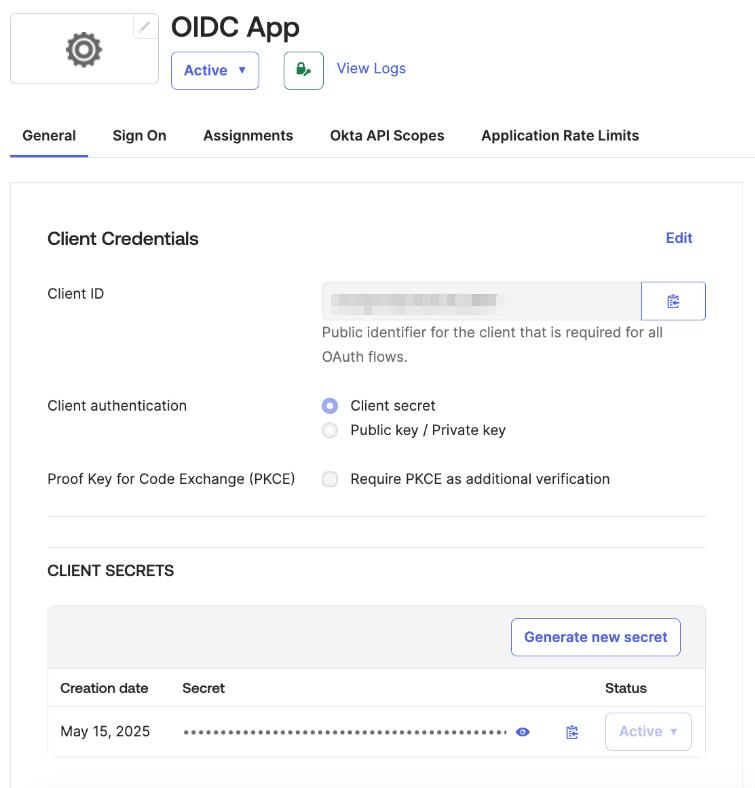
ActualClient ID and Client secret key values may be found on the General tab of the created application
You can now proceed to start CVAT. For additional CVAT configuration details, refer to Configuring SSO in CVAT.
SAML
Follow these steps to configure an application on the Okta platform and integrate it with CVAT:
Step 1: Register an SAML-based application
To start, log into your Okta admin dashboard. Once you’re in:
-
Navigate to the
Applicationssection in the menu on the left. -
Click on the
Create App integrationbutton. -
Select
SAML 2.0as a sign-in method, then clickNext.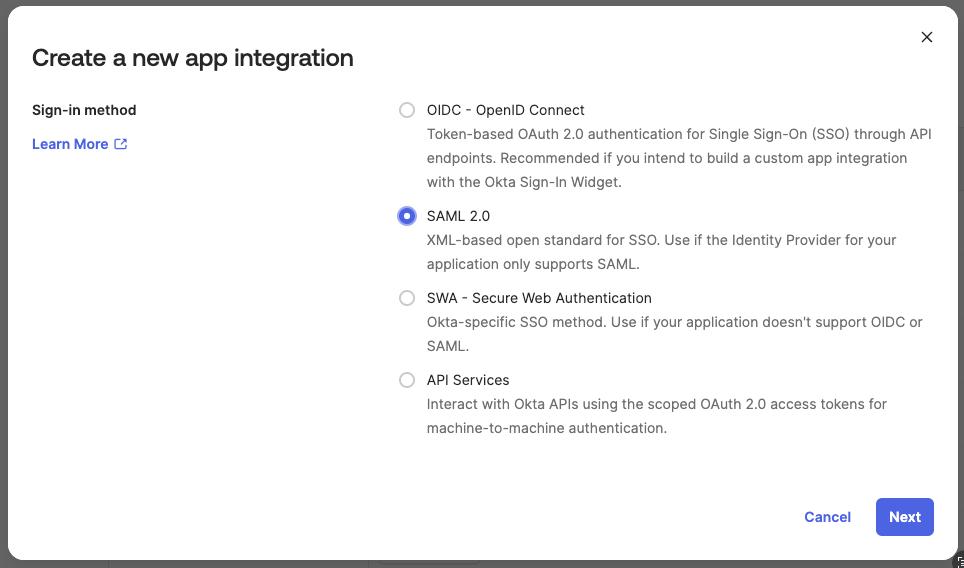
-
Fill the form with the general settings and go to the next configuration step.
-
On the
Configure SAMLform set the following fields:Single sign-on URL:<scheme:cvat_domain>/api/auth/saml/<idp-id:okta-saml>/acs/Audience URI (SP Entity ID:<scheme:cvat_domain>/api/auth/saml/<idp-id:okta-saml>/metadata/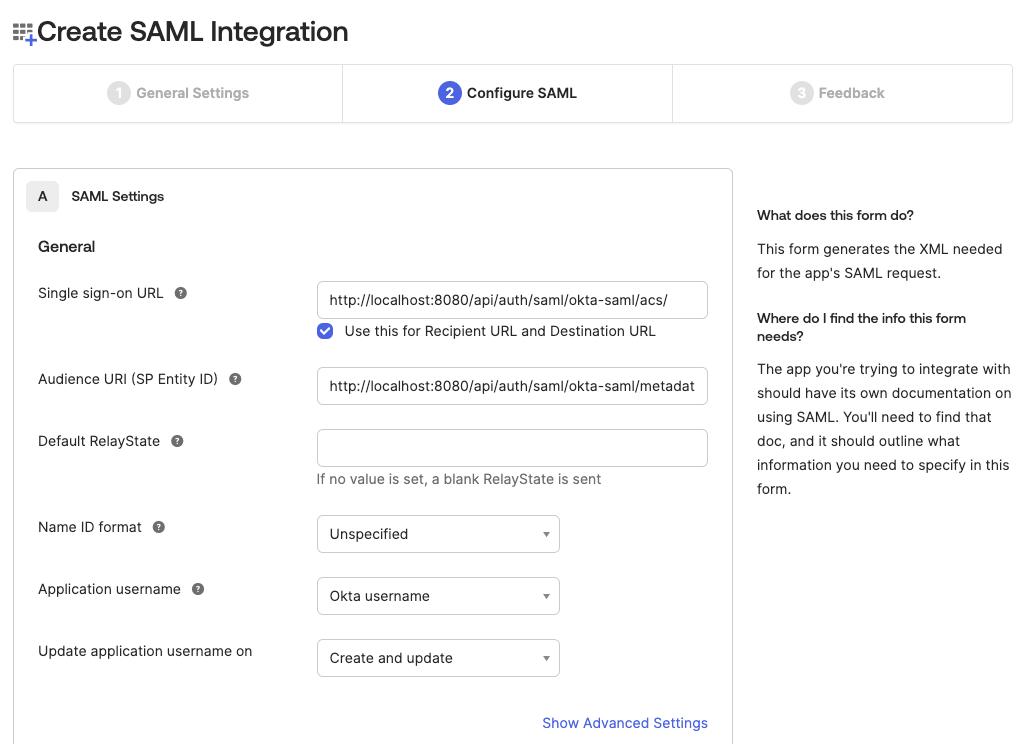
-
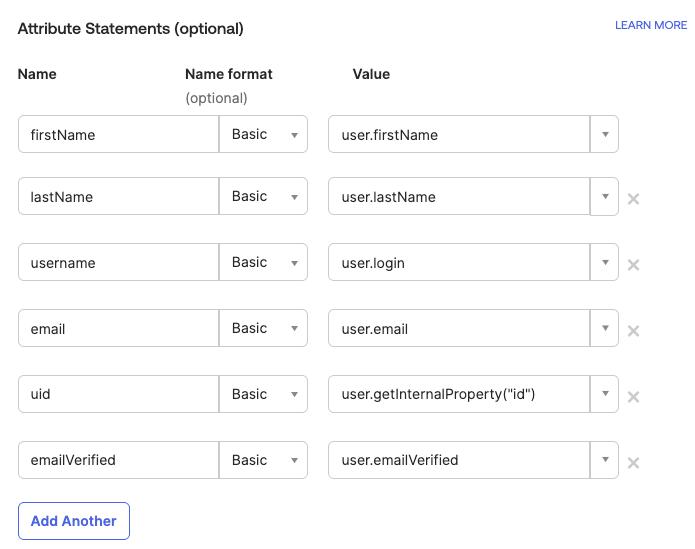
Define attribute statements that will be shared with CVAT. In our example we will use the
Basicattribute name format and set the mapping as shown below:firstName:user.firstNamelastName:user.lastNameusername:user.loginemail:user.emailuid:user.getInternalProperty("id")
Tip
If attribute mapping needs to be adapted, follow the official documentation on how to configureAttribute Statements -
Navigate to the next configuration step and fill the
Feedbackform.
You’ve created and configured the app. You can now either complete an optional step to simplify the login process in CVAT or proceed directly to the CVAT configuration step.
Step 2: Simplify login process
If CVAT is configured to require email verification,
it expects the Identity Provider to include the email_verified claim. However, Okta does not send this claim
by default. As a result, users will receive a confirmation email with a verification link.
There is an option to include email verification claim on the sign-in step:
- Add one more mapping
emailVerified->user.emailVerifiedon SAML-based application configuration step:- Navigate to the
SAML Settingson theGeneraltab and clickEdit. - Add one more attribute mapping as it was described in the app configuration step.
- Navigate to the
- Add custom user attribute
emailVerified:- Navigate to the
Directorysection in the menu on the left ->Profile Editoritem - Select the default user profile from the list (
User (default)) - Click
+ Add Attribute - Fill out the form with your desired values, making sure to select the
booleandata type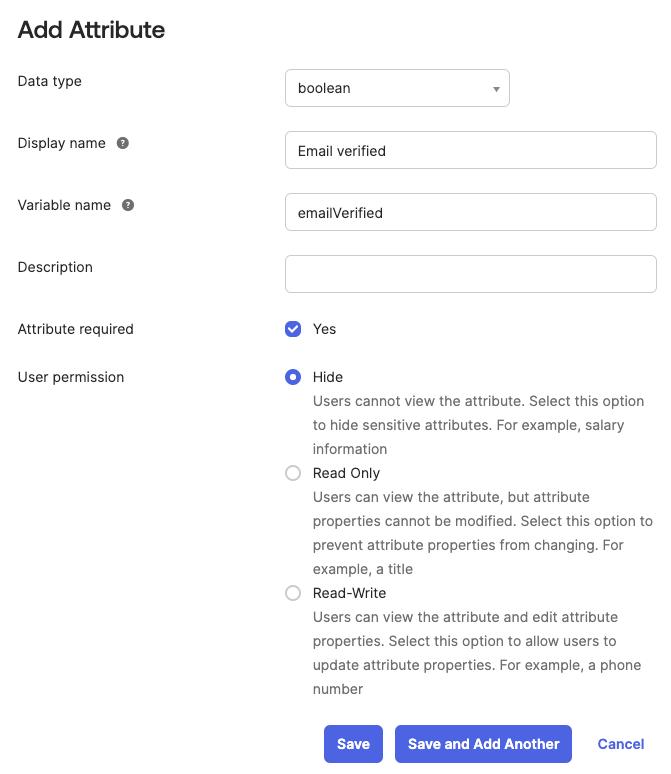
- Click
Save
- Navigate to the
- Update user profiles:
- Navigate to the
Peoplesection in the menu on the left - Set the value for the recently created attribute for each person
- Navigate to the
Step 3: Configure CVAT
Utilize the example below as a template for your configuration:
sso:
  enabled: true
  selection_mode: email_address
  identity_providers:
    - id: <idp-id:okta-saml>
      protocol: SAML
      name: Okta SAML-based Identity Provider
      entity_id: <Issuer>
      metadata_url: <Metadata URL>

      attribute_mapping:
        uid: uid
        username: username
        email: email
        first_name: firstName
        last_name: lastName
        email_verified: emailVerified # if configured

      email_domain: <company_email_domain>
Tip
Metadata URL and Issuer values may be found on the Sign On tab of the application setting

You can now proceed to start CVAT. For additional CVAT configuration details, refer to Configuring SSO in CVAT.
Auth0
OpenID Connect
Follow these steps to configure an application in the Auth0 platform and integrate it with CVAT:
Step 1: Register an OIDC-based application
To start, log into your Auth0 dashboard. Once you’re in:
- Navigate to the
Applicationssection in the menu on the left, click+ Create Application. - Enter a name for the application and choose the
Regular Web Applicationstype, then clickCreate.
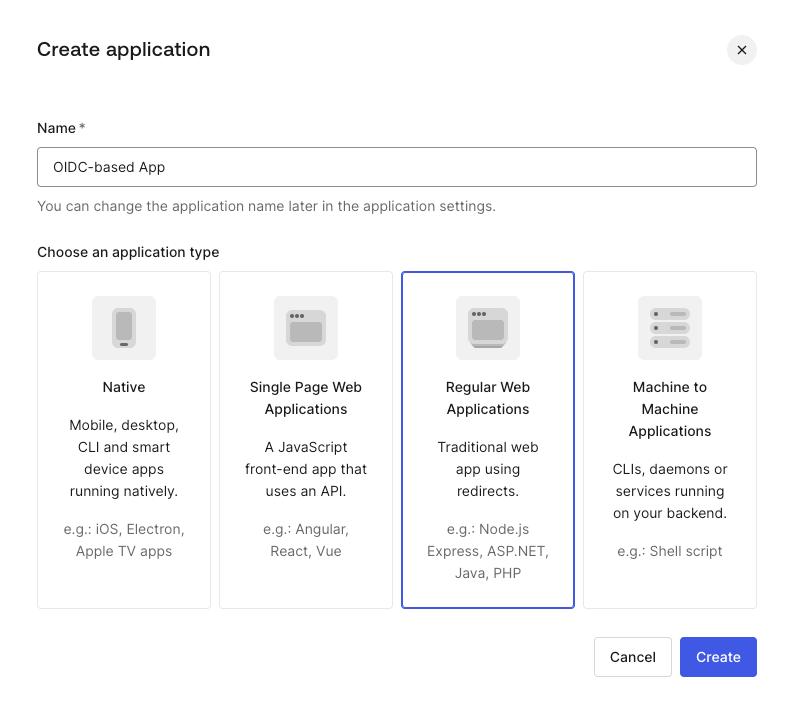
You’ve created an app, now you should finalize its configuration.
Step 2: Configure a created application
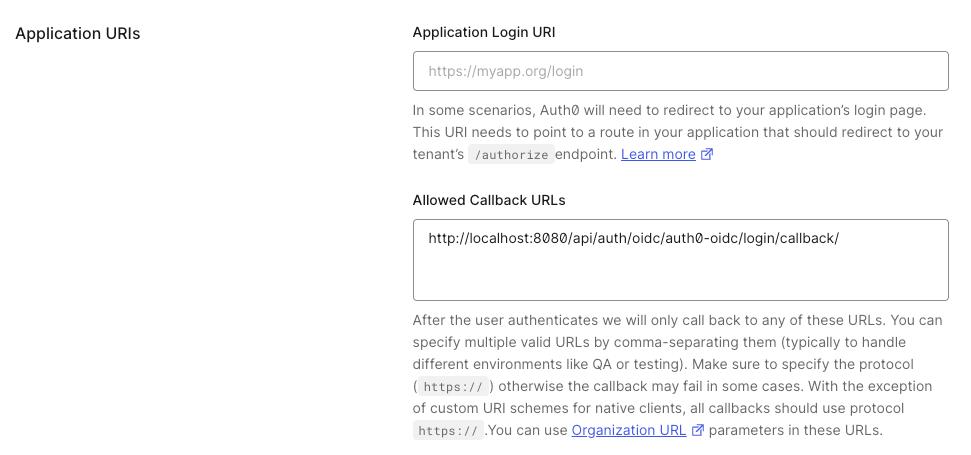
- In the
Settingstab of your new application, scroll down to theApplication URIssection. - Add
<scheme:cvat_domain>/api/auth/oidc/<idp-id:auth0-oidc>/login/callback/to theAllowed Callback URLs. - Save changes.
That’s it, now we can move on to the configuration in CVAT.
Step 3: Configure CVAT
Utilize the example below as a template for your configuration:
sso:
  enabled: true
  selection_mode: email_address
  identity_providers:
    - id: <idp-id:auth0-oidc>
      protocol: OIDC
      name: Auth0 OIDC-based IdP
      server_url: https://<auth0_domain>/
      client_id: <client_id>
      client_secret: <client_secret>
      email_domain: <company_email_domain>
Tip
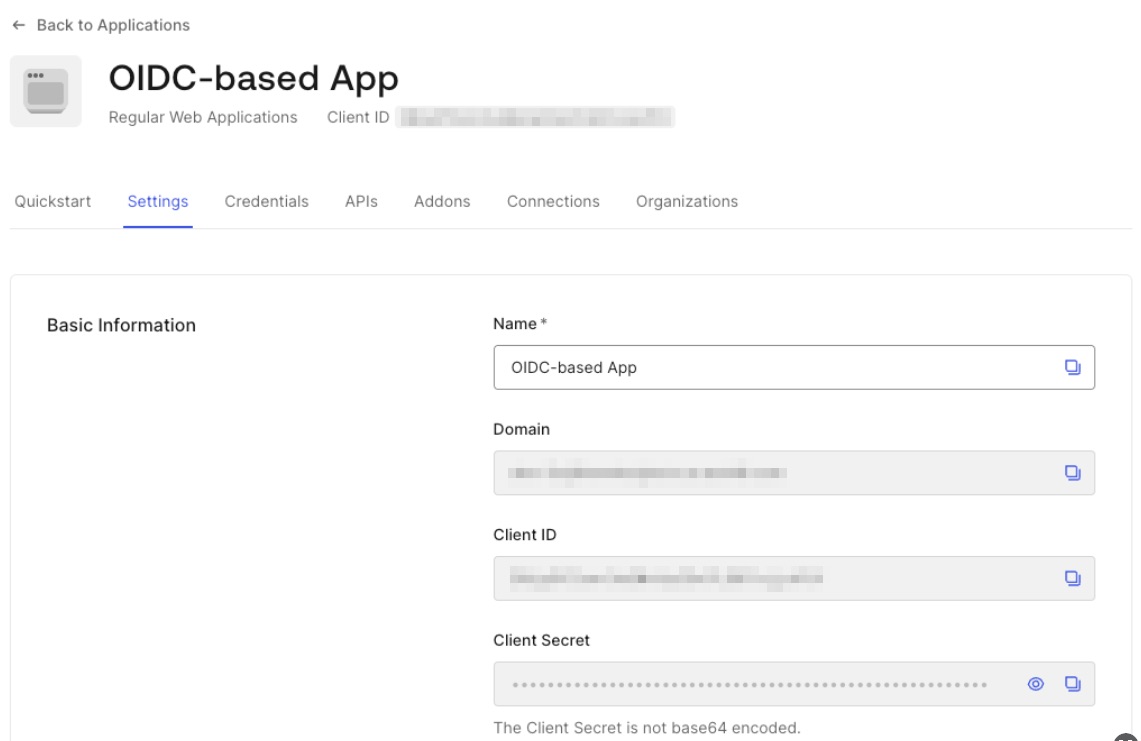
Client ID, Client Secret and Domain can be found in the Basic Information section of application settings
You can now proceed to start CVAT. For additional CVAT configuration details, refer to Configuring SSO in CVAT.
SAML
Follow these steps to configure an application in the Auth0 platform and integrate it with CVAT:
Step 1: Register an SAML-based application
To start, log into your Auth0 dashboard. Once you’re in:
- Navigate to the
Applicationssection in the menu on the left, click+ Create Application. - Enter a name for the application and choose the
Regular Web Applicationstype, then clickCreate.

You’ve created an app, now you should finalize its configuration.
Step 2: Configure a created application
-
Navigate to the
Addonstab of the created application and click on theSAML2 WEB APPbutton.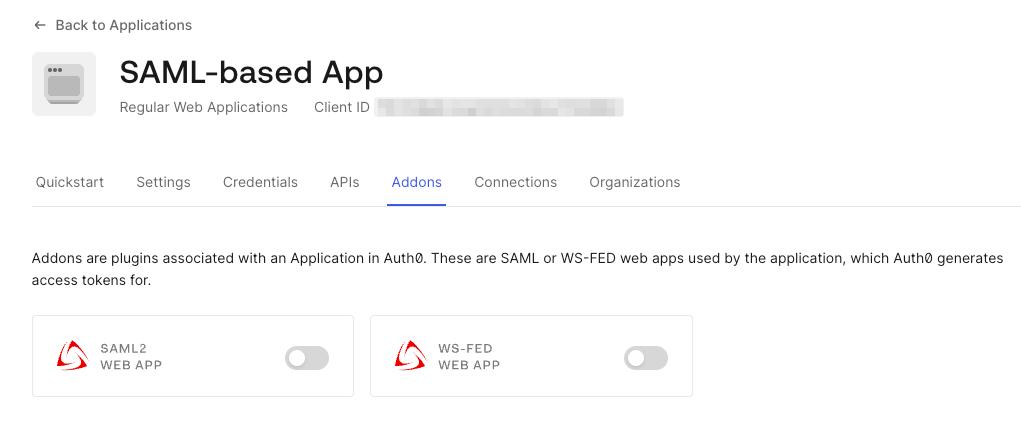
-
Open the
Settingstab in the popup window and set the following configuration: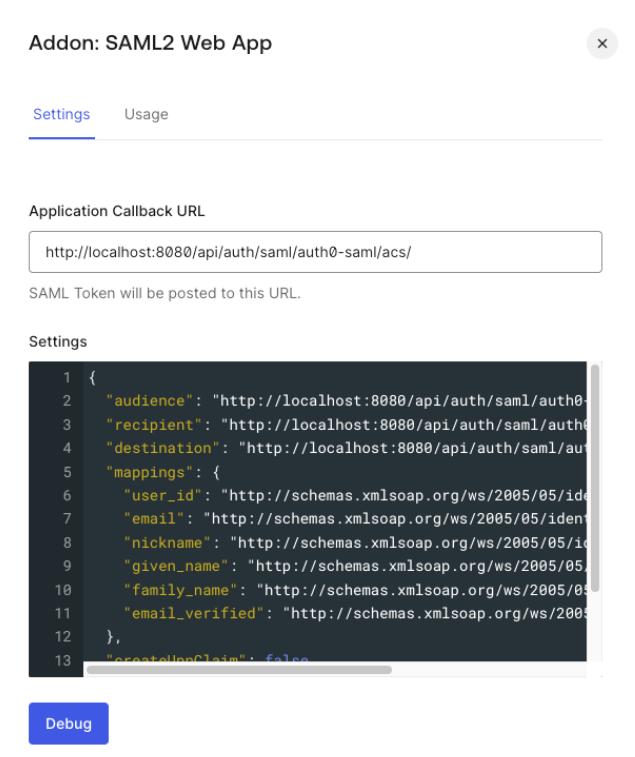
Application Callback URL:<scheme:cvat_domain>/api/auth/saml/<idp-id:auth0-saml>/acs/Settings: enter a JSON object like the following:
{ "audience": "<scheme:cvat_domain>/api/auth/saml/<idp-id:auth0-saml>/metadata/", "recipient": "<scheme:cvat_domain>/api/auth/saml/<idp-id:auth0-saml>/acs/", "destination": "<scheme:cvat_domain>/api/auth/saml/<idp-id:auth0-saml>/acs/", "mappings": { "user_id": "http://schemas.xmlsoap.org/ws/2005/05/identity/claims/nameidentifier", "email": "http://schemas.xmlsoap.org/ws/2005/05/identity/claims/emailaddress", "nickname": "http://schemas.xmlsoap.org/ws/2005/05/identity/claims/username", "given_name": "http://schemas.xmlsoap.org/ws/2005/05/identity/claims/givenname", "family_name": "http://schemas.xmlsoap.org/ws/2005/05/identity/claims/surname", "email_verified": "http://schemas.xmlsoap.org/ws/2005/05/identity/claims/emailverified" }, "createUpnClaim": false, "passthroughClaimsWithNoMapping": false, "mapIdentities": false } -
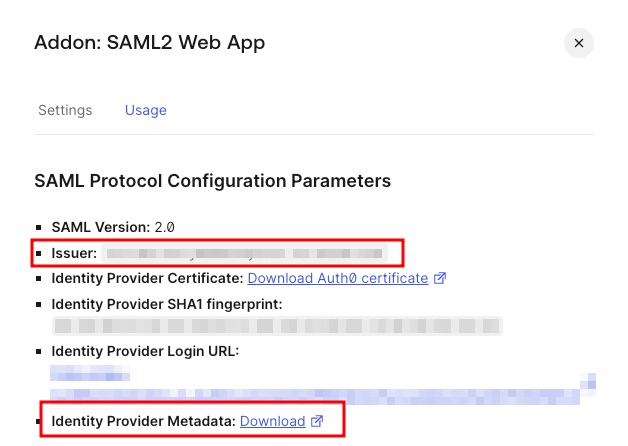
Scroll down and click
Enable.
Note
More information on how to configure an application on Auth0 platform can be found here.That’s it, now we can move on to the configuration in CVAT.
Step 3: Configure CVAT
Utilize the example below as a template for your configuration:
sso:
  enabled: true
  selection_mode: email_address
  identity_providers:
    - id: <idp-id:auth0-saml>
      protocol: SAML
      name: Auth0 SAML-based IdP
      entity_id: <Issuer>
      metadata_url: <Metadata URL>

      attribute_mapping:
        uid: http://schemas.xmlsoap.org/ws/2005/05/identity/claims/nameidentifier
        username: http://schemas.xmlsoap.org/ws/2005/05/identity/claims/username
        email: http://schemas.xmlsoap.org/ws/2005/05/identity/claims/emailaddress
        first_name: http://schemas.xmlsoap.org/ws/2005/05/identity/claims/givenname
        last_name: http://schemas.xmlsoap.org/ws/2005/05/identity/claims/surname
        email_verified: http://schemas.xmlsoap.org/ws/2005/05/identity/claims/emailverified

      email_domain: <company_email_domain>
Tip
ActualMetadata URL and Issuer values may be found on the Usage tab of the SAML2 Web App plugin
You can now proceed to start CVAT. For additional CVAT configuration details, refer to Configuring SSO in CVAT.
Keycloak
To configure SSO in terms of Keycloak we need to create a client.
OpenID Connect
Follow these steps to do that:
Step 1: Register an OIDC-based client
To start, go to the Keycloak service (by default it is listening for HTTP and HTTPS requests using the ports 8080 and 8443, respectively) and log into your admin account. Once you’re in:
- Under the desired
realmnavigate to theClientssection and clickcreate client. - Fill out the general client settings:

Client type: OpenID ConnectClient ID: enter client identifier- Enter a name for the client, e.g. OIDC-based client
- In the next step, enable the
Client authenticationtoggle.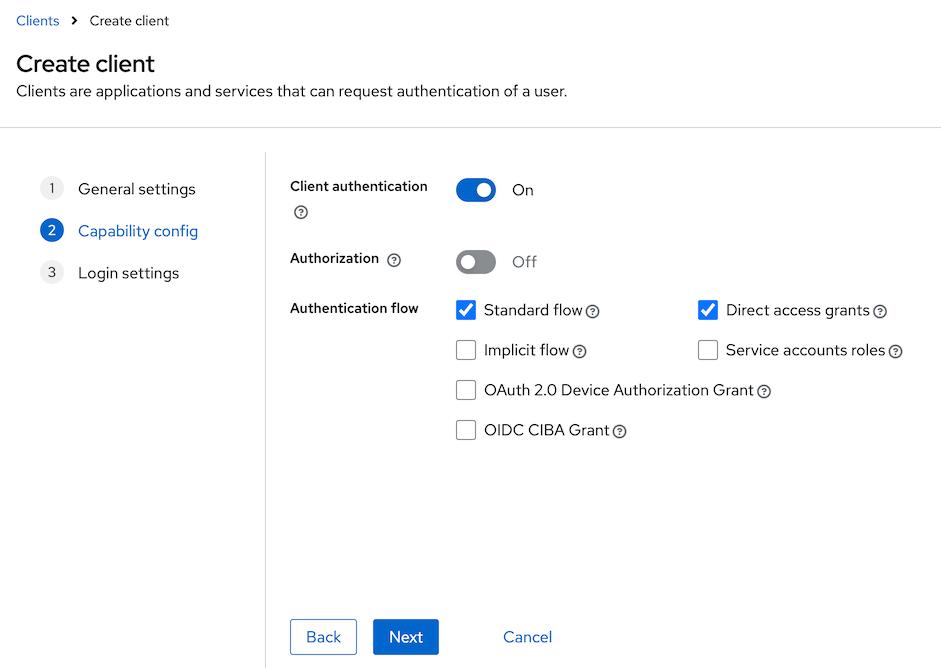
- In the
Login settingssection, provide the following values: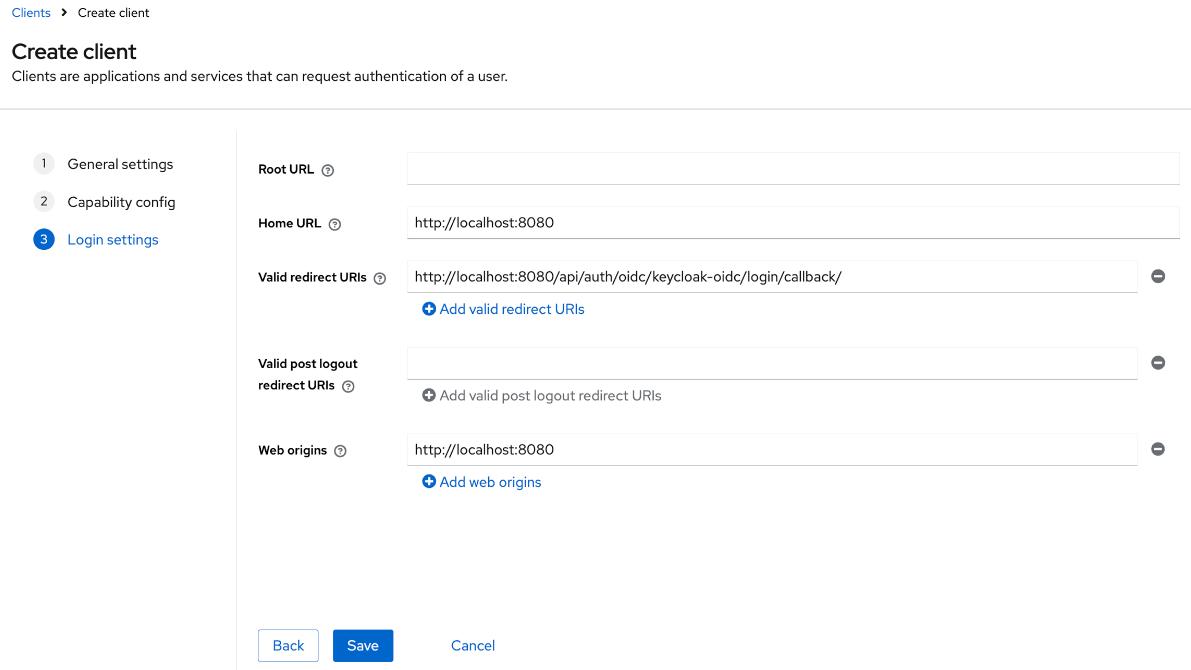
Home URL:<scheme:cvat_domain>Valid redirect URIs:<scheme:cvat_domain>/api/auth/oidc/<idp-id:keycloak-oidc>/login/callback/Web origins:<scheme:cvat_domain>
That’s it, now we can move on to the configuration in CVAT.
Step 2: Configure CVAT
Utilize the example below as a template for your configuration:
sso:
  enabled: true
  selection_mode: email_address
  identity_providers:
    - id: <idp-id:keycloak-oidc>
      protocol: OIDC
      name: Keycloak OIDC-based Identity Provider
      server_url: <scheme:keycloak_domain>/realms/<custom_realm>/.well-known/openid-configuration
      client_id: <Client ID>
      client_secret: <Client Secret>
      email_domain: <company_email_domain>
Tip
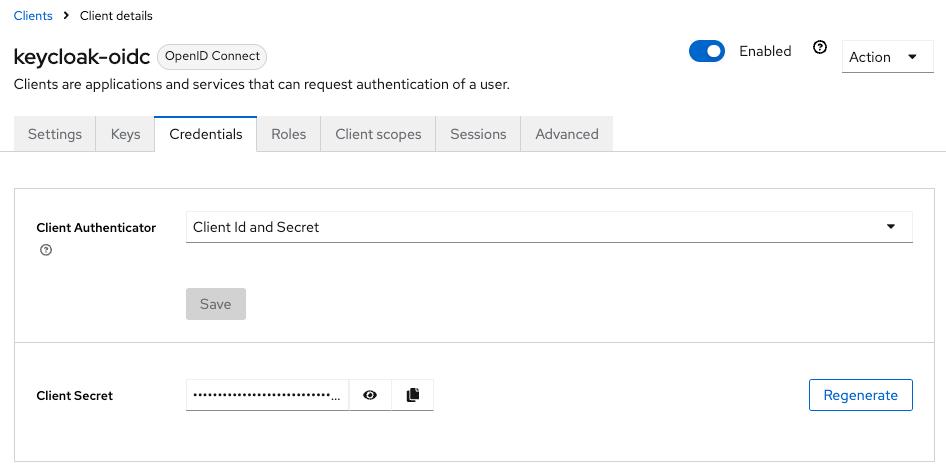
ActualClient Secret value can be found on the Credentials tab of the created OIDC client
You can now proceed to start CVAT. For additional CVAT configuration details, refer to Configuring SSO in CVAT.
SAML
Follow these steps to configure a client:
Step 1: Register a SAML-based client
To start, go to the Keycloak service (by default it is listening for HTTP and HTTPS requests using the ports 8080 and 8443, respectively) and log into your admin account. Once you’re in:
- Under the desired
realmnavigate to theClientssection and clickcreate client. - Fill out the general client settings:
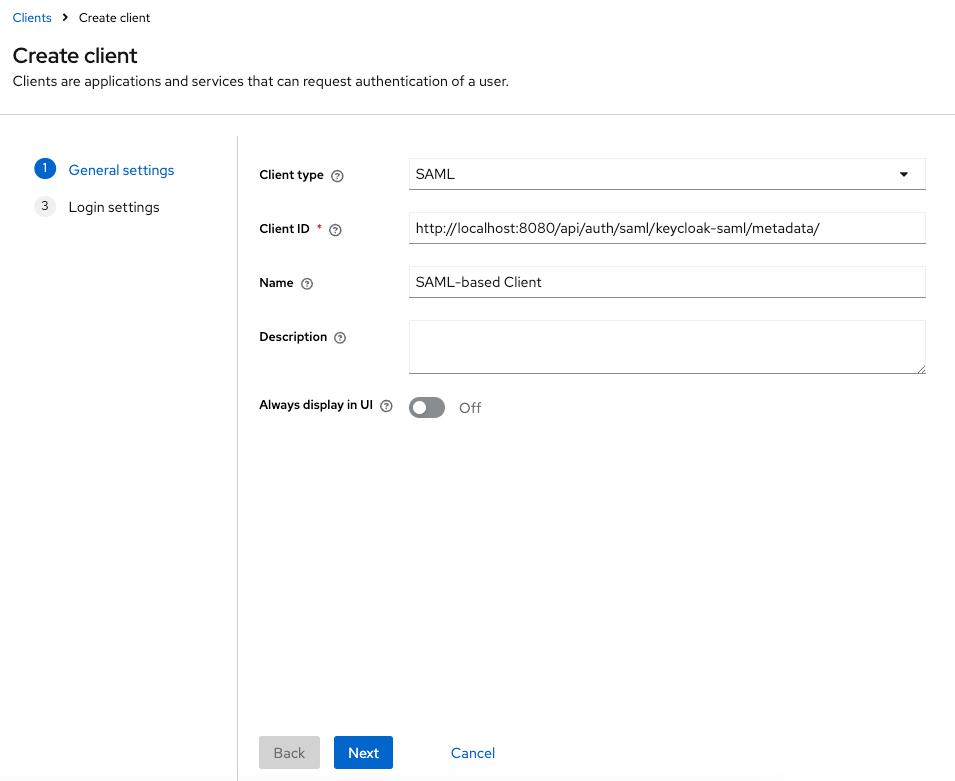
Client type: SAML- Set the
Clint IDthe URL:<scheme:cvat_domain>/api/auth/saml/<idp-id:keycloak-saml>/metadata/ - Enter a name for the client, e.g. SAML client
- In the
Login settingssection, provide the following values: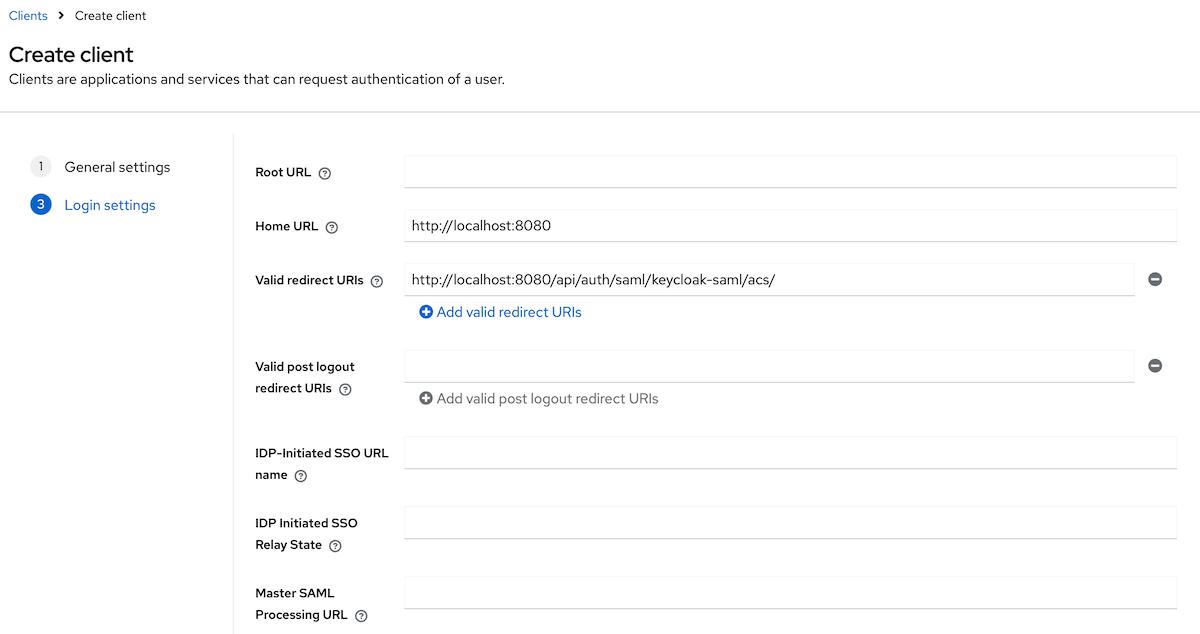
Home URL:<scheme:cvat_domain>Valid redirect URIs:<scheme:cvat_domain>/api/auth/saml/<idp-id:keycloak-saml>/acs/
You’ve created a client, now you should finalize its configuration.
Step 2: Configure a created client
- Navigate to the general settings of the created client, scroll down to the
SAML capabilitiessection. - Update the following parameters:
Name ID format: emailForce name ID format:On
- Navigate to the
Keystab and enable theClient signature requiredtoggle. - Configure attributes & claims:
-
Navigate to the
Client scopestab on the created client -> dedicated scopes for the client. You will see that there is no configured mappers.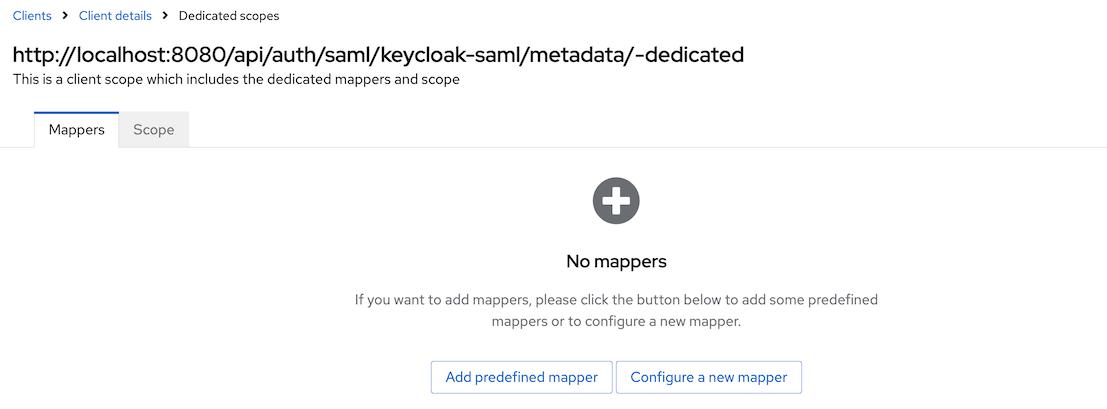
-
Set up mappers for the following attributes:
- uid
- first_name
- last_name
- username
For attributes like
email,first name, andlast name, you can either- Use the predefined mappers

- Or follow the manual configuration steps to create them yourself.
To configure other mappers click
Configure a new mapperif it is a first mapper orAdd mapper->By configurationand then selectUser Property.For instance, to configure a mapper for the
usernameattribute, fill in the form as it is done below:
Name: usernameProperty: usernameSAML Attribute Name: usernameAttribute
-
That’s it, now we can move on to the configuration in CVAT.
Step 3: Configure CVAT
Utilize the example below as a template for your configuration:
sso:
  enabled: true
  selection_mode: email_address
  identity_providers:
    - id: <idp-id:keycloak-saml>
      protocol: SAML
      name: Keycloak SAML-based Identity Provider
      entity_id: <scheme:keycloak_domain>/realms/<custom_realm>
      metadata_url: <scheme:keycloak_domain>/realms/<custom_realm>/protocol/saml/descriptor

      attribute_mapping:
        uid: uidAttribute
        email_verified: emailVerifiedAttribute
        email: emailAttribute
        last_name: lastNameAttribute
        first_name: firstNameAttribute
        username: usernameAttribute

      email_domain: <company_email_domain>
Tip
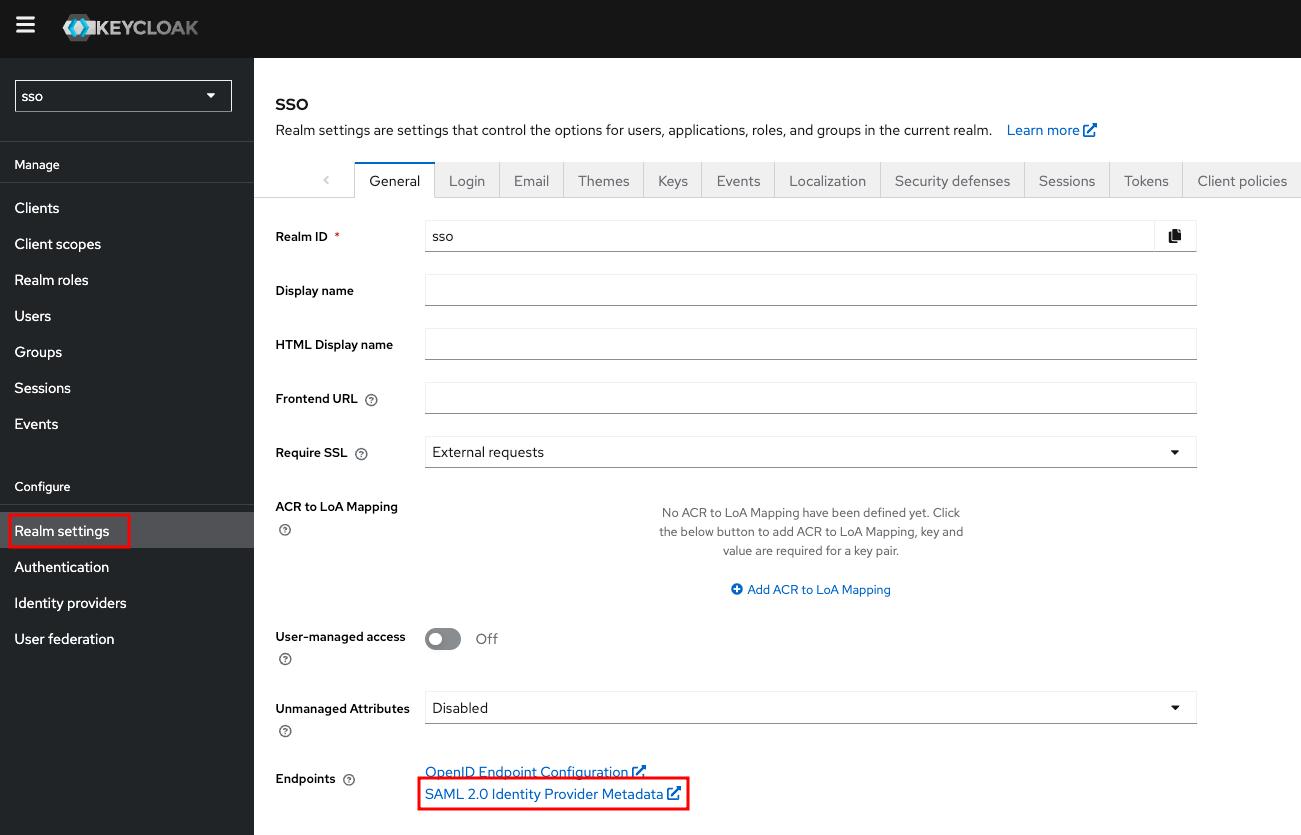
ActualMetadata URL may be found in the Realm settings on the General tab
You can now proceed to start CVAT. For additional CVAT configuration details, refer to Configuring SSO in CVAT.
Configuring SSO in CVAT
CVAT provides a dedicated configuration file to customize the login and registration flow.
The sso section of this file specifies which external Identity Provider (IdP)
integrations are enabled. To set up SSO, you typically create a custom YAML configuration file
(e.g., auth_config.yml) and supply its path when starting CVAT.
SSO settings
| Setting | Description |
|---|---|
enabled |
Enables or disables Single Sign-On (SSO) functionality. |
selection_mode |
Defines how the Identity Provider (IdP) is selected for authenticating a given user. Available modes:
|
enable_pkce |
Controls whether Proof Key for Code Exchange (PKCE) is enabled for the authentication flow (disabled by default). This setting applies to all configured OIDC-based Identity Providers |
---
sso:
  enabled: true|false
  selection_mode: email_address|lowest_weight
  enable_pkce: true|false
  ...
IdP Configuration Structure
To integrate an Identity Provider, you must define its configuration block under the identity_providers section
in the CVAT config file. Each provider’s configuration includes both general and protocol-specific settings.
| Setting | Required | Description |
|---|---|---|
id |
required | A unique, URL-safe identifier for the IdP. Used in callback URLs. |
name |
required | A human-readable name for the IdP. |
protocol |
required | Authentication protocol (OIDC/SAML). |
email_domain |
optional | Company email domain (used with email_address selection mode). |
weight |
optional | Determines priority (used with lowest_weight selection mode). The default is 10. |
Additionally, each IdP configuration must include several protocol-specific parameters:
-
client_idandclient_secret(required): These values can be obtained from the configuration page of the specific provider. -
server_url(required): URL is used to obtain IdP OpenID Configuration Metadata.NOTE: How to check
server_urlcorrectness: server_url +/.well-known/openid-configurationAPI should exist and return OpenID Provider Metadata. Generally, each authentication platform provides a list of all endpoints. You need to find the corresponding endpoint and select the part in front of/.well-known/openid-configuration. For example, in the case of integrating an OIDC Microsoft Entry ID application, don’t forget to specify the second version of API (https://login.microsoftonline.com/<tenant_id>/v2.0). -
token_auth_method(optional): Token endpoint authentication method which can be one ofclient_secret_basic,client_secret_post. If this field is omitted, a method from the server’s token auth methods list will be used.
entity_id(required): IdP entity ID, should be equal to the corresponding setting in the IdP configuration.metadata_url(optional): SAML metadata URL. This can typically be found on the IdP configuration page.x509_cert(optional): The SAML X.509 certificate. Also could be found in the IdP’s configuration. If themetadata_urlis not specified, this parameter becomes required.sso_url(optional): SAML endpoint for the Single Sign-On service. Also could be found in the IdP’s configuration. If themetadata_urlis not specified, this parameter becomes required.attribute_mapping(required): A mapping between user account attributes and attributes sent by the Identity Provider.
Below are examples of SSO configuration file for both protocols:
---
sso:
  enabled: true
  selection_mode: email_address
  identity_providers:
    - id: oidc-idp
      protocol: OIDC
      name: OIDC-based IdP
      server_url: https://example.com
      client_id: xxx
      client_secret: xxx
      email_domain: example.com
 ---
 sso:
   enabled: true
   selection_mode: lowest_weight
   identity_providers:
     - id: saml-idp
       protocol: SAML
       name: SAML-based IdP
       entity_id: <idp-entity-id>
       weight: 1
       # specify only metadata_url or sso_url and x509_cert
       metadata_url: http://example.com/path/to/saml/metadata/
       sso_url: <Login URL>
       x509_cert: |
         -----BEGIN CERTIFICATE-----
         certificate content
         -----END CERTIFICATE-----

       attribute_mapping:
         uid: uidAttribute
         email_verified: emailVerifiedAttribute
         email: emailAttribute
         last_name: lastNameAttribute
         first_name: firstNameAttribute
         username: usernameAttribute
More information about OIDC-based and SAML-based IdP configuration expected by Django Allauth can be found here and here respectively.
Start CVAT
Restart required
If CVAT is already running, don’t forget to restart the containers to apply the SSO configurationOnce the configuration file is created, several environment variables must be exported before running CVAT:
export AUTH_CONFIG_PATH="<path_to_auth_config>"
export CVAT_HOST="<cvat_host>"
# cvat_port is optional
export CVAT_BASE_URL="<http|https>://${CVAT_HOST}:<cvat_port>"
Start the CVAT Enterprise instance as usual.
That’s it! The CVAT login page now should have the Continue with SSO option,
allowing users to authenticate using the configured Identity Provider.
