This is the multi-page printable view of this section. Click here to print.
CVAT Documentation
Everything you need to know about CVAT, from basic data annotation tips to advanced and AI-assisted labeling guides.
- 1: Getting Started
- 1.1: CVAT Overview
- 1.2: Vocabulary
- 1.3: Shortcuts
- 2: Products
- 2.1: CVAT Online
- 2.2: CVAT Enterprise
- 2.3: CVAT Community
- 3: Workspace
- 3.1: Projects
- 3.2: Tasks
- 3.3: Jobs
- 3.4: Cloud storages
- 3.5: Attach cloud storage
- 3.6: Requests
- 3.7: Models
- 3.8: Bulk actions
- 3.9: Search
- 4: Account Management
- 4.1: Registration & account access
- 4.2: User roles
- 4.3: Organization
- 4.4: Subscription management
- 4.5: SSO configuration
- 4.6: Social auth configuration
- 4.7: Disable registration or password-based login
- 5: Dataset Management
- 5.1: Dataset formats
- 5.1.1: CVAT for image
- 5.1.2: Datumaro
- 5.1.3: LabelMe
- 5.1.4: MOT
- 5.1.5: MOTS
- 5.1.6: COCO
- 5.1.7: COCO Keypoints
- 5.1.8: Pascal VOC
- 5.1.9: Segmentation Mask
- 5.1.10: Ultralytics YOLO
- 5.1.11: Ultralytics-YOLO-Classification
- 5.1.12: YOLO
- 5.1.13: ImageNet
- 5.1.14: Wider Face
- 5.1.15: CamVid
- 5.1.16: VGGFace2
- 5.1.17: Market-1501
- 5.1.18: ICDAR13/15
- 5.1.19: Open Images
- 5.1.20: Cityscapes
- 5.1.21: KITTI
- 5.1.22: LFW
- 5.2: Import annotations and data to CVAT
- 5.3: Export annotations and data from CVAT
- 5.4: Backup Task and Project
- 5.5: Dataset Manifest
- 5.6: Data preparation on the fly
- 6: Annotation
- 6.1: Editor
- 6.1.1: Menu and Navigation Bar
- 6.1.2: Workspace
- 6.1.3: Objects sidebar
- 6.1.4: Controls sidebar
- 6.1.5: Settings
- 6.1.6: 3D task workspace
- 6.2: Manual Annotation
- 6.2.1: Annotation modes
- 6.2.1.1: Single shape
- 6.2.1.2: Track mode
- 6.2.1.3: Attribute annotation mode
- 6.2.1.4: 3D object annotation
- 6.2.1.5: Annotation with tags
- 6.2.2: Annotation with shapes
- 6.2.2.1: Annotation with rectangles
- 6.2.2.2: Shape mode
- 6.2.2.3: Annotation with polygons
- 6.2.2.3.1: Manual drawing
- 6.2.2.3.2: Drawing using automatic borders
- 6.2.2.3.3: Edit polygon
- 6.2.2.3.4: Track mode with polygons
- 6.2.2.3.5: Creating masks
- 6.2.2.4: Annotation with polylines
- 6.2.2.5: Track mode
- 6.2.2.6: Annotation with points
- 6.2.2.6.1: Points in shape mode
- 6.2.2.6.2: Linear interpolation with one point
- 6.2.2.7: Annotation with ellipses
- 6.2.2.8: Annotation with cuboids
- 6.2.2.8.1: Creating the cuboid
- 6.2.2.8.2: Editing the cuboid
- 6.2.2.9: Annotation with skeletons
- 6.2.2.10: Annotation with brush tool
- 6.2.2.11: Types of shapes
- 6.2.2.12: Shape grouping
- 6.2.3: Editing & Utility Tools
- 6.2.3.1: Join and slice tools
- 6.2.3.2: Shapes converter
- 6.2.3.3: Contextual images
- 6.2.3.4: Filter
- 6.3: Specification for annotators
- 6.4: Automated Annotation
- 6.4.1: Overview
- 6.4.2: Segment Anything 2 Tracker
- 6.4.3: AI Tools
- 7: Guides
- 8: QA & Analytics
- 8.1: Quality control
- 8.2: Manual QA and Review
- 8.3: Automated QA, Review & Honeypots
- 8.4: Consensus-based annotation
- 8.5: Immediate job feedback
- 8.6: Analytics
- 9: Integrations
- 9.1: FiftyOne
- 9.2: CVAT and Human Protocol
- 10: System Administration
- 10.1: Community Deployment
- 10.1.1: Basics
- 10.1.1.1: Installation Guide
- 10.1.1.2: Superuser registration
- 10.1.1.3: AWS-Deployment Guide
- 10.1.2: Advanced
- 10.1.2.1: CVAT Architecture
- 10.1.2.2: CVAT deployment on Kubernetes with Helm
- 10.1.2.3: Semi-automatic and Automatic Annotation
- 10.1.2.4: CVAT Analytics and monitoring
- 10.1.2.5: Mounting cloud storage
- 10.1.2.6: LDAP Backed Authentication
- 10.1.2.7: Backup guide
- 10.1.2.8: Upgrade guide
- 10.1.2.9: Webhooks
- 10.1.2.10: Custom Certificates
- 10.2: Enterprise Deployment
- 10.2.1: Deployment with Docker Compose
- 10.2.2: Deployment on Kubernetes
- 11: Developer Documentation
- 11.1: Server API
- 11.2: CVAT Python SDK
- 11.2.1: SDK API Reference
- 11.2.1.1: APIs
- 11.2.1.1.1: AssetsApi class reference
- 11.2.1.1.2: AuthApi class reference
- 11.2.1.1.3: CloudstoragesApi class reference
- 11.2.1.1.4: CommentsApi class reference
- 11.2.1.1.5: ConsensusApi class reference
- 11.2.1.1.6: EventsApi class reference
- 11.2.1.1.7: GuidesApi class reference
- 11.2.1.1.8: InvitationsApi class reference
- 11.2.1.1.9: IssuesApi class reference
- 11.2.1.1.10: JobsApi class reference
- 11.2.1.1.11: LabelsApi class reference
- 11.2.1.1.12: LambdaApi class reference
- 11.2.1.1.13: MembershipsApi class reference
- 11.2.1.1.14: OrganizationsApi class reference
- 11.2.1.1.15: ProjectsApi class reference
- 11.2.1.1.16: QualityApi class reference
- 11.2.1.1.17: RequestsApi class reference
- 11.2.1.1.18: SchemaApi class reference
- 11.2.1.1.19: ServerApi class reference
- 11.2.1.1.20: TasksApi class reference
- 11.2.1.1.21: UsersApi class reference
- 11.2.1.1.22: WebhooksApi class reference
- 11.2.1.2: Models
- 11.2.1.2.1: About class reference
- 11.2.1.2.2: AcceptInvitationRead class reference
- 11.2.1.2.3: AccessTokenRead class reference
- 11.2.1.2.4: AccessTokenWriteRequest class reference
- 11.2.1.2.5: AnnotationConflict class reference
- 11.2.1.2.6: AnnotationConflictAnnotationType class reference
- 11.2.1.2.7: AnnotationConflictSeverity class reference
- 11.2.1.2.8: AnnotationConflictType class reference
- 11.2.1.2.9: AnnotationFileRequest class reference
- 11.2.1.2.10: AnnotationGuideRead class reference
- 11.2.1.2.11: AnnotationGuideWriteRequest class reference
- 11.2.1.2.12: AnnotationId class reference
- 11.2.1.2.13: AnnotationIdShapeType class reference
- 11.2.1.2.14: AssetRead class reference
- 11.2.1.2.15: Attribute class reference
- 11.2.1.2.16: AttributeRequest class reference
- 11.2.1.2.17: AttributeVal class reference
- 11.2.1.2.18: AttributeValRequest class reference
- 11.2.1.2.19: BasicOrganization class reference
- 11.2.1.2.20: BasicUser class reference
- 11.2.1.2.21: BasicUserRequest class reference
- 11.2.1.2.22: Chapter class reference
- 11.2.1.2.23: ChapterMetadata class reference
- 11.2.1.2.24: ChunkType class reference
- 11.2.1.2.25: ClientEvents class reference
- 11.2.1.2.26: ClientEventsRequest class reference
- 11.2.1.2.27: ClientEventsRequestPreviousEvent class reference
- 11.2.1.2.28: CloudStorageContent class reference
- 11.2.1.2.29: CloudStorageRead class reference
- 11.2.1.2.30: CloudStorageReadOwner class reference
- 11.2.1.2.31: CloudStorageWriteRequest class reference
- 11.2.1.2.32: CommentRead class reference
- 11.2.1.2.33: CommentsSummary class reference
- 11.2.1.2.34: CommentWriteRequest class reference
- 11.2.1.2.35: ConsensusMergeCreateRequest class reference
- 11.2.1.2.36: ConsensusSettings class reference
- 11.2.1.2.37: CredentialsTypeEnum class reference
- 11.2.1.2.38: DataMetaRead class reference
- 11.2.1.2.39: DataRequest class reference
- 11.2.1.2.40: DataRequestValidationParams class reference
- 11.2.1.2.41: DataResponse class reference
- 11.2.1.2.42: DatasetFileRequest class reference
- 11.2.1.2.43: DatasetFormat class reference
- 11.2.1.2.44: DatasetFormats class reference
- 11.2.1.2.45: Event class reference
- 11.2.1.2.46: EventRequest class reference
- 11.2.1.2.47: Events class reference
- 11.2.1.2.48: EventsEnum class reference
- 11.2.1.2.49: FileInfo class reference
- 11.2.1.2.50: FileInfoTypeEnum class reference
- 11.2.1.2.51: FrameMeta class reference
- 11.2.1.2.52: FrameSelectionMethod class reference
- 11.2.1.2.53: FunctionCall class reference
- 11.2.1.2.54: FunctionCallParams class reference
- 11.2.1.2.55: FunctionCallRequest class reference
- 11.2.1.2.56: InputTypeEnum class reference
- 11.2.1.2.57: InvitationRead class reference
- 11.2.1.2.58: InvitationWriteRequest class reference
- 11.2.1.2.59: IssueRead class reference
- 11.2.1.2.60: IssuesSummary class reference
- 11.2.1.2.61: IssueWriteRequest class reference
- 11.2.1.2.62: JobRead class reference
- 11.2.1.2.63: JobReadAssignee class reference
- 11.2.1.2.64: JobReadTargetStorage class reference
- 11.2.1.2.65: JobsSummary class reference
- 11.2.1.2.66: JobStage class reference
- 11.2.1.2.67: JobStatus class reference
- 11.2.1.2.68: JobType class reference
- 11.2.1.2.69: JobValidationLayoutRead class reference
- 11.2.1.2.70: JobWriteRequest class reference
- 11.2.1.2.71: Label class reference
- 11.2.1.2.72: LabeledData class reference
- 11.2.1.2.73: LabeledDataRequest class reference
- 11.2.1.2.74: LabeledImage class reference
- 11.2.1.2.75: LabeledImageRequest class reference
- 11.2.1.2.76: LabeledShape class reference
- 11.2.1.2.77: LabeledShapeRequest class reference
- 11.2.1.2.78: LabeledTrack class reference
- 11.2.1.2.79: LabeledTrackRequest class reference
- 11.2.1.2.80: LabelMappingEntryRequest class reference
- 11.2.1.2.81: LabelsSummary class reference
- 11.2.1.2.82: LabelType class reference
- 11.2.1.2.83: LocationEnum class reference
- 11.2.1.2.84: LoginSerializerExRequest class reference
- 11.2.1.2.85: MembershipRead class reference
- 11.2.1.2.86: MetaUser class reference
- 11.2.1.2.87: NullEnum class reference
- 11.2.1.2.88: OnlineFunctionCallRequest class reference
- 11.2.1.2.89: OperationStatus class reference
- 11.2.1.2.90: OrganizationRead class reference
- 11.2.1.2.91: OrganizationWriteRequest class reference
- 11.2.1.2.92: PaginatedAccessTokenReadList class reference
- 11.2.1.2.93: PaginatedAnnotationConflictList class reference
- 11.2.1.2.94: PaginatedCloudStorageReadList class reference
- 11.2.1.2.95: PaginatedCommentReadList class reference
- 11.2.1.2.96: PaginatedConsensusSettingsList class reference
- 11.2.1.2.97: PaginatedInvitationReadList class reference
- 11.2.1.2.98: PaginatedIssueReadList class reference
- 11.2.1.2.99: PaginatedJobReadList class reference
- 11.2.1.2.100: PaginatedLabelList class reference
- 11.2.1.2.101: PaginatedMembershipReadList class reference
- 11.2.1.2.102: PaginatedMetaUserList class reference
- 11.2.1.2.103: PaginatedOrganizationReadList class reference
- 11.2.1.2.104: PaginatedProjectReadList class reference
- 11.2.1.2.105: PaginatedQualityReportList class reference
- 11.2.1.2.106: PaginatedQualitySettingsList class reference
- 11.2.1.2.107: PaginatedRequestList class reference
- 11.2.1.2.108: PaginatedTaskReadList class reference
- 11.2.1.2.109: PaginatedWebhookDeliveryReadList class reference
- 11.2.1.2.110: PaginatedWebhookReadList class reference
- 11.2.1.2.111: PasswordChangeRequest class reference
- 11.2.1.2.112: PasswordResetConfirmRequest class reference
- 11.2.1.2.113: PasswordResetSerializerExRequest class reference
- 11.2.1.2.114: PatchedAccessTokenWriteRequest class reference
- 11.2.1.2.115: PatchedAnnotationGuideWriteRequest class reference
- 11.2.1.2.116: PatchedCloudStorageWriteRequest class reference
- 11.2.1.2.117: PatchedCommentWriteRequest class reference
- 11.2.1.2.118: PatchedConsensusSettingsRequest class reference
- 11.2.1.2.119: PatchedDataMetaWriteRequest class reference
- 11.2.1.2.120: PatchedInvitationWriteRequest class reference
- 11.2.1.2.121: PatchedIssueWriteRequest class reference
- 11.2.1.2.122: PatchedJobDataMetaWriteRequest class reference
- 11.2.1.2.123: PatchedJobValidationLayoutWriteRequest class reference
- 11.2.1.2.124: PatchedJobWriteRequest class reference
- 11.2.1.2.125: PatchedLabeledDataRequest class reference
- 11.2.1.2.126: PatchedLabelRequest class reference
- 11.2.1.2.127: PatchedMembershipWriteRequest class reference
- 11.2.1.2.128: PatchedOrganizationWriteRequest class reference
- 11.2.1.2.129: PatchedProjectWriteRequest class reference
- 11.2.1.2.130: PatchedProjectWriteRequestTargetStorage class reference
- 11.2.1.2.131: PatchedQualitySettingsRequest class reference
- 11.2.1.2.132: PatchedTaskValidationLayoutWriteRequest class reference
- 11.2.1.2.133: PatchedTaskWriteRequest class reference
- 11.2.1.2.134: PatchedUserRequest class reference
- 11.2.1.2.135: PatchedWebhookWriteRequest class reference
- 11.2.1.2.136: Plugins class reference
- 11.2.1.2.137: ProjectFileRequest class reference
- 11.2.1.2.138: ProjectRead class reference
- 11.2.1.2.139: ProjectReadTargetStorage class reference
- 11.2.1.2.140: ProjectWriteRequest class reference
- 11.2.1.2.141: ProviderTypeEnum class reference
- 11.2.1.2.142: QualityPointSizeBase class reference
- 11.2.1.2.143: QualityReport class reference
- 11.2.1.2.144: QualityReportCreateRequest class reference
- 11.2.1.2.145: QualityReportJobsSummary class reference
- 11.2.1.2.146: QualityReportSummary class reference
- 11.2.1.2.147: QualityReportSummaryJobs class reference
- 11.2.1.2.148: QualityReportSummaryTasks class reference
- 11.2.1.2.149: QualityReportTarget class reference
- 11.2.1.2.150: QualityReportTasksSummary class reference
- 11.2.1.2.151: QualitySettings class reference
- 11.2.1.2.152: QualityTargetMetric class reference
- 11.2.1.2.153: RegisterSerializerEx class reference
- 11.2.1.2.154: RegisterSerializerExRequest class reference
- 11.2.1.2.155: Request class reference
- 11.2.1.2.156: RequestDataOperation class reference
- 11.2.1.2.157: RequestOwner class reference
- 11.2.1.2.158: RequestStatus class reference
- 11.2.1.2.159: RestAuthDetail class reference
- 11.2.1.2.160: RoleEnum class reference
- 11.2.1.2.161: RqId class reference
- 11.2.1.2.162: RqStatus class reference
- 11.2.1.2.163: RqStatusStateEnum class reference
- 11.2.1.2.164: ShapeType class reference
- 11.2.1.2.165: SortingMethod class reference
- 11.2.1.2.166: Storage class reference
- 11.2.1.2.167: StorageMethod class reference
- 11.2.1.2.168: StorageRequest class reference
- 11.2.1.2.169: StorageType class reference
- 11.2.1.2.170: Sublabel class reference
- 11.2.1.2.171: SubLabeledShape class reference
- 11.2.1.2.172: SubLabeledShapeRequest class reference
- 11.2.1.2.173: SubLabeledTrack class reference
- 11.2.1.2.174: SubLabeledTrackRequest class reference
- 11.2.1.2.175: SublabelMappingEntryRequest class reference
- 11.2.1.2.176: SublabelRequest class reference
- 11.2.1.2.177: TaskFileRequest class reference
- 11.2.1.2.178: TaskRead class reference
- 11.2.1.2.179: TasksSummary class reference
- 11.2.1.2.180: TaskValidationLayoutRead class reference
- 11.2.1.2.181: TaskValidationLayoutReadMode class reference
- 11.2.1.2.182: TaskWriteRequest class reference
- 11.2.1.2.183: Token class reference
- 11.2.1.2.184: TrackedShape class reference
- 11.2.1.2.185: TrackedShapeRequest class reference
- 11.2.1.2.186: User class reference
- 11.2.1.2.187: UserIdentifiers class reference
- 11.2.1.2.188: ValidationMode class reference
- 11.2.1.2.189: ValidationParamsRequest class reference
- 11.2.1.2.190: WebhookContentType class reference
- 11.2.1.2.191: WebhookDeliveryRead class reference
- 11.2.1.2.192: WebhookRead class reference
- 11.2.1.2.193: WebhookType class reference
- 11.2.1.2.194: WebhookWriteRequest class reference
- 11.2.2: Low-level API
- 11.2.3: High-level API
- 11.2.4: PyTorch adapter
- 11.2.5: Auto-annotation API
- 11.2.6: Developer guide
- 11.3: Command line interface (CLI)
- 11.4: Access Tokens
- 12: Frequently asked questions
- 13: Contributing to CVAT Community
- 13.1: Development environment
- 13.2: Setup additional components in development environment
- 13.3: Coding style
- 13.4: Branching model
- 13.5: Using the issue tracker
- 13.6: Bug reports
- 13.7: Feature requests
- 13.8: Pull requests
- 13.9: How to add a new annotation format support
- 13.10: Server Profiling
- 13.11: Running tests
- 13.12: Repository structure
1 - Getting Started
1.1 - CVAT Overview
CVAT is an enterprise-grade platform for managing high-quality visual datasets for computer vision applications. It offers advanced tools for image, video, and 3D annotation, built-in quality assurance (QA), automation, and secure team collaboration.
Backed by an active open-source community and trusted by thousands of organizations worldwide, CVAT helps organizations streamline data labeling for faster, more accurate model development.
Products and services
CVAT comes in three editions: CVAT Community, CVAT Online, and CVAT Enterprise.
CVAT Community
- Free edition you can deploy on-premises or in your own cloud
- Full annotation toolset, import/export formats, and core workflow
- Ideal for technical teams comfortable managing infrastructure
- Installation & Setup Guide →
- GitHub repository
CVAT Online
- Hosted cloud edition with automatic updates, maintenance, and managed infrastructure.
- Available under multiple subscription tiers (Free, Solo, Team) for individual and collaborative work.
- Designed for fast onboarding, built-in collaboration and flexible storage
- Pricing & Plans →
- Try for free: app.cvat.ai
CVAT Enterprise
- For large organisations and regulated environments.
- Includes advanced features such as SSO/LDAP, audit logs, dedicated support, and custom SLAs.
- Managed deployment options, on-premises or private cloud.
- Pricing & Plans →
Labeling as a Service
- If you prefer not to build your own annotation team, we offer expert annotation services using CVAT.
- Scalable annotation across projects, with QA built-in and reporting dashboards.
- Ideal for one-time annotation projects and recurring workflows alike.
Learn more about CVAT Labeling Services →
Supported data & formats
CVAT supports a wide range of file formats and includes comprehensive built-in annotation tools for various computer vision tasks.
Input:
- Image: All formats supported by the Python
Pillow library,
including
JPEG,PNG,BMP,GIF,PPMandTIFF - Video: all formats, supported by ffmpeg, including
MP4,AVI, andMOV - 3D:
.pcd,.bin
For more information about dataset formats, see Dataset Management.
Manual annotation
CVAT supports several tools and modes for manually labeling images, videos, and 3D data.
These tools define how the editor behaves, how shapes are created, and what geometric types you can use during annotation.
Annotation modes
Annotation modes control how the annotation workspace behaves and which actions are available:
- Standard mode – full access to all annotation tools and object editing.
- Attribute annotation mode – focus on editing object attributes, such as color, size, etc. without changing shapes.
- Single shape mode – create one shape and automatically exit drawing.
- Tag annotation mode – add frame-level tags without drawing shapes.
- Review mode – review and validate existing annotations.
Creating shapes
When drawing objects on frames, you can choose how shapes behave over time:
Shape – creates a single shape on the current frame.
Track – creates a sequence of shapes linked as the same object across multiple frames.
CVAT also supports different drawing methods, such as defining shapes by two opposite points or by placing four corner points for extra control.
Shape tools
Shapes represent the geometry used to annotate objects. CVAT supports multiple shape types for different tasks:
| Shape | Use case |
|---|---|
| Rectangles | Best for simple object detection where objects have a box-like shape, such as detecting windows in a building. |
| Polygons | Suited for complex shapes in images, like outlining geographical features in maps or detailed product shapes. |
| Polylines | Great for annotating linear objects like roads, pathways, or limbs in pose estimation. |
| Ellipses | A tool for creating segmentation masks for circular or oval objects like plates, balls, or eyes. |
| Cuboids | A tool for creating 3D segmentation masks that capture object volume and position, useful for autonomous driving or robotics. |
| Skeletons | A tool for creating segmentation masks of articulated structures, ideal for human pose estimation, animation, and movement analysis. |
| Brush Tool | A tool for creating detailed, free-form segmentation masks where pixel-level precision is required, such as in medical imaging. |
| Tags | Useful for image and video classification tasks, like identifying scenes or themes in a dataset. |
Automated annotation
CVAT provides a set of AI-powered tools that speed up annotation by automatically detecting, segmenting, or tracking objects on images and videos. These tools work with built-in models (such as SAM/SAM2), pre-trained models from native integrations like Hugging Face and Roboflow, as well as custom or third-party models you deploy through CVAT AI Agents (including YOLO and other frameworks).
Below is a detailed table of the supported models and the platforms they operate on:
| Algorithm Name | Category | Framework | CPU Support | GPU Support |
|---|---|---|---|---|
| Segment Anything | Interactor | PyTorch | ✔️ | ✔️ |
| Faster RCNN | Detector | OpenVINO | ✔️ | |
| Mask RCNN | Detector | OpenVINO | ✔️ | |
| YOLO v3 | Detector | OpenVINO | ✔️ | |
| YOLO v7 | Detector | ONNX | ✔️ | ✔️ |
| Object Reidentification | ReID | OpenVINO | ✔️ | |
| Semantic Segmentation for ADAS | Detector | OpenVINO | ✔️ | |
| Text Detection v4 | Detector | OpenVINO | ✔️ | |
| SiamMask | Tracker | PyTorch | ✔️ | ✔️ |
| TransT | Tracker | PyTorch | ✔️ | ✔️ |
| Inside-Outside Guidance | Interactor | PyTorch | ✔️ | |
| Faster RCNN | Detector | TensorFlow | ✔️ | ✔️ |
| RetinaNet | Detector | PyTorch | ✔️ | ✔️ |
| Face Detection | Detector | OpenVINO | ✔️ |
Useful links
| Name | Description |
|---|---|
| Self-hosted Installation Guide | Start here to install self-hosted solution on your premises. |
| Dataset Management Framework | Specifically for the Self-Hosted version, this framework and CLI tool are essential for building, transforming, and analyzing datasets. |
| Server API | The CVAT server offers a HTTP REST API for interactions. This section explains how client applications, whether they are command line tools, browsers, or scripts, interact with CVAT through HTTP requests and responses. |
| Python SDK | The CVAT SDK is a Python library providing access to server interactions and additional functionalities like data validation and serialization. |
| Command Line Tool | This tool offers a straightforward command line interface for managing CVAT tasks. Currently featuring basic functionalities, it has the potential to develop into a more advanced administration tool for CVAT. |
| XML Annotation Format | Detailed documentation on the XML format used for annotations in CVAT essential for understanding data structure and compatibility. |
| AWS Deployment Guide | A step-by-step guide for deploying CVAT on Amazon Web Services, covering all necessary procedures and tips. |
| Frequently Asked Questions | This section addresses common queries and provides helpful answers and insights about using CVAT. |
Integrations
CVAT is a global tool, trusted and utilized by teams worldwide. Below is a list of key companies that contribute significantly to our product support or are an integral part of our ecosystem.
| Service | Available In | Description |
|---|---|---|
| Human Protocol | CVAT Online, CVAT Community, CVAT Enterprise | Incorporates CVAT to augment annotation services within the Human Protocol framework, enhancing its capabilities in data labeling. |
| FiftyOne | CVAT Online, CVAT Community, CVAT Enterprise | An open-source tool for dataset management and model analysis in computer vision, FiftyOne is closely integrated with CVAT to enhance annotation capabilities and label refinement. |
| Hugging Face, Roboflow | CVAT Online | In CVAT Online, models from Hugging Face and Roboflow can be added to enhance computer vision tasks. For more information, see Integration with Hugging Face and Roboflow |
License information
CVAT includes the following licenses:
| License Type | Applicable To | Description |
|---|---|---|
| MIT License | CVAT Community, CVAT Enterprise | This code is distributed under the MIT License, a permissive free software license that allows for broad use, modification, and distribution. |
| LGPL License (FFmpeg) | CVAT Online, CVAT Community, CVAT Enterprise | Incorporates LGPL-licensed components from the FFmpeg project. Users should verify if their use of FFmpeg requires additional licenses. CVAT.ai Corporation does not provide these licenses and is not liable for any related licensing fees. |
| Commercial License | CVAT Enterprise | For commercial use of the Enterprise solution of CVAT, a separate commercial license is applicable. This is tailored for businesses and commercial entities. |
| Terms of Use | CVAT Online, CVAT Community, CVAT Enterprise | Outlines the terms of use and confidential information handling for CVAT. Important for understanding the legal framework of using the platform. |
| Privacy Policy | CVAT Online, CVAT Community, CVAT Enterprise | Our Privacy Policy governs your visit to https://cvat.ai and your use of https://app.cvat.ai, and explains how we collect, safeguard and disclose information that results from your use of our Service. |
Get in touch
To get in touch, use one of the following channels:
| Type of inquiry | Applicable to | Description |
|---|---|---|
| Commercial Inquiries | CVAT Online, CVAT Enterprise, Labeling Services | Request a quote for CVAT Enterprise, CVAT Online Team subscription or order our labeling services. |
| General Inquiries | All products and services | Reach out to discuss partnership, co-marketing or investment opportunities with CVAT team. |
| CVAT Online Customer Support | CVAT Online (Pro and Team plans) | Chat with us about product support, resolve billing questions, or provide feedback. |
| CVAT Community Customer Support | CVAT Community | Report a bug or submit a feature request in out GitHub repository. |
1.2 - Vocabulary
List of terms pertaining to annotation in CVAT.
Label
Label is a type of an annotated object (e.g. person, car, vehicle, etc.)
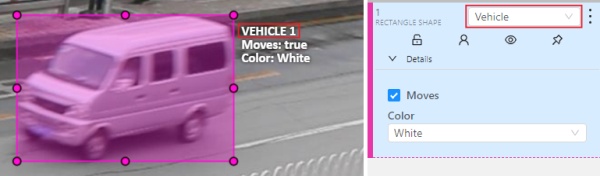
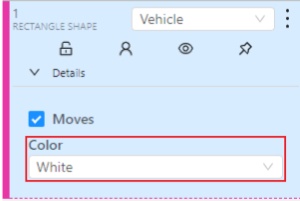
Attribute
Attribute is a property of an annotated object (e.g. color, model, quality, etc.). There are two types of attributes:
Unique
Unique immutable and can’t be changed from frame to frame (e.g. age, gender, color, etc.)
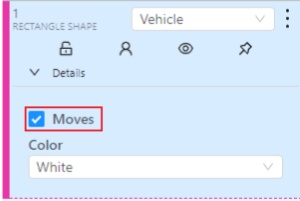
Temporary
Temporary mutable and can be changed on any frame (e.g. quality, pose, truncated, etc.)
Track
Track is a set of shapes on different frames which corresponds to one object.
Tracks are created in Track mode

Annotation
Annotation is a set of shapes and tracks. There are several types of annotations:
- Manual which is created by a person
- Semi-automatic which is created mainly automatically, but the user provides some data (e.g. interpolation)
- Automatic which is created automatically without a person in the loop
Approximation
Approximation allows you to reduce the number of points in the polygon. Can be used to reduce the annotation file and to facilitate editing polygons.
Trackable
Trackable object will be tracked automatically if the previous frame was a latest keyframe for the object. More details in the section trackers.
![]()
Mode
Interpolation
Mode for video annotation, which uses track objects.
Only objects on keyframes are manually annotation, and intermediate frames are linearly interpolated.
Related sections:
Annotation
Mode for images annotation, which uses shape objects.
Related sections:
Dimension
Depends on the task data type that is defined when the task is created.
2D
The data format of 2d tasks are images and videos. Related sections:
3D
The data format of 3d tasks is a cloud of points. Data formats for a 3D task
Related sections:
State
State of the job. The state can be changed by an assigned user in
the menu inside the job.
There are several possible states: new, in progress, rejected, completed.
Stage
Stage of the job. The stage is specified with the drop-down list on the
task page.
There are three stages: annotation, validation or acceptance. This value affects the task progress bar.
Subset
A project can have subsets. Subsets are groups for tasks that make it easier to work with the dataset.
It could be test, train, validation or custom subset.
Credentials
Under credentials is understood Key & secret key, Account name and token, Anonymous access, Key file.
Used to attach cloud storage.
Resource
Under resource is understood bucket name or container name.
Used to attach cloud storage.
1.3 - Shortcuts
List of available keyboard shortcuts and notes about their customization.
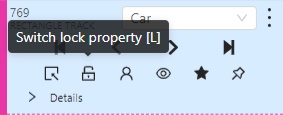
CVAT provides a wide range of customizable shortcuts, with many UI elements offering shortcut hints when hovered over with the mouse.
These shortcuts are organized by scopes. Some are global, meaning they work across the entire application, while others are specific to certain sections or workspaces. This approach allows reusing the same shortcuts in different scopes, depending on whether they might conflict. For example, global shortcuts must be unique since they apply across all pages and workspaces. However, similar shortcuts can be used in different workspaces, like having the same shortcuts in both the Standard Workspace and the Standard 3D Workspace, as these two do not coexist.
| Scope | Shortcut Conflicts |
|---|---|
| Global | Must be unique across all scopes, as they apply universally. |
| Annotation Page | Must be unique across all scopes, except Labels Editor. |
| Standard Workspace | Must be unique across itself, Annotation Page and Global Scope. |
| Standard 3D Workspace | Must be unique across itself, Annotation Page and Global Scope. |
| Attribute Annotation Workspace | Must be unique across itself, Annotation Page and Global Scope. |
| Review Workspace | Must be unique across itself, Annotation Page and Global Scope. |
| Tag Annotation Workspace | Must be unique across itself, Annotation Page and Global Scope. |
| Control Sidebar | Must be unique across itself, all workspaces, Annotation Page and Global Scope. |
| Objects Sidebar | Must be unique across itself, all workspaces, Annotation Page and Global Scope. |
| Labels Editor | Must be unique across itself and Global Scope. |
Shortcuts Customization
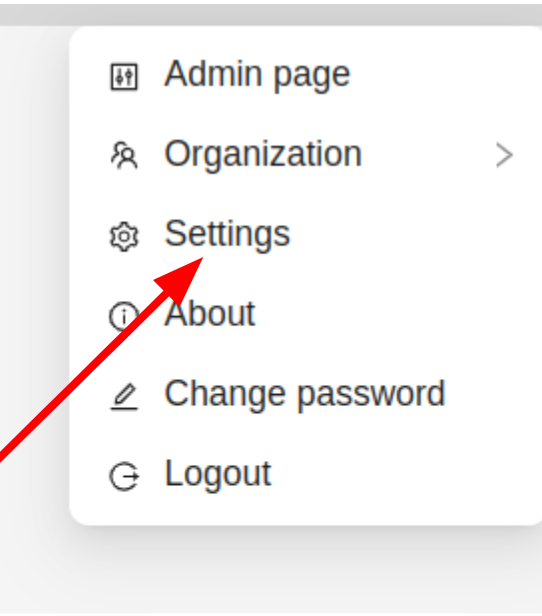
You can customize shortcuts in CVAT settings.
-
Open Settings:
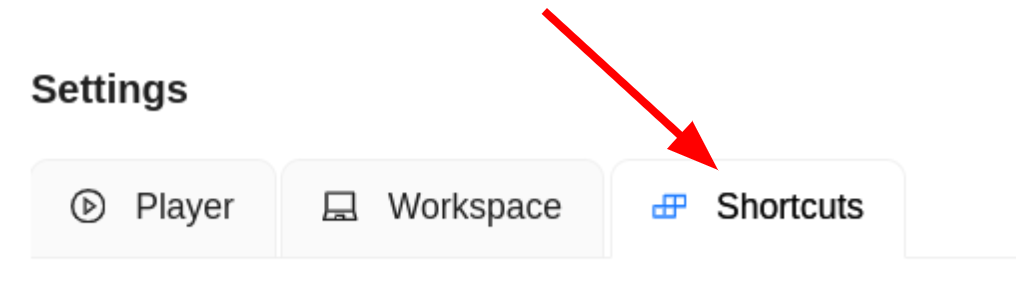
-
Go to the Shortcuts tab:
-
You’ll see the shortcuts customization menu:
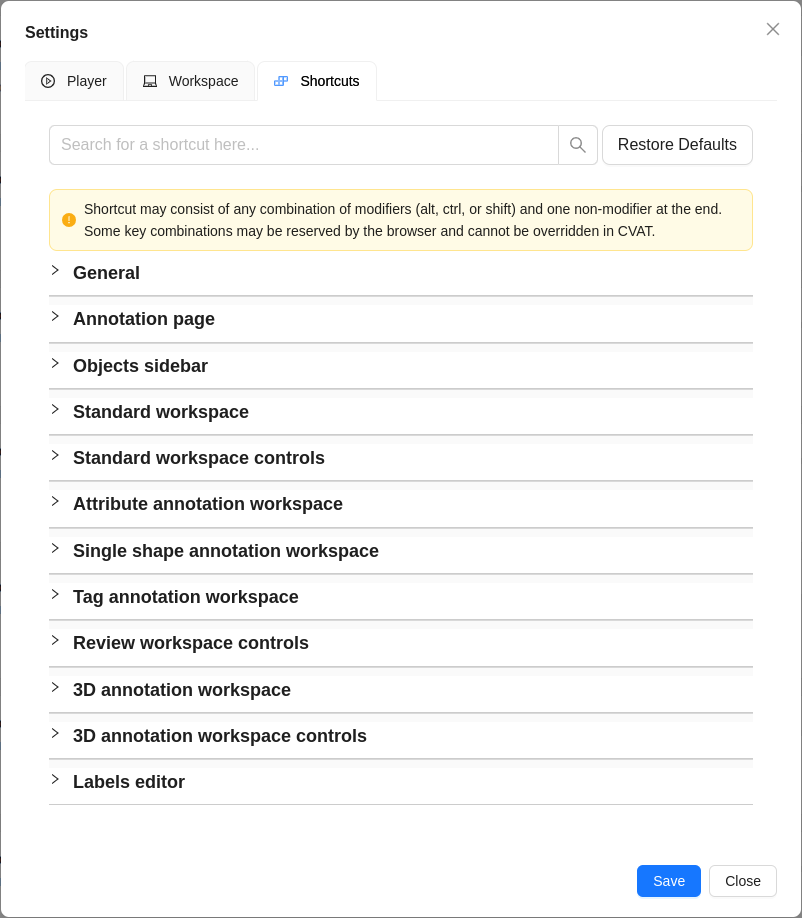
-
As it can be seen there is a warning, that some shortcuts are reserved by a browser and cannot be overridden in CVAT, there isn’t a specific list available for such combinations, but shortcuts such as ctrl + tab (switching tabs) or ctrl + w (closing tabs) etc, are reserved by the browser and shortcuts such as alt + f4 (closing the window) are usually reserved by your operating system.
-
All sections collapsible, so you can easily navigate through the list of shortcuts. Here is the Global scope expanded:
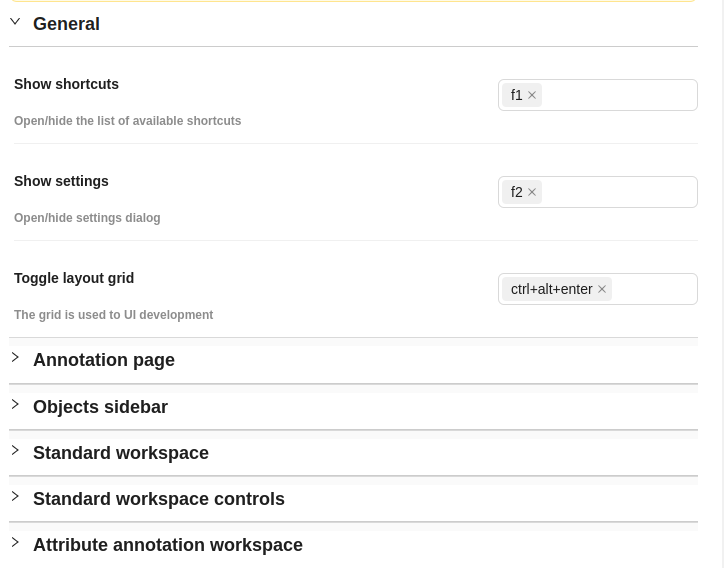
-
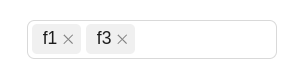
To add a custom shortcut all you have to do is to click the input field and start pressing the sequence you want to assign to the action. As an example
f3has been set here for Show Shortcuts along withf1:
-
Shortcuts can be any combination of modifiers (ctrl, shift or alt) and up to one non-modifier key e.g.
ctrl+shift+f1etc.

-
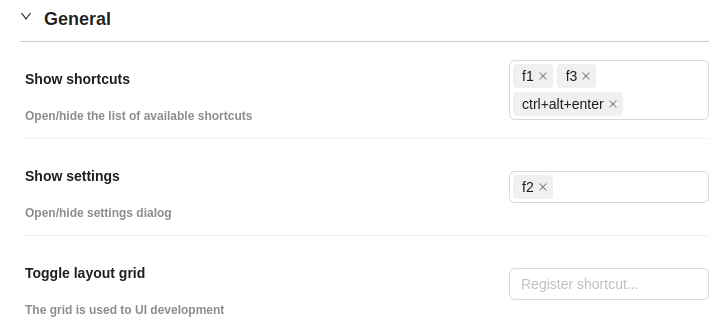
If you try to add a shortcut that is already in use, you will get a warning message:
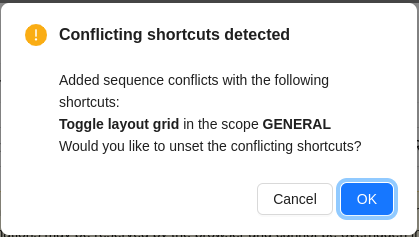
-
If pressed cancel it will remain the same otherwise the conflicting shortcut will be unset.
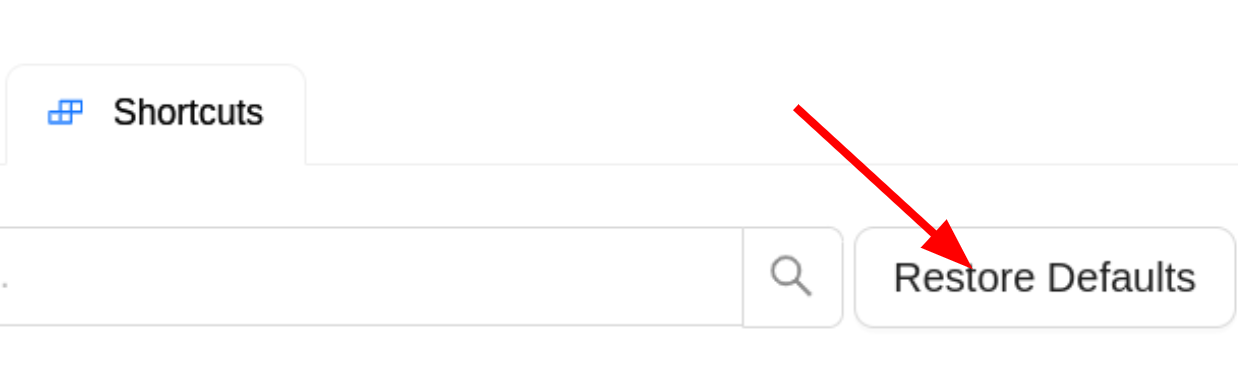
-
If you want to reset all the shortcuts to default, you can do so by clicking the Restore Defaults button at the top of the shortcut settings.
2 - Products
Documentation grouped by CVAT product editions.
2.1 - CVAT Online
Documentation for CVAT Online.
CVAT Online is the cloud edition of CVAT with managed infrastructure.
Below you can find all documentation relevant to CVAT Online:
2.2 - CVAT Enterprise
Documentation for enterprise-grade deployments of CVAT.
CVAT Enterprise is designed for large organizations and regulated environments. It offers SSO/LDAP, audit logs, enterprise-grade security, and custom deployment options.
Below are the documents relevant specifically to the CVAT Enterprise edition:
2.3 - CVAT Community
Documentation for the self-hosted open-source edition.
CVAT Community is the free, self-hosted open-source edition of CVAT, suitable for technical teams that prefer full control over their infrastructure and custom deployments.
Below are the documents relevant specifically to the CVAT Community edition:
3 - Workspace
Learn how to create, organize, and manage projects, tasks, and jobs, and collaborate efficiently with your team.
3.1 - Projects
Creating and exporting projects in CVAT.
Projects page
On this page, you can create a new project, create a project from a backup, and also see the created projects.
In the upper left corner there is a search bar, using which you can find the project by project name, assignee etc. In the upper right corner there are sorting, quick filters and filter.
Filter
Note
Applying a filter disables the quick filters.The filter works similarly to the filters for annotation, you can create rules from properties, operators and values and group rules into groups. For more details, see the filter section. Learn more about date and time selection.
To clear all filters, press Clear filters.
Supported properties for projects list
| Properties | Supported values | Description |
|---|---|---|
Assignee |
username | Assignee is the user who is working on the project, task or job. (is specified on task page) |
Owner |
username | The user who owns the project, task, or job |
Last updated |
last modified date and time (or value range) | The date can be entered in the dd.MM.yyyy HH:mm format or by selecting the date in the window that appears when you click on the input field |
ID |
number or range of job ID | |
Name |
name | On the tasks page - name of the task, on the project page - name of the project |
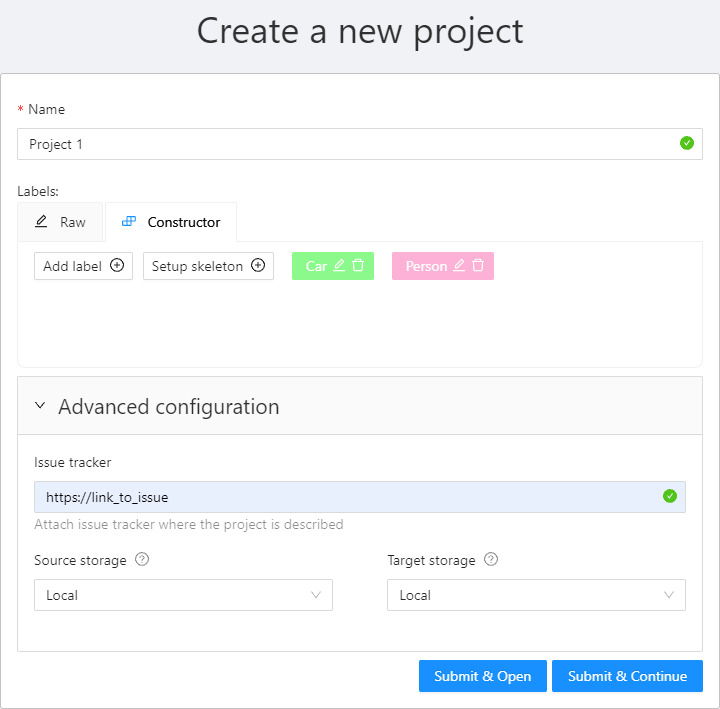
Create a project
In CVAT, you can create a project containing tasks of the same type. All tasks related to the project will inherit a list of labels.
To create a project, go to the projects section by clicking on the Projects item in the top menu.
On the projects page, you can see a list of projects, use a search,
or create a new project by clicking on the + button and select Create New Project.

Note
Note that the project will be created in the organization that you selected at the time of creation. Read more about organizations.You can change: the name of the project, the list of labels (which will be used for tasks created as parts of this project) and a skeleton if it’s necessary. In advanced configuration also you can specify: a link to the issue, source and target storages. Learn more about creating a label list, creating the skeleton and attach cloud storage.
To save and open a project, click on Submit & Open button. Also, you
can click on Submit & Continue button to create several projects in sequence.
Once created, the project will appear on the projects page. To open a project, just click on it.
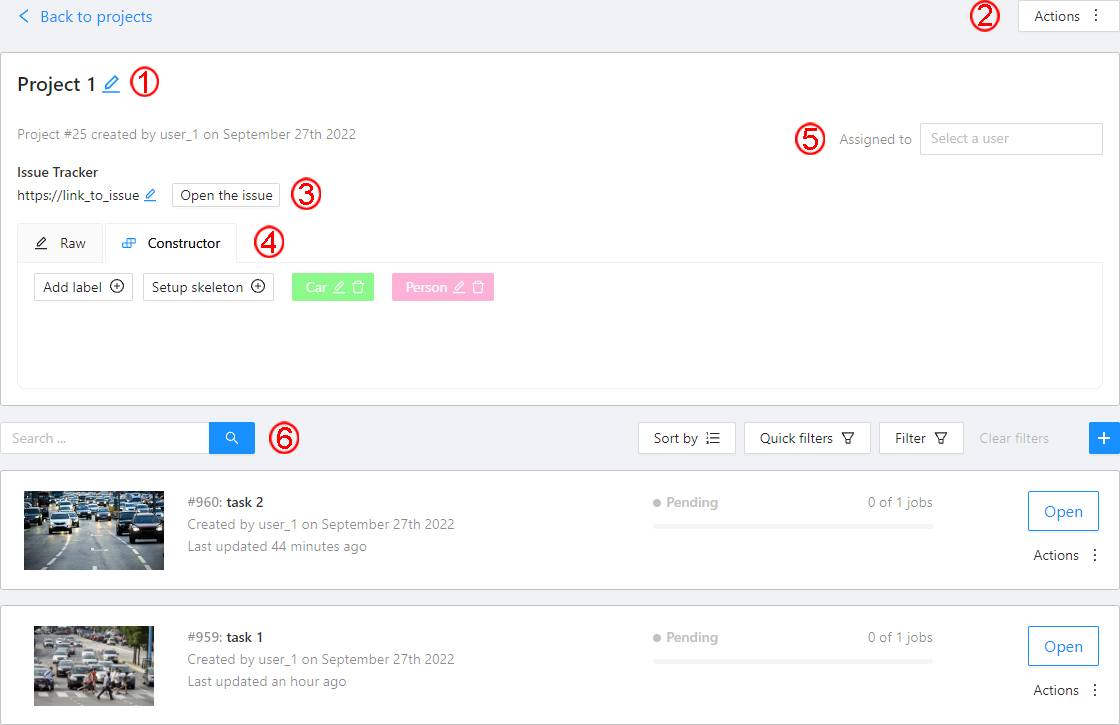
Here you can do the following:
-
Change the project’s title.
-
Open the
Actionsmenu. Each button is responsible for a specific function in theActionsmenu:Export dataset/Import dataset- download/upload annotations or annotations and images in a specific format. See more information at export/import datasets.Backup project- make a backup of the project read more in the backup section.Organization- move the project between your personal workspace or organizations. Please, refer to the Transfer between organizations section for details.Delete- remove the project and all related tasks.
-
Change issue tracker or open issue tracker if it is specified.
-
Change labels and skeleton. You can add new labels or add attributes for the existing labels in the
Rawmode or theConstructormode. You can also change the color for different labels. By clickingSetup skeletonyou can create a skeleton for this project. -
Assigned to — is used to assign a project to a person. Start typing an assignee’s name and/or choose the right person out of the dropdown list.
-
Tasks— is a list of all tasks for a particular project, with the ability to search, sort and filter for tasks in the project. Read more about search. Read more about sorting and filter It is possible to choose a subset for tasks in the project. You can use the available options (Train,Test,Validation) or set your own.
3.2 - Tasks
Overview of the Tasks page.
Overview

The Tasks page contains elements and each of them relates to a separate task. They are sorted in creation order.
Each element contains: the task name, preview, progress bar, button Open, and menu Actions.
Each button is responsible for a menu Actions specific function:
Export task dataset— download annotations or annotations and images in a specific format. More information is available in the export/import datasets section.Upload annotationupload annotations in a specific format. More information is available in the export/import datasets section.Automatic Annotation— automatic annotation with OpenVINO toolkit. Presence depends on how you build the CVAT instance.Backup task— make a backup of this task into a zip archive. Read more in the backup section.Move to project— Moving a task to a project (you can move only a task that does not belong to any project). In case of a label mismatch, you can create or delete necessary labels in the project/task. Some task labels can be matched with the target project labels.Organization- moving a task between your personal workspace or organizations. Only available for individual tasks (not tasks in a project). Please, refer to the Transfer between organizations section for details.Delete— delete task.
In the upper left corner, there is a search bar, using which you can find the task by assignee, task name etc. In the upper right corner, there are sorting, quick filters, and filter.
Filter
Note
Applying a filter disables the quick filter.The filter works similarly to the filters for annotation, you can create rules from properties, operators, and values and group rules into groups. For more details, consult the filter section. Learn more about date and time selection.
For clear all filters press Clear filters.
Supported properties for tasks list
| Properties | Supported values | Description |
|---|---|---|
Dimension |
2D or 3D |
Depends on the data format (read more in creating an annotation task) |
Status |
annotation, validation or completed |
|
Data |
video, images |
Depends on the data format (read more in creating an annotation task) |
Subset |
test, train, validation or custom subset |
learn more |
Assignee |
username | Assignee is the user who is working on the project, task or job (they are specified on task page) |
Owner |
username | The user who owns the project, task, or job |
Last updated |
last modified date and time (or value range) | The date can be entered in the dd.MM.yyyy HH:mm format or by selecting the date in the window that appears when you click on the input field |
ID |
number or range of job ID | |
Project ID |
number or range of project ID | |
Name |
name | On the tasks page: name of the task, on the project page: name of the project |
Project name |
project name | Specified when creating a project, can be changed on the (project section) |
Select Open to go to task details.
Task details page
Task details is a task page that contains a preview, a progress bar, the details of the task (specified when the task was created), and the Jobs section.
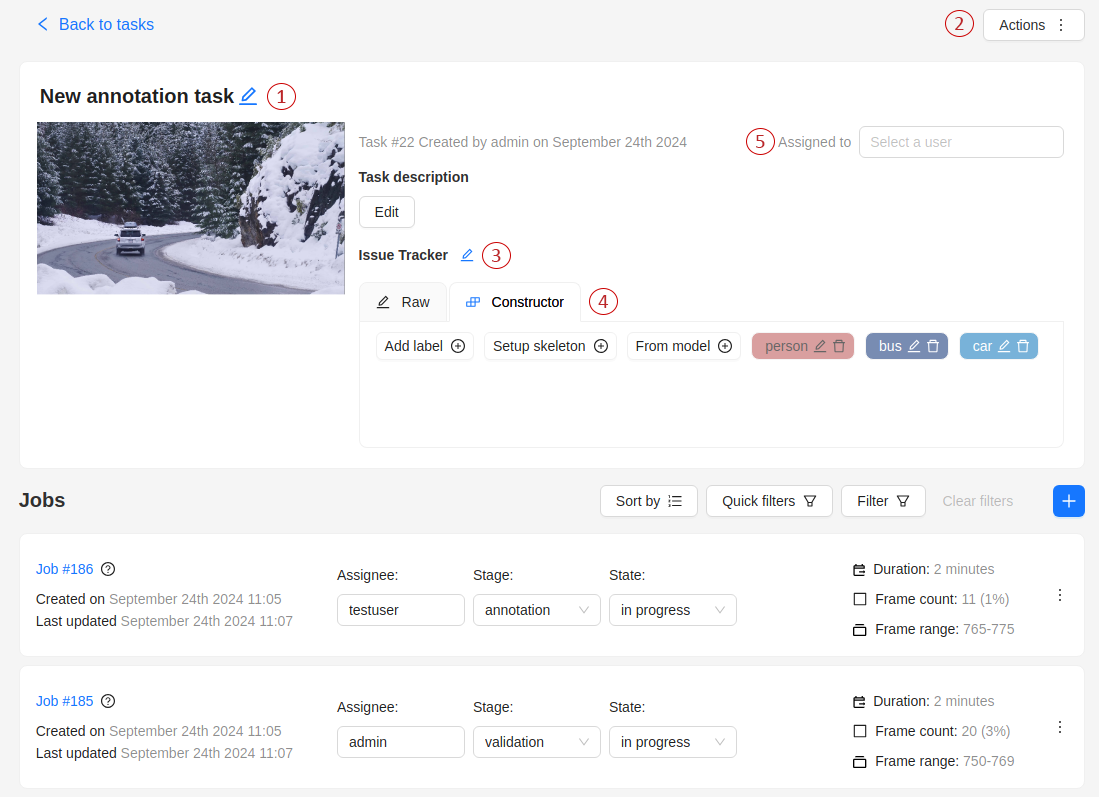
The next actions are available on this page:
-
Change the task’s title.
-
Open
Actionsmenu. -
Change the issue tracker or open it if specified.
-
Change labels (available only if the task is not related to the project).
You can add new labels or add attributes for the existing labels in the Raw mode or the Constructor mode. By selecting
Copyyou will copy the labels to the clipboard. -
Assigned to — is used to assign a task to a person. Start typing an assignee’s name and/or choose the right person out of the dropdown list. In the list of users, you will only see the users of the organization where the task is created.
-
Cloud storage — view the cloud storage attached to the task and change it to another attached storage if needed.
Jobs is a list of all jobs for a particular task. Here you can find the next data:
- Jobs name with a hyperlink to it.
- Frame range — the frame interval.
- A stage of the job. The stage is specified by a drop-down list.
There are three stages:
annotation,validation, oracceptance. This value affects the task progress bar. - A state of the job. The state can be changed by an assigned user in the menu inside the job.
There are several possible states:
new,in progress,rejected,completed. - Duration — is the amount of time the job is being worked.
- Assignee is the user who is working on the job (annotator, reviewer, or corrector). You can start typing an assignee’s name and/or choose the right person out of the dropdown list.
You can filter or sort jobs by status, assignee, and updated date using the filters panel.
Follow a link inside Jobs section to start the annotation process. In some cases, you can have several links. It depends on the size of your task and Overlap Size and Segment Size parameters. To improve UX, only the first chunk of several frames will be loaded and you will be able to annotate the first images. Other frames will be loaded in the background.
How to create and configure an annotation task
To start annotating in CVAT, you must create an annotation task and specify its parameters.
Create a task
To create a task:
- On the Tasks page, select +
- Select Create new task.

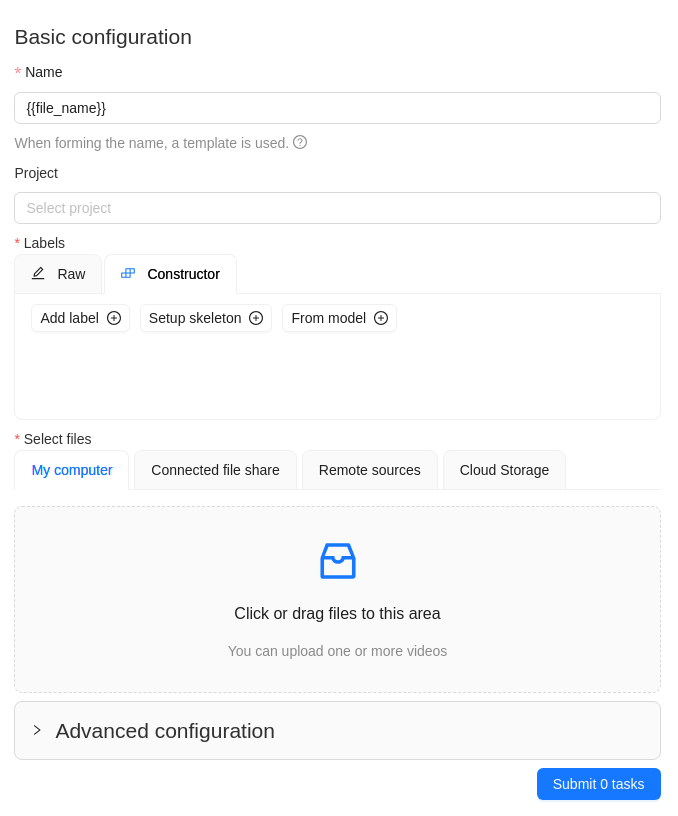
Next, specify the task parameters in the configurator:
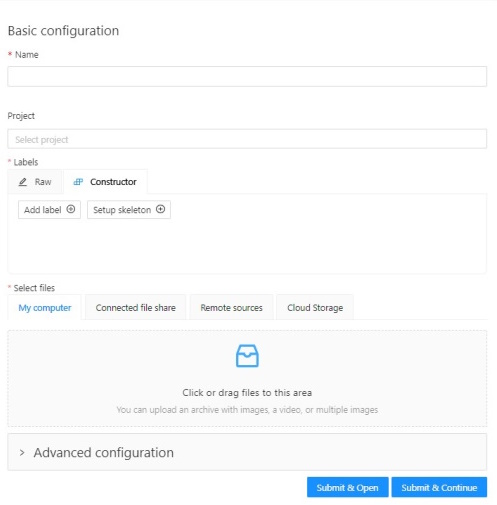
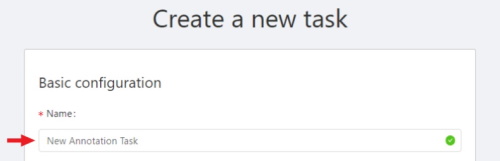
-
In the Name field, enter the name of the new task.
-
(Optional) From the Projects drop-down, select a project for the new task.
Leave this field empty if you do not want to assign the task to any project.
Note
Following steps are valid if the task does not belong to a project.
If the task has been assigned to a project, the project’s labels will be applied to the task. -
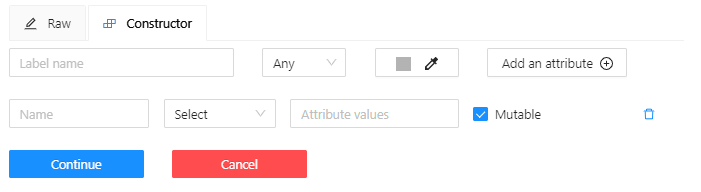
On the Constructor tab, select Add label.
The label constructor menu will open:
-
In the Label name field, enter the name of the label.
-
(Optional) To limit the use of the label to a certain shape tool, from the Label shape drop-down select the shape.
-
(Optional) Select the color for the label.

-
(Optional) Select Add an attribute and set up its properties.
-
Select Select files to upload files for annotation.
-
Select Continue to submit the label and start adding a new one
or Cancel to terminate the current label and return you to the labels list. -
Select Submit and open to submit the configuration and open the created task,
or Submit and continue, to submit the configuration and start a new task.
Label shape
Labels (or classes) are categories of objects that you can annotate.
Label shape limits the use of the label to certain shape tool.
Any is the default setting that does not limit the use of the
label to any particular shape tool.
For example, if you added:
- Label
sunwith the Label shape typeellipse - Label
carwith the Label shape typeany
As a result:
-
The
sunlabel will be available only for ellipse shape. -
The
carlabel will be available for all shapes.
The tools on the Controls sidebar will be limited to the selected types of shapes.
For example, if you select Any,
all tools will be available,
but if you select Rectangle for all labels,
only the Rectangle tool will be
visible on the sidebar.
Note
You cannot apply the Label shape to the AI and OpenCV tools, these tools will always be available.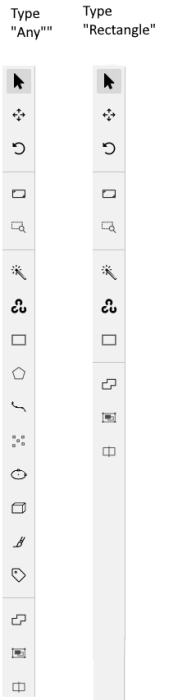
You can change the shape of the label as needed. This change will not affect the existing annotation.
For example, if you created objects using polygons and then changed the label shape to polylines, all previously created objects will remain polygons. However, you will not be able to add new polygon objects with the same label.
Note
You cannot change the shape of theskeleton label.
The Label shape field for the
skeleton label is disabled.
Add an attribute
Attribute is a property of an annotated object, such as color, model, or other quality.
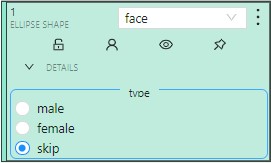
For example, you have a label for face and want to
specify the type of face. Instead of creating additional
labels for male and female, you can use attributes
to add this information.
There are two types of attributes:
- Immutable attributes are unique and do not change from frame to frame.
For example,
age,gender, andcolor. - Mutable attributes are temporary and can change from frame to frame.
For example,
pose,quality, andtruncated.
Added attributes will be available from the Objects menu:
To add an attribute:
-
Go to the Constructor tab and select Add attribute.
-
In the Name field, enter the attribute name.
-
In the drop-down menu, select the way to display the attribute in the Objects menu:
-
Selectenables a drop-down list, from which you can select an attribute.
If in the Attribute value field you add__undefined__, the drop-down list will have a blank value.
This is useful for cases where the attribute of the object cannot be clarified: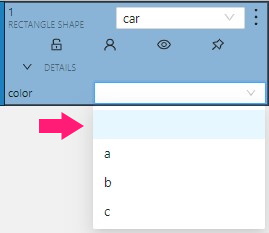
-
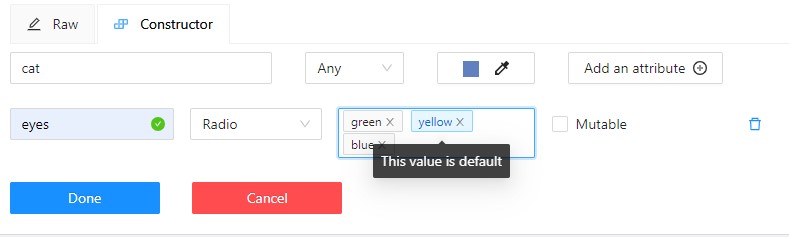
Radioenables the selection of one option from several options. -
Checkboxenables the selection of multiple options. -
Textsets the attribute to a text field. -
Numbersets the attribute to numerical field in the following format:min;max;step.
-
-
In the Attribute values field, add attribute values.
To separate values use Enter.
To delete value, use Backspace or click x next to the value name. -
(Optional) For mutable attributes, select Mutable.
-
(Optional) To set an attribute value as default, select it. The default value will change color to blue.
To delete an attribute, select Delete attribute.
Select files
There are several ways to upload files:
| Data source | Description |
|---|---|
| My computer | Use this option to select files from your laptop or PC. To select file: 1. Select Select files field:  . . 2. Select files to upload. |
| Connected file share | Advanced option. Upload files from a local or cloud shared folder. Note, that you need to mount a fileshare first. For more information, consult Share path |
| Remote source | Enter a list of URLs (one per line) in the field. |
| Cloud Storage | Advanced option. To upload files from cloud storage, type the cloud storage name, (optional) choose the manifest file, and select the required files. For more information, consult Attach cloud storage. Use the search feature to find a file (by file name) from the connected cloud storage. |
Editing labels in RAW format
The Raw is a way of working with labels for an advanced user.
It is useful when you need to copy labels from one independent task to another.
Note
Be careful with changing the raw specification of an existing task/project. Removing any “id” properties will lead to losing existing annotations. This property will be removed automatically from any text you insert to this field.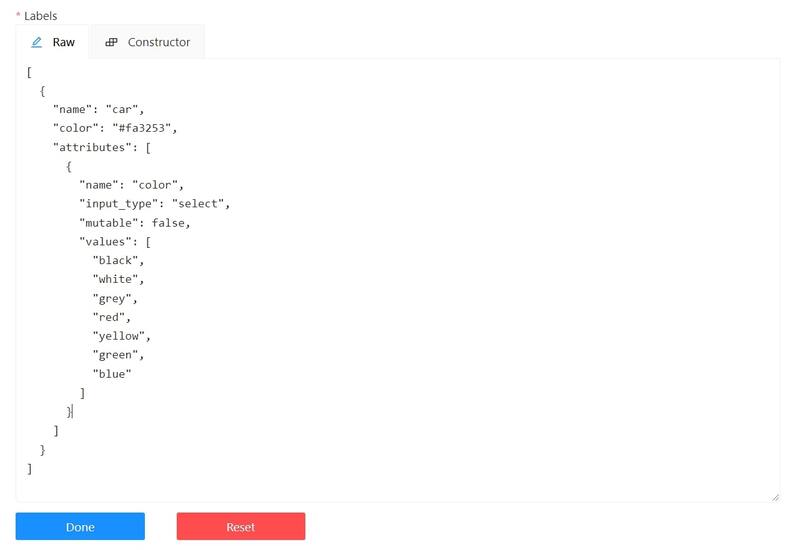
Raw presents label data in .json format with an option of editing and copying labels as text. The Done button applies the changes and the Reset button cancels the changes.
Data formats for a 3D task
To create a 3D task, you must prepare an archive with one of the following directory structures.
Note
You can’t mix 2D and 3D data in the same task. VELODYNE FORMAT
Structure:
velodyne_points/
data/
image_01.bin
IMAGE_00 # unknown dirname,
# generally image_01.png can be under IMAGE_00, IMAGE_01, IMAGE_02, IMAGE_03, etc
data/
image_01.png 3D POINTCLOUD DATA FORMAT
Structure:
pointcloud/
00001.pcd
related_images/
00001_pcd/
image_01.png # or any other image 3D, DEFAULT DATAFORMAT Option 1
Structure:
data/
image.pcd
image.png 3D, DEFAULT DATAFORMAT Option 2
Structure:
data/
image_1/
image_1.pcd
context_1.png # or any other name
context_2.jpgAdvanced configuration
Use advanced configuration to set additional parameters for the task and customize it to meet specific needs or requirements.
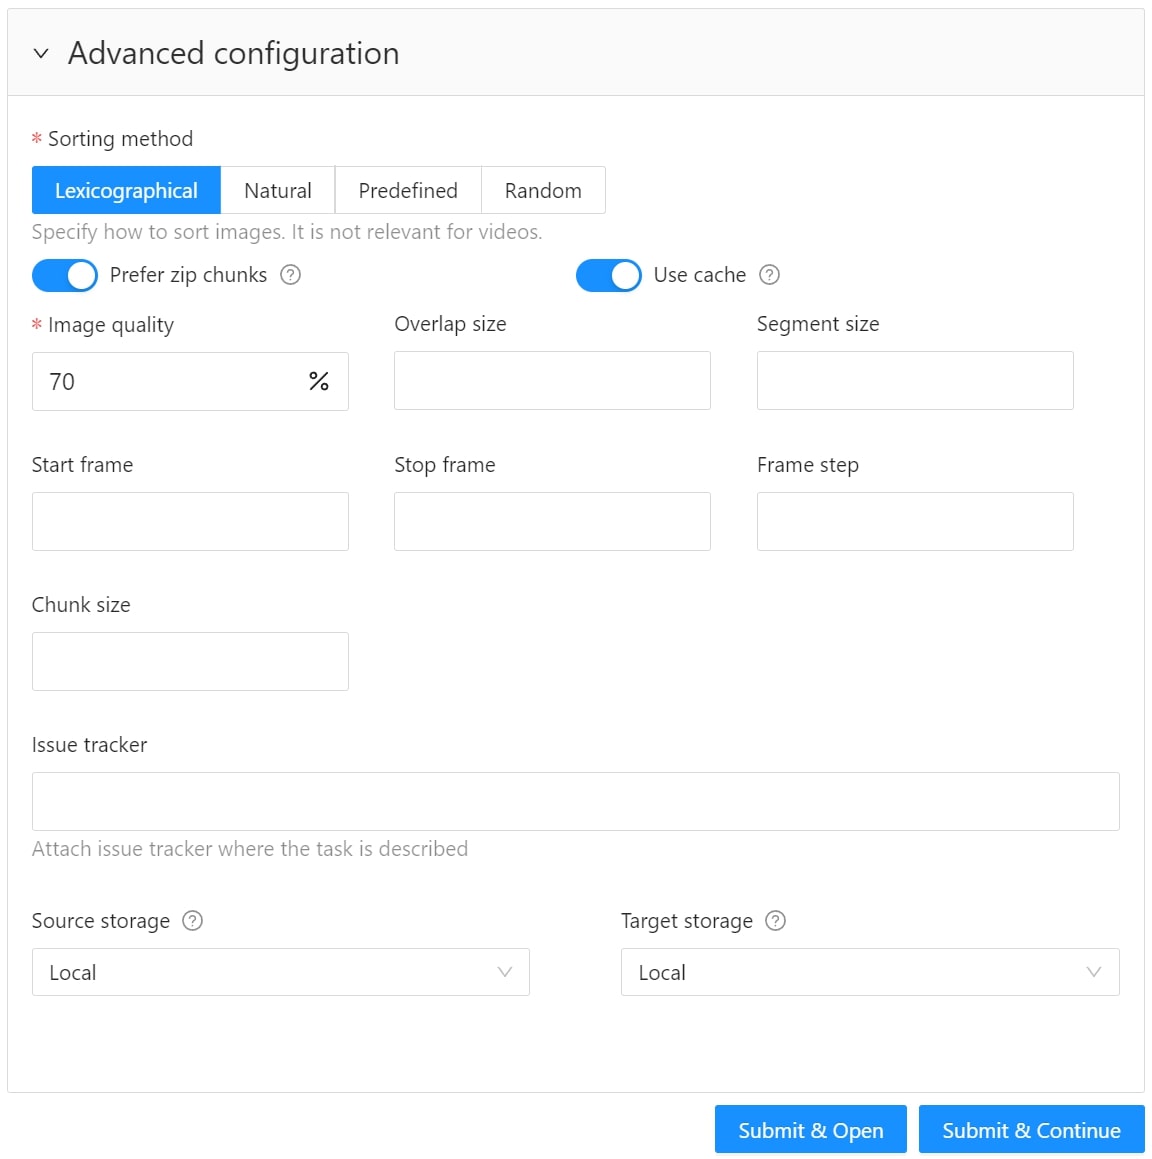
The following parameters are available:
| Element | Description |
|---|---|
| Sorting method | Note: Does not work for the video data. Several methods to sort the data. For example, the sequence 2.jpeg, 10.jpeg, 1.jpeg after sorting will be: 1.jpeg, 10.jpeg, 2.jpeg 1.jpeg, 2.jpeg, 10.jpeg 2.jpeg, 10.jpeg, 1.jpeg |
| Prefer zip chunks | Use this parameter to divide your video or image dataset for annotation into short video clips a zip file of frames. Zip files are larger but do not require decoding on the client side, and video clips are smaller but require decoding. It is recommended to turn off this parameter for video tasks to reduce traffic between the client side and the server. |
| Use cache | Select the checkbox to enable on-the-fly data processing to reduce task creation time and store data in a cache with a policy of evicting less popular items. For more information, see Data preparation on the fly. |
| Image quality | CVAT has two types of data: original quality and compressed. Original quality images are used for dataset export and automatic annotation. Compressed images are used only for annotations to reduce traffic between the server and client side. It is recommended to adjust the compression level only if the images contain small objects that are not visible in the original quality. Values range from 5 (highly compressed images) to 100 (not compressed). |
| Overlap size | Use this parameter to create overlapped segments, making tracking continuous from one segment to another. Note that this functionality only works for bounding boxes. This parameter has the following options: Interpolation task (video sequence). If you annotate with a bounding box on two adjacent segments, they will be merged into a single bounding box. In case the overlap is zero or the bounding box is inaccurate (not enclosing the object properly, misaligned or distorted) on the adjacent segments, it may be difficult to accurately interpolate the object’s movement between the segments. As a result, multiple tracks will be created for the same object. Annotation task (independent images). If an object exists on overlapped segments with overlap greater than zero, and the annotation of these segments is done properly, then the segments will be automatically merged into a single object. If the overlap is zero or the annotation is inaccurate (not enclosing the object properly, misaligned, distorted) on the adjacent segments, it may be difficult to accurately track the object. As a result, multiple bounding boxes will be created for the same object. If the annotations on different segments (on overlapped frames) are very different, you will have two shapes for the same object. To avoid this, accurately annotate the object on the first segment and the same object on the second segment to create a track between two annotations. |
| Segment size | Use this parameter to divide a dataset into smaller parts. For example, if you want to share a dataset among multiple annotators, you can split it into smaller sections and assign each section to a separate job. This allows annotators to work on the same dataset concurrently. |
| Start frame | Defines the first frame of the video. |
| Stop frame | Defines the last frame of the video. |
| Frame step | Use this parameter to filter video frames or images in a dataset. Specify frame step value to include only certain frames or images in the dataset. For example, if the frame step value is 25, the dataset will include every 25th frame or image. If a video has 100 frames, setting the frame step to 25 will include only frames 1, 26, 51, 76, and 100 in the dataset. This can be useful for reducing the size of the dataset, or for focusing on specific frames or images of particular interest. |
| Chunk size | Defines amount of frames to be packed in a chunk when send from client to server. The server defines automatically if the chunk is empty. Recommended values: |
| Issue tracker | Use this parameter to specify the issue tracker URL. |
| Source storage | Specify the source storage for importing resources like annotations and backups. If the task was assigned to the project, use the Use project source storage toggle to determine whether to use project values or specify new ones. |
| Target storage | Specify the target storage (local or cloud) for exporting resources like annotations and backups. If the task is created in the project, use the Use project target storage toggle to determine whether to use project values or specify new ones. |
To save and open the task, select Submit & Open .
To create several tasks in sequence, select Submit & Continue.
Created tasks will be displayed on the tasks page.
How to create and set up multiple tasks
Use Create multi tasks to create multiple video annotation tasks with the same configuration.
Note
The Create multi tasks feature is available for videos only.Check out:
Create multi tasks
To create the multi tasks:
- On the Tasks page select +.
- Select Create multi tasks.

Next, specify the parameters in the task configurator:
-
In the Name field, enter the name of the new task:
- Enter the name of the task
- (Optional)
{{index}}adds an index to the file in the set (starting from 0). - (Optional)
{{file_name}}adds the file’s name to the task’s name.
-
(Optional) From the Projects drop-down, select a project for the tasks.
Leave this field empty if you do not want to assign tasks to any project.
Note
Following steps are valid if the tasks do not belong to a project.
If the tasks have been assigned to a project, the project’s labels will be applied to the tasks. -
On the Constructor tab, select Add label.
-
In the Label name field, enter the name of the label.
-
(Optional) Select the color for the label.
-
(Optional) Select Add an attribute and set up its properties.
-
Select Select files to upload files for annotation.
Note
You cannot upload multiple tasks from the cloud storage. -
Select Submit
Ntasks
Example
A step-by-step example for creating the multiple tasks:
-
In the Name field, enter the
Create_multitask-{{index}}-{{file_name}}. -
Add labels.
-
Select files.
In case there are more than four files, only the total number of selected files will be displayed: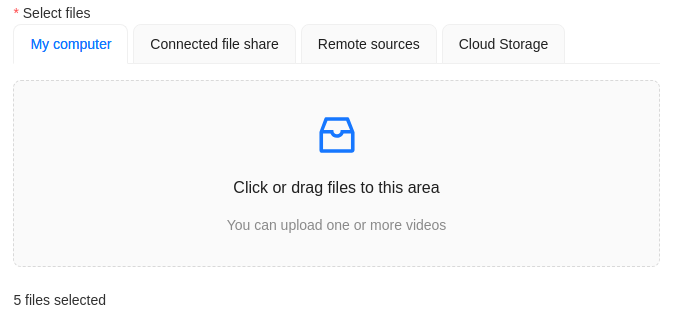
-
Select Submit
Ntasks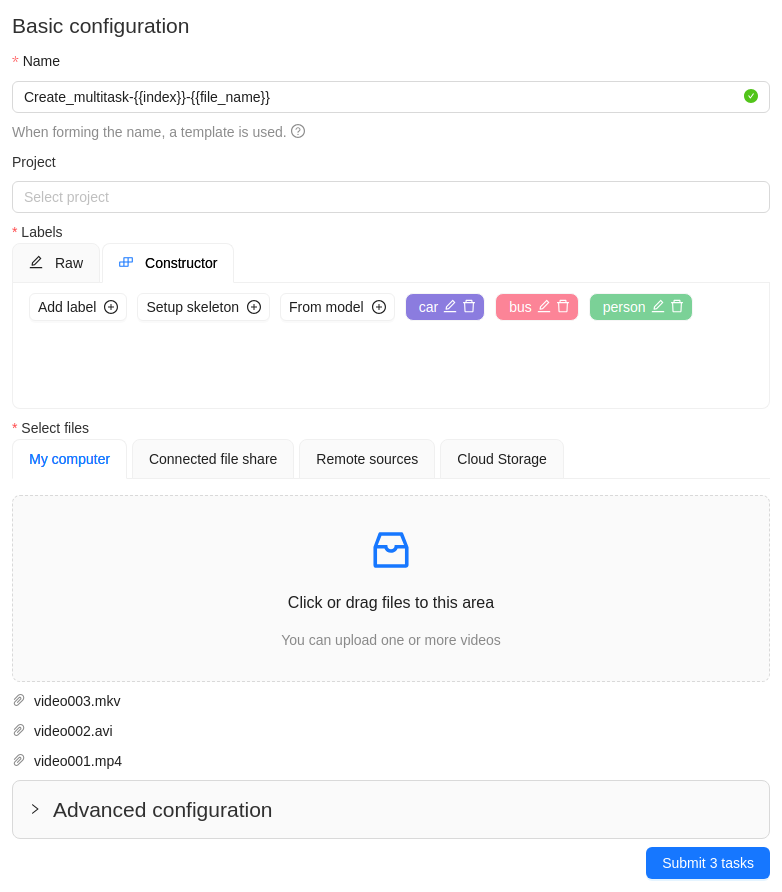
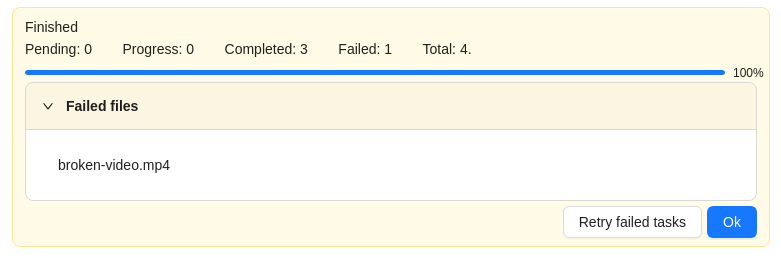
-
You will see a progress bar that shows the progress of the tasks being created:

-
Select Ok.

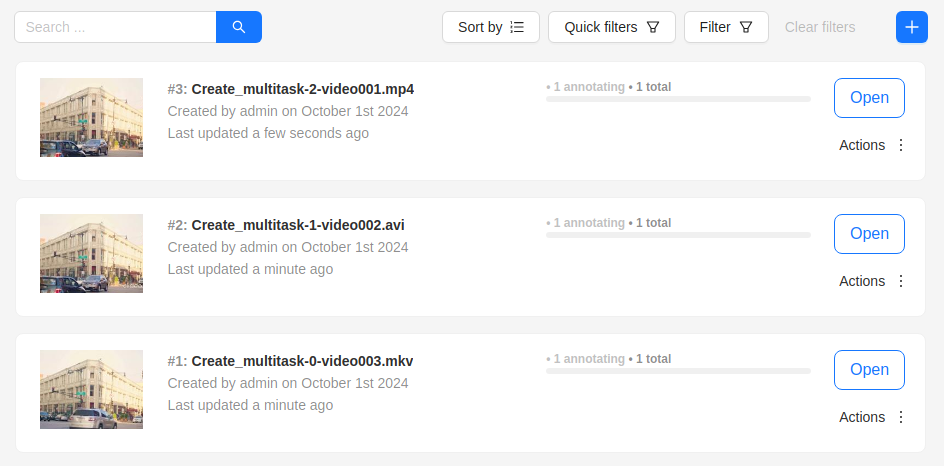
The result will look like the following:
Errors
During the process of adding multiple tasks, the following errors may occur:
| Error | Description |
|---|---|
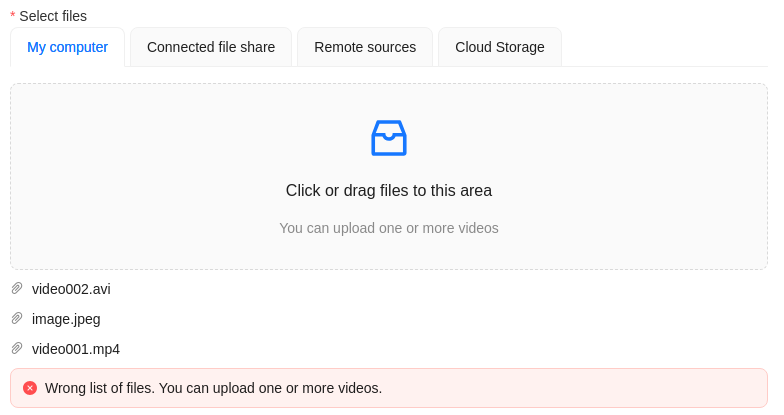 |
Wrong file format. You can add only video files. |
 |
In the process of creating a task, CVAT was not able to process the video file. The name of the failed file will be displayed on the progress bar. To fix this issue: |
Advanced configuration
Use advanced configuration to set additional parameters for the task and customize it to meet specific needs or requirements.
For more information, consult Advanced configuration
How to delete a frame from a task
You can delete the current frame from a task. This frame will not be presented either in the UI or in the exported annotation. Thus, it is possible to mark corrupted frames that are not subject to annotation.
-
Go to the Job annotation view and click on the Delete frame button (Alt+Del).
Note
When you delete with the shortcut, the frame will be deleted immediately without additional confirmation.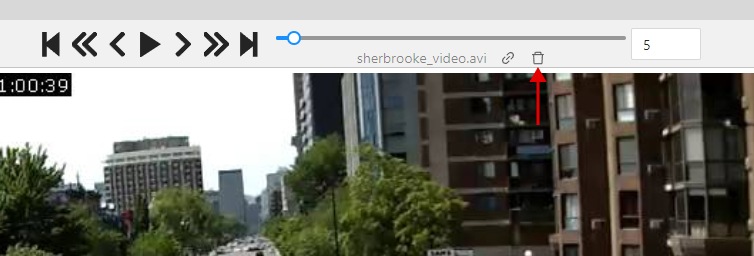
-
After that you will be asked to confirm frame deleting.
Note
all annotations from that frame will be deleted, unsaved annotations will be saved and the frame will be invisible in the annotation view (Until you make it visible in the settings). If there is some overlap in the task and the deleted frame falls within this interval, then this will cause this frame to become unavailable in another job as well. -
When you delete a frame in a job with tracks, you may need to adjust some tracks manually. Common adjustments are:
- Add keyframes at the edges of the deleted interval for the interpolation to look correct;
- Move the keyframe start or end keyframe to the correct side of the deleted interval.
Configure deleted frames visibility and navigation
If you need to enable showing the deleted frames, you can do it in the settings.
-
Go to the settings and chose Player settings.
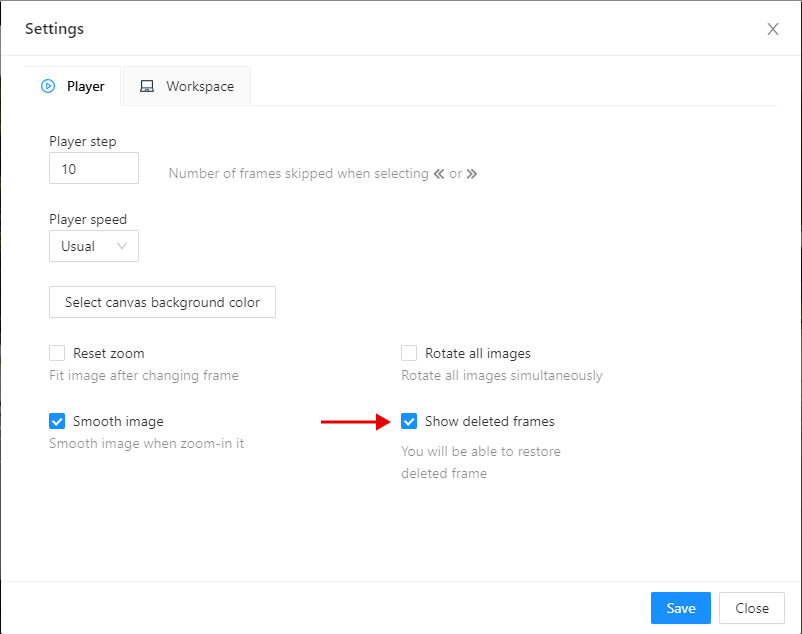
-
Click on the Show deleted frames checkbox. And close the settings dialog.

-
Then you will be able to navigate through deleted frames. But annotation tools will be unavailable. Deleted frames differ in the corresponding overlay.
-
There are ways to navigate through deleted frames without enabling this option:
- Go to the frame via direct navigation methods: navigation slider or frame input field,
- Go to the frame via the direct link, for example:
/api/tasks/{id}/jobs/{id}?frame={frame_id}.
-
Navigation with step will not count deleted frames.
Restore deleted frame
You can also restore deleted frames in the task.
-
Turn on deleted frames visibility, as it was told in the previous part, and go to the deleted frame you want to restore.
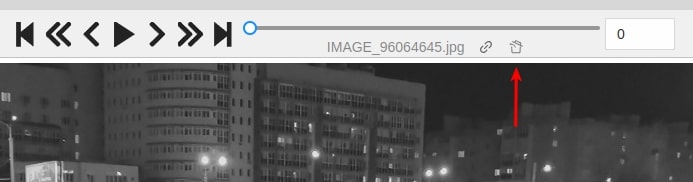
-
Click on the Restore icon. The frame will be restored immediately.
3.3 - Jobs
On the Jobs page, users (for example, with the worker role) can see the jobs that are assigned to them without having access to the task page, as well as track progress, sort, and apply filters to the job list.
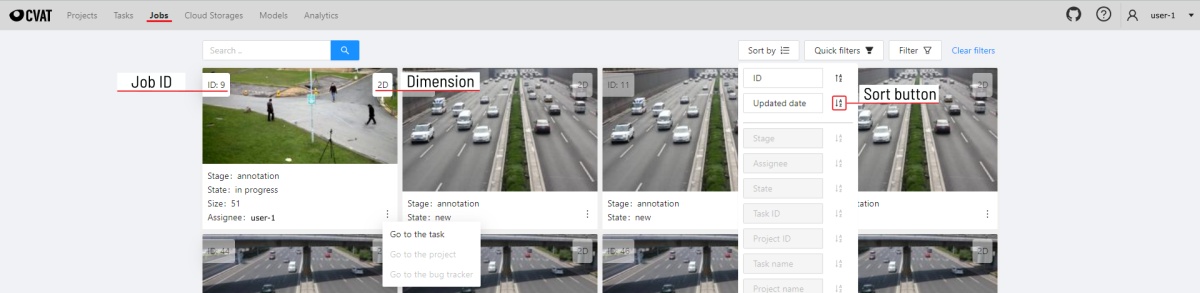
On the page, there is a list of jobs presented in the form of tiles, where each tile is one job. Each element contains:
- job ID
- dimension
2Dor3D - preview
- stage and state
- when hovering over an element, you can see:
- size
- assignee
- menu to navigate to a task, project, or bug tracker.
Note
To open the job in a new tab, click on the job by holdingCtrl.
In the upper left corner, there is a search bar, using which you can find the job by assignee, stage, state, etc. In the upper right corner, there are sorting, quick filters, and filter.
Filter
Note
Applying a filter disables the quick filter.The filter works similarly to the filters for annotation, you can create rules from properties, operators, and values and group rules into groups. For more details, consult the filter section. Learn more about date and time selection.
To clear all filters, select Clear filters.
Supported properties for jobs list
| Properties | Supported values | Description |
|---|---|---|
State |
all the state names | The state of the job (can be changed in the menu inside the job) |
Stage |
all the stage names | The stage of the job (is specified by a drop-down list on the task page) |
Dimension |
2D or 3D |
Depends on the data format (read more in creating an annotation task) |
Assignee |
username | Assignee is the user who is working on the job. (is specified on task page) |
Last updated |
last modified date and time (or value range) | The date can be entered in the dd.MM.yyyy HH:mm format or by selecting the date in the window that appears when you click on the input field |
ID |
number or range of job ID | |
Task ID |
number or range of task ID | |
Project ID |
number or range of project ID | |
Task name |
task name | Set when creating a task, can be changed on the (task page) |
Project name |
project name | Specified when creating a project, can be changed on the (project section) |
3.4 - Cloud storages
Overview of the cloud storages page.
CVAT supports Amazon S3, Azure Blob Storage, Backblaze B2 (S3-compatible) and Google Cloud Storage for importing and exporting annotation datasets.
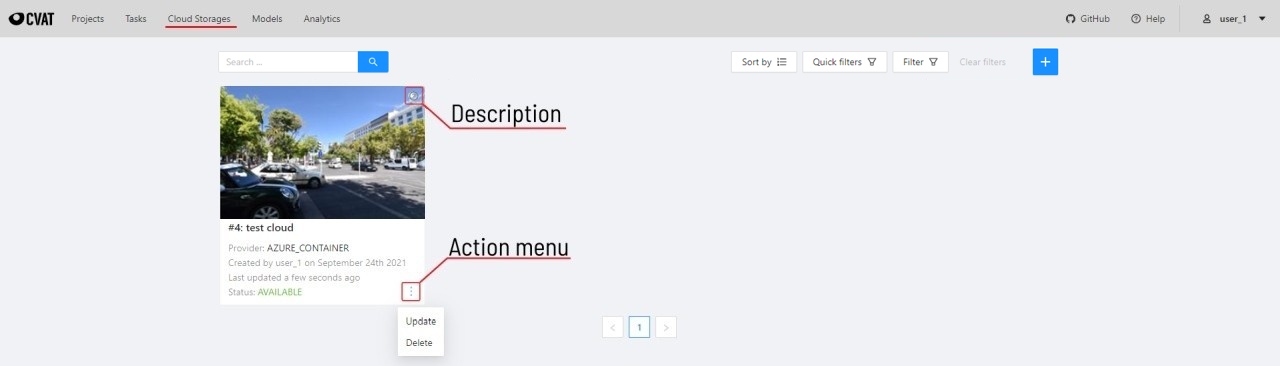
The cloud storages page contains elements, each of them relating to a separate cloud storage.
Each element contains: preview, cloud storage name, provider, creation and update info, status,
? button for displaying the description and the actions menu.
Each button in the action menu is responsible for a specific function:
Update— update this cloud storageDelete— delete cloud storage.
![]()
This preview will appear when it is impossible to get a real preview (e.g. storage is empty or invalid credentials were used).
In the upper left corner, there is a search bar, using which you can find the cloud storage by display name, provider, etc. In the upper right corner, there are sorting, quick filters, and filter.
Filter
Note
Applying the filter disables the quick filters.The filter works similarly to the filters for annotation, you can create rules from properties, operators, and values and group rules into groups. For more details, consult the filter section. Learn more about date and time selection.
To clear all filters, select Clear filters.
Supported properties for cloud storages list
| Properties | Supported values | Description |
|---|---|---|
ID |
number or range of task ID | |
Provider type |
Amazon S3, Azure Blob Storage, Google Cloud Storage |
|
Credentials type |
Key & secret key, Account name and token,Anonymous access, Key file |
|
Resource name |
Bucket name or container name |
|
Display name |
Set when creating cloud storage | |
Description |
Description of the cloud storage | |
Owner |
username | The user who owns the project, task, or job |
Last updated |
last modified date and time (or value range) | The date can be entered in the dd.MM.yyyy HH:mm format or by selecting the date in the window that appears when you select the input field |
Note: Backblaze B2 uses the
Amazon S3provider type (S3-compatible).
Select the + button to attach a new cloud storage.
3.5 - Attach cloud storage
Instructions on how to attach cloud storage using UI
In CVAT, you can use Amazon S3, Azure Blob Storage, Backblaze B2, and Google Cloud Storage storages to import and export image datasets for your tasks.
Check out:
Amazon S3
Create a bucket
To create bucket, do the following:
-
Create an AWS account.
-
Go to the Amazon S3 console, and select Create bucket.
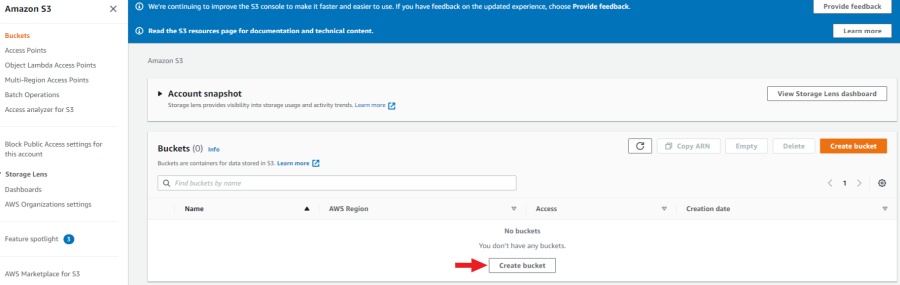
-
Specify the name and region of the bucket. You can also copy the settings of another bucket by selecting Choose bucket.
-
Enable Block all public access. For access, you will use access key ID and secret access key.
-
Select Create bucket.
A new bucket will appear on the list of buckets.
Upload data
Note
The manifest file is optional.You need to upload data for annotation and the manifest.jsonl file.
-
Prepare data. For more information, refer on how to prepare the dataset.
-
Open the bucket and select Upload.

-
Drag the manifest file and image folder on the page and select Upload:
Access permissions
Authenticated access
To add access permissions, do the following:
-
Go to IAM and select Add users.
-
Set User name and enable Access key - programmatic access.
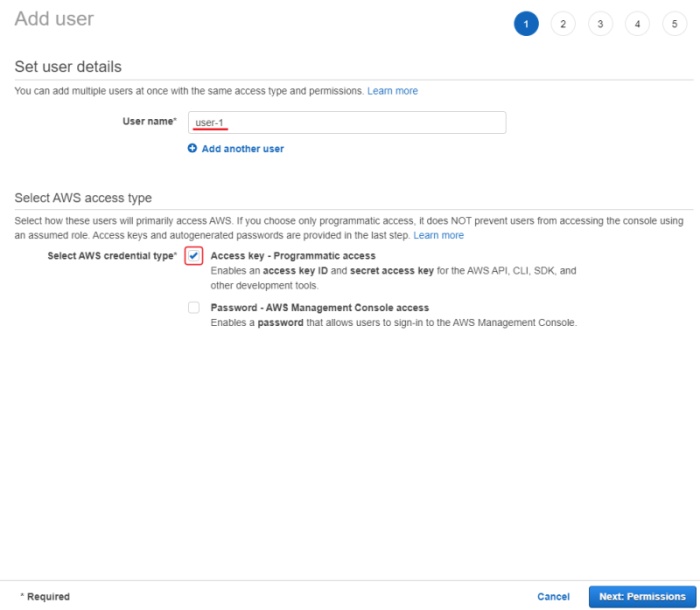
-
Select Next: Permissions.
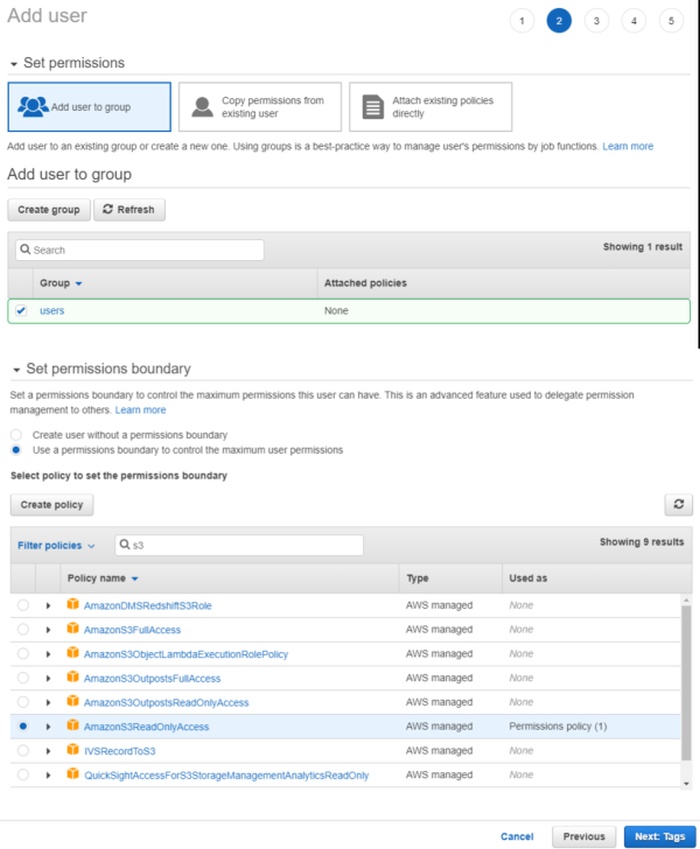
-
Select Create group, enter the group name.
-
Use search to find and select:
- For read-only access: AmazonS3ReadOnlyAccess.
- For full access: AmazonS3FullAccess.
-
(Optional) Add tags for the user and go to the next page.
-
Save Access key ID and Secret access key.
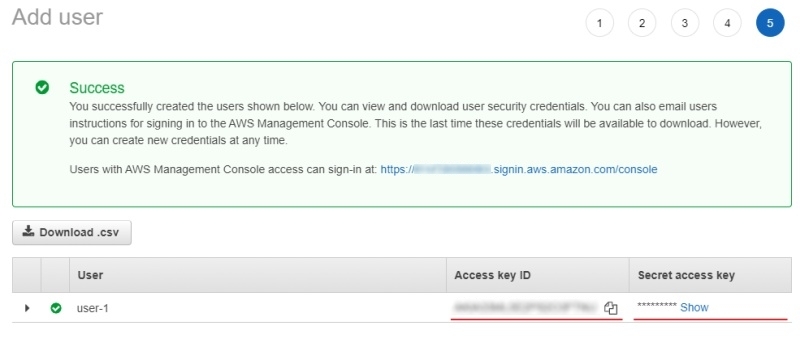
For more information, consult Creating an IAM user in your AWS account
Anonymous access
On how to grant public access to the bucket, consult Configuring block public access settings for your S3 buckets
Attach Amazon S3 storage
To attach storage, do the following:
- Log into CVAT and in the separate tab open your bucket page.
- In the CVAT, on the top menu select Cloud storages > on the opened page select +.
Fill in the following fields:
| CVAT | Amazon S3 |
|---|---|
| Display name | Preferred display name for your storage. |
| Description | (Optional) Add description of storage. |
| Provider | From drop-down list select Amazon S3. |
| Bucket name | Name of the Bucket. |
| Authentication type | Depends on the bucket setup: |
| Region | (Optional) Choose a region from the list or add a new one. For more information, consult Available locations. |
| Prefix | (Optional) Prefix is used to filter bucket content. By setting a default prefix, you ensure that only data from a specific folder in the cloud is used in CVAT. This will affect which files you see when creating a task with cloud data. |
| Manifests | (Optional) Select + Add manifest and enter the name of the manifest file with an extension. For example: manifest.jsonl. |
After filling in all the fields, select Submit.
Amazon S3 manifest file
Note
The manifest file is optional.To prepare the manifest file, do the following:
-
Go to AWS CLI and run script for prepare manifest file.
-
Perform the installation, following the aws-shell manual,
You can configure credentials by runningaws configure.
You will need to enterAccess Key IDandSecret Access Keyas well as the region.aws configure Access Key ID: <your Access Key ID> Secret Access Key: <your Secret Access Key> -
Copy the content of the bucket to a folder on your computer:
aws s3 cp <s3://bucket-name> <yourfolder> --recursive -
After copying the files, you can create a manifest file as described in prepare manifest file section:
python <cvat repository>/utils/dataset_manifest/create.py --output-dir <yourfolder> <yourfolder> -
When the manifest file is ready, upload it to the S3 bucket:
-
For read and write permissions when you created the user, run:
aws s3 cp <yourfolder>/manifest.jsonl <s3://bucket-name> -
For read-only permissions, use the download through the browser, select upload, drag the manifest file to the page and select upload.
-
Video tutorial: Add Amazon S3 as Cloud Storage in CVAT
Backblaze B2
Backblaze B2 is an S3-compatible cloud storage service. It can be used in CVAT by selecting Amazon S3 as the provider and specifying the Backblaze B2 endpoint (for example, https://s3.us-west-004.backblazeb2.com).
Create a bucket
To create a B2 bucket, do the following:
- Create a Backblaze account or log into an existing one.
- In the Backblaze console, go to B2 Cloud Storage > Buckets.
- Select Create a Bucket.
- Configure your bucket:
- Bucket Unique Name: Enter a globally unique name for your bucket.
- Files in Bucket: Select Private for secure access or Public for anonymous access.
- Default Encryption: (Optional) Enable server-side encryption for added security.
- Object Lock: (Optional) Enable if you need compliance features.
- Select Create a Bucket.
The new bucket will appear in your buckets list.
Upload data
Note
The manifest file is optional.You need to upload data for annotation and optionally the manifest.jsonl file.
- Prepare data. For more information, refer on how to prepare the dataset.
- Open the bucket and select Upload/Download.
- Drag and drop files or folders, or select Browse files to upload your data.
Alternatively, you can use the Backblaze CLI or any S3-compatible tool like the AWS CLI with B2 endpoints.
Access permissions
To access your B2 bucket from CVAT, you need to create Application Keys:
- In the Backblaze console, go to App Keys.
- Select Add a New Application Key.
- Configure the key:
- Name of Key: Enter a descriptive name (e.g., “CVAT Access”).
- Allow access to Bucket(s): Select the specific bucket you created, or choose All for access to all buckets.
- Type of Access: Select Read and Write for full access, or Read Only if you only need to import data.
- Allow List All Bucket Names: Enable if you want to list all buckets.
- File name prefix: (Optional) Restrict access to specific file prefixes.
- Duration: (Optional) Set an expiration time for the key.
- Select Create New Key.
- Important: Save the keyID and applicationKey immediately. The applicationKey is only shown once and cannot be retrieved later.
Warning
Store your applicationKey securely. It will only be displayed once during creation and cannot be recovered later.For more information, consult B2 Application Keys.
Attach Backblaze B2 storage
To attach B2 storage to CVAT, do the following:
- Log into CVAT.
- In CVAT, on the top menu select Cloud storages > on the opened page select +.
Fill in the following fields:
| CVAT field | Backblaze B2 value |
|---|---|
| Display name | Preferred display name for your storage. |
| Description | (Optional) Add a description of the storage. |
| Provider | From the drop-down list, select Amazon S3 (Backblaze B2 is S3-compatible). |
| Bucket name | Name of your B2 bucket. |
| Authentication type | Select Key ID and secret access key pair. |
| Access key ID | Enter the keyID from your B2 Application Key. |
| Secret access key | Enter the applicationKey from your B2 Application Key. |
| Endpoint URL | Required for B2: Enter your B2 S3 endpoint URL (for example, https://s3.us-west-004.backblazeb2.com). You can find the endpoint in your bucket details page. |
| Prefix | (Optional) Use to limit CVAT to a specific folder within the bucket. |
| Manifests | (Optional) Select + Add manifest and specify a manifest file name such as manifest.jsonl. |
Important
When using Backblaze B2, you must specify the Endpoint URL field with your B2 S3-compatible endpoint (e.g.,https://s3.us-west-004.backblazeb2.com).
This tells CVAT to connect to Backblaze instead of Amazon S3.
After filling in all the fields, select Submit.
Google Cloud Storage
Create a bucket
To create bucket, do the following:
-
Create Google account and log into it.
-
On the Google Cloud page, select Start Free, then enter the required data and accept the terms of service.
Note
Google requires to add payment, you will need a bank card to accomplish step 2. -
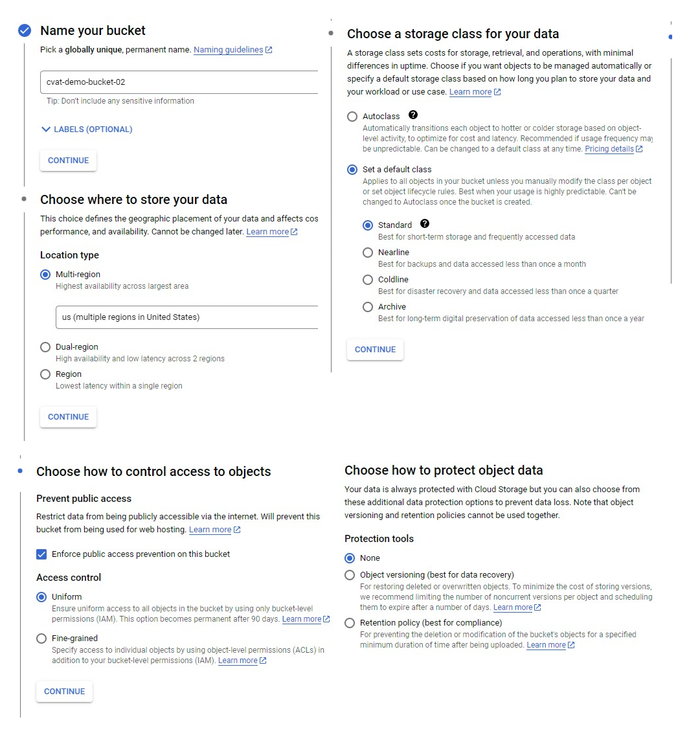
Create a Bucket with the following parameters:
- Name your bucket: Unique name.
- Choose where to store your data: Set up a location nearest to you.
- Choose a storage class for your data:
Set a default class>Standard. - Choose how to control access to objects:
Enforce public access prevention on this bucket>Uniform(default). - How to protect data:
None
You will be forwarded to the bucket.
Upload data
Note
The manifest file is optional.You need to upload data for annotation and the manifest.jsonl file.
- Prepare data. For more information, consult prepare the dataset.
- Open the bucket and from the top menu select Upload files or Upload folder (depends on how your files are organized).
Access permissions
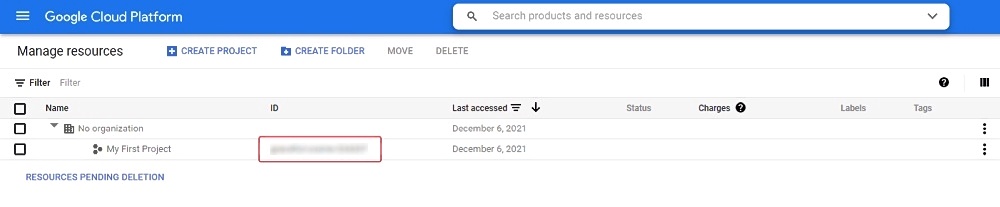
To access Google Cloud Storage get a Project ID from cloud resource manager page
And follow instructions below based on the preferable type of access.
Authenticated access
For authenticated access you need to create a service account and key file.
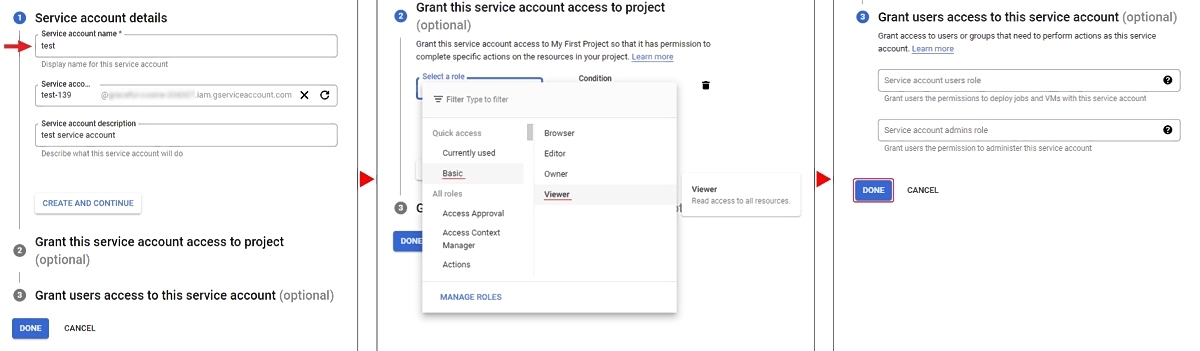
To create a service account:
- On the Google Cloud platform, go to IAM & Admin > Service Accounts and select +Create Service Account.
- Enter your account name and select Create And Continue.
- Select a role, for example Basic > Viewer, and select Continue.
- (Optional) Give access rights to the service account.
- Select Done.
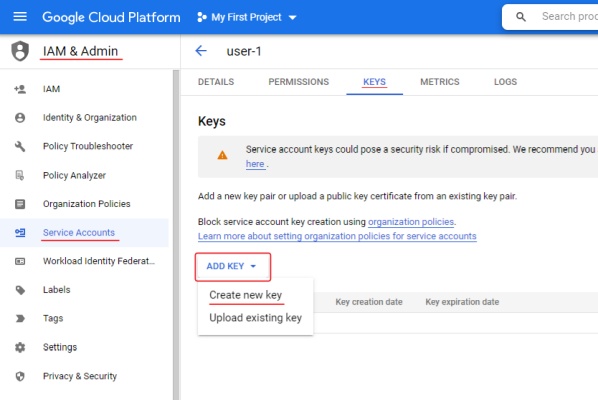
To create a key:
- Go to IAM & Admin > Service Accounts > select on account name > Keys.
- Select Add key and select Create new key > JSON
- Select Create. The key file will be downloaded automatically.
For more information about keys, consult Learn more about creating keys.
Anonymous access
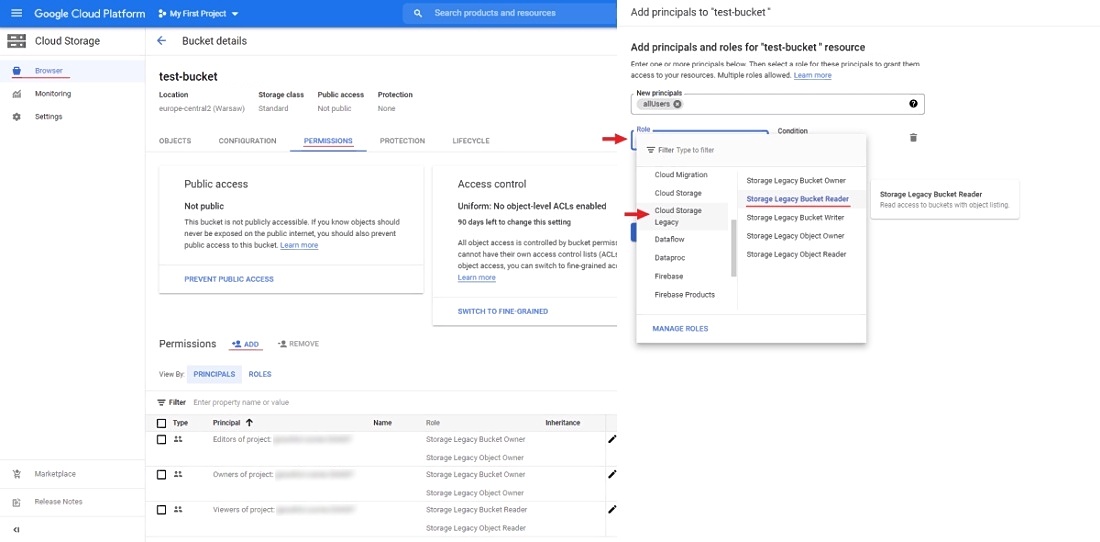
To configure anonymous access:
- Open the bucket and go to the Permissions tab.
- Click + Grant access to add new principals.
- In the New principals field specify
allUsers, select roles:Cloud Storage Legacy>Storage Legacy Bucket Reader. - Select Save.
Now you can attach the Google Cloud Storage bucket to CVAT.
Attach Google Cloud Storage
To attach storage, do the following:
- Log into CVAT and in the separate tab open your bucket page.
- In the CVAT, on the top menu select Cloud storages > on the opened page select +.
Fill in the following fields:
| CVAT | Google Cloud Storage |
|---|---|
| Display name | Preferred display name for your storage. |
| Description | (Optional) Add description of storage. |
| Provider | From drop-down list select Google Cloud Storage. |
| Bucket name | Name of the bucket. You can find it on the storage browser page. |
| Authentication type | Depends on the bucket setup: Advanced: For self-hosted solution, if the key file was not attached, then environment variable GOOGLE_APPLICATION_CREDENTIALS that was specified for an environment will be used. For more information, consult Authenticate to Cloud services using client libraries. |
| Prefix | (Optional) Used to filter data from the bucket. By setting a default prefix, you ensure that only data from a specific folder in the cloud is used in CVAT. This will affect which files you see when creating a task with cloud data. |
| Project ID | Project ID. For more information, consult projects page and cloud resource manager page. Note: Project name does not match the project ID. |
| Location | (Optional) Choose a region from the list or add a new one. For more information, consult Available locations. |
| Manifests | (Optional) Select + Add manifest and enter the name of the manifest file with an extension. For example: manifest.jsonl. |
After filling in all the fields, select Submit.
Video tutorial: Add Google Cloud Storage as Cloud Storage in CVAT
Microsoft Azure Blob Storage
Create a bucket
To create bucket, do the following:
-
Create an Microsoft Azure account and log into it.
-
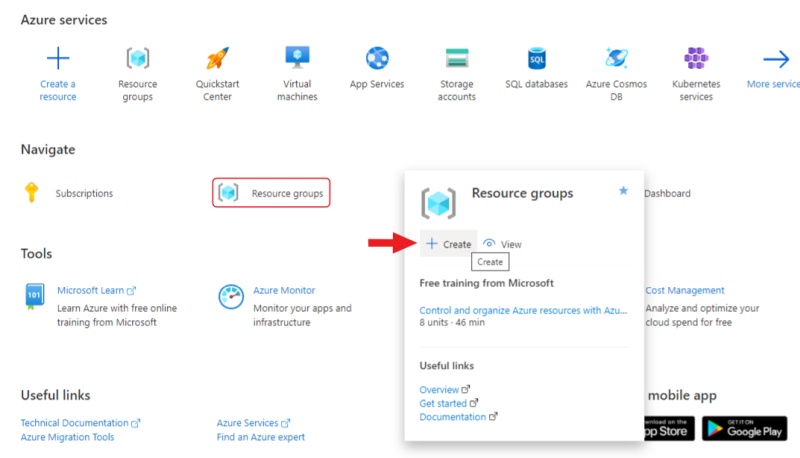
Go to Azure portal, hover over the resource , and in the pop-up window select Create.
-
Enter a name for the group and select Review + create, check the entered data and select Create.
-
Go to the resource groups page, navigate to the group that you created and select Create resources.
-
On the marketplace page, use search to find Storage account.

-
Select on Storage account and on the next page select Create.
-
On the Basics tab, fill in the following fields:
- Storage account name: to access container from CVAT.
- Select a region closest to you.
- Select Performance > Standard.
- Select Local-redundancy storage (LRS).
- Select next: Advanced>.
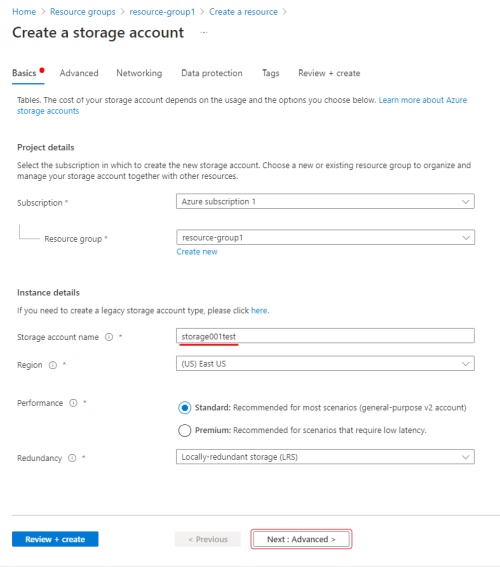
-
On the Advanced page, fill in the following fields:
- (Optional) Disable Allow enabling public access on containers to prohibit anonymous access to the container.
- Select Next > Networking.
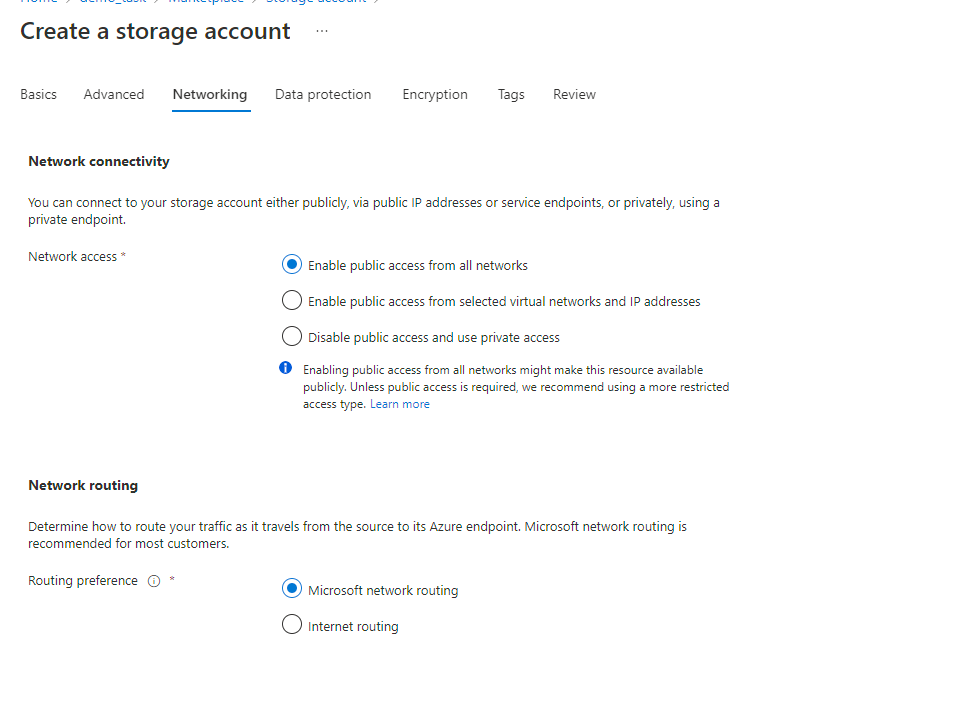
-
On the Networking tab, fill in the following fields:
-
If you want to change public access, enable Public access from all networks.
-
Select Next>Data protection.
You do not need to change anything in other tabs until you need some specific setup.
-
-
Select Review and wait for the data to load.
-
Select Create. Deployment will start.
-
After deployment is over, select Go to resource.
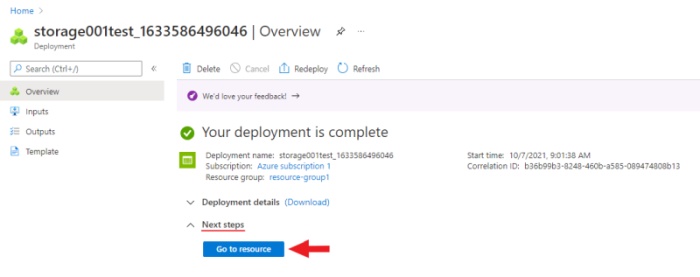
Create a container
To create container, do the following:
-
Go to the containers section and on the top menu select +Container
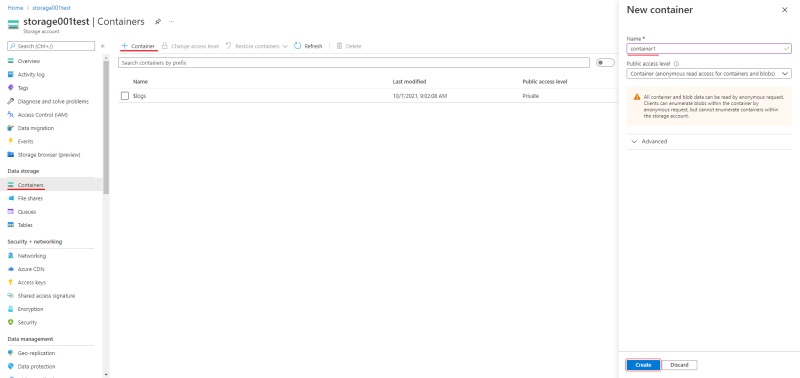
-
Enter the name of the container.
-
(Optional) In the Public access level drop-down, select type of the access.
Note: this field will inactive if you disabled Allow enabling public access on containers. -
Select Create.
Upload data
You need to upload data for annotation and the manifest.jsonl file.
-
Prepare data. For more information, refer on how to prepare the dataset.
-
Go to container and select Upload.
-
Select Browse for files and select images.
Note
If images are in folder, specify folder in the Advanced settings > Upload to folder. -
Select Upload.
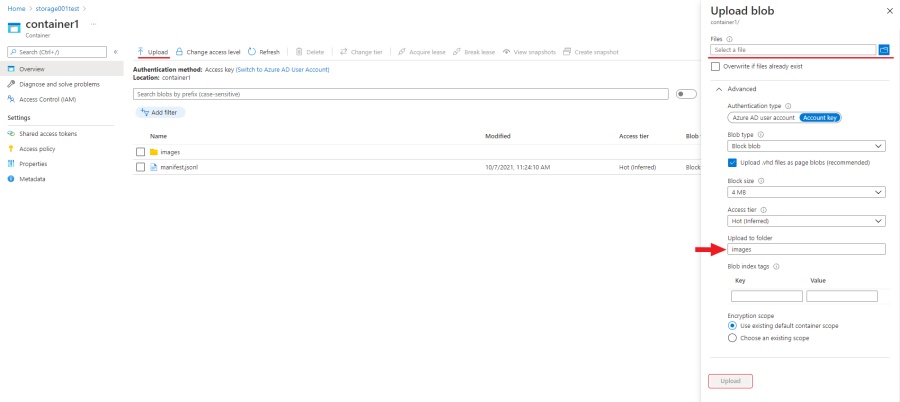
SAS token and connection string
Use the SAS token or connection string to grant secure access to the container.
To configure the credentials:
- Go to Home > Resource groups > You resource name > Your storage account.
- On the left menu, select Shared access signature.
- Change the following fields:
- Allowed services: Enable Blob . Disable all other fields.
- Allowed resource types: Enable Container and Object. Disable all other fields.
- Allowed permissions: Enable Read, Write, and List. Disable all other fields.
- Start and expiry date: Set up start and expiry dates.
- Allowed protocols: Select HTTPS and HTTP
- Leave all other fields with default parameters.
- Select Generate SAS and connection string and copy SAS token or Connection string.
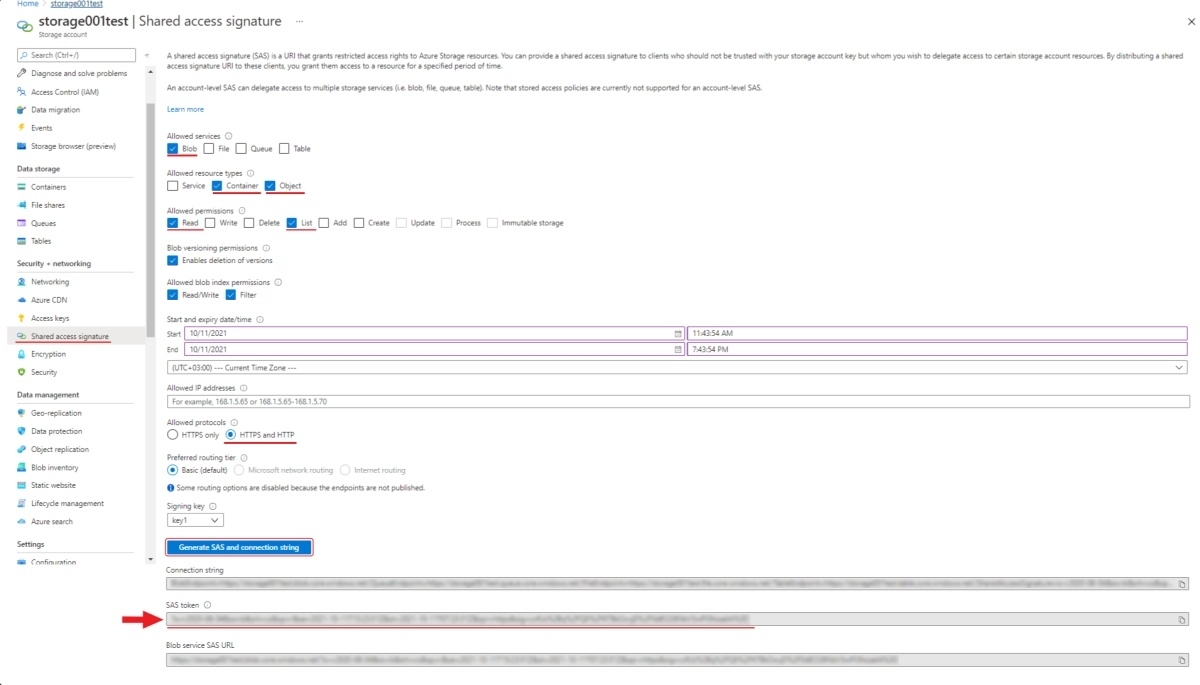
Personal use
For personal use, you can use the Access Key from your storage account in the CVAT SAS Token field.
To get the Access Key:
- In the Azure Portal, go to the Security + networking > Access Keys
- Select Show and copy the key.
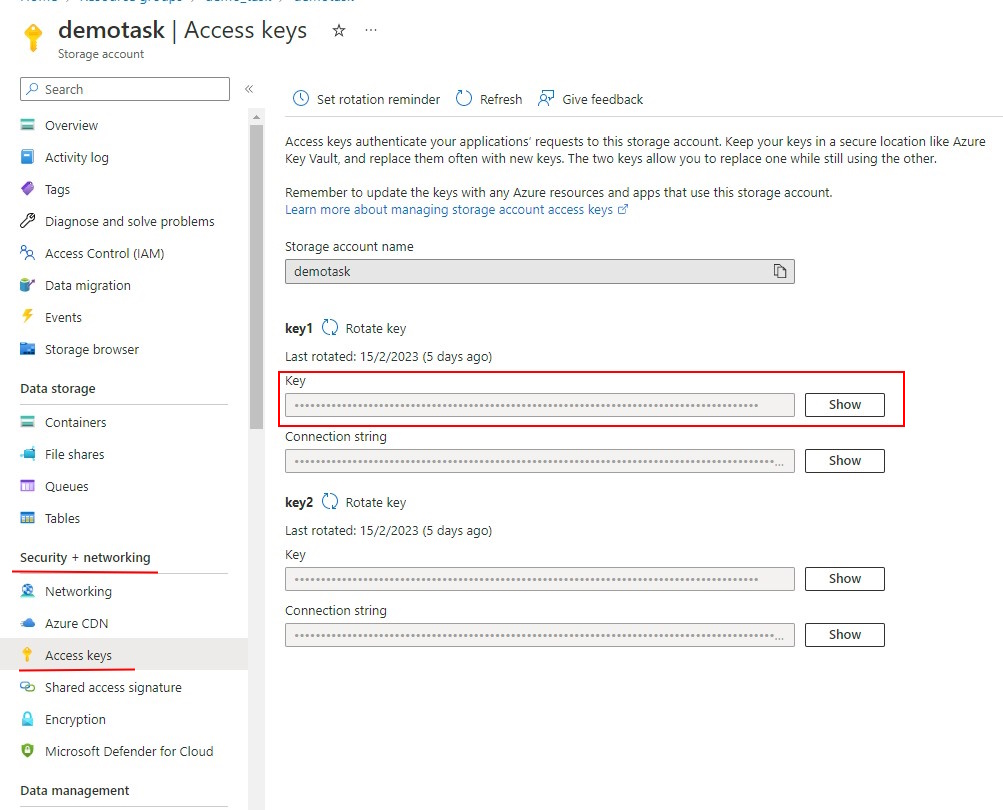
Attach Azure Blob Storage
To attach storage, do the following:
- Log into CVAT and in the separate tab open your bucket page.
- In the CVAT, on the top menu select Cloud storages > on the opened page select +.
Fill in the following fields:
| CVAT | Azure |
|---|---|
| Display name | Preferred display name for your storage. |
| Description | (Optional) Add description of storage. |
| Provider | From drop-down list select Azure Blob Storage. |
| Container name` | Name of the cloud storage container. |
| Authentication type | Depends on the container setup. Account name and SAS token:
|
| Prefix | (Optional) Used to filter data from the bucket. By setting a default prefix, you ensure that only data from a specific folder in the cloud is used in CVAT. This will affect which files you see when creating a task with cloud data. |
| Manifests | (Optional) Select + Add manifest and enter the name of the manifest file with an extension. For example: manifest.jsonl. |
After filling in all the fields, select Submit.
Video tutorial: Add Microsoft Azure Blob Storage as Cloud Storage in CVAT
Prepare the dataset
For example, the dataset is The Oxford-IIIT Pet Dataset:
- Download the archive with images.
- Unpack the archive into the prepared folder.
- Create a manifest. For more information, consult Dataset manifest:
python <cvat repository>/utils/dataset_manifest/create.py --output-dir <your_folder> <your_folder>
3.6 - Requests
The Requests page allows users to track the status of data processing jobs (such as exporting annotations or importing datasets) and most of the background processes (such as task creation, quality calculation, report preparation with analytics, merge consensus jobs). Users can monitor progress, download results, and check for errors if they occur.
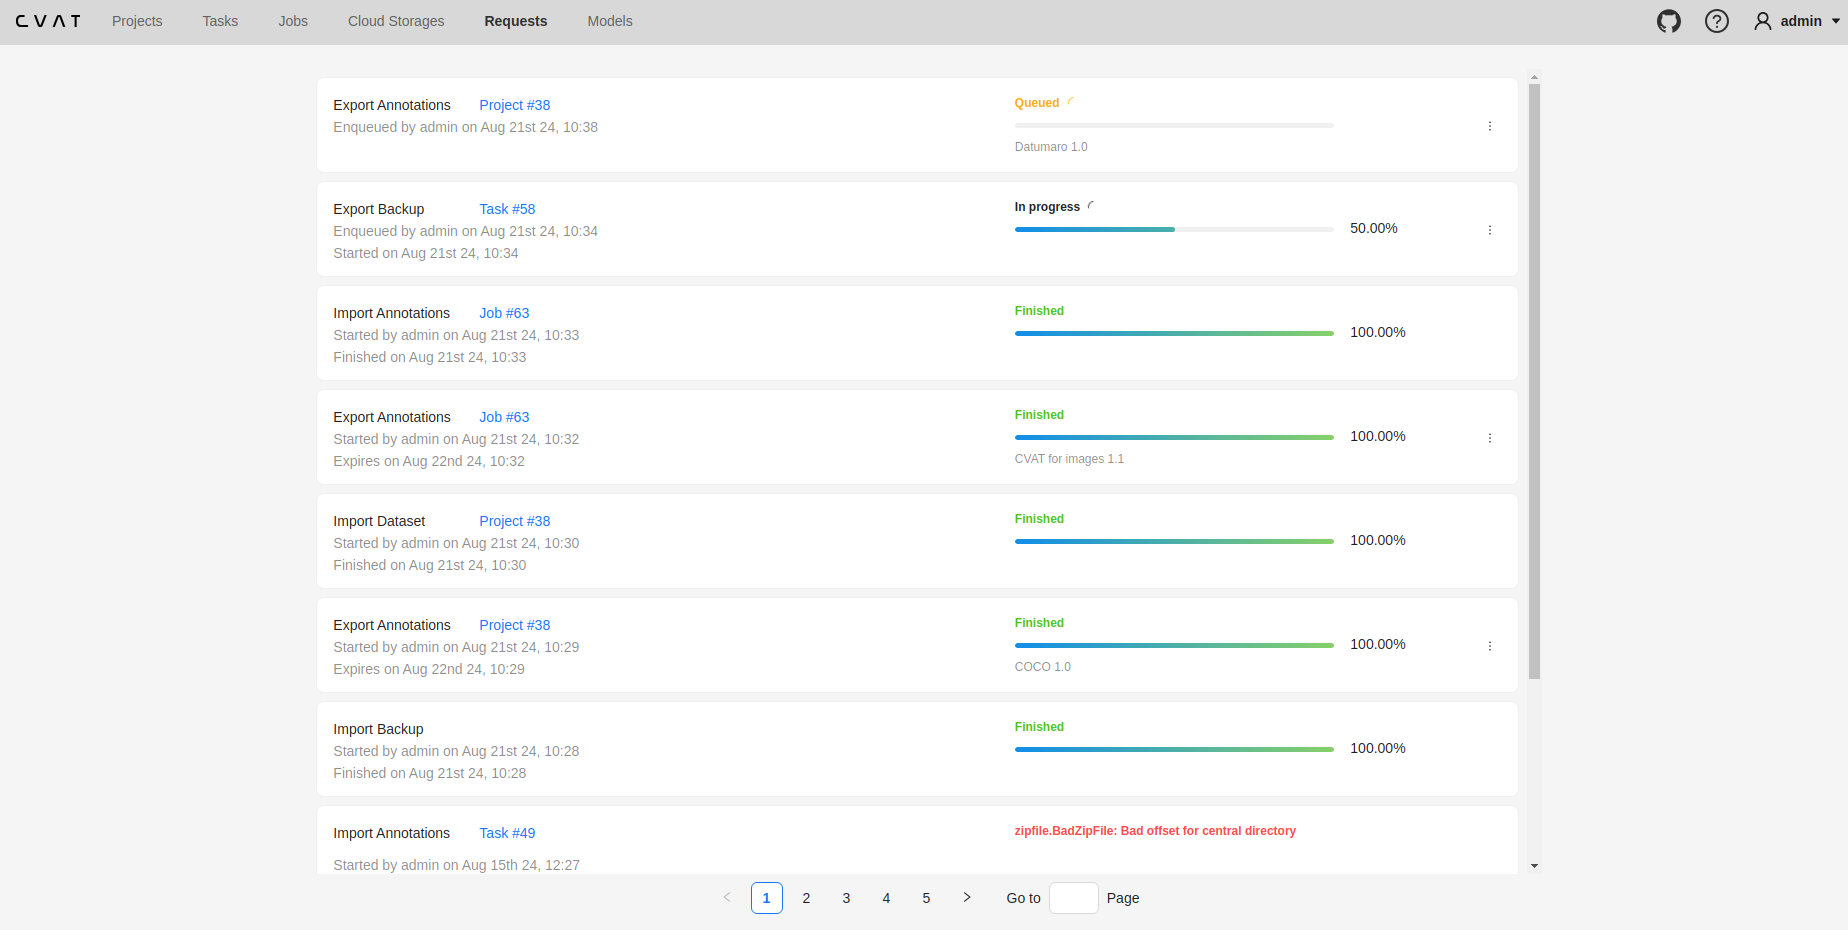
Requests List
On the Requests page, requests are displayed as cards. Each card contains the following details (if applicable):
- Operation Name
- Resource Link
- Status of the Request
- Timestamps:
- Enqueued Date
- Started Date
- Finished Date
- Result Expiration Date
- Annotations Format
- Lightweight backup (shown for backup requests created with the lightweight option)
- Menu to download the result or cancel a
Queuedjob
Note
Currently supported operations include creating tasks, importing/exporting annotations and datasets, and backups.Statuses for Requests List
The following statuses are used to indicate the state of each request:
| Status | Description |
|---|---|
In Progress |
The requested job is being executed. The progress percentage is shown. |
Queued |
The requested job is waiting to be picked up by a worker. |
Finished |
The requested job is finished. Downloading the result is available. |
Failed |
The requested job cannot be executed due to an unexpected error. The error description is available. |
3.7 - Models
To deploy the models, you will need to install the necessary components using Semi-automatic and Automatic Annotation guide. To learn how to deploy the model, read Serverless tutorial.
The Models page contains a list of deep learning (DL) models deployed for semi-automatic and automatic annotation. To open the Models page, click the Models button on the navigation bar. The list of models is presented in the form of a table. The parameters indicated for each model are the following:
Frameworkthe model is based on- model
Name - model
Type:detector- used for automatic annotation (available in detectors and automatic annotation)interactor- used for semi-automatic shape annotation (available in interactors)tracker- used for semi-automatic track annotation (available in trackers)reid- used to combine individual objects into a track (available in automatic annotation)
Description- brief description of the modelLabels- list of the supported labels (only for the models of thedetectorstype)
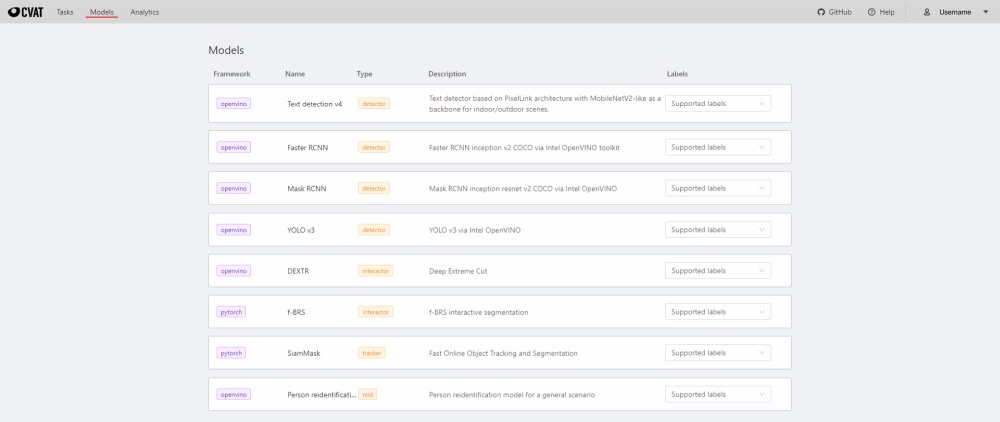
3.8 - Bulk actions
Overview
Bulk Actions allow you to select multiple resources (such as jobs, tasks, projects and more) and perform actions on all of them at once. This streamlines workflows by enabling mass updates, such as changing an assignee or state for a group of jobs, without needing to update each resource individually.
Supported Resources
- Jobs
- Tasks
- Projects
- Cloud storages
- Requests
- Models
- Webhooks
- Organization members
Typical Bulk Actions
- Update Assignee: Assign a new user to multiple jobs, tasks, or projects.
- Update State/Stage: Change the status or stage for a group of jobs.
- Delete: Remove multiple resources in one operation.
- Other field updates: Depending on resource type, other fields may be updated in bulk.
How It Works
- Selection: Select multiple resources using selection tools in the UI.
- Ctrl (Cmd for Mac) + Click: Select or deselect individual resources by holding the Ctrl key and clicking on them.
- Shift + Click: Select a range of resources by clicking the first item, holding Shift, and clicking the last item in the range.
- Select All Button: Use the “Select All” button in the top bar to select all resources on the current page.
- Click: Click anywhere outside the selected resources to reset the selection.
Note
Selection is limited to visible resources according to the current page size, filtering, and sorting options. It’s important to adjust filters or sorting before selection to bring them into view. Changing the page clears all selected resources.
- Action Menu: Once resources are selected, you can either right-click on any of them or left-click the actions menu of a selected resource. An actions appears, offering bulk operations relevant to that resource type.
- Execution: The chosen action is applied to all selected resources. Progress and status messages are shown for each item.
- Error Handling: If an operation fails for some items, the system provides feedback and allows retrying the failed items.

3.9 - Search
Overview of available search options.
Search
Search within all fields (owner, assignee, task name, task status, task mode). To execute enter a search string in search field.
The search is case insensitive.
Note
The applied search will be displayed in the URL of your browser, Thus, you can share the page with applied parameters.
4 - Account Management
Manage your CVAT account settings, team invitations, subscriptions, and single sign-on (SSO) setup.
4.1 - Registration & account access
CVAT registration and account access.
To start annotating in CVAT, you must create an account or log in to the existing one.
Check out:
- User registration
- User registration with social accounts
- Account access
- Password reset
- Change password
To create an account or log in, go to the CVAT Online login page:
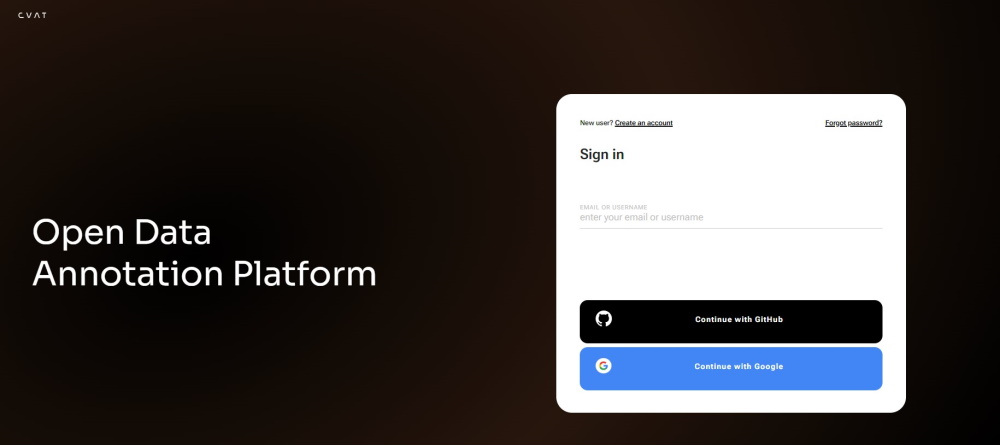
Note
By default, authentication and registration with Google and GitHub work only for CVAT Online.If you want to use Google and GitHub authentication on a local installation, consult Social auth configuration.
User registration
To register:
-
Select Create an account.
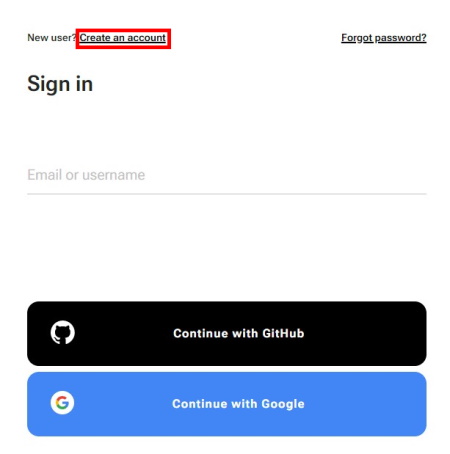
-
Fill in all blank fields, accept terms of use, and select Create an account.
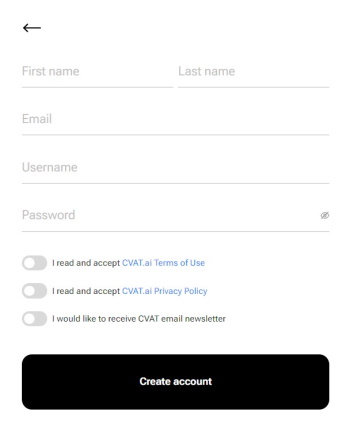
A username generates from the email automatically. You can edit it if needed.
User registration with social accounts
To register with Google or GitHub, select the button with the service name and follow the instructions.
Account access
To access your account:
- Go to the login page.
- Enter username or email. The password field will appear.
- Enter the password and click Next.
To log in with Google or GitHub, select the button with the service name.
Password reset
To reset password:
-
Go to the CVAT Online page and select Forgot password?
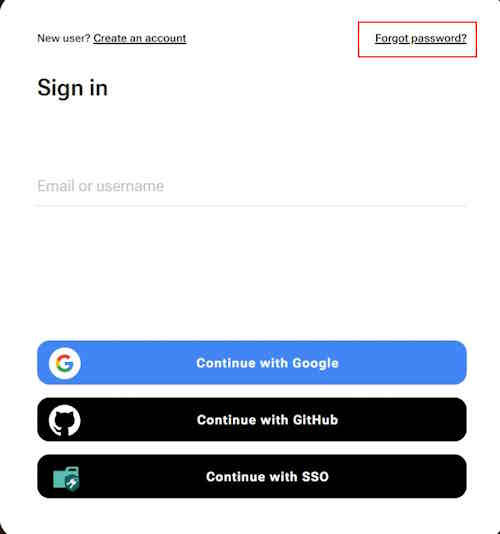
-
Enter email you used for registration and select Send.
-
Open email and select on the link from CVAT.
-
Enter new password in both fields and select Change password.
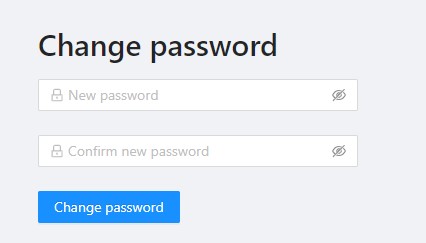
Change password
To change password:
-
Log in to your CVAT account.
-
In the top right corner, select the username.
-
Select Change password.
-
Follow the instructions on the screen.
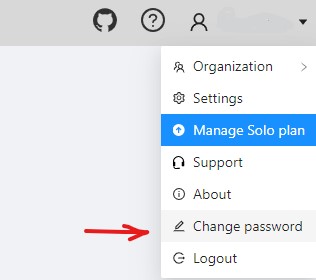
4.2 - User roles
CVAT offers two distinct types of roles:
- Global Roles: These are universal roles that apply to the entire system. Anyone who logs into the CVAT platform is automatically assigned a global role. It sets the basic permissions that every registered user has across CVAT, regardless of their specific tasks or responsibilities.
- Organization Roles: These roles determine what a user can do within the Organization, allowing for more tailored access based on the user’s specific duties and responsibilities.
Organization roles complement global roles by determining the visibility of different resources for example, tasks or jobs.
Limits: Limits are applicable to all users of CVAT Online using the Free plan and can be lifted upon choosing a subscription.
All roles are predefined and cannot be modified through the user interface.
However, within the self-hosted solution, roles can be adjusted using .rego
files stored in cvat/apps/*/rules/.
Rego is a declarative language employed for defining
OPA (Open Policy Agent) policies, and its syntax is detailed
in the OPA documentation.
Note
Once you’ve made changes to the.rego files, you must
rebuild and restart the Docker Compose for those changes to be applied.
In this scenario, be sure to include the docker-compose.dev.yml compose
configuration file when executing the Docker Compose command.
See:
Global roles in CVAT
Note
Global roles can be adjusted only on self-hosted solution.CVAT has implemented three Global roles, categorized as user Groups. These roles are:
| Role | Description |
|---|---|
| Administrator | An administrator possesses unrestricted access to the CVAT instance and all activities within this instance. The administrator has visibility over all tasks and projects, with the ability to modify or manage each comprehensively. This role is exclusive to self-hosted instances, ensuring comprehensive oversight and control. |
| User (default role) |
A User is a default role who is assigned to any user who is registered in CVAT*. Users can view and manage all tasks and projects within their registered accounts, but their activities are subject to specific limitations, see Free plan. * If a user, that did not have a CVAT account, has been invited to the organization by the organization owner or maintainer, it will be automatically assigned the Organization role and will be subject to the role’s limitations when operating within the Organization. |
| Worker | Workers are limited to specific functionalities and do not have the permissions to create tasks, assign roles, or perform other administrative actions. Their activities are primarily focused on viewing and interacting with the content within the boundaries of their designated roles (validation or annotation of the jobs). |
Organization roles in CVAT
Organization Roles are available only within the CVAT Organization.
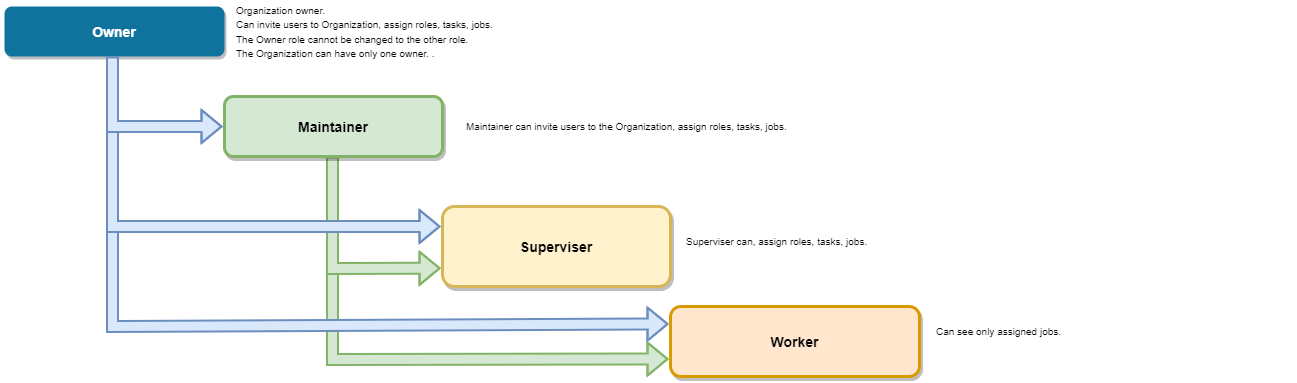
Organization roles are assigned when users are invited to the Organization.
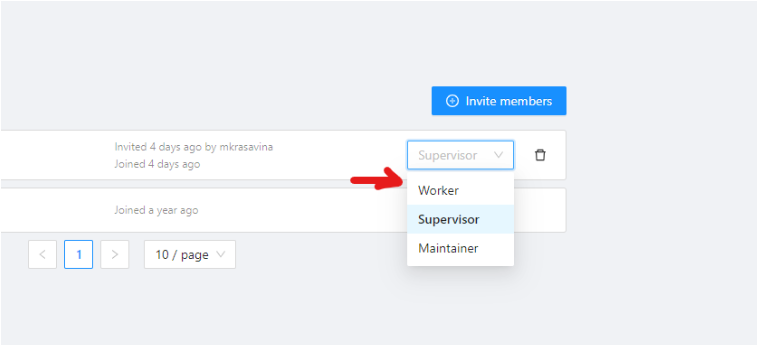
There are the following roles available in CVAT:
| Role | Description |
|---|---|
| Owner | The Owner is the person who created the Organization. The Owner role is assigned to the creator of the organization by default. This role has maximum capabilities and cannot be changed or assigned to the other user. The Owner has no extra restrictions in the organization and is only limited by the chosen organization plan (see Free and Team plans). Owners can invite other users to the Organization and assign roles to the invited users so the team can collaborate. |
| Maintainer | The maintainer is the person who can invite users to organization, create and update tasks and jobs, and see all tasks within the organization. Maintainer has complete access to Cloud Storages, and the ability to modify members and their roles. |
| Supervisor | The supervisor is a manager role. Supervisor can create and assign jobs, tasks, and projects to the Organization members. Supervisor cannot invite new members and modify members roles. |
| Worker | Workers’ primary focus is actual annotation and reviews. They are limited to specific functionalities and has access only to the jobs assigned to them. |
Job Stage
Job Stage can be assigned to any team member.
Stages are not roles.
Jobs can have an assigned user (with any role) and that Assignee will perform a Stage specific work which is to annotate, validate, or accept the job.
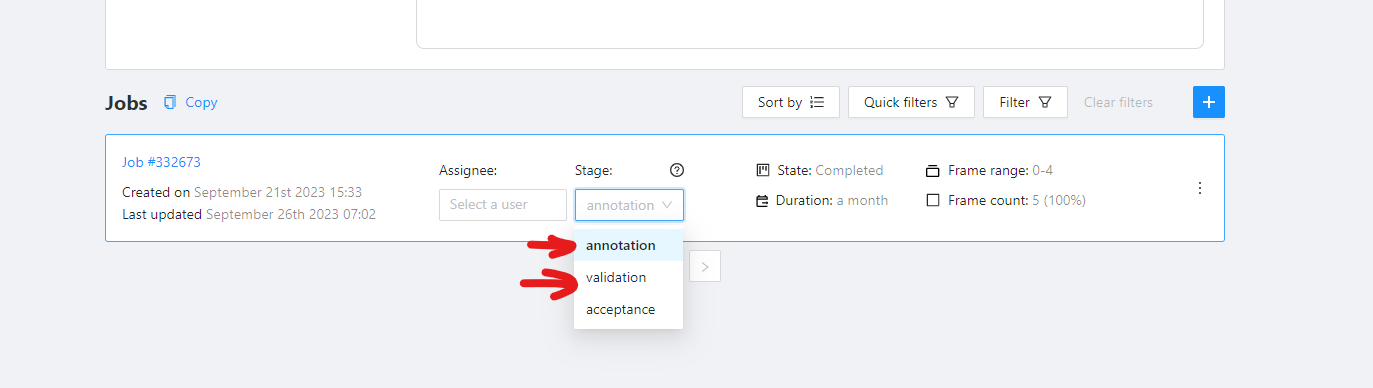
Job Stage can be:
| Stage | Description |
|---|---|
| Annotation | Provides access to annotation tools. Assignees will be able to see their assigned jobs and annotate them. By default, assignees with the Annotation stage cannot report annotation errors or issues. |
| Validation | Grants access to QA tools. Assignees will see their assigned jobs and can validate them while also reporting issues. By default, assignees with the Validation stage cannot correct errors or annotate datasets. |
| Acceptance | Does not grant any additional access or change the annotator’s interface. It just marks the job as done. |
Any Assignee can modify their assigned Stage specific functions via the annotation interface toolbar:

- Standard: switches interface to Annotation mode.
- Review: switches interface to the Validation mode.
4.3 - Organization
Using organization in CVAT.
Organization is a feature for teams of several users who work together on projects and share tasks.
Create an Organization, invite your team members, and assign roles to make the team work better on shared tasks.
See:
- Personal workspace
- Create new organization
- Organization page
- Invite members into organization: menu and roles
- Delete organization
Personal workspace
The account’s default state is activated when no Organization is selected.
If you do not select an Organization, the system links all new resources directly to your personal account, that inhibits resource sharing with others.
When Personal workspace is selected, it will be marked with a tick in the menu.
Create new organization
To create an organization, do the following:
-
Log in to the CVAT.
-
On the top menu, click your Username > Organization > + Create.

-
Fill in the following fields and click Submit.
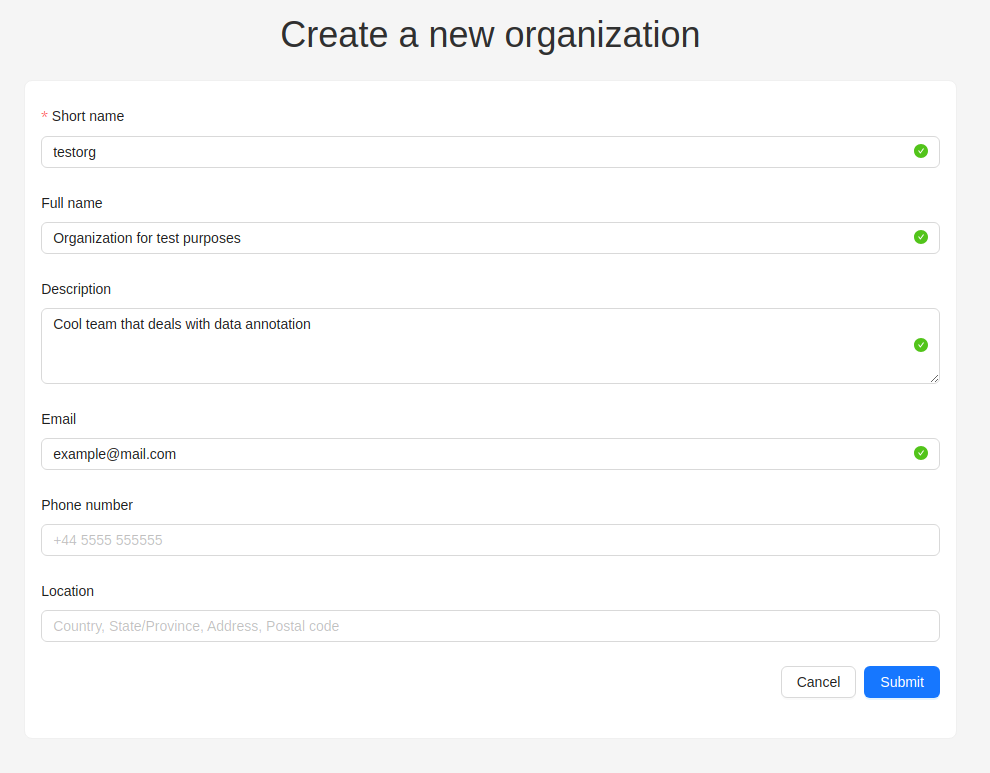
| Field | Description |
|---|---|
| Short name | A name of the organization that will be displayed in the CVAT menu. |
| Full name | Optional. Full name of the organization. |
| Description | Optional. Description of organization. |
| Optional. Your email. | |
| Phone number | Optional. Your phone number. |
| Location | Optional. Organization address. |
Upon creation, the organization page will open automatically.
For future access to your organization, navigate to Username > Organization
Switching between organizations
If you have more than one Organization, it is possible to switch between these Organizations at any given time.
Follow these steps:
- In the top menu, select your Username > Organization.
- From the drop-down menu, under the Personal space section, choose the desired Organization.
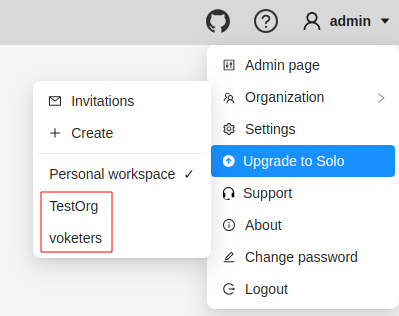
Note
If you’ve created more than 10 organizations, a Switch organization line will appear in the drop-down menu.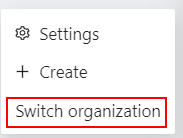
Click on it to see the Select organization dialog, and select organization from drop-down list.
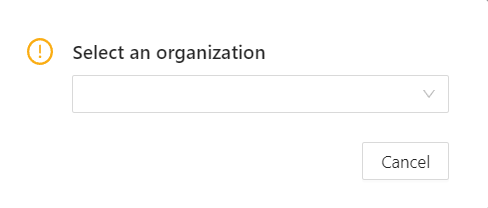
Transfer tasks and projects between organizations
You can move high-level resources (projects and individual tasks) between organizations and the personal workspace.
To transfer a resource:
- Open the Actions menu of the corresponding task or project.
- In the Actions menu, select Organization (only visible if the resource can be transferred).
- Choose the destination workspace in the selector.
- A dialog will open. Confirm the transfer.
- If the resource has attached to a cloud storage, choose how CVAT should handle it:
- The current cloud storages will be detached anyway as they are not available in another workspace.
- Move & Detach: After transferring, you can set a new cloud storage manually (only applicable for data source cloud storage in a task). Source and target cloud storages cannot be setup this way.
- Move & Auto Match: During the transfer, CVAT will try finding a cloud storage, matching similar parameters in the target workspace. This option is only available if the resource has source or target cloud storage configured.
Organization page
Organization page is a place, where you can edit the Organization information and manage Organization members.
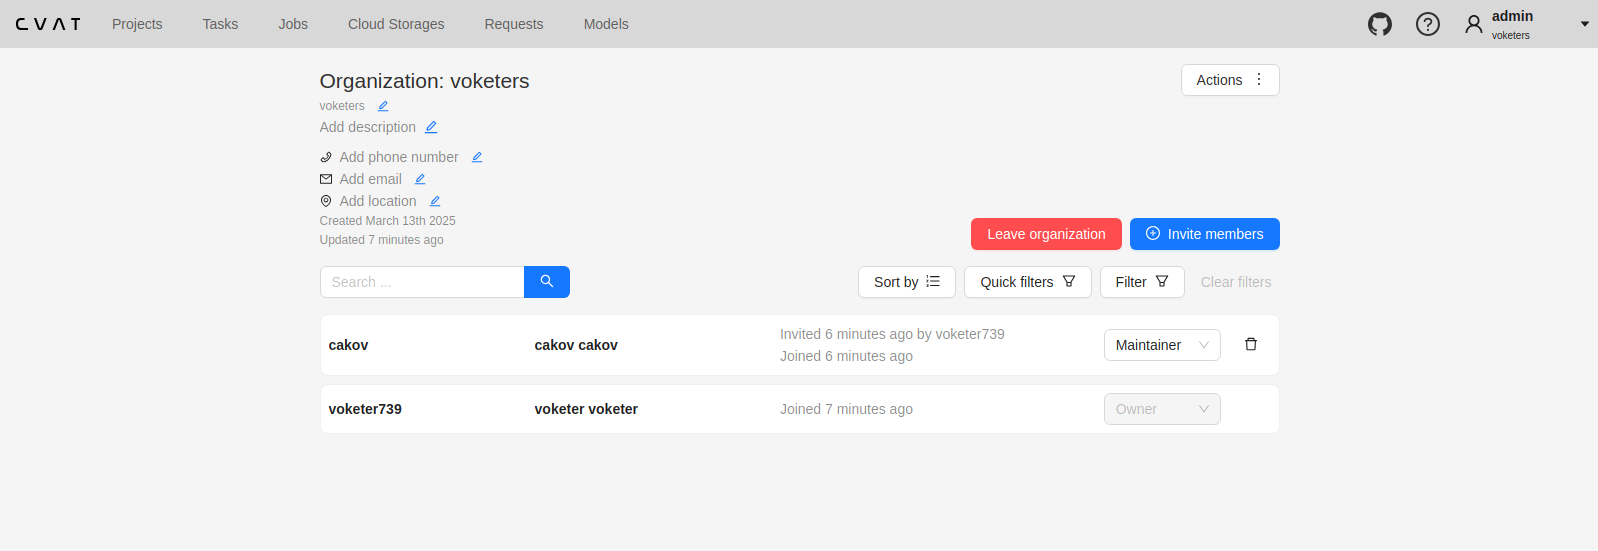
Note
In order to access the organization page, you must first activate the organization (see Switching between organizations). Without activation, the organization page will remain inaccessible.An organization is considered activated when it’s ticked in the drop-down menu and its name is visible in the top-right corner under the username.
To go to the Organization page, do the following:
- On the top menu, click your Username > Organization.
- In the drop-down menu, select Organization.
- In the drop-down menu, click Settings.

Invite members into organization: menu and roles
Invite members form is available from Organization page.
It has the following fields:
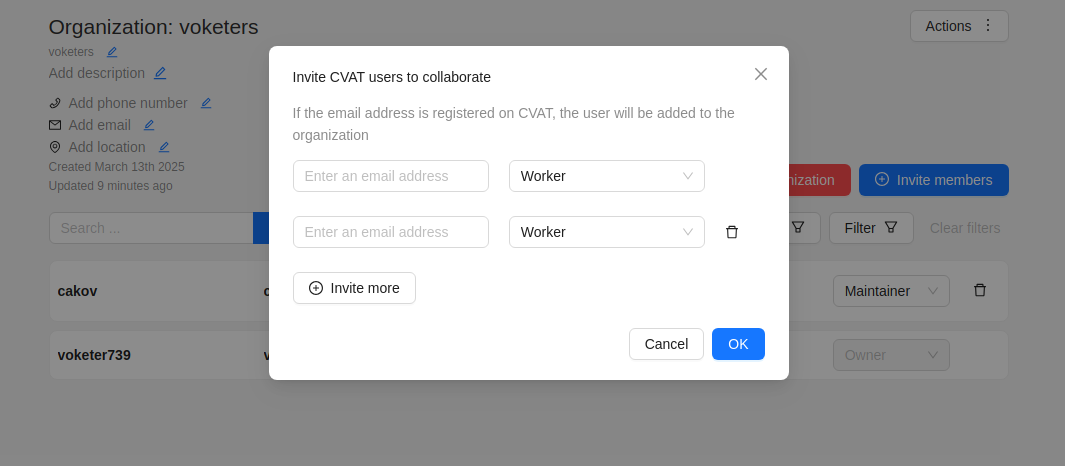
| Field | Description |
|---|---|
| Specifies the email address of the user who is being added to the Organization. | |
| Role drop-down list | Defines the role of the user which sets the level of access within the Organization: |
| Invite more | Button to add another user to the Organization. |
Members of Organization will appear on the Organization page:
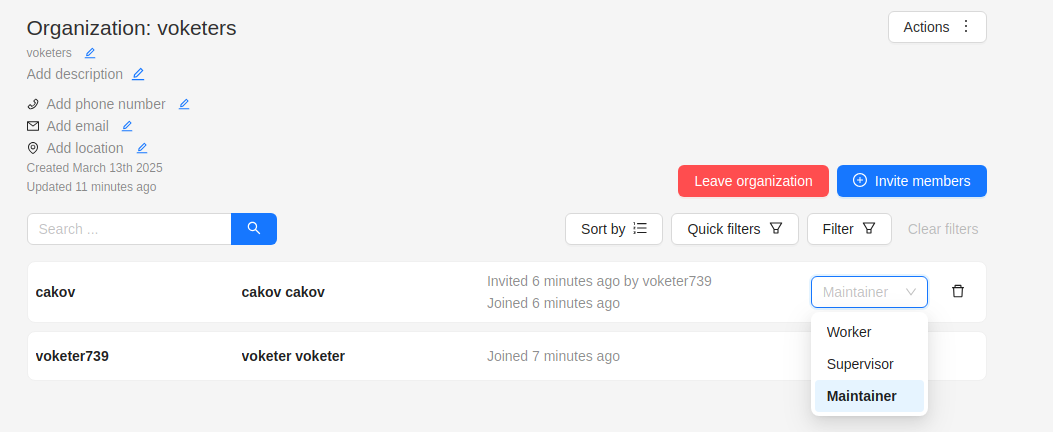
The member of the organization can leave the organization by going to Organization page > Leave organization.
The organization owner can remove members, by clicking on the Bin icon.
Inviting members to Organization
To invite members to Organization do the following:
-
Go to the Organization page, and click Invite members.
-
Fill in the form (see below).
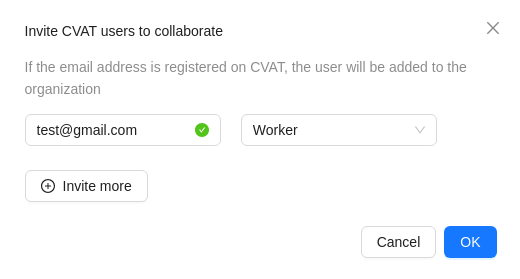
-
Click OK.
-
The person being invited will receive an email with the link.
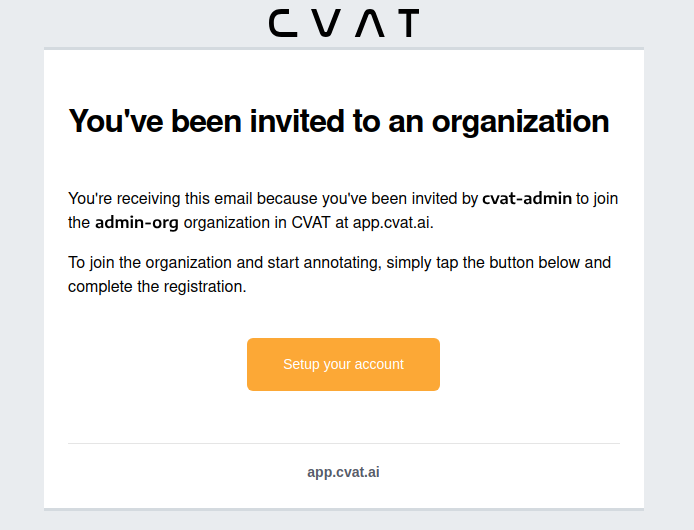
-
Person must click the link and:
- If the invitee does not have the CVAT account, then set up an account.
- If the invitee has a CVAT account, then log in to the account.
Invitations list
User can see the list of active invitations.
To see the list, Go to Username > Organization > Invitations.
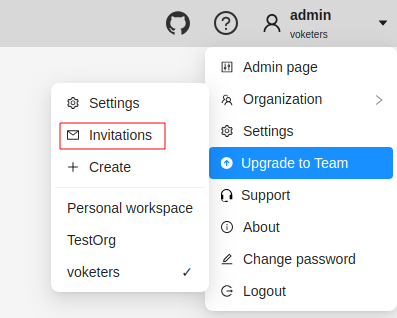
You will see the page with the list of invitations.
You will also see pop-up notification the link to the page with invitations list.
Resending and removing invitations
The organization owner and maintainers can remove members, by clicking on the three dots, and selecting Remove invitation
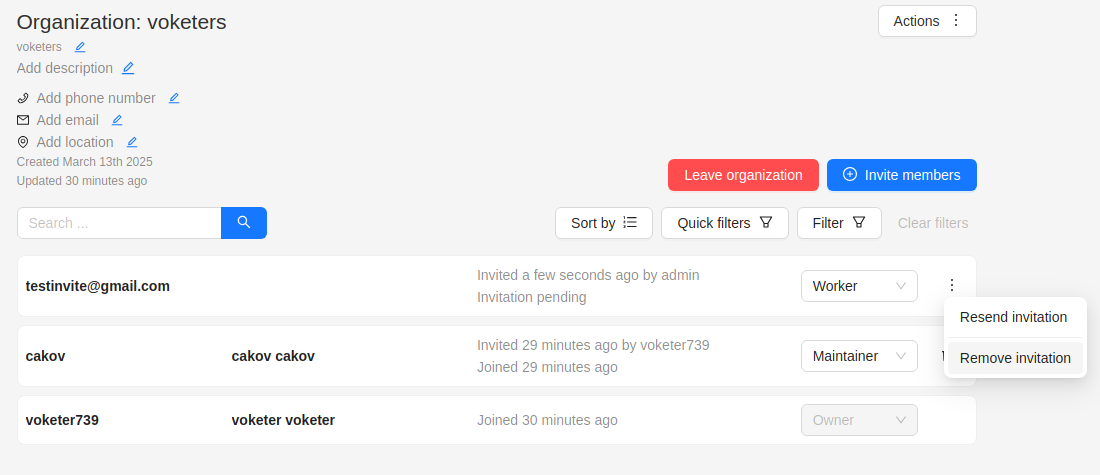
Delete organization
You can remove an organization that you created.
Note
Removing an organization will delete all related resources (annotations, jobs, tasks, projects, cloud storage, and so on).To remove an organization, do the following:
- Go to the Organization page.
- In the top-right corner click Actions > Remove organization.
- Enter the short name of the organization in the dialog field.
- Click Remove.
4.4 - Subscription management
How to manage your subscription
This article provides tips on how to effectively manage your CVAT Online subscriptions, including tracking expenses and canceling unnecessary subscriptions, to optimize your finances and save time.
Whether you’re a business owner or an individual, you’ll learn how to take control of your subscriptions and manage them.
See:
- Available paid plans
- Billing
- How to add VAT/tax and other information to the CVAT Online invoice before the first payment?
- How to update VAT/tax information and other details for upcoming invoices from CVAT Online?
- Can a paid invoice be modified?
- How can I get a quote before I subscribe? How to add a PO number to my invoices?
- Can you sign an agreement before I subscribe?
- Can you handle a bank transfer with 30-day payment terms?
- Where can I find my invoices?
- I am a student, can I have a discount or free access?
- Payment methods
- Adding and removing team members
- Change plan
- Can I subscribe to several plans?
- Cancel plan
- Plan renewal
- Subscription management video tutorial
Available paid plans
This section outlines the paid plans available on CVAT Online.
Monthly plans
| Name | Description |
|---|---|
| Solo | The Solo plan has a fixed price and is designed for personal use only. It does not assume collaboration with team members and is not suitable for use within organizations, but it removes all other limitations of the Free plan. Note: Although it allows the creation of an organization and access for up to 2 members – it is for trial purposes only! Organization and members will have all the limitations of the Free plan. |
| Team | The Team is for collaboration, it removes limitations of the Free plan for the whole organization, allowing you to share paid benefits with your colleagues. The monthly payment for the plan depends on the number of team members you’ve added. All limits of the Free plan will be removed. Note: The organization owner is also part of the team. So, if you have two annotators working, you’ll need to pay for 3 seats (2 annotators + 1 organization owner). |
Annual plans
Whether you’re a new user, or have a subscription to Team or Solo plan, you can subscribe to our annual plan and save up to 30% on CVAT Online usage costs.
The annual subscription offers all the benefits of our paid plans but at a more affordable monthly rate.
For more information, see How to switch from monthly subscription to annual?
Billing
This section describes the billing model and gives short a description of limitations for each plan.
There are two types of subscriptions available for both the Solo and Team plans: monthly and annual.
For more information, see: Pricing Plans
How to add VAT/tax and other information to the CVAT Online invoice before the first payment?
To ensure VAT (tax) information and other relevant details are included on your CVAT Online invoices, it’s important to add this information before making the first payment.
Here’s how you can do it:
- Sign up for a CVAT Online account and log in.
- (Optional) If you add the VAT/tax number to the organization, first create an organization and switch to an Organization account.
- Navigate to the top right corner, next to the nickname, click on the arrow > upgrade to the plan.
- Switch on the I would like the invoice to include additional data (address, phone number, VAT information) toggle, select the best payment period for you, and click Get Started.
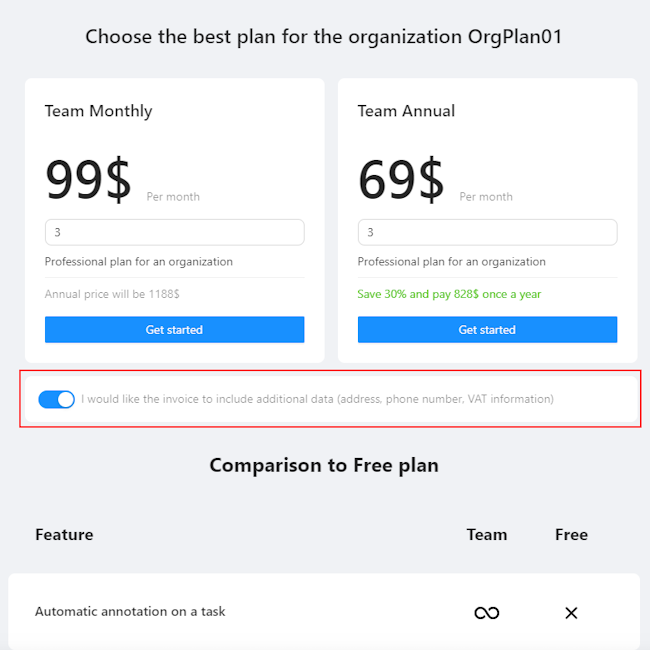
- You will see the billing page:
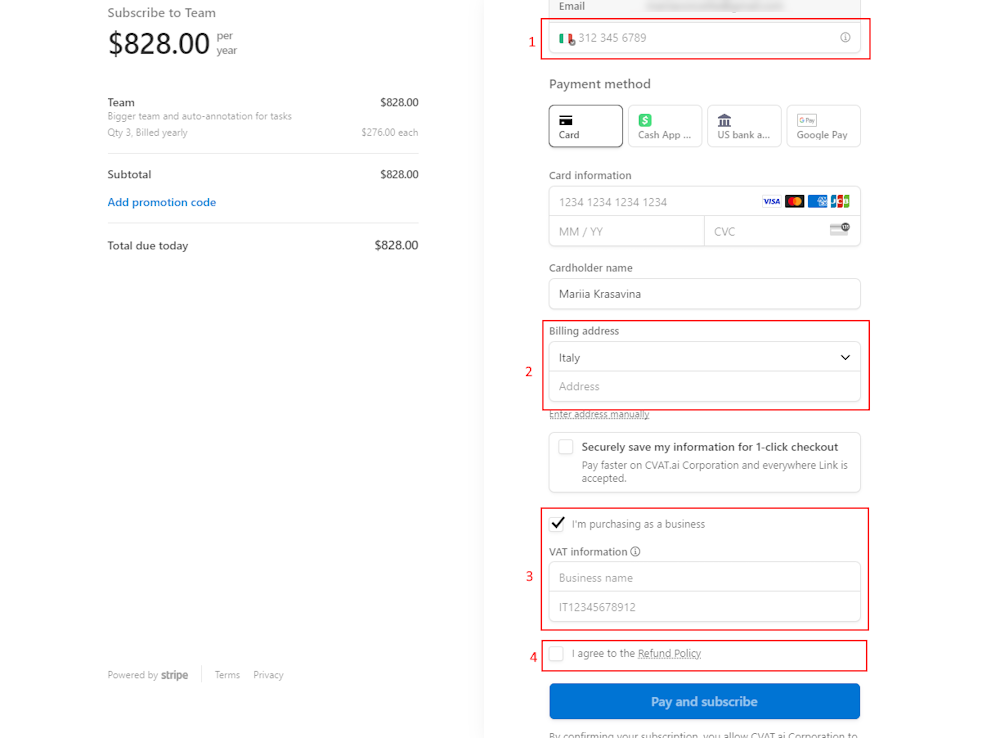
- Phone number (1).
- Billing Address: Enter the billing address you want to appear on the invoice in the address field (2).
- VAT Information and Business Name: Select the checkbox I am purchasing as a business and enter your VAT and business name information (3).
-
Select checkbox I agree to refund policy (4).
Note
Please read the Refund policy before selecting the checkbox. -
Click Pay & Subscribe.
All information you’ve added will appear on the billing page and in the invoice.
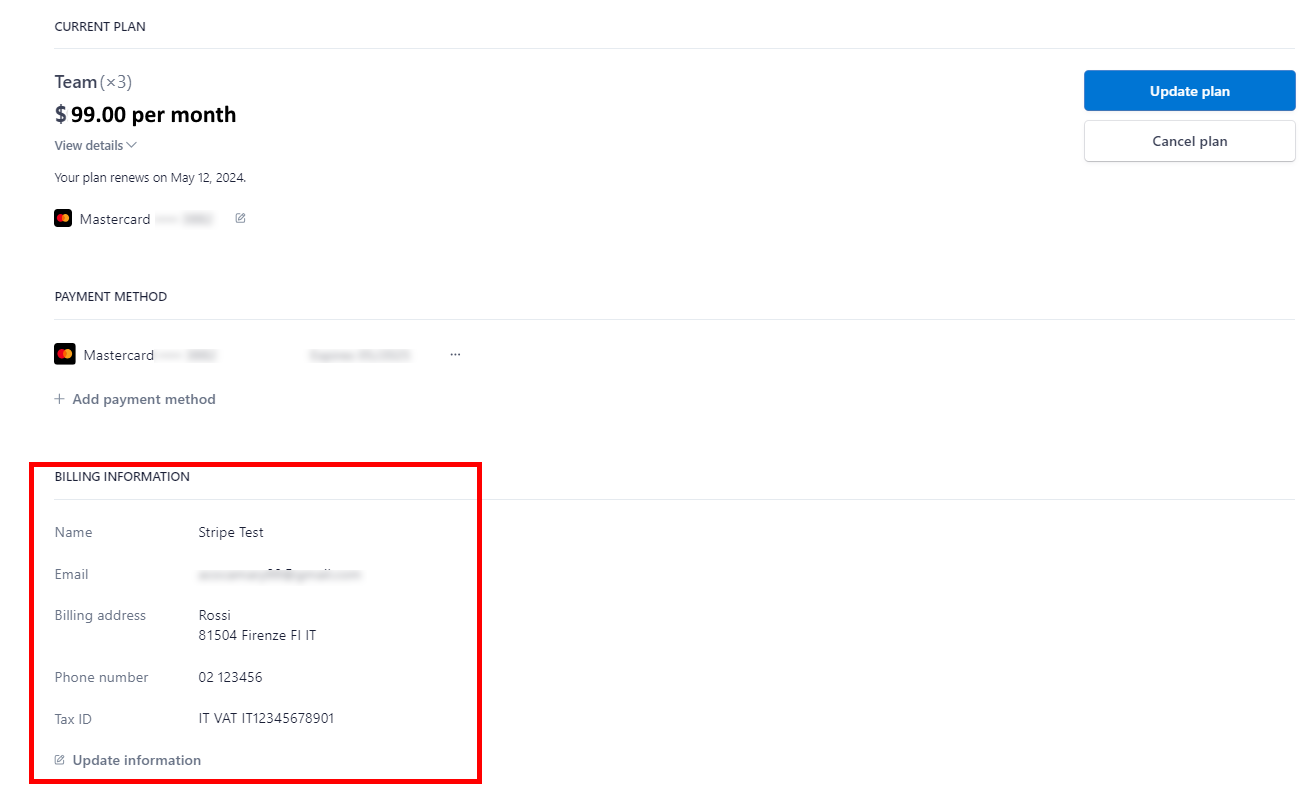
By following these steps, you can seamlessly add VAT and other crucial information to your invoices, making your financial transactions with CVAT Online transparent and compliant.
How to update VAT/tax information and other details for upcoming invoices from CVAT Online?
In the top right corner, near the nickname, click on the arrow > manage plan.
You will see the Stripe page. Go to the Billing Information > Update Information.

Can a paid invoice be modified?
Once an invoice has been paid, it is not possible to modify it. This restriction is due to the limitations of the payment processing platform used, which in the case of CVAT Online, is Stripe.
Stripe’s policy dictates that revisions to an invoice can only be made before payment. For more comprehensive information on this policy, please refer to Stripe’s official documentation on invoice edits at their website.
How can I get a quote before I subscribe? How to add a PO number to my invoices?
If you require a quote from CVAT Online for payment via bank transfer, certain criteria must be met:
- The total subscription cost must be $396 and up per year.
- Quotes are available exclusively for annual subscriptions.
Should you meet these requirements, please write to support@cvat.ai
Can you sign an agreement before I subscribe?
Sign of specific agreements and approvals are available if you meet specific criteria (the total subscription cost must be $10,000 and up per year), for more details contact support@cvat.ai
Can you handle a bank transfer with 30-day payment terms?
Yes, it is available if you fit the quota criteria, for details contact support@cvat.ai.
Where can I find my invoices?
In the top right corner, near the nickname, click on the arrow > manage plan.
You will see the Stripe page. At the bottom of the page, you will see the Invoice History section with all invoices.
Invoices are automatically sent to the account owner’s address used for the registration.
To see the invoice click on the Show Invoice Icon![]() icon.
icon.

I am a student, can I have a discount or free access?
To consider your request for a discount, we’d need a few details from you:
- A copy of your valid student ID or any document confirming your university affiliation.
- Your university advisor’s contact details.
- The name and contact information of the dean of your faculty.
- A brief outline of your project plan. This helps us understand how we might collaborate on a joint marketing statement highlighting your use of CVAT Online, and how it can benefit your project.
- We’d also appreciate a positive LinkedIn post about your experience using CVAT Online, making sure to tag @CVAT.ai.
All these details must be sent to support@cvat.ai. Once we have this information, we’ll gladly offer you a 50% discount for one year.
Payment methods
This section describes how to change or add payment methods.
Paying with bank transfer
Note
At the moment this method of payment works only with US banks.To pay with a bank transfer:
- Go to the Upgrade to Solo/Team plan> Get started.
- Click US Bank Transfer.
- Upon successful completion of the payment, you will receive a receipt via email.
Note
The completion of the payment process may take up to three banking days.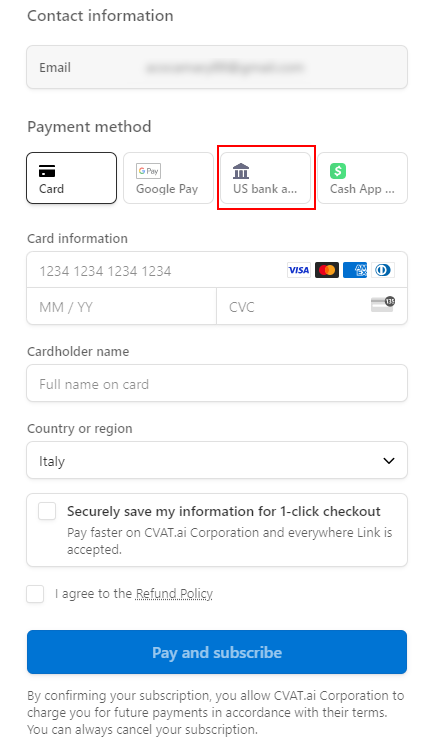
How to change the payment method?
In the top right corner, near the nickname, click on the arrow > manage plan > +Add Payment Method
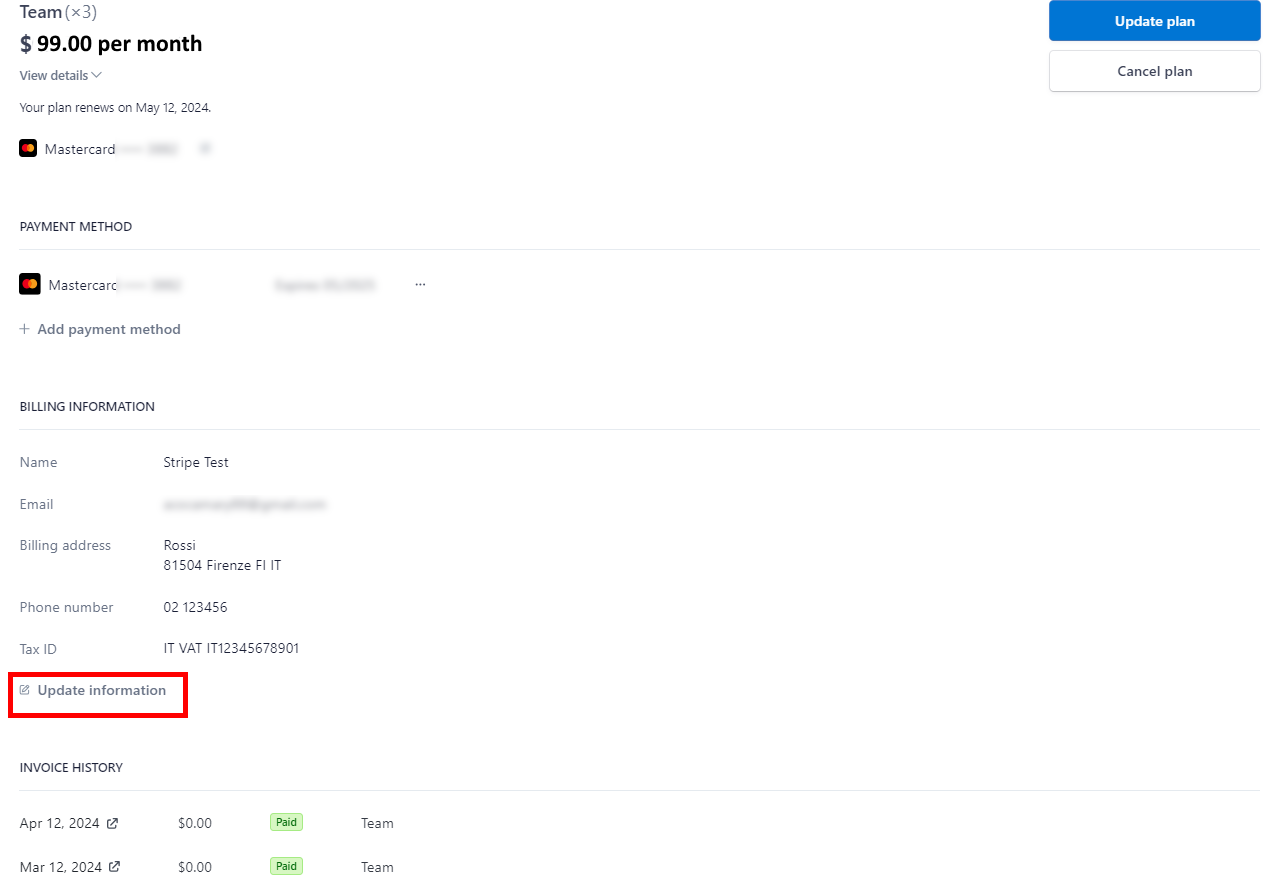
Adding and removing team members
Note
Solo plan is for personal use only, you cannot add or remove team members.Team plan is for collaboration. To add members to your Organization, go to the Manage Team plan > Update quantity.
If you’ve added a user before the current billing period ends, the payment will be prorated for the remaining time until the next billing cycle begins. From the following month onward, the full payment will be charged.
In case you removed the user before the current billing period ends, funds will not be returned to your account, but next month you will pay less by the amount of unused funds.
Change plan
How to change the plan from Solo to Team?
The procedure is the same for both Solo and Team plans.
If for some reason you want to change your plan, you need to:
- Unsubscribe from the previous plan.
- If you need a refund, contact us at support@cvat.ai.
- Subscribe to a new plan.
How to switch from a monthly subscription to an annual one?
If you have monthly subscription, and wish to switch to the Annual plan, please follow these steps:
- In the top-right corner, near the nickname, click on the arrow.
- Select Manage Solo/Team Plan.
- On the Stripe page that appears, click Update Plan.
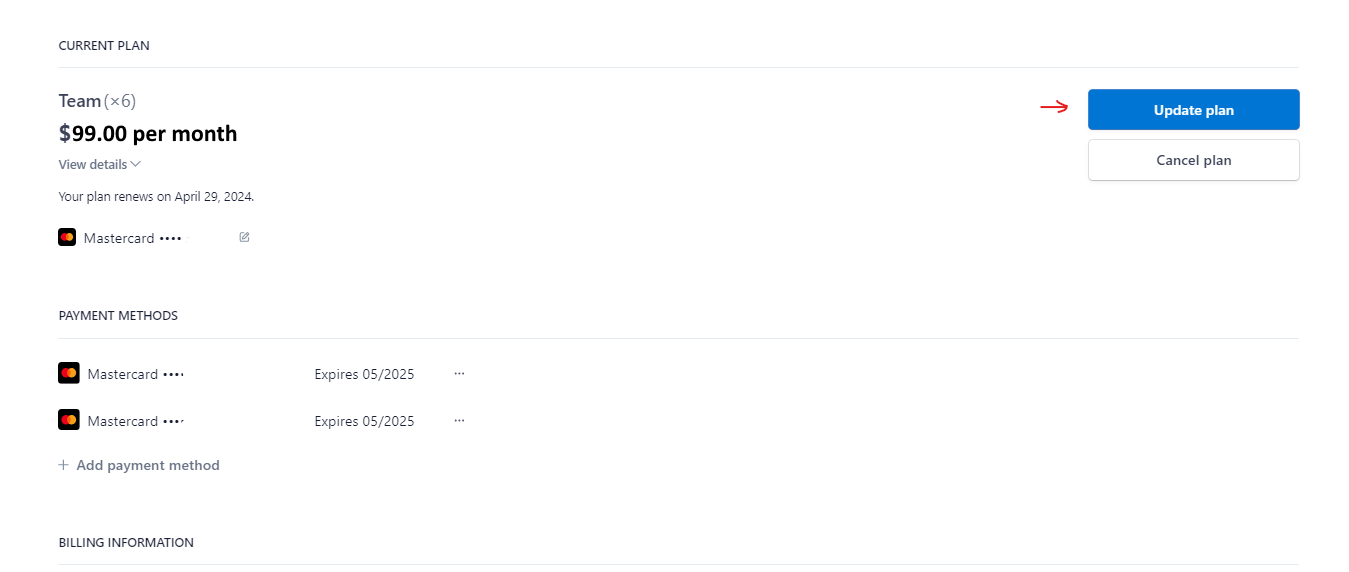
- Choose Yearly and then click Continue.
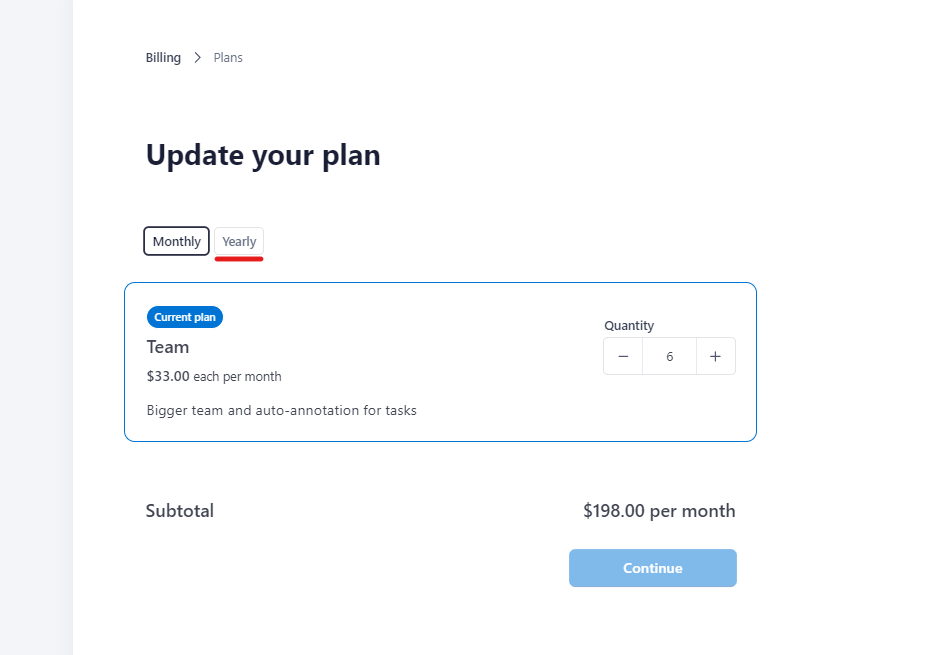
The price will be adjusted according to the number of members, selected in the Quantity field (if updated), taking into account the amount of money that was not spent in the current period.
Upon payment, your subscription will be renewed and the start date will be reset to the day you switch to the new plan.
Can I subscribe to several plans?
Paid plans are not mutually exclusive. You can have several active subscriptions, for example, the Solo plan and several Team plans for different organizations.
Cancel plan
This section describes how to cancel your CVAT subscription and what will happen to your data.
What will happen to my data?
Once you have terminated your subscription, your data will remain accessible within the system for a month. During this period, you will be unable to add new tasks and free plan limits will be applied.
In case you possess a substantial amount of data, it will be switched to read-only mode. It means you will not be able to save annotations, add any resources, and so on.
Following the one month, you will receive a notification requesting you to either remove the excess data or it will be deleted automatically.
How to cancel any plan?
To cancel the plan, in the top right corner, near the nickname, click on the arrow> manage plan > Cancel plan
Please, fill out the feedback form, to help us improve our platform.
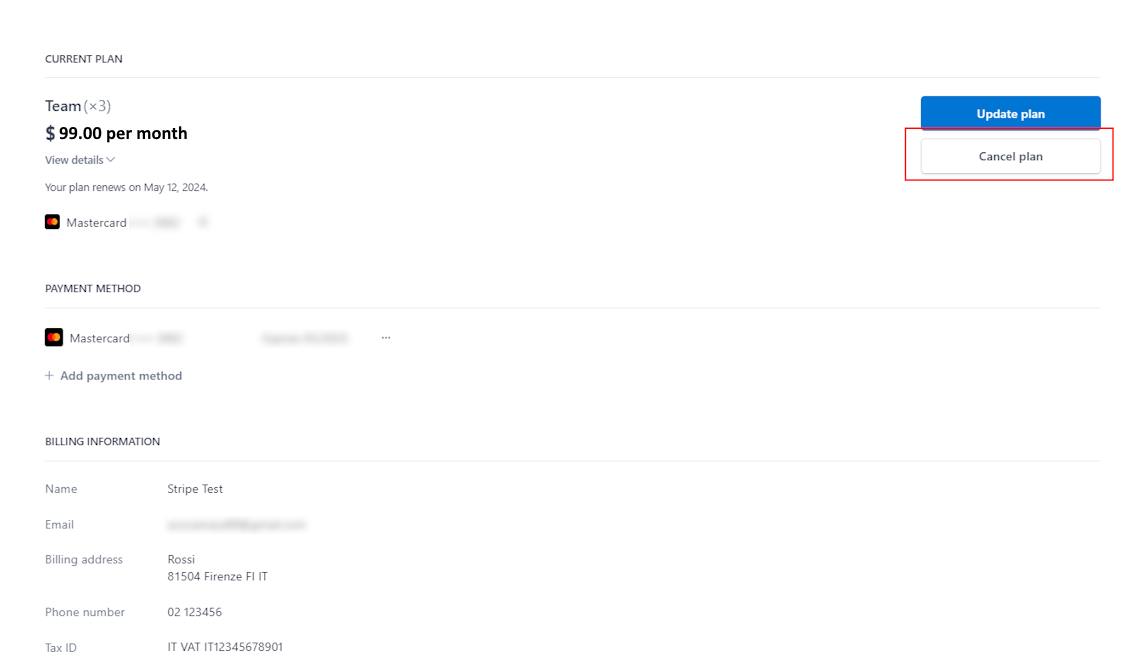
How can I get a refund?
To understand if you are eligible for a refund, see Refund policy.
- Cancel the subscription before asking for a refund.
- Contact our support team at support@cvat.ai or use the “Support” option in the app.cvat.ai interface.
- Provide your account details and a brief explanation of the reason for the refund:
- Send us your last invoice.
- Send us the username and e-mail address you’ve used to register in CVAT Online.
Our team will review your request. We may request additional information if needed. Once approved, the refund will be processed to your original payment method within 5-10 business days.
Plan renewal
To renew your CVAT Online subscription, in the top right corner, near the nickname, click on the arrow> manage plan > Renew plan.
Subscription management video tutorial
4.5 - SSO configuration
SSO for a Self-Hosted solution
CVAT supports Single Sign-On (SSO) using both OpenID Connect (OIDC) and Security Assertion Markup Language (SAML) protocols.
To configure SSO, complete the following 2 main steps:
- Configure the Identity Provider (IdP) — set up an application on your IdP platform.
- Update the CVAT configuration — provide the necessary identity provider settings in the CVAT configuration file.
If the application is already configured, refer to the Configuring SSO in CVAT section. Otherwise, you may follow one of the detailed platform-specific guides to set up such an application:
Platform specific IdP configuration
Microsoft Azure
OpenID Connect
Follow these steps to configure an application on the Microsoft Azure platform and integrate it with CVAT:
Step 1: Register an OIDC-based application
To start, log into your Microsoft Azure Portal. Once you’re in:
-
Navigate to the
Microsoft Entra IDservice ->App registrationssection in the menu on the left. -
Click on the
+ New registrationbutton. -
Enter application name.
-
Select
Supported account typesbased on your needs. -
Add
Redirect URI: chooseWebplatform and set<scheme:cvat_domain>/api/auth/oidc/<idp-id:azure-oidc>/login/callback/to the value field.
-
Click on the
Registerbutton.
Note
More information on how to configure an OIDC-based application on the Azure platform can be found here.You’ve created an app, now you should configure the credentials for it.
Step 2: Configure credentials
- Navigate to the
Overviewtab of your newly created application.
- In the
Client credentialssection, click theAdd a certificate or secretlink. This will take you to theCertificates & secretspage. - Click
+ New client secret. - In the popup form, enter a description and select an expiration period, then click
Add.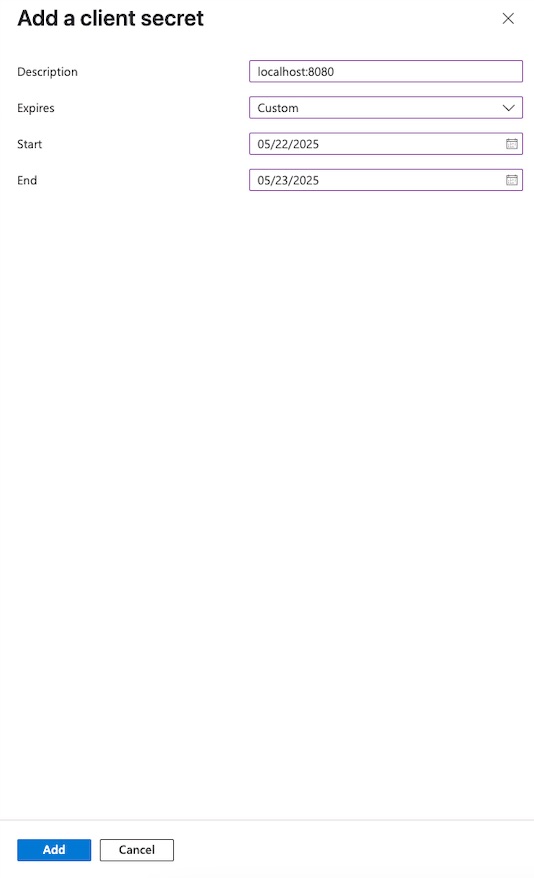
The newly created secret will appear in the list.
Make sure to copy the value now — you won’t be able to see it again later.
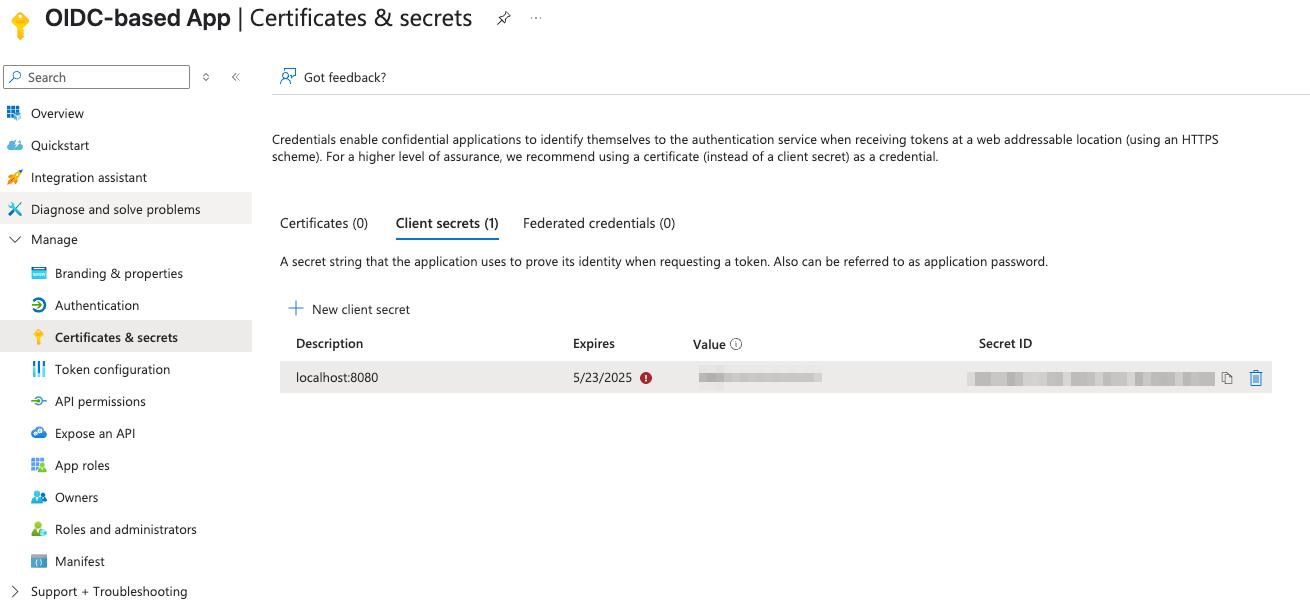
Step 3: Configure CVAT
Utilize the example below as a template for your configuration:
sso:
  enabled: true
  selection_mode: email_address
  identity_providers:
    - id: <idp-id:azure-oidc>
      protocol: OIDC
      name: Azure OIDC-based IdP
      server_url: https://<Directory (tenant) ID>/v2.0/
      client_id: <Secret ID>
      client_secret: <Secret Value>
      email_domain: <company_email_domain>
Tip
ActualSecret ID and Secret Value values may be found on Certificates & secrets tab of the application,
while Directory (tenant) ID - on the Overview tab.
You can now proceed to start CVAT. For additional CVAT configuration details, refer to Configuring SSO in CVAT.
SAML
Follow these steps to configure an application on the Microsoft Azure platform and integrate it with CVAT:
Step 1: Register an SAML-based application
To start, log into your Microsoft Azure Portal. Once you’re in:
- Navigate to the
Microsoft Entra IDservice ->Enterprise applicationssection in the menu on the left. - Click
+ New applicationand enter a name for the application in the popup window, then clickCreate.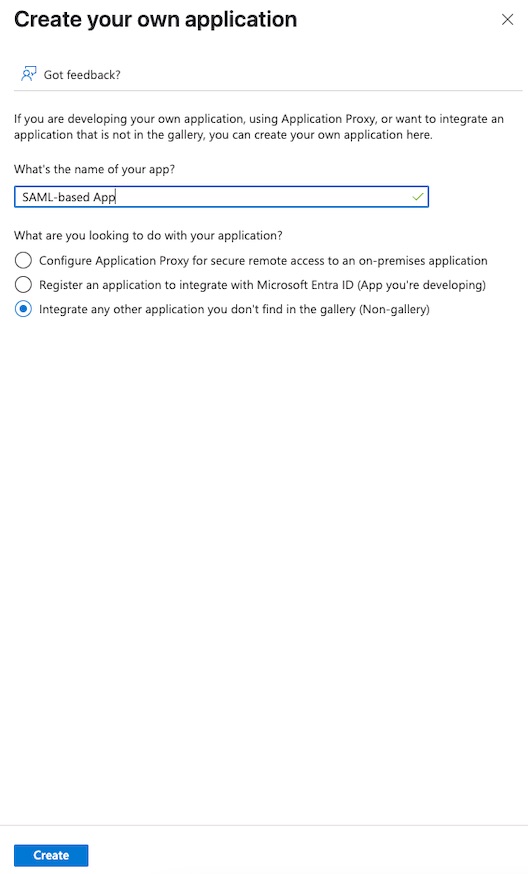
You’ve created an app, now you should finalize its configuration and assign users or groups.
Step 2: Configure a created application
- Navigate to the
Single sign-onsection in the menu on the left. - Choose the SAML protocol as the single sign-on method.
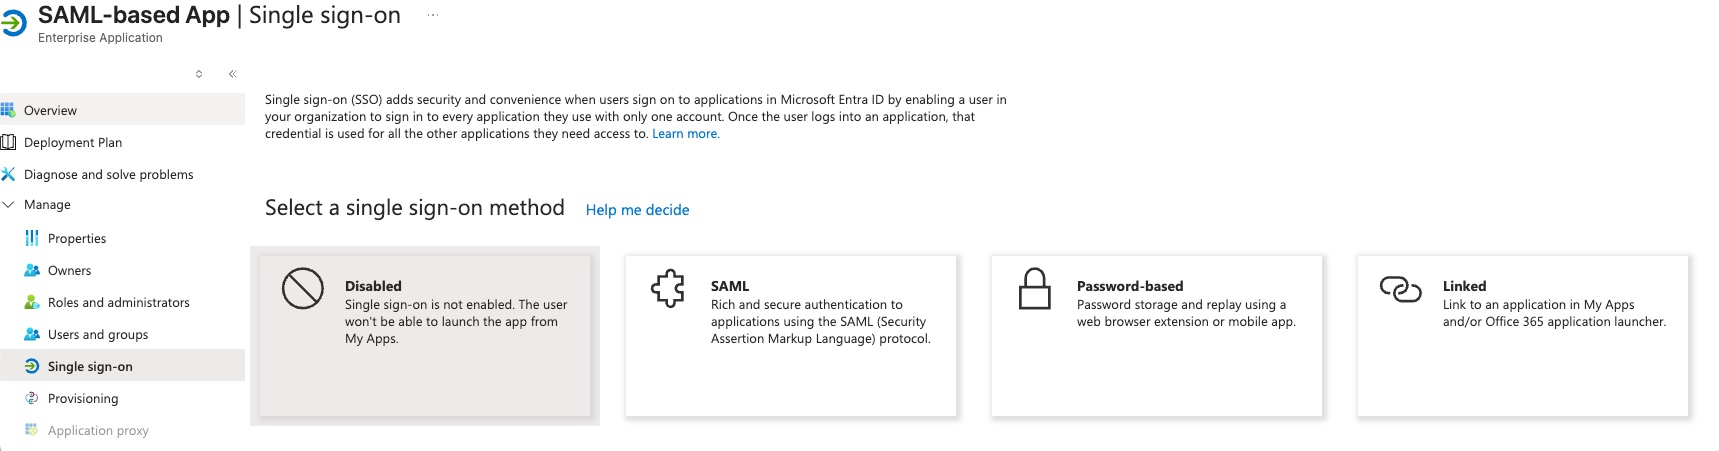
- Edit
Basic SAML Configuration:Identifier (Entity ID):<scheme:cvat_domain>/api/auth/saml/<idp-id:azure-saml>/metadata/Reply URL (Assertion Consumer Service URL):<scheme:cvat_domain>/api/auth/saml/<idp-id:azure-saml>/acs/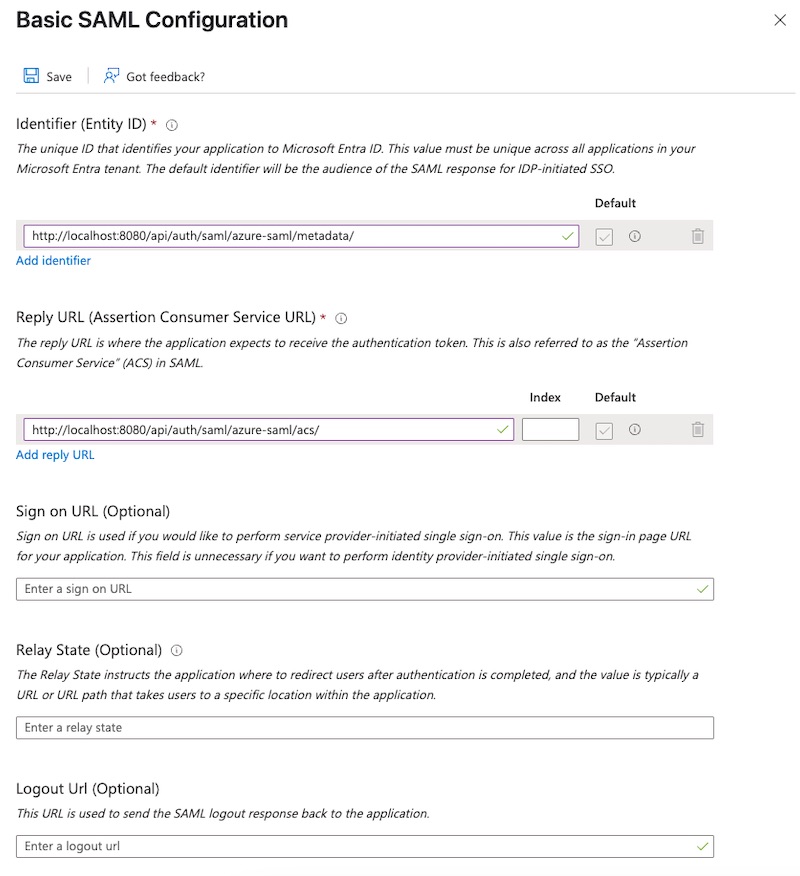
- Save changes
- Edit
Attributes & Claimsby adding a newuidclaim:- Name:
uid - Namespace:
http://schemas.xmlsoap.org/ws/2005/05/identity/claims - Source:
attribute - Source attribute:
user.objectid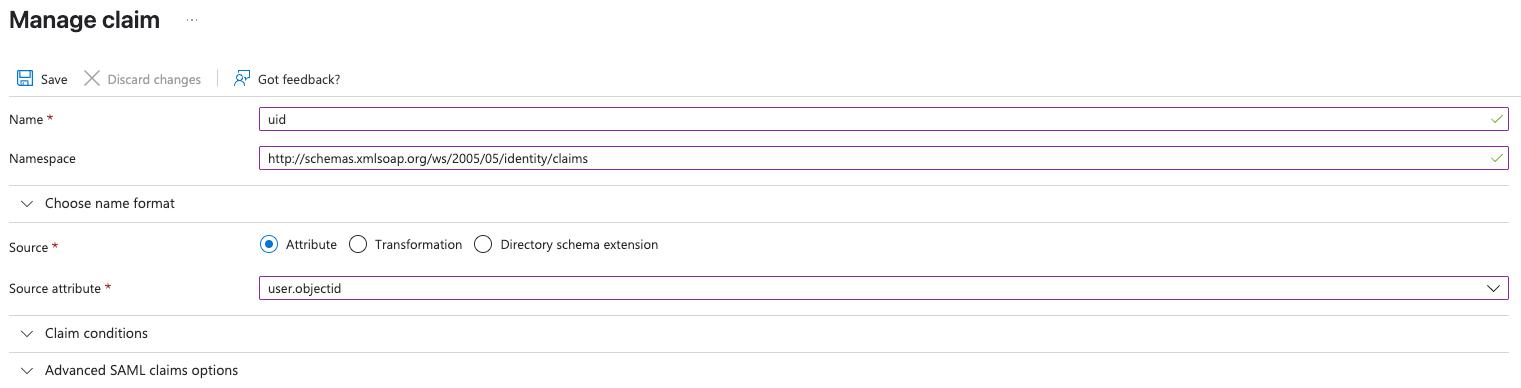
- Name:
Note
More information on how to configure an application on Azure platform can be found here.Step 3: Assign users and groups
At this point, no users or groups have been assigned to the application. To grant access:
- Navigate to the
Users and groupssection of the application. - Click the
+ Add user/groupbutton. - Select the users or groups you want to assign.
- Confirm selection.
The selected users or groups will now appear in the assignment list.
That’s it, now we can move on to the configuration in CVAT.
Step 4: Configure CVAT
Utilize the example below as a template for your configuration:
sso:
  enabled: true
  selection_mode: email_address
  identity_providers:
    - id: <idp-id:azure-saml>
      protocol: SAML
      name: Azure SAML-based IdP
      entity_id: <Microsoft Entra Identifier> (https://sts.windows.net/<tenantId>/)
      metadata_url: <App Federation Metadata Url>

      attribute_mapping:
        uid: http://schemas.xmlsoap.org/ws/2005/05/identity/claims/uid
        username: http://schemas.xmlsoap.org/ws/2005/05/identity/claims/nameidentifier
        email: http://schemas.xmlsoap.org/ws/2005/05/identity/claims/emailaddress
        first_name: http://schemas.xmlsoap.org/ws/2005/05/identity/claims/givenname
        last_name: http://schemas.xmlsoap.org/ws/2005/05/identity/claims/surname
        # email_verified: it is not possible to configure SAML-based application to send this claim to the SP

      email_domain: <company_email_domain>
Tip
Actual Microsoft Entra Identifier and App Federation Metadata Url values may be found
on the Single sign-on tab of the created application

You can now proceed to start CVAT. For additional CVAT configuration details, refer to Configuring SSO in CVAT.
Okta
OpenID Connect
Follow these steps to configure an application on the Okta platform and integrate it with CVAT:
Step 1: Register an OIDC-based application
To start, log into your Okta admin dashboard. Once you’re in:
-
Navigate to the
Applicationssection in the menu on the left. -
Click on the
Create App integrationbutton. -
Select
OIDC - OpenID Connectas a sign-in method andWeb Applicationtype.
-
Fill the form with the following content:
App integration name: enter a name for the applicationSign-in redirect URIs:<scheme:cvat_domain>/api/auth/oidc/<idp-id:okta-oidc>/login/callback/- Select option in the
Controlled accessto match your requirements. In this example, we’ll useSkip group assignment for now.
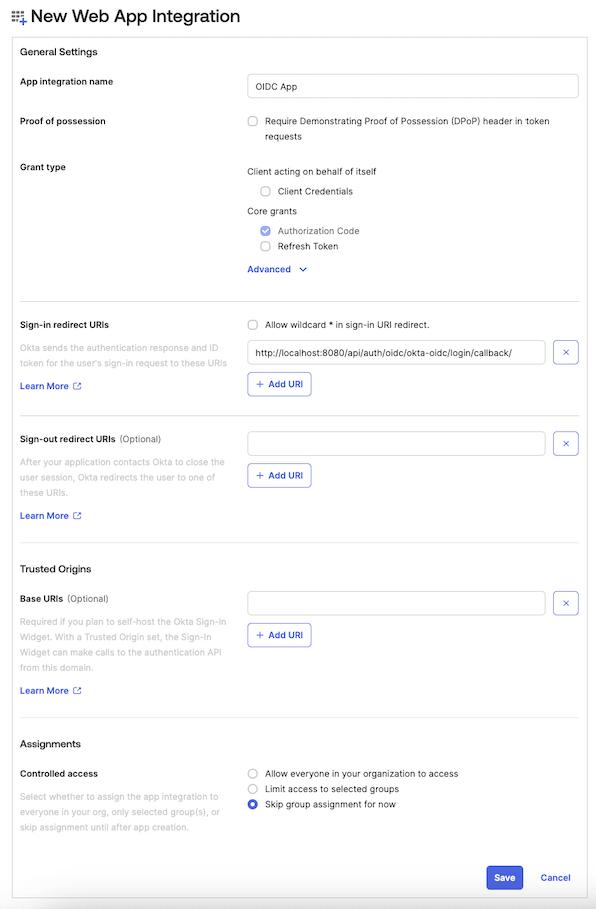
Note
More information on how to configure an OIDC-based application on the Okta platform can be found here.You’ve created and configured the app, now you should assign users or groups to the application.
Step 2: Assign users or groups
At this point, no users or groups have been assigned to the application. To grant access:
- Navigate to the
Assignmentstab of the application. - Click the
Assignbutton and selectAssign to PeopleorAssign to Groupsbased on your needs. - Identify the users or groups you want to assign, then click
assign.
The selected users or groups will now appear in the assignment list.
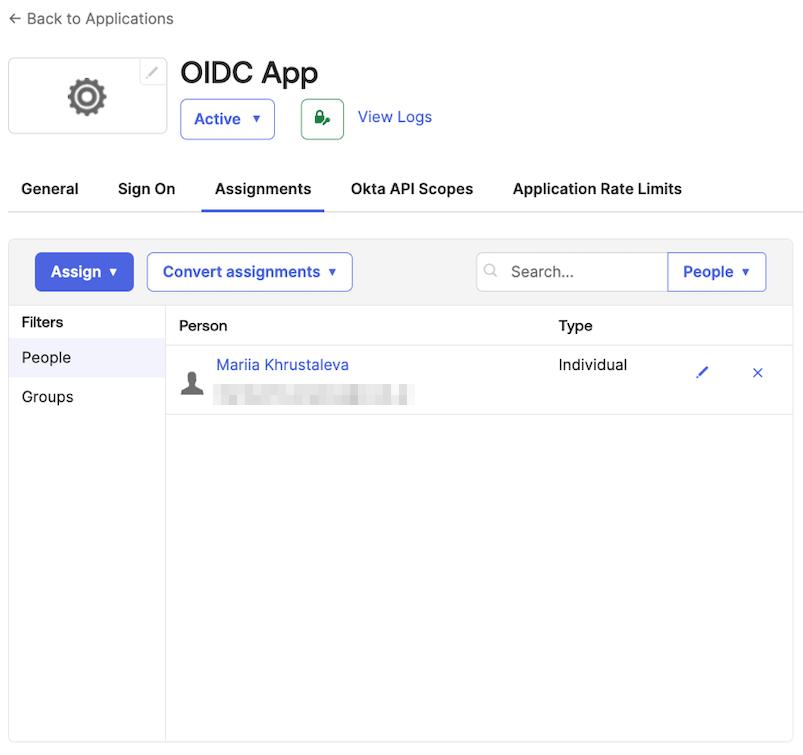
Step 3: Configure CVAT
Utilize the example below as a template for your configuration:
sso:
  enabled: true
  selection_mode: email_address
  identity_providers:
    - id: <idp-id:okta-oidc>
      protocol: OIDC
      name: Okta OIDC-based IdP
      server_url: https://<okta_domain>/
      client_id: <client_id>
      client_secret: <client_secret>
      email_domain: <company_email_domain>
Tip
ActualClient ID and Client secret key values may be found on the General tab of the created application
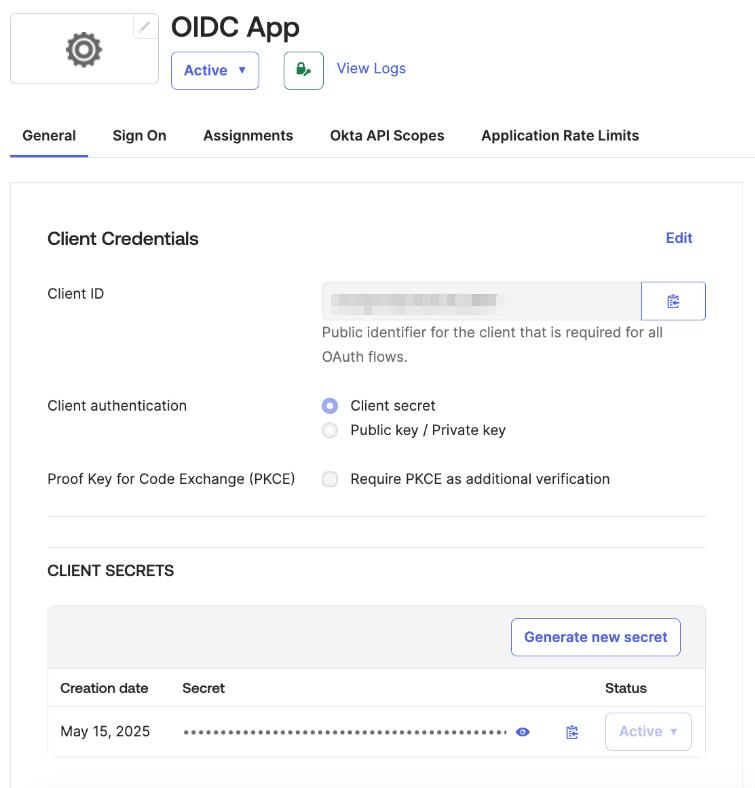
You can now proceed to start CVAT. For additional CVAT configuration details, refer to Configuring SSO in CVAT.
SAML
Follow these steps to configure an application on the Okta platform and integrate it with CVAT:
Step 1: Register an SAML-based application
To start, log into your Okta admin dashboard. Once you’re in:
-
Navigate to the
Applicationssection in the menu on the left. -
Click on the
Create App integrationbutton. -
Select
SAML 2.0as a sign-in method, then clickNext.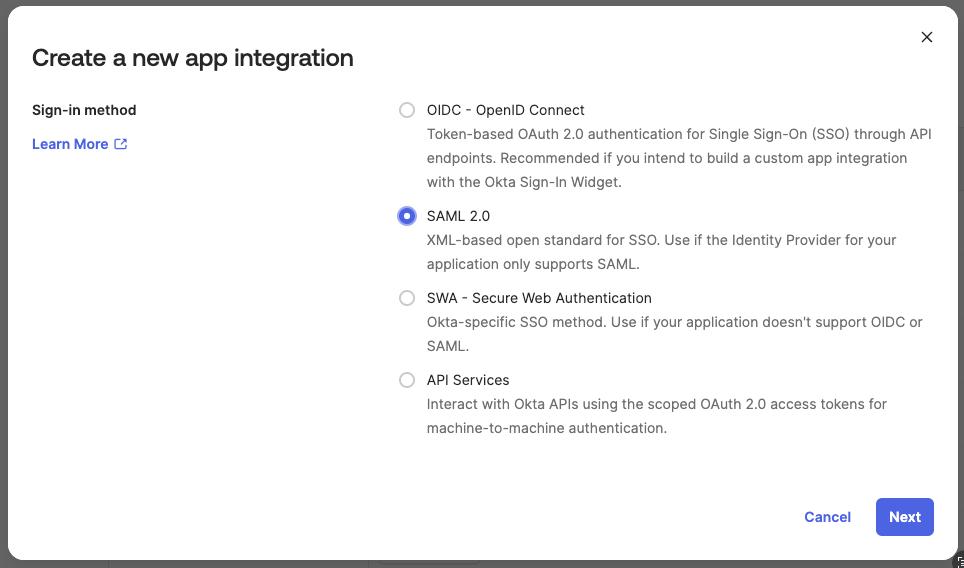
-
Fill the form with the general settings and go to the next configuration step.
-
On the
Configure SAMLform set the following fields:Single sign-on URL:<scheme:cvat_domain>/api/auth/saml/<idp-id:okta-saml>/acs/Audience URI (SP Entity ID:<scheme:cvat_domain>/api/auth/saml/<idp-id:okta-saml>/metadata/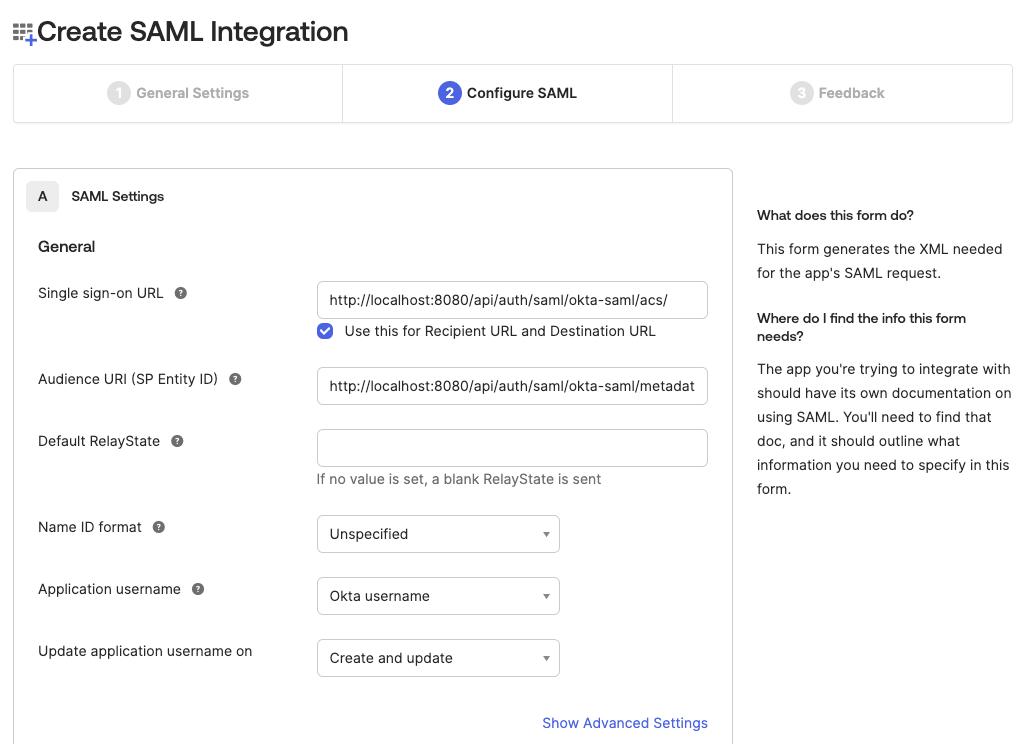
-
Define attribute statements that will be shared with CVAT. In our example we will use the
Basicattribute name format and set the mapping as shown below:firstName:user.firstNamelastName:user.lastNameusername:user.loginemail:user.emailuid:user.getInternalProperty("id")
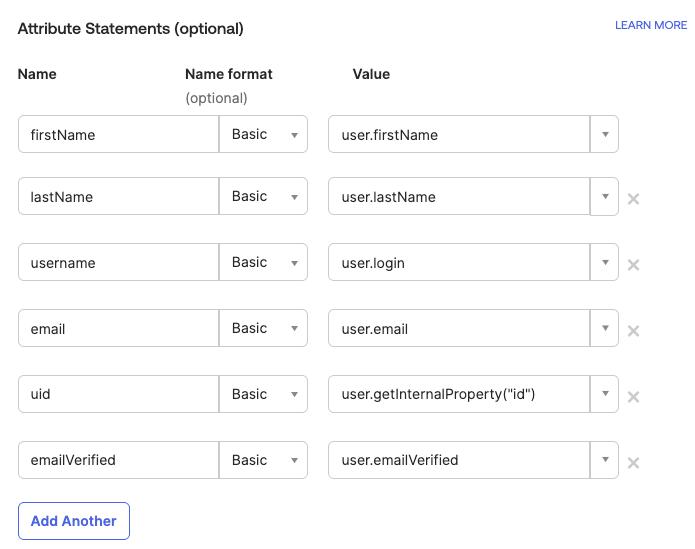
Tip
If attribute mapping needs to be adapted, follow the official documentation on how to configureAttribute Statements -
Navigate to the next configuration step and fill the
Feedbackform.
You’ve created and configured the app. You can now either complete an optional step to simplify the login process in CVAT or proceed directly to the CVAT configuration step.
Step 2: Simplify login process
If CVAT is configured to require
email verification,
it expects the Identity Provider to include the email_verified claim. However, Okta does not send this claim
by default. As a result, users will receive a confirmation email with a verification link.
There is an option to include email verification claim on the sign-in step:
- Add one more mapping
emailVerified->user.emailVerifiedon SAML-based application configuration step:- Navigate to the
SAML Settingson theGeneraltab and clickEdit. - Add one more attribute mapping as it was described in the app configuration step.
- Navigate to the
- Add custom user attribute
emailVerified:- Navigate to the
Directorysection in the menu on the left ->Profile Editoritem - Select the default user profile from the list (
User (default)) - Click
+ Add Attribute - Fill out the form with your desired values, making sure to select the
booleandata type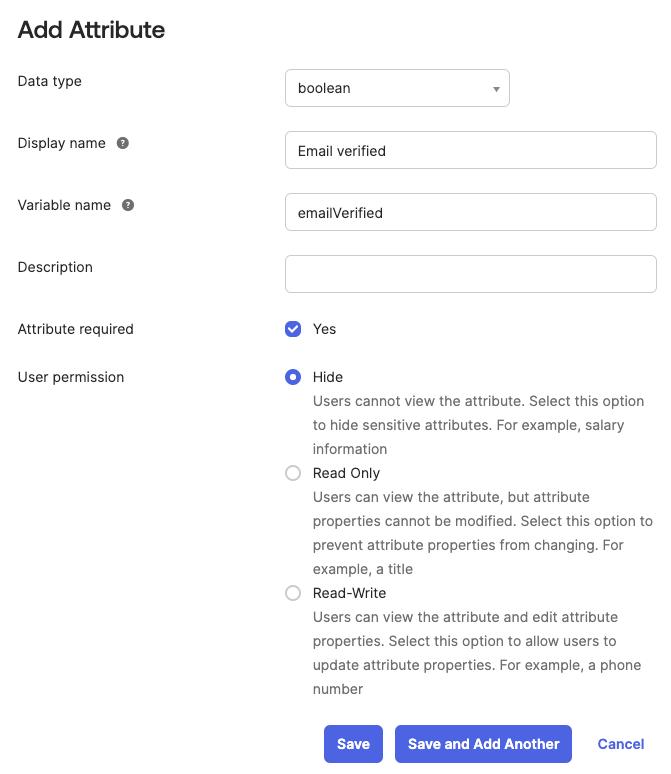
- Click
Save
- Navigate to the
- Update user profiles:
- Navigate to the
Peoplesection in the menu on the left - Set the value for the recently created attribute for each person
- Navigate to the
Step 3: Configure CVAT
Utilize the example below as a template for your configuration:
sso:
  enabled: true
  selection_mode: email_address
  identity_providers:
    - id: <idp-id:okta-saml>
      protocol: SAML
      name: Okta SAML-based Identity Provider
      entity_id: <Issuer>
      metadata_url: <Metadata URL>

      attribute_mapping:
        uid: uid
        username: username
        email: email
        first_name: firstName
        last_name: lastName
        email_verified: emailVerified # if configured

      email_domain: <company_email_domain>
Tip
Metadata URL and Issuer values may be found on the Sign On tab of the application setting

You can now proceed to start CVAT. For additional CVAT configuration details, refer to Configuring SSO in CVAT.
Auth0
OpenID Connect
Follow these steps to configure an application in the Auth0 platform and integrate it with CVAT:
Step 1: Register an OIDC-based application
To start, log into your Auth0 dashboard. Once you’re in:
- Navigate to the
Applicationssection in the menu on the left, click+ Create Application. - Enter a name for the application and choose the
Regular Web Applicationstype, then clickCreate.
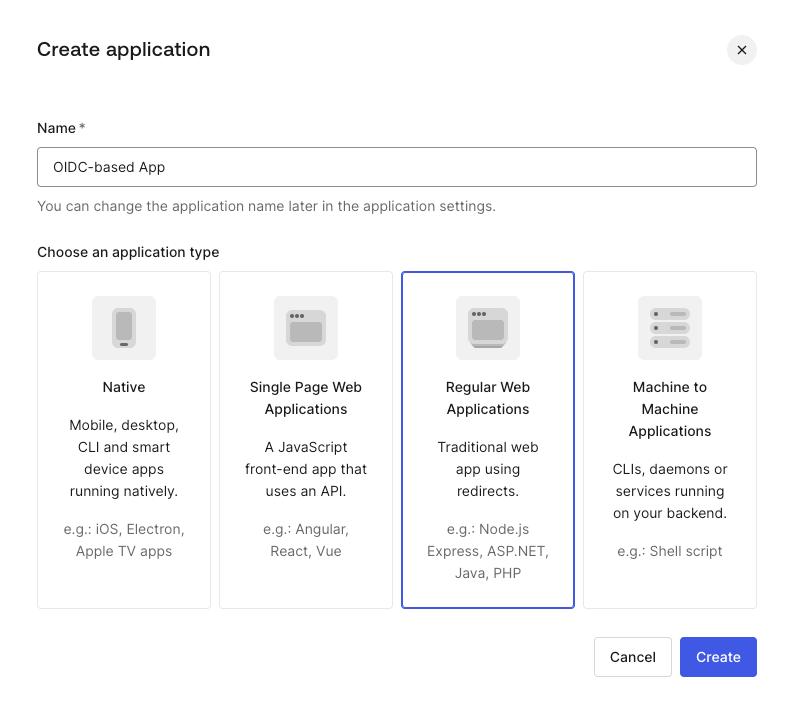
You’ve created an app, now you should finalize its configuration.
Step 2: Configure a created application
- In the
Settingstab of your new application, scroll down to theApplication URIssection. - Add
<scheme:cvat_domain>/api/auth/oidc/<idp-id:auth0-oidc>/login/callback/to theAllowed Callback URLs. - Save changes.
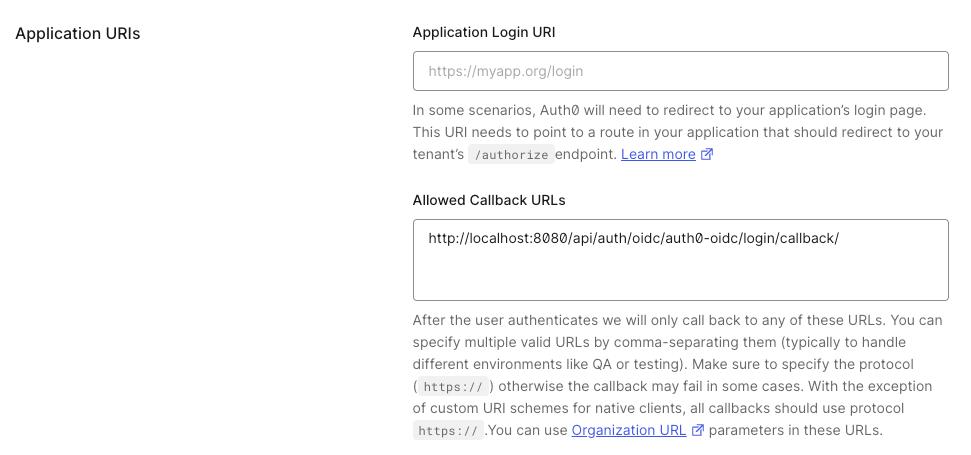
That’s it, now we can move on to the configuration in CVAT.
Step 3: Configure CVAT
Utilize the example below as a template for your configuration:
sso:
  enabled: true
  selection_mode: email_address
  identity_providers:
    - id: <idp-id:auth0-oidc>
      protocol: OIDC
      name: Auth0 OIDC-based IdP
      server_url: https://<auth0_domain>/
      client_id: <client_id>
      client_secret: <client_secret>
      email_domain: <company_email_domain>
Tip
Client ID, Client Secret and Domain can be found in the Basic Information section of application settings
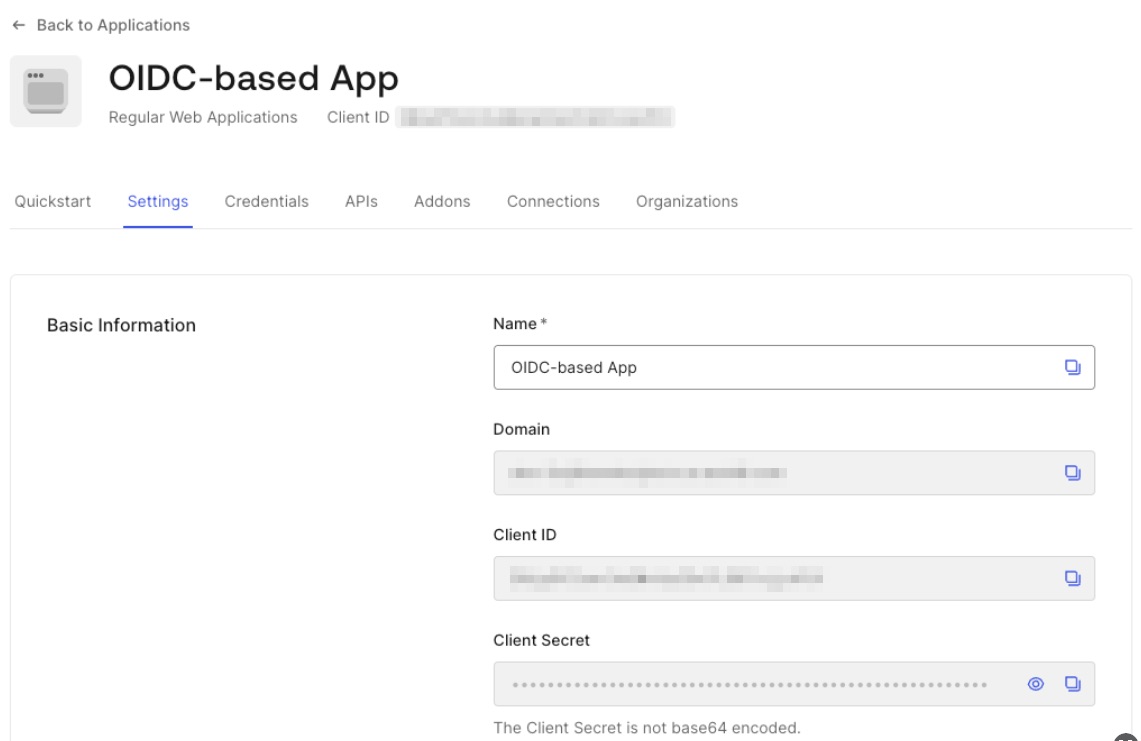
You can now proceed to start CVAT. For additional CVAT configuration details, refer to Configuring SSO in CVAT.
SAML
Follow these steps to configure an application in the Auth0 platform and integrate it with CVAT:
Step 1: Register an SAML-based application
To start, log into your Auth0 dashboard. Once you’re in:
- Navigate to the
Applicationssection in the menu on the left, click+ Create Application. - Enter a name for the application and choose the
Regular Web Applicationstype, then clickCreate.

You’ve created an app, now you should finalize its configuration.
Step 2: Configure a created application
-
Navigate to the
Addonstab of the created application and click on theSAML2 WEB APPbutton.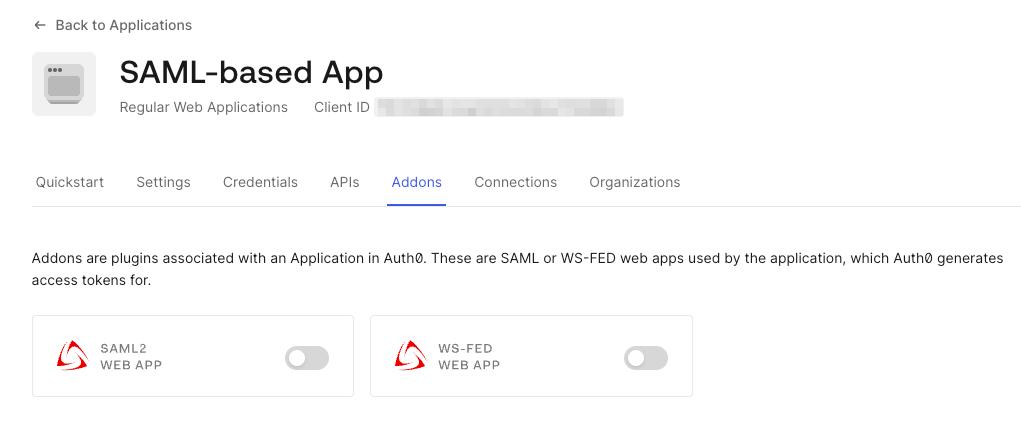
-
Open the
Settingstab in the popup window and set the following configuration: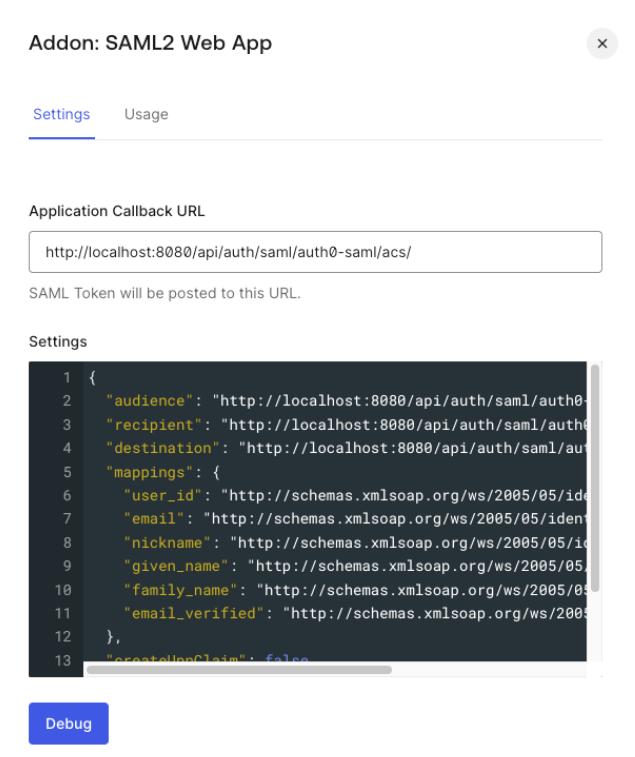
Application Callback URL:<scheme:cvat_domain>/api/auth/saml/<idp-id:auth0-saml>/acs/Settings: enter a JSON object like the following:
{ "audience": "<scheme:cvat_domain>/api/auth/saml/<idp-id:auth0-saml>/metadata/", "recipient": "<scheme:cvat_domain>/api/auth/saml/<idp-id:auth0-saml>/acs/", "destination": "<scheme:cvat_domain>/api/auth/saml/<idp-id:auth0-saml>/acs/", "mappings": { "user_id": "http://schemas.xmlsoap.org/ws/2005/05/identity/claims/nameidentifier", "email": "http://schemas.xmlsoap.org/ws/2005/05/identity/claims/emailaddress", "nickname": "http://schemas.xmlsoap.org/ws/2005/05/identity/claims/username", "given_name": "http://schemas.xmlsoap.org/ws/2005/05/identity/claims/givenname", "family_name": "http://schemas.xmlsoap.org/ws/2005/05/identity/claims/surname", "email_verified": "http://schemas.xmlsoap.org/ws/2005/05/identity/claims/emailverified" }, "createUpnClaim": false, "passthroughClaimsWithNoMapping": false, "mapIdentities": false } -
Scroll down and click
Enable.
Note
More information on how to configure an application on Auth0 platform can be found here.That’s it, now we can move on to the configuration in CVAT.
Step 3: Configure CVAT
Utilize the example below as a template for your configuration:
sso:
  enabled: true
  selection_mode: email_address
  identity_providers:
    - id: <idp-id:auth0-saml>
      protocol: SAML
      name: Auth0 SAML-based IdP
      entity_id: <Issuer>
      metadata_url: <Metadata URL>

      attribute_mapping:
        uid: http://schemas.xmlsoap.org/ws/2005/05/identity/claims/nameidentifier
        username: http://schemas.xmlsoap.org/ws/2005/05/identity/claims/username
        email: http://schemas.xmlsoap.org/ws/2005/05/identity/claims/emailaddress
        first_name: http://schemas.xmlsoap.org/ws/2005/05/identity/claims/givenname
        last_name: http://schemas.xmlsoap.org/ws/2005/05/identity/claims/surname
        email_verified: http://schemas.xmlsoap.org/ws/2005/05/identity/claims/emailverified

      email_domain: <company_email_domain>
Tip
ActualMetadata URL and Issuer values may be found on the Usage tab of the SAML2 Web App plugin
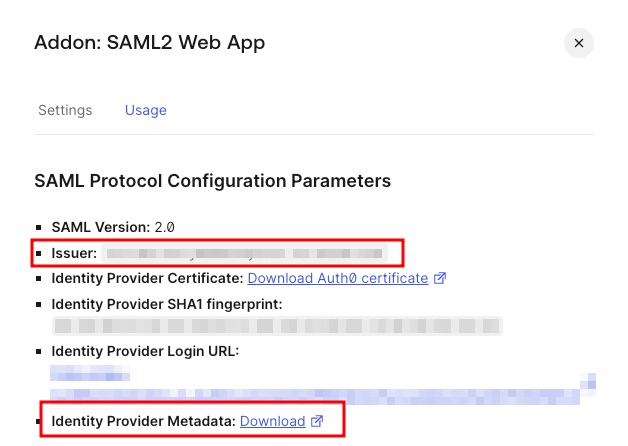
You can now proceed to start CVAT. For additional CVAT configuration details, refer to Configuring SSO in CVAT.
Keycloak
To configure SSO in terms of Keycloak we need to create a client.
OpenID Connect
Follow these steps to do that:
Step 1: Register an OIDC-based client
To start, go to the Keycloak service (by default it is listening for HTTP and HTTPS requests using the ports 8080 and 8443, respectively) and log into your admin account. Once you’re in:
- Under the desired
realmnavigate to theClientssection and clickcreate client. - Fill out the general client settings:

Client type: OpenID ConnectClient ID: enter client identifier- Enter a name for the client, e.g. OIDC-based client
- In the next step, enable the
Client authenticationtoggle.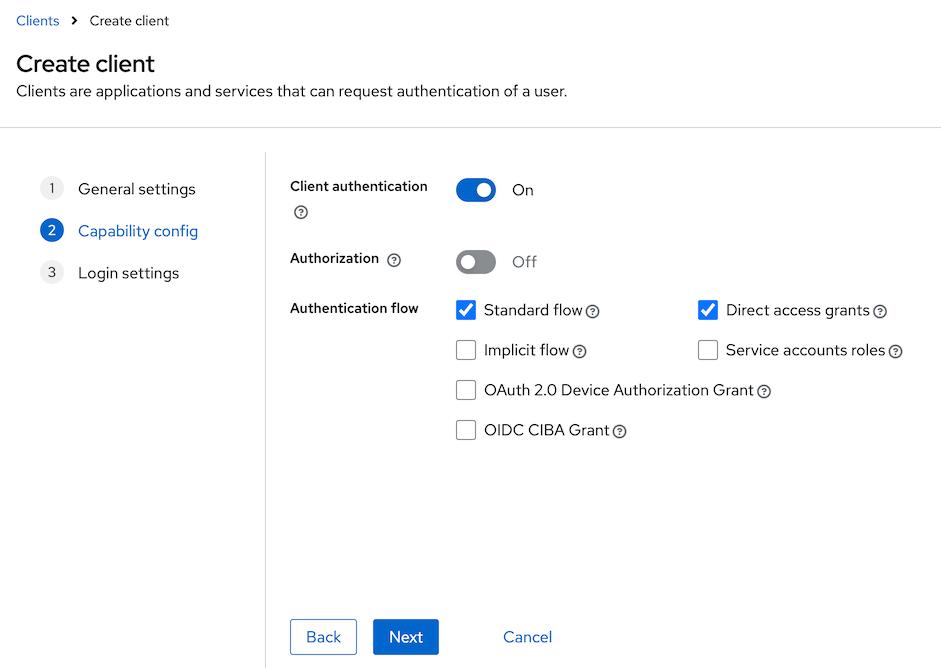
- In the
Login settingssection, provide the following values: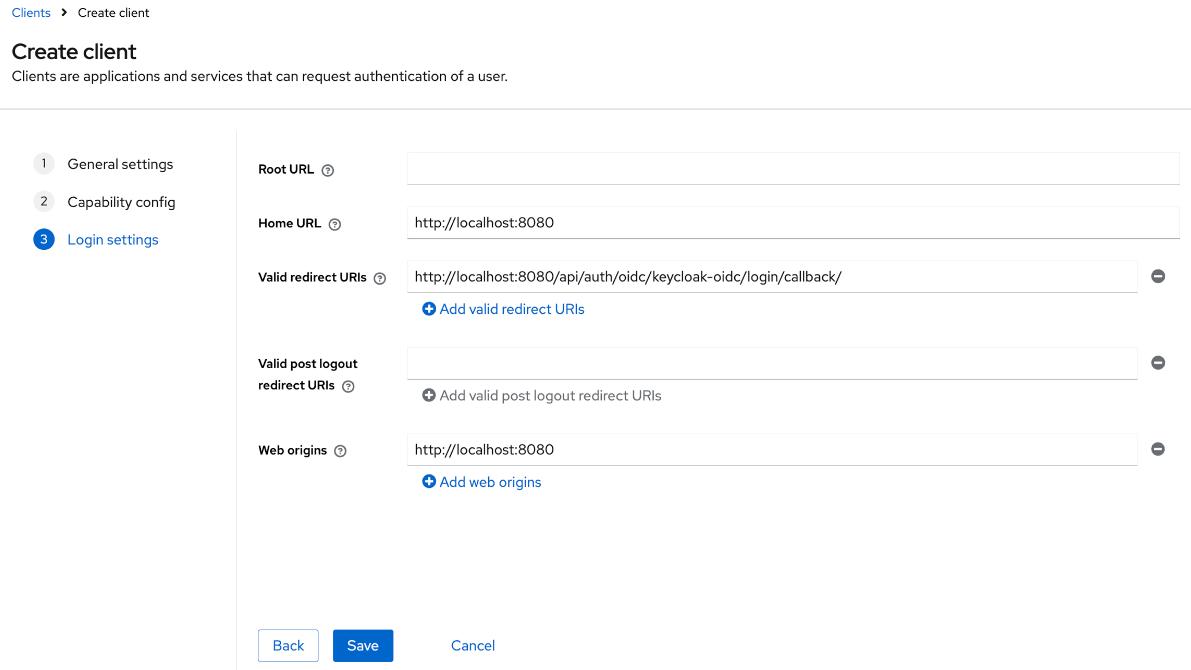
Home URL:<scheme:cvat_domain>Valid redirect URIs:<scheme:cvat_domain>/api/auth/oidc/<idp-id:keycloak-oidc>/login/callback/Web origins:<scheme:cvat_domain>
That’s it, now we can move on to the configuration in CVAT.
Step 2: Configure CVAT
Utilize the example below as a template for your configuration:
sso:
  enabled: true
  selection_mode: email_address
  identity_providers:
    - id: <idp-id:keycloak-oidc>
      protocol: OIDC
      name: Keycloak OIDC-based Identity Provider
      server_url: <scheme:keycloak_domain>/realms/<custom_realm>/.well-known/openid-configuration
      client_id: <Client ID>
      client_secret: <Client Secret>
      email_domain: <company_email_domain>
Tip
ActualClient Secret value can be found on the Credentials tab of the created OIDC client
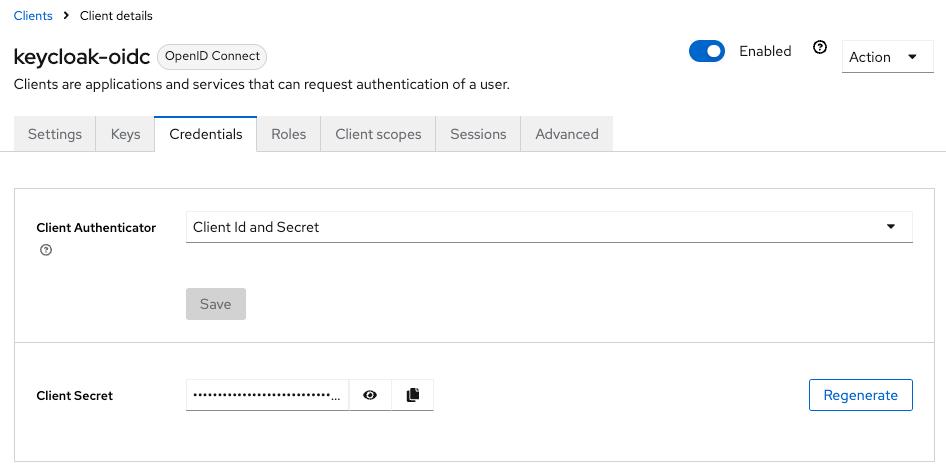
You can now proceed to start CVAT. For additional CVAT configuration details, refer to Configuring SSO in CVAT.
SAML
Follow these steps to configure a client:
Step 1: Register a SAML-based client
To start, go to the Keycloak service (by default it is listening for HTTP and HTTPS requests using the ports 8080 and 8443, respectively) and log into your admin account. Once you’re in:
- Under the desired
realmnavigate to theClientssection and clickcreate client. - Fill out the general client settings:
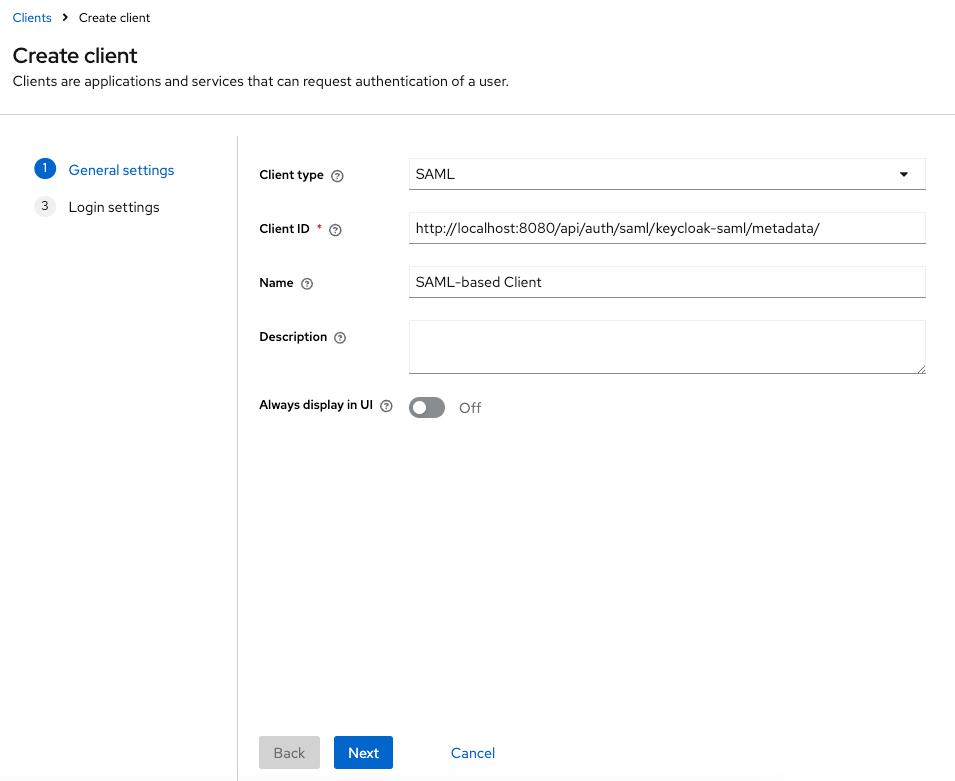
Client type: SAML- Set the
Clint IDthe URL:<scheme:cvat_domain>/api/auth/saml/<idp-id:keycloak-saml>/metadata/ - Enter a name for the client, e.g. SAML client
- In the
Login settingssection, provide the following values: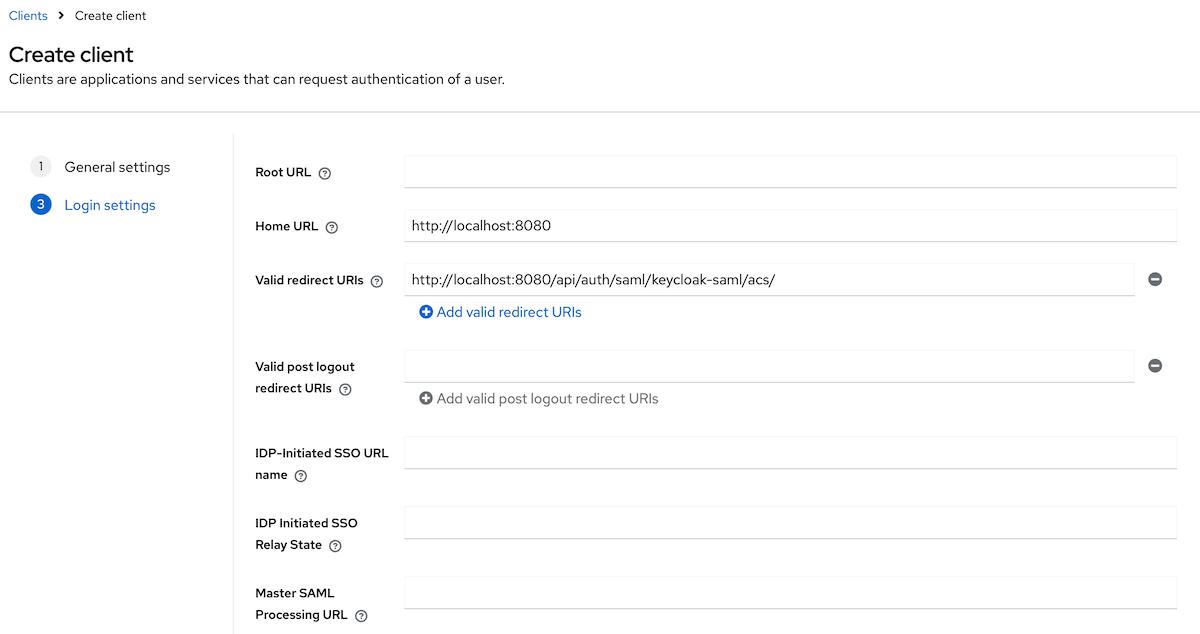
Home URL:<scheme:cvat_domain>Valid redirect URIs:<scheme:cvat_domain>/api/auth/saml/<idp-id:keycloak-saml>/acs/
You’ve created a client, now you should finalize its configuration.
Step 2: Configure a created client
- Navigate to the general settings of the created client, scroll down to the
SAML capabilitiessection. - Update the following parameters:
Name ID format: emailForce name ID format:On
- Navigate to the
Keystab and enable theClient signature requiredtoggle. - Configure attributes & claims:
-
Navigate to the
Client scopestab on the created client -> dedicated scopes for the client. You will see that there is no configured mappers.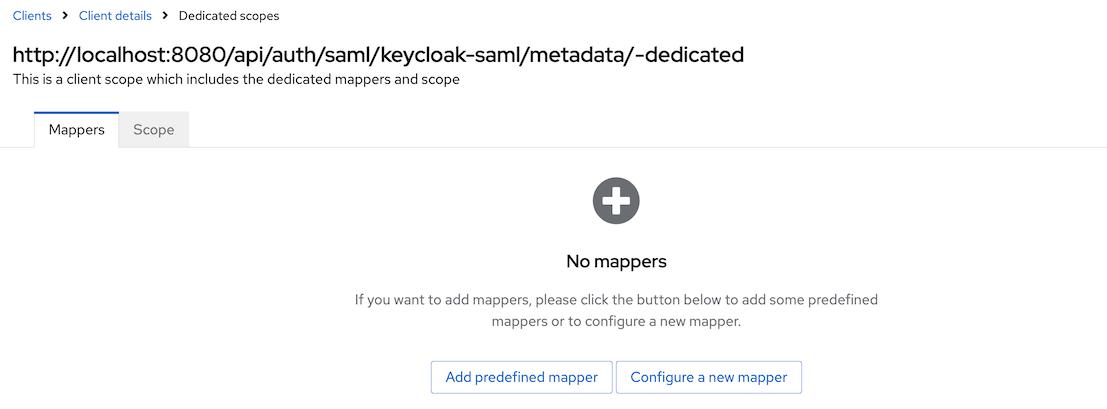
-
Set up mappers for the following attributes:
- uid
- first_name
- last_name
- username
For attributes like
email,first name, andlast name, you can either- Use the predefined mappers

- Or follow the manual configuration steps to create them yourself.
To configure other mappers click
Configure a new mapperif it is a first mapper orAdd mapper->By configurationand then selectUser Property.For instance, to configure a mapper for the
usernameattribute, fill in the form as it is done below:
Name: usernameProperty: usernameSAML Attribute Name: usernameAttribute
-
That’s it, now we can move on to the configuration in CVAT.
Step 3: Configure CVAT
Utilize the example below as a template for your configuration:
sso:
  enabled: true
  selection_mode: email_address
  identity_providers:
    - id: <idp-id:keycloak-saml>
      protocol: SAML
      name: Keycloak SAML-based Identity Provider
      entity_id: <scheme:keycloak_domain>/realms/<custom_realm>
      metadata_url: <scheme:keycloak_domain>/realms/<custom_realm>/protocol/saml/descriptor

      attribute_mapping:
        uid: uidAttribute
        email_verified: emailVerifiedAttribute
        email: emailAttribute
        last_name: lastNameAttribute
        first_name: firstNameAttribute
        username: usernameAttribute

      email_domain: <company_email_domain>
Tip
ActualMetadata URL may be found in the Realm settings on the General tab
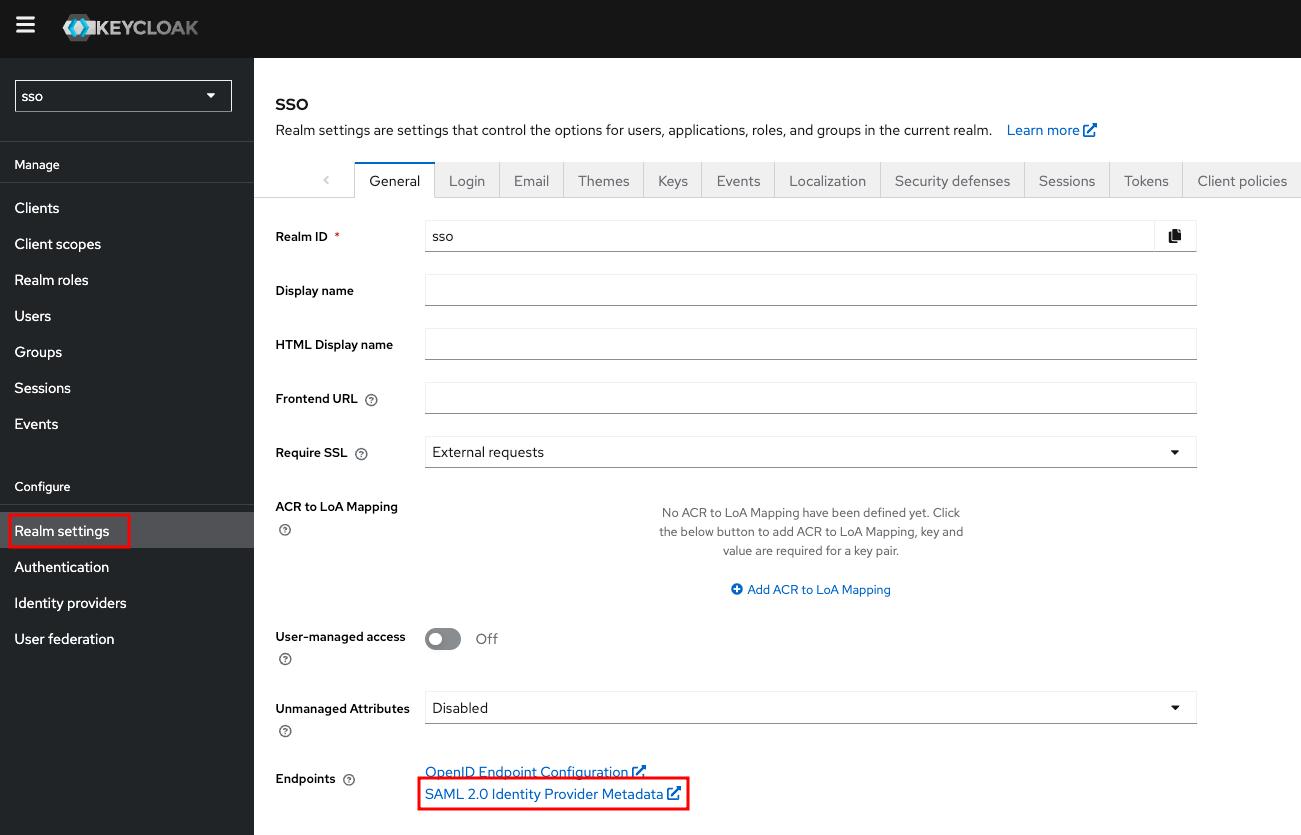
You can now proceed to start CVAT. For additional CVAT configuration details, refer to Configuring SSO in CVAT.
Configuring SSO in CVAT
CVAT provides a dedicated configuration file to customize the login and registration flow.
The sso section of this file specifies which external Identity Provider (IdP)
integrations are enabled. To set up SSO, you typically create a custom YAML configuration file
(e.g., auth_config.yml) and supply its path when starting CVAT.
SSO settings
| Setting | Description |
|---|---|
enabled |
Enables or disables Single Sign-On (SSO) functionality. |
selection_mode |
Defines how the Identity Provider (IdP) is selected for authenticating a given user. Available modes:
|
enable_pkce |
Controls whether Proof Key for Code Exchange (PKCE) is enabled for the authentication flow (disabled by default). This setting applies to all configured OIDC-based Identity Providers |
---
sso:
  enabled: true|false
  selection_mode: email_address|lowest_weight
  enable_pkce: true|false
  ...
IdP Configuration Structure
To integrate an Identity Provider, you must define its configuration block under the identity_providers section
in the CVAT config file. Each provider’s configuration includes both general and protocol-specific settings.
| Setting | Required | Description |
|---|---|---|
id |
required | A unique, URL-safe identifier for the IdP. Used in callback URLs. |
name |
required | A human-readable name for the IdP. |
protocol |
required | Authentication protocol (OIDC/SAML). |
email_domain |
optional | Company email domain (used with email_address selection mode). |
weight |
optional | Determines priority (used with lowest_weight selection mode). The default is 10. |
Additionally, each IdP configuration must include several protocol-specific parameters:
-
client_idandclient_secret(required): These values can be obtained from the configuration page of the specific provider. -
server_url(required): URL is used to obtain IdP OpenID Configuration Metadata.NOTE: How to check
server_urlcorrectness: server_url +/.well-known/openid-configurationAPI should exist and return OpenID Provider Metadata. Generally, each authentication platform provides a list of all endpoints. You need to find the corresponding endpoint and select the part in front of/.well-known/openid-configuration. For example, in the case of integrating an OIDC Microsoft Entry ID application, don’t forget to specify the second version of API (https://login.microsoftonline.com/<tenant_id>/v2.0). -
token_auth_method(optional): Token endpoint authentication method which can be one ofclient_secret_basic,client_secret_post. If this field is omitted, a method from the server’s token auth methods list will be used.
entity_id(required): IdP entity ID, should be equal to the corresponding setting in the IdP configuration.metadata_url(optional): SAML metadata URL. This can typically be found on the IdP configuration page.x509_cert(optional): The SAML X.509 certificate. Also could be found in the IdP’s configuration. If themetadata_urlis not specified, this parameter becomes required.sso_url(optional): SAML endpoint for the Single Sign-On service. Also could be found in the IdP’s configuration. If themetadata_urlis not specified, this parameter becomes required.attribute_mapping(required): A mapping between user account attributes and attributes sent by the Identity Provider.
Below are examples of SSO configuration file for both protocols:
---
sso:
  enabled: true
  selection_mode: email_address
  identity_providers:
    - id: oidc-idp
      protocol: OIDC
      name: OIDC-based IdP
      server_url: https://example.com
      client_id: xxx
      client_secret: xxx
      email_domain: example.com
 ---
 sso:
   enabled: true
   selection_mode: lowest_weight
   identity_providers:
     - id: saml-idp
       protocol: SAML
       name: SAML-based IdP
       entity_id: <idp-entity-id>
       weight: 1
       # specify only metadata_url or sso_url and x509_cert
       metadata_url: http://example.com/path/to/saml/metadata/
       sso_url: <Login URL>
       x509_cert: |
         -----BEGIN CERTIFICATE-----
         certificate content
         -----END CERTIFICATE-----

       attribute_mapping:
         uid: uidAttribute
         email_verified: emailVerifiedAttribute
         email: emailAttribute
         last_name: lastNameAttribute
         first_name: firstNameAttribute
         username: usernameAttribute
More information about OIDC-based and SAML-based IdP configuration expected by Django Allauth can be found here and here respectively.
Start CVAT
Restart required
If CVAT is already running, don’t forget to restart the containers to apply the SSO configurationOnce the configuration file is created, several environment variables must be exported before running CVAT:
export AUTH_CONFIG_PATH="<path_to_auth_config>"
export CVAT_HOST="<cvat_host>"
# cvat_port is optional
export CVAT_BASE_URL="<http|https>://${CVAT_HOST}:<cvat_port>"
Start the CVAT Enterprise instance as usual.
That’s it! The CVAT login page now should have the Continue with SSO option,
allowing users to authenticate using the configured Identity Provider.

4.6 - Social auth configuration
Social accounts authentication for a Self-Hosted solution
Note
This is a paid feature available for Enterprise clients.You can now easily set up authentication with popular social services, which opens doors to such benefits as:
- Convenience: you can use the existing social service credentials to sign in to CVAT.
- Time-saving: with just two clicks, you can sign in without the hassle of typing in credentials, saving time and effort.
- Security: social auth service providers have high-level security measures in place to protect your accounts.
Currently, we offer three options:
With more to come soon. Stay tuned!
Authentication with Google
To enable authentication, do the following:
-
Log in to the Google Cloud console
-
Create a project, and go to APIs & Services
-
On the left menu, select OAuth consent, then select User type (Internal or External), and click Create.
-
On the OAuth consent screen fill all required fields, and click Save and Continue.
-
On the Scopes screen, click Add or remove scopes and select
auth/userinfo.email,auth/userinfo.profile, andopenid. Click Update, and Save and Continue.
For more information, see Configure Auth Consent. -
On the left menu, click Credentials, on the top menu click + Create credentials, and select OAuth client ID.
-
From the Application Type select Web application and configure: Application name, Authorized JavaScript origins, Authorized redirect URIs.
For example, if you plan to deploy CVAT instance onhttps://localhost:8080, addhttps://localhost:8080to authorized JS origins andhttps://localhost:8080/api/auth/social/goolge/login/callback/to redirect URIs. -
Create configuration file in CVAT:
-
Create the
auth_config.ymlfile with the following content:--- social_account: enabled: true google: client_id: <some_client_id> client_secret: <some_client_secret> -
Set
AUTH_CONFIG_PATH="<path_to_auth_config>environment variable.
-
-
In a terminal, run the following command:
docker compose -f docker-compose.yml -f docker-compose.dev.yml -f docker-compose.override.yml up -d --build
Authentication with GitHub
There are 2 basic steps to enable GitHub account authentication.
-
Open the GitHub settings page.
-
On the left menu, click <> Developer settings > OAuth Apps > Register new application.
For more information, see Creating an OAuth App -
Fill in the name field, set the homepage URL (for example:
https://localhost:8080), and authentication callback URL (for example:https://localhost:8080/api/auth/social/github/login/callback/). -
Create configuration file in CVAT:
-
Create the
auth_config.ymlfile with the following content:--- social_account: enabled: true github: client_id: <some_client_id> client_secret: <some_client_secret> -
Set
AUTH_CONFIG_PATH="<path_to_auth_config>environment variable.
-
-
In a terminal, run the following command:
docker compose -f docker-compose.yml -f docker-compose.dev.yml -f docker-compose.override.yml up -d --build
Note
You can also configure GitHub App, but don’t forget to add required permissions.In the Permission > Account permissions > Email addresses must be set to read-only.
Authentication with Amazon Cognito
To enable authentication with Amazon Cognito for your CVAT instance, follow these steps:
- Create an Amazon Cognito pool (Optional)
- Set up a new app client
- Configure social authentication in CVAT
Now, let’s dive deeper into how to accomplish these steps.
Amazon Cognito pool creation
This step is optional and should only be performed if a user pool has not already been created. To create a user pool, follow these instructions:
- Go to the AWS Management Console
- Locate
Cognitoin the list of services - Click
Create user pool - Fill in the required fields
App client creation
To create a new app client, follow these steps:
- Go to the details page of the created user pool
- Find the
App clientsitem in the menu on the left - Click
Create app client - Fill out the form as shown bellow:
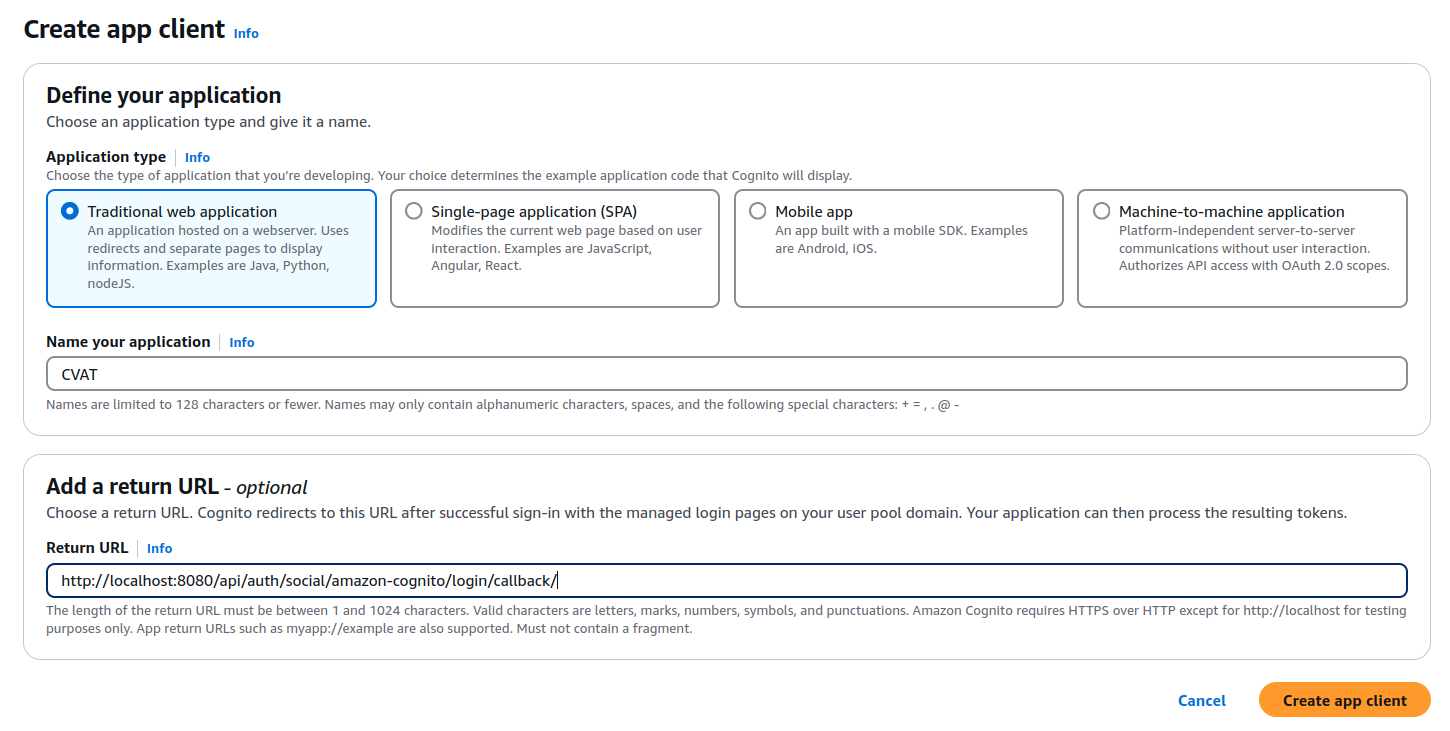
Application type:Traditional web applicationApplication name: Specify a desired name, or leave the autogenerated oneReturn URL(optional): Specify the CVAT redirect URL (<http|https>://<cvat_domain>/api/auth/social/amazon-cognito/login/callback/). This setting can also be updated or specified later after the app client is created.
- Navigate to the
Login pagestab of the created app client - Check the parameters in the
Managed login pages configurationsection and edit them if needed: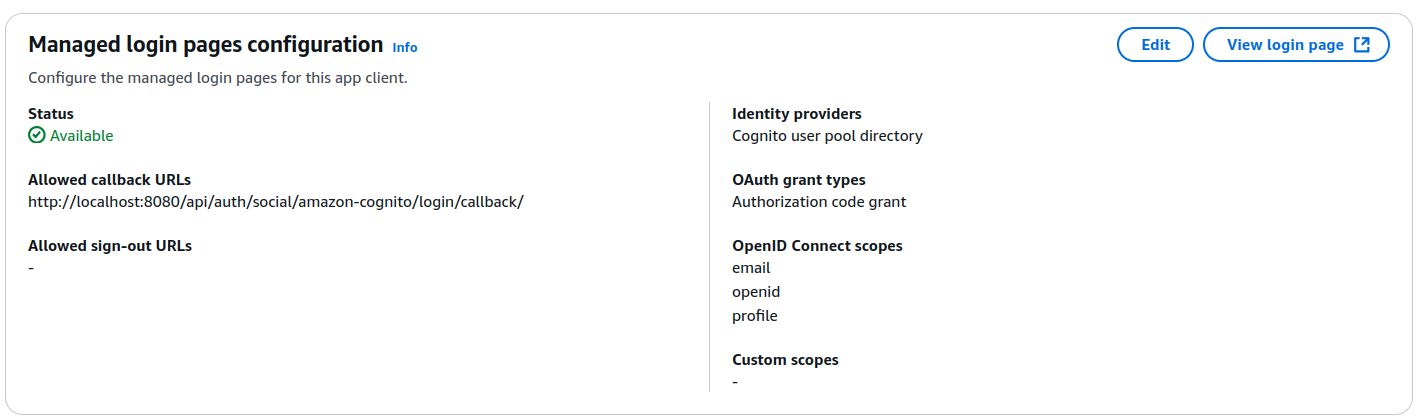
Allowed callback URLs: Must be set to the CVAT redirect URLIdentity providers: Must be specifiedOAuth grant types: TheAuthorization code grantmust be selectedOpenID Connect scopes:OpenID,Profile,Emailscopes must be selected
Setting up social authentication in CVAT
To configure social authentication in CVAT, create a configuration file
(auth_config.yml) with the following content:
---
social_account:
  enabled: true
  amazon_cognito:
    client_id: <client_id>
    client_secret: <client_secret>
    domain: <custom-domain> or
      https://<custom-cognito-prefix>.auth.us-east-1.amazoncognito.com
To find the client_id and client_secret values, navigate to the created app client page
and check the App client information section. To find domain, look for the Domain item in the list on the left.
Once the configuration file is updated, several environment variables must be exported before running CVAT:
export AUTH_CONFIG_PATH="<path_to_auth_config>"
export CVAT_HOST="<cvat_host>"
# cvat_port is optional
export CVAT_BASE_URL="<http|https>://${CVAT_HOST}:<cvat_port>"
Start the CVAT enterprise instance as usual.
That’s it! On the CVAT login page, you should now see the option Continue with Amazon Cognito.
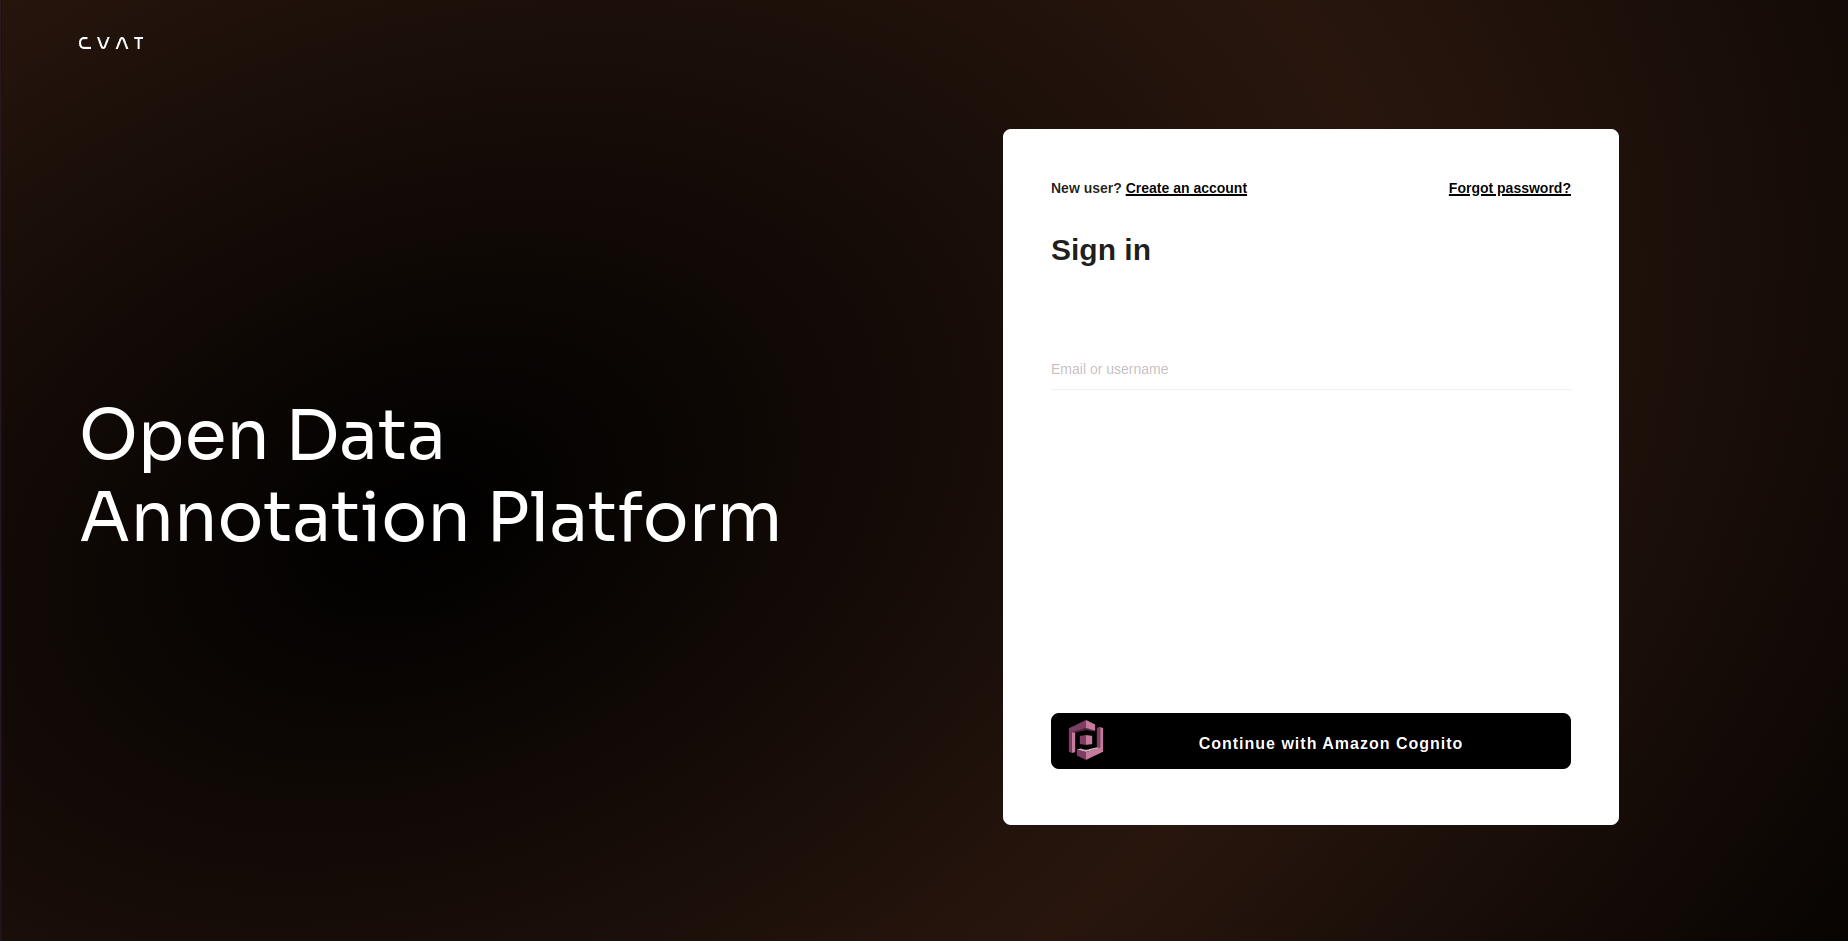
4.7 - Disable registration or password-based login
Disallow users to create accounts or login using passwords for a Self-hosted solution
Note
This is a paid feature available for Enterprise clients.Update authentication config
Please add the following lines to your auth_config.yml (or create such file if it does not exist)
to prevent registering user accounts and disable password-based login:
basic:
  registration:
    enabled: false

  login:
    enabled: false
You may permit login, by changing the corresponding flag to true.
Start CVAT
Restart required
If CVAT is already running, don’t forget to restart the containers to apply authentication configuration.Once the configuration file is created/updated, export corresponding environment variable before running CVAT:
export AUTH_CONFIG_PATH="<path_to_auth_config>"
5 - Dataset Management
Import, export, and organize datasets in CVAT with support for multiple formats and efficient data handling.
5.1 - Dataset formats
List of data export formats supported by CVAT.
In CVAT, you have the option to export data in various formats. The choice of export format depends on the type of annotation as well as the intended future use of the dataset.
The table below outlines the available formats for data export in CVAT.
| Format | Type | Task | Models | Shapes | Attributes | Video Tracks |
|---|---|---|---|---|---|---|
| CamVid 1.0 | .txt .png |
Semantic Segmentation |
U-Net, SegNet, DeepLab, PSPNet, FCN, Mask R-CNN, ICNet, ERFNet, HRNet, V-Net, and others. |
Polygons, Masks | Not supported | Not supported |
| Cityscapes 1.0 | .txt .png |
Semantic Segmentation |
U-Net, SegNet, DeepLab, PSPNet, FCN, ERFNet, ICNet, Mask R-CNN, HRNet, ENet, and others. |
Polygons, Masks | Specific attributes | Not supported |
| COCO 1.0 | .json | Detection, Semantic Segmentation |
YOLO (You Only Look Once), Faster R-CNN, Mask R-CNN, SSD (Single Shot MultiBox Detector), RetinaNet, EfficientDet, UNet, DeepLabv3+, CenterNet, Cascade R-CNN, and others. |
Bounding Boxes, Oriented Bounding Boxes, Polygons, Masks | All attributes | Supported |
| COCO Keypoints 1.0 | .json | Keypoints | OpenPose, PoseNet, AlphaPose, SPM (Single Person Model), Mask R-CNN with Keypoint Detection:, and others. |
Skeletons | All attributes | Supported |
| CVAT for images 1.1 | .xml | Any in 2D except for Video Tracking | Any model that can decode the format. | Tags, Bounding Boxes, Oriented Bounding Boxes, Polygons, Polylines, Points, Cuboids, Skeletons, Ellipses, Masks |
All attributes | Supported |
| CVAT for video 1.1 | .xml | Any in 2D except for Classification | Any model that can decode the format. | Bounding Boxes, Oriented Bounding Boxes, Polygons, Polylines, Points, Cuboids, Skeletons, Ellipses, Masks |
All attributes | Supported |
| Datumaro 1.0 | .json | Any | Any model that can decode the format. Main format in Datumaro framework |
Tags, Bounding Boxes, Oriented Bounding Boxes, Polygons, Polylines, Points, Cuboids, Skeletons, Ellipses, Masks |
All attributes | Supported |
| ICDAR Includes ICDAR Recognition 1.0, ICDAR Detection 1.0, and ICDAR Segmentation 1.0 descriptions. |
.txt | Text recognition, Text detection, Text segmentation |
EAST: Efficient and Accurate Scene Text Detector, CRNN, Mask TextSpotter, TextSnake, and others. |
Tags, Bounding Boxes, Polygons, Masks | Specific attributes | Not supported |
| ImageNet 1.0 | .jpg .txt |
Semantic Segmentation, Classification, Detection |
VGG (VGG16, VGG19), Inception, YOLO, Faster R-CNN , U-Net, and others | Tags | No attributes | Not supported |
| KITTI 1.0 | .txt .png |
Semantic Segmentation, Detection, 3D | PointPillars, SECOND, AVOD, YOLO, DeepSORT, PWC-Net, ORB-SLAM, and others. | Bounding Boxes, Polygons, Masks | Specific attributes | Not supported |
| LabelMe 3.0 | .xml | Compatibility, Semantic Segmentation |
U-Net, Mask R-CNN, Fast R-CNN, Faster R-CNN, DeepLab, YOLO, and others. |
Bounding Boxes, Polygons, Masks | Supported (Polygons) | Not supported |
| LFW 1.0 | .txt | Verification, Face recognition |
OpenFace, VGGFace & VGGFace2, FaceNet, ArcFace, and others. |
Tags, Skeletons | Specific attributes | Not supported |
| Market-1501 1.0 | .txt | Re-identification | Triplet Loss Networks, Deep ReID models, and others. |
Bounding Boxes | Specific attributes | Not supported |
| MOT 1.0 | .txt | Video Tracking, Detection |
SORT, MOT-Net, IOU Tracker, and others. |
Bounding Boxes | Specific attributes | Supported |
| MOTS PNG 1.0 | .png .txt |
Video Tracking, Detection |
SORT, MOT-Net, IOU Tracker, and others. |
Bounding Boxes, Masks | Specific attributes | Supported |
| Open Images 1.0 | .csv | Detection, Classification, Semantic Segmentation |
Faster R-CNN, YOLO, U-Net, CornerNet, and others. |
Tags, Bounding Boxes, Polygons, Masks | Specific attributes | Not supported |
| PASCAL VOC 1.0 | .xml, .png | Classification, Detection | Faster R-CNN, SSD, YOLO, AlexNet, and others. |
Tags, Bounding Boxes, Polygons, Masks | Specific attributes | Not supported |
| Segmentation Mask 1.0 | .png | Semantic Segmentation | Faster R-CNN, SSD, YOLO, AlexNet, and others. |
Polygons, Masks | No attributes | Not supported |
| VGGFace2 1.0 | .csv | Face recognition | VGGFace, ResNet, Inception, and others. |
Bounding Boxes, Points | No attributes | Not supported |
| WIDER Face 1.0 | .txt | Detection | SSD (Single Shot MultiBox Detector), Faster R-CNN, YOLO, and others. |
Tags, Bounding Boxes | Specific attributes | Not supported |
| YOLO 1.0 | .txt | Detection | YOLOv1, YOLOv2 (YOLO9000), YOLOv3, YOLOv4, and others. |
Bounding Boxes | No attributes | Not supported |
| Ultralytics YOLO Detection 1.0 | .txt | Detection | YOLOv8 | Bounding Boxes | No attributes | Supported |
| Ultralytics YOLO Segmentation 1.0 | .txt | Instance Segmentation | YOLOv8 | Polygons, Masks | No attributes | Supported |
| Ultralytics YOLO Pose 1.0 | .txt | Keypoints | YOLOv8 | Skeletons | No attributes | Supported |
| Ultralytics YOLO Oriented Bounding Boxes 1.0 | .txt | Detection | YOLOv8 | Oriented Bounding Boxes | No attributes | Supported |
| Ultralytics YOLO Classification 1.0 | .jpg | Classification | YOLOv8 | Tags | No attributes | Not supported |
5.1.1 - CVAT for image
How to export and import data in CVAT for image format
This is CVAT’s native annotation format, which fully supports all of CVAT’s annotation features. It is ideal for creating data backups.
For more information, see:
CVAT for image export
Applicable for all computer vision tasks in 2D except for Video Tracking.
- Supported annotations: Tags, Oriented Bounding Boxes, Bounding Boxes, Polygons, Polylines, Points, Cuboids, Ellipses, Skeletons, Masks.
- Attributes: Supported.
- Tracks: Supported (via the extra
track_idattribute).
The downloaded file is a .zip archive with following structure:
taskname.zip/
├── images/
|   ├── img1.png
|   └── img2.jpg
└── annotations.xml
CVAT for video export
Applicable for all computer vision tasks in 2D except for Classification
- Supported annotations: Bounding Boxes, Oriented Bounding Boxes, Polygons, Polylines, Points, Cuboids, Ellipses, Skeletons, Masks.
- Attributes: Supported.
- Tracks: Supported.
- Shapes are exported as single-frame tracks
Downloaded file is a .zip archive with following structure:
taskname.zip/
├── images/
|   ├── frame_000000.png
|   └── frame_000001.png
└── annotations.xml
CVAT for video import
Uploaded file: either an .xml file or a
.zip file with the contents described above.
Format specifications
Each format has X.Y version (e.g. 1.0). In general the major version (X) is incremented when the data format has incompatible changes and the minor version (Y) is incremented when the data format is slightly modified (e.g. it has one or several extra fields inside meta information). The document will describe all changes for all versions of XML annotation format.
Version 1.1
There are two different formats for images and video tasks at the moment.
The both formats have a common part which is described below. From the previous version flipped tag was added.
Also original_size tag was added for interpolation mode to specify frame size.
In annotation mode each image tag has width and height attributes for the same purpose.
For what is rle, see Run-length encoding
<?xml version="1.0" encoding="utf-8"?>
<annotations>
  <version>1.1</version>
  <meta>
    <task>
      <id>Number: id of the task</id>
      <name>String: some task name</name>
      <size>Number: count of frames/images in the task</size>
      <mode>String: interpolation or annotation</mode>
      <overlap>Number: number of overlapped frames between segments</overlap>
      <bugtracker>String: URL on an page which describe the task</bugtracker>
      <flipped>Boolean: were images of the task flipped? (True/False)</flipped>
      <created>String: date when the task was created</created>
      <updated>String: date when the task was updated</updated>
      <labels>
        <label>
          <name>String: name of the label (e.g. car, person)</name>
          <type>String: any, bbox, cuboid, ellipse, mask, polygon, polyline, points, skeleton, tag</type>
          <attributes>
            <attribute>
              <name>String: attribute name</name>
              <mutable>Boolean: mutable (allow different values between frames)</mutable>
              <input_type>String: select, checkbox, radio, number, text</input_type>
              <default_value>String: default value</default_value>
              <values>String: possible values, separated by newlines
ex. value 2
ex. value 3</values>
            </attribute>
          </attributes>
          <svg>String: label representation in svg, only for skeletons</svg>
          <parent>String: label parent name, only for skeletons</parent>
        </label>
      </labels>
      <segments>
        <segment>
          <id>Number: id of the segment</id>
          <start>Number: first frame</start>
          <stop>Number: last frame</stop>
          <url>String: URL (e.g. http://cvat.example.com/?id=213)</url>
        </segment>
      </segments>
      <owner>
        <username>String: the author of the task</username>
        <email>String: email of the author</email>
      </owner>
      <original_size>
        <width>Number: frame width</width>
        <height>Number: frame height</height>
      </original_size>
    </task>
    <dumped>String: date when the annotation was dumped</dumped>
  </meta>
  ...
</annotations>
Annotation
Below you can find description of the data format for images tasks.
On each image it is possible to have many different objects. Each object can have multiple attributes.
If an annotation task is created with z_order flag then each object will have z_order attribute which is used
to draw objects properly when they are intersected (if z_order is bigger the object is closer to camera).
In previous versions of the format only box shape was available.
In later releases mask, polygon, polyline, points, skeletons and tags were added.
Please see below for more details:
<?xml version="1.0" encoding="utf-8"?>
<annotations>
  ...
  <image id="Number: id of the image (the index in lexical order of images)" name="String: path to the image"
    width="Number: image width" height="Number: image height">
    <box label="String: the associated label" xtl="Number: float" ytl="Number: float" xbr="Number: float" ybr="Number: float" occluded="Number: 0 - False, 1 - True" z_order="Number: z-order of the object">
      <attribute name="String: an attribute name">String: the attribute value</attribute>
      ...
    </box>
    <polygon label="String: the associated label" points="x0,y0;x1,y1;..." occluded="Number: 0 - False, 1 - True"
    z_order="Number: z-order of the object">
      <attribute name="String: an attribute name">String: the attribute value</attribute>
      ...
    </polygon>
    <polyline label="String: the associated label" points="x0,y0;x1,y1;..." occluded="Number: 0 - False, 1 - True"
    z_order="Number: z-order of the object">
      <attribute name="String: an attribute name">String: the attribute value</attribute>
      ...
    </polyline>
    <polyline label="String: the associated label" points="x0,y0;x1,y1;..." occluded="Number: 0 - False, 1 - True"
    z_order="Number: z-order of the object">
      <attribute name="String: an attribute name">String: the attribute value</attribute>
      ...
    </polyline>
    <points label="String: the associated label" points="x0,y0;x1,y1;..." occluded="Number: 0 - False, 1 - True"
    z_order="Number: z-order of the object">
      <attribute name="String: an attribute name">String: the attribute value</attribute>
      ...
    </points>
    <tag label="String: the associated label" source="manual or auto">
      <attribute name="String: an attribute name">String: the attribute value</attribute>
      ...
    </tag>
    <skeleton label="String: the associated label" z_order="Number: z-order of the object">
      <points label="String: the associated label" occluded="Number: 0 - False, 1 - True" outside="Number: 0 - False, 1 - True" points="x0,y0;x1,y1">
        <attribute name="String: an attribute name">String: the attribute value</attribute>
      </points>
      ...
      <attribute name="String: an attribute name">String: the attribute value</attribute>
      ...
    </skeleton>
    <mask label="String: the associated label" source="manual or auto" occluded="Number: 0 - False, 1 - True" rle="RLE mask" left="Number: left coordinate of the image where the mask begins" top="Number: top coordinate of the image where the mask begins" width="Number: width of the mask" height="Number: height of the mask" z_order="Number: z-order of the object">
    </mask>
    ...
  </image>
  ...
</annotations>
Example:
<?xml version="1.0" encoding="utf-8"?>
<annotations>
<version>1.1</version>
<meta>
<task>
<id>4</id>
<name>segmentation</name>
<size>27</size>
<mode>annotation</mode>
<overlap>0</overlap>
<bugtracker></bugtracker>
<flipped>False</flipped>
<created>2018-09-25 11:34:24.617558+03:00</created>
<updated>2018-09-25 11:38:27.301183+03:00</updated>
<labels>
<label>
<name>car</name>
<attributes>
</attributes>
</label>
<label>
<name>traffic_line</name>
<attributes>
</attributes>
</label>
<label>
<name>wheel</name>
<attributes>
</attributes>
</label>
<label>
<name>plate</name>
<attributes>
</attributes>
</label>
<label>
<name>s1</name>
<type>skeleton</type>
<attributes>
</attributes>
<svg><line x1="36.87290954589844" y1="47.732025146484375" x2="86.87290954589844" y2="10.775501251220703" stroke="black" data-type="edge" data-node-from="2" stroke-width="0.5" data-node-to="3"></line><line x1="25.167224884033203" y1="22.64841079711914" x2="36.87290954589844" y2="47.732025146484375" stroke="black" data-type="edge" data-node-from="1" stroke-width="0.5" data-node-to="2"></line><circle r="1.5" stroke="black" fill="#b3b3b3" cx="25.167224884033203" cy="22.64841079711914" stroke-width="0.1" data-type="element node" data-element-id="1" data-node-id="1" data-label-name="1"></circle><circle r="1.5" stroke="black" fill="#b3b3b3" cx="36.87290954589844" cy="47.732025146484375" stroke-width="0.1" data-type="element node" data-element-id="2" data-node-id="2" data-label-name="2"></circle><circle r="1.5" stroke="black" fill="#b3b3b3" cx="86.87290954589844" cy="10.775501251220703" stroke-width="0.1" data-type="element node" data-element-id="3" data-node-id="3" data-label-name="3"></circle></svg>
</label>
<label>
<name>1</name>
<type>points</type>
<attributes>
</attributes>
<parent>s1</parent>
</label>
<label>
<name>2</name>
<type>points</type>
<attributes>
</attributes>
<parent>s1</parent>
</label>
<label>
<name>3</name>
<type>points</type>
<attributes>
</attributes>
<parent>s1</parent>
</label>
</labels>
<segments>
<segment>
<id>4</id>
<start>0</start>
<stop>26</stop>
<url>http://localhost:8080/?id=4</url>
</segment>
</segments>
<owner>
<username>admin</username>
<email></email>
</owner>
</task>
<dumped>2018-09-25 11:38:28.799808+03:00</dumped>
</meta>
<image id="0" name="filename000.jpg" width="1600" height="1200">
<box label="plate" xtl="797.33" ytl="870.92" xbr="965.52" ybr="928.94" occluded="0" z_order="4">
</box>
<polygon label="car" points="561.30,916.23;561.30,842.77;554.72,761.63;553.62,716.67;565.68,677.20;577.74,566.45;547.04,559.87;536.08,542.33;528.40,520.40;541.56,512.72;559.10,509.43;582.13,506.14;588.71,464.48;583.23,448.03;587.61,434.87;594.19,431.58;609.54,399.78;633.66,369.08;676.43,294.52;695.07,279.17;703.84,279.17;735.64,268.20;817.88,264.91;923.14,266.01;997.70,274.78;1047.04,283.55;1063.49,289.04;1090.90,330.70;1111.74,371.27;1135.86,397.59;1147.92,428.29;1155.60,435.97;1157.79,451.32;1156.69,462.28;1159.98,491.89;1163.27,522.59;1173.14,513.82;1199.46,516.01;1224.68,521.49;1225.77,544.52;1207.13,568.64;1181.91,576.32;1178.62,582.90;1177.53,619.08;1186.30,680.48;1199.46,711.19;1206.03,733.12;1203.84,760.53;1197.26,818.64;1199.46,840.57;1203.84,908.56;1192.88,930.49;1184.10,939.26;1162.17,944.74;1139.15,960.09;1058.01,976.54;1028.40,969.96;1002.09,972.15;931.91,974.35;844.19,972.15;772.92,972.15;729.06,967.77;713.71,971.06;685.20,973.25;659.98,968.86;644.63,984.21;623.80,983.12;588.71,985.31;560.20,966.67" occluded="0" z_order="1">
</polygon>
<polyline label="traffic_line" points="462.10,0.00;126.80,1200.00" occluded="0" z_order="3">
</polyline>
<polyline label="traffic_line" points="1212.40,0.00;1568.66,1200.00" occluded="0" z_order="2">
</polyline>
<points label="wheel" points="574.90,939.48;1170.16,907.90;1130.69,445.26;600.16,459.48" occluded="0" z_order="5">
</points>
<tag label="good_frame" source="manual">
</tag>
<skeleton label="s1" source="manual" z_order="0">
<points label="1" occluded="0" source="manual" outside="0" points="54.47,94.81">
</points>
<points label="2" occluded="0" source="manual" outside="0" points="68.02,162.34">
</points>
<points label="3" occluded="0" source="manual" outside="0" points="125.87,62.85">
</points>
</skeleton>
<mask label="car" source="manual" occluded="0" rle="3, 5, 7, 7, 5, 9, 3, 11, 2, 11, 2, 12, 1, 12, 1, 26, 1, 12, 1, 12, 2, 11, 3, 9, 5, 7, 7, 5, 3" left="707" top="888" width="13" height="15" z_order="0">
</mask>
</image>
</annotations>
Interpolation
Below you can find description of the data format for video tasks. The annotation contains tracks. Each track corresponds to an object which can be presented on multiple frames. The same object cannot be presented on the same frame in multiple locations. Each location of the object can have multiple attributes even if an attribute is immutable for the object it will be cloned for each location (a known redundancy).
<?xml version="1.0" encoding="utf-8"?>
<annotations>
  ...
  <track id="Number: id of the track (doesn't have any special meeting)" label="String: the associated label" source="manual or auto">
    <box frame="Number: frame" xtl="Number: float" ytl="Number: float" xbr="Number: float" ybr="Number: float" outside="Number: 0 - False, 1 - True" occluded="Number: 0 - False, 1 - True" keyframe="Number: 0 - False, 1 - True">
      <attribute name="String: an attribute name">String: the attribute value</attribute>
      ...
    </box>
    <polygon frame="Number: frame" points="x0,y0;x1,y1;..." outside="Number: 0 - False, 1 - True" occluded="Number: 0 - False, 1 - True" keyframe="Number: 0 - False, 1 - True">
      <attribute name="String: an attribute name">String: the attribute value</attribute>
    </polygon>
    <polyline frame="Number: frame" points="x0,y0;x1,y1;..." outside="Number: 0 - False, 1 - True" occluded="Number: 0 - False, 1 - True" keyframe="Number: 0 - False, 1 - True">
      <attribute name="String: an attribute name">String: the attribute value</attribute>
    </polyline>
    <points frame="Number: frame" points="x0,y0;x1,y1;..." outside="Number: 0 - False, 1 - True" occluded="Number: 0 - False, 1 - True" keyframe="Number: 0 - False, 1 - True">
      <attribute name="String: an attribute name">String: the attribute value</attribute>
    </points>
    <mask frame="Number: frame" outside="Number: 0 - False, 1 - True" occluded="Number: 0 - False, 1 - True" rle="RLE mask" left="Number: left coordinate of the image where the mask begins" top="Number: top coordinate of the image where the mask begins" width="Number: width of the mask" height="Number: height of the mask" z_order="Number: z-order of the object">
    </mask>
    ...
  </track>
  <track id="Number: id of the track (doesn't have any special meeting)" label="String: the associated label" source="manual or auto">
    <skeleton frame="Number: frame" keyframe="Number: 0 - False, 1 - True">
      <points label="String: the associated label" outside="Number: 0 - False, 1 - True" occluded="Number: 0 - False, 1 - True" keyframe="Number: 0 - False, 1 - True" points="x0,y0;x1,y1">
      </points>
      ...
    </skeleton>
    ...
  </track>
  ...
</annotations>
Example:
<?xml version="1.0" encoding="utf-8"?>
<annotations>
<version>1.1</version>
<meta>
<task>
<id>5</id>
<name>interpolation</name>
<size>4620</size>
<mode>interpolation</mode>
<overlap>5</overlap>
<bugtracker></bugtracker>
<flipped>False</flipped>
<created>2018-09-25 12:32:09.868194+03:00</created>
<updated>2018-09-25 16:05:05.619841+03:00</updated>
<labels>
<label>
<name>person</name>
<attributes>
</attributes>
</label>
<label>
<name>car</name>
<attributes>
</attributes>
</label>
<label>
<name>s1</name>
<type>skeleton</type>
<attributes>
</attributes>
<svg><line x1="36.87290954589844" y1="47.732025146484375" x2="86.87290954589844" y2="10.775501251220703" stroke="black" data-type="edge" data-node-from="2" stroke-width="0.5" data-node-to="3"></line><line x1="25.167224884033203" y1="22.64841079711914" x2="36.87290954589844" y2="47.732025146484375" stroke="black" data-type="edge" data-node-from="1" stroke-width="0.5" data-node-to="2"></line><circle r="1.5" stroke="black" fill="#b3b3b3" cx="25.167224884033203" cy="22.64841079711914" stroke-width="0.1" data-type="element node" data-element-id="1" data-node-id="1" data-label-name="1"></circle><circle r="1.5" stroke="black" fill="#b3b3b3" cx="36.87290954589844" cy="47.732025146484375" stroke-width="0.1" data-type="element node" data-element-id="2" data-node-id="2" data-label-name="2"></circle><circle r="1.5" stroke="black" fill="#b3b3b3" cx="86.87290954589844" cy="10.775501251220703" stroke-width="0.1" data-type="element node" data-element-id="3" data-node-id="3" data-label-name="3"></circle></svg>
</label>
<label>
<name>1</name>
<type>points</type>
<attributes>
</attributes>
<parent>s1</parent>
</label>
<label>
<name>2</name>
<type>points</type>
<attributes>
</attributes>
<parent>s1</parent>
</label>
<label>
<name>3</name>
<type>points</type>
<attributes>
</attributes>
<parent>s1</parent>
</label>
</labels>
<segments>
<segment>
<id>5</id>
<start>0</start>
<stop>4619</stop>
<url>http://localhost:8080/?id=5</url>
</segment>
</segments>
<owner>
<username>admin</username>
<email></email>
</owner>
<original_size>
<width>640</width>
<height>480</height>
</original_size>
</task>
<dumped>2018-09-25 16:05:07.134046+03:00</dumped>
</meta>
<track id="0" label="car">
<polygon frame="0" points="324.79,213.16;323.74,227.90;347.42,237.37;371.11,217.37;350.05,190.00;318.47,191.58" outside="0" occluded="0" keyframe="1">
</polygon>
<polygon frame="1" points="324.79,213.16;323.74,227.90;347.42,237.37;371.11,217.37;350.05,190.00;318.47,191.58" outside="1" occluded="0" keyframe="1">
</polygon>
<polygon frame="6" points="305.32,237.90;312.16,207.90;352.69,206.32;355.32,233.16;331.11,254.74" outside="0" occluded="0" keyframe="1">
</polygon>
<polygon frame="7" points="305.32,237.90;312.16,207.90;352.69,206.32;355.32,233.16;331.11,254.74" outside="1" occluded="0" keyframe="1">
</polygon>
<polygon frame="13" points="313.74,233.16;331.11,220.00;359.53,243.16;333.21,283.16;287.95,274.74" outside="0" occluded="0" keyframe="1">
</polygon>
<polygon frame="14" points="313.74,233.16;331.11,220.00;359.53,243.16;333.21,283.16;287.95,274.74" outside="1" occluded="0" keyframe="1">
</polygon>
</track>
<track id="1" label="s1" source="manual">
<skeleton frame="0" keyframe="1" z_order="0">
<points label="1" outside="0" occluded="0" keyframe="1" points="112.07,258.59">
</points>
<points label="2" outside="0" occluded="0" keyframe="1" points="127.87,333.23">
</points>
<points label="3" outside="0" occluded="0" keyframe="1" points="195.37,223.27">
</points>
</skeleton>
<skeleton frame="1" keyframe="1" z_order="0">
<points label="1" outside="1" occluded="0" keyframe="1" points="112.07,258.59">
</points>
<points label="2" outside="1" occluded="0" keyframe="1" points="127.87,333.23">
</points>
<points label="3" outside="1" occluded="0" keyframe="1" points="195.37,223.27">
</points>
</skeleton>
<skeleton frame="6" keyframe="1" z_order="0">
<points label="1" outside="0" occluded="0" keyframe="0" points="120.07,270.59">
</points>
<points label="2" outside="0" occluded="0" keyframe="0" points="140.87,350.23">
</points>
<points label="3" outside="0" occluded="0" keyframe="0" points="210.37,260.27">
</points>
</skeleton>
<skeleton frame="7" keyframe="1" z_order="0">
<points label="1" outside="1" occluded="0" keyframe="1" points="120.07,270.59">
</points>
<points label="2" outside="1" occluded="0" keyframe="1" points="140.87,350.23">
</points>
<points label="3" outside="1" occluded="0" keyframe="1" points="210.37,260.27">
</points>
</skeleton>
<skeleton frame="13" keyframe="0" z_order="0">
<points label="1" outside="0" occluded="0" keyframe="0" points="112.07,258.59">
</points>
<points label="2" outside="0" occluded="0" keyframe="0" points="127.87,333.23">
</points>
<points label="3" outside="0" occluded="0" keyframe="0" points="195.37,223.27">
</points>
</skeleton>
<skeleton frame="14" keyframe="1" z_order="0">
<points label="1" outside="1" occluded="0" keyframe="1" points="112.07,258.59">
</points>
<points label="2" outside="1" occluded="0" keyframe="1" points="127.87,333.23">
</points>
<points label="3" outside="1" occluded="0" keyframe="1" points="195.37,223.27">
</points>
</skeleton>
</track>
</annotations>
5.1.2 - Datumaro
How to export and import data in Datumaro format
The Datumaro format is a universal format, capable of handling arbitrary datasets and annotations. It is the native format of the Datumaro dataset framework.
The framework can be used for various dataset operations, such as dataset and annotation transformations, format conversions, computation of statistics, and dataset merging.
This framework is used in CVAT as the dataset support provider. It effectively means that anything you import in CVAT or export from CVAT, can be processed with Datumaro, allowing you to perform custom dataset operations easily.
For more information, see:
Datumaro export
- Supported annotations: Tags, Bounding Boxes, Oriented Bounding Boxes, Polygons, Polylines, Points, Cuboids, Ellipses, Masks, Skeletons.
- Attributes: Supported.
- Tracks: Supported (via the
track_idattribute).
The downloaded file is a .zip archive with the following structure:
taskname.zip/
├── annotations/
│   └── default.json
└── images/
    └── default/
        ├── image1.jpg
        ├── image2.jpg
        ├── ...
Datumaro import
- Supported annotations: Tags, Bounding Boxes, Polygons, Polylines, Points, Cuboids, Ellipses, Masks, Skeletons.
- Attributes: Supported.
- Tracks: Supported.
Uploaded file: a .json file with annotations or a .zip archive of the following structure:
archive.zip/
└── annotations/
    ├── subset1.json
    └── subset2.json
The .json annotations files in the annotations directory should have similar structure:
{
  "info": {},
  "categories": {
    "label": {
      "labels": [
        {
          "name": "label_0",
          "parent": "",
          "attributes": []
        },
        {
          "name": "label_1",
          "parent": "",
          "attributes": []
        }
      ],
      "attributes": []
    }
  },
  "items": [
    {
      "id": "img1",
      "annotations": [
        {
          "id": 0,
          "type": "polygon",
          "attributes": {},
          "group": 0,
          "label_id": 1,
          "points": [1.0, 2.0, 3.0, 4.0, 5.0, 6.0, 7.0, 8.0],
          "z_order": 0
        },
        {
          "id": 1,
          "type": "bbox",
          "attributes": {},
          "group": 1,
          "label_id": 0,
          "z_order": 0,
          "bbox": [1.0, 2.0, 3.0, 4.0]
        },
        {
          "id": 2,
          "type": "mask",
          "attributes": {},
          "group": 1,
          "label_id": 0,
          "rle": {
            "counts": "d0d0:F\\0",
            "size": [10, 10]
          },
          "z_order": 0
        }
      ]
    }
  ]
}
5.1.3 - LabelMe
How to export and import data in LabelMe format
The LabelMe format is often used for image segmentation tasks in computer vision. While it may not be specifically tied to any particular models, it’s designed to be versatile and can be easily converted to formats that are compatible with popular frameworks like TensorFlow or PyTorch.
For more information, see:
LabelMe export
For export of images:
- Supported annotations: Bounding Boxes, Polygons, Masks, Ellipses (as masks).
- Attributes: Supported for Polygons.
- Tracks: Not supported.
The downloaded file is a .zip archive with the following structure:
taskname.zip/
├── img1.jpg
└── img1.xml
LabelMe import
- Supported annotations: Rectangles, Polygons, Masks
Uploaded file: a .zip archive of the following structure:
taskname.zip/
├── Masks/
|   ├── img1_mask1.png
|   └── img1_mask2.png
├── img1.xml
├── img2.xml
└── img3.xml
5.1.4 - MOT
How to export and import data in MOT format
The MOT (Multiple Object Tracking) sequence format is widely used for evaluating multi-object tracking algorithms, particularly in the domains of pedestrian tracking, vehicle tracking, and more. The MOT sequence format essentially contains frames of video along with annotations that specify object locations and identities over time.
For more information, see:
MOT export
For export of images and videos:
- Supported annotations: Bounding Box tracks.
- Attributes:
visibility(number),ignored(checkbox) - Tracks: Supported.
The downloaded file is a .zip archive with the following structure:
taskname.zip/
├── img1/
|   ├── image1.jpg
|   └── image2.jpg
└── gt/
    ├── labels.txt
    └── gt.txt

# labels.txt
cat
dog
person
...

# gt.txt
# frame_id, track_id, x, y, w, h, "not ignored", class_id, visibility, <skipped>
1,1,1363,569,103,241,1,1,0.86014
...
MOT import
Uploaded file: a .zip archive of the structure above or:
archive.zip/
└── gt/
    └── gt.txt
    └── labels.txt # optional, mandatory for non-official labels
5.1.5 - MOTS
How to export and import data in MOTS format
The MOT (Multiple Object Tracking) sequence format is widely used for evaluating multi-object tracking algorithms, particularly in the domains of pedestrian tracking, vehicle tracking, and more. The MOT sequence format essentially contains frames of video along with annotations that specify object locations and identities over time.
This version encoded as .png. Supports masks.
For more information, see:
MOTS PNG export
For export of images and videos:
- Supported annotations: Masks, Bounding Boxes (as masks), Polygons (as masks), Ellipses (as masks).
- Attributes:
visibility(number),ignored(checkbox). - Tracks: Supported. Only tracks are supported, shapes are ignored.
The downloaded file is a .zip archive with the following structure:
taskname.zip/
└── <any_subset_name>/
    |   images/
    |   ├── image1.jpg
    |   └── image2.jpg
    └── instances/
        ├── labels.txt
        ├── image1.png
        └── image2.png

# labels.txt
cat
dog
person
...
MOTS PNG import
- Supported annotations: Masks or Polygon tracks
Uploaded file: a .zip archive of the structure above
5.1.6 - COCO
How to export and import data in COCO format
The COCO dataset format is a popular format, designed for tasks involving object detection and instance segmentation. It’s supported by many annotation tools and model training frameworks, making it a safe default choice for typical object detection projects.
For more information, see:
COCO export
- Supported annotations: Bounding Boxes, Oriented Bounding Boxes, Polygons, Masks, Ellipses (as masks).
- Attributes:
is_crowdThis can either be a checkbox or an integer (with values of 0 or 1). It indicates whether the instance (a group of objects) should be represented as an RLE-encoded mask or a set of polygons in thesegmentationfield of the annotation file. The largest (by area) shape in the group sets the properties for the entire object group. If the attribute is not specified, the input shape type is used (polygon or mask). IfTrueor 1, all shapes within the group will be converted into a single mask. IfFalseor 0, all shapes within the group will be converted into polygons.- Arbitrary attributes: These will be stored within the custom
attributessection of the annotation.
- Tracks: Supported (via the
track_idcustom attribute).
The downloaded file is a .zip archive with the following structure:
taskname.zip/
├── images/
│   └── <subset_name>/
│       ├── <image_name1.ext>
│       ├── <image_name2.ext>
│       └── ...
└── annotations/
   ├── instances_<subset_name>.json
   └── ...
When exporting a dataset from a Project, subset names will mirror those used within the project itself. Otherwise, a singular default subset will be created to house all the dataset information.
COCO import
- Supported annotations: Bounding Boxes (if the
segmentationfield is empty), Polygons, Masks. - Attributes: Supported, as described in the export section
- Tracks: Supported (via the
track_idcustom attribute). - Supported tasks:
instances,person_keypoints(only segmentations will be imported),panoptic.
Upload format: a .json file with annotations
or a .zip archive with the structure described above or
here
(without images).
Note
Even thoughlicenses and info fields are required according to format specifications,
CVAT does not require them to import annotations.
How to create a task from MS COCO dataset
-
Download the MS COCO dataset.
For example
val imagesandinstancesannotations -
Create a CVAT task with the following labels:
person bicycle car motorcycle airplane bus train truck boat "traffic light" "fire hydrant" "stop sign" "parking meter" bench bird cat dog horse sheep cow elephant bear zebra giraffe backpack umbrella handbag tie suitcase frisbee skis snowboard "sports ball" kite "baseball bat" "baseball glove" skateboard surfboard "tennis racket" bottle "wine glass" cup fork knife spoon bowl banana apple sandwich orange broccoli carrot "hot dog" pizza donut cake chair couch "potted plant" bed "dining table" toilet tv laptop mouse remote keyboard "cell phone" microwave oven toaster sink refrigerator book clock vase scissors "teddy bear" "hair drier" toothbrush -
Select
val2017.zipas data (See Creating an annotation task guide for details) -
Unpack
annotations_trainval2017.zip -
click
Upload annotationbutton, chooseCOCO 1.1and selectinstances_val2017.jsonannotation file. It can take some time.
5.1.7 - COCO Keypoints
How to export and import data in COCO Keypoints format
The COCO Keypoints format is designed specifically for human pose estimation tasks, where the objective is to identify and localize body joints or keypoints on a human figure within an image. This format is used with a variety of state-of-the-art models focused on pose estimation.
For more information, see:
COCO Keypoints export
- Supported annotations: Skeletons
- Attributes: Supported (stored in the custom
attributesfield of the annotation). - Tracks: Supported (via the
track_idcustom attribute).
Downloaded file is a .zip archive with the following structure:
├── images/
│   └── <subset_name>/
│       ├── <image_name1.ext>
│       ├── <image_name2.ext>
│       └── ...
└── annotations/
   ├── person_keypoints_<subset_name>.json
   └── ...
COCO Keypoints import
- Supported annotations: Skeletons
- Attributes: Supported (via the custom
attributesfield of the annotation). - Tracks: Supported (via the
track_idcustom attribute).
Uploaded file: a single unpacked .json or a .zip archive with the structure described above or
here
(without images).
5.1.8 - Pascal VOC
How to export and import data in Pascal VOC format
The Pascal VOC (Visual Object Classes) format is one of the earlier established benchmarks for object classification and detection, which provides a standardized image data set for object class recognition.
The export data format is XML-based and has been widely adopted in computer vision tasks.
For more information, see:
Pascal VOC export
For export of images:
- Supported annotations: Bounding Boxes (detection), Tags (classification), Polygons (segmentation), Masks (segmentation), Ellipses (segmentation, as masks).
- Attributes:
occludedas both UI option and a separate attribute.truncatedanddifficultmust be defined for labels ascheckbox.- Arbitrary attributes in the
attributessection of XML files.
- Tracks: Not supported.
The downloaded file is a .zip archive with the following structure:
taskname.zip/
├── JPEGImages/
│   ├── <image_name1>.jpg
│   ├── <image_name2>.jpg
│   └── <image_nameN>.jpg
├── Annotations/
│   ├── <image_name1>.xml
│   ├── <image_name2>.xml
│   └── <image_nameN>.xml
├── ImageSets/
│   └── Main/
│       └── default.txt
└── labelmap.txt

# labelmap.txt
# label : color_rgb : 'body' parts : actions
background:::
aeroplane:::
bicycle:::
bird:::
Pascal VOC import
- Supported attributes: action attributes (import only, should be defined as
checkbox-es)
Uploaded file: a .zip archive of the structure declared above or the following:
taskname.zip/
├── <image_name1>.xml
├── <image_name2>.xml
└── <image_nameN>.xml
It must be possible for CVAT to match the frame name and file name
from annotation .xml file (the filename tag, e. g.
<filename>2008_004457.jpg</filename> ).
There are 2 options:
-
full match between frame name and file name from annotation
.xml(in cases when task was created from images or image archive). -
match by frame number. File name should be
<number>.jpgorframe_000000.jpg. It should be used when task was created from video.
How to create a task from Pascal VOC dataset
-
Download the Pascal Voc dataset (Can be downloaded from the PASCAL VOC website)
-
Create a CVAT task with the following labels:
aeroplane bicycle bird boat bottle bus car cat chair cow diningtable
dog horse motorbike person pottedplant sheep sofa train tvmonitor
You can add
~checkbox=difficult:false ~checkbox=truncated:falseattributes for each label if you want to use them.Select interesting image files (See Creating an annotation task guide for details).
-
Zip the corresponding annotation files
-
Click
Upload annotationbutton, choosePascal VOC ZIP 1.1and select the zip file with annotations from previous step. It may take some time.
5.1.9 - Segmentation Mask
How to export and import data in Segmentation Mask format
Segmentation Mask format is a simple format for image segmentation tasks like semantic segmentation, instance segmentation, and panoptic segmentation. It is a custom format based on the Pascal VOC segmentation format.
Segmentation Mask export
- Supported annotations: Masks, Bounding Boxes (as masks), Polygons (as masks), Ellipses (as masks).
- Attributes: Not supported.
- Tracks: Not supported (exported as separate shapes).
The downloaded file is a .zip archive with the following structure:
taskname.zip/
├── labelmap.txt # optional, required for non-Pascal VOC labels
├── ImageSets/
│   └── Segmentation/
│       └── default.txt # list of image names without extension
├── SegmentationClass/ # merged class masks
│   ├── image1.png
│   └── image2.png
└── SegmentationObject/ # merged instance masks
    ├── image1.png
    └── image2.png

# labelmap.txt
# label : color (RGB) : 'body' parts : actions
background:0,128,0::
aeroplane:10,10,128::
bicycle:10,128,0::
bird:0,108,128::
boat:108,0,100::
bottle:18,0,8::
bus:12,28,0::
A mask is a .png image that can have either 1 or 3 channels.
Each pixel in the image has a color that corresponds to a specific label.
The colors are generated according to the Pascal VOC
algorithm.
By default, the color (0, 0, 0) is used to represent the background.
Segmentation Mask import
- Supported annotations: Masks, Polygons (if Convert masks to polygons is enabled).
- Attributes: Not supported.
- Tracks: Not supported.
Uploaded file: a .zip archive of the following structure:
archive.zip/
├── labelmap.txt # optional, required for non-Pascal VOC labels
├── ImageSets/
│   └── Segmentation/
│       └── <any_subset_name>.txt
├── SegmentationClass/
│   ├── image1.png
│   └── image2.png
└── SegmentationObject/
    ├── image1.png
    └── image2.png
The format supports both 3-channel and grayscale (1-channel) PNG masks.
To import 3-channel masks, the labelmap.txt file should declare all the colors used in
the dataset:
# labelmap.txt
# label : color (RGB) : 'body' parts : actions
background:0,128,0::
aeroplane:10,10,128::
bicycle:10,128,0::
bird:0,108,128::
boat:108,0,100::
bottle:18,0,8::
bus:12,28,0::
To import 1-channel masks, the labelmap.txt file should declare all the indices used in
the dataset with no gaps. The number of lines must be equal
to the maximum color index on images. The lines must be in the right order
so that line index is equal to the color index. Lines can have arbitrary,
but different, colors. If there are gaps in the used color
indices in the annotations, they must be filled with arbitrary dummy labels.
# labelmap.txt
# label : color (RGB) : 'body' parts : actions
q:0,128,0:: # color index 0
aeroplane:10,10,128:: # color index 1
_dummy2:2,2,2:: # filler for color index 2
_dummy3:3,3,3:: # filler for color index 3
boat:108,0,100:: # color index 4
...
_dummy198:198,198,198:: # filler for color index 198
_dummy199:199,199,199:: # filler for color index 199
...
the last label:12,28,0:: # color index 200
5.1.10 - Ultralytics YOLO
How to export and import data in Ultralytics YOLO formats
Ultralytics YOLO is a format family which consists of four formats:
Dataset examples:
Ultralytics YOLO export
For export of images:
- Supported annotations
- Detection: Bounding Boxes
- Oriented bounding box: Oriented Bounding Boxes
- Segmentation: Polygons, Masks
- Pose: Skeletons
- Attributes: Not supported.
- Tracks: Supported.
The downloaded file is a .zip archive with the following structure:
archive.zip/
   ├── data.yaml  # configuration file
   ├── train.txt  # list of train subset image paths
   │
   ├── images/
   │   ├── train/  # directory with images for train subset
   │   │    ├── image1.jpg
   │   │    ├── image2.jpg
   │   │    ├── image3.jpg
   │   │    └── ...
   ├── labels/
   │   ├── train/  # directory with annotations for train subset
   │   │    ├── image1.txt
   │   │    ├── image2.txt
   │   │    ├── image3.txt
   │   │    └── ...

# train.txt:
images/<subset>/image1.jpg
images/<subset>/image2.jpg
...

# data.yaml:
path:  ./ # dataset root dir
train: train.txt  # train images (relative to 'path')

# Ultralytics YOLO Pose specific field
# First number is the number of points in a skeleton.
# If there are several skeletons with different number of points, it is the greatest number of points
# Second number defines the format of point info in annotation txt files
kpt_shape: [17, 3]

# Classes
names:
  0: person
  1: bicycle
  2: car
  # ...

# <image_name>.txt:
# content depends on format

# Ultralytics YOLO Detection:
# label_id - id from names field of data.yaml
# cx, cy - relative coordinates of the bbox center
# rw, rh - relative size of the bbox
# label_id cx cy rw rh
1 0.3 0.8 0.1 0.3
2 0.7 0.2 0.3 0.1

# Ultralytics YOLO Oriented Bounding Boxes:
# xn, yn - relative coordinates of the n-th point
# label_id x1 y1 x2 y2 x3 y3 x4 y4
1 0.3 0.8 0.1 0.3 0.4 0.5 0.7 0.5
2 0.7 0.2 0.3 0.1 0.4 0.5 0.5 0.6

# Ultralytics YOLO Segmentation:
# xn, yn - relative coordinates of the n-th point
# label_id x1 y1 x2 y2 x3 y3 ...
1 0.3 0.8 0.1 0.3 0.4 0.5
2 0.7 0.2 0.3 0.1 0.4 0.5 0.5 0.6 0.7 0.5

# Ultralytics YOLO Pose:
# cx, cy - relative coordinates of the bbox center
# rw, rh - relative size of the bbox
# xn, yn - relative coordinates of the n-th point
# vn - visibility of n-th point. 2 - visible, 1 - partially visible, 0 - not visible
# if second value in kpt_shape is 3:
# label_id cx cy rw rh x1 y1 v1 x2 y2 v2 x3 y3 v3 ...
1 0.3 0.8 0.1 0.3 0.3 0.8 2 0.1 0.3 2 0.4 0.5 2 0.0 0.0 0 0.0 0.0 0
2 0.3 0.8 0.1 0.3 0.7 0.2 2 0.3 0.1 1 0.4 0.5 0 0.5 0.6 2 0.7 0.5 2

# if second value in kpt_shape is 2:
# label_id cx cy rw rh x1 y1 x2 y2 x3 y3 ...
1 0.3 0.8 0.1 0.3 0.3 0.8 0.1 0.3 0.4 0.5 0.0 0.0 0.0 0.0
2 0.3 0.8 0.1 0.3 0.7 0.2 0.3 0.1 0.4 0.5 0.5 0.6 0.7 0.5

# Note, that if there are several skeletons with different number of points,
# smaller skeletons are padded with points with coordinates 0.0 0.0 and visibility = 0
All coordinates must be normalized. It can be achieved by dividing x coordinates and widths by image width, and y coordinates and heights by image height.
Note
In CVAT you can place an object or some parts of it outside the image, which will cause the coordinates to be outside the [0, 1] range. YOLOv8 framework ignores labels with such coordinates.Each annotation file, with the .txt extension,
is named to correspond with its associated image file.
For example, frame_000001.txt serves as the annotation for the
frame_000001.jpg image.
Track support
Tracks can be saved on export for Detection by using Ultralytics YOLO Detection Track format. It writes track ids to the end of corresponding annotations:
# label_id cx cy rw rh <optional track_id>
1 0.3 0.8 0.1 0.3 1
2 0.7 0.2 0.3 0.1
Ultralytics YOLO Import
Uploaded file: a .zip archive of the same structure as above.
For compatibility with other tools exporting in Ultralytics YOLO format
(e.g. roboflow),
CVAT supports datasets with the inverted directory order of subset and “images” or “labels”,
i.e. both train/images/, images/train/ are valid inputs.
archive.zip/
   ├── train/
   │   ├── images/  # directory with images for train subset
   │   │    ├── image1.jpg
   │   │    ├── image2.jpg
   │   │    └── ...
   │   ├── labels/  # directory with annotations for train subset
   │   │    ├── image1.txt
   │   │    ├── image2.txt
   │   │    └── ...
Track support
Import in each of the Ultralytics YOLO formats support tracking. Integer track id can be added to the end of any annotation, e.g. with Detection format:
# label_id cx cy rw rh <optional track_id>
1 0.3 0.8 0.1 0.3 1
2 0.7 0.2 0.3 0.1
5.1.11 - Ultralytics-YOLO-Classification
How to export and import data in Ultralytics YOLO Classification format
For more information, see:
Ultralytics YOLO Classification export
For export of images:
- Supported annotations: Tags.
- Attributes: Not supported.
- Tracks: Not supported.
The downloaded file is a .zip archive with the following structure:
archive.zip/
├── train
│    ├── labels.json  # CVAT extension. Contains original ids and labels
│    │                # is not needed when using dataset with YOLOv8 framework
│    │                # but is useful when importing it back to CVAT
│    ├── label_0
│    │      ├── <image_name_0>.jpg
│    │      ├── <image_name_1>.jpg
│    │      ├── <image_name_2>.jpg
│    │      ├── ...
│    ├── label_1
│    │      ├── <image_name_0>.jpg
│    │      ├── <image_name_1>.jpg
│    │      ├── <image_name_2>.jpg
│    │      ├── ...
├── ...
5.1.12 - YOLO
How to export and import data in YOLO format
YOLO, which stands for “You Only Look Once,” is a renowned framework predominantly utilized for real-time object detection tasks. Its efficiency and speed make it an ideal choice for many applications. While YOLO has its unique data format, this format can be tailored to suit other object detection models as well.
For more information, see:
YOLO export
For export of images:
- Supported annotations: Bounding Boxes.
- Attributes: Not supported.
- Tracks: Not supported.
The downloaded file is a .zip archive with the following structure:
archive.zip/
├── obj.data
├── obj.names
├── obj_<subset>_data
│   ├── image1.txt
│   └── image2.txt
└── train.txt # list of subset image paths

# the only valid subsets are: train, valid
# train.txt and valid.txt:
obj_<subset>_data/image1.jpg
obj_<subset>_data/image2.jpg

# obj.data:
classes = 3 # optional
names = obj.names
train = train.txt
valid = valid.txt # optional
backup = backup/ # optional

# obj.names:
cat
dog
airplane

# image_name.txt:
# label_id - id from obj.names
# cx, cy - relative coordinates of the bbox center
# rw, rh - relative size of the bbox
# label_id cx cy rw rh
1 0.3 0.8 0.1 0.3
2 0.7 0.2 0.3 0.1
Each annotation file, with the .txt extension,
is named to correspond with its associated image file.
For example, frame_000001.txt serves as the annotation for the
frame_000001.jpg image.
The structure of the .txt file is as follows:
each line describes a label and a bounding box
in the format label_id cx cy w h.
The file obj.names contains an ordered list of label names.
YOLO import
Uploaded file: a .zip archive of the same structure as above
It must be possible to match the CVAT frame (image name)
and annotation file name. There are 2 options:
-
full match between image name and name of annotation
*.txtfile (in cases when a task was created from images or archive of images). -
match by frame number (if CVAT cannot match by name). File name should be in the following format
<number>.jpg. It should be used when task was created from a video.
How to create a task from YOLO formatted dataset (from VOC for example)
-
Follow the official guide (see Training YOLO on VOC section) and prepare the YOLO formatted annotation files.
-
Zip train images
zip images.zip -j -@ < train.txt -
Create a CVAT task with the following labels:
aeroplane bicycle bird boat bottle bus car cat chair cow diningtable dog
horse motorbike person pottedplant sheep sofa train tvmonitor
Select images. zip as data. Most likely you should use
sharefunctionality because size of images. zip is more than 500Mb. See Creating an annotation task guide for details. -
Create
obj.nameswith the following content:aeroplane bicycle bird boat bottle bus car cat chair cow diningtable dog horse motorbike person pottedplant sheep sofa train tvmonitor -
Zip all label files together (we need to add only label files that correspond to the train subset):
cat train.txt | while read p; do echo ${p%/*/*}/labels/${${p##*/}%%.*}.txt; done | zip labels.zip -j -@ obj.names -
Click
Upload annotationbutton, chooseYOLO 1.1and select the zip file with labels from the previous step.
5.1.13 - ImageNet
How to export and import data in ImageNet format
The ImageNet is typically used for a variety of computer vision tasks, including but not limited to image classification, object detection, and segmentation.
It is widely recognized and used in the training and benchmarking of various machine learning models.
For more information, see:
ImageNet export
For export of images:
- Supported annotations: Tags.
- Attributes: Not supported.
- Tracks: Not supported.
The downloaded file is a .zip archive with the following structure:
# if we save images:
taskname.zip/
├── label1/
|   ├── label1_image1.jpg
|   └── label1_image2.jpg
└── label2/
    ├── label2_image1.jpg
    ├── label2_image3.jpg
    └── label2_image4.jpg

# if we keep only annotation:
taskname.zip/
├── <any_subset_name>.txt
└── synsets.txt
ImageNet import
- Supported annotations: Tags.
Uploaded file: a .zip archive of the structure above
5.1.14 - Wider Face
How to export and import data in Wider Face format
The WIDER Face dataset is widely used for face detection tasks. Many popular models for object detection and face detection specifically are trained on this dataset for benchmarking and deployment.
For more information, see:
WIDER Face export
For export of images:
- Supported annotations: Bounding Boxes (with attributes), Tags.
- Attributes:
blur,expression,illumination,pose,invalidoccluded(both the annotation property & an attribute).
- Tracks: Not supported.
The downloaded file is a .zip archive with the following structure:
taskname.zip/
├── labels.txt # optional
├── wider_face_split/
│   └── wider_face_<any_subset_name>_bbx_gt.txt
└── WIDER_<any_subset_name>/
    └── images/
        ├── 0--label0/
        │   └── 0_label0_image1.jpg
        └── 1--label1/
            └── 1_label1_image2.jpg
WIDER Face import
- Supported annotations: Rectangles (with attributes), Labels
- supported attributes:
blur,expression,illumination,occluded,pose,invalid
Uploaded file: a .zip archive of the structure above
5.1.15 - CamVid
How to export and import data in CamVid format
The CamVid (Cambridge-driving Labeled Video Database) format is most commonly used in the realm of semantic segmentation tasks. It is particularly useful for training and evaluating models for autonomous driving and other vision-based robotics applications.
For more information, see:
CamVid export
- Supported annotations: Masks, Bounding Boxes (as masks), Polygons (as masks), Ellipses (as masks).
- Attributes: Not supported.
- Tracks: Not supported (exported as separate shapes).
The downloaded file is a .zip archive with the following structure:
taskname.zip/
├── label_colors.txt # optional, required for non-CamVid labels
├── <any_subset_name>/
|   ├── image1.png
|   └── image2.png
├── <any_subset_name>annot/
|   ├── image1.png
|   └── image2.png
└── <any_subset_name>.txt

# label_colors.txt (with color value type)
# if you want to manually set the color for labels, configure label_colors.txt as follows:
# color (RGB) label
0 0 0 Void
64 128 64 Animal
192 0 128 Archway
0 128 192 Bicyclist
0 128 64 Bridge

# label_colors.txt (without color value type)
# if you do not manually set the color for labels, it will be set automatically:
# label
Void
Animal
Archway
Bicyclist
Bridge
A mask in the CamVid dataset is typically a .png
image with either one or three channels.
In this image, each pixel is assigned a specific color that corresponds to a particular label.
By default, the color (0, 0, 0) — or black — is used
to represent the background.
CamVid import
- Supported annotations: Masks, Polygons (if Convert masks to polygons is enabled).
- Attributes: Not supported.
- Tracks: Not supported.
Uploaded file: a .zip archive of the structure above
5.1.16 - VGGFace2
How to export and import data in VGGFace2 format
The VGGFace2 is primarily designed for face recognition tasks and is most commonly used with deep learning models specifically designed for face recognition, verification, and similar tasks.
For more information, see:
VGGFace2 export
For export of images:
- Supported annotations: Bounding Boxes, Points (landmarks - groups of 5 points).
- Attributes: Not supported.
- Tracks: Not supported.
The downloaded file is a .zip archive with the following structure:
taskname.zip/
├── labels.txt # optional
├── <any_subset_name>/
|   ├── label0/
|   |   └── image1.jpg
|   └── label1/
|       └── image2.jpg
└── bb_landmark/
    ├── loose_bb_<any_subset_name>.csv
    └── loose_landmark_<any_subset_name>.csv
# labels.txt
# n000001 car
label0 <class0>
label1 <class1>
VGGFace2 import
- Supported annotations: Rectangles, Points (landmarks - groups of 5 points)
Uploaded file: a .zip archive of the structure above
5.1.17 - Market-1501
How to export and import data in Market-1501 format
The Market-1501 dataset is widely used for person re-identification tasks. It is a challenging dataset that has gained significant attention in the computer vision community.
For more information, see:
Market-1501 export
For export of images:
- Supported annotations: Bounding Boxes
- Attributes:
query(checkbox),person_id(number),camera_id(number). - Tracks: Not supported.
Th downloaded file is a .zip archive with the following structure:
taskname.zip/
├── bounding_box_<any_subset_name>/
│   └── image_name_1.jpg
└── query
    ├── image_name_2.jpg
    └── image_name_3.jpg
# if we keep only annotation:
taskname.zip/
└── images_<any_subset_name>.txt
# images_<any_subset_name>.txt
query/image_name_1.jpg
bounding_box_<any_subset_name>/image_name_2.jpg
bounding_box_<any_subset_name>/image_name_3.jpg
# image_name = 0001_c1s1_000015_00.jpg
0001 - person id
c1 - camera id (there are totally 6 cameras)
s1 - sequence
000015 - frame number in sequence
00 - means that this bounding box is the first one among the several
Market-1501 import
- Supported annotations: Label
market-1501with attributes (query,person_id,camera_id)
Uploaded file: a .zip archive of the structure above
5.1.18 - ICDAR13/15
How to export and import data in ICDAR13/15 format
ICDAR 13/15 formats are typically used for text detection and recognition tasks and OCR (Optical Character Recognition).
These formats are usually paired with specialized text detection and recognition models.
For more information, see:
ICDAR13/15 export
- ICDAR Recognition 1.0 (Text recognition):
- Supported annotations: Tags with the
icdarlabel - Attributes:
caption.
- Supported annotations: Tags with the
- ICDAR Detection 1.0 (Text detection):
- Supported annotations: Bounding Boxes, Polygons with the
icdarlabel - Attributes:
text.
- Supported annotations: Bounding Boxes, Polygons with the
- ICDAR Segmentation 1.0 (Text segmentation):
- Supported annotations: Masks, Bounding Boxes, Polygons, or Ellipses with the
icdarlabel - Attributes:
index,text,color,center
- Supported annotations: Masks, Bounding Boxes, Polygons, or Ellipses with the
- Tracks: Not supported.
The downloaded file is a .zip archive with the following structure:
# text recognition task
taskname.zip/
└── word_recognition/
    └── <any_subset_name>/
        ├── images
        |   ├── word1.png
        |   └── word2.png
        └── gt.txt
# text localization task
taskname.zip/
└── text_localization/
    └── <any_subset_name>/
        ├── images
        |   ├── img_1.png
        |   └── img_2.png
        ├── gt_img_1.txt
        └── gt_img_1.txt
#text segmentation task
taskname.zip/
└── text_localization/
    └── <any_subset_name>/
        ├── images
        |   ├── 1.png
        |   └── 2.png
        ├── 1_GT.bmp
        ├── 1_GT.txt
        ├── 2_GT.bmp
        └── 2_GT.txt
ICDAR13/15 import
Word recognition task:
- Supported annotations: Tags with the
icdarlabel andcaptionattribute
Text localization task:
- Supported annotations: Rectangles and Polygons with the
icdarlabel andtextattribute
Text segmentation task:
- Supported annotations: Masks or Polygons with the
icdarlabel andindex,text,color,centerattributes
Uploaded file: a .zip archive of the structure above
5.1.19 - Open Images
How to export and import data in Open Images format
The Open Images format is based on a large-scale, diverse dataset that contains object detection, object segmentation, visual relationship, and localized narratives annotations.
Its export data format is compatible with many object detection and segmentation models.
For more information, see:
Open Images export
For export of images:
-
Supported annotations: Bounding Boxes (detection), Tags (classification), Polygons (segmentation), Masks (segmentation), Ellipses (segmentation, as masks).
-
Supported attributes:
- Tags:
scoremust be defined for labels astextornumber. The confidence level from 0 to 1. - Bounding boxes:
scoremust be defined for labels astextornumber. The confidence level from 0 to 1.
occludedas both UI option and a separate attribute. Whether the object is occluded by another object.truncatedmust be defined for labels ascheckbox. Whether the object extends beyond the boundary of the image.is_group_ofmust be defined for labels ascheckbox. Whether the object represents a group of objects of the same class.is_depictionmust be defined for labels ascheckbox. Whether the object is a depiction (such as a drawing) rather than a real object.is_insidemust be defined for labels ascheckbox. Whether the object is seen from the inside. - Masks:
box_idmust be defined for labels astext. An identifier for the bounding box associated with the mask.predicted_ioumust be defined for labels astextornumber. Predicted IoU value with respect to the ground truth.
- Tags:
-
Tracks: Not supported.
The downloaded file is a .zip archive with the following structure:
└─ taskname.zip/
    ├── annotations/
    │   ├── bbox_labels_600_hierarchy.json
    │   ├── class-descriptions.csv
    |   ├── images.meta  # additional file with information about image sizes
    │   ├── <subset_name>-image_ids_and_rotation.csv
    │   ├── <subset_name>-annotations-bbox.csv
    │   ├── <subset_name>-annotations-human-imagelabels.csv
    │   └── <subset_name>-annotations-object-segmentation.csv
    ├── images/
    │   ├── subset1/
    │   │   ├── <image_name101.jpg>
    │   │   ├── <image_name102.jpg>
    │   │   └── ...
    │   ├── subset2/
    │   │   ├── <image_name201.jpg>
    │   │   ├── <image_name202.jpg>
    │   │   └── ...
    |   ├── ...
    └── masks/
        ├── subset1/
        │   ├── <mask_name101.png>
        │   ├── <mask_name102.png>
        │   └── ...
        ├── subset2/
        │   ├── <mask_name201.png>
        │   ├── <mask_name202.png>
        │   └── ...
        ├── ...
Open Images import
Uploaded file: a .zip archive of the following structure:
└─ upload.zip/
    ├── annotations/
    │   ├── bbox_labels_600_hierarchy.json
    │   ├── class-descriptions.csv
    |   ├── images.meta  # optional, file with information about image sizes
    │   ├── <subset_name>-image_ids_and_rotation.csv
    │   ├── <subset_name>-annotations-bbox.csv
    │   ├── <subset_name>-annotations-human-imagelabels.csv
    │   └── <subset_name>-annotations-object-segmentation.csv
    └── masks/
        ├── subset1/
        │   ├── <mask_name101.png>
        │   ├── <mask_name102.png>
        │   └── ...
        ├── subset2/
        │   ├── <mask_name201.png>
        │   ├── <mask_name202.png>
        │   └── ...
        ├── ...
Image ids in the <subset_name>-image_ids_and_rotation.csv should match with
image names in the task.
5.1.20 - Cityscapes
How to export and import data in Cityscapes format
The Cityscapes format is a widely-used standard in the field of computer vision, particularly for tasks involving semantic and instance segmentation in urban scenes. This dataset format typically comprises high-resolution images of cityscapes along with detailed pixel-level annotations.
Each pixel is labeled with a category such as “road,” “pedestrian,” or “vehicle,” making it a valuable resource for training and validating machine learning models aimed at understanding urban environments. It’s a go-to choice for researchers and professionals working on autonomous vehicles, robotics, and smart cities.
For more information, see:
Cityscapes export
- Supported annotations: Masks, Polygons (as masks), Bounding Boxes (as masks), Ellipses (as masks).
- Attributes:
is_crowdboolean, should be defined for labels ascheckbox. Specifies if the annotation label can distinguish between different instances. IfFalse, the exported annotation will include the instance id value.
- Tracks: Not supported (exported as separate shapes).
The downloaded file is a .zip archive with the following structure:
taskname.zip/
├── label_color.txt
├── gtFine
│   ├── <subset_name>
│   │   └── <city_name>
│   │       ├── image_0_gtFine_instanceIds.png
│   │       ├── image_0_gtFine_color.png
│   │       ├── image_0_gtFine_labelIds.png
│   │       ├── image_1_gtFine_instanceIds.png
│   │       ├── image_1_gtFine_color.png
│   │       ├── image_1_gtFine_labelIds.png
│   │       ├── ...
└── imgsFine  # if saving images was requested
    └── leftImg8bit
        ├── <subset_name>
        │   └── <city_name>
        │       ├── image_0_leftImg8bit.png
        │       ├── image_1_leftImg8bit.png
        │       ├── ...
label_color.txta file that describes the color for each label
# label_color.txt example
# r g b label_name
0 0 0 background
0 255 0 tree
...
*_gtFine_color.pngclass labels encoded by its color.*_gtFine_labelIds.pngclass labels are encoded by its index.*_gtFine_instanceIds.pngclass and instance labels encoded by an instance ID. The pixel values encode class and the individual instance: the integer part of a division by 1000 of each ID provides class ID, the remainder is the instance ID. If a certain annotation describes multiple instances, then the pixels have the regular ID of that class
Cityscapes import
- Supported annotations: Masks, Polygons (if Convert masks to polygons is enabled).
- Attributes:
is_crowdboolean, should be defined for labels ascheckbox.
- Tracks: Not supported.
Uploaded file: a .zip archive with the following structure:
archive.zip/
├── label_color.txt # optional
└── gtFine
    └── <city_name>
        ├── image_0_gtFine_instanceIds.png
        ├── image_1_gtFine_instanceIds.png
        ├── ...
Creating task for Cityscapes dataset
Create a task with the labels you need or you can use the labels and colors of the original dataset. To work with the Cityscapes format, you must have a black color label for the background.
Original Cityscapes color map:
[
    {"name": "unlabeled", "color": "#000000", "attributes": []},
    {"name": "egovehicle", "color": "#000000", "attributes": []},
    {"name": "rectificationborder", "color": "#000000", "attributes": []},
    {"name": "outofroi", "color": "#000000", "attributes": []},
    {"name": "static", "color": "#000000", "attributes": []},
    {"name": "dynamic", "color": "#6f4a00", "attributes": []},
    {"name": "ground", "color": "#510051", "attributes": []},
    {"name": "road", "color": "#804080", "attributes": []},
    {"name": "sidewalk", "color": "#f423e8", "attributes": []},
    {"name": "parking", "color": "#faaaa0", "attributes": []},
    {"name": "railtrack", "color": "#e6968c", "attributes": []},
    {"name": "building", "color": "#464646", "attributes": []},
    {"name": "wall", "color": "#66669c", "attributes": []},
    {"name": "fence", "color": "#be9999", "attributes": []},
    {"name": "guardrail", "color": "#b4a5b4", "attributes": []},
    {"name": "bridge", "color": "#966464", "attributes": []},
    {"name": "tunnel", "color": "#96785a", "attributes": []},
    {"name": "pole", "color": "#999999", "attributes": []},
    {"name": "polegroup", "color": "#999999", "attributes": []},
    {"name": "trafficlight", "color": "#faaa1e", "attributes": []},
    {"name": "trafficsign", "color": "#dcdc00", "attributes": []},
    {"name": "vegetation", "color": "#6b8e23", "attributes": []},
    {"name": "terrain", "color": "#98fb98", "attributes": []},
    {"name": "sky", "color": "#4682b4", "attributes": []},
    {"name": "person", "color": "#dc143c", "attributes": []},
    {"name": "rider", "color": "#ff0000", "attributes": []},
    {"name": "car", "color": "#00008e", "attributes": []},
    {"name": "truck", "color": "#000046", "attributes": []},
    {"name": "bus", "color": "#003c64", "attributes": []},
    {"name": "caravan", "color": "#00005a", "attributes": []},
    {"name": "trailer", "color": "#00006e", "attributes": []},
    {"name": "train", "color": "#005064", "attributes": []},
    {"name": "motorcycle", "color": "#0000e6", "attributes": []},
    {"name": "bicycle", "color": "#770b20", "attributes": []},
    {"name": "licenseplate", "color": "#00000e", "attributes": []}
]
Upload images when creating a task:
images.zip/
    ├── image_0.jpg
    ├── image_1.jpg
    ├── ...
After creating the task, upload the Cityscapes annotations as described in the previous section.
5.1.21 - KITTI
How to export and import data in KITTI format
The KITTI format is widely used for a range of computer vision tasks related to autonomous driving, including but not limited to 3D object detection, multi-object tracking, and scene flow estimation. Given its special focus on automotive scenes, the KITTI format is generally used with models that are designed or adapted for these types of tasks.
For more information, see:
- KITTI site
- Format specification for KITTI detection
- Format specification for KITTI segmentation
- Dataset examples
KITTI export
For export of images:
- Supported annotations: Bounding Boxes (detection), Polygons (segmentation), Masks (segmentation), Ellipses (segmentation, as masks).
- Supported attributes:
occluded(Available both as a UI option and a separate attribute) Denotes that a major portion of the object within the bounding box is obstructed by another object.truncated(Only applicable to bounding boxes) Must be represented ascheckboxesfor labels. Suggests that the bounding box does not encompass the entire object; some part is cut off.is_crowd(Only valid for polygons). Should be indicated usingcheckboxesfor labels. Signifies that the annotation encapsulates multiple instances of the same object class.
- Tracks: Not supported (exported as separate shapes).
The downloaded file is a .zip archive with the following structure:
└─ annotations.zip/
    ├── label_colors.txt # list of pairs r g b label_name
    ├── labels.txt # list of labels
    └── default/
        ├── label_2/ # left color camera label files
        │   ├── <image_name_1>.txt
        │   ├── <image_name_2>.txt
        │   └── ...
        ├── instance/ # instance segmentation masks
        │   ├── <image_name_1>.png
        │   ├── <image_name_2>.png
        │   └── ...
        ├── semantic/ # semantic segmentation masks (labels are encoded by its id)
        │   ├── <image_name_1>.png
        │   ├── <image_name_2>.png
        │   └── ...
        └── semantic_rgb/ # semantic segmentation masks (labels are encoded by its color)
            ├── <image_name_1>.png
            ├── <image_name_2>.png
            └── ...
KITTI import
You can upload KITTI annotations in two ways: rectangles for the detection task and masks for the segmentation task.
For detection tasks the uploading archive should have the following structure:
└─ annotations.zip/
    ├── labels.txt # optional, labels list for non-original detection labels
    └── <subset_name>/
        ├── label_2/ # left color camera label files
        │   ├── <image_name_1>.txt
        │   ├── <image_name_2>.txt
        │   └── ...
For segmentation tasks the uploading archive should have the following structure:
└─ annotations.zip/
    ├── label_colors.txt # optional, color map for non-original segmentation labels
    └── <subset_name>/
        ├── instance/ # instance segmentation masks
        │   ├── <image_name_1>.png
        │   ├── <image_name_2>.png
        │   └── ...
        ├── semantic/ # optional, semantic segmentation masks (labels are encoded by its id)
        │   ├── <image_name_1>.png
        │   ├── <image_name_2>.png
        │   └── ...
        └── semantic_rgb/ # optional, semantic segmentation masks (labels are encoded by its color)
            ├── <image_name_1>.png
            ├── <image_name_2>.png
            └── ...
All annotation files and masks should have structures that are described in the original format specification.
5.1.22 - LFW
How to export and import data in LFW format
The Labeled Faces in the Wild (LFW) format is primarily used for face verification and face recognition tasks. The LFW format is designed to be straightforward and is compatible with a variety of machine learning and deep learning frameworks.
For more information, see:
LFW export
For export of images:
-
Supported annotations: Tags, Skeletons.
-
Attributes:
negative_pairs(should be defined for labels astext): list of image names with mismatched persons.positive_pairs(should be defined for labels astext): list of image names with matched persons.
-
Tracks: Not supported.
The downloaded file is a .zip archive with the following structure:
<archive_name>.zip/
    └── images/ # if the option save images was selected
    │    ├── name1/
    │    │   ├── name1_0001.jpg
    │    │   ├── name1_0002.jpg
    │    │   ├── ...
    │    ├── name2/
    │    │   ├── name2_0001.jpg
    │    │   ├── name2_0002.jpg
    │    │   ├── ...
    │    ├── ...
    ├── landmarks.txt
    ├── pairs.txt
    └── people.txt
LFW import
The uploaded annotations file should be a zip file with the following structure:
<archive_name>.zip/
    └── annotations/
        ├── landmarks.txt # list with landmark points for each image
        ├── pairs.txt # list of matched and mismatched pairs of person
        └── people.txt # optional file with a list of persons name
Full information about the content of annotation files is available here
Example: create task with images and upload LFW annotations into it
This is one of the possible ways to create a task and add LFW annotations for it.
- On the task creation page:
- Add labels that correspond to the names of the persons.
- For each label define
textattributes with namespositive_pairsandnegative_pairs - Add images using zip archive from local repository:
images.zip/
    ├── name1_0001.jpg
    ├── name1_0002.jpg
    ├── ...
    ├── name1_<N>.jpg
    ├── name2_0001.jpg
    ├── ...
- On the annotation page: Upload annotation -> LFW 1.0 -> choose archive with structure that described in the import section.
5.2 - Import annotations and data to CVAT
This section explains how to import datasets into projects, add data when creating tasks, and upload annotations to existing tasks or jobs.
Importing a dataset into a project
You can import a dataset into a project. When you do this, CVAT:
- If the project has no defined labels, creates required labels based on the information available in the dataset. Only label names can be imported this way, colors, attributes, and skeleton labels must be defined manually.
- Creates new tasks inside the project. If there are several subsets in the imported dataset, each one is imported as a separate task with the corresponding subset name.
- Populates each imported task with the imported data and annotations (if the format contains annotations).
Note: Importing a dataset always creates a new task in the project.
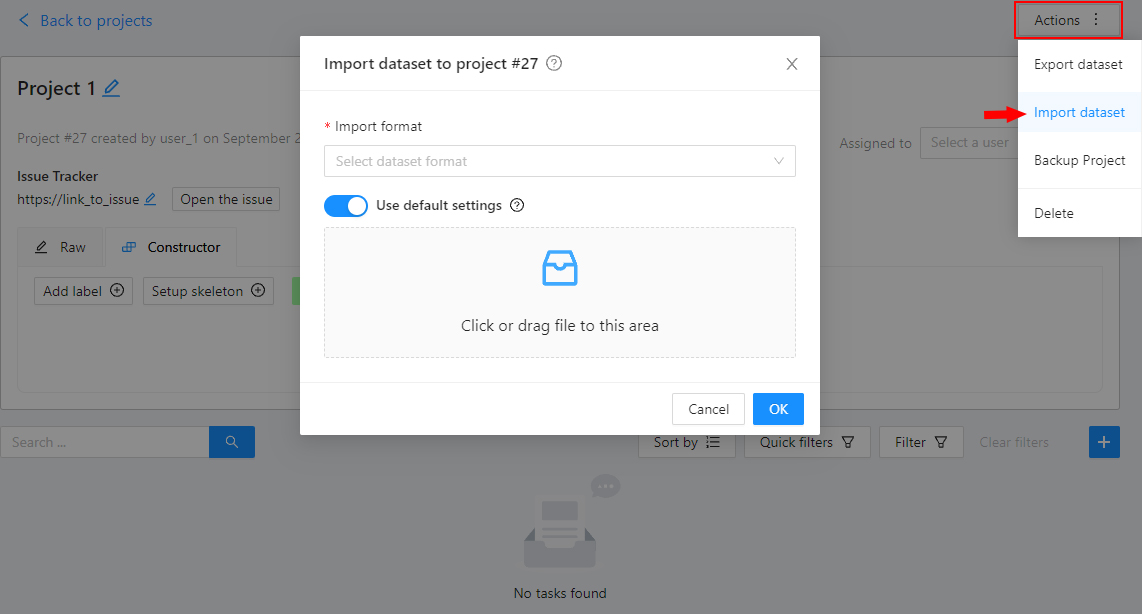
To import a dataset into a project:
- Open the project on the
Projects page. - Open the
Actionsmenu in the upper right corner. - Click
Import dataset. - Select the dataset format.
- Drag the file to the file upload area or click on the upload area to select the file through the explorer.
You can also import a dataset from attached cloud storage.
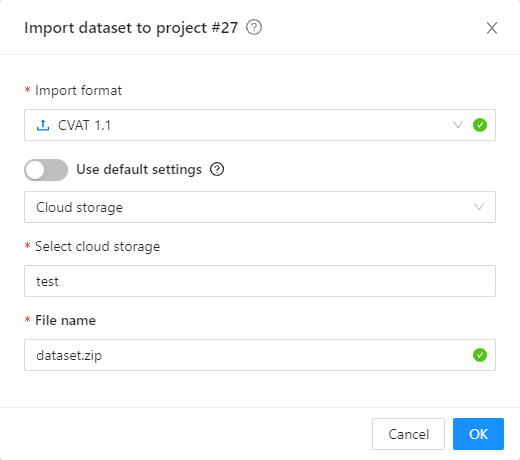
- First, select the annotation format.
- Then, select a cloud storage connection from the list or use the default one configured for the project.
- Specify the ZIP archive name in the
File namefield.
During the import process, you will be able to track the progress of the import on the Requests page.
Importing a dataset into a task
You can also add data when you create a task. A task can be:
- Inside a project (linked to that project), or
- Standalone.
After a task is created, you cannot add more data. To add extra data, create another task.
To learn more about creating a task in CVAT, see How to create and configure an annotation task.
Uploading annotations to tasks and jobs
If you already have a file with annotations or an annotated dataset, you can upload it to an entire task or to a single job.
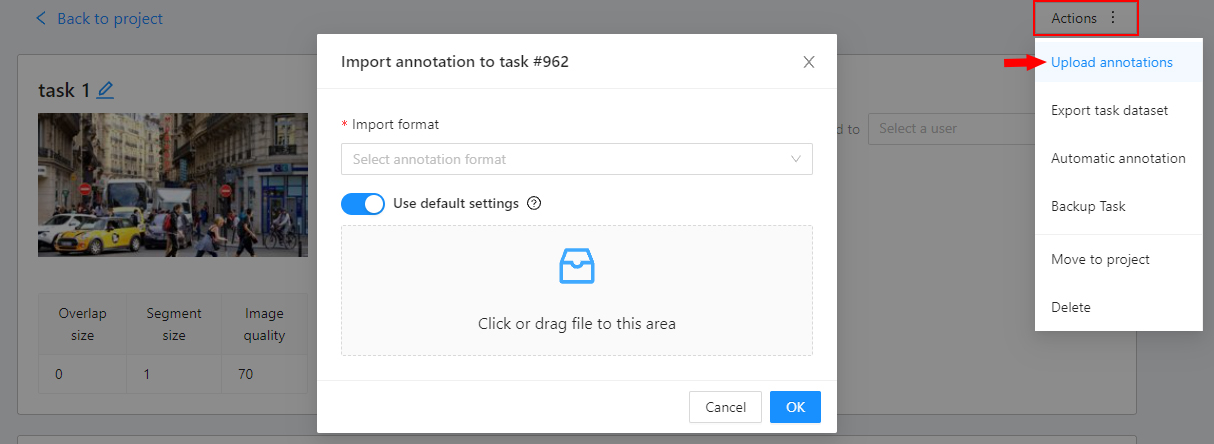
Warning
When you upload annotations, CVAT removes the existing ones.Uploading annotations to a task
- On the Tasks page, click the three dots next to the task.
- Or open the task and go to the
Actionsmenu. - Click
Upload annotations. - Select the annotation format.
- Upload the file from your computer or choose one from cloud storage.
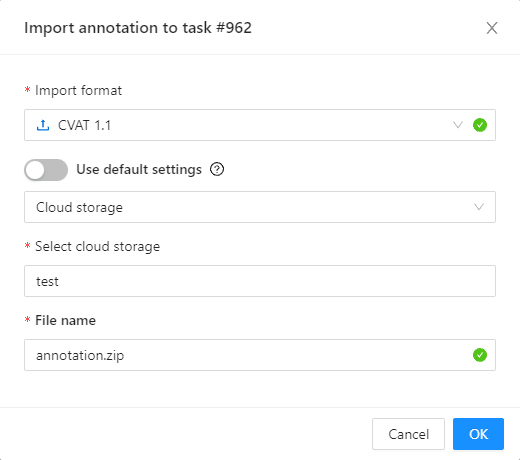
Uploading annotations to a job
- Open the task, and click the three dots next to the job.
- Click
Import annotations. - Select the annotation format.
- Upload the file from your computer or choose one from cloud storage.
5.3 - Export annotations and data from CVAT
This section explains how to download datasets (including annotation, images, and metadata) from projects, tasks, and jobs.
Exporting dataset from a task
To export the dataset from the task, follow these steps:
-
Open Task.
-
Go to Actions > Export task dataset.
-
Choose the desired format from the list of available options.
-
(Optional) Toggle the Save images switch if you wish to include images in the export.
Note
The Save images option is a paid feature.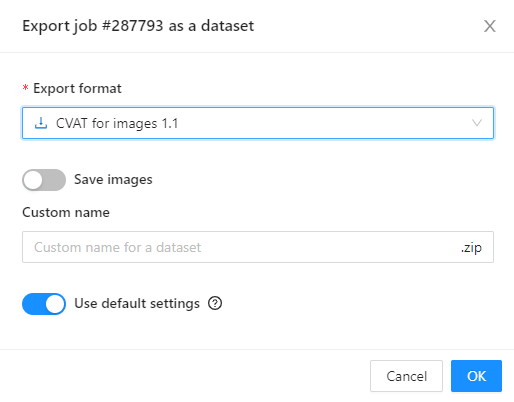
-
Input a name for the resulting
.ziparchive. -
Click OK to initiate the export.
Exporting dataset from a job
To export a dataset from Job follow these steps:
-
Navigate to Menu > Export job dataset.
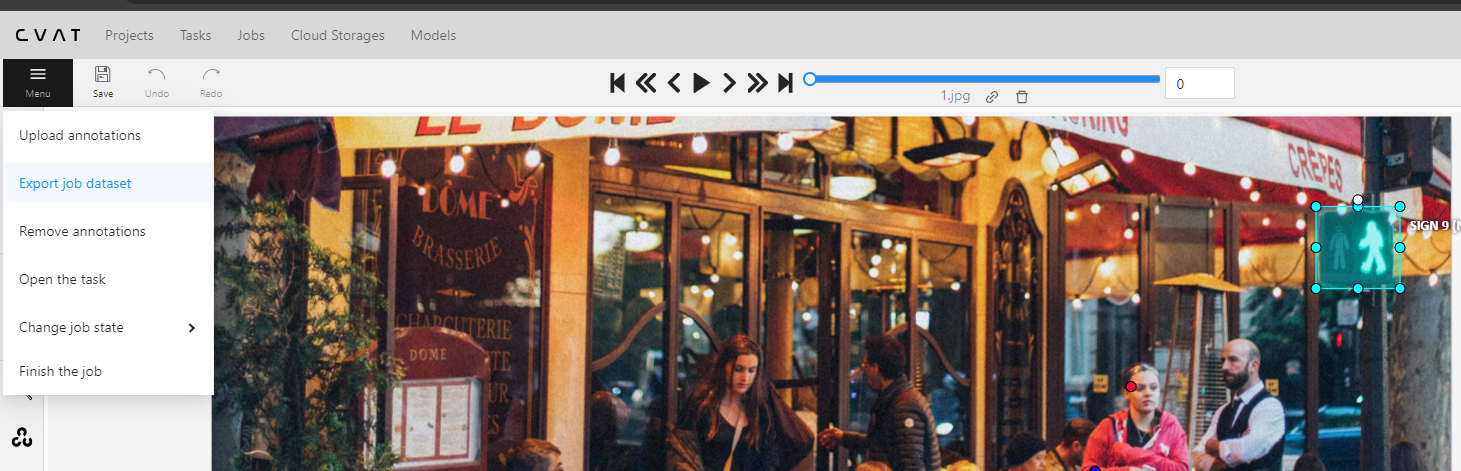
-
Choose the desired format from the list of available options.
-
(Optional) Toggle the Save images switch if you wish to include images in the export.
Note
The Save images option is a paid feature. -
Input a name for the resulting
.ziparchive. -
Click OK to initiate the export.
Data export video tutorial
For more information on the process, see the following tutorial:
5.4 - Backup Task and Project
Overview
In CVAT you can backup tasks and projects. This can be used to backup a task or project on your PC or to transfer to another server.
Create backup
To backup a task or project, open the action menu and select Backup Task or Backup Project.
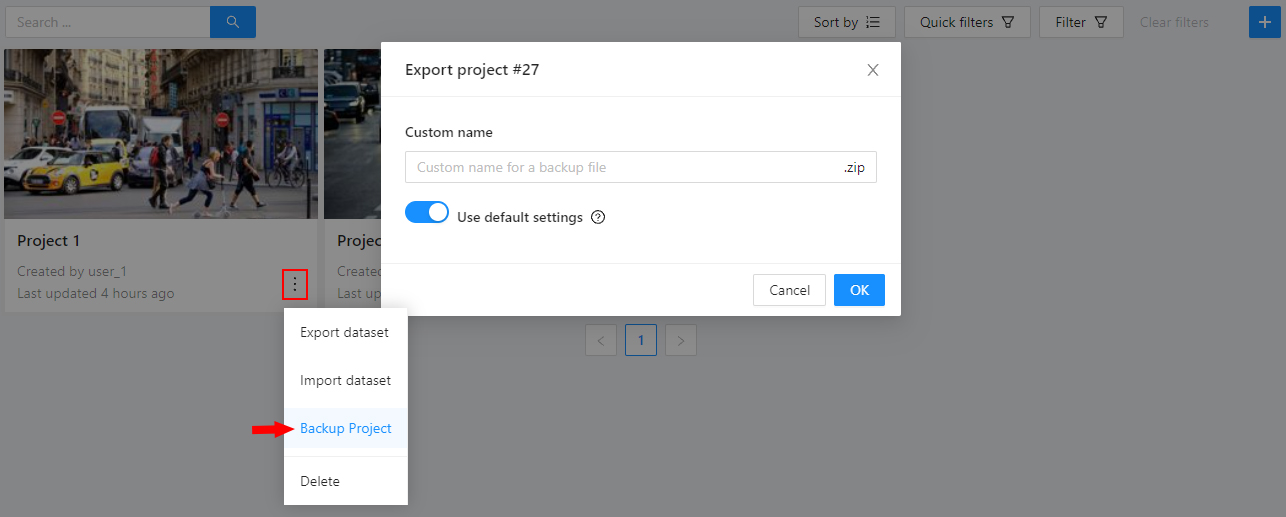
You can backup a project or a task locally on your PC or using an attached cloud storage.
The dialog includes a switch Use lightweight backup whenever possible.
When enabled, CVAT creates a lightweight backup for data that comes from attached cloud storage:
the backup stores task/project meta and annotations and does not copy raw media files.
This reduces backup size and time for cloud-backed data.
The switch has no effect on a tasks, whose data is located on CVAT.
The switch is enabled by default.
(Optional) Specify the name in the Custom name text field for backup, otherwise the file of backup name
will be given by the mask project_<project_name>_backup_<date>_<time>.zip for the projects
and task_<task_name>_backup_<date>_<time>.zip for the tasks.
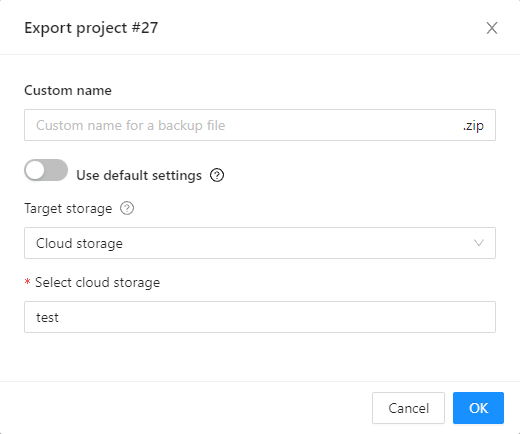
If you want to save a backup to a specific
attached cloud storage,
you should additionally turn off the switch Use default settings, select the Cloud storage value
in the Target storage and select this storage in the list of the attached cloud storages.
Create backup APIs
- endpoints:
/tasks/{id}/backup/projects/{id}/backup
- method:
GET - responses: 202, 201 with zip archive payload
Upload backup APIs
- endpoints:
/api/tasks/backup/api/projects/backup
- method:
POST - Content-Type:
multipart/form-data - responses: 202, 201 with json payload
Create from backup
To create a task or project from a backup, go to the tasks or projects page,
click the Create from backup button and select the archive you need.

As a result, you’ll get a task containing data, parameters, and annotations of the previously exported task.
Note: When restoring from a lightweight backup, CVAT creates a task which is not attached to cloud storage. Data cannot be fetched until cloud storage is attached on a Task page.
Backup file structure
As a result, you’ll get a zip archive containing data, task or project and task specification and annotations with the following structure:
    .
    ├── data
    │   └── {user uploaded data}
    ├── task.json
    └── annotations.json
    .
    ├── task_{id}
    │   ├── data
    │   │   └── {user uploaded data}
    │   ├── task.json
    │   └── annotations.json
    └── project.json
5.5 - Dataset Manifest
Overview
When we create a new task in CVAT, we need to specify where to get the input data from. CVAT allows to use different data sources, including local file uploads, a mounted file share on the server, cloud storages and remote URLs. In some cases CVAT needs to have extra information about the input data. This information can be provided in Dataset manifest files. They are mainly used when working with cloud storages to reduce the amount of network traffic used and speed up the task creation process. However, they can also be used in other cases, which will be explained below.
A dataset manifest file is a text file in the JSONL format. These files can be created automatically with the special command-line tool, or manually, following the manifest file format specification.
How and when to use manifest files
Manifest files can be used in the following cases:
- A video file or a set of images is used as the data source and the caching mode is enabled. Read more
- The data is located in a cloud storage. Read more
- The
predefinedfile sorting method is specified. Read more
The predefined sorting method
Independently of the file source being used, when the predefined
sorting method is selected in the task configuration, the source files will be
ordered according to the .jsonl manifest file, if it is found in the input list of files.
If a manifest is not found, the order provided in the input file list is used.
For image archives (e.g. .zip), a manifest file (*.jsonl) is required when using
the predefined file ordering. A manifest file must be provided next to the archive
in the input list of files, it must not be inside the archive.
If there are multiple manifest files in the input file list, an error will be raised.
How to generate manifest files
CVAT provides a dedicated Python tool to generate manifest files. The source code can be found here.
Using the tool is the recommended way to create manifest files for you data. The data must be available locally to the tool to generate manifest.
Usage
usage: create.py [-h] [--force] [--output-dir .] source

positional arguments:
  source                Source paths

optional arguments:
  -h, --help            show this help message and exit
  --force               Use this flag to prepare the manifest file for video data
                        if by default the video does not meet the requirements
                        and a manifest file is not prepared
  --output-dir OUTPUT_DIR
                        Directory where the manifest file will be saved
Use the script from a Docker image
This is the recommended way to use the tool.
The script can be used from the cvat/server image:
docker run -it --rm -u "$(id -u)":"$(id -g)" \
  -v "${PWD}":"/local" \
  --entrypoint python3 \
  cvat/server \
  utils/dataset_manifest/create.py --output-dir /local /local/<path/to/sources>
Make sure to adapt the command to your file locations.
Use the script directly
Ubuntu 20.04
Install dependencies:
# General
sudo apt-get update && sudo apt-get --no-install-recommends install -y \
    python3-dev python3-pip python3-venv pkg-config
# Library components
sudo apt-get install --no-install-recommends -y \
    libavformat-dev libavcodec-dev libavdevice-dev \
    libavutil-dev libswscale-dev libswresample-dev libavfilter-dev
Create an environment and install the necessary python modules:
python3 -m venv .env
. .env/bin/activate
pip install -U pip
pip install -r utils/dataset_manifest/requirements.in
Note
Please note that if used with video this way, the results may be different from what would the server decode. It is related to the ffmpeg library version. For this reason, using the Docker-based version of the tool is recommended.Examples
Create a dataset manifest in the current directory with video which contains enough keyframes:
python utils/dataset_manifest/create.py ~/Documents/video.mp4
Create a dataset manifest with video which does not contain enough keyframes:
python utils/dataset_manifest/create.py --force --output-dir ~/Documents ~/Documents/video.mp4
Create a dataset manifest with images:
python utils/dataset_manifest/create.py --output-dir ~/Documents ~/Documents/images/
Create a dataset manifest with pattern (may be used *, ?, []):
python utils/dataset_manifest/create.py --output-dir ~/Documents "/home/${USER}/Documents/**/image*.jpeg"
Create a dataset manifest using Docker image:
docker run -it --rm -u "$(id -u)":"$(id -g)" \
  -v ~/Documents/data/:${HOME}/manifest/:rw \
  --entrypoint '/usr/bin/bash' \
  cvat/server \
  utils/dataset_manifest/create.py --output-dir ~/manifest/ ~/manifest/images/
File format
The dataset manifest files are text files in JSONL format. These files have 2 sub-formats: for video and for images and 3d data.
Note
Each top-level entry enclosed in curly braces must use 1 string, no empty strings is allowed. The formatting in the descriptions below is only for demonstration.Dataset manifest for video
The file describes a single video.
pts - time at which the frame should be shown to the user
checksum - md5 hash sum for the specific image/frame decoded
{ "version": <string, version id> }
{ "type": "video" }
{ "properties": {
  "name": <string, filename>,
  "resolution": [<int, width>, <int, height>],
  "length": <int, frame count>
}}
{
  "number": <int, frame number>,
  "pts": <int, frame pts>,
  "checksum": <string, md5 frame hash>
} (repeatable)
Dataset manifest for images and other data types
The file describes an ordered set of images and 3d point clouds.
name - file basename and leading directories from the dataset root
checksum - md5 hash sum for the specific image/frame decoded
{ "version": <string, version id> }
{ "type": "images" }
{
  "name": <string, image filename>,
  "extension": <string, . + file extension>,
  "width": <int, width>,
  "height": <int, height>,
  "meta": <dict, optional>,
  "checksum": <string, md5 hash, optional>
} (repeatable)
Example files
Manifest for a video
{"version":"1.0"}
{"type":"video"}
{"properties":{"name":"video.mp4","resolution":[1280,720],"length":778}}
{"number":0,"pts":0,"checksum":"17bb40d76887b56fe8213c6fded3d540"}
{"number":135,"pts":486000,"checksum":"9da9b4d42c1206d71bf17a7070a05847"}
{"number":270,"pts":972000,"checksum":"a1c3a61814f9b58b00a795fa18bb6d3e"}
{"number":405,"pts":1458000,"checksum":"18c0803b3cc1aa62ac75b112439d2b62"}
{"number":540,"pts":1944000,"checksum":"4551ecea0f80e95a6c32c32e70cac59e"}
{"number":675,"pts":2430000,"checksum":"0e72faf67e5218c70b506445ac91cdd7"}
Manifest for a dataset with images
{"version":"1.0"}
{"type":"images"}
{"name":"image1","extension":".jpg","width":720,"height":405,"meta":{"related_images":[]},"checksum":"548918ec4b56132a5cff1d4acabe9947"}
{"name":"image2","extension":".jpg","width":183,"height":275,"meta":{"related_images":[]},"checksum":"4b4eefd03cc6a45c1c068b98477fb639"}
{"name":"image3","extension":".jpg","width":301,"height":167,"meta":{"related_images":[]},"checksum":"0e454a6f4a13d56c82890c98be063663"}
5.6 - Data preparation on the fly
Description
Data on the fly processing is a way of working with data, the main idea of which is as follows: when creating a task, the minimum necessary meta information is collected. This meta information allows in the future to create necessary chunks when receiving a request from a client.
Generated chunks are stored in a cache of the limited size with a policy of evicting less popular items.
When a request is received from a client, the required chunk is searched for in the cache. If the chunk does not exist yet, it is created using prepared meta information and then put into the cache.
This method of working with data allows:
- reduce the task creation time.
- store data in a cache of the limited size with a policy of evicting less popular items.
Unfortunately, this method has several drawbacks:
- The first access to the data will take more time.
- It will not work for some videos, even if they have a valid manifest file. If there are not enough keyframes in the video for smooth video decoding, the task data chunks will be created with the default method, i.e. during the task creation.
- If the data has not been cached yet, and is not reachable during the access time, it cannot be retrieved.
How to use
To enable or disable this feature for a new task, use the
Use Cache
toggle in the task configuration.
Uploading a manifest with data
When creating a task, you can upload a manifest.jsonl file along with the video or dataset with images.
You can see how to prepare it here.
6 - Annotation
Master CVAT’s annotation tools, shortcuts, and workflows for precise and efficient labeling.
6.1 - Editor
This section describes CVAT annotation editor, it’s key components, tools, and settings.
This section of the documentation describes the annotation interface and all available options that you can use to annotate image data accurately and quickly.
The interface includes the following areas:
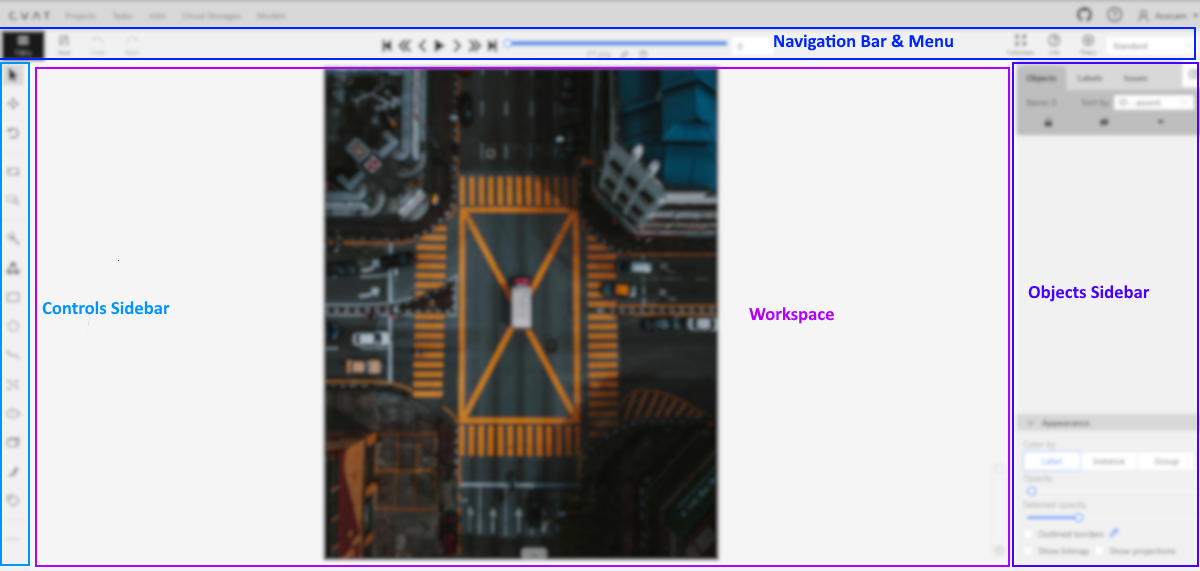
6.1.1 - Menu and Navigation Bar
Features navigation arrows to switch between frames, provides access to main functions, and Menu.
The navigation panel and drop-down Menu, allow you to switch between frames, change the annotation mode, save your work, and more.
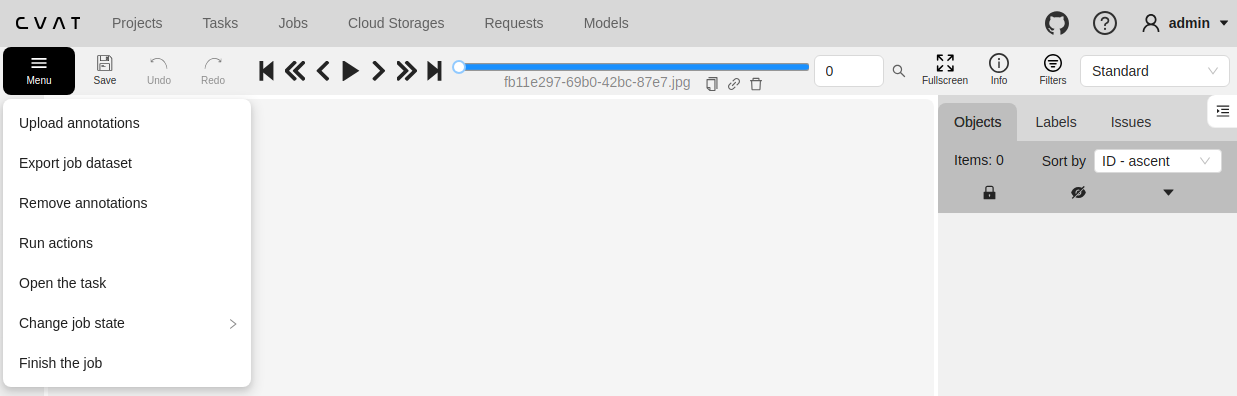
See:
Menu
Use the Menu options to upload and download annotations, change the status of the job, and access other features listed in the table below:
| Panel Item | Description |
|---|---|
| Upload annotations | Upload annotations into a task. |
| Export as a dataset | Download a dataset in one of the supported formats. |
| Remove annotations | Delete all annotations for the current job. Use Select range to remove annotations for a specific range of frames. Enable the Delete only keyframe for tracks checkbox to delete only keyframes from the tracks within the selected range. 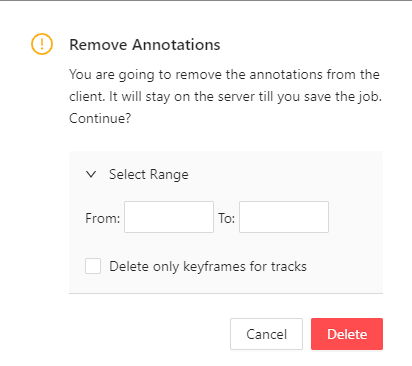 |
| Preload data | Activates background preloading of job chunks. This feature loads data in advance to ensure smoother playback and navigation. The progress of loaded chunks is displayed on the player slider, which fills with blue color as chunks are preloaded. To stop preloading, click Cancel preload. |
| Run actions | Run annotation actions on the annotated dataset. Annotations action is a feature that allows you to modify a bulk of annotations on many frames. It supports only shape objects. |
| Open the task | Opens a page with details about the task. |
| Change job state | Changes the state of the job:
|
| Finish the job | Saves annotations and sets job state to Completed. |
Navigation bar
Use the navigation bar to save annotation results, switch between frames, and access other features listed in the tables below.
Save, Undo, Done
Use the following buttons, to save your work, undo changes, and move tasks to done.
| Function | Description |
|---|---|
Save work |
Saves annotations for the current job. The button indicates the saving process. |
Undo/Redo |
Use buttons to undo actions or redo them. |
Done |
Used to complete the creation of the object. This button appears only when the object is being created. |
Block |
Used to pause automatic line creation when drawing a polygon with OpenCV Intelligent scissors. Also used to postpone server requests when creating an object using AI Tools. |
Navigation controls
Overview of how to navigate through frames within the interface, with detailed descriptions provided in the table below.
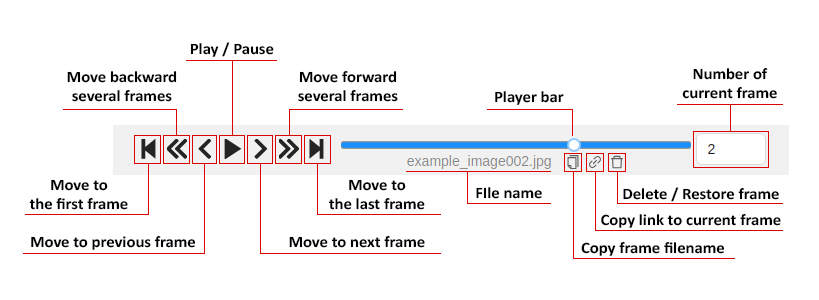
| Function | Description |
|---|---|
Toggle chapter menu |
Presents the list of chapters stored in the metadata of the video file. Click on a chapter in the list to seek the player to the start frame of this chapter. 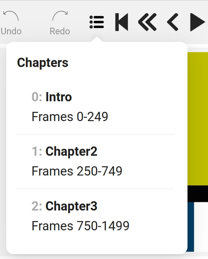 Only available in video tasks and if the video file contains chapters. |
Go to the first/last frame |
Navigate to the first or the last frame of the sequence. |
Go back with a step/Go next with a step |
Move to the previous or next frame by a predefined step. Shortcuts: Default step size is 10 frames. To modify this, navigate to Nickname > Settings > Player Step. |
Go back/Go next |
Navigate to the neighboring frames. Shortcuts: Go back/Go next buttons are customizable:  To customize, right-click on the button and select one of the options (from left to right):
|
Play/Pause |
Switch between playing and pausing the sequence of frames or set of images. Shortcut: Space. To adjust the playback speed, go to Nickname > Settings > Player Speed. |
Go to the specific frame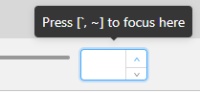 |
Enter the number of the frame you want to go to and press Enter. |
| Search frame by filename |
Click to open the search pop-up. Type a frame filename to search for it within the job. Select the filename and press Enter to navigate to the selected frame. |
| Copy frame name |
Click to copy frame name to the clipboard. |
| Copy frame link |
Click to copy link to the frame. |
| Delete frame |
Click to delete or restore current frame. |
Job information and Annotation Mode switcher
This section outlines various functionalities, including how to switch to the fullscreen player mode, access job information, and use the Workspace Switcher to toggle between different annotation and QA modes.
| Function | Description |
|---|---|
Fullscreen |
The fullscreen player mode. The keyboard shortcut is F11. |
Info |
Open the job info. 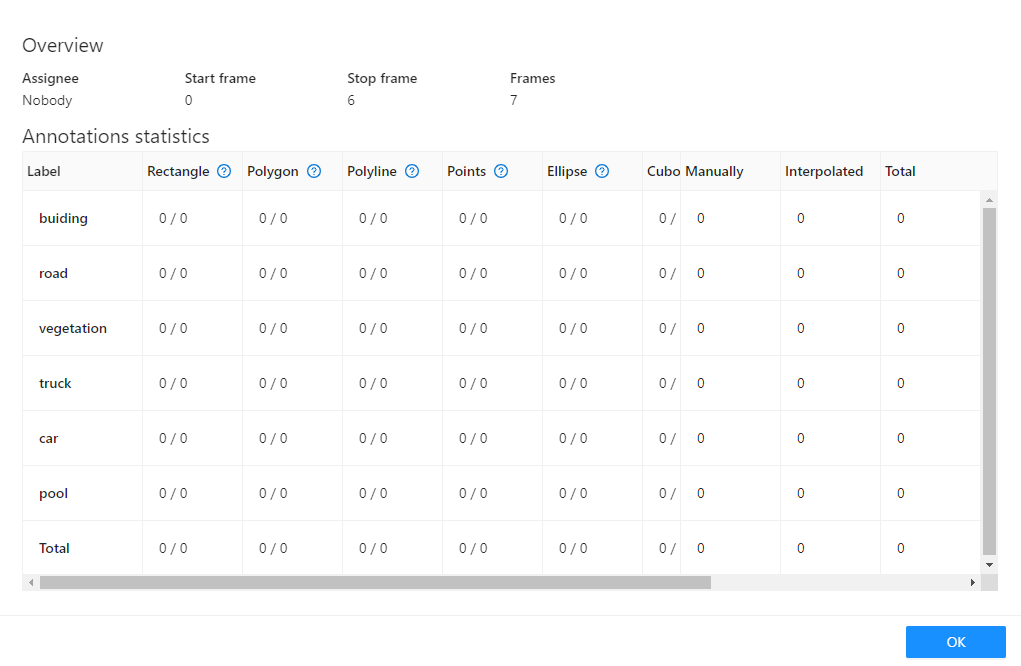 Overview:
Annotations Statistics table displays the number of created shapes, categorized by labels (e.g. vehicle, person) and the type of annotation (shape, track), as well as the count of manual and interpolated frames. |
Filters |
Switches on Filters. |
| Workplace Switcher | The drop-down list to switch between different annotation modes: 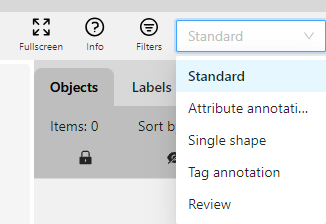 Overview:
|
6.1.2 - Workspace
The main annotation area where images, videos and 3D data are displayed for annotation.
In CVAT, the workspace serves as a work area where annotators interact with images, videos, and the various tools available to create high-quality annotations.
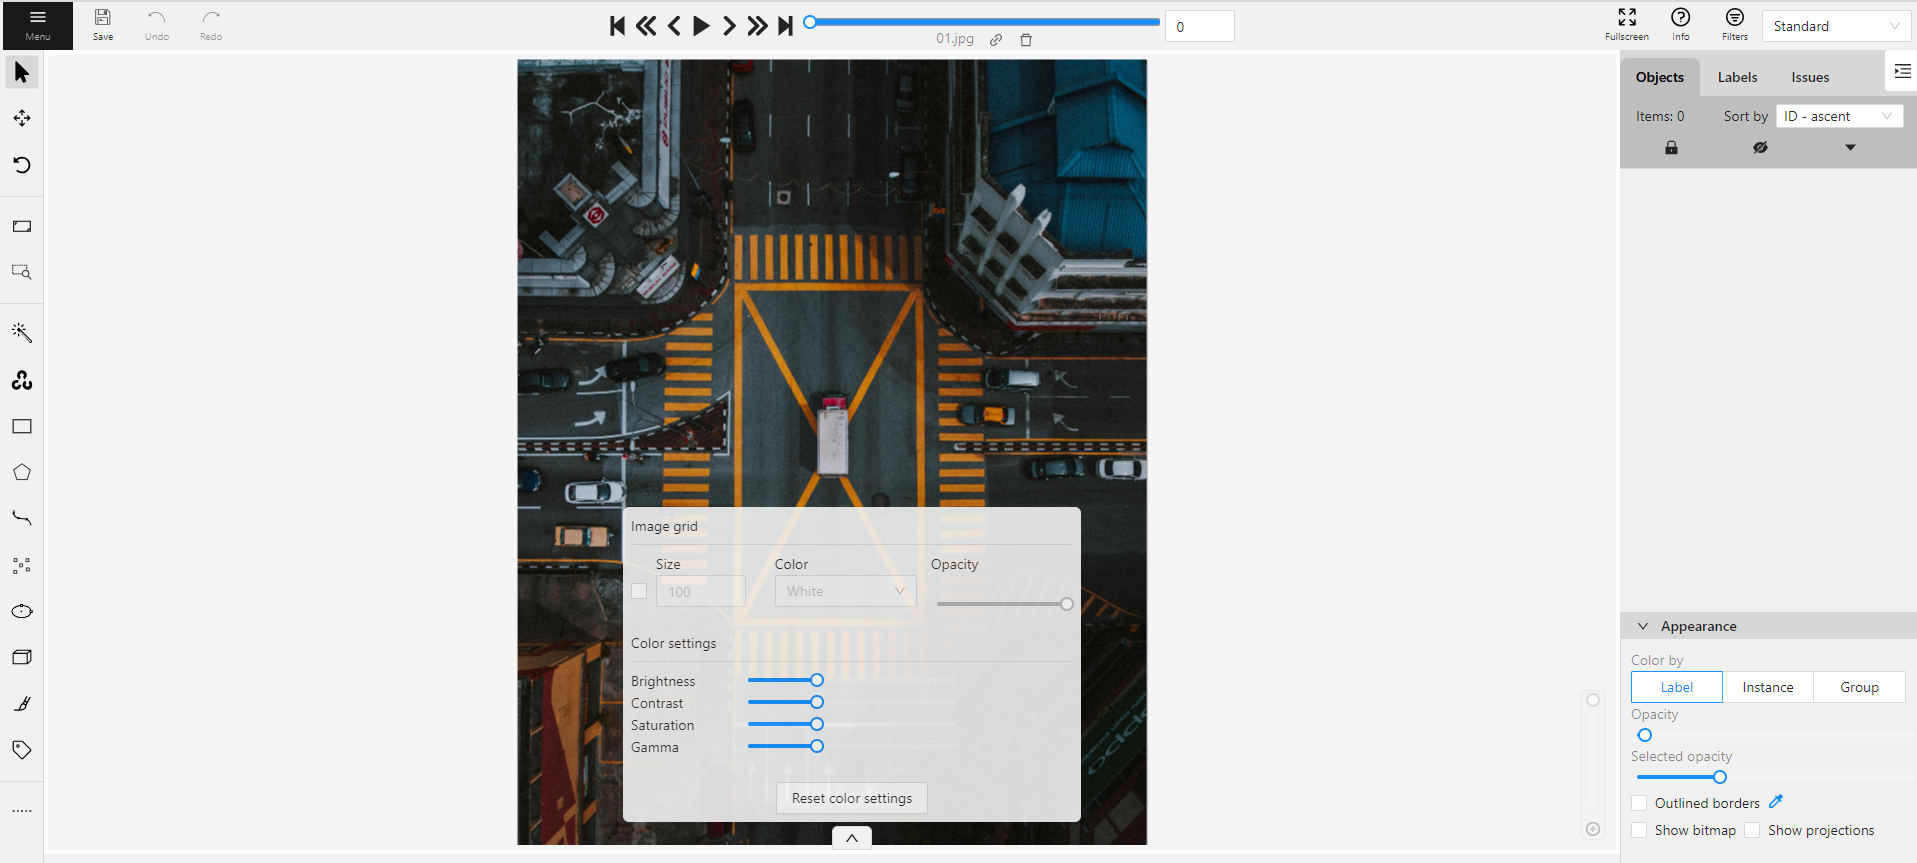
See:
Image settings in CVAT
The Image settings panel serves as a versatile tool for fine-tuning the visual aspects of your image. Whether you need to brighten the image, increase contrast, or make other adjustments, this panel is your go-to.
Additionally, the panel allows you to overlay a grid on the image for more precise annotation.
Note
Adjusting the image settings only alters how the pictures are displayed. The images themselves will remain unmodified and unchanged.By default, the Image settings panel is not visible. To access
it, click on the Arrow Up (![]() )
icon located at the bottom of the workspace.
)
icon located at the bottom of the workspace.
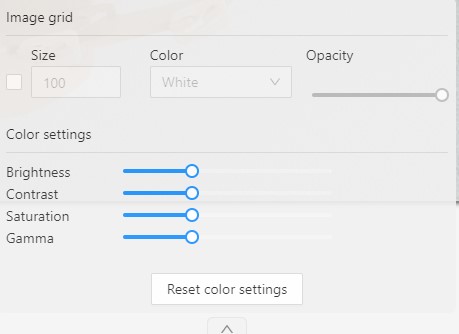
Adding grid overlay to image in CVAT
To add the grid to the image, do the following:
- Open the Image Settings panel.
- Locate and check the box that allows you to overlay a grid on the image.
- Specify the grid cell size in square millimeters by entering the desired number in the Size field.
- From the Color drop-down list, select the color of the grid.
- Use the Opacity slider to change the transparency of the grid overlay.
Changing color settings of image in CVAT
To change the color setting of the image is CVAT, do the following:
- Open the Image Settings panel.
- Use the slider to change the color quality.
There are four color quality settings in CVAT:
Brightness increases and decreases the overall lightness of the image:
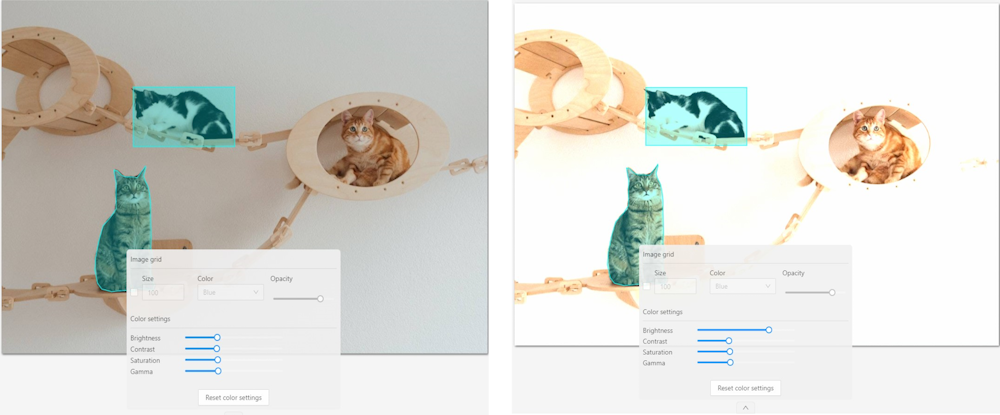
Contrast is the range of brightness, from lightest to darkest, in an image.
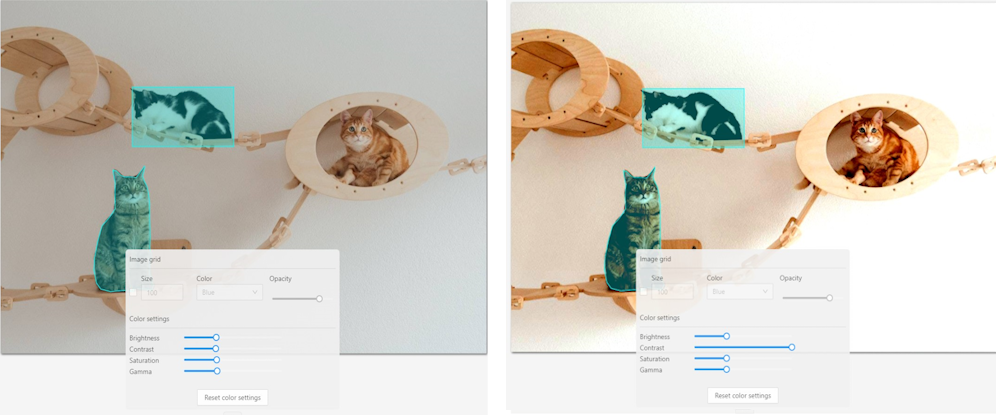
Saturation describes the intensity of the color.
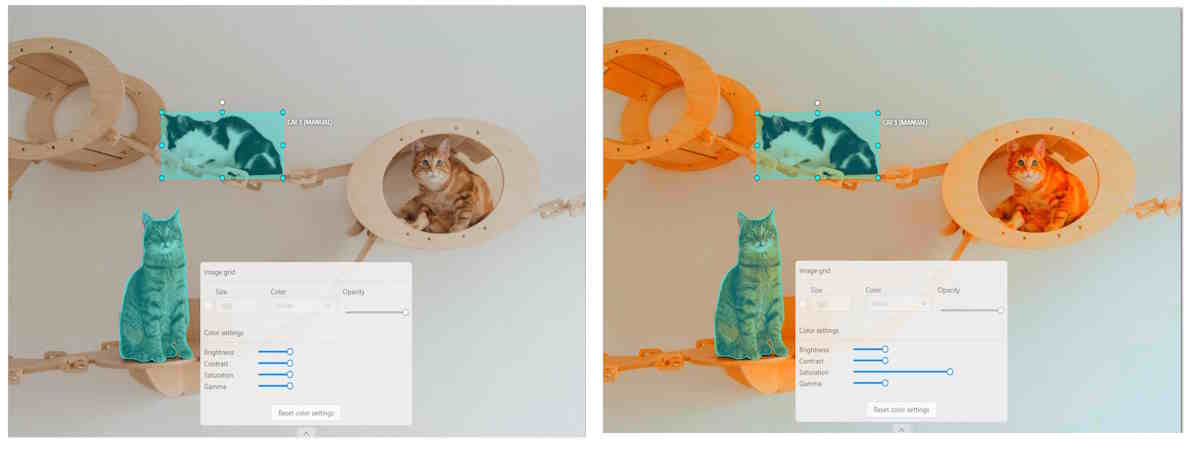
Gamma correction can be used to control the overall brightness of an image
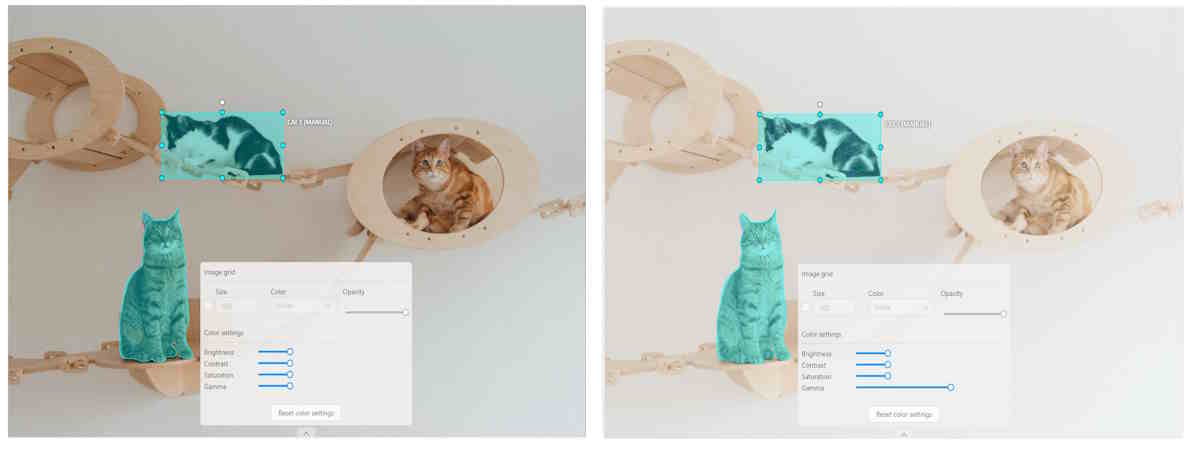
To reset the setting to default values, click Reset color settings
Adding layers and Z-axis slider
Z-axis Slider enables you to add annotation layers while hiding the layers positioned beyond.
You can also move between layers by moving the slider to the layer you need.
The slider becomes active when multiple Z-layers are present within a frame. Click + on the slider to add a new layer; upon pressing it, a new layer is automatically created and activated.
You can also relocate objects between layers using the + and - keys.

Interacting with Objects
The workspace is also equipped with the following features:
-
Right-clicking an object opens the Object Card. This interface contains essential controls for modifying the object’s label and attributes, as well as providing access to an action menu.
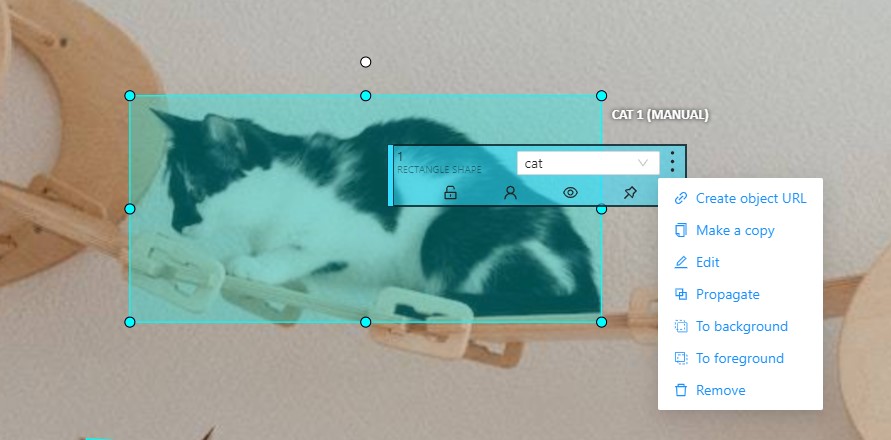
-
Right-clicking on a polygon point will open a menu, from which you can Delete point or Set start point.
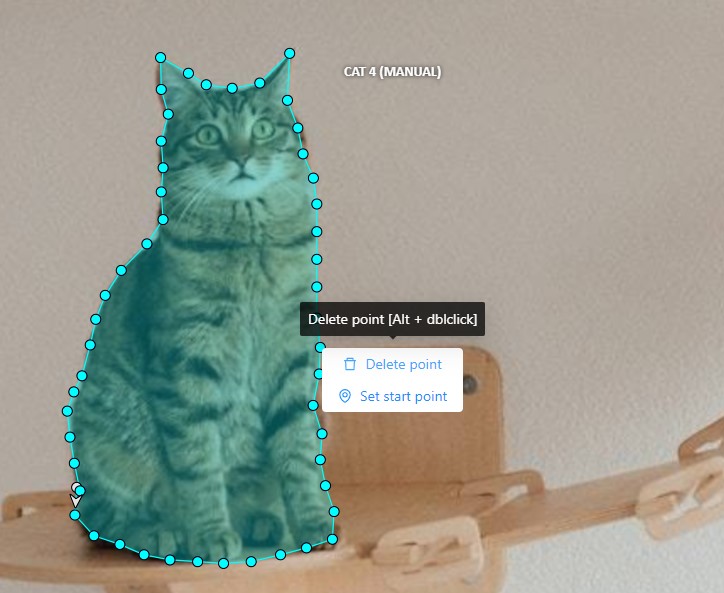
6.1.3 - Objects sidebar
Displays annotated objects and includes a label filter, lists of objects (current frame) and labels (objects on the frame), and appearance settings.
In the objects sidebar, you can see the list of available objects on the current frame. The following figure is an example of how the list might look like:
| Shape mode | Track mode |
|---|---|
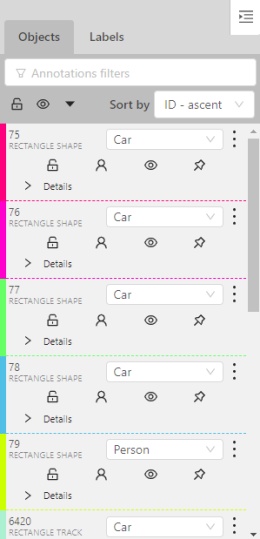 |
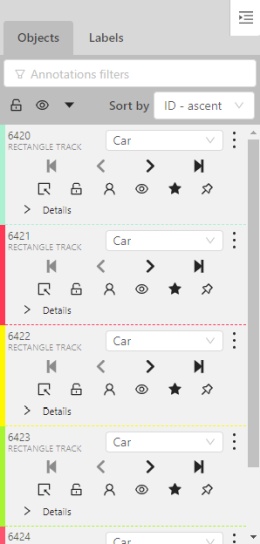 |
Objects properties
Filter input box
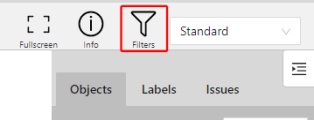
The way how to use filters is described in the advanced guide here.
List of objects

- Switch lock property for all - switches lock property of all objects in the frame.
- Switch hidden property for all - switches hide the property of all objects in the frame.
- Expand/collapse all - collapses/expands the details field of all objects in the frame.
- Sorting - sort the list of objects: updated time, ID - accent, ID - descent
Objects on the sidebar
The type of shape can be changed by selecting the Label property. For instance, it can look like shown in the figure below:
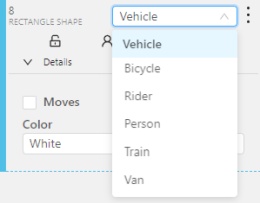
Object action menu
The action menu calls up the button:

The action menu contains:
-
Create object URL - puts a link to an object on the clipboard. After you open the link, this object will be filtered.
-
Make a copy - copies an object. The keyboard shortcut is Ctrl + C > Ctrl + V.
-
Propagate function copies the form to multiple frames and displays a dialog box where you can specify the number of copies or the frame to which you want to copy the object. The keyboard shortcut is Ctrl + B. On how to propagate only filtered shapes, see Shapes converter
There are two options available:- Propagate forward (
 ) creates a
copy of the object on
) creates a
copy of the object on Nsubsequent frames at the same position. - Propagate backward (
 ) creates
a copy of the object on
) creates
a copy of the object on Nprevious frames at the same position.
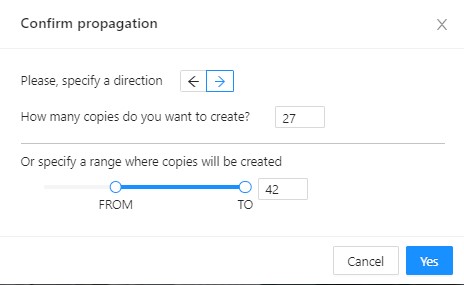
- Propagate forward (
-
To background - moves the object to the background. The keyboard shortcut - or _
-
To foreground - moves the object to the foreground. The keyboard shortcut + or =
-
To one layer backward - Moves the object one layer backward.
-
To one layer forward - Moves the object one layer forward.
-
Change instance color- choosing a color using the color picker (available only in instance mode).
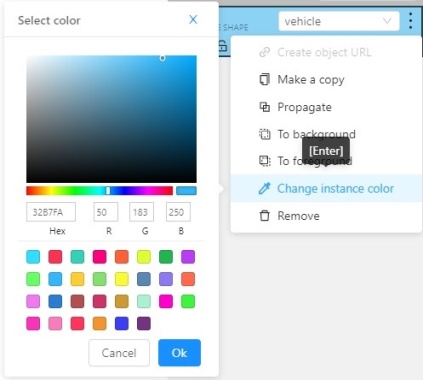
-
Remove - removes the object. The keyboard shortcut Del, Shift+Del.
A shape can be locked to prevent its modification or moving by an accident. Shortcut to lock an object: L.
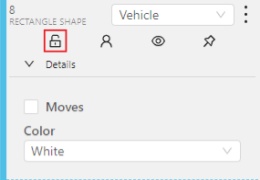
A shape can be Occluded. Shortcut: Q. Such shapes have dashed boundaries.
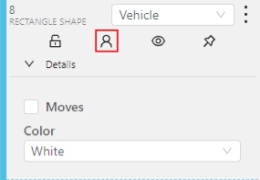
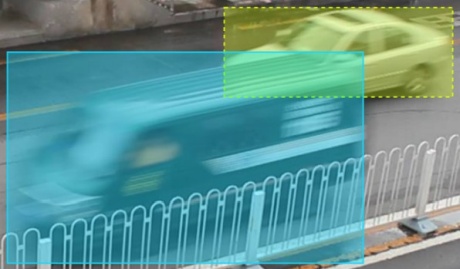
You can change the way an object is displayed on a frame (show or hide).
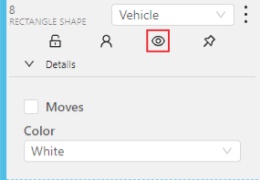
Switch pinned property - when enabled, a shape cannot be moved by dragging or dropping.
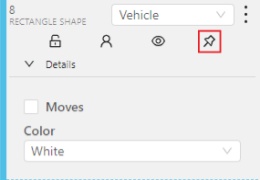
Tracker switcher - enable/disable tracking for the object.
![]()
By clicking on the Details button you can collapse or expand the field with all the attributes of the object.
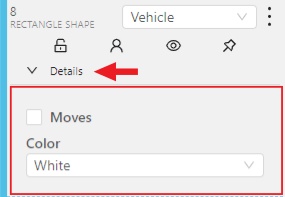
Labels
In this tab, you can lock or hide objects of a certain label. To change the color for a specific label, you need to go to the task page and select the color by clicking the edit button, this way you will change the label color for all jobs in the task.
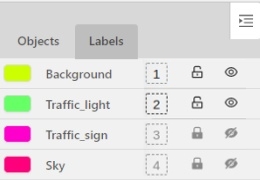
Fast label change
You can change the label of an object using hotkeys. In order to do it, you need to assign a number (from 0 to 9) to labels. By default numbers 1,2…0 are assigned to the first ten labels. To assign a number, click on the button placed at the right of a label name on the sidebar.
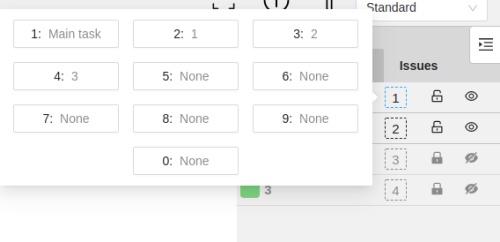
After that, you will be able to assign a corresponding label to an object by hovering your mouse cursor over it and pressing Ctrl + Num(0..9).
In case you do not point the cursor to the object, pressing Ctrl + Num(0..9) will set a chosen label as default,
so that the next object you create (use the N key) will automatically have this label assigned.
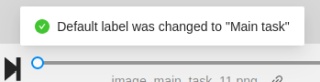
Appearance
Color By options
Change the color scheme of the annotation:
-
Instance— every shape has a random color
-
Group— every group of shape has its own random color, ungrouped shapes are white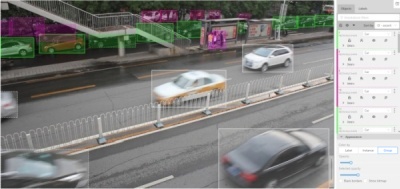
-
Label— every label (e.g. car, person) has its own random color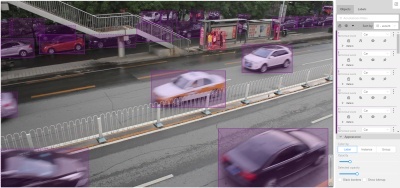
You can change any random color pointing to a needed box on a frame or on an object sidebar.
Fill Opacity slider
Change the opacity of every shape in the annotation.

Selected Fill Opacity slider
Change the opacity of the selected object’s fill. It is possible to change the opacity while drawing an object in the case of rectangles, polygons, and cuboids.

Outlined borders checkbox
You can change a special shape border color by clicking on the Eyedropper icon.

Show bitmap checkbox
If enabled all shapes are displayed in white and the background is black.

Show projections checkbox
Enables/disables the display of auxiliary perspective lines. Only relevant for cuboids
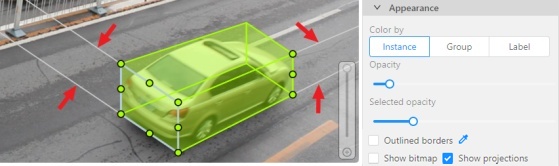
Hide objects sidebar
Hide - the button hides the object’s sidebar.
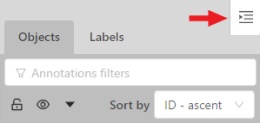
6.1.4 - Controls sidebar
Offers tools for navigating within the image, annotation tools, and additional options to merge, split, and group labels.
Navigation
Navigation block - contains tools for moving and rotating images.
| Icon | Description |
|---|---|
 |
Cursor (Esc)- a basic annotation editing tool. |
 |
Move the image- a tool for moving around the image withoutthe possibility of editing. |
 |
Rotate- two buttons to rotate the current framea clockwise ( Ctrl+R) and anticlockwise (Ctrl+Shift+R).You can enable Rotate all images in the settings to rotate all the images in the job |
Zoom
Zoom block - contains tools for image zoom.
| Icon | Description |
|---|---|
 |
Fit image- fits image into the workspace size.Shortcut - double click on an image |
 |
Select a region of interest- zooms in on a selected region.You can use this tool to quickly zoom in on a specific part of the frame. |
Shapes
Shapes block - contains all the tools for creating shapes.
| Icon | Description | Links to section |
|---|---|---|
 |
AI Tools |
AI Tools |
 |
OpenCV |
OpenCV |
 |
Rectangle |
Shape mode; Track mode; Drawing by 4 points |
 |
Polygon |
Annotation with polygons; Track mode with polygons |
 |
Polyline |
Annotation with polylines |
 |
Points |
Annotation with points |
 |
Ellipses |
Annotation with ellipses |
 |
Cuboid |
Annotation with cuboids |
Brushing tools |
Annotation with brushing | |
 |
Tag |
Annotation with tags |
 |
Open an issue |
Review (available only in review mode) |
Edit
Edit block - contains tools for editing tracks and shapes.
| Icon | Description | Links to section |
|---|---|---|
 |
Merge Shapes(M) - starts/stops the merging shapes mode. |
Track mode (basics) |
 |
Group Shapes (G) - starts/stops the grouping shapes mode. |
Shape grouping |
 |
Split - splits a track. |
Track mode (advanced) |
| Joins multiple labels into one | Joining mask tool | |
| Slices one label into several. | Slice mask/polygon |
Move image
Switching between user interface modes.
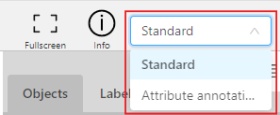
-
Use arrows below to move to the next/previous frame. Use the scroll bar slider to scroll through frames. Almost every button has a shortcut. To get a hint about a shortcut, just move your mouse pointer over an UI element.
-
To navigate the image, use the button on the controls sidebar. Another way an image can be moved/shifted is by holding the left mouse button inside an area without annotated objects. If the
Mouse Wheelis pressed, then all annotated objects are ignored. Otherwise the a highlighted bounding box will be moved instead of the image itself.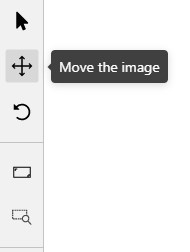
-
You can use the button on the sidebar controls to zoom on a region of interest. Use the button
Fit the imageto fit the image in the workspace. You can also use the mouse wheel to scale the image (the image will be zoomed relatively to your current cursor position).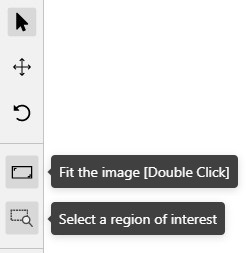
6.1.5 - Settings
To open the Settings, open the user menu in the header and select Settings.
Or you can use the default F2 shortcut.
The Settings section has three tabs:
Player
In the Player tab, you can:
- Control step of
CandVshortcuts. - Control the speed of
Space/Playbutton. - Select canvas background color. You can choose a background color or enter manually (in RGB or HEX format).
Reset zoomShow every image in full size or zoomed out like the previous (it is enabled by default for interpolation mode and disabled for annotation mode).Rotate all imagescheckbox — switch the rotation of all frames or an individual frame.Smooth imagecheckbox — smooth image when zoom-in it.smoothed pixelized 

Workspace
In the Workspace tab, you can:
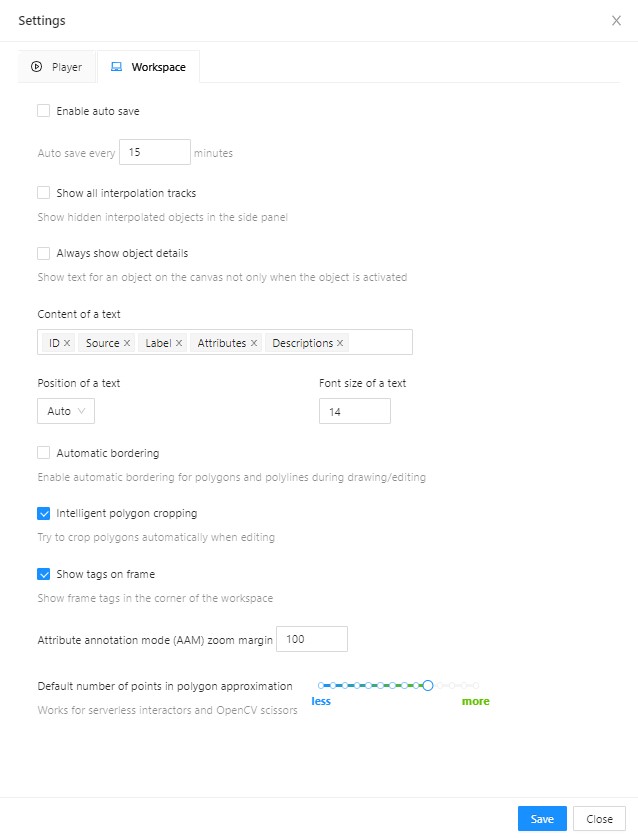
-
Enable auto savecheckbox — turned off by default. -
Auto save interval (min)input box — 15 minutes by default. -
Show all interpolation trackscheckbox — shows hidden objects on the side panel for every interpolated object (turned off by default). -
Always show object details- show text for an object on the canvas not only when the object is activated: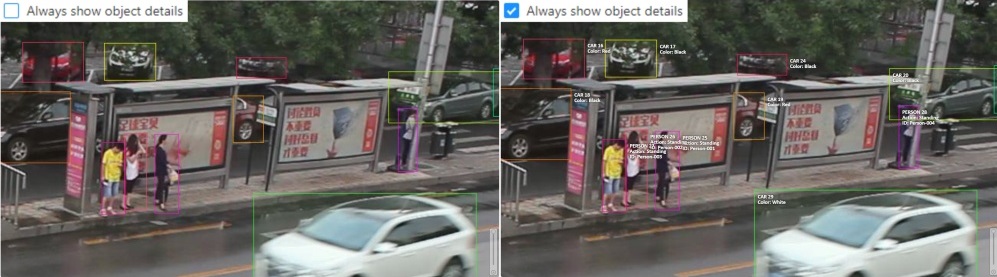
-
Content of a text- setup of the composition of the object details:ID- object identifier.Attributes- attributes of the object.Label- object label.Source- source of creating of objectsMANUAL,AUTOorSEMI-AUTO.Descriptions- description of attributes.Dimensions- width, height and rotation for rectangles and ellipses.
-
Position of a text- text positioning mode selection:Auto- the object details will be automatically placed where free space is.Center- the object details will be embedded to a corresponding object if possible.
-
Font size of a text- specifies the text size of the object details. -
Automatic bordering- enable automatic bordering for polygons and polylines during drawing/editing. For more information To find out more, go to the section annotation with polygons. -
Intelligent polygon cropping- activates intelligent cropping when editing the polygon (read more in the section edit polygon -
Show tags on frame- shows/hides frame tags on the current frame -
Attribute annotation mode (AAM) zoom margininput box — defines margins (in px) for shape in the attribute annotation mode. -
Control points size— defines the size of any interactable points in the tool (polygon’s vertices, rectangle dragging points, etc.) -
Default number of points in polygon approximationWith this setting, you can choose the default number of points in polygon. Works for serverless interactors and OpenCV scissors. -
Select Save to save settings (settings will be saved on the server and will not change after the page is refreshed). Select Cancel or press
F2to return to the annotation.
Shortcuts
In the Shortcuts tab, you can set the keyboard combinations. Learn more in Shortcuts.
6.1.6 - 3D task workspace
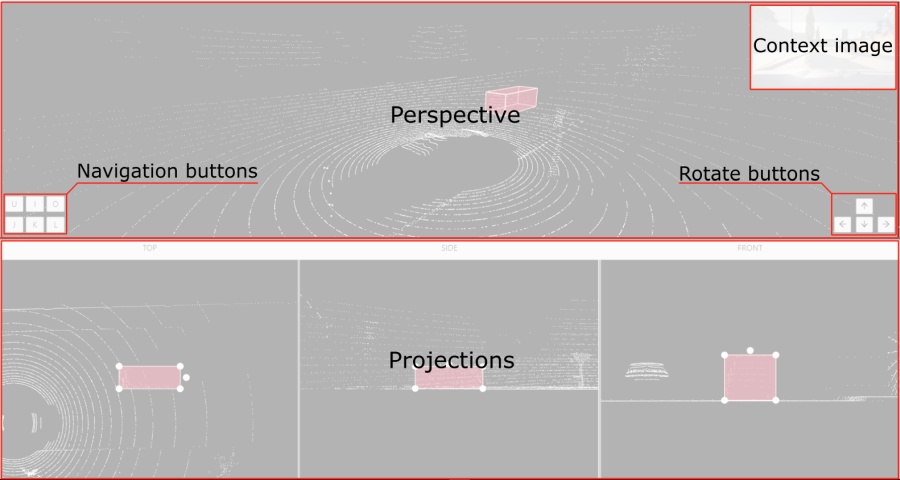
If the related_images folder contains any images, a context image will be available in the perspective window.
The contextual image could be compared to 3D data and would help to identify the labels of marked objects.
Perspective – a main window for work with objects in a 3D task.
Projections - projections are tied to an object so that a cuboid is in the center and looks like a rectangle. Projections show only the selected object.
Top– a projection of the view from above.Side– a projection of the left side of the object.Front- a frontal projection of the object.
6.2 - Manual Annotation
Tools, shape types, and annotation modes used for manual object labeling.
6.2.1 - Annotation modes
Overview of editor-level modes in CVAT and how they affect the annotation workflow.
CVAT provides several editor-level modes that change how the annotation workspace behaves. These modes control what actions are available to the user, which tools can be used, and how objects can be created or modified.
Use this section to understand when to switch modes and how each mode supports a specific step of the annotation workflow.
6.2.1.1 - Single shape
Guide to annotating tasks using Single Shape mode
The CVAT Single Shape annotation mode accelerates the annotation process and enhances workflow efficiency for specific scenarios.
By using this mode you can label objects with a chosen annotation shape and label when an image contains only a single object. By eliminating the necessity to select tools from the sidebar and facilitating quicker navigation between images without the reliance on hotkeys, this feature makes the annotation process significantly faster.
See:
- Single Shape mode annotation interface
- Annotating in Single Shape mode
- Query parameters
- Video tutorial
Single Shape mode annotation interface
A set of controls in the interface of the Single Shape annotation mode may vary depending on different settings.
Images below displays the complete interface, featuring all available fields; as mentioned above, certain fields may be absent depending on the scenario.
For instance, when annotating with rectangles, the Number of points field will not appear, and if annotating a single class, the Labels selector will be omitted.
To access Single Shape mode, open the job, navigate to the top right corner, and from the drop-down menu, select Single Shape.
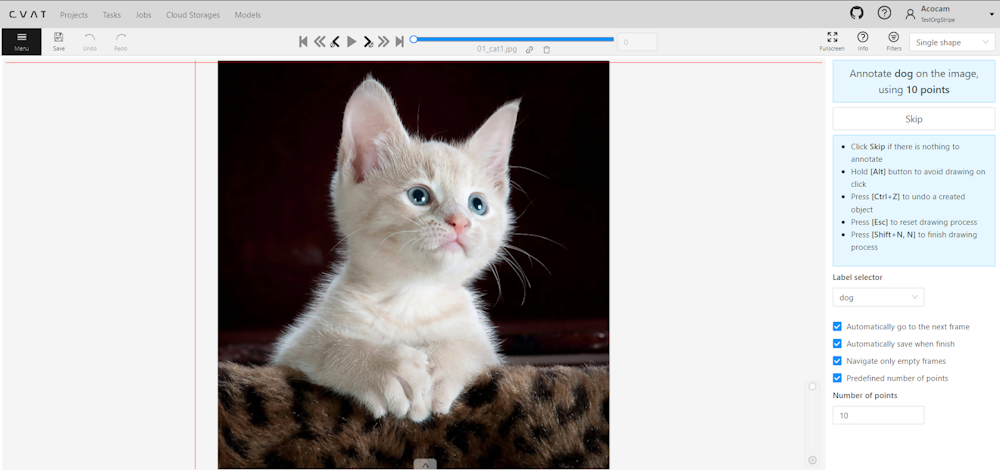
The interface will be different if the shape type was set to Any in the label Constructor:
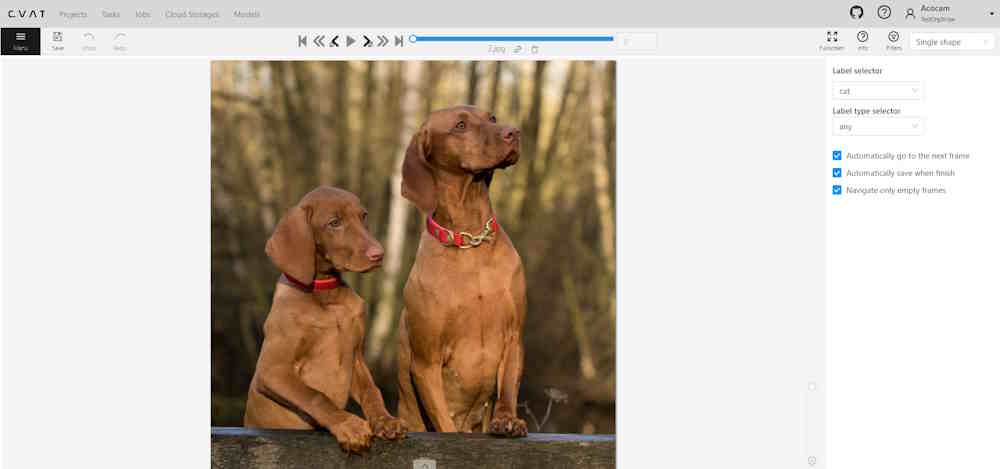
The Single Shape annotation mode has the following fields:
| Feature | Explanation |
|---|---|
| Prompt for Shape and Label | Displays the selected shape and label for the annotation task, for example: “Annotate cat on the image using rectangle”. |
| Skip Button | Enables moving to the next frame without annotating the current one, particularly useful when the frame does not have anything to be annotated. |
| List of Hints | Offers guidance on using the interface effectively, including: - Click Skip for frames without required annotations. - Hold the Alt button to avoid unintentional drawing (e.g. when you want only move the image). - Use the Ctrl+Z combination to undo the last action if needed. - Use the Esc button to completely reset the current drawing progress. |
| Label selector | Allows for the selection of different labels (cat, or dog in our example) for annotation within the interface. |
| Label type selector | A drop-down list to select type of the label (rectangle, ellipse, etc). Only visible when the type of the shape is Any. |
| Options to Enable or Disable | Provides configurable options to streamline the annotation process, such as: - Automatically go to the next frame. - Automatically save when finish. - Navigate only empty frames. - Predefined number of points - Specific to polyshape annotations, enabling this option auto-completes a shape once a predefined number of points is reached. Otherwise, pressing N is required to finalize the shape. |
| Number of Points | Applicable for polyshape annotations, indicating the number of points to use for image annotation. |
Annotating in Single Shape mode
To annotate in Single Shape mode, follow these steps:
- Open the job and switch to Single Shape mode.
- Annotate the image based on the selected shape. For more information on shapes, see Annotation Tools.
- (Optional) If the image does not contain any objects to annotate, click Skip at the top of the right panel.
- Submit your work.
Query parameters
Also, we introduced additional query parameters, which you may append to the job link, to initialize the annotation process and automate workflow:
| Query Parameter | Possible Values | Explanation |
|---|---|---|
defaultWorkspace |
Workspace identifier (e.g., single_shape, tags, review, attributes) |
Specifies the workspace to be used initially, streamlining the setup for different annotation tasks. |
defaultLabel |
A string representation of a label (label name) | Sets a default label for the annotation session, facilitating consistency across similar tasks. |
defaultPointsCount |
Integer - number of points for polyshapes | Defines a preset number of points for polyshape annotations, optimizing the annotation process. |
You can combine these parameters to customize the workspace for an annotator, for example:
/tasks/<tid>/jobs/<jid>?defaultWorkspace=single_shape&defaultLabel=dog&defaultPointsCount=10
Will open the following job:
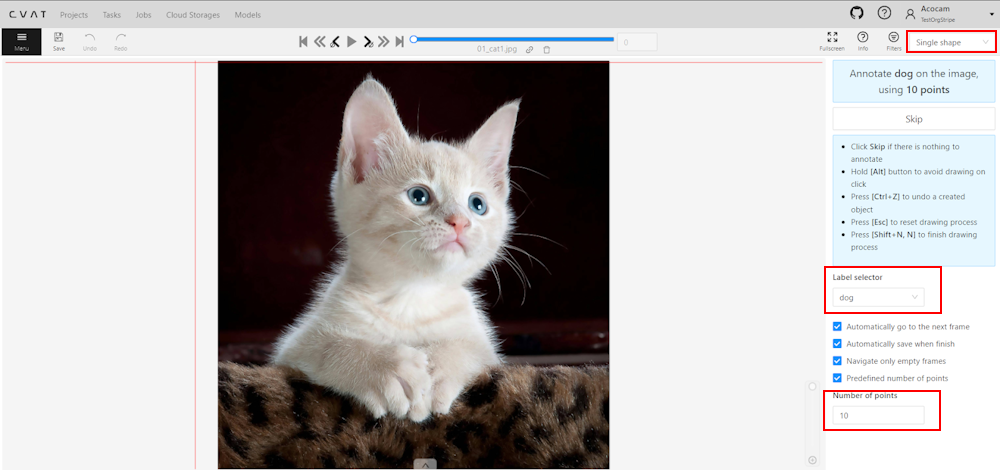
Video tutorial
For a better understanding of how Single Shape mode operates, we recommend watching the following tutorial.
6.2.1.2 - Track mode
Usage examples and basic operations available during annotation in track mode.
Usage examples:
- Create new annotations for a sequence of frames.
- Add/modify/delete objects for existing annotations.
- Edit tracks, merge several rectangles into one track.
-
Like in the
Shape mode, you need to select aRectangleon the sidebar, in the appearing form, select the desiredLabeland theDrawing method.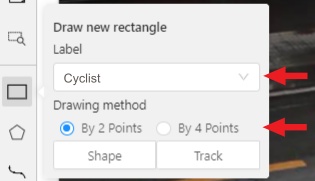
-
Creating a track for an object (look at the selected car as an example):
-
Create a
RectangleinTrack modeby selectingTrack.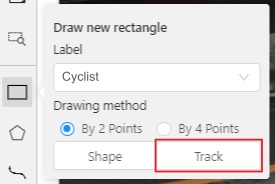
-
In
Track mode, the rectangle will be automatically interpolated on the next frames. -
The cyclist starts moving on frame #2270. Let’s mark the frame as a key frame. You can press
Kfor that or select thestarbutton (see the screenshot below).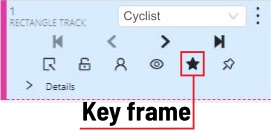
-
If the object starts to change its position, you need to modify the rectangle where it happens. It isn’t necessary to change the rectangle on each frame, simply update several keyframes and the frames between them will be interpolated automatically.
-
Let’s jump 30 frames forward and adjust the boundaries of the object. See an example below:

-
After that the rectangle of the object will be changed automatically on frames 2270 to 2300:

-
-
When the annotated object disappears or becomes too small, you need to finish the track. You have to choose
Outside Property, shortcutO.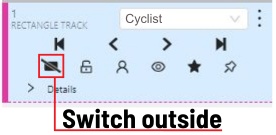
-
If the object isn’t visible on a couple of frames and then appears again, you can use the
Mergefeature to merge several individual tracks into one.
-
Create tracks for moments when the cyclist is visible:

-
Select
Mergebutton or press keyMand select on any rectangle of the first track and on any rectangle of the second track and so on: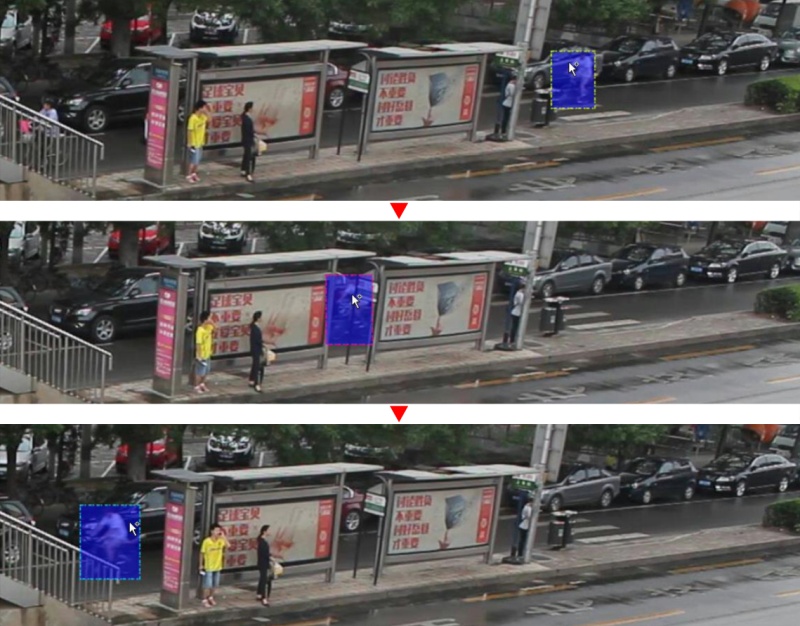
-
Select
Mergebutton or pressMto apply changes. -
The final annotated sequence of frames in
Interpolationmode can look like the clip below:
-
Shapes that were created in the track mode, have extra navigation buttons.
-
These buttons help to jump to the previous/next keyframe.
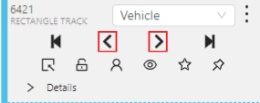
-
The button helps to jump to the initial frame and to the last keyframe.
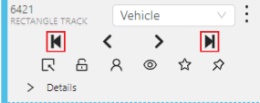
You can use the Split function to split one track into two tracks:
6.2.1.3 - Attribute annotation mode
Usage examples and basic operations available in attribute annotation mode.
-
In this mode, you can edit attributes with fast navigation between objects and frames using a keyboard. Open the drop-down list in the top panel and select Attribute annotation.
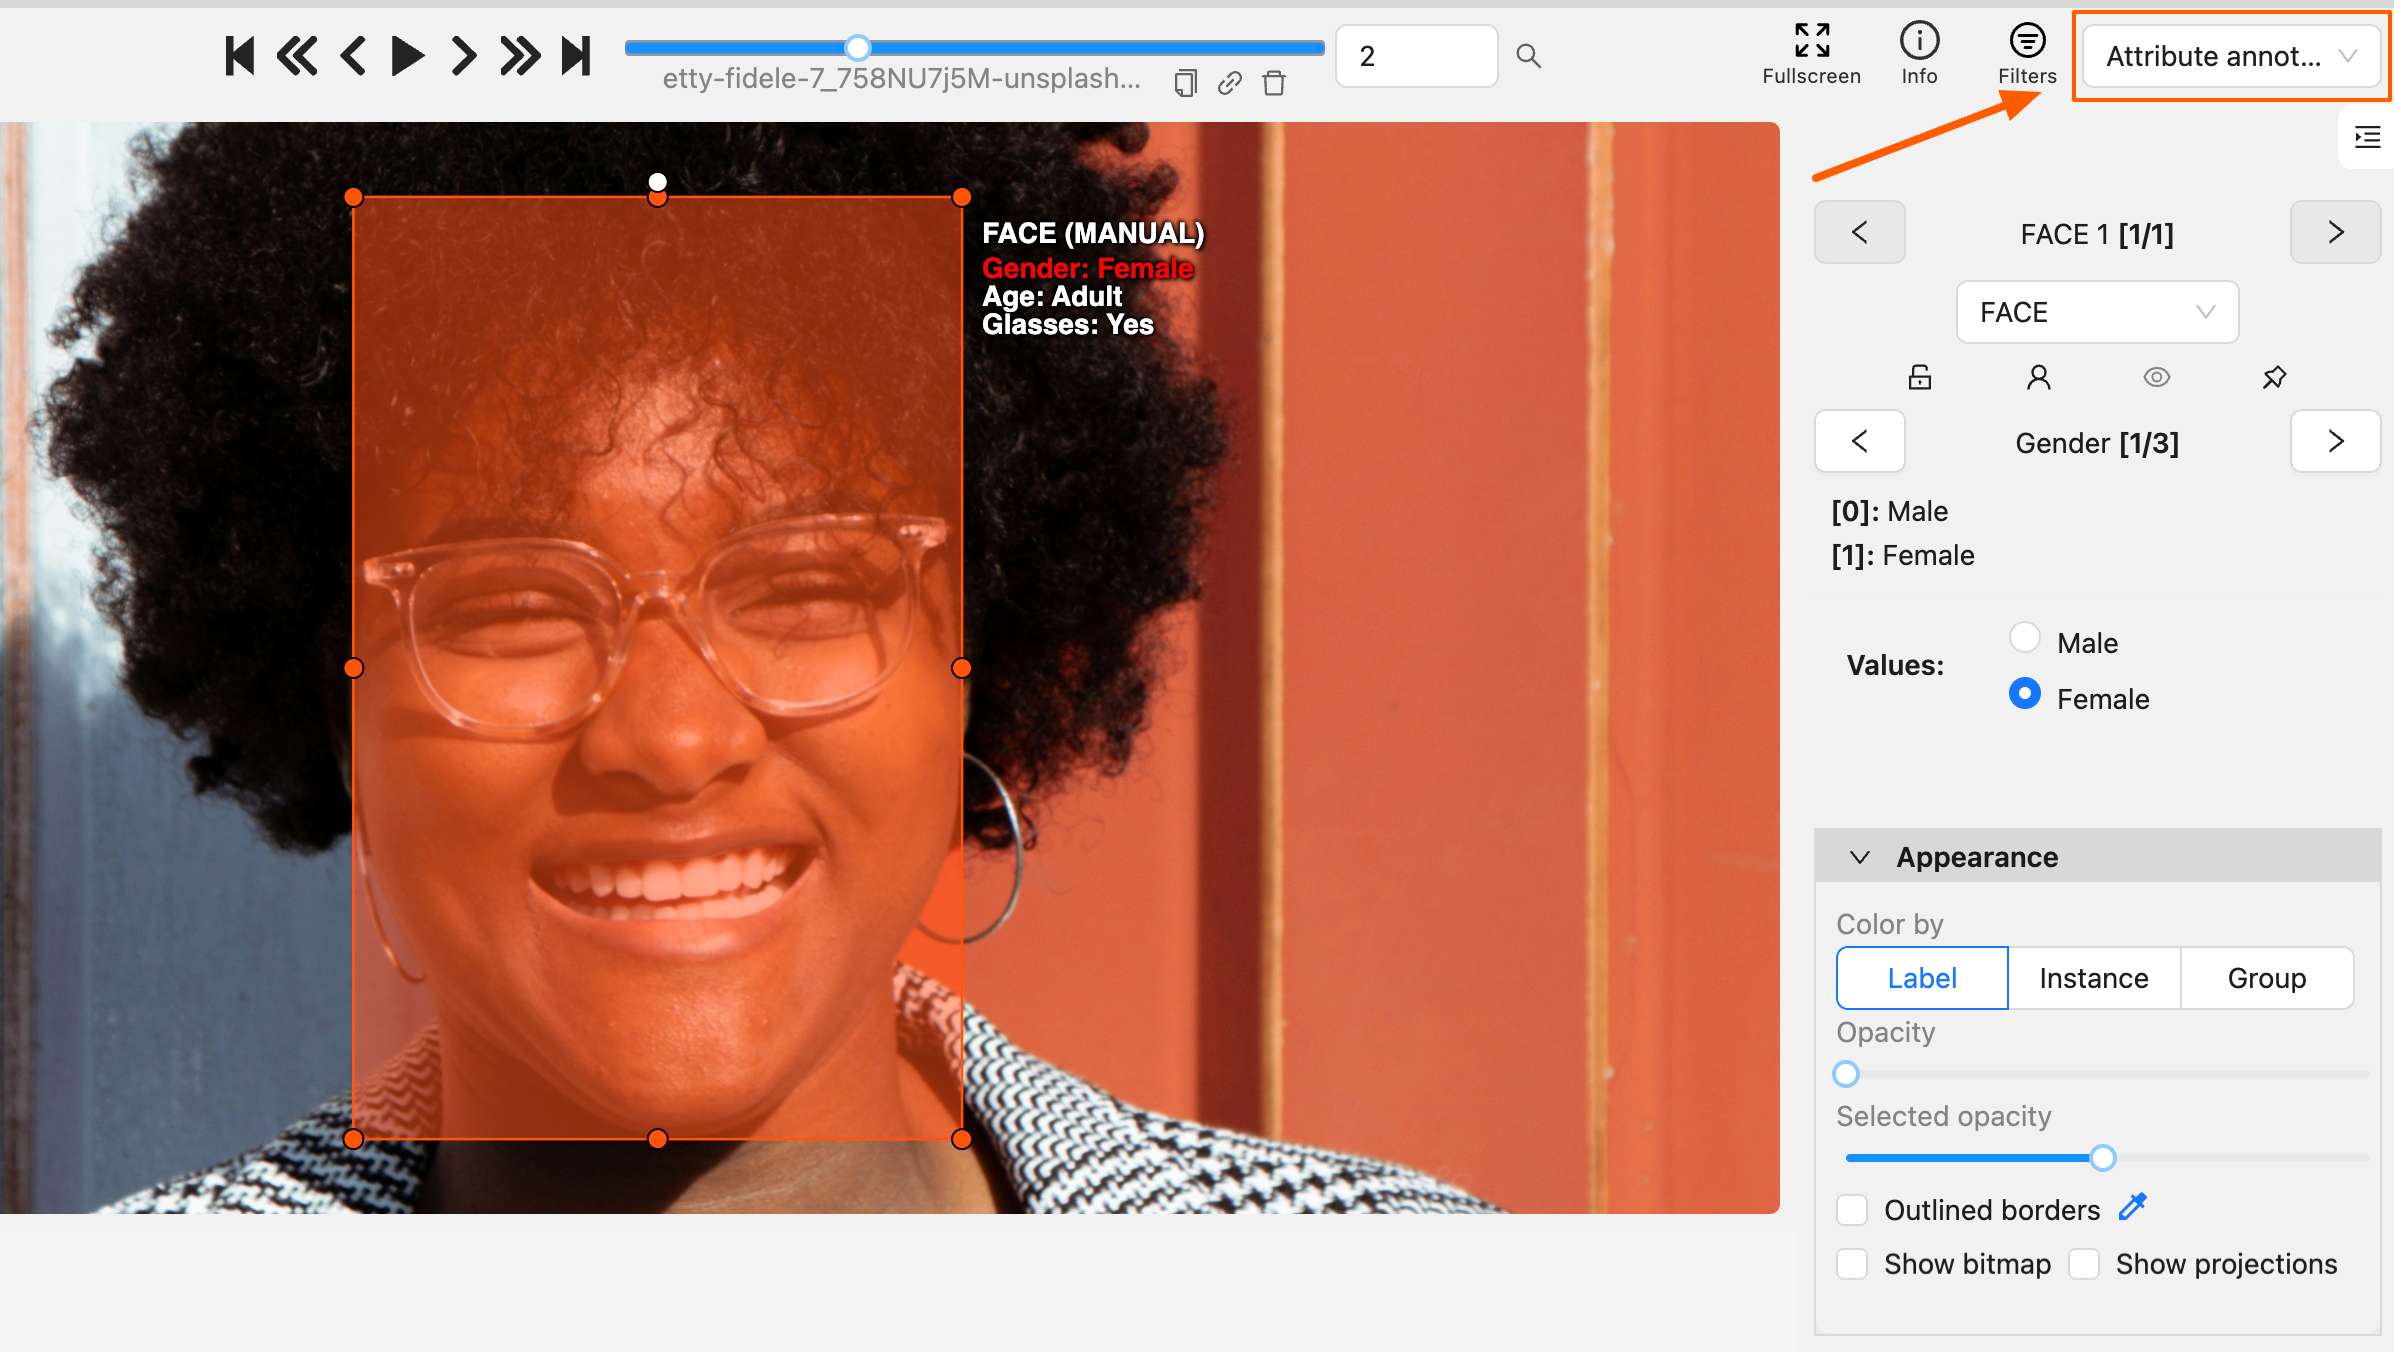
-
In this mode, objects panel change to a special panel:
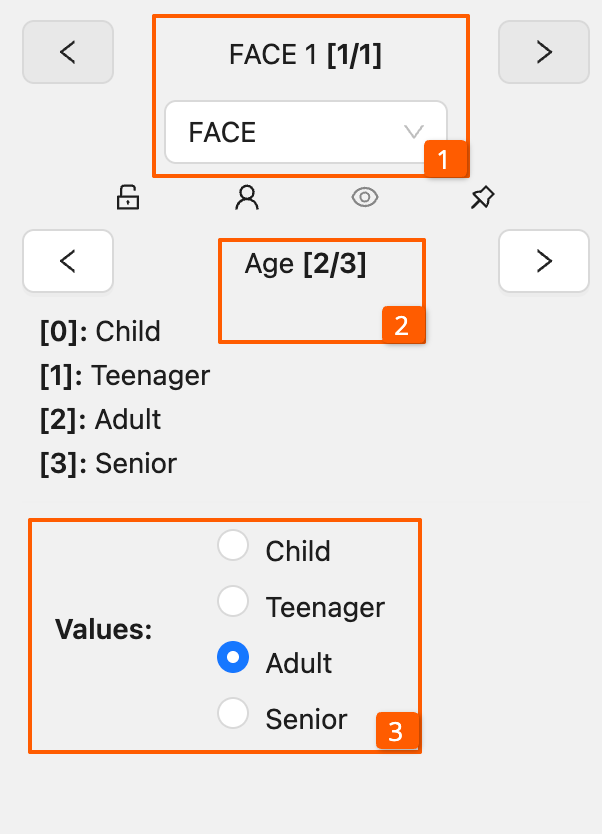
-
The active attribute will be red. In this case, it is
gender. Look at the bottom side panel to see all possible shortcuts for changing the attribute. Press key2on your keyboard to assign a value (female) for the attribute or select from the drop-down list.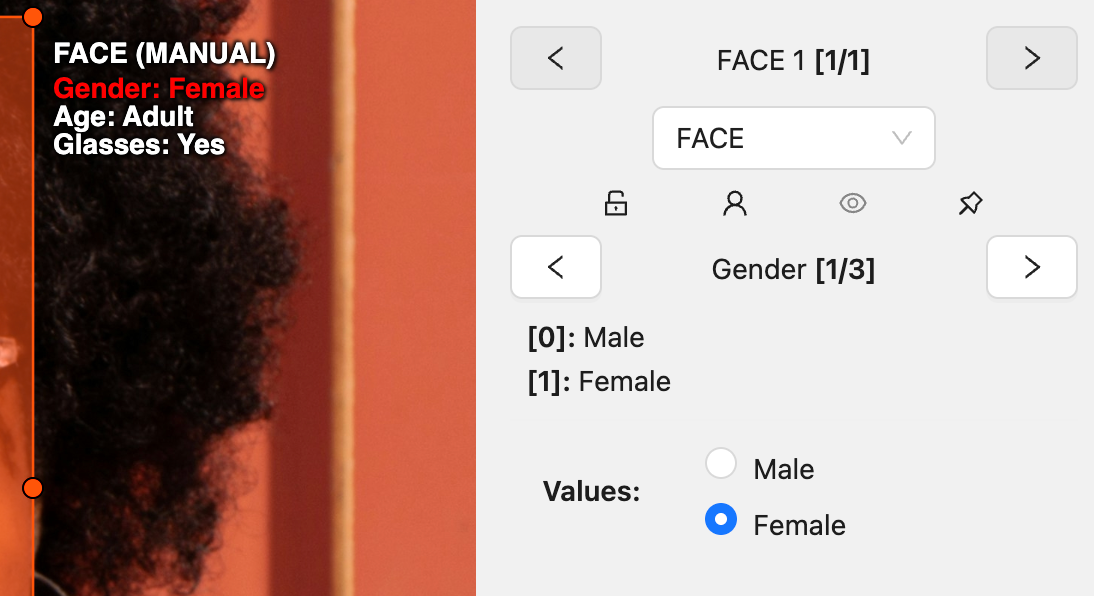
-
Press
Up Arrow/Down Arrowon your keyboard or select the buttons in the UI to go to the next/previous attribute. In this case, after pressingDown Arrowyou will be able to edit theAgeattribute.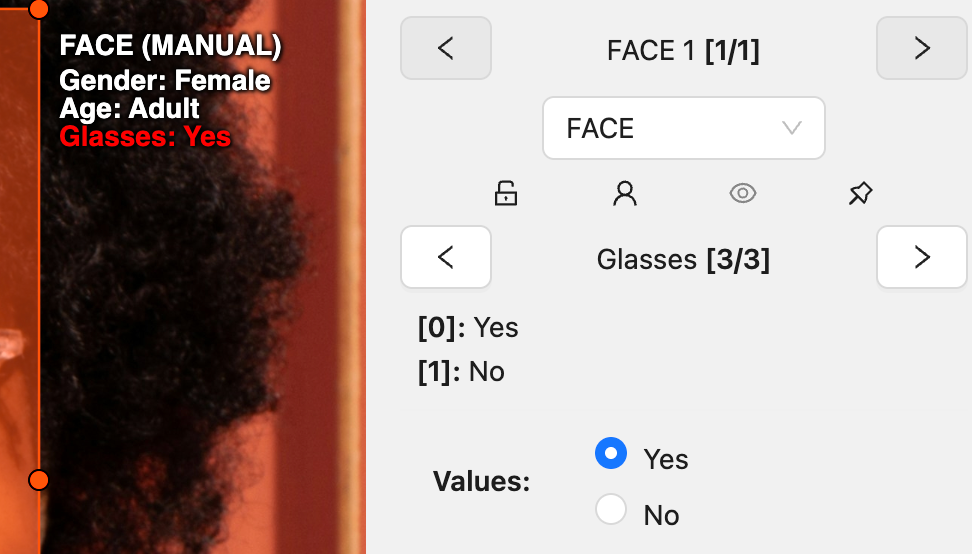
-
Use
Right Arrow/Left Arrowkeys to move to the previous/next image with annotation.
To display all the hot keys available in the attribute annotation mode, press F2.
It is possible to handle lots of objects on the same frame in the mode.
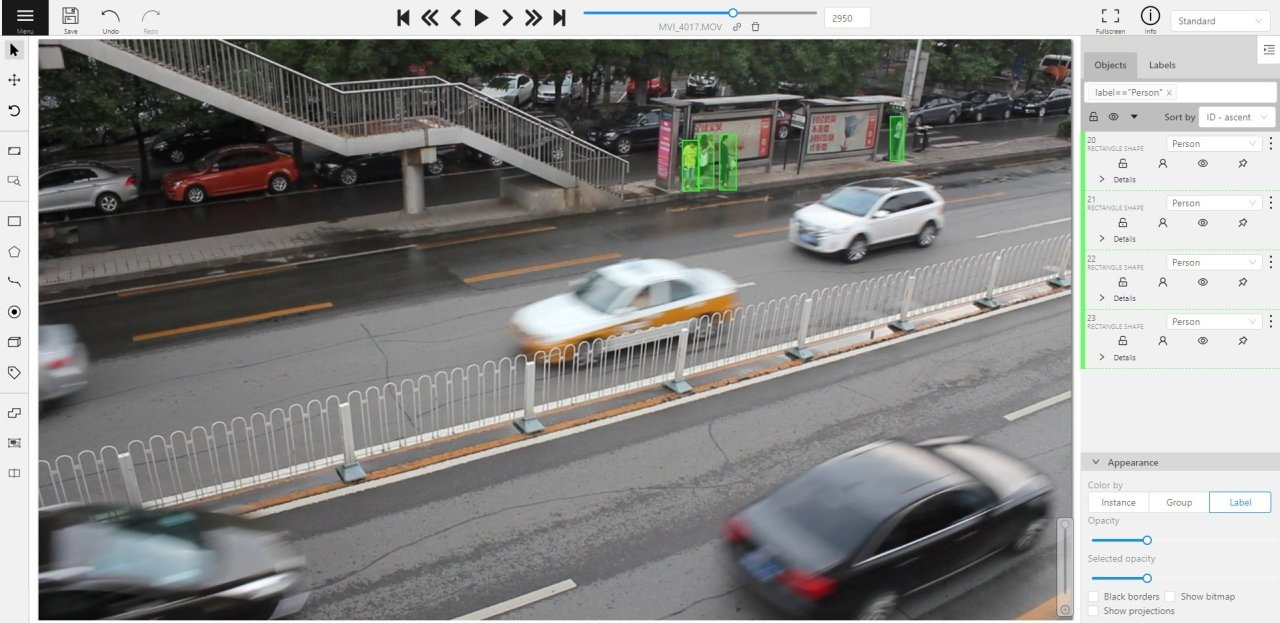
It is more convenient to annotate objects of the same type. In this case you can apply
the appropriate filter. For example, the following filter will
hide all objects except person: label=="Person".
To navigate between objects (person in this case),
use the following buttons switch between objects in the frame on the special panel:
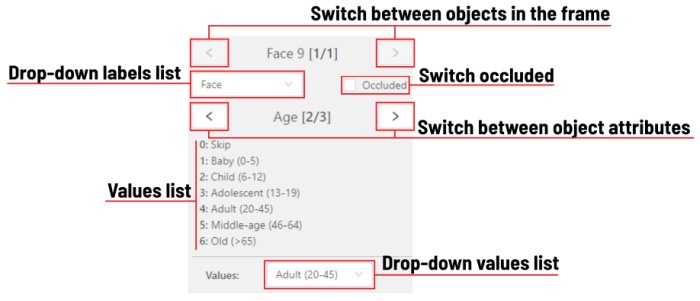
or shortcuts:
Tab— go to the next objectShift+Tab— go to the previous object.
In order to change the zoom level, go to settings (press F3) in the workspace tab and set the value Attribute annotation mode (AAM) zoom margin in px.
6.2.1.4 - 3D object annotation
Overview of basic operations available when annotating 3D objects.
Use the 3D Annotation tool for labeling 3D objects and scenes, such as vehicles, buildings, landscapes, and others.
Check out:
Navigation
The 3D annotation canvas looks like the following:
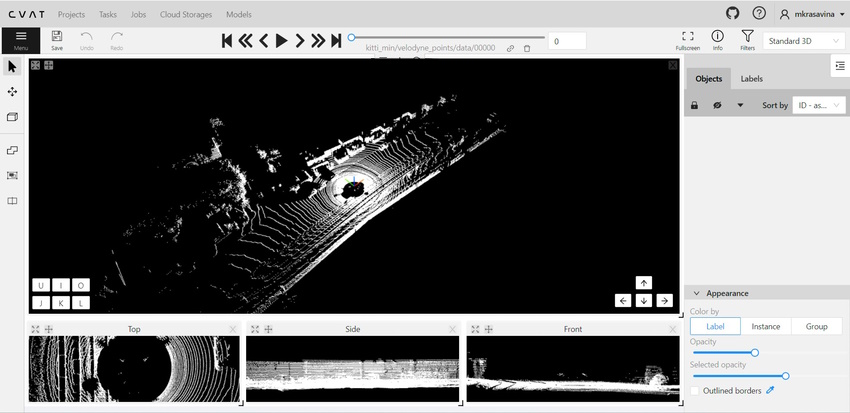
Note
If you added contextual images to the dataset, the canvas will include them. For more information, consult Contextual imagesFor information on the available tools, consult Controls sidebar.
You can navigate, using the mouse, or navigation keys:

You can also use keyboard shortcuts to navigate:
| Action | Keys |
|---|---|
| Camera rotation | Shift + Arrow (Up, Down, Left, Right) |
| Left/Right | Alt+J/ Alt+L |
| Up/down | Alt+U/ Alt+O |
| Zoom in/ou | Alt+K/ Alt+I |
Annotation with cuboids
There are two options available for 3D annotation:
- Shape: for tasks like object detection.
- Track: uses interpolation to predict the position of objects in subsequent frames. A unique ID will be assigned to each object and maintained throughout the sequence of images.
Annotation with shapes
To add a 3D shape:
-
On the objects pane, select Draw new cuboid > select the label from the drop-down list > Shape.
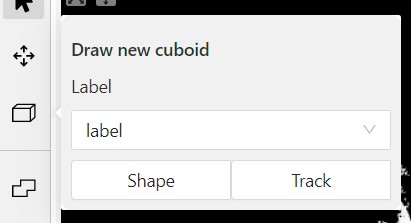
-
The cursor will be followed by a cuboid. Place the cuboid on the 3D scene.
-
Use projections to adjust the cuboid. Click and hold the left mouse button to edit the label shape on the projection.
-
(Optional) Move one of the four points to change the size of the cuboid.

-
(Optional) To rotate the cuboid, select the middle point and then drag the cuboid up/down or to left/right.

Tracking with cuboids
To track with cuboids:
-
On the objects pane, select Draw new cuboid > select the label from the drop-down list > Track.
-
The cursor will be followed by a cuboid. Place the cuboid on the 3D scene.
-
Use projections to adjust the cuboid. Select and hold the left mouse button to edit the label shape on the projection.
-
(Optional) Move one of the four points to change the size of the cuboid.
-
(Optional) To rotate the cuboid, click on the middle point and then drag the cuboid up/down or to left/right.
-
Move several frames forward. You will see the cuboid you’ve added in frame 1. Adjust it, if needed.
-
Repeat to the last frame with the presence of the object you are tracking.
For more information about tracking, consult Track mode.
As well as 2D-task objects, 3D-task objects support the ability to change appearance, attributes, properties and have an action menu. Read more in objects sidebar section.
Moving an object
If you hover the cursor over a cuboid and press Shift+N, the cuboid will be cut,
so you can paste it in other place (double-click to paste the cuboid).
Copying
As well as in 2D task you can copy and paste objects by Ctrl+C and Ctrl+V,
but unlike 2D tasks you have to place a copied object in a 3D space (double click to paste).
Image of the projection window
You can copy or save the projection-window image by left-clicking on it and selecting a “save image as” or “copy image”.
Cuboid orientation
The feature enables or disables the display of cuboid orientation arrows in the 3D space. It is controlled by a checkbox located in the appearance block. When enabled, arrows representing the cuboid’s axis orientation (X - red, Y - green, Z - blue) are displayed, providing a visual reference for the cuboid’s alignment within the 3D environment. This feature is useful for understanding the spatial orientation of the cuboid.
Cuboid size input
The size input feature allows users to manually specify the dimensions of a cuboid in the 3D space. This feature is accessible through the objects sidebar - details panel, where you can input precise values for the width, height, and length (X - width, Y - height, Z - length) of the cuboid. By entering these values, the cuboid’s size is adjusted accordingly to its orientation, providing greater control and accuracy when annotating objects in 3D tasks.
6.2.1.5 - Annotation with tags
It is used to annotate frames, tags are not displayed in the workspace.
Before you start, open the drop-down list in the top panel and select Tag annotation.
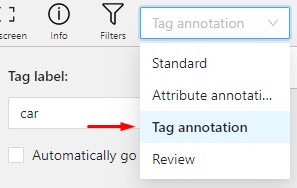
The objects sidebar will be replaced with a special panel for working with tags.
Here you can select a label for a tag and add it by clicking on the Plus button.
You can also customize hotkeys for each label.
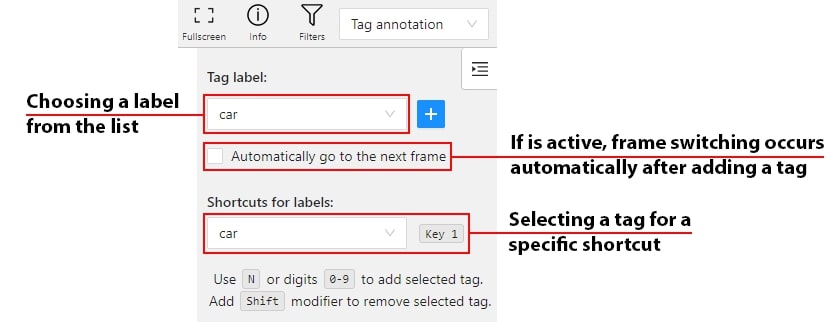
If you need to use only one label for one frame, then enable the Automatically go to the next frame
checkbox, then after you add the tag the frame will automatically switch to the next.
Tags will be shown in the top left corner of the canvas. You can show/hide them in the settings.
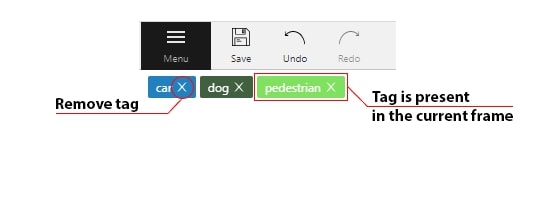
6.2.2 - Annotation with shapes
Overview of object types supported in CVAT for annotation.
This section describes all shapes you can create in CVAT. Each shape type supports its own tools, editing options, and use cases.
Review these pages to choose the correct shape tool for your annotation task.
6.2.2.1 - Annotation with rectangles
To learn more about annotation using a rectangle, see the sections:
Rotation rectangle
To rotate the rectangle, pull on the rotation point. Rotation is done around the center of the rectangle.
To rotate at a fixed angle (multiple of 15 degrees),
hold shift. In the process of rotation, you can see the angle of rotation.

Annotation with rectangle by 4 points
It is an efficient method of bounding box annotation, proposed here. Before starting, you need to make sure that the drawing method by 4 points is selected.
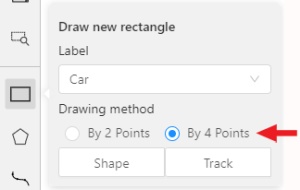
Press Shape or Track for entering drawing mode. Click on four extreme points:
the top, bottom, left- and right-most physical points on the object.
Drawing will be automatically completed right after clicking the fourth point.
Press Esc to cancel editing.

6.2.2.2 - Shape mode
Usage examples and basic operations available during annotation in shape mode.
Usage examples:
- Create new annotations for a set of images.
- Add/modify/delete objects for existing annotations.
-
You need to select
Rectangleon the controls sidebar: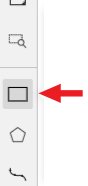
Before you start, select the correct
Label(should be specified by you when creating the task) andDrawing Method(by 2 points or by 4 points):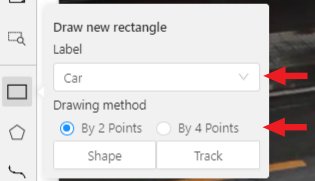
-
Creating a new annotation in
Shape mode:-
Create a separate
Rectangleby selectingShape.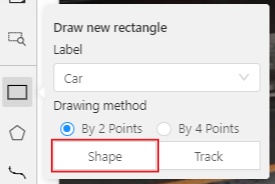
-
Choose the opposite points. Your first rectangle is ready!

-
To learn more about creating a rectangle read here.
-
It is possible to adjust boundaries and location of the rectangle using a mouse. The rectangle’s size is shown in the top right corner, you can check it by selecting any point of the shape. You can also undo your actions using
Ctrl+Zand redo them withShift+Ctrl+ZorCtrl+Y.
-
-
You can see the
Object cardin the objects sidebar or open it by right-clicking on the object. You can change the attributes in the details section. You can perform basic operations or delete an object by selecting on the action menu button.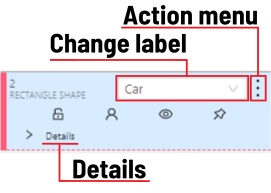
-
The following figure is an example of a fully annotated frame with separate shapes.
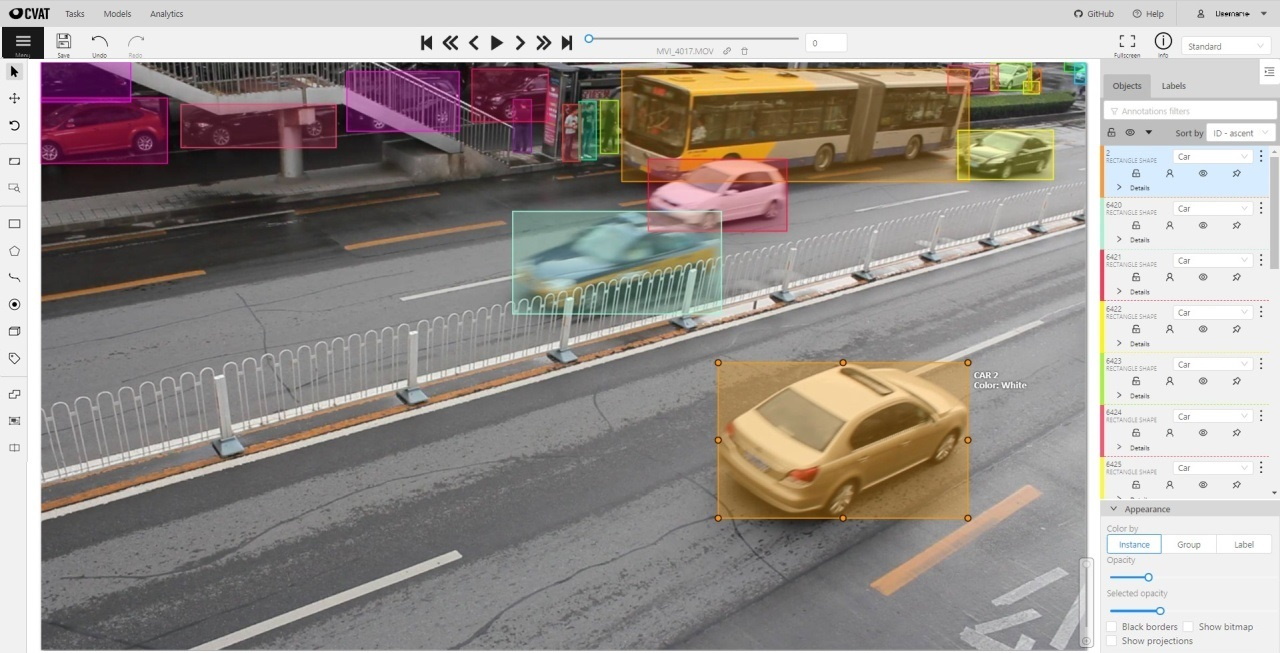
Occluded
Occlusion is an attribute used if an object is occluded by another object or
isn’t fully visible on the frame. Use Q shortcut to set the property
quickly.

Example: the three cars on the figure below should be labeled as occluded.

If a frame contains too many objects and it is difficult to annotate them
due to many shapes placed mostly in the same place, it makes sense
to lock them. Shapes for locked objects are transparent, and it is easy to
annotate new objects. Besides, you can’t change previously annotated objects
by accident. Shortcut: L.

6.2.2.3 - Annotation with polygons
Guide to creating and editing polygons.
6.2.2.3.1 - Manual drawing
It is used for semantic / instance segmentation.
Before starting, you need to select Polygon on the controls sidebar and choose the correct Label.
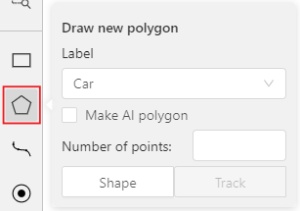
- Click
Shapeto enter drawing mode. There are two ways to draw a polygon: either create points by clicking or by dragging the mouse on the screen while holdingShift.
| Clicking points | Holding Shift+Dragging |
|---|---|
 |
 |
- When
Shiftisn’t pressed, you can zoom in/out (when scrolling the mouse wheel) and move (when clicking the mouse wheel and moving the mouse), you can also delete the previous point by right-clicking on it. - You can use the
Selected opacityslider in theObjects sidebarto change the opacity of the polygon. You can read more in the Objects sidebar section. - Press
Nagain or click theDonebutton on the top panel for completing the shape. - After creating the polygon, you can move the points or delete them by right-clicking and selecting
Delete pointor clicking with pressedAltkey in the context menu.
6.2.2.3.2 - Drawing using automatic borders
You can use auto borders when drawing a polygon. Using automatic borders allows you to automatically trace the outline of polygons existing in the annotation.
-
To do this, go to settings -> workspace tab and enable
Automatic Borderingor pressCtrlwhile drawing a polygon.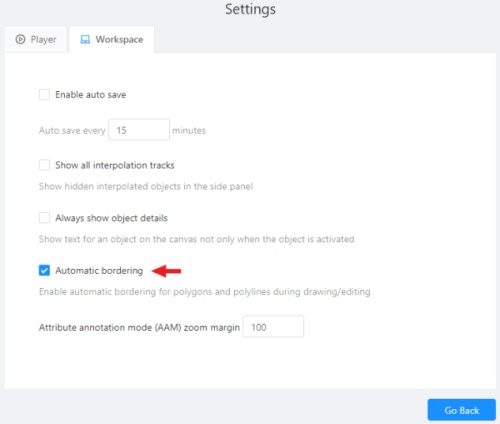
-
Start drawing / editing a polygon.
-
Points of other shapes will be highlighted, which means that the polygon can be attached to them.
-
Define the part of the polygon path that you want to repeat.
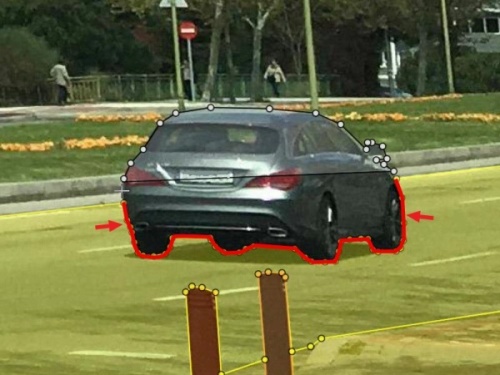
-
Click on the first point of the contour part.
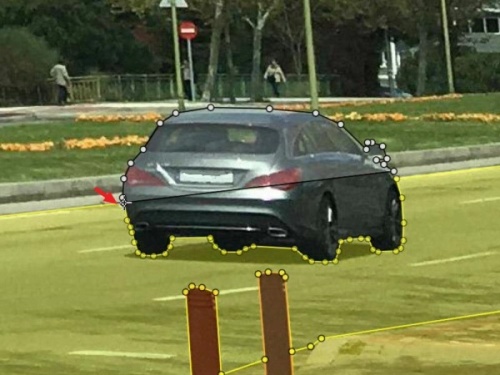
-
Then click on any point located on part of the path. The selected point will be highlighted in purple.
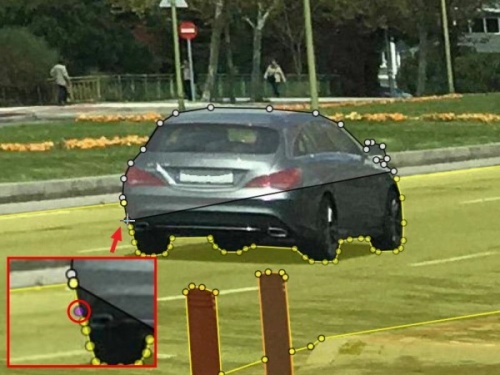
-
Click on the last point and the outline to this point will be built automatically.
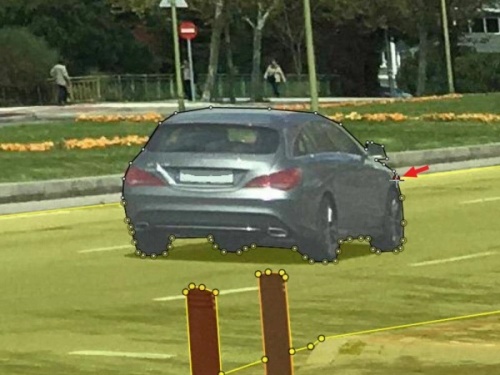
Besides, you can set a fixed number of points in the Number of points field, then
drawing will be stopped automatically. To enable dragging you should right-click
inside the polygon and choose Switch pinned property.
Below you can see results with opacity and black stroke:

If you need to annotate small objects, increase Image Quality to
95 in Create task dialog for your convenience.
6.2.2.3.3 - Edit polygon
To edit a polygon you have to click on it while holding Shift, it will open the polygon editor.
-
In the editor you can create new points or delete part of a polygon by closing the line on another point.
-
When
Intelligent polygon croppingoption is activated in the settings, CVAT considers two criteria to decide which part of a polygon should be cut off during automatic editing.- The first criteria is a number of cut points.
- The second criteria is a length of a cut curve.
If both criteria recommend to cut the same part, algorithm works automatically, and if not, a user has to make the decision. If you want to choose manually which part of a polygon should be cut off, disable
Intelligent polygon croppingin the settings. In this case after closing the polygon, you can select the part of the polygon you want to leave.
-
You can press
Escto cancel editing.
6.2.2.3.4 - Track mode with polygons
Polygons in the track mode allow you to mark moving objects more accurately other than using a rectangle.
-
To create a polygon in the track mode, click the
Trackbutton.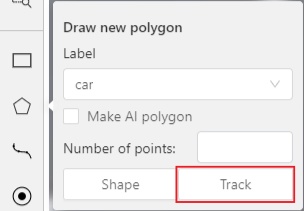
-
Create a polygon the same way as in the case of Annotation with polygons. Press
Nor click theDonebutton on the top panel to complete the polygon. -
Pay attention to the fact that the created polygon has a starting point and a direction, these elements are important for annotation of the following frames.
-
After going a few frames forward press
Shift+N, the old polygon will disappear and you can create a new polygon. The new starting point should match the starting point of the previously created polygon (in this example, the top of the left mirror). The direction must also match (in this example, clockwise). After creating the polygon, pressNand the intermediate frames will be interpolated automatically.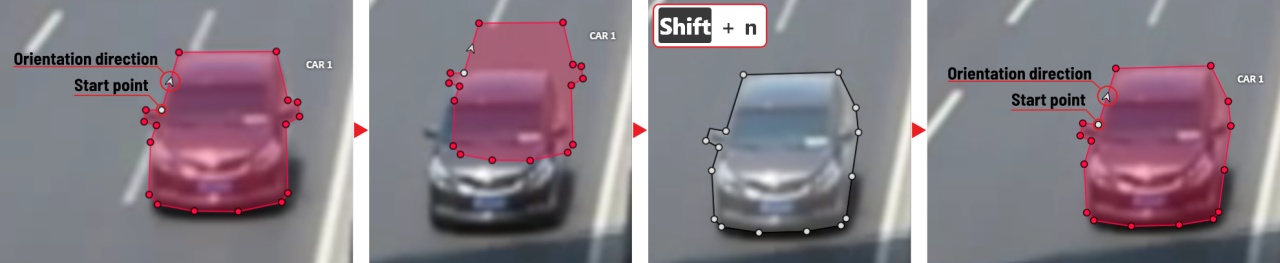
-
If you need to change the starting point, right-click on the desired point and select
Set starting point. To change the direction, right-click on the desired point and select switch orientation.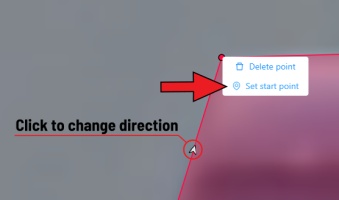
There is no need to redraw the polygon every time using Shift+N,
instead you can simply move the points or edit a part of the polygon by pressing Shift+Click.
6.2.2.3.5 - Creating masks
Cutting holes in polygons
Currently, CVAT does not support cutting transparent holes in polygons. However, it is possible to generate holes in exported instance and class masks. To do this, one needs to define a background class in the task and draw holes with it as additional shapes above the shapes needed to have holes:
The editor window:
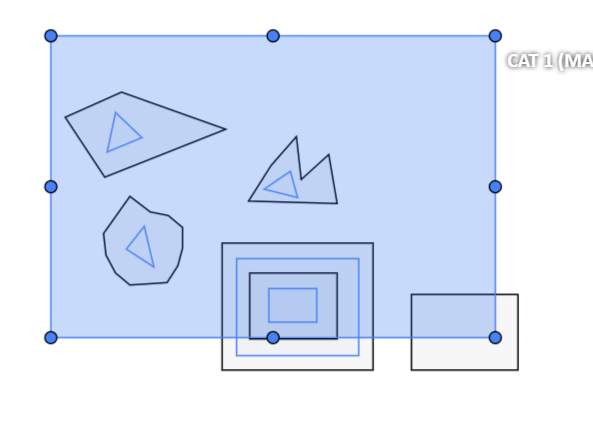
Remember to use z-axis ordering for shapes by [-] and [+, =] keys.
Exported masks:


Notice that it is currently impossible to have a single instance number for internal shapes (they will be merged into the largest one and then covered by “holes”).
Creating masks
There are several formats in CVAT that can be used to export masks:
Segmentation Mask(PASCAL VOC masks)CamVidMOTSICDARCOCO(RLE-encoded instance masks, guide)Datumaro
An example of exported masks (in the Segmentation Mask format):

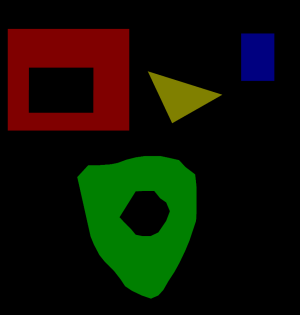
Important notices:
- Both boxes and polygons are converted into masks
- Grouped objects are considered as a single instance and exported as a single mask (label and attributes are taken from the largest object in the group)
Class colors
All the labels have associated colors, which are used in the generated masks. These colors can be changed in the task label properties:
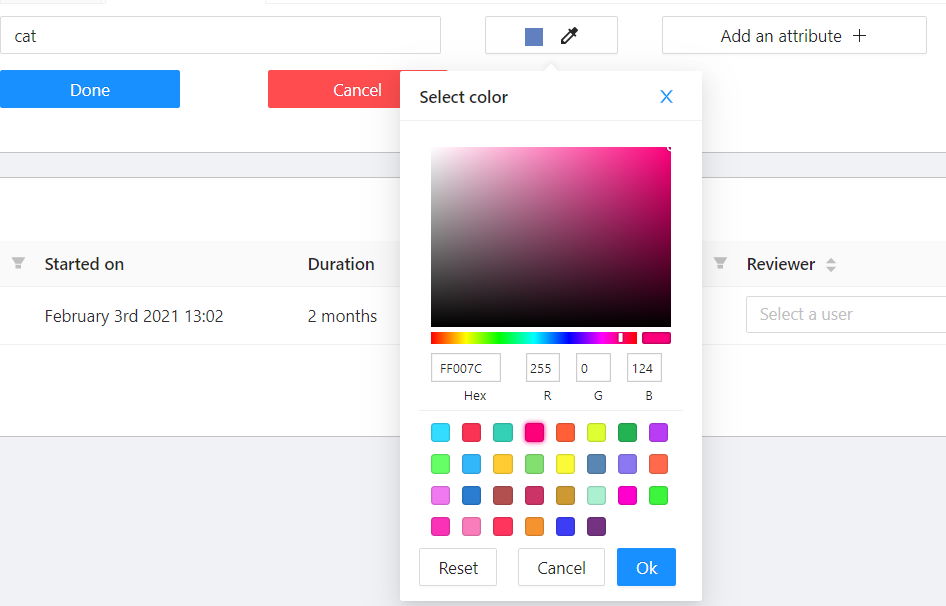
Label colors are also displayed in the annotation window on the right panel, where you can show or hide specific labels (only the presented labels are displayed):
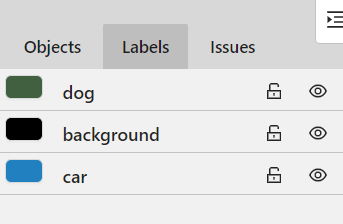
A background class can be:
- A default class, which is implicitly-added, of black color (RGB 0, 0, 0)
backgroundclass with any color (has a priority, name is case-insensitive)- Any class of black color (RGB 0, 0, 0)
To change background color in generated masks (default is black),
change background class color to the desired one.
6.2.2.4 - Annotation with polylines
Guide to annotating tasks using polylines.
It is used for road markup annotation etc.
Before starting, you need to select the Polyline. You can set a fixed number of points
in the Number of points field, then drawing will be stopped automatically.
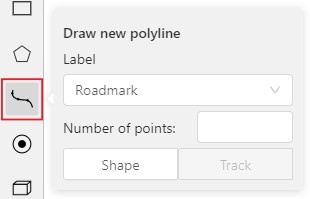
Click Shape to enter drawing mode. There are two ways to draw a polyline —
you either create points by clicking or by dragging a mouse on the screen while holding Shift.
When Shift isn’t pressed, you can zoom in/out (when scrolling the mouse wheel)
and move (when clicking the mouse wheel and moving the mouse), you can delete
previous points by right-clicking on it.
Press N again or click the Done button on the top panel to complete the shape.
You can delete a point by clicking on it with pressed Ctrl or right-clicking on a point
and selecting Delete point. Click with pressed Shift will open a polyline editor.
There you can create new points(by clicking or dragging) or delete part of a polygon closing
the red line on another point. Press Esc to cancel editing.

6.2.2.5 - Track mode
Usage examples and basic operations available during annotation in track mode.
Usage examples:
- Create new annotations for a sequence of frames.
- Add/modify/delete objects for existing annotations.
- Edit tracks, merge several rectangles into one track.
-
Like in the
Shape mode, you need to select aRectangleon the sidebar, in the appearing form, select the desiredLabeland theDrawing method. -
Creating a track for an object (look at the selected car as an example):
-
Create a
RectangleinTrack modeby selectingTrack. -
In
Track mode, the rectangle will be automatically interpolated on the next frames. -
The cyclist starts moving on frame #2270. Let’s mark the frame as a key frame. You can press
Kfor that or select thestarbutton (see the screenshot below). -
If the object starts to change its position, you need to modify the rectangle where it happens. It isn’t necessary to change the rectangle on each frame, simply update several keyframes and the frames between them will be interpolated automatically.
-
Let’s jump 30 frames forward and adjust the boundaries of the object. See an example below:
-
After that the rectangle of the object will be changed automatically on frames 2270 to 2300:
-
-
When the annotated object disappears or becomes too small, you need to finish the track. You have to choose
Outside Property, shortcutO. -
If the object isn’t visible on a couple of frames and then appears again, you can use the
Mergefeature to merge several individual tracks into one.-
Create tracks for moments when the cyclist is visible:
-
Select
Mergebutton or press keyMand select on any rectangle of the first track and on any rectangle of the second track and so on: -
Select
Mergebutton or pressMto apply changes. -
The final annotated sequence of frames in
Interpolationmode can look like the clip below:
-
Shapes that were created in the track mode, have extra navigation buttons.
-
These buttons help to jump to the previous/next keyframe.
-
The button helps to jump to the initial frame and to the last keyframe.
You can use the Split function to split one track into two tracks:
6.2.2.6 - Annotation with points
Guide to annotating tasks using single points or shapes containing multiple points.
6.2.2.6.1 - Points in shape mode
It is used for face, landmarks annotation etc.
Before you start you need to select the Points. If necessary you can set a fixed number of points
in the Number of points field, then drawing will be stopped automatically.
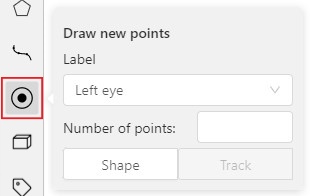
Click Shape to entering the drawing mode. Now you can start annotation of the necessary area.
Points are automatically grouped — all points will be considered linked between each start and finish.
Press N again or click the Done button on the top panel to finish marking the area.
You can delete a point by clicking with pressed Ctrl or right-clicking on a point and selecting Delete point.
Clicking with pressed Shift will open the points shape editor.
There you can add new points into an existing shape. You can zoom in/out (when scrolling the mouse wheel)
and move (when clicking the mouse wheel and moving the mouse) while drawing. You can drag an object after
it has been drawn and change the position of individual points after finishing an object.

6.2.2.6.2 - Linear interpolation with one point
You can use linear interpolation for points to annotate a moving object:
-
Before you start, select the
Points. -
Linear interpolation works only with one point, so you need to set
Number of pointsto 1. -
After that select the
Track.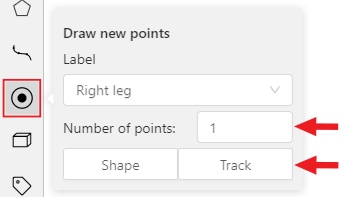
-
Click
Trackto enter the drawing mode left-click to create a point and after that shape will be automatically completed.
-
Move forward a few frames and move the point to the desired position, this way you will create a keyframe and intermediate frames will be drawn automatically. You can work with this object as with an interpolated track: you can hide it using the
Outside, move around keyframes, etc.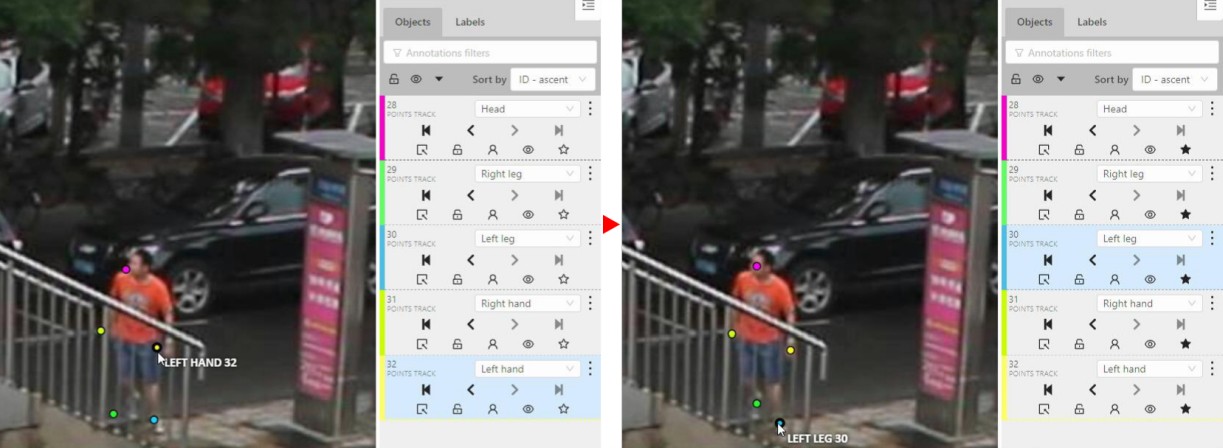
-
This way you’ll get linear interpolation using the
Points.
6.2.2.7 - Annotation with ellipses
Guide to annotating tasks using ellipses.
It is used for road sign annotation etc.
First of all you need to select the ellipse on the controls sidebar.
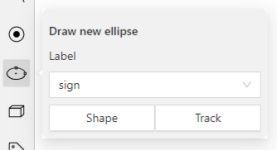
Choose a Label and click Shape or Track to start drawing. An ellipse can be created the same way as
a rectangle,
you need to specify two opposite points,
and the ellipse will be inscribed in an imaginary rectangle. Press N or click the Done button on the top panel
to complete the shape.

You can rotate ellipses using a rotation point in the same way as rectangles.
Annotation with ellipses video tutorial
6.2.2.8 - Annotation with cuboids
Guide to creating and editing cuboids.
It is used to annotate 3 dimensional objects such as cars, boxes, etc… Currently the feature supports one point perspective and has the constraint where the vertical edges are exactly parallel to the sides.
6.2.2.8.1 - Creating the cuboid
Before you start, you have to make sure that Cuboid is selected
and choose a drawing method from rectangle or by 4 points.
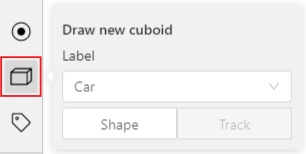
Drawing cuboid by 4 points
Choose a drawing method by 4 points and select Shape to enter the drawing mode.
There are many ways to draw a cuboid.
You can draw the cuboid by placing 4 points, after that the drawing will be completed automatically.
The first 3 points determine the plane of the cuboid while the last point determines the depth of that plane.
For the first 3 points, it is recommended to only draw the 2 closest side faces, as well as the top and bottom face.
A few examples:
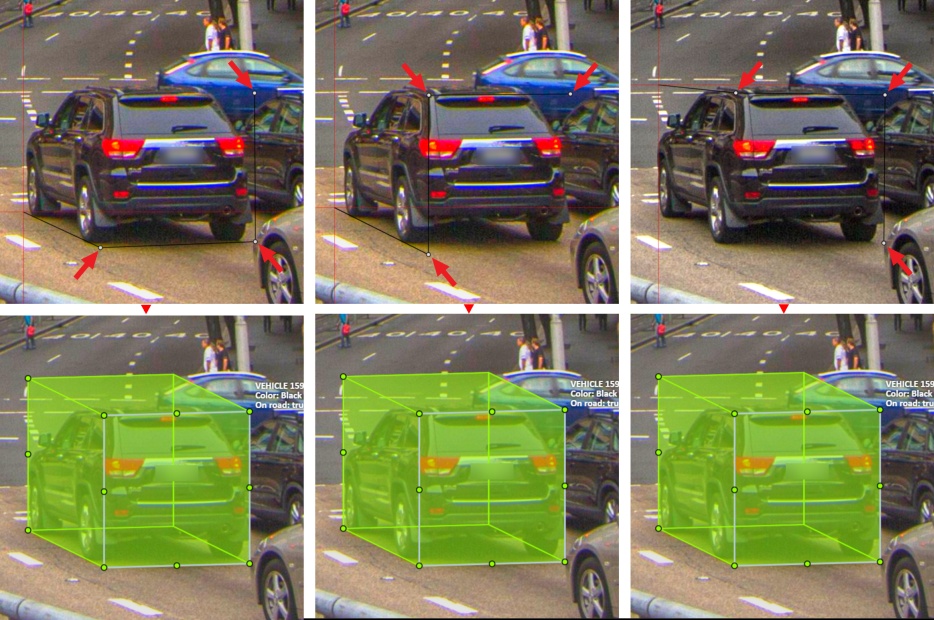
Drawing cuboid from rectangle
Choose a drawing method from rectangle and select Shape to enter the drawing mode.
When you draw using the rectangle method, you must select the frontal plane of the object using the bounding box.
The depth and perspective of the resulting cuboid can be edited.
Example:
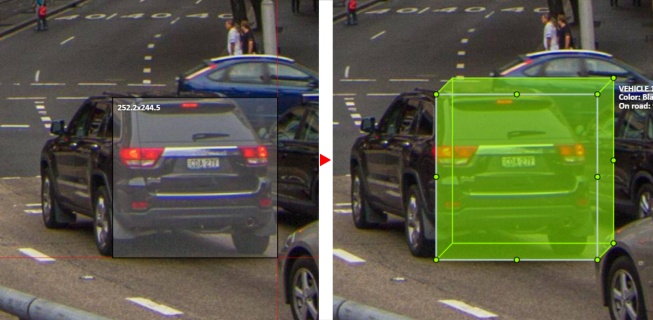
6.2.2.8.2 - Editing the cuboid
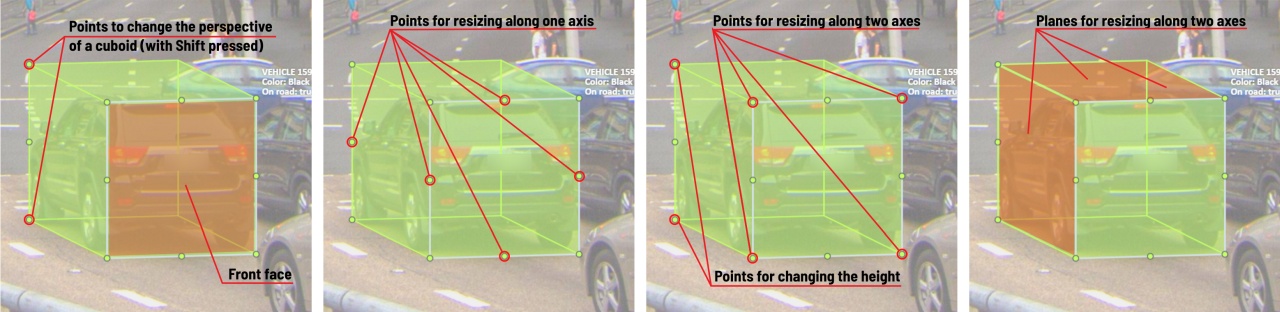
The cuboid can be edited in multiple ways: by dragging points, by dragging certain faces or by dragging planes. First notice that there is a face that is painted with gray lines only, let us call it the front face.
You can move the cuboid by simply dragging the shape behind the front face. The cuboid can be extended by dragging on the point in the middle of the edges. The cuboid can also be extended up and down by dragging the point at the vertices.

To draw with perspective effects it should be assumed that the front face is the closest to the camera.
To begin simply drag the points on the vertices that are not on the gray/front face while holding Shift.
The cuboid can then be edited as usual.

If you wish to reset perspective effects, you may right click on the cuboid,
and select Reset perspective to return to a regular cuboid.

The location of the gray face can be swapped with the adjacent visible side face.
You can do it by right clicking on the cuboid and selecting Switch perspective orientation.
Note that this will also reset the perspective effects.

Certain faces of the cuboid can also be edited, these faces are: the left, right and dorsal faces, relative to the gray face. Simply drag the faces to move them independently from the rest of the cuboid.

You can also use cuboids in track mode, similar to rectangles in track mode (basics) or
6.2.2.9 - Annotation with skeletons
Guide to annotating tasks using Skeletons
In this guide, we delve into the efficient process of annotating complex structures through the implementation of Skeleton annotations.
Skeletons serve as annotation templates for annotating complex objects with a consistent structure, such as human pose estimation or facial landmarks.
A Skeleton is composed of numerous points (also referred to as elements), which may be connected by edges. Each point functions as an individual object, possessing unique attributes and properties like color, occlusion, and visibility.
Skeletons can be exported in two formats: CVAT for image and COCO Keypoints.
Note
Skeletons’ labels cannot be imported in a label-less project by importing a dataset. You need to define the labels manually before the import.See:
- Adding Skeleton manually
- Adding Skeleton labels from the model
- Annotation with Skeletons
- Automatic annotation with Skeletons
- Editing skeletons on the canvas
- Editing skeletons on the sidebar
Adding Skeleton manually
To start annotating using skeletons, you need to set up a Skeleton task in Configurator:
To open Configurator, when creating a task, click on the Setup skeleton button if you want to set up the skeleton manually, or From model if you want to add skeleton labels from a model.
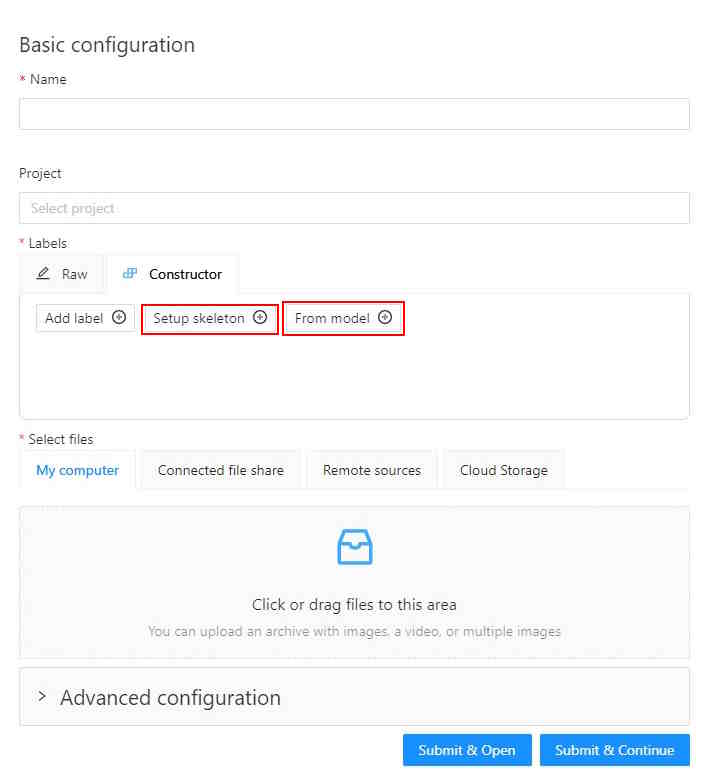
Skeleton Configurator
The skeleton Configurator is a tool to build skeletons for annotation. It has the following fields:
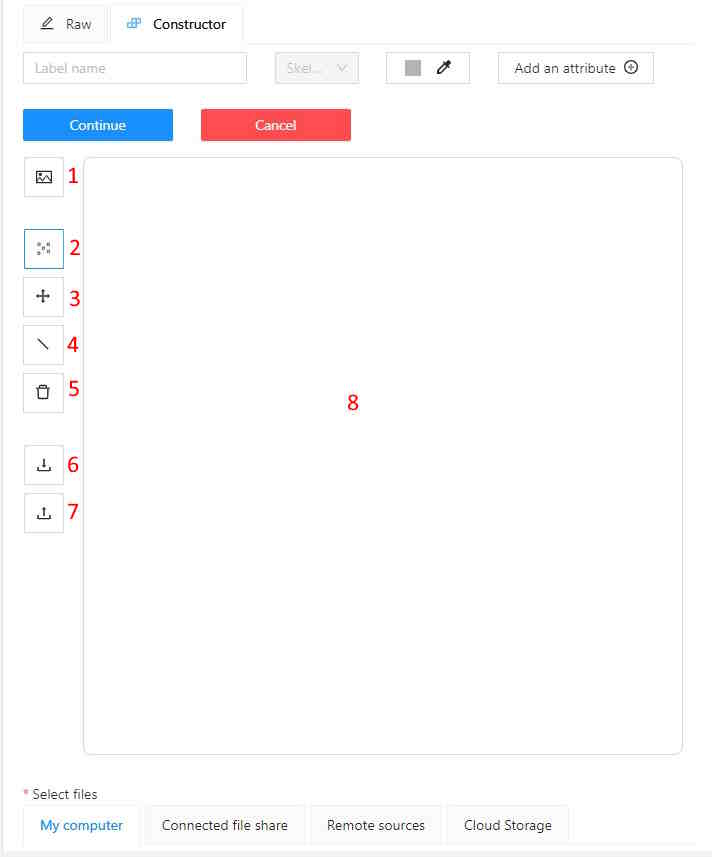
| Number | Name | Description |
|---|---|---|
| 1 | Upload background image | (Optional) Use it to upload a background image, to draw a skeleton on top of it. |
| 2 | Add point | Use it to add Skeleton points to the Drawing area (8). |
| 3 | Click and drag | Use it to move points across the Drawing area (8). |
| 4 | Add edge | Use it to add edge on the Drawing area (8) to connect the points (2). |
| 5 | Remove point | Use it to remove points. Click on Remove point and then on any point (2) on the Drawing area (8) to delete the point. |
| 6 | Download skeleton | Use it to download created skeleton in .SVG format. |
| 7 | Upload skeleton | Use it to upload skeleton in .SVG format. |
| 8 | Drawing area | Use it as a canvas to draw a skeleton. |
Configuring Skeleton points
You can name labels, set attributes, and change the color of each point of the skeleton.
To do this, right-click on the skeleton point and select Configure:
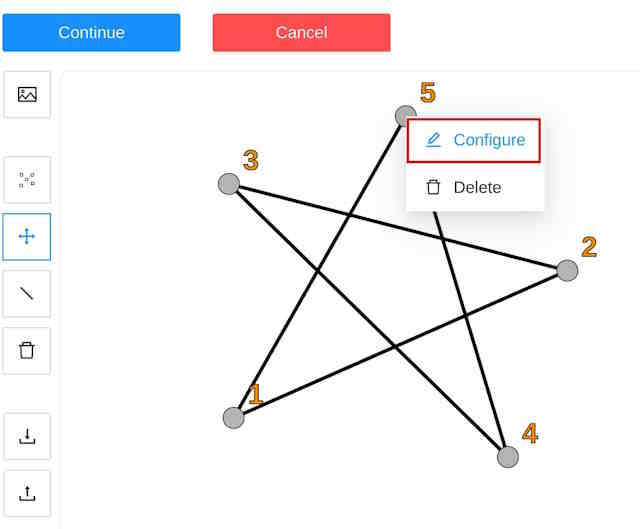
In the opened menu, you can change the point setting. It is similar to adding labels and attributes of the regular task:
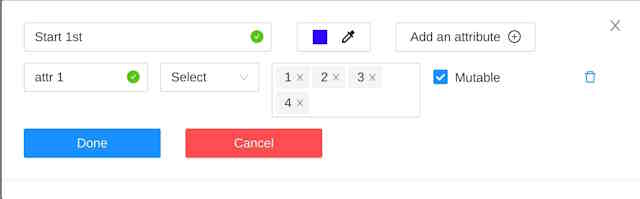
A Skeleton point can only exist within its parent Skeleton.
Note
You cannot change the skeleton configuration for an existing task/project.
You can copy/insert skeleton configuration from the Raw tab of the label configurator.
Adding Skeleton labels manually
To create the Skeleton task, do the following:
- Open Configurator.
- (Optional) Upload background image.
- In the Label name field, enter the name of the label.
- (Optional) Add attribute
Note: you can add attributes exclusively to each point, for more information, see Configuring Skeleton points - Use Add point to add points to the Drawing area.
- Use Add edge to add edges between points.
- Upload files.
- Click:
- Submit & Open to create and open the task.
- Submit & Continue to submit the configuration and start creating a new task.
Adding Skeleton labels from the model
To add points from the model, and annotate do the following:
-
Open Basic configurator.
-
On the Constructor tab, click From model.
-
From the Select a model to pick labels select the
Human pose estimationmodel or others if available. -
Click on the model’s labels, you want to use.
Selected labels will become gray.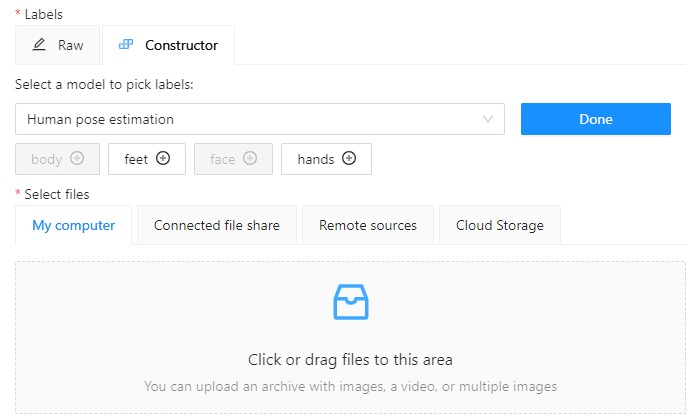
-
(Optional) If you want to adjust labels, within the label, click the Update attributes icon.
The Skeleton configurator will open, where you can configure the skeleton.
Note: Labels cannot be adjusted after the task/project is created. -
Click Done. The labels, that you selected, will appear in the labels window.
-
Upload data.
-
Click:
- Submit & Open to create and open the task.
- Submit & Continue to submit the configuration and start creating a new task.
Annotation with Skeletons
To annotate with Skeleton, do the following
-
Open job.
-
On the tools panel select Draw new skeleton.
-
Select Track to annotate with tracking or Shape to annotate without tracking.
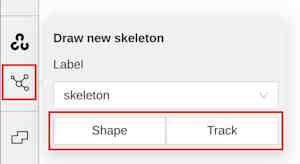
-
Draw a skeleton on the image.
Automatic annotation with Skeletons
To automatically annotate with Skeleton, do the following
-
Open the job and on the tools panel select AI Tools > Detectors
-
From the drop-down list select the model. You will see a list of points to match and the name of the skeleton on the top of the list.
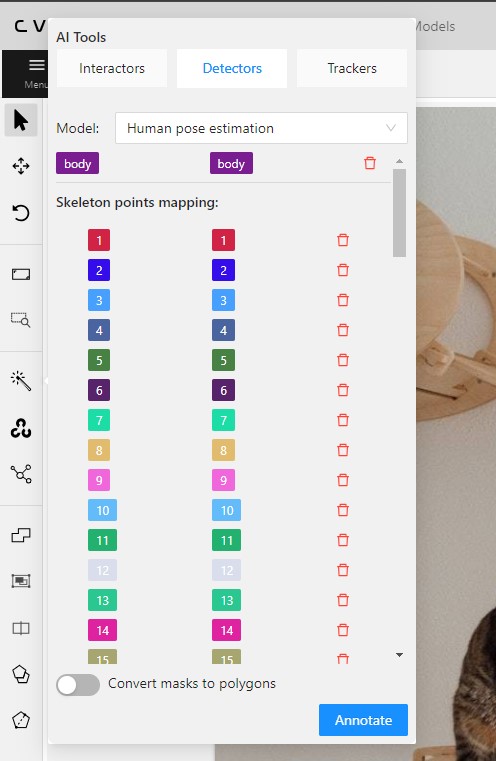
-
(Optional) By clicking on the Bin icon, you can remove any mapped item:
- A skeleton together with all points.
- Certain points from two mapped skeletons.
-
Click Annotate.
Editing skeletons on the canvas
A drawn skeleton is encompassed within a bounding box, it allows you to manipulate the skeleton as a regular bounding box, enabling actions such as dragging, resizing, or rotating:
Upon repositioning a point, the bounding box adjusts automatically, without affecting other points:

Additionally, Shortcuts are applicable to both the skeleton as a whole and its elements:
- To use a shortcut to the entire skeleton, hover over the bounding box and push the shortcut keyboard key. This action is applicable for shortcuts like the lock, occluded, pinned, keyframe, and outside for skeleton tracks.
- To use a shortcut to a specific skeleton point, hover over the point and push the shortcut keyboard key. The same list of shortcuts is available, with the addition of outside, which is also applicable to individual skeleton shape elements.
Editing skeletons on the sidebar
In CVAT, the sidebar offers an alternative method for setting up skeleton properties and attributes.
This approach is similar to that used for other object types supported by CVAT, but with a few specific alterations:
An additional collapsible section is provided for users to view a comprehensive list of skeleton parts.
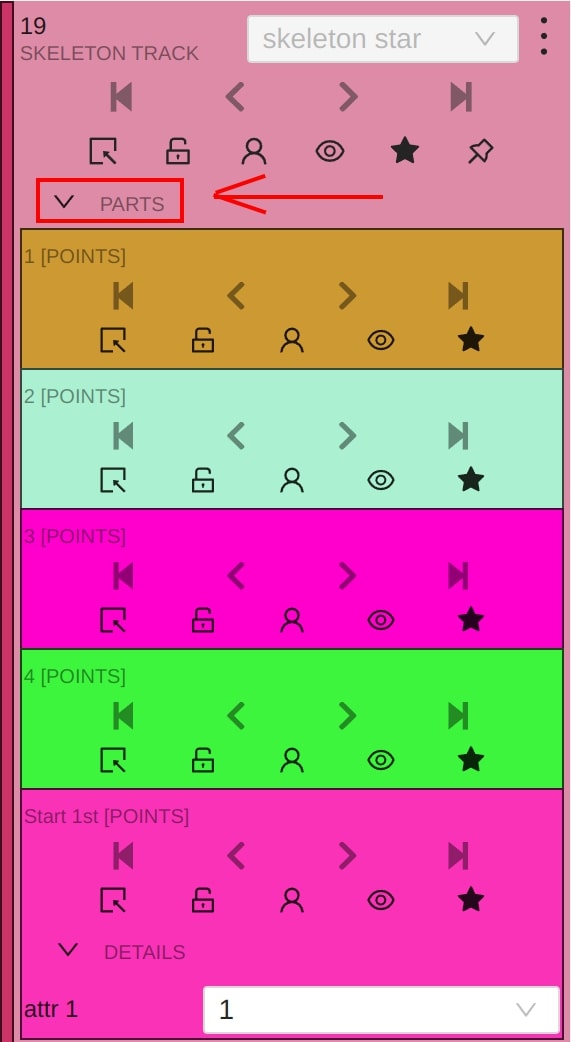
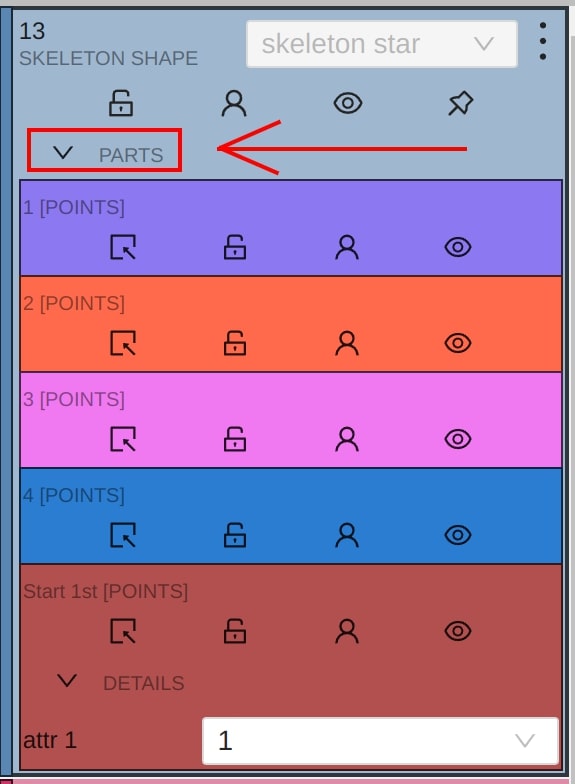
Skeleton points can have properties like Outside, Occluded, and Hidden.
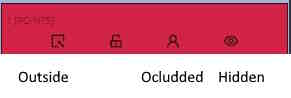
Both Outside and Hidden make a skeleton point invisible.
-
Outside property is part of annotations. Use it when part of the object is out of frame borders.
-
Hidden makes a point hidden only for the annotator’s convenience, this property will not be saved between different sessions.
-
Occluded keeps the point visible on the frame and usually means that the point is still on a frame, just hidden behind another object.
6.2.2.10 - Annotation with brush tool
Guide to annotating tasks using brush tools.
With a brush tool, you can create masks for disjoint objects, that have multiple parts, such as a house hiding behind trees, a car behind a pedestrian, or a pillar behind a traffic sign. The brush tool has several modes, for example: erase pixels, change brush shapes, and polygon-to-mask mode.
Use brush tool for Semantic (Panoptic) and Instance Image Segmentation tasks.
For more information about segmentation masks in CVAT, see Creating masks.
See:
- Brush tool menu
- Annotation with brush
- Annotation with polygon-to-mask
- Remove underlying pixels
- AI Tools
- Import and export
Brush tool menu
The brush tool menu appears on the top of the screen after you click Shape:

It has the following elements:
| Element | Description |
|---|---|
| Save mask saves the created mask. The saved mask will appear on the object sidebar | |
 |
Save mask and continue adds a new mask to the object sidebar and allows you to draw a new one immediately. |
| Brush adds new mask/ new regions to the previously added mask). | |
 |
Eraser removes part of the mask. |
 |
Polygon selection tool. Selection will become a mask. |
 |
Remove polygon selection subtracts part of the polygon selection. |
 |
Brush size in pixels. Note: Visible only when Brush or Eraser are selected. |
 |
Brush shape with two options: circle and square. Note: Visible only when Brush or Eraser are selected. |
| Remove underlying pixels. When you are drawing or editing a mask with this tool, pixels on other masks that are located at the same positions as the pixels of the current mask are deleted. |
|
 |
Hide mask. When drawing or editing a mask, you can enable this feature to temporarily hide the mask, allowing you to see the objects underneath more clearly. |
 |
Label that will be assigned to the newly created mask |
 |
Move. Click and hold to move the menu bar to the other place on the screen |
Annotation with brush
To annotate with brush, do the following:
-
From the controls sidebar, select Brush
 .
. -
In the Draw new mask menu, select label for your mask, and click Shape.
The Brush tool will be selected by default.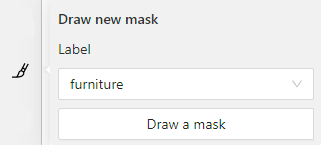
-
With the brush, draw a mask on the object you want to label.
To erase selection, use Eraser
-
After you applied the mask, on the top menu bar click Save mask

to finish the process (or N on the keyboard). -
Added object will appear on the objects sidebar.
To add the next object, repeat steps 1 to 5. All added objects will be visible on the image and the objects sidebar.
To save the job with all added objects, on the top menu, click Save  .
.
Annotation with polygon-to-mask
To annotate with polygon-to-mask, do the following:
-
From the controls sidebar, select Brush
. -
In the Draw new mask menu, select label for your mask, and click Shape.
-
In the brush tool menu, select Polygon
. -
With the Polygon
tool, draw a mask for the object you want to label.
To correct selection, use Remove polygon selection. -
Use Save mask
(or N on the keyboard)
to switch between add/remove polygon tools:
-
After you added the polygon selection, on the top menu bar click Save mask
to finish the process (or N on the keyboard). -
Click Save mask
again (or N on the keyboard).
The added object will appear on the objects sidebar.
To add the next object, repeat steps 1 to 5.
All added objects will be visible on the image and the objects sidebar.
To save the job with all added objects, on the top menu, click Save .
Remove underlying pixels
Use Remove underlying pixels tool when you want to add a mask and simultaneously delete the pixels of
other masks that are located at the same positions. It is a highly useful feature to avoid meticulous drawing edges twice between two different objects.
![]()
AI Tools
You can convert AI tool masks to polygons. To do this, use the following AI tool menu:
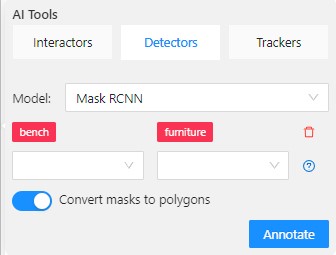
- Go to the Detectors tab.
- Switch toggle Masks to polygons to the right.
- Add source and destination labels from the drop-down lists.
- Click Annotate.
Import and export
For export, see Export dataset
Import follows the general import dataset procedure, with the additional option of converting masks to polygons.
Note
This option is available for formats that work with masks only.To use it, when uploading the dataset, switch the Convert masks to polygon toggle to the right:
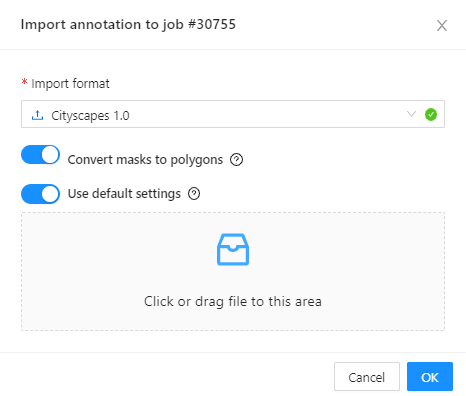
6.2.2.11 - Types of shapes
List of shapes available for annotation.
There are several shapes with which you can annotate your images:
RectangleorBounding boxPolygonPolylinePointsEllipseCuboidCuboid in 3D taskSkeletonTag
And there is what they look like:


Tag - has no shape in the workspace, but is displayed in objects sidebar.
6.2.2.12 - Shape grouping
Grouping multiple shapes during annotation.
This feature allows us to group several shapes.
You may use the Group Shapes button or shortcuts:
G— start selection / end selection in group modeEsc— close group modeShift+G— reset group for selected shapes
You may select shapes clicking on them or selecting an area.
Grouped shapes will have group_id filed in dumped annotation.
Also you may switch color distribution from an instance (default) to a group.
You have to switch Color By Group checkbox for that.
Shapes that don’t have group_id, will be highlighted in white.
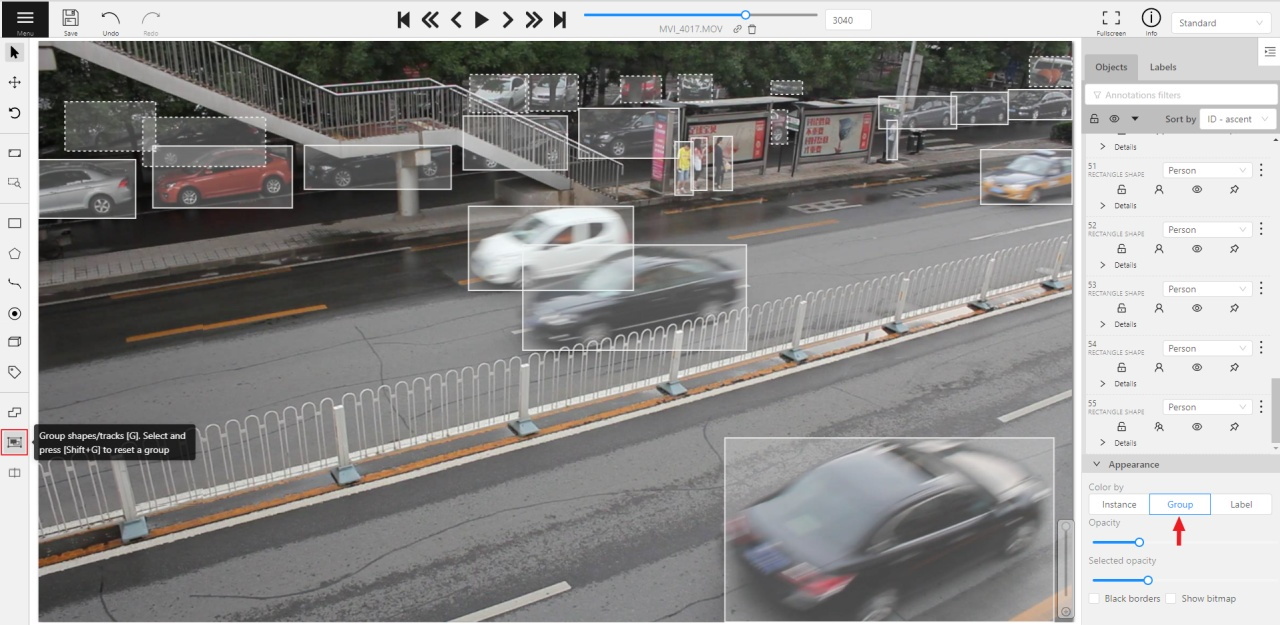
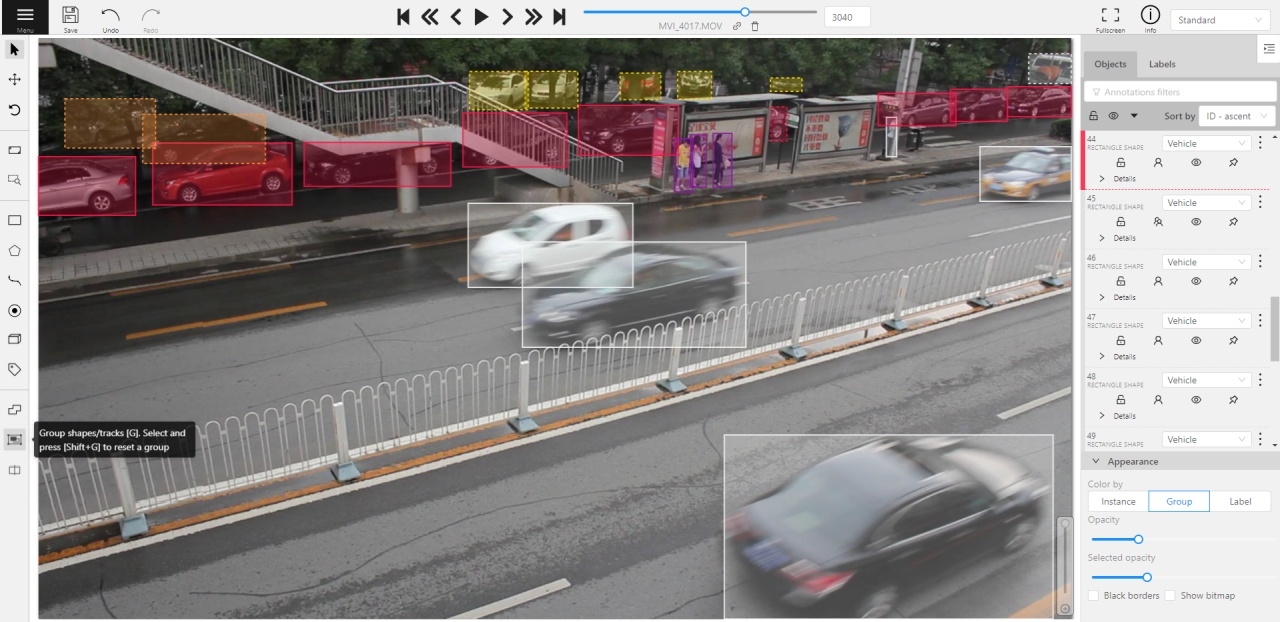
Shapes grouping video tutorial
6.2.3 - Editing & Utility Tools
Tools for modifying, grouping, filtering, and managing annotations.
This section covers tools that help modify shapes, manage large annotations, and streamline the annotation workflow.
Use these guides to learn how to join or split shapes, group them, filter objects, and work with contextual images and frame operations.
6.2.3.1 - Join and slice tools
This section explains how to slice or join several labels
In CVAT you can modify shapes by either joining multiple shapes into a single label or slicing a single label into several shapes.
This document provides guidance on how to perform these operations effectively.
See:
Joining masks
The Join masks tool (![]() ),
is specifically designed to work with mask annotations.
),
is specifically designed to work with mask annotations.
This tool is useful in scenarios where a single object in an image is annotated with multiple shapes, and there is a need to merge these shapes into a single one.
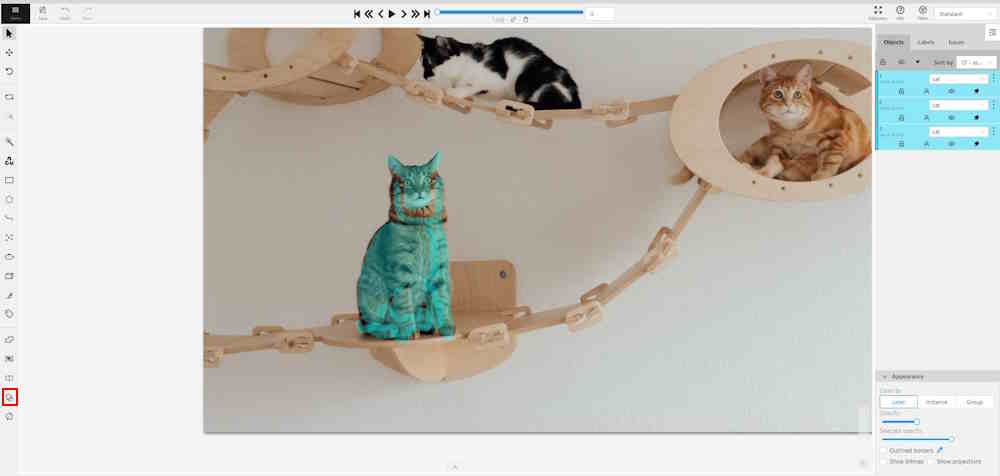
To join masks, do the following:
- From the Edit block,
select Join masks
 .
. - Click on the canvas area, to select masks that you want to join.
- (Optional) To remove the selection click the mask one more time.
- Click again on Join masks
(J) to execute the join operation.
Upon completion, the selected masks will be joined into a single mask.
Slicing polygons and masks
The Slice mask/polygon (![]() )
is compatible with both mask and polygon annotations.
)
is compatible with both mask and polygon annotations.
This tool is useful in scenarios where multiple objects in an image are annotated with one shape, and there is a need to slice this shape into multiple parts.
Note
The shape can be sliced only in two parts at a time. Use the slice tool several times to split a shape to as many parts as you need.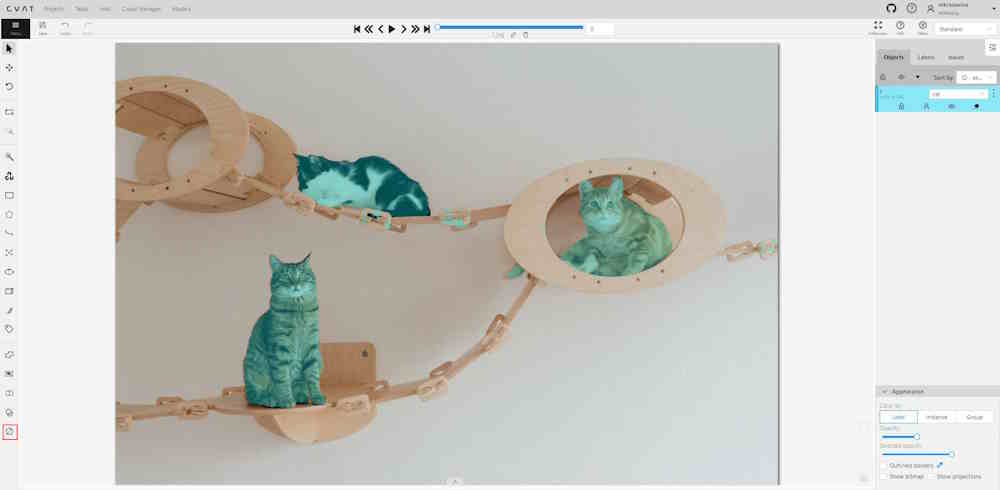
To slice mask or polygon, do the following:
- From the Edit block,
select Slice mask/polygon
 .
. - Click on the shape you intend to slice. A black contour will appear around the selected shape.
- Set an initial point for slicing by clicking on the contour.
- Draw a line across the shape to define the slicing path.
Hold Shift to add points automatically on cursor movement.
Note: The line cannot cross itself.
Note: The line cannot cross the contour more than twice. - (Optional)> Right-click to cancel the latest point.
- Click on the contour (Alt+J) (outside the contour) to finalize the slicing.
6.2.3.2 - Shapes converter
How to perform bulk actions on filtered shapes
The shapes converter is a feature that enables bulk actions on filtered shapes. It allows you to perform mutual conversion between masks, polygons and rectangles.
Note
All shapes converter work only when the filter is set up.See:
Run actions menu
Annotations actions can be accessed from the annotation menu. To access it, click on the burger icon and then select Run actions.
Note
All Shapes converter functions work in alignment with set up filter.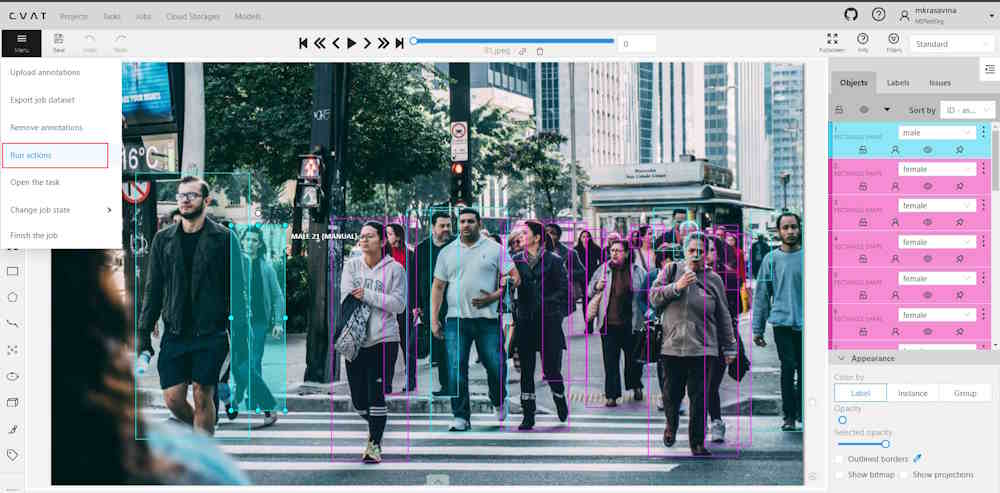
You will see the following dialog:
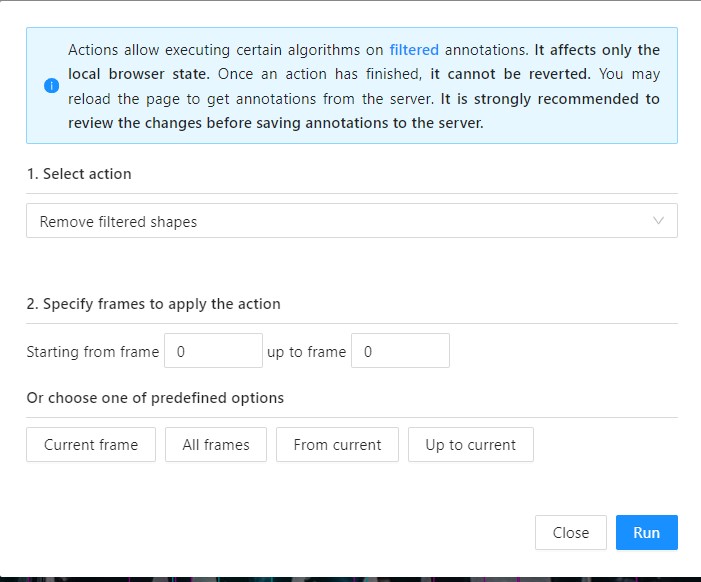
With the following fields:
| Field | Description |
|---|---|
| Select action | Drop-down list with available actions: Note: only Propagate shapes and Remove filtered shapes is available in the community version. |
| Specify frames to run action | Field where you can specify the frame range for the selected action. Enter the starting frame in the Starting from frame: field, and the ending frame in the up to frame field. If nothing is selected here or in Choose one of the predefined options section, the action will be applied to all fields. |
| Choose one of the predefined options | Predefined options to apply to frames. Selection here is mutually exclusive with Specify frames to run action. If nothing is selected here or in Specify frames to run action section, the action will be applied to all fields. |
Convert shapes
Recommended Precautions Before Running Annotation Actions
-
Saving changes: It is recommended to save all changes prior to initiating the annotation action. If unsaved changes are detected, a prompt will advise to save these changes to avoid any potential loss of data.
-
Disable auto-save: Prior to running the annotation action, disabling the auto-save feature is advisable. A notification will suggest this action if auto-save is currently active.
-
Committing changes: Changes applied during the annotation session will not be committed to the server until the saving process is manually initiated. This can be done either by the user or through the auto-save feature, should it be enabled.
To convert shapes, do the following:
-
Annotate your dataset.
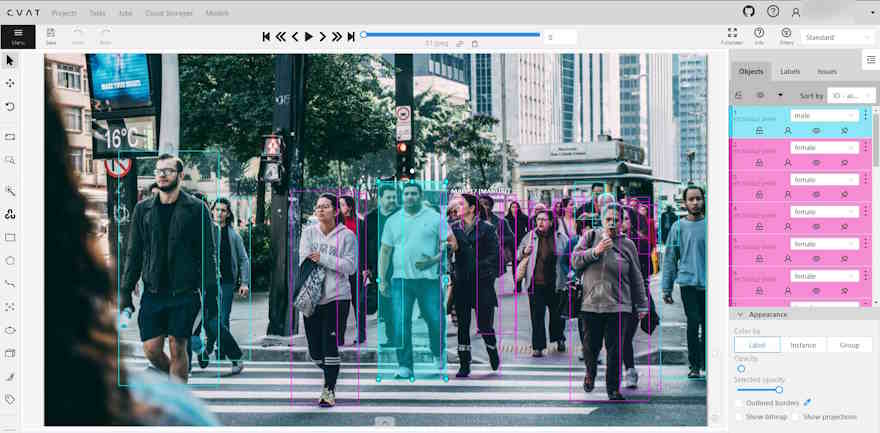
-
Set up filters.
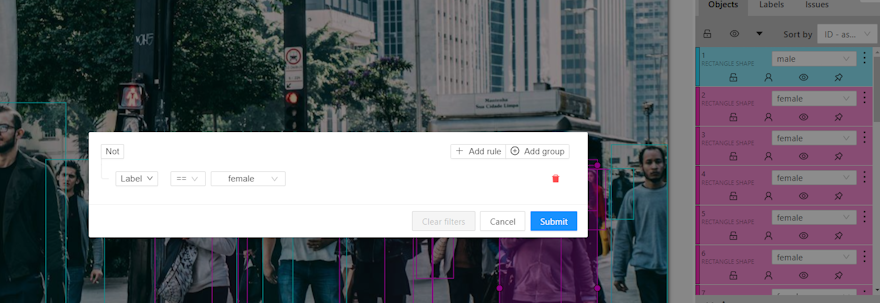
-
From the burger menu, select Run actions.
-
Choose the action you need from the Select action drop-down list.
-
(Optional) In the Starting from frame field, enter the frame number where the action should begin, and in the up to frame field, specify the frame number where the action should end.
-
(Optional) Select an option from Or choose one of the predefined options to apply the action.
-
Click Run.
A progress bar will appear. You may abort the process by clicking Cancel until the process commits modified objects at the end of pipeline.
Note
Once the action is applied, it cannot be undone.Convert shapes video tutorial
6.2.3.3 - Contextual images
Contextual images of the task
Contextual images (or related images) are additional images that provide context or additional information related to the primary image.
Use them to add extra contextual about the object to improve the accuracy of annotation.
Contextual images are available for 2D and 3D tasks.
See:
Folder structure
To add contextual images to the task, you need to organize the images folder into one of the supported file layouts. A task with contextual images can be created both from an archive or from raw files.
Example for 2D tasks:
- In the folder with the images for annotation, create a folder:
related_images. - Add to the
related_imagesa subfolder with the same name as the primary image to which it should be linked. - Place the contextual image(s) within the subfolder created in step 2.
- Add folder to the archive.
- Create task.
Supported file layouts for 2D and 3D tasks:
root_directory/
  image_1_to_be_annotated.jpg
  image_2_to_be_annotated.jpg
  related_images/
    image_1_to_be_annotated_jpg/
      context_image_for_image_1.jpg
    image_2_to_be_annotated_jpg/
      context_image_for_image_2.jpg
    subdirectory_example/
      image_3_to_be_annotated.jpg
        related_images/
        image_3_to_be_annotated_jpg/
            context_image_for_image_3.jpg
Point clouds and related images are put into the same directory. Related files must have the same names as the corresponding point clouds. This format is limited by only 1 related image per point cloud.
root_directory/
  pointcloud1.pcd
  pointcloud1.jpg
  pointcloud2.pcd
  pointcloud2.png
  ...
Each point cloud is put into a separate directory with matching file name. Related images are put next to the corresponding point cloud, the file names and extensions can be arbitrary.
root_directory/
  pointcloud1/
    pointcloud1.pcd
    pointcloud1_ri1.png
    pointcloud1_ri2.jpg
    ...
  pointcloud2/
    pointcloud2.pcd
    pointcloud2_ri1.bmp
Context images are placed in the image_00/, image_01/, image_N/ (N is any number)
directories. Their file names must correspond to the point cloud files in the data/ directory.
image_00/
  data/
    0000000000.png
    0000000001.png
    0000000002.png
    0000000003.png
image_01/
  data/
    0000000000.png
    0000000001.png
    0000000002.png
    0000000003.png
image_N/
  data/
    0000000000.png
    0000000001.png
    0000000002.png
    0000000003.png
velodyne_points/
  data/
    0000000000.bin
    0000000001.bin
    0000000002.bin
    0000000003.bin
root_directory/
  pointcloud/
    pointcloud1.pcd
    pointcloud2.pcd
  related_images/
    pointcloud1_pcd/
      context_image_for_pointclud1.jpg
    pointcloud2_pcd/
      context_image_for_pointcloud2.jpg
For more general information about 3D data formats, see 3D data formats.
Contextual images
The maximum amount of contextual images is twelve.
By default they will be positioned on the right side of the main image.
Note
By default, only three contextual images will be visible.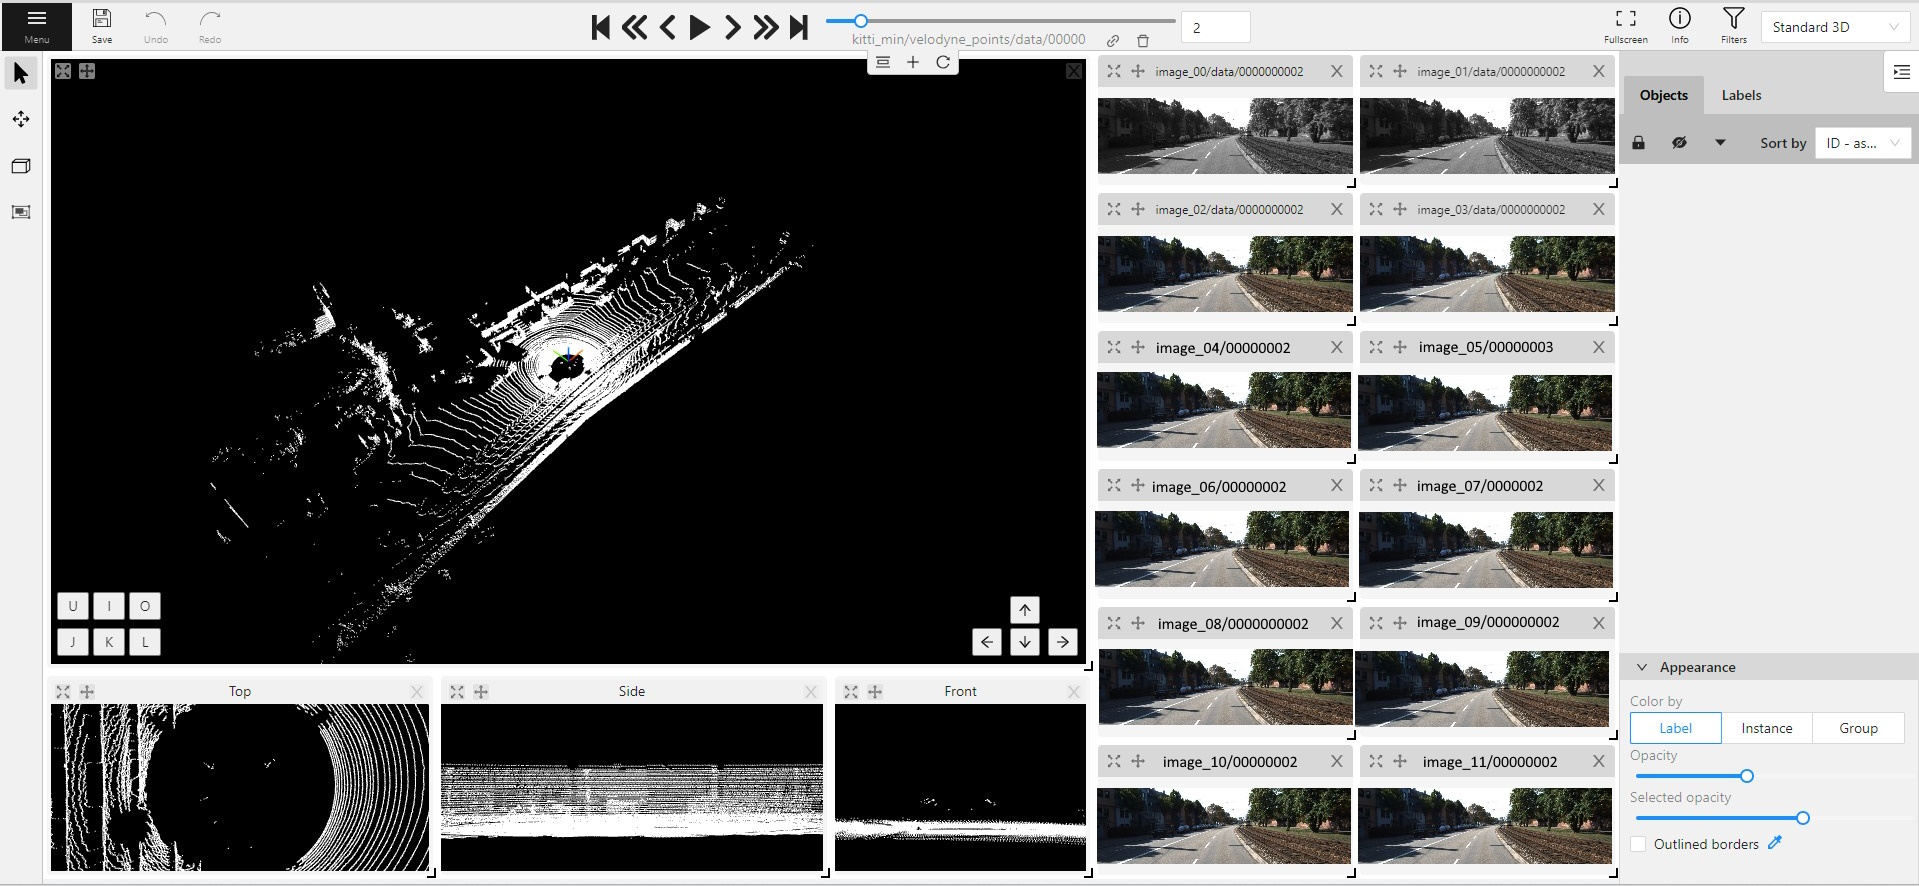
When you add contextual images to the set, small toolbar will appear on the top of the screen, with the following elements:
| Element | Description |
|---|---|
 |
Fit views. Click to restore the layout to its original appearance. If you’ve expanded any images in the layout, they will returned to their original size. This won’t affect the number of context images on the screen. |
 |
Add new image. Click to add context image to the layout. |
 |
Reload layout. Click to reload layout to the default view. Note, that this action can change the number of context images resetting them back to three. |
Each context image has the following elements:
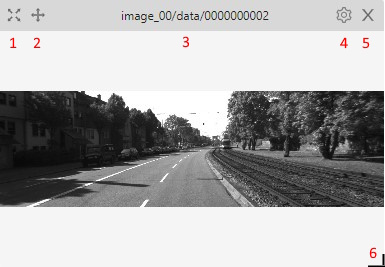
| Element | Description |
|---|---|
| 1 | Full screen. Click to expand the contextual image in to the full screen mode. Click again to revert contextual image to windowed mode. |
| 2 | Move contextual image. Hold and move contextual image to the other place on the screen.
|
| 3 | Name. Unique contextual image name |
| 4 | Select contextual image. Click to open a horizontal listview of all available contextual images. Click on one to select. |
| 5 | Close. Click to remove image from contextual images menu. |
| 6 | Extend Hold and pull to extend the image. |
6.2.3.4 - Filter
Guide to using the Filter feature in CVAT.
There are some reasons to use the feature:
- When you use a filter, objects that don’t match the filter will be hidden.
- The fast navigation between frames which have an object of interest.
Use the
Left Arrow/Right Arrowkeys for this purpose or customize the UI buttons by right-clicking and selectswitching by filter. If there are no objects which correspond to the filter, you will go to the previous / next frame which contains any annotated objects.
To apply filters you need to click on the button on the top panel.
Create a filter
It will open a window for filter input. Here you will find two buttons: Add rule and Add group.
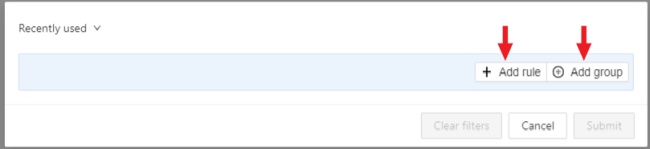
Rules
The Add rule button adds a rule for objects display. A rule may use the following properties:
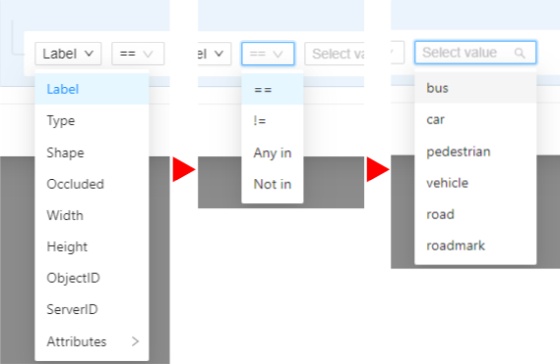
Supported properties for annotation
| Properties | Supported values | Description |
|---|---|---|
Label |
all the label names that are in the task | label name |
Type |
shape, track or tag | type of object |
Shape |
all shape types | type of shape |
Occluded |
true or false | occluded (read more) |
Width |
number of px or field | shape width |
Height |
number of px or field | shape height |
Rotation |
number of degrees or field | shape rotation (for boxes and ellipses) |
ServerID |
number or field | ID of the object on the server (You can find out by forming a link to the object through the Action menu) |
ObjectID |
number or field | ID of the object in your client (indicated on the objects sidebar) |
Score |
number | consensus score |
Votes |
number | consensus votes |
Attributes |
some other fields including attributes with a similar type or a specific attribute value |
any fields specified by a label |
- Supported properties for projects list
- Supported properties for tasks list
- Supported properties for jobs list
- Supported properties for cloud storages list
Supported operators for properties
== - Equally; != - Not equal; > - More; >= - More or equal; < - Less; <= - Less or equal;
Any in; Not in - these operators allow you to set multiple values in one rule;
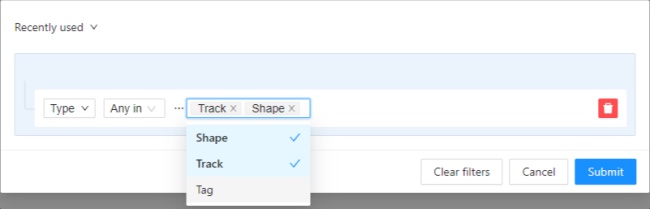
Is empty; is not empty – these operators don’t require to input a value.
Between; Not between – these operators allow you to choose a range between two values.
Like - this operator indicate that the property must contain a value.
Starts with; Ends with - filter by beginning or end.
Some properties support two types of values that you can choose:
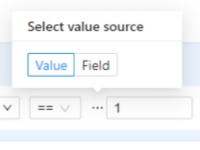
You can add multiple rules, to do so click the add rule button and set another rule.
Once you’ve set a new rule, you’ll be able to choose which operator they will be connected by: And or Or.

All subsequent rules will be joined by the chosen operator.
Click Submit to apply the filter or if you want multiple rules to be connected by different operators, use groups.
Groups
To add a group, click the Add group button. Inside the group you can create rules or groups.
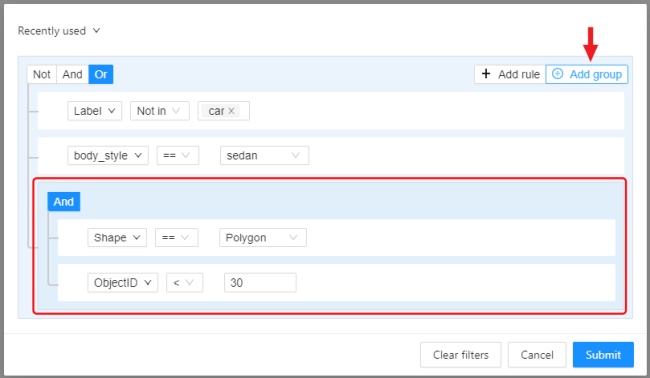
If there is more than one rule in the group, they can be connected by And or Or operators.
The rule group will work as well as a separate rule outside the group and will be joined by an
operator outside the group.
You can create groups within other groups, to do so you need to click the add group button within the group.
You can move rules and groups. To move the rule or group, drag it by the button.
To remove the rule or group, click on the Delete button.
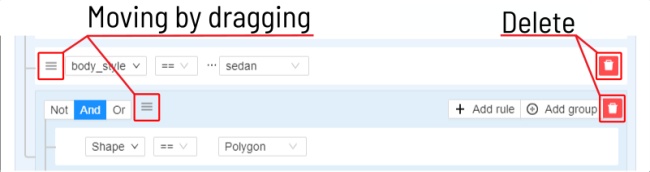
If you activate the Not button, objects that don’t match the group will be filtered out.
Click Submit to apply the filter.
The Cancel button undoes the filter. The Clear filter button removes the filter.
Once applied filter automatically appears in Recent used list. Maximum length of the list is 10.
Sort and filter lists
On the projects, task list on the project page, tasks, jobs, and cloud storage pages, you can use sorting and filters.
Note
The applied filter and sorting will be displayed in the URL of your browser, Thus, you can share the page with sorting and filter applied.Sort by
You can sort by the following parameters:
- Jobs list: ID, assignee, updated date, stage, state, task ID, project ID, task name, project name.
- Tasks list or tasks list on project page: ID, owner, status, assignee, updated date, subset, mode, dimension, project ID, name, project name.
- Projects list: ID, assignee, owner, status, name, updated date.
- Cloud storages list: ID, provider type, updated date, display name, resource, credentials, owner, description.
To apply sorting, drag the parameter to the top area above the horizontal bar. The parameters below the horizontal line will not be applied. By moving the parameters you can change the priority, first of all sorting will occur according to the parameters that are above.
Pressing the Sort button switches Ascending sort/Descending sort.
Quick filters
Quick Filters contain several frequently used filters:
Assigned to me- show only those projects, tasks or jobs that are assigned to you.Owned by me- show only those projects or tasks that are owned by you.Not completed- show only those projects, tasks or jobs that have a status other than completed.AWS storages- show only AWS cloud storagesAzure storages- show only Azure cloud storagesGoogle cloud storages- show only Google cloud storages
Date and time selection
When creating a Last updated rule, you can select the date and time by using the selection window.
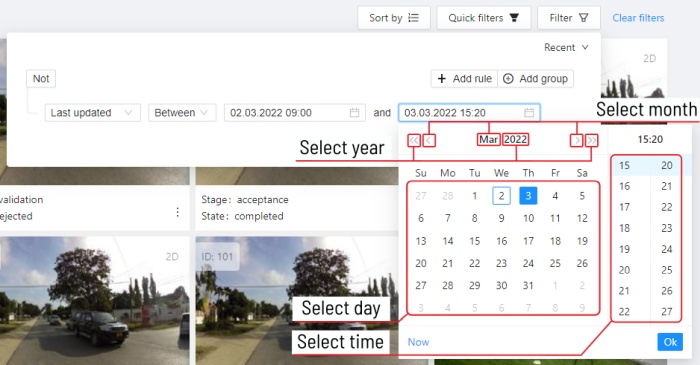
You can select the year and month using the arrows or by clicking on the year and month.
To select a day, click on it in the calendar,
To select the time, you can select the hours and minutes using the scrolling list.
Or you can select the current date and time by clicking the Now button.
To apply, click Ok.
Export filtered data
After applying filters and sorting to your lists, you can export the filtered data to CSV format for further analysis or reporting.
Export to CSV
To export filtered data click Export as CSV download button on the filtering header. The CSV file will be
downloaded with the current filtered and sorted data

Note
The process might take a while as we export resources from all pagesCSV file contents
The exported CSV file includes the following parameters:
- Projects list: ID, name, project URL, owner, assignee, status, dimension, task subsets, created date, updated date, bug tracker.
- Tasks list or tasks list on project page: ID, name, task URL, project ID, project name, project URL, owner, assignee, status, mode, size, subset, created date, updated date, bug tracker.
- Jobs list: ID, job URL, task ID, task name, task URL, project ID, project name, project URL, assignee, stage, state, type, start frame, stop frame, frame count, created date, updated date.
Note
Some fields may be exported as empty values if you don’t have sufficient permissions to view the related resources (e.g., project name, task name).6.3 - Specification for annotators
Learn how to easily create and add specification for annotators using the Guide feature.
The Guide feature provides a built-in markdown editor that allows you to create specification for annotators.
Once you create and submit the specification, it will be accessible from the annotation interface (see below).
You can attach the specification to Projects or to Tasks.
The attachment procedure is the same for individual users and organizations.
See:
- Adding specification to Project
- Adding specification to Task
- Access to specification for annotators
- Markdown editor guide
- Specification for annotators’ video tutorial
Adding specification to Project
To add specification to the Projects, do the following:
- Go to the Projects page and click on the project to which you want to add specification.
- Under the Project description, click Edit.
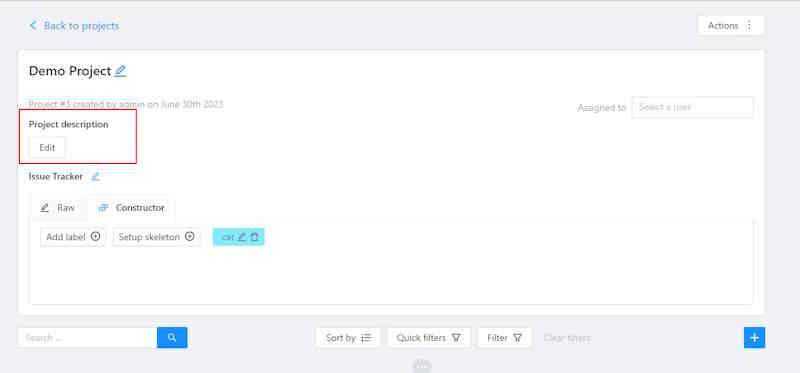
- Add instruction to the Markdown editor, and click Submit.
Editing rights
- For individual users: only the project owner and the project assignee can edit the specification.
- For organizations: specification additionally can be edited by the organization owner and maintainer
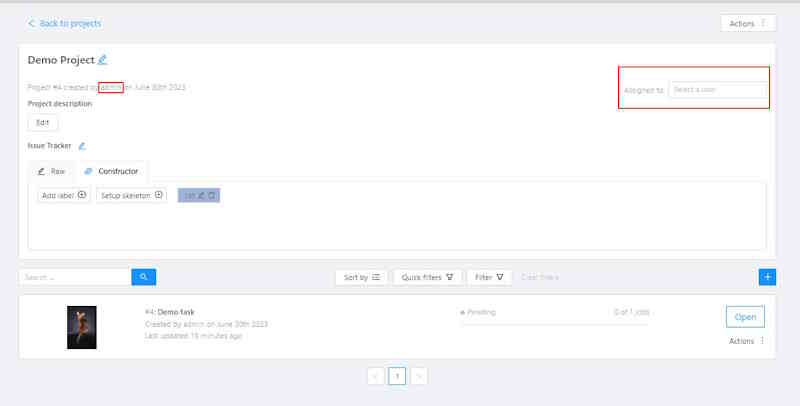
Adding specification to Task
To add specification to the Task, do the following:
-
Go to the Tasks page and click on the task to which you want to add specification.
-
Under the Task description, click Edit.
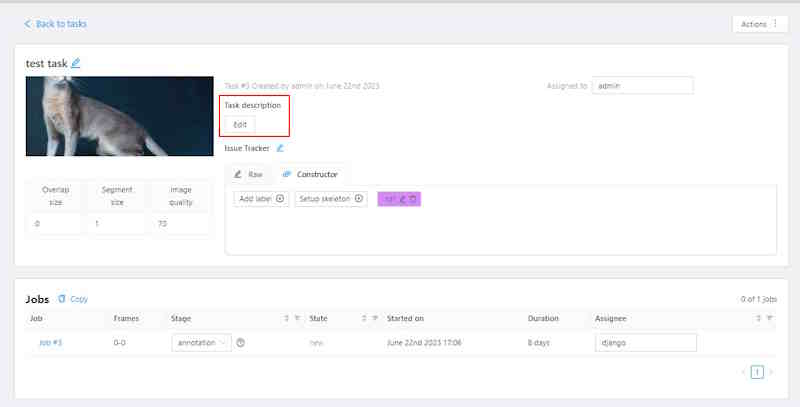
-
Add instruction to the Markdown editor, and click Submit.
Editing rights
- For individual users: only the task owner and task assignee can edit the specification.
- For organizations: only the task owner, maintainer, and task assignee can edit the specification.
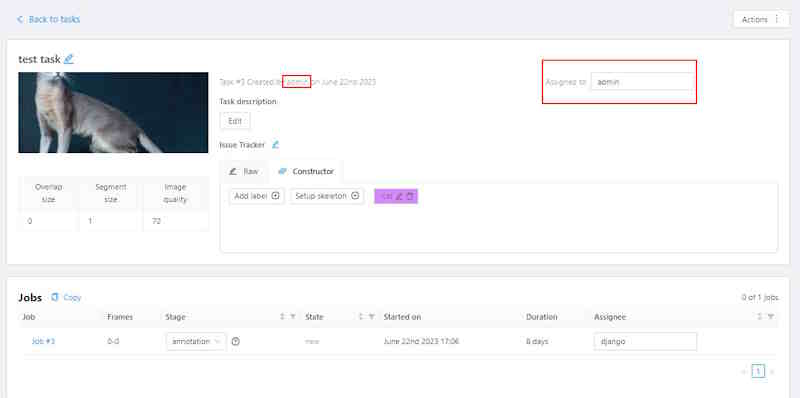
Access to specification for annotators
The specification is opened automatically when the job has new annotation state.
It means, that it will open when the assigned user begins working on the first
job within a Project or Task.
The specifications will not automatically reopen if the user moves to another job within the same Project or Task.
If a Project or Task is reassigned to another annotator, the specifications will automatically be shown when the annotator opens the first job but will not reappear for subsequent jobs.
To enable the option for specifications to always open automatically,
append the ?openGuide parameter to the end of the job URL you share with the annotator:
/tasks/<task_id>/jobs/<job_id>?openGuide
For example:
https://app.cvat.ai/tasks/taskID/jobs/jobID?openGuide
To open specification manually, do the following:
- Open the job to see the annotation interface.
- In the top right corner, click Guide button(
 ).
).
Markdown editor guide
The markdown editor for Guide has two panes. Add instructions to the left pane, and the editor will immediately show the formatted result on the right.
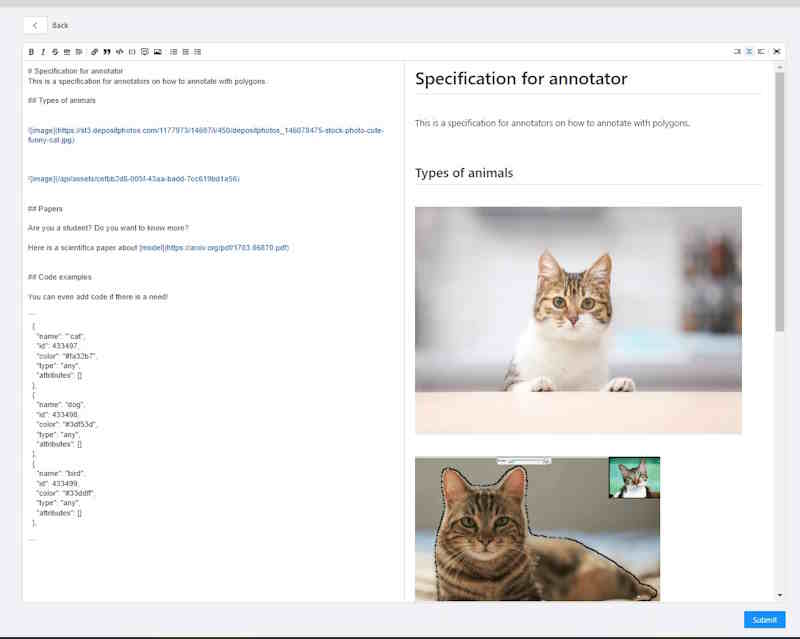
You can write in raw markdown or use the toolbar on the top of the editor.

| Element | Description |
|---|---|
| 1 | Text formatting: bold, cursive, and strikethrough. |
| 2 | Insert a horizontal rule (horizontal line). |
| 3 | Add a title, heading, or subheading. It provides a drop-down list to select the title level (from 1 to 6). |
| 4 | Add a link. Note: If you left-click on the link, it will open in the same window. |
| 5 | Add a quote. |
| 6 | Add a single line of code. |
| 7 | Add a block of code. |
| 8 | Add a comment. The comment is only visible to Guide editors and remains invisible to annotators. |
| 9 | Add a picture. To use this option, first, upload the picture to an external resource and then add the link in the editor. Alternatively, you can drag and drop a picture into the editor, which will upload it to the CVAT server and add it to the specification. |
| 10 | Add a list: bullet list, numbered list, and checklist. |
| 11 | Hide the editor pane: options to hide the right pane, show both panes or hide the left pane. |
| 12 | Enable full-screen mode. |
Specification for annotators’ video tutorial
Video tutorial on how to use the Guide feature.
6.4 - Automated Annotation
Learn how to leverage AI models and automation tools in CVAT to speed up labeling and improve consistency.
6.4.1 - Overview
Automatic annotation of tasks
Automatic annotation in CVAT is a tool that you can use to automatically pre-annotate your data with pre-trained models.
CVAT can use models from the following sources:
- Pre-installed models.
- Models integrated from Hugging Face and Roboflow.
- Self-hosted models deployed with Nuclio.
- AI agent functions (SAM2 tracking) for CVAT Online and Enterprise.
The following table describes the available options:
| Self-hosted | Online | |
|---|---|---|
| Price | Free | See Pricing |
| Models | You have to add models | You can use pre-installed models |
| Hugging Face & Roboflow integration |
Not supported | Supported |
| AI Agent Functions | Supported (Enterprise) | Supported (SAM2 tracking available) |
See:
Running Automatic annotation
To start automatic annotation, do the following:
-
On the top menu, click Tasks.
-
Find the task you want to annotate and click Action > Automatic annotation.
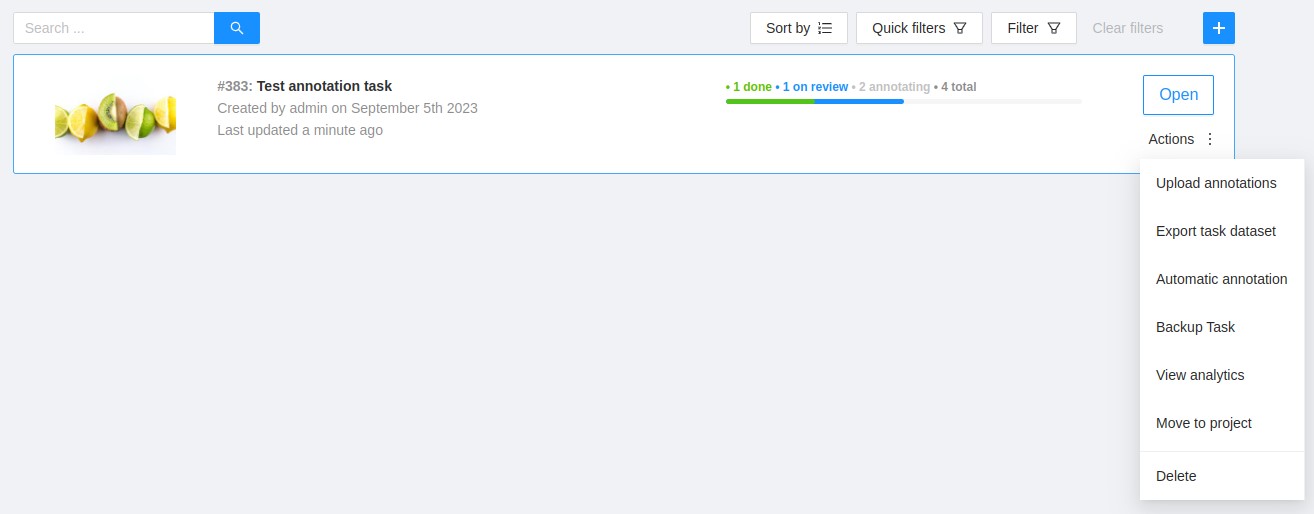
-
In the Automatic annotation dialog, from the drop-down list, select a model.
-
Match the labels of the model and the task.
-
(Optional) In case you need the model to return masks as polygons, switch toggle Return masks as polygons.
-
(Optional) In case you need to remove all previous annotations, switch toggle Clean old annotations.
-
(Optional) You can specify a Threshold for the model. If not provided, the default value from the model settings will be used.
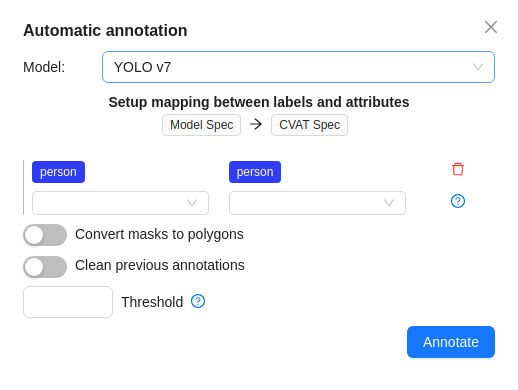
-
Click Annotate.
CVAT will show the progress of annotation on the progress bar.

You can stop the automatic annotation at any moment by clicking cancel.
Labels matching
Each model is trained on a dataset and supports only the dataset’s labels.
For example:
- DL model has the label
car. - Your task (or project) has the label
vehicle.
To annotate, you need to match these two labels to give
CVAT a hint that, in this case, car = vehicle.
If you have a label that is not on the list of DL labels, you will not be able to match them.
For this reason, supported DL models are suitable only for certain labels.
To check the list of labels for each model, see Models papers and official documentation.
Models
Automatic annotation uses pre-installed and added models.
List of pre-installed models:
| Model | Description |
|---|---|
| Attributed face detection | Three OpenVINO models work together: |
| RetinaNet R101 | RetinaNet is a one-stage object detection model that utilizes a focal loss function to address class imbalance during training. Focal loss applies a modulating term to the cross entropy loss to focus learning on hard negative examples. RetinaNet is a single, unified network composed of a backbone network and two task-specific subnetworks. For more information, see: |
| Text detection | Text detector based on PixelLink architecture with MobileNetV2, depth_multiplier=1.4 as a backbone for indoor/outdoor scenes. For more information, see: |
| YOLO v3 | YOLO v3 is a family of object detection architectures and models pre-trained on the COCO dataset. For more information, see: |
| YOLO v7 | YOLOv7 is an advanced object detection model that outperforms other detectors in terms of both speed and accuracy. It can process frames at a rate ranging from 5 to 160 frames per second (FPS) and achieves the highest accuracy with 56.8% average precision (AP) among real-time object detectors running at 30 FPS or higher on the V100 graphics processing unit (GPU). For more information, see: |
Adding models from Hugging Face and Roboflow
In case you did not find the model you need, you can add a model of your choice from Hugging Face or Roboflow.
Note
You cannot add models from Hugging Face and Roboflow to self-hosted CVAT.For more information, see Streamline annotation by integrating Hugging Face and Roboflow models.
This video demonstrates the process:
6.4.2 - Segment Anything 2 Tracker
Accelerating video labeling using SAM2 model
Overview
Segment Anything 2 is a segmentation model that allows fast and precise selection of any object in videos or images. SAM2 tracking is available in two implementations:
-
Nuclio SAM2 Tracker: Available only for Enterprise deployments. This is implemented as a serverless function deployed via Nuclio framework.
-
AI Agent SAM2 Tracker: Available for CVAT Online and Enterprise via auto-annotation (AA) functions that run on user-side agents. This brings SAM2 tracking capabilities to CVAT Online users who previously couldn’t access this feature.
It is strongly recommended to deploy the model using a GPU. Although it is possible to use a CPU-based version, it generally performs much slower and is suitable only for handling a single parallel request. The AI agent variant runs on user hardware, providing flexibility for GPU usage without server configuration requirements.
Unlike a regular tracking model, both SAM2 tracker implementations are designed to be applied to existing objects (polygons and masks) to track them forward for a specified number of frames.
How to install
Choose the installation method based on your platform and deployment needs.
Note
Nuclio SAM2 Tracker is only available in the Enterprise version. The AI agent variant brings SAM2 tracking to CVAT Online and Enterprise.Note
Both tracker implementations require the enhanced actions UI plugin, which is enabled by default. Usually, no additional steps are necessary on this.Nuclio SAM2 Tracker (CVAT Enterprise)
Docker
You can use existing scripts from the community repository
(./serverless/deploy_cpu.sh or ./serverless/deploy_gpu.sh).
To deploy the feature, simply run:
./serverless/deploy_gpu.sh "path/to/the/function"
Kubernetes
- You need to deploy the Nuclio function manually.
Note that this function requires a Redis storage configured to keep the tracking state.
You may use the same storage as
cvat_redis_ondiskuses. When running thenuclio deploycommand, make sure to provide the necessary arguments. The minimal command is:
nuctl deploy "path/to/the/function"
  --env CVAT_FUNCTIONS_REDIS_HOST="<redis_host>"
  --env CVAT_FUNCTIONS_REDIS_PORT="<redis_port>"
  --env CVAT_FUNCTIONS_REDIS_PASSWORD="<redis_password>" # if applicable
AI Agent SAM2 Tracker (CVAT Online + Enterprise)
The AI agent implementation enables SAM2 tracking for CVAT Online users and provides an alternative deployment method for Enterprise customers. This approach runs the tracking model on user hardware via auto-annotation (AA) functions.
Prerequisites
- Python 3.10 or later
- Git
- CVAT Online account or Enterprise instance
- Optional: NVIDIA GPU with CUDA support for faster inference
Setup Instructions
-
Clone the CVAT repository:
git clone https://github.com/cvat-ai/cvat.git <CVAT_DIR> -
Install required dependencies:
pip install cvat-cli -r <CVAT_DIR>/ai-models/tracker/sam2/requirements.txtNote
If you encounter issues installing SAM2, refer to the SAM2 installation guide for solutions to common problems. -
Register the SAM2 function with CVAT:
cvat-cli --server-host <CVAT_BASE_URL> --auth <USERNAME>:<PASSWORD> \ function create-native "SAM2" \ --function-file=<CVAT_DIR>/ai-models/tracker/sam2/func.py -p model_id=str:<MODEL_ID> -
Run the AI agent:
cvat-cli --server-host <CVAT_BASE_URL> --auth <USERNAME>:<PASSWORD> \
    function run-agent <FUNCTION_ID> \
    --function-file=<CVAT_DIR>/ai-models/tracker/sam2/func.py -p model_id=str:<MODEL_ID>
Parameter Reference
<CVAT_BASE_URL>: Your CVAT instance URL (e.g.,https://app.cvat.ai)<USERNAME>and<PASSWORD>: Your CVAT credentials<FUNCTION_ID>: The ID returned by thefunction create-nativecommand<MODEL_ID>: A SAM2 model ID from Hugging Face Hub (e.g.,facebook/sam2.1-hiera-tiny)
Optional Parameters
- GPU Support: Add
-p device=str:cudato the agent command to use NVIDIA GPU acceleration - Organization Sharing: Add
--org <ORG_SLUG>to both commands to share the function with your organization
Agent Behavior and Resilience
The AI agent runs as a persistent process on your hardware, providing several advantages:
- Hardware Independence: Runs outside the CVAT server, enabling tracking without server-side GPU/Nuclio installation
- Isolation: Agent crashes don’t affect the server; requests are retried or reassigned automatically
- Resource Control: You control the computational resources (CPU/GPU) used for tracking
Important
Keep the agent process running to handle tracking requests. If the agent stops, active tracking operations will fail and need to be restarted.Version Requirements
- AI Agent SAM2 Tracker: Requires CVAT version 2.42.0 or later
- Classic SAM2 Tracker: Available in all Enterprise versions
- Python: Version 3.10 or later for AI agent setup
- GPU Support: Optional but recommended for both implementations
Usage
Both SAM2 tracker implementations provide similar user experiences with slight differences in the UI labels.
Running the Nuclio SAM2 Tracker
The nuclio tracker can be applied to any polygons and masks. To run the tracker on an object, open the object menu and click Run annotation action.
Alternatively, you can use a hotkey: select the object and press Ctrl + E (default shortcut). When the modal opened, in “Select action” list, choose Segment Anything 2: Tracker:
Running the AI Agent SAM2 Tracker
Once you have registered the SAM2 AI agent and it’s running, you’ll see “AI Tracker: SAM2” as an available action in the annotation UI for video shape tracking.
To use the AI agent tracker:
- Create or open a CVAT task from a video file or video-like sequence of images (all images must have the same dimensions)
- Open one of the jobs from the task
- Draw a mask or polygon around an object
- Right-click the object and choose “Run annotation action”
- Select “AI Tracker: SAM2” from the action list
- Specify the target frame and click Run
The usage flow parallels the existing annotation action interface but utilizes the remote AI agent rather than built-in serverless functions.
Tracking Process
Specify the target frame until which you want the object to be tracked, then click the Run button to start tracking. The process begins and may take some time to complete. The duration depends on the inference device, and the number of frames where the object will be tracked.
Once the process is complete, the modal window closes. You can review how the object was tracked. If you notice that the tracked shape deteriorates at some point, you can adjust the object coordinates and run the tracker again from that frame.
Running on multiple objects
Instead of tracking each object individually, you can track multiple objects simultaneously. To do this, click the Menu button in the annotation view and select the Run Actions option:
Alternatively, you can use a hotkey: just press Ctrl + E (default shortcut) when there are no objects selected. This opens the actions modal. In this case, the tracker will be applied to all visible objects of suitable types (polygons and masks). In the action list of the opened modal, select either:
- Segment Anything 2: Tracker (for the nuclio implementation)
- AI Tracker: SAM2 (for the AI agent implementation)
Specify the target frame until which you want the objects to be tracked, then click the Run button to start tracking. The process begins and may take some time to complete. The duration depends on the inference device, the number of simultaneously tracked objects, and the number of frames where the objects will be tracked.
Once the process finishes, you may close the modal and review how the objects were tracked. If you notice that the tracked shapes deteriorate, you can adjust their coordinates and run the tracker again from that frame (for a single object or for many objects).
Limitations and Considerations
AI Agent Limitations
When using the AI agent implementation, keep in mind:
- Single Agent Constraint: Only one agent can run at a time for any given tracking function. Running multiple agents may cause random failures as they compete for tracking states.
- Memory-based State: Tracking states are kept in agent memory. If the agent crashes or is shut down, all tracking states are lost and active tracking processes will fail.
- Agent-only Usage: Tracking functions can only be used via agents.
There is no equivalent of the
cvat-cli task auto-annotatecommand for tracking. - Rectangle Limitation: When using the AI Tools dialog (sidebar), only tracking functions that support rectangles will be selectable. The SAM2 tracker supports polygons and masks but not rectangles.
- Skeleton Tracking: Skeletons cannot currently be tracked by either implementation.
Tracker parameters
- Target frame: Objects will be tracked up to this frame. Must be greater than the current frame
- Convert polygon shapes to tracks: When enabled, all visible polygon shapes in the current frame will be converted to tracks before tracking begins. Use this option if you need tracks as the final output but started with shapes, produced for example by interactors (e.g. SAM2 or another one).
See Also
- SAM2 Object Tracking via AI Agent (Blog, July 31, 2025) - Detailed implementation and background information
- Auto-annotation Functions Documentation - Reference for creating custom tracking functions
- CVAT CLI Examples - Additional CLI usage examples
6.4.3 - AI Tools
Overview of semi-automatic and automatic annotation tools available in CVAT.
Label and annotate your data in semi-automatic and automatic mode with the help of AI and OpenCV tools.
While interpolation is good for annotation of the videos made by the security cameras, AI and OpenCV tools are good for both: videos where the camera is stable and videos, where it moves together with the object, or movements of the object are chaotic.
See:
Interactors
Interactors are a part of AI and OpenCV tools.
Use interactors to label objects in images by creating a polygon semi-automatically.
When creating a polygon, you can use positive points or negative points (for some models):
- Positive points define the area in which the object is located.
- Negative points define the area in which the object is not located.

AI tools: annotate with interactors
To annotate with interactors, do the following:
- Click Magic wand , and go to the Interactors tab.
- From the Label drop-down, select a label for the polygon.
- From the Interactor drop-down, select a model (see Interactors models).
Click the Question mark to see information about each model: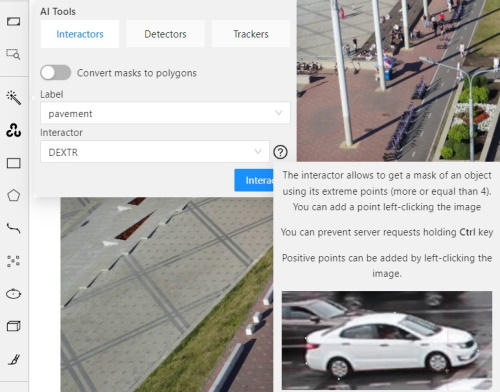
- (Optional) If the model returns masks, and you need to convert masks to polygons, use the Convert masks to polygons toggle.
- Click Interact.
- Use the left click to add positive points and the right click to add negative points.
Number of points you can add depends on the model. - On the top menu, click Done (or Shift+N, N).
AI tools: add extra points
Note
More points improve outline accuracy, but make shape editing harder. Fewer points make shape editing easier, but reduce outline accuracy.Each model has a minimum required number of points for annotation. Once the required number of points is reached, the request is automatically sent to the server. The server processes the request and adds a polygon to the frame.
For a more accurate outline, postpone request to finish adding extra points first:
- Hold down the Ctrl key.
On the top panel, the Block button will turn blue. - Add points to the image.
- Release the Ctrl key, when ready.
In case you used Mask to polygon when the object is finished, you can edit it like a polygon.
You can change the number of points in the polygon with the slider:

AI tools: delete points
To delete a point, do the following:
- With the cursor, hover over the point you want to delete.
- If the point can be deleted, it will enlarge and the cursor will turn into a cross.
- Left-click on the point.
OpenCV: intelligent scissors
To use Intelligent scissors, do the following:
-
On the menu toolbar, click OpenCV
and wait for the library to load.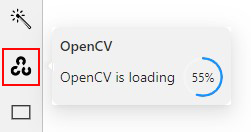
-
Go to the Drawing tab, select the label, and click on the Intelligent scissors button.
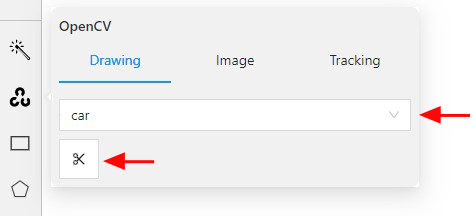
-
Add the first point on the boundary of the allocated object.
You will see a line repeating the outline of the object. -
Add the second point, so that the previous point is within the restrictive threshold.
After that a line repeating the object boundary will be automatically created between the points.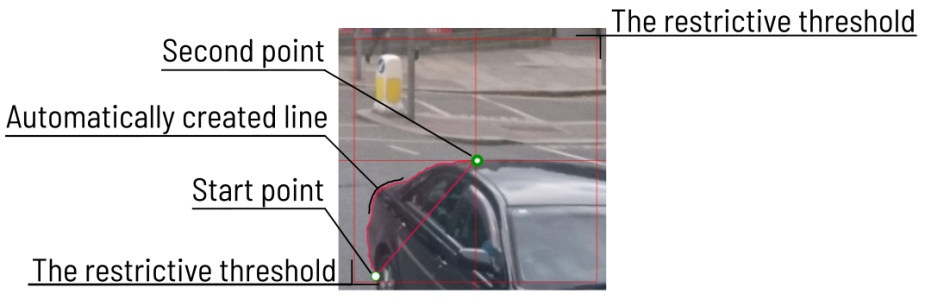
-
To finish placing points, on the top menu click Done (or N on the keyboard).
As a result, a polygon will be created.
You can change the number of points in the polygon with the slider:
To increase or lower the action threshold, hold Ctrl and scroll the mouse wheel.
During the drawing process, you can remove the last point by clicking on it with the left mouse button.
Settings
-
On how to adjust the polygon, see Objects sidebar.
-
For more information about polygons in general, see Annotation with polygons.
Interactors models
| Model | Tool | Description | Example |
|---|---|---|---|
| Segment Anything Model (SAM) | AI Tools | The Segment Anything Model (SAM) produces high quality object masks, and it can be used to generate masks for all objects in an image. It has been trained on a dataset of 11 million images and 1.1 billion masks, and has strong zero-shot performance on a variety of segmentation tasks. For more information, see: |
 |
| Inside-Outside-Guidance (IOG) |
AI Tool | The model uses a bounding box and inside/outside points to create a mask. First of all, you need to create a bounding box, wrapping the object. Then you need to use positive and negative points to say the model where is a foreground, and where is a background. Negative points are optional. For more information, see: |
 |
| Intelligent scissors | OpenCV | Intelligent scissors is a CV method of creating a polygon by placing points with the automatic drawing of a line between them. The distance between the adjacent points is limited by the threshold of action, displayed as a red square that is tied to the cursor. For more information, see: |
 |
Detectors
Detectors are a part of AI tools.
Use detectors to automatically identify and locate objects in images or videos.
Labels matching
Each model is trained on a dataset and supports only the dataset’s labels.
For example:
- DL model has the label
car. - Your task (or project) has the label
vehicle.
To annotate, you need to match these two labels to give
DL model a hint, that in this case car = vehicle.
If you have a label that is not on the list of DL labels, you will not be able to match them.
For this reason, supported DL models are suitable only for certain labels.
To check the list of labels for each model, see Detectors models.
Annotate with detectors
To annotate with detectors, do the following:
-
Click Magic wand
, and go to the Detectors tab. -
From the Model drop-down, select model (see Detectors models).
-
From the left drop-down select the DL model label, from the right drop-down select the matching label of your task.
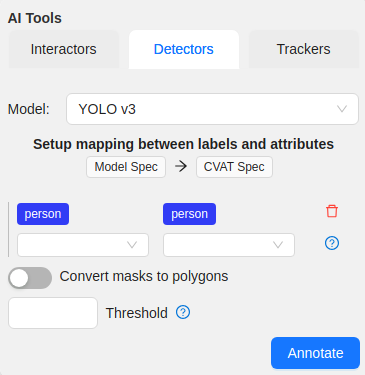
-
(Optional) If the model returns masks, and you need to convert masks to polygons, use the Convert masks to polygons toggle.
-
(Optional) You can specify a Threshold for the model. If not provided, the default value from the model settings will be used.
-
Click Annotate.
This action will automatically annotate one frame. For automatic annotation of multiple frames, see Automatic annotation.
Detectors models
| Model | Description |
|---|---|
| Mask RCNN | The model generates polygons for each instance of an object in the image. For more information, see: |
| Faster RCNN | The model generates bounding boxes for each instance of an object in the image. In this model, RPN and Fast R-CNN are combined into a single network. For more information, see: |
| YOLO v3 | YOLO v3 is a family of object detection architectures and models pre-trained on the COCO dataset. For more information, see: |
| Semantic segmentation for ADAS | This is a segmentation network to classify each pixel into 20 classes. For more information, see: |
| Faster RCNN with Tensorflow | Faster RCNN version with Tensorflow. The model generates bounding boxes for each instance of an object in the image. In this model, RPN and Fast R-CNN are combined into a single network. For more information, see: |
| RetinaNet | Pytorch implementation of RetinaNet object detection. For more information, see: |
| Face Detection | Face detector based on MobileNetV2 as a backbone for indoor and outdoor scenes shot by a front-facing camera. For more information, see: |
Trackers
Trackers are part of AI and OpenCV tools.
Use trackers to identify and label objects in a video or image sequence that are moving or changing over time.
AI tools: annotate with trackers
To annotate with trackers, do the following:
-
Click Magic wand
, and go to the Trackers tab.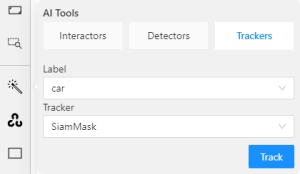
-
From the Label drop-down, select the label for the object.
-
From Tracker drop-down, select tracker.
-
Click Track, and annotate the objects with the bounding box in the first frame.
-
Go to the top menu and click Next (or the F on the keyboard) to move to the next frame.
All annotated objects will be automatically tracked.
When tracking
-
To enable/disable tracking, use Tracker switcher on the sidebar.
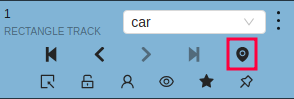
-
Trackable objects have an indication on canvas with a model name.

-
You can follow the tracking by the messages appearing at the top.

OpenCV: annotate with trackers
To annotate with trackers, do the following:
-
Create basic rectangle shapes or tracks for tracker initialization
-
On the menu toolbar, click OpenCV
and wait for the library to load. -
From Tracker drop-down, select tracker and Click Track
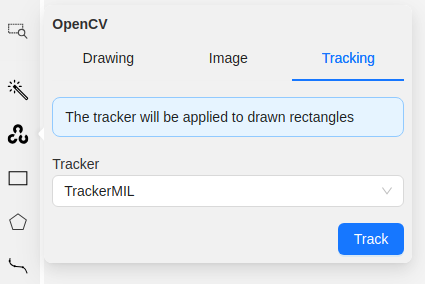
-
Annotation actions window will pop-up. Setup
Target frameandConvert rectangle shapes to tracksparameters and clickRunNote
Tracking will be applied to all filtered rectangle annotations.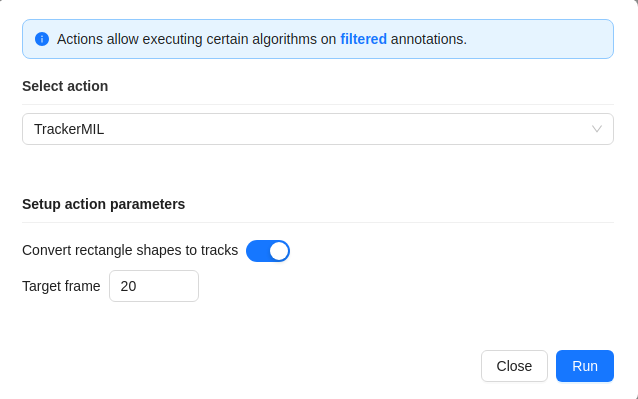
All annotated objects will be automatically tracked up until target frame parameter.
Trackers models
| Model | Tool | Description | Example |
|---|---|---|---|
| TrackerMIL | OpenCV | TrackerMIL model is not bound to labels and can be used for any object. It is a fast client-side model designed to track simple non-overlapping objects. For more information, see: |
|
| SiamMask | AI Tools | Fast online Object Tracking and Segmentation. The trackable object will be tracked automatically if the previous frame was the latest keyframe for the object. For more information, see: |
|
| Transformer Tracking (TransT) | AI Tools | Simple and efficient online tool for object tracking and segmentation. If the previous frame was the latest keyframe for the object, the trackable object will be tracked automatically. This is a modified version of the PyTracking Python framework based on Pytorch For more information, see: |
|
| SAM2 Tracker | AI Agent | Advanced object tracking and segmentation using Meta’s Segment Anything Model 2. Available for CVAT Online and Enterprise via AI agents. Supports polygons and masks with high precision tracking. Requires user-side agent setup with Python 3.10+. For more information, see: |
Example coming soon |
OpenCV: histogram equalization
Histogram equalization improves the contrast by stretching the intensity range.
It increases the global contrast of images when its usable data is represented by close contrast values.
It is useful in images with backgrounds and foregrounds that are bright or dark.
To improve the contrast of the image, do the following:
- In the OpenCV menu, go to the Image tab.
- Click on Histogram equalization button.

Histogram equalization will improve contrast on current and following frames.
Example of the result:

To disable Histogram equalization, click on the button again.
7 - Guides
Practical how-to guides for using CVAT,from creating projects and tasks to automation, integrations, and quality validation.
7.1 - Complete workflow guide for organizations
Welcome to CVAT, this page is the place to start your team’s annotation process using the Computer Vision Annotation Tool (CVAT).
This guide aims to equip your organization with the knowledge and best practices needed to use CVAT effectively.
We’ll walk you through every step of the CVAT workflow, from initial setup to advanced features.
See:
Workflow diagram
The workflow diagram presents an overview of the general process at a high level.
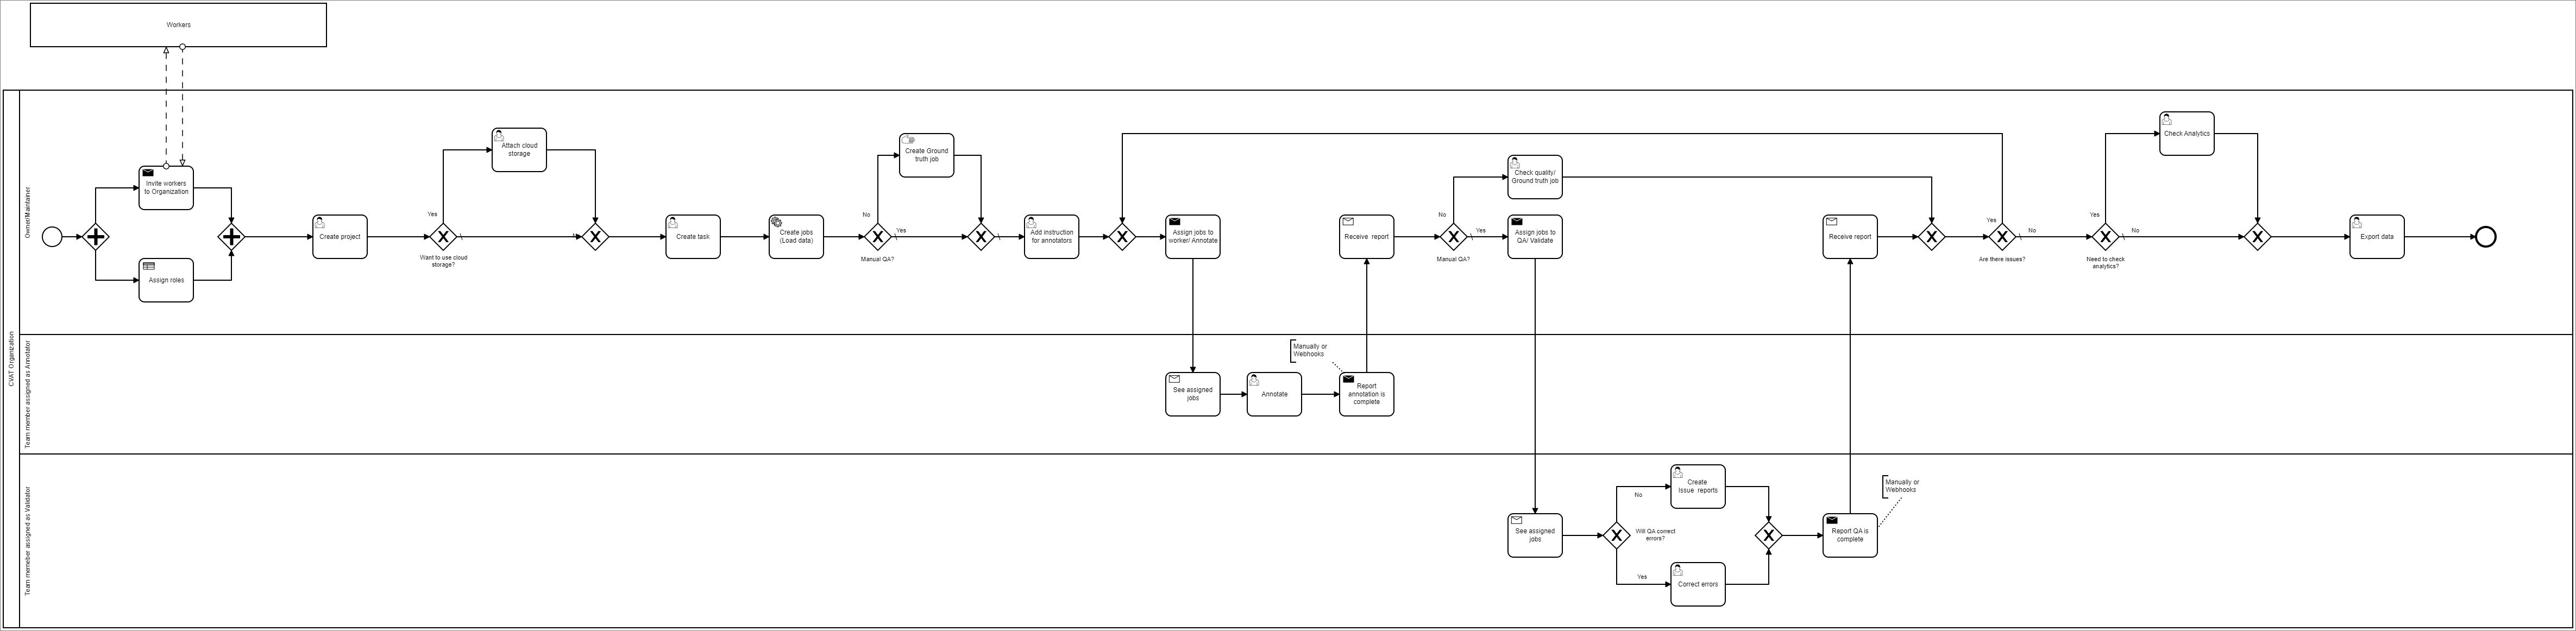
End-to-end workflow for Organizations
To use CVAT within your organization, please follow these steps:
- Create an account in CVAT.
- Create Organization.
- Switch to the Organization that you’ve created and subscribe to the Team plan.
- Invite members to Organization and assign User roles to invited members.
- Create Project.
- (Optional) Attach Cloud storages to the Project.
- Create Task or
Multitask.
At this step the CVAT platform will automatically create jobs. - (Optional) Create Ground truth job.
This step can be skipped if you’re employing a manual QA approach. - (Optional) Add Instructions for annotators.
- (Optional) Configure Webhooks.
- Assign jobs to annotators by adding the annotator name to Assignee and changing the Job stage to Annotation.
- Annotator will see assigned jobs and annotate them.
- (Optional) In case you’ve created a Ground truth job give the CVAT platform some time to accumulate the data and check the accuracy of the annotation.
- If you are using the manual validation, assign jobs to validators by adding the validator name to Assignee and changing the Job stage to Validation.
- Validator will see assigned jobs and report issues.
Note, that validators can correct issues, see Manual QA and Review - Check issues and if there is a need for additional improvement, reassign jobs to either the Validator or Annotator.
- (Optional) Check Analytics.
- Export Data.
Complete Workflow Guide video tutorial
7.2 - Serverless tutorial
Introduction
Leveraging the power of computers to solve daily routine problems, fix mistakes, and find information has become second nature. It is therefore natural to use computing power in annotating datasets. There are multiple publicly available DL models for classification, object detection, and semantic segmentation which can be used for data annotation. Whilst some of these publicly available DL models can be found on CVAT, it is relatively simple to integrate your privately trained ML/DL model into CVAT.
With the imperfection of the world, alongside the unavailability of a silver bullet that can solve all our problems; publicly available DL models cannot be used when we want to detect niche or specific objects on which these publicly available models were not trained. As annotation requirements can be sometimes strict, automatically annotated objects cannot be accepted as it is, and it is easier to annotate them from scratch. With these limitations in mind, a DL solution that can perfectly annotate 50% of your data equates to reducing manual annotation by half.
Since we know DL models can help us to annotate faster, how then do we use them? In CVAT all such DL models are implemented as serverless functions using the Nuclio serverless platform. There are multiple implemented functions that can be found in the serverless directory such as _Mask RCNN, Faster RCNN, SiamMask, Inside Outside Guidance, Segment Anything, etc. Follow the installation guide to build and deploy these serverless functions. See the user guide to understand how to use these functions in the UI to automatically annotate data.
What is a serverless function and why is it used for automatic annotation in CVAT? Let’s assume that you have a DL model and want to use it for AI-assisted annotation. The naive approach is to implement a Python script which uses the DL model to prepare a file with annotations in a public format like MS COCO or Pascal VOC. After that you can upload the annotation file into CVAT. It works but it is not user-friendly. How to make CVAT run the script for you?
You can pack the script with your DL model into a container which provides a standard interface for interacting with it. One way to do that is to use the function as a service approach. Your script becomes a function inside cloud infrastructure which can be called over HTTP. The Nuclio serverless platform helps us to implement and manage such functions.
CVAT supports Nuclio out of the box if it is built properly. See the installation guide for instructions. Thus if you deploy a serverless function, the CVAT server can see it and call it with appropriate arguments. Of course there are some tricks how to create serverless functions for CVAT and we will discuss them in next sections of the tutorial.
Using builtin DL models in practice
In the tutorial it is assumed that you already have the cloned
CVAT GitHub repo.
To build CVAT with serverless support you need to run docker compose command
with specific configuration files. In the case it is docker-compose.serverless.yml.
It has necessary instructions how to build and deploy Nuclio platform as a
docker container and enable corresponding support in CVAT.
docker compose -f docker-compose.yml -f docker-compose.dev.yml -f components/serverless/docker-compose.serverless.yml up -d --build
docker compose -f docker-compose.yml -f docker-compose.dev.yml -f components/serverless/docker-compose.serverless.yml ps
   Name                 Command                  State                            Ports
-------------------------------------------------------------------------------------------------------------
cvat         /usr/bin/supervisord             Up             8080/tcp
cvat_db      docker-entrypoint.sh postgres    Up             5432/tcp
cvat_proxy   /docker-entrypoint.sh /bin ...   Up             0.0.0.0:8080->80/tcp,:::8080->80/tcp
cvat_redis   docker-entrypoint.sh redis ...   Up             6379/tcp
cvat_ui      /docker-entrypoint.sh ngin ...   Up             80/tcp
nuclio       /docker-entrypoint.sh sh - ...   Up (healthy)   80/tcp, 0.0.0.0:8070->8070/tcp,:::8070->8070/tcp
Next step is to deploy builtin serverless functions using Nuclio command
line tool (aka nuctl). It is assumed that you followed
the installation guide and nuctl
is already installed on your operating system. Run the following
command to check that it works. In the beginning you should not have
any deployed serverless functions.
nuctl get functions
No functions found
Let’s see on examples how to use DL models for annotation in different computer vision tasks.
Tracking using TransT (Transformer Tracking)
In this use case a user needs to annotate all individual objects on a video as tracks. Basically for every object we need to know its location on every frame.
First step is to deploy TransT. The deployment process
can depend on your operating system. On Linux you can use serverless/deploy_cpu.sh
auxiliary script, but below we are using nuctl directly.
nuctl create project cvat --platform local

nuctl deploy --project-name cvat --path serverless/pytorch/dschoerk/transt/nuclio --platform local
25.12.08 14:09:38.783 (I)                     nuctl Deploying function {"name": "pth-dschoerk-transt"}
25.12.08 14:09:38.783 (I)                     nuctl Building {"builderKind": "docker", "versionInfo": "Label: 1.15.9, Git commit: ad1fde3b47fcd9035f3f0eea45b2ff654655e8be, OS: linux, Arch: amd64, Go version: go1.25.4", "name": "pth-dschoerk-transt"}
25.12.08 14:09:38.992 (I)                     nuctl Staging files and preparing base images
25.12.08 14:09:38.995 (W)                     nuctl Using user provided base image, runtime interpreter version is provided by the base image {"baseImage": "ubuntu:22.04"}
25.12.08 14:09:38.995 (I)                     nuctl Building processor image {"registryURL": "", "taggedImageName": "cvat.pth.dschoerk.transt:latest"}
25.12.08 14:09:38.995 (I)     nuctl.platform.docker Pulling image {"imageName": "quay.io/nuclio/handler-builder-python-onbuild:1.15.9-amd64"}
25.12.08 14:09:41.414 (I)     nuctl.platform.docker Pulling image {"imageName": "gcr.io/iguazio/uhttpc:0.0.3-amd64"}
25.12.08 14:09:43.140 (I)            nuctl.platform Building docker image {"image": "cvat.pth.dschoerk.transt:latest"}
25.12.08 14:09:52.744 (I)            nuctl.platform Pushing docker image into registry {"image": "cvat.pth.dschoerk.transt:latest", "registry": ""}
25.12.08 14:09:52.744 (I)            nuctl.platform Docker image was successfully built and pushed into docker registry {"image": "cvat.pth.dschoerk.transt:latest"}
25.12.08 14:09:52.745 (I)                     nuctl Build complete {"image": "cvat.pth.dschoerk.transt:latest"}
25.12.08 14:09:52.751 (I)                     nuctl Cleaning up before deployment {"functionName": "pth-dschoerk-transt"}
25.12.08 14:09:53.433 (I)            nuctl.platform Waiting for function to be ready {"timeout": 120}
25.12.08 14:09:55.304 (I)                     nuctl Function deploy complete {"functionName": "pth-dschoerk-transt", "httpPort": 32771, "internalInvocationURLs": ["172.17.0.4:8080"], "externalInvocationURLs": ["0.0.0.0:32771"]}
nuctl get functions --platform local
 NAMESPACE | NAME                | PROJECT | STATE | REPLICAS | NODE PORT
 nuclio    | pth-dschoerk-transt | cvat    | ready | 1/1      | 32771
Let’s see how it works in the UI. Go to the models tab and check that you can see TransT in the list. If you cannot, it means that there are some problems. Go to one of our public channels and ask for help.
After that, go to the new task page and
create a task with this video file. You can choose any task name,
any labels, and even another video file if you like. In this case, the Remote sources
option was used to specify the video file. Press submit button at the end to
finish the process.
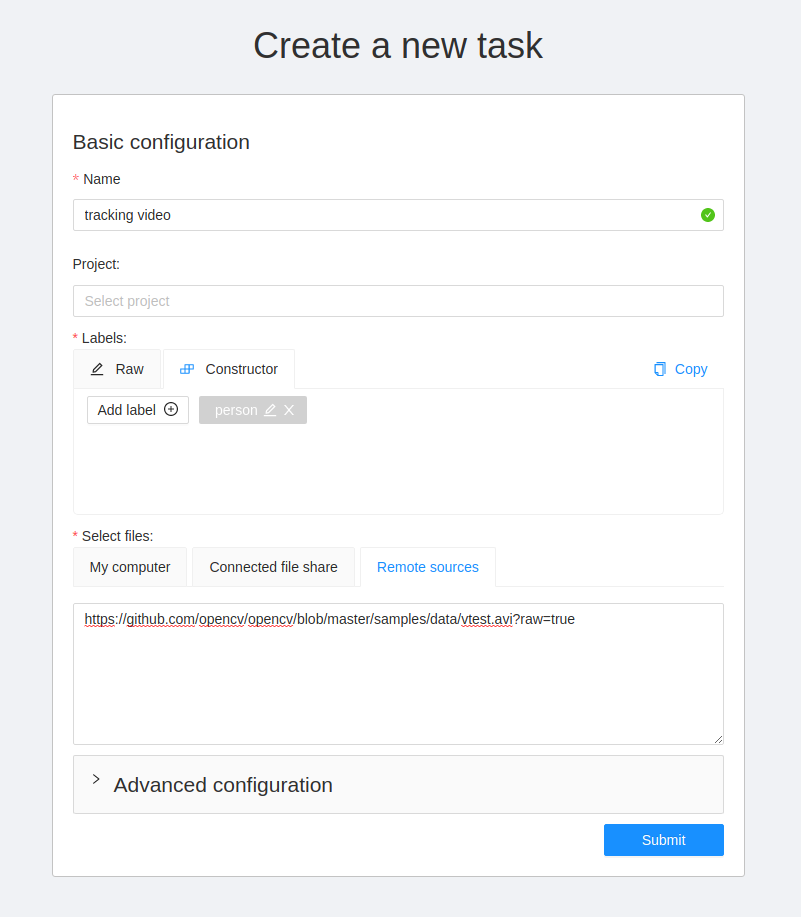
Open the task and use AI tools to start tracking an object. Draw a bounding box around an object, and sequentially switch through the frame and correct the restrictive box if necessary.
![]()
Finally you will get bounding boxes.
TransT model is more optimized to work on Nvidia GPUs.
- For more information about deploying the model for the GPU, read on.
Object detection using YOLO-v3
First of all let’s deploy the DL model. The deployment process is similar for
all serverless functions. Need to run nuctl deploy command with appropriate
arguments. To simplify the process, you can use serverless/deploy_cpu.sh
command. Inference of the serverless function is optimized for CPU using
Intel OpenVINO framework.
serverless/deploy_cpu.sh serverless/openvino/omz/public/yolo-v3-tf/
serverless/deploy_cpu.sh serverless/openvino/omz/public/yolo-v3-tf/
Deploying serverless/openvino/omz/public/yolo-v3-tf function...
21.07.12 15:55:17.314                     nuctl (I) Deploying function {"name": ""}
21.07.12 15:55:17.314                     nuctl (I) Building {"versionInfo": "Label: 1.5.16, Git commit: ae43a6a560c2bec42d7ccfdf6e8e11a1e3cc3774, OS: linux, Arch: amd64, Go version: go1.14.3", "name": ""}
21.07.12 15:55:17.682                     nuctl (I) Cleaning up before deployment {"functionName": "openvino-omz-public-yolo-v3-tf"}
21.07.12 15:55:17.739                     nuctl (I) Staging files and preparing base images
21.07.12 15:55:17.743                     nuctl (I) Building processor image {"imageName": "cvat/openvino.omz.public.yolo-v3-tf:latest"}
21.07.12 15:55:17.743     nuctl.platform.docker (I) Pulling image {"imageName": "quay.io/nuclio/handler-builder-python-onbuild:1.5.16-amd64"}
21.07.12 15:55:21.048     nuctl.platform.docker (I) Pulling image {"imageName": "quay.io/nuclio/uhttpc:0.0.1-amd64"}
21.07.12 15:55:24.595            nuctl.platform (I) Building docker image {"image": "cvat/openvino.omz.public.yolo-v3-tf:latest"}
21.07.12 15:55:30.359            nuctl.platform (I) Pushing docker image into registry {"image": "cvat/openvino.omz.public.yolo-v3-tf:latest", "registry": ""}
21.07.12 15:55:30.359            nuctl.platform (I) Docker image was successfully built and pushed into docker registry {"image": "cvat/openvino.omz.public.yolo-v3-tf:latest"}
21.07.12 15:55:30.359                     nuctl (I) Build complete {"result": {"Image":"cvat/openvino.omz.public.yolo-v3-tf:latest","UpdatedFunctionConfig":{"metadata":{"name":"openvino-omz-public-yolo-v3-tf","namespace":"nuclio","labels":{"nuclio.io/project-name":"cvat"},"annotations":{"framework":"openvino","name":"YOLO v3","spec":"[\n  { \"id\": 0, \"name\": \"person\" },\n  { \"id\": 1, \"name\": \"bicycle\" },\n  { \"id\": 2, \"name\": \"car\" },\n  { \"id\": 3, \"name\": \"motorbike\" },\n  { \"id\": 4, \"name\": \"aeroplane\" },\n  { \"id\": 5, \"name\": \"bus\" },\n  { \"id\": 6, \"name\": \"train\" },\n  { \"id\": 7, \"name\": \"truck\" },\n  { \"id\": 8, \"name\": \"boat\" },\n  { \"id\": 9, \"name\": \"traffic light\" },\n  { \"id\": 10, \"name\": \"fire hydrant\" },\n  { \"id\": 11, \"name\": \"stop sign\" },\n  { \"id\": 12, \"name\": \"parking meter\" },\n  { \"id\": 13, \"name\": \"bench\" },\n  { \"id\": 14, \"name\": \"bird\" },\n  { \"id\": 15, \"name\": \"cat\" },\n  { \"id\": 16, \"name\": \"dog\" },\n  { \"id\": 17, \"name\": \"horse\" },\n  { \"id\": 18, \"name\": \"sheep\" },\n  { \"id\": 19, \"name\": \"cow\" },\n  { \"id\": 20, \"name\": \"elephant\" },\n  { \"id\": 21, \"name\": \"bear\" },\n  { \"id\": 22, \"name\": \"zebra\" },\n  { \"id\": 23, \"name\": \"giraffe\" },\n  { \"id\": 24, \"name\": \"backpack\" },\n  { \"id\": 25, \"name\": \"umbrella\" },\n  { \"id\": 26, \"name\": \"handbag\" },\n  { \"id\": 27, \"name\": \"tie\" },\n  { \"id\": 28, \"name\": \"suitcase\" },\n  { \"id\": 29, \"name\": \"frisbee\" },\n  { \"id\": 30, \"name\": \"skis\" },\n  { \"id\": 31, \"name\": \"snowboard\" },\n  { \"id\": 32, \"name\": \"sports ball\" },\n  { \"id\": 33, \"name\": \"kite\" },\n  { \"id\": 34, \"name\": \"baseball bat\" },\n  { \"id\": 35, \"name\": \"baseball glove\" },\n  { \"id\": 36, \"name\": \"skateboard\" },\n  { \"id\": 37, \"name\": \"surfboard\" },\n  { \"id\": 38, \"name\": \"tennis racket\" },\n  { \"id\": 39, \"name\": \"bottle\" },\n  { \"id\": 40, \"name\": \"wine glass\" },\n  { \"id\": 41, \"name\": \"cup\" },\n  { \"id\": 42, \"name\": \"fork\" },\n  { \"id\": 43, \"name\": \"knife\" },\n  { \"id\": 44, \"name\": \"spoon\" },\n  { \"id\": 45, \"name\": \"bowl\" },\n  { \"id\": 46, \"name\": \"banana\" },\n  { \"id\": 47, \"name\": \"apple\" },\n  { \"id\": 48, \"name\": \"sandwich\" },\n  { \"id\": 49, \"name\": \"orange\" },\n  { \"id\": 50, \"name\": \"broccoli\" },\n  { \"id\": 51, \"name\": \"carrot\" },\n  { \"id\": 52, \"name\": \"hot dog\" },\n  { \"id\": 53, \"name\": \"pizza\" },\n  { \"id\": 54, \"name\": \"donut\" },\n  { \"id\": 55, \"name\": \"cake\" },\n  { \"id\": 56, \"name\": \"chair\" },\n  { \"id\": 57, \"name\": \"sofa\" },\n  { \"id\": 58, \"name\": \"pottedplant\" },\n  { \"id\": 59, \"name\": \"bed\" },\n  { \"id\": 60, \"name\": \"diningtable\" },\n  { \"id\": 61, \"name\": \"toilet\" },\n  { \"id\": 62, \"name\": \"tvmonitor\" },\n  { \"id\": 63, \"name\": \"laptop\" },\n  { \"id\": 64, \"name\": \"mouse\" },\n  { \"id\": 65, \"name\": \"remote\" },\n  { \"id\": 66, \"name\": \"keyboard\" },\n  { \"id\": 67, \"name\": \"cell phone\" },\n  { \"id\": 68, \"name\": \"microwave\" },\n  { \"id\": 69, \"name\": \"oven\" },\n  { \"id\": 70, \"name\": \"toaster\" },\n  { \"id\": 71, \"name\": \"sink\" },\n  { \"id\": 72, \"name\": \"refrigerator\" },\n  { \"id\": 73, \"name\": \"book\" },\n  { \"id\": 74, \"name\": \"clock\" },\n  { \"id\": 75, \"name\": \"vase\" },\n  { \"id\": 76, \"name\": \"scissors\" },\n  { \"id\": 77, \"name\": \"teddy bear\" },\n  { \"id\": 78, \"name\": \"hair drier\" },\n  { \"id\": 79, \"name\": \"toothbrush\" }\n]\n","type":"detector"}},"spec":{"description":"YOLO v3 via Intel OpenVINO","handler":"main:handler","runtime":"python:3.6","env":[{"name":"NUCLIO_PYTHON_EXE_PATH","value":"/opt/nuclio/common/openvino/python3"}],"resources":{},"image":"cvat/openvino.omz.public.yolo-v3-tf:latest","targetCPU":75,"triggers":{"myHttpTrigger":{"class":"","kind":"http","name":"myHttpTrigger","maxWorkers":2,"workerAvailabilityTimeoutMilliseconds":10000,"attributes":{"maxRequestBodySize":33554432}}},"volumes":[{"volume":{"name":"volume-1","hostPath":{"path":"/home/nmanovic/Workspace/cvat/serverless/common"}},"volumeMount":{"name":"volume-1","mountPath":"/opt/nuclio/common"}}],"build":{"image":"cvat/openvino.omz.public.yolo-v3-tf","baseImage":"openvino/ubuntu18_dev:2020.2","directives":{"preCopy":[{"kind":"USER","value":"root"},{"kind":"WORKDIR","value":"/opt/nuclio"},{"kind":"RUN","value":"ln -s /usr/bin/pip3 /usr/bin/pip"},{"kind":"RUN","value":"/opt/intel/openvino/deployment_tools/open_model_zoo/tools/downloader/downloader.py --name yolo-v3-tf -o /opt/nuclio/open_model_zoo"},{"kind":"RUN","value":"/opt/intel/openvino/deployment_tools/open_model_zoo/tools/downloader/converter.py --name yolo-v3-tf --precisions FP32 -d /opt/nuclio/open_model_zoo -o /opt/nuclio/open_model_zoo"}]},"codeEntryType":"image"},"platform":{"attributes":{"mountMode":"volume","restartPolicy":{"maximumRetryCount":3,"name":"always"}}},"readinessTimeoutSeconds":60,"securityContext":{},"eventTimeout":"30s"}}}}
21.07.12 15:55:31.496            nuctl.platform (I) Waiting for function to be ready {"timeout": 60}
21.07.12 15:55:32.894                     nuctl (I) Function deploy complete {"functionName": "openvino-omz-public-yolo-v3-tf", "httpPort": 49156}
Again, go to models tab and check that you can
see YOLO v3 in the list. If you cannot by a reason it means that there are some
problems. Go to one of our public channels and ask for help.
Let us reuse the task which you created for testing SiamMask serverless function
above. Choose the magic wand tool, go to the Detectors tab, and select
YOLO v3 model. Press Annotate button and after a couple of seconds you
should see detection results. Do not forget to save annotations.
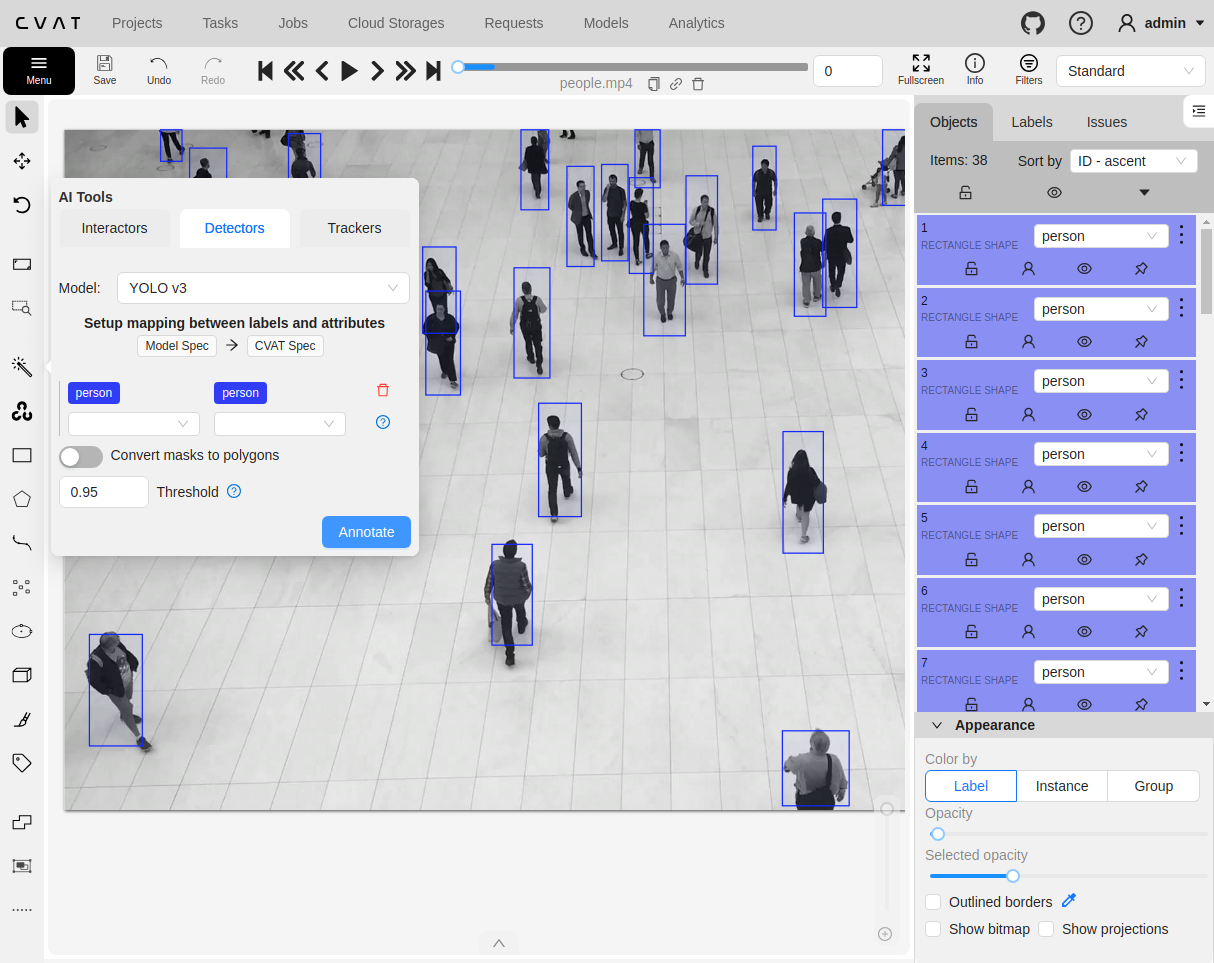
Also it is possible to run a detector for the whole annotation task. Thus CVAT will run the serverless function on every frame of the task and submit results directly into database. For more details please read the guide.
Object segmentation using Segment Anything
If you have an interactor that returns masks, you can use it to segment objects.
One such interactor is Segment Anything. Several implementations are available out of the box:
serverless/pytorch/facebookresearch/sam/Includes two versions: one optimized for CPU and another for GPU.
Deploying a serverless function optimized for GPU follows a similar process.
You only need to run the serverless/deploy_gpu.sh script, which executes the
same commands but utilizes the function-gpu.yaml configuration file instead of function.yaml.
See the following sections for details on the differences.
Note: Please do not run several GPU functions at the same time. In many cases, it will not work out of the box. For now, you should manually schedule different functions on different GPUs and it requires source code modification. Nuclio autoscaler does not support the local platform (docker).
serverless/deploy_gpu.sh serverless/pytorch/facebookresearch/sam/
serverless/deploy_gpu.sh serverless/pytorch/facebookresearch/sam/
25.01.30 11:02:07.034 (I)                     nuctl Deploying function {"name": "pth-facebookresearch-sam-vit-h"}
25.01.30 11:02:07.034 (I)                     nuctl Building {"builderKind": "docker", "versionInfo": "Label: 1.13.0, Git commit: c4422eb772781fb50fbf017698aae96199d81388, OS: linux, Arch: amd64, Go version: go1.21.7", "name": "pth-facebookresearch-sam-vit-h"}
25.01.30 11:02:07.159 (I)                     nuctl Staging files and preparing base images
25.01.30 11:02:07.160 (W)                     nuctl Using user provided base image, runtime interpreter version is provided by the base image {"baseImage": "ubuntu:22.04"}
25.01.30 11:02:07.160 (I)                     nuctl Building processor image {"registryURL": "", "taggedImageName": "cvat.pth.facebookresearch.sam.vit_h:latest"}
25.01.30 11:02:07.160 (I)     nuctl.platform.docker Pulling image {"imageName": "quay.io/nuclio/handler-builder-python-onbuild:1.13.0-amd64"}
25.01.30 11:02:09.656 (I)     nuctl.platform.docker Pulling image {"imageName": "quay.io/nuclio/uhttpc:0.0.1-amd64"}
25.01.30 11:02:12.174 (I)            nuctl.platform Building docker image {"image": "cvat.pth.facebookresearch.sam.vit_h:latest"}
25.01.30 11:20:54.431 (I)            nuctl.platform Pushing docker image into registry {"image": "cvat.pth.facebookresearch.sam.vit_h:latest", "registry": ""}
25.01.30 11:20:54.431 (I)            nuctl.platform Docker image was successfully built and pushed into docker registry {"image": "cvat.pth.facebookresearch.sam.vit_h:latest"}
25.01.30 11:20:54.431 (I)                     nuctl Build complete {"image": "cvat.pth.facebookresearch.sam.vit_h:latest"}
25.01.30 11:20:54.436 (I)                     nuctl Cleaning up before deployment {"functionName": "pth-facebookresearch-sam-vit-h"}
25.01.30 11:20:55.018 (I)            nuctl.platform Waiting for function to be ready {"timeout": 120}
25.01.30 11:20:56.719 (I)                     nuctl Function deploy complete {"functionName": "pth-facebookresearch-sam-vit-h", "httpPort": 32771, "internalInvocationURLs": ["172.18.0.22:8080"], "externalInvocationURLs": ["0.0.0.0:32771"]}
Now you should be able to annotate objects using segment anything.
Adding your own DL models
Choose a DL model
For the tutorial I will choose a popular AI library with a lot of models inside. In your case it can be your own model. If it is based on detectron2 it will be easy to integrate. Just follow the tutorial.
Detectron2 is Facebook AI Research’s next generation library that provides state-of-the-art detection and segmentation algorithms. It is the successor of Detectron and maskrcnn-benchmark. It supports a number of computer vision research projects and production applications in Facebook.
Clone the repository somewhere. I assume that all other experiments will be
run from the cloned detectron2 directory.
git clone https://github.com/facebookresearch/detectron2
cd detectron2
Run local experiments
Let’s run a detection model locally. First of all need to install requirements for the library.
In my case I have Ubuntu 20.04 with python 3.8.5. I installed PyTorch 1.8.1 for Linux with pip, python, and CPU inside a virtual environment. Follow opencv-python installation guide to get the library for demo and visualization.
python3 -m venv .detectron2
. .detectron2/bin/activate
pip install torch==1.8.1+cpu torchvision==0.9.1+cpu torchaudio==0.8.1 -f https://download.pytorch.org/whl/torch_stable.html
pip install opencv-python
Install the detectron2 library from your local clone (you should be inside detectron2 directory).
python -m pip install -e .
After the library from Facebook AI Research is installed, we can run a couple of experiments. See the official tutorial for more examples. I decided to experiment with RetinaNet. First step is to download model weights.
curl -O https://dl.fbaipublicfiles.com/detectron2/COCO-Detection/retinanet_R_101_FPN_3x/190397697/model_final_971ab9.pkl
To run experiments let’s download an image with cats from wikipedia.
curl -O https://upload.wikimedia.org/wikipedia/commons/thumb/0/0b/Cat_poster_1.jpg/1920px-Cat_poster_1.jpg
Finally let’s run the DL model inference on CPU. If all is fine, you will see a window with cats and bounding boxes around them with scores.
python demo/demo.py --config-file configs/COCO-Detection/retinanet_R_101_FPN_3x.yaml \
  --input 1920px-Cat_poster_1.jpg --opts MODEL.WEIGHTS model_final_971ab9.pkl MODEL.DEVICE cpu
Next step is to minimize demo/demo.py script and keep code which is necessary to load,
run, and interpret output of the model only. Let’s hard code parameters and remove
argparse. Keep only code which is responsible for working with an image. There is
no common advice how to minimize some code.
Finally you should get something like the code below which has fixed config, read a predefined image, initialize predictor, and run inference. As the final step it prints all detected bounding boxes with scores and labels.
from detectron2.config import get_cfg
from detectron2.data.detection_utils import read_image
from detectron2.engine.defaults import DefaultPredictor
from detectron2.data.datasets.builtin_meta import COCO_CATEGORIES

CONFIG_FILE = "configs/COCO-Detection/retinanet_R_101_FPN_3x.yaml"
CONFIG_OPTS = ["MODEL.WEIGHTS", "model_final_971ab9.pkl", "MODEL.DEVICE", "cpu"]
CONFIDENCE_THRESHOLD = 0.5

def setup_cfg():
    cfg = get_cfg()
    cfg.merge_from_file(CONFIG_FILE)
    cfg.merge_from_list(CONFIG_OPTS)
    cfg.MODEL.RETINANET.SCORE_THRESH_TEST = CONFIDENCE_THRESHOLD
    cfg.MODEL.ROI_HEADS.SCORE_THRESH_TEST = CONFIDENCE_THRESHOLD
    cfg.MODEL.PANOPTIC_FPN.COMBINE.INSTANCES_CONFIDENCE_THRESH = CONFIDENCE_THRESHOLD
    cfg.freeze()
    return cfg


if __name__ == "__main__":
    cfg = setup_cfg()
    input = "1920px-Cat_poster_1.jpg"
    img = read_image(input, format="BGR")
    predictor = DefaultPredictor(cfg)
    predictions = predictor(img)
    instances = predictions['instances']
    pred_boxes = instances.pred_boxes
    scores = instances.scores
    pred_classes = instances.pred_classes
    for box, score, label in zip(pred_boxes, scores, pred_classes):
        label = COCO_CATEGORIES[int(label)]["name"]
        print(box.tolist(), float(score), label)
DL model as a serverless function
When we know how to run the DL model locally, we can prepare a serverless function which can be used by CVAT to annotate data. Let’s see how function.yaml will look like…
Let’s look at faster_rcnn_inception_v2_coco serverless
function configuration as an example and try adapting it to our case.
First of all let’s invent an unique name for the new function:
pth-facebookresearch-detectron2-retinanet-r101. Section annotations
describes our function for CVAT serverless subsystem:
annotations.nameis a display nameannotations.typeis a type of the serverless function. It can have several different values. Basically it affects input and output of the function. In our case it hasdetectortype and it means that the integrated DL model can generate shapes with labels for an image.annotations.frameworkis used for information only and can have arbitrary value. Usually it has values like OpenVINO, PyTorch, TensorFlow, etc.annotations.specdescribes the list of labels which the model supports. In the case the DL model was trained on MS COCO dataset and the list of labels correspond to the dataset.spec.descriptionis used to provide basic information for the model.
All other parameters are described in Nuclio documentation.
spec.handleris the entry point to your function.spec.runtimeis the name of the language runtime.spec.eventTimeoutis the global event timeout
Next step is to describe how to build our serverless function:
spec.build.imageis the name of your docker imagespec.build.baseImageis the name of a base container image from which to build the functionspec.build.directivesare commands to build your docker image
In our case we start from Ubuntu 20.04 base image, install curl to download
weights for our model, git to clone detectron2 project from GitHub, and
python together with pip. Repeat installation steps which we used to setup
the DL model locally with minor modifications.
For Nuclio platform we have to specify a couple of more parameters:
spec.triggers.myHttpTriggerdescribes HTTP trigger to handle incoming HTTP requests.spec.platformdescribes some important parameters to run your functions likerestartPolicyandmountMode. Read Nuclio documentation for more details.
metadata:
  name: pth-facebookresearch-detectron2-retinanet-r101
  namespace: cvat
  annotations:
    name: RetinaNet R101
    type: detector
    spec: |
      [
        { "id": 1, "name": "person" },
        { "id": 2, "name": "bicycle" },

        ...

        { "id":89, "name": "hair_drier" },
        { "id":90, "name": "toothbrush" }
      ]

spec:
  description: RetinaNet R101 from Detectron2
  runtime: 'python:3.10'
  handler: main:handler
  eventTimeout: 30s

  build:
    image: cvat.pth.facebookresearch.detectron2.retinanet_r101
    baseImage: ubuntu:22.04

    directives:
      preCopy:
        - kind: ENV
          value: DEBIAN_FRONTEND=noninteractive
        - kind: RUN
          value: |-
            apt-get update \
            && apt-get install -y --no-install-recommends \
              curl \
              git \
              g++ \
              ca-certificates \
              python-is-python3 \
              python3 \
              python3-dev \
              python3-pip \
            && rm -rf /var/lib/apt/lists/*
        - kind: RUN
          value: |-
            pip install \
              torch==1.13.1+cpu torchvision==0.14.1+cpu numpy==1.26.4 \
              --extra-index-url https://download.pytorch.org/whl/cpu \
              --no-cache-dir
        - kind: RUN
          value: pip install 'git+https://github.com/facebookresearch/detectron2@ff53992b1985' --no-cache-dir
        - kind: WORKDIR
          value: /opt/nuclio
        - kind: RUN
          value: curl -O https://dl.fbaipublicfiles.com/detectron2/COCO-Detection/retinanet_R_101_FPN_3x/190397697/model_final_971ab9.pkl

  triggers:
    myHttpTrigger:
      numWorkers: 2
      kind: 'http'
      workerAvailabilityTimeoutMilliseconds: 10000
      attributes:
        maxRequestBodySize: 33554432 # 32MB

  platform:
    attributes:
      restartPolicy:
        name: always
        maximumRetryCount: 3
      mountMode: volume
Full code can be found here: detectron2/retinanet/nuclio/function.yaml
Next step is to adapt our source code which we implemented to run the DL model
locally to requirements of Nuclio platform. First step is to load the model
into memory using init_context(context) function. Read more about the function
in Best Practices and Common Pitfalls.
After that we need to accept incoming HTTP requests, run inference,
reply with detection results. For the process our entry point is responsible
which we specified in our function specification handler(context, event).
Again in accordance to function specification the entry point should be
located inside main.py.
def init_context(context):
    context.logger.info("Init context...  0%")

    cfg = get_config('COCO-Detection/retinanet_R_101_FPN_3x.yaml')
    cfg.merge_from_list(CONFIG_OPTS)
    cfg.MODEL.RETINANET.SCORE_THRESH_TEST = CONFIDENCE_THRESHOLD
    cfg.MODEL.ROI_HEADS.SCORE_THRESH_TEST = CONFIDENCE_THRESHOLD
    cfg.MODEL.PANOPTIC_FPN.COMBINE.INSTANCES_CONFIDENCE_THRESH = CONFIDENCE_THRESHOLD
    cfg.freeze()
    predictor = DefaultPredictor(cfg)

    context.user_data.model_handler = predictor

    context.logger.info("Init context...100%")

def handler(context, event):
    context.logger.info("Run retinanet-R101 model")
    data = event.body
    buf = io.BytesIO(base64.b64decode(data["image"]))
    threshold = float(data.get("threshold", 0.5))
    image = convert_PIL_to_numpy(Image.open(buf), format="BGR")

    predictions = context.user_data.model_handler(image)

    instances = predictions['instances']
    pred_boxes = instances.pred_boxes
    scores = instances.scores
    pred_classes = instances.pred_classes
    results = []
    for box, score, label in zip(pred_boxes, scores, pred_classes):
        label = COCO_CATEGORIES[int(label)]["name"]
        if score >= threshold:
            results.append({
                "confidence": str(float(score)),
                "label": label,
                "points": box.tolist(),
                "type": "rectangle",
            })

    return context.Response(body=json.dumps(results), headers={},
        content_type='application/json', status_code=200)
Full code can be found here: detectron2/retinanet/nuclio/main.py
Deploy RetinaNet serverless function
To use the new serverless function you have to deploy it using nuctl command.
The actual deployment process is described in
automatic annotation guide.
./serverless/deploy_cpu.sh ./serverless/pytorch/facebookresearch/detectron2/retinanet_r101
./serverless/deploy_cpu.sh ./serverless/pytorch/facebookresearch/detectron2/retinanet_r101
25.12.08 15:43:18.740 (I)                     nuctl Project created {"Name": "cvat", "Namespace": "nuclio"}
Deploying pytorch/facebookresearch/detectron2/retinanet_r101 function...
25.12.08 15:43:18.977 (I)                     nuctl Deploying function {"name": "pth-facebookresearch-detectron2-retinanet-r101"}
25.12.08 15:43:18.977 (I)                     nuctl Building {"builderKind": "docker", "versionInfo": "Label: 1.15.9, Git commit: ad1fde3b47fcd9035f3f0eea45b2ff654655e8be, OS: linux, Arch: amd64, Go version: go1.25.4", "name": "pth-facebookresearch-detectron2-retinanet-r101"}
25.12.08 15:43:19.129 (I)                     nuctl Staging files and preparing base images
25.12.08 15:43:19.130 (W)                     nuctl Using user provided base image, runtime interpreter version is provided by the base image {"baseImage": "ubuntu:22.04"}
25.12.08 15:43:19.130 (I)                     nuctl Building processor image {"registryURL": "", "taggedImageName": "cvat.pth.facebookresearch.detectron2.retinanet_r101:latest"}
25.12.08 15:43:19.130 (I)     nuctl.platform.docker Pulling image {"imageName": "quay.io/nuclio/handler-builder-python-onbuild:1.15.9-amd64"}
25.12.08 15:43:21.390 (I)     nuctl.platform.docker Pulling image {"imageName": "gcr.io/iguazio/uhttpc:0.0.3-amd64"}
25.12.08 15:43:23.018 (I)            nuctl.platform Building docker image {"image": "cvat.pth.facebookresearch.detectron2.retinanet_r101:latest"}
25.12.08 15:43:23.206 (I)            nuctl.platform Pushing docker image into registry {"image": "cvat.pth.facebookresearch.detectron2.retinanet_r101:latest", "registry": ""}
25.12.08 15:43:23.206 (I)            nuctl.platform Docker image was successfully built and pushed into docker registry {"image": "cvat.pth.facebookresearch.detectron2.retinanet_r101:latest"}
25.12.08 15:43:23.206 (I)                     nuctl Build complete {"image": "cvat.pth.facebookresearch.detectron2.retinanet_r101:latest"}
25.12.08 15:43:23.213 (I)                     nuctl Cleaning up before deployment {"functionName": "pth-facebookresearch-detectron2-retinanet-r101"}
25.12.08 15:43:23.667 (I)            nuctl.platform Waiting for function to be ready {"timeout": 120}
25.12.08 15:43:25.516 (I)                     nuctl Function deploy complete {"functionName": "pth-facebookresearch-detectron2-retinanet-r101", "httpPort": 32773, "internalInvocationURLs": ["172.18.0.21:8080"], "externalInvocationURLs": ["0.0.0.0:32773"]}
 NAMESPACE | NAME                                           | PROJECT | STATE | REPLICAS | NODE PORT
 nuclio    | pth-facebookresearch-detectron2-retinanet-r101 | cvat    | ready | 1/1      | 32773
Advanced capabilities
Optimize using GPU
To optimize a function for a specific device (e.g. GPU), basically you just need to modify instructions above to run the function on the target device. In most cases it will be necessary to modify installation instructions only.
For RetinaNet R101 which was added above modifications will look like:
--- function.yaml	2021-06-25 21:06:51.603281723 +0300
+++ function-gpu.yaml	2021-07-07 22:38:53.454202637 +0300
@@ -89,19 +89,21 @@ metadata:
       ]

 spec:
-  description: RetinaNet R101 from Detectron2
+  description: RetinaNet R101 from Detectron2 optimized for GPU
   runtime: 'python:3.10'
   handler: main:handler
   eventTimeout: 30s

   build:
-    image: cvat.pth.facebookresearch.detectron2.retinanet_r101
+    image: cvat.pth.facebookresearch.detectron2.retinanet_r101:latest-gpu
     baseImage: ubuntu:22.04

     directives:
       preCopy:
         - kind: ENV
           value: DEBIAN_FRONTEND=noninteractive
+        - kind: ENV
+          value: NVIDIA_VISIBLE_DEVICES=all NVIDIA_DRIVER_CAPABILITIES=compute,utility
         - kind: RUN
           value: |-
             apt-get update \
@@ -109,20 +111,34 @@ spec:
               curl \
               git \
               g++ \
-              ca-certificates \
               python-is-python3 \
               python3 \
               python3-dev \
               python3-pip \
+            && curl -fsSL -o /tmp/cuda-keyring.deb \
+              https://developer.download.nvidia.com/compute/cuda/repos/ubuntu2204/x86_64/cuda-keyring_1.1-1_all.deb \
+            && dpkg -i /tmp/cuda-keyring.deb \
+            && rm -f /tmp/cuda-keyring.deb \
+            && apt-get update \
+            && apt-get install -y --no-install-recommends \
+              cuda-nvcc-11-7 \
+              libcublas-dev-11-7 \
+              libcusolver-dev-11-7 \
+              libcusparse-dev-11-7 \
             && rm -rf /var/lib/apt/lists/*
+        - kind: ENV
+          value: PATH=/usr/local/cuda-11.7/bin:${PATH} CUDA_HOME=/usr/local/cuda-11.7
         - kind: RUN
           value: |-
             pip install \
-              torch==1.13.1+cpu torchvision==0.14.1+cpu numpy==1.26.4 \
-              --extra-index-url https://download.pytorch.org/whl/cpu \
+              torch==1.13.1+cu117 torchvision==0.14.1+cu117 numpy==1.26.4 \
+              --extra-index-url https://download.pytorch.org/whl/cu117 \
               --no-cache-dir
         - kind: RUN
-          value: pip install 'git+https://github.com/facebookresearch/detectron2@ff53992b1985' --no-cache-dir
+          value: |-
+            FORCE_CUDA=1 \
+            TORCH_CUDA_ARCH_LIST="Kepler;Kepler+Tesla;Maxwell;Maxwell+Tegra;Pascal;Volta;Turing" \
+            pip install 'git+https://github.com/facebookresearch/detectron2@ff53992b1985' --no-cache-dir
         - kind: WORKDIR
           value: /opt/nuclio
         - kind: RUN
@@ -130,12 +146,16 @@ spec:

   triggers:
     myHttpTrigger:
-      numWorkers: 2
+      numWorkers: 1
       kind: 'http'
       workerAvailabilityTimeoutMilliseconds: 10000
       attributes:
         maxRequestBodySize: 33554432 # 32MB

+  resources:
+    limits:
+      nvidia.com/gpu: 1
+
   platform:
     attributes:
       restartPolicy:
Note: GPU has very limited amount of memory and it doesn’t allow to run multiple serverless functions in parallel for now using free open-source Nuclio version on the local platform because scaling to zero feature is absent. Theoretically it is possible to run different functions on different GPUs, but it requires to change source code on corresponding serverless functions to choose a free GPU.
Debugging a serverless function
Let’s say you have a problem with your serverless function and want to debug it.
Of course you can use context.logger.info or similar methods to print the
intermediate state of your function.
Another way is to debug using Visual Studio Code.
Please see instructions below to setup your environment step by step.
Let’s modify our function.yaml to include debugpy
package and specify that maxWorkers count is 1. Otherwise both workers will
try to use the same port and it will lead to an exception in python code.
        - kind: RUN
          value: pip3 install debugpy

  triggers:
    myHttpTrigger:
      maxWorkers: 1
Change main.py to listen to a port (e.g. 5678). Insert code below
in the beginning of your file with entry point.
import debugpy
debugpy.listen(5678)
After these changes deploy the serverless function once again. For
serverless/pytorch/facebookresearch/detectron2/retinanet/nuclio/ you should
run the command below:
serverless/deploy_cpu.sh serverless/pytorch/facebookresearch/detectron2/retinanet
To debug python code inside a container you have to publish the port (in this tutorial it is 5678). Nuclio deploy command doesn’t support that and we have to workaround it using SSH port forwarding.
- Install SSH server on your host machine using
sudo apt install openssh-server - In
/etc/ssh/sshd_confighost file setGatewayPorts yes - Restart ssh service to apply changes using
sudo systemctl restart ssh.service
Next step is to install ssh client inside the container and run port forwarding.
In the snippet below instead of user and ipaddress provide username and
IP address of your host (usually IP address starts from 192.168.). You will
need to confirm that you want to connect to your host computer and enter your
password. Keep the terminal open after that.
docker exec -it nuclio-nuclio-pth-facebookresearch-detectron2-retinanet-r101 /bin/bash
apt update && apt install -y ssh
ssh -R 5678:localhost:5678 user@ipaddress
See how the latest command looks like in my case:
root@2d6cceec8f70:/opt/nuclio# ssh -R 5678:localhost:5678 nmanovic@192.168.50.188
The authenticity of host '192.168.50.188 (192.168.50.188)' can't be established.
ECDSA key fingerprint is SHA256:0sD6IWi+FKAhtUXr2TroHqyjcnYRIGLLx/wkGaZeRuo.
Are you sure you want to continue connecting (yes/no/[fingerprint])? yes
Warning: Permanently added '192.168.50.188' (ECDSA) to the list of known hosts.
nmanovic@192.168.50.188's password:
Welcome to Ubuntu 20.04.2 LTS (GNU/Linux 5.8.0-53-generic x86_64)

 * Documentation:  https://help.ubuntu.com
 * Management:     https://landscape.canonical.com
 * Support:        https://ubuntu.com/advantage

223 updates can be applied immediately.
132 of these updates are standard security updates.
To see these additional updates run: apt list --upgradable

Your Hardware Enablement Stack (HWE) is supported until April 2025.
Last login: Fri Jun 25 16:39:04 2021 from 172.17.0.5
[setupvars.sh] OpenVINO environment initialized
nmanovic@nmanovic-dl-node:~$
Finally, add the configuration below into your launch.json. Open Visual Studio Code and
run Serverless Debug configuration, set a breakpoint in main.py and try to call the
serverless function from CVAT UI. The breakpoint should be triggered in Visual Studio
Code and it should be possible to inspect variables and debug code.
{
  "name": "Serverless Debug",
  "type": "python",
  "request": "attach",
  "connect": {
    "host": "localhost",
    "port": 5678
  },
  "pathMappings": [
    {
      "localRoot": "${workspaceFolder}/serverless/pytorch/facebookresearch/detectron2/retinanet/nuclio",
      "remoteRoot": "/opt/nuclio"
    }
  ]
}
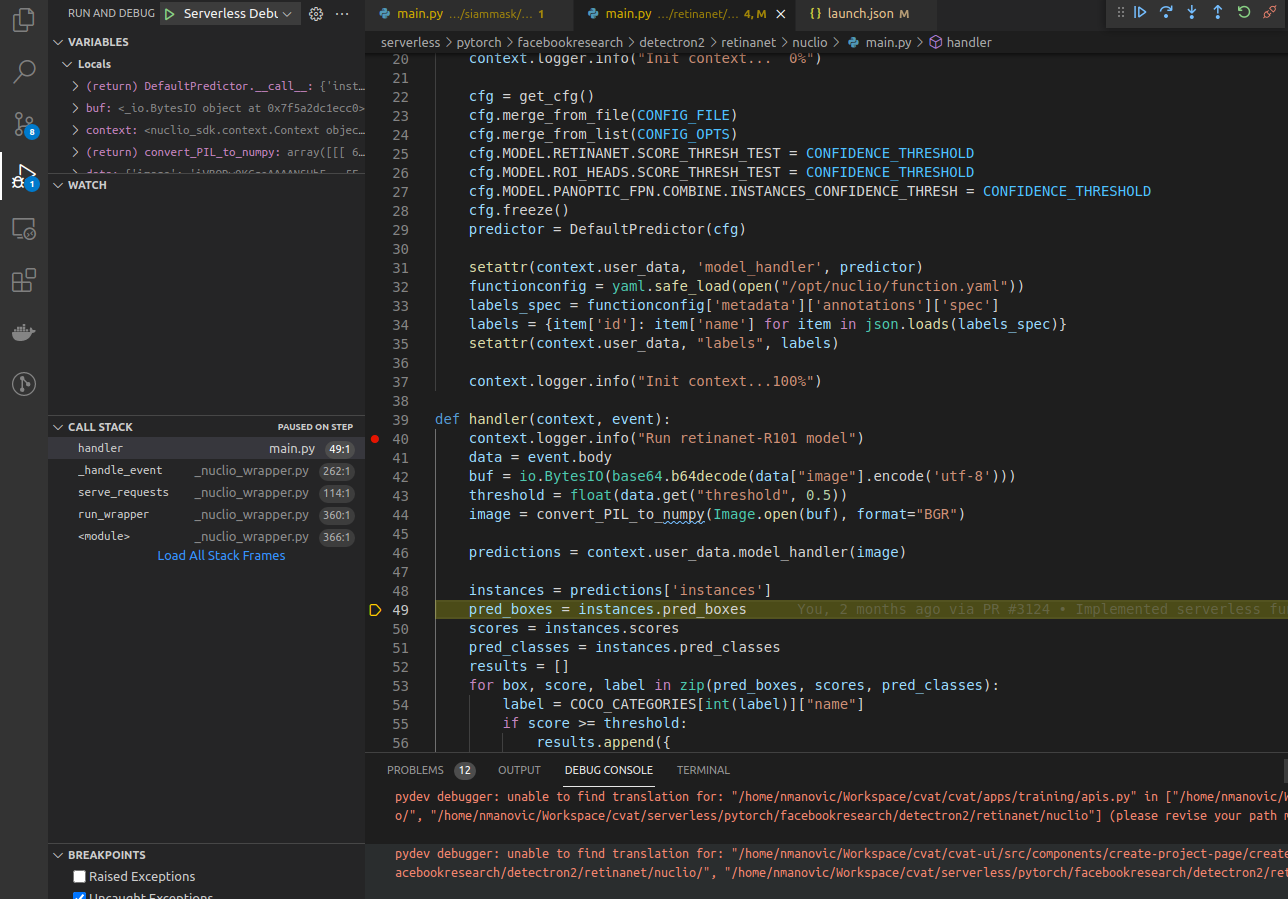
Note: In case of changes in the source code, need to re-deploy the function and initiate port forwarding again.
Troubleshooting
First of all need to check that you are using the recommended version of
Nuclio framework. In my case it is 1.5.16 but you need to check
the installation manual.
nuctl version
Client version:
"Label: 1.5.16, Git commit: ae43a6a560c2bec42d7ccfdf6e8e11a1e3cc3774, OS: linux, Arch: amd64, Go version: go1.14.3"
Check that Nuclio dashboard is running and its version corresponds to nuctl.
docker ps --filter NAME=^nuclio$
CONTAINER ID   IMAGE                                   COMMAND                  CREATED       STATUS                    PORTS                                               NAMES
7ab0c076c927   quay.io/nuclio/dashboard:1.5.16-amd64   "/docker-entrypoint.…"   6 weeks ago   Up 46 minutes (healthy)   80/tcp, 0.0.0.0:8070->8070/tcp, :::8070->8070/tcp   nuclio
Be sure that the model, which doesn’t work, is healthy. In my case Inside Outside Guidance is not running.
docker ps --filter NAME=iog
CONTAINER ID IMAGE COMMAND CREATED STATUS PORTS NAMES
Let’s run it. Go to the root of CVAT repository and run the deploying command.
serverless/deploy_cpu.sh serverless/pytorch/shiyinzhang/iog
Deploying serverless/pytorch/shiyinzhang/iog function...
21.07.06 12:49:08.763                     nuctl (I) Deploying function {"name": ""}
21.07.06 12:49:08.763                     nuctl (I) Building {"versionInfo": "Label: 1.5.16, Git commit: ae43a6a560c2bec42d7ccfdf6e8e11a1e3cc3774, OS: linux, Arch: amd64, Go version: go1.14.3", "name": ""}
21.07.06 12:49:09.085                     nuctl (I) Cleaning up before deployment {"functionName": "pth-shiyinzhang-iog"}
21.07.06 12:49:09.162                     nuctl (I) Function already exists, deleting function containers {"functionName": "pth-shiyinzhang-iog"}
21.07.06 12:49:09.230                     nuctl (I) Staging files and preparing base images
21.07.06 12:49:09.232                     nuctl (I) Building processor image {"imageName": "cvat/pth.shiyinzhang.iog:latest"}
21.07.06 12:49:09.232     nuctl.platform.docker (I) Pulling image {"imageName": "quay.io/nuclio/handler-builder-python-onbuild:1.5.16-amd64"}
21.07.06 12:49:12.525     nuctl.platform.docker (I) Pulling image {"imageName": "quay.io/nuclio/uhttpc:0.0.1-amd64"}
21.07.06 12:49:16.222            nuctl.platform (I) Building docker image {"image": "cvat/pth.shiyinzhang.iog:latest"}
21.07.06 12:49:16.555            nuctl.platform (I) Pushing docker image into registry {"image": "cvat/pth.shiyinzhang.iog:latest", "registry": ""}
21.07.06 12:49:16.555            nuctl.platform (I) Docker image was successfully built and pushed into docker registry {"image": "cvat/pth.shiyinzhang.iog:latest"}
21.07.06 12:49:16.555                     nuctl (I) Build complete {"result": {"Image":"cvat/pth.shiyinzhang.iog:latest","UpdatedFunctionConfig":{"metadata":{"name":"pth-shiyinzhang-iog","namespace":"nuclio","labels":{"nuclio.io/project-name":"cvat"},"annotations":{"framework":"pytorch","min_pos_points":"1","name":"IOG","spec":"","startswith_box":"true","type":"interactor"}},"spec":{"description":"Interactive Object Segmentation with Inside-Outside Guidance","handler":"main:handler","runtime":"python:3.6","env":[{"name":"PYTHONPATH","value":"/opt/nuclio/iog"}],"resources":{},"image":"cvat/pth.shiyinzhang.iog:latest","targetCPU":75,"triggers":{"myHttpTrigger":{"class":"","kind":"http","name":"myHttpTrigger","maxWorkers":2,"workerAvailabilityTimeoutMilliseconds":10000,"attributes":{"maxRequestBodySize":33554432}}},"volumes":[{"volume":{"name":"volume-1","hostPath":{"path":"/home/nmanovic/Workspace/cvat/serverless/common"}},"volumeMount":{"name":"volume-1","mountPath":"/opt/nuclio/common"}}],"build":{"image":"cvat/pth.shiyinzhang.iog","baseImage":"continuumio/miniconda3","directives":{"preCopy":[{"kind":"WORKDIR","value":"/opt/nuclio"},{"kind":"RUN","value":"conda create -y -n iog python=3.6"},{"kind":"SHELL","value":"[\"conda\", \"run\", \"-n\", \"iog\", \"/bin/bash\", \"-c\"]"},{"kind":"RUN","value":"conda install -y -c anaconda curl"},{"kind":"RUN","value":"conda install -y pytorch=0.4 torchvision=0.2 -c pytorch"},{"kind":"RUN","value":"conda install -y -c conda-forge pycocotools opencv scipy"},{"kind":"RUN","value":"git clone https://github.com/shiyinzhang/Inside-Outside-Guidance.git iog"},{"kind":"WORKDIR","value":"/opt/nuclio/iog"},{"kind":"ENV","value":"fileid=1Lm1hhMhhjjnNwO4Pf7SC6tXLayH2iH0l"},{"kind":"ENV","value":"filename=IOG_PASCAL_SBD.pth"},{"kind":"RUN","value":"curl -c ./cookie -s -L \"https://drive.google.com/uc?export=download\u0026id=${fileid}\""},{"kind":"RUN","value":"echo \"/download/ {print \\$NF}\" \u003e confirm_code.awk"},{"kind":"RUN","value":"curl -Lb ./cookie \"https://drive.google.com/uc?export=download\u0026confirm=`awk -f confirm_code.awk ./cookie`\u0026id=${fileid}\" -o ${filename}"},{"kind":"WORKDIR","value":"/opt/nuclio"},{"kind":"ENTRYPOINT","value":"[\"conda\", \"run\", \"-n\", \"iog\"]"}]},"codeEntryType":"image"},"platform":{"attributes":{"mountMode":"volume","restartPolicy":{"maximumRetryCount":3,"name":"always"}}},"readinessTimeoutSeconds":60,"securityContext":{},"eventTimeout":"30s"}}}}
21.07.06 12:49:17.422     nuctl.platform.docker (W) Failed to run container {"err": "stdout:\n1373cb432a178a3606685b5975e40a0755bc7958786c182304f5d1bbc0873ceb\ndocker: Error response from daemon: driver failed programming external connectivity on endpoint nuclio-nuclio-pth-shiyinzhang-iog (df68e7b4a60e553ee3079f1f1622b050cc958bd50f2cd359a20164d8a417d0ea): Bind for 0.0.0.0:49154 failed: port is already allocated.\n\nstderr:\n", "errVerbose": "\nError - exit status 125\n    /nuclio/pkg/cmdrunner/shellrunner.go:96\n\nCall stack:\nstdout:\n1373cb432a178a3606685b5975e40a0755bc7958786c182304f5d1bbc0873ceb\ndocker: Error response from daemon: driver failed programming external connectivity on endpoint nuclio-nuclio-pth-shiyinzhang-iog (df68e7b4a60e553ee3079f1f1622b050cc958bd50f2cd359a20164d8a417d0ea): Bind for 0.0.0.0:49154 failed: port is already allocated.\n\nstderr:\n\n    /nuclio/pkg/cmdrunner/shellrunner.go:96\nstdout:\n1373cb432a178a3606685b5975e40a0755bc7958786c182304f5d1bbc0873ceb\ndocker: Error response from daemon: driver failed programming external connectivity on endpoint nuclio-nuclio-pth-shiyinzhang-iog (df68e7b4a60e553ee3079f1f1622b050cc958bd50f2cd359a20164d8a417d0ea): Bind for 0.0.0.0:49154 failed: port is already allocated.\n\nstderr:\n", "errCauses": [{"error": "exit status 125"}], "stdout": "1373cb432a178a3606685b5975e40a0755bc7958786c182304f5d1bbc0873ceb\ndocker: Error response from daemon: driver failed programming external connectivity on endpoint nuclio-nuclio-pth-shiyinzhang-iog (df68e7b4a60e553ee3079f1f1622b050cc958bd50f2cd359a20164d8a417d0ea): Bind for 0.0.0.0:49154 failed: port is already allocated.\n", "stderr": ""}
21.07.06 12:49:17.422                     nuctl (W) Failed to create a function; setting the function status {"err": "Failed to run a Docker container", "errVerbose": "\nError - exit status 125\n    /nuclio/pkg/cmdrunner/shellrunner.go:96\n\nCall stack:\nstdout:\n1373cb432a178a3606685b5975e40a0755bc7958786c182304f5d1bbc0873ceb\ndocker: Error response from daemon: driver failed programming external connectivity on endpoint nuclio-nuclio-pth-shiyinzhang-iog (df68e7b4a60e553ee3079f1f1622b050cc958bd50f2cd359a20164d8a417d0ea): Bind for 0.0.0.0:49154 failed: port is already allocated.\n\nstderr:\n\n    /nuclio/pkg/cmdrunner/shellrunner.go:96\nFailed to run a Docker container\n    /nuclio/pkg/platform/local/platform.go:653\nFailed to run a Docker container", "errCauses": [{"error": "stdout:\n1373cb432a178a3606685b5975e40a0755bc7958786c182304f5d1bbc0873ceb\ndocker: Error response from daemon: driver failed programming external connectivity on endpoint nuclio-nuclio-pth-shiyinzhang-iog (df68e7b4a60e553ee3079f1f1622b050cc958bd50f2cd359a20164d8a417d0ea): Bind for 0.0.0.0:49154 failed: port is already allocated.\n\nstderr:\n", "errorVerbose": "\nError - exit status 125\n    /nuclio/pkg/cmdrunner/shellrunner.go:96\n\nCall stack:\nstdout:\n1373cb432a178a3606685b5975e40a0755bc7958786c182304f5d1bbc0873ceb\ndocker: Error response from daemon: driver failed programming external connectivity on endpoint nuclio-nuclio-pth-shiyinzhang-iog (df68e7b4a60e553ee3079f1f1622b050cc958bd50f2cd359a20164d8a417d0ea): Bind for 0.0.0.0:49154 failed: port is already allocated.\n\nstderr:\n\n    /nuclio/pkg/cmdrunner/shellrunner.go:96\nstdout:\n1373cb432a178a3606685b5975e40a0755bc7958786c182304f5d1bbc0873ceb\ndocker: Error response from daemon: driver failed programming external connectivity on endpoint nuclio-nuclio-pth-shiyinzhang-iog (df68e7b4a60e553ee3079f1f1622b050cc958bd50f2cd359a20164d8a417d0ea): Bind for 0.0.0.0:49154 failed: port is already allocated.\n\nstderr:\n", "errorCauses": [{"error": "exit status 125"}]}]}

Error - exit status 125
    /nuclio/pkg/cmdrunner/shellrunner.go:96

Call stack:
stdout:
1373cb432a178a3606685b5975e40a0755bc7958786c182304f5d1bbc0873ceb
docker: Error response from daemon: driver failed programming external connectivity on endpoint nuclio-nuclio-pth-shiyinzhang-iog (df68e7b4a60e553ee3079f1f1622b050cc958bd50f2cd359a20164d8a417d0ea): Bind for 0.0.0.0:49154 failed: port is already allocated.

stderr:

    /nuclio/pkg/cmdrunner/shellrunner.go:96
Failed to run a Docker container
    /nuclio/pkg/platform/local/platform.go:653
Failed to deploy function
    ...//nuclio/pkg/platform/abstract/platform.go:182
  NAMESPACE |                      NAME                      | PROJECT | STATE | NODE PORT | REPLICAS
  nuclio    | pth-facebookresearch-sam-vit-h                 | cvat    | ready |     49154 | 1/1
  nuclio    | pth-foolwood-siammask                          | cvat    | ready |     49155 | 1/1
  nuclio    | pth-facebookresearch-detectron2-retinanet-r101 | cvat    | ready |     49155 | 1/1
  nuclio    | pth-shiyinzhang-iog                            | cvat    | error |         0 | 1/1
In this case the container was built some time ago and the port 49154 was
assigned by Nuclio. Now the port is used by pth-facebookresearch-sam-vit-h as we can
see in logs. To prove our hypothesis just need to run a couple of docker
commands:
docker container ls -a | grep iog
eb0c1ee46630 cvat/pth.shiyinzhang.iog:latest "conda run -n iog pr…" 9 minutes ago Created nuclio-nuclio-pth-shiyinzhang-iog
docker inspect eb0c1ee46630 | grep 49154
            "Error": "driver failed programming external connectivity on endpoint nuclio-nuclio-pth-shiyinzhang-iog (02384290f91b2216162b1603322dadee426afe7f439d3d090f598af5d4863b2d): Bind for 0.0.0.0:49154 failed: port is already allocated",
                        "HostPort": "49154"
To solve the problem let’s just remove the previous container for the function.
In this case it is eb0c1ee46630. After that the deploying command works as
expected.
docker container rm eb0c1ee46630
eb0c1ee46630
serverless/deploy_cpu.sh serverless/pytorch/shiyinzhang/iog
Deploying serverless/pytorch/shiyinzhang/iog function...
21.07.06 13:09:52.934                     nuctl (I) Deploying function {"name": ""}
21.07.06 13:09:52.934                     nuctl (I) Building {"versionInfo": "Label: 1.5.16, Git commit: ae43a6a560c2bec42d7ccfdf6e8e11a1e3cc3774, OS: linux, Arch: amd64, Go version: go1.14.3", "name": ""}
21.07.06 13:09:53.282                     nuctl (I) Cleaning up before deployment {"functionName": "pth-shiyinzhang-iog"}
21.07.06 13:09:53.341                     nuctl (I) Staging files and preparing base images
21.07.06 13:09:53.342                     nuctl (I) Building processor image {"imageName": "cvat/pth.shiyinzhang.iog:latest"}
21.07.06 13:09:53.342     nuctl.platform.docker (I) Pulling image {"imageName": "quay.io/nuclio/handler-builder-python-onbuild:1.5.16-amd64"}
21.07.06 13:09:56.633     nuctl.platform.docker (I) Pulling image {"imageName": "quay.io/nuclio/uhttpc:0.0.1-amd64"}
21.07.06 13:10:00.163            nuctl.platform (I) Building docker image {"image": "cvat/pth.shiyinzhang.iog:latest"}
21.07.06 13:10:00.452            nuctl.platform (I) Pushing docker image into registry {"image": "cvat/pth.shiyinzhang.iog:latest", "registry": ""}
21.07.06 13:10:00.452            nuctl.platform (I) Docker image was successfully built and pushed into docker registry {"image": "cvat/pth.shiyinzhang.iog:latest"}
21.07.06 13:10:00.452                     nuctl (I) Build complete {"result": {"Image":"cvat/pth.shiyinzhang.iog:latest","UpdatedFunctionConfig":{"metadata":{"name":"pth-shiyinzhang-iog","namespace":"nuclio","labels":{"nuclio.io/project-name":"cvat"},"annotations":{"framework":"pytorch","min_pos_points":"1","name":"IOG","spec":"","startswith_box":"true","type":"interactor"}},"spec":{"description":"Interactive Object Segmentation with Inside-Outside Guidance","handler":"main:handler","runtime":"python:3.6","env":[{"name":"PYTHONPATH","value":"/opt/nuclio/iog"}],"resources":{},"image":"cvat/pth.shiyinzhang.iog:latest","targetCPU":75,"triggers":{"myHttpTrigger":{"class":"","kind":"http","name":"myHttpTrigger","maxWorkers":2,"workerAvailabilityTimeoutMilliseconds":10000,"attributes":{"maxRequestBodySize":33554432}}},"volumes":[{"volume":{"name":"volume-1","hostPath":{"path":"/home/nmanovic/Workspace/cvat/serverless/common"}},"volumeMount":{"name":"volume-1","mountPath":"/opt/nuclio/common"}}],"build":{"image":"cvat/pth.shiyinzhang.iog","baseImage":"continuumio/miniconda3","directives":{"preCopy":[{"kind":"WORKDIR","value":"/opt/nuclio"},{"kind":"RUN","value":"conda create -y -n iog python=3.6"},{"kind":"SHELL","value":"[\"conda\", \"run\", \"-n\", \"iog\", \"/bin/bash\", \"-c\"]"},{"kind":"RUN","value":"conda install -y -c anaconda curl"},{"kind":"RUN","value":"conda install -y pytorch=0.4 torchvision=0.2 -c pytorch"},{"kind":"RUN","value":"conda install -y -c conda-forge pycocotools opencv scipy"},{"kind":"RUN","value":"git clone https://github.com/shiyinzhang/Inside-Outside-Guidance.git iog"},{"kind":"WORKDIR","value":"/opt/nuclio/iog"},{"kind":"ENV","value":"fileid=1Lm1hhMhhjjnNwO4Pf7SC6tXLayH2iH0l"},{"kind":"ENV","value":"filename=IOG_PASCAL_SBD.pth"},{"kind":"RUN","value":"curl -c ./cookie -s -L \"https://drive.google.com/uc?export=download\u0026id=${fileid}\""},{"kind":"RUN","value":"echo \"/download/ {print \\$NF}\" \u003e confirm_code.awk"},{"kind":"RUN","value":"curl -Lb ./cookie \"https://drive.google.com/uc?export=download\u0026confirm=`awk -f confirm_code.awk ./cookie`\u0026id=${fileid}\" -o ${filename}"},{"kind":"WORKDIR","value":"/opt/nuclio"},{"kind":"ENTRYPOINT","value":"[\"conda\", \"run\", \"-n\", \"iog\"]"}]},"codeEntryType":"image"},"platform":{"attributes":{"mountMode":"volume","restartPolicy":{"maximumRetryCount":3,"name":"always"}}},"readinessTimeoutSeconds":60,"securityContext":{},"eventTimeout":"30s"}}}}
21.07.06 13:10:01.604            nuctl.platform (I) Waiting for function to be ready {"timeout": 60}
21.07.06 13:10:02.976                     nuctl (I) Function deploy complete {"functionName": "pth-shiyinzhang-iog", "httpPort": 49159}
  NAMESPACE |                      NAME                      | PROJECT | STATE | NODE PORT | REPLICAS
  nuclio    | pth-facebookresearch-sam-vit-h                 | cvat    | ready |     49154 | 1/1
  nuclio    | pth-foolwood-siammask                          | cvat    | ready |     49155 | 1/1
  nuclio    | pth-facebookresearch-detectron2-retinanet-r101 | cvat    | ready |     49155 | 1/1
  nuclio    | pth-shiyinzhang-iog                            | cvat    | ready |     49159 | 1/1
When you investigate an issue with a serverless function, it is extremely
useful to look at logs. Just run a couple of commands like
docker logs <container>.
docker logs cvat
2021-07-06 13:44:54,699 DEBG 'runserver' stderr output:
[Tue Jul 06 13:44:54.699431 2021] [wsgi:error] [pid 625:tid 140010969868032] [remote 172.28.0.3:40972] [2021-07-06 13:44:54,699] ERROR django.request: Internal Server Error: /api/lambda/functions/pth-shiyinzhang-iog

2021-07-06 13:44:54,700 DEBG 'runserver' stderr output:
[Tue Jul 06 13:44:54.699712 2021] [wsgi:error] [pid 625:tid 140010969868032] [remote 172.28.0.3:40972] ERROR - 2021-07-06 13:44:54,699 - log - Internal Server Error: /api/lambda/functions/pth-shiyinzhang-iog
docker container ls --filter name=iog
CONTAINER ID   IMAGE                             COMMAND                  CREATED       STATUS                 PORTS                                         NAMES
3b6ef9a9f3e2   cvat/pth.shiyinzhang.iog:latest   "conda run -n iog pr…"   4 hours ago   Up 4 hours (healthy)   0.0.0.0:49159->8080/tcp, :::49159->8080/tcp   nuclio-nuclio-pth-shiyinzhang-iog
docker logs nuclio-nuclio-pth-shiyinzhang-iog
If before model deployment you see that the NODE PORT is 0, you need to assign it manually.
Add the port: 32001 attribute to the function.yaml file of each model, before you deploy the model.
Different ports should be prescribed for different models.
triggers:
myHttpTrigger:
    maxWorkers: 1
    kind: 'http'
    workerAvailabilityTimeoutMilliseconds: 10000
    attributes:
+     port: 32001
      maxRequestBodySize: 33554432 # 32MB
Installation serverless functions on Windows 10 with using the Ubuntu subsystem
If you encounter a problem running serverless functions on Windows 10, you can use the Ubuntu subsystem, for this do the following:
-
Install
WSL 2andDocker Desktopas described in installation manual -
Install Ubuntu 18.04 from Microsoft store.
-
Enable integration for Ubuntu-18.04 in the settings of
Docker Desktopin theResourcesWSL integrationtab: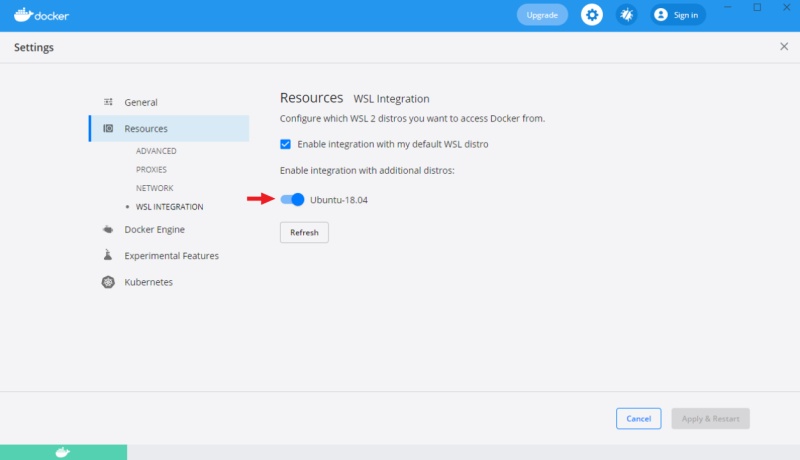
-
Then you can download and install
nuctlon Ubuntu, using the automatic annotation guide. -
Install
gitand clone repository on Ubuntu, as described in the installation manual. -
After that, run the commands from this tutorial through Ubuntu.
8 - QA & Analytics
Learn how to ensure annotation quality with validation tools, Ground Truth jobs, Honeypots, and performance analytics.
8.1 - Quality control
Overview of quality control features
CVAT has the following features for automated quality control of annotations:
- Validation set configuration for a task
- Job validation on job finish (Immediate feedback)
- Review mode for problems found
- Quality analytics
In this section, we highlight only the key steps in quality estimation. Consult the detailed guide on quality estimation in CVAT in the Advanced section.
How to enable quality control
-
Go to task creation
-
Select the source media, configure other task parameters
-
Scroll down to the Quality Control section
-
Select one of the validation modes available
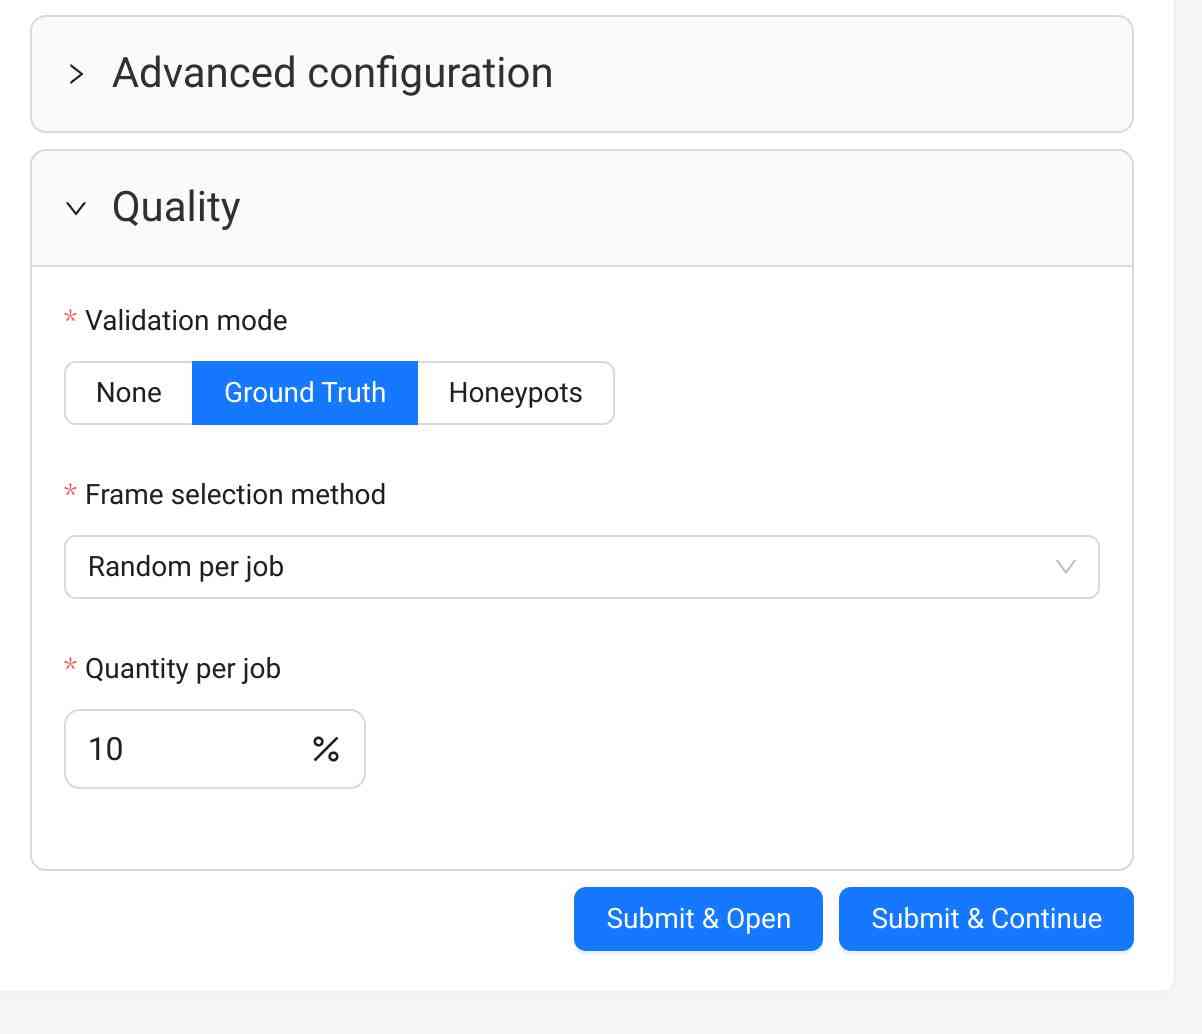
-
Create the task
-
Upload or create Ground Truth annotations in the Ground Truth job in the task
-
Switch the Ground Truth job into the
acceptancestage andcompletedstate
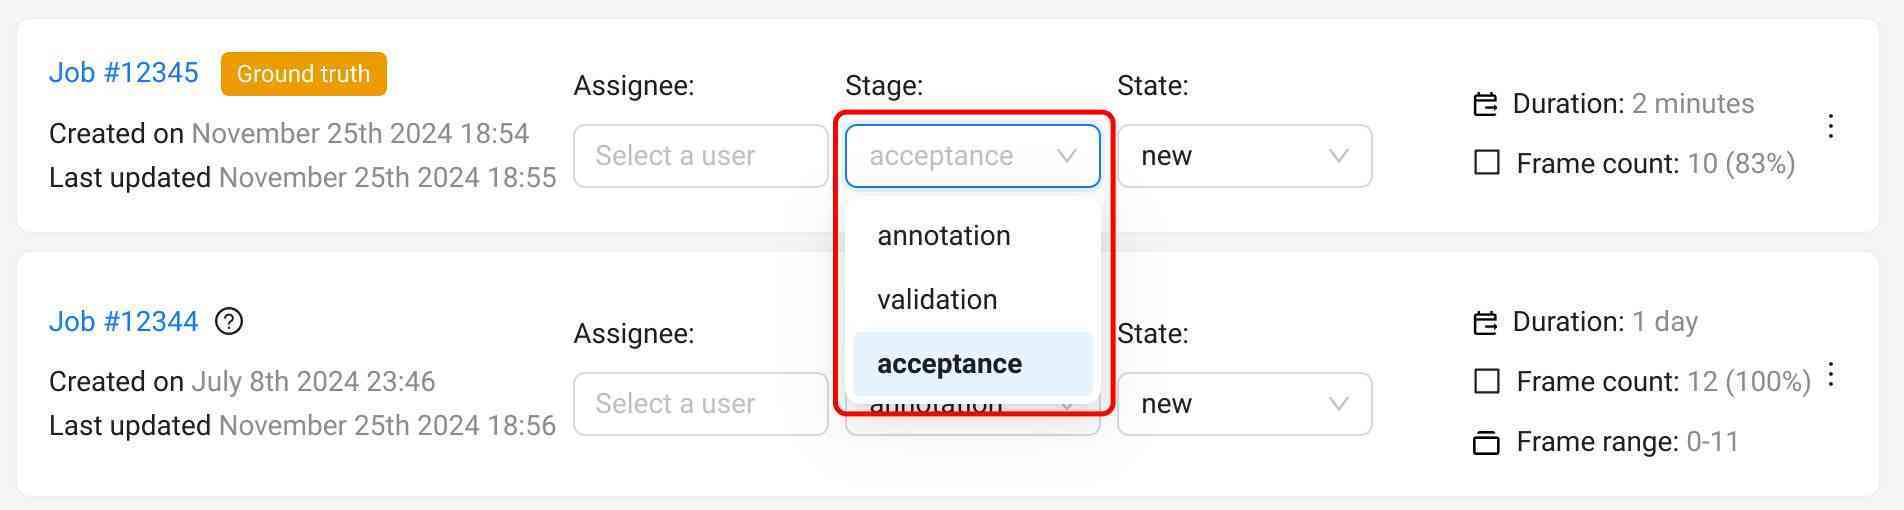
Note
For already existing tasks only the Ground Truth validation mode is available. If you want
to use Honeypots for your task, you will need to recreate the task.
-
Open the task page
-
Select the
+button next to the job list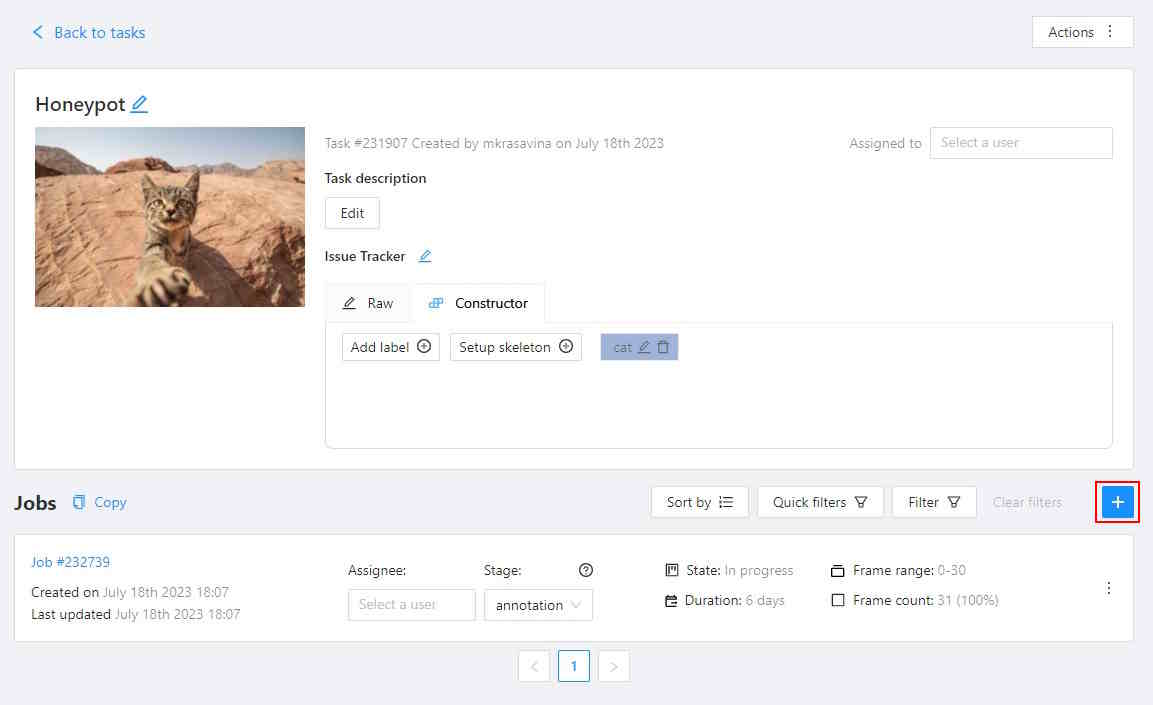
-
Select Job Type Ground truth and configure the job parameters
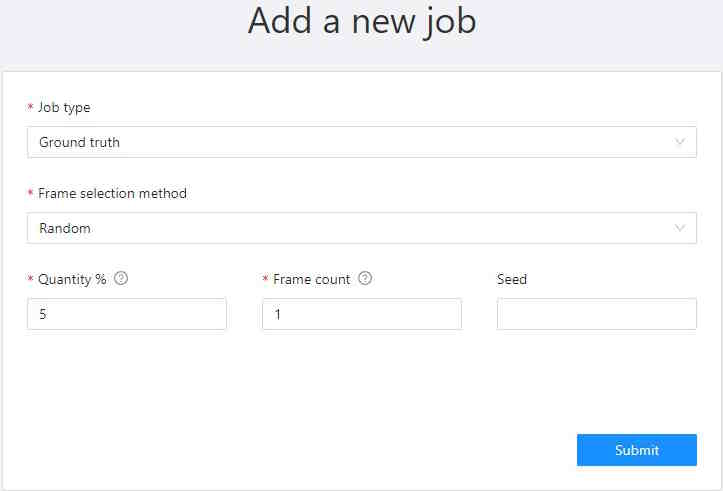
-
Upload or create Ground Truth annotations in the Ground Truth job in the task
-
Switch the Ground Truth job into the
acceptancestage andcompletedstate
How to enable immediate job feedback
Note
This feature requires a configured validation set in the task. Learn more in How to enable quality control and in the full guide.-
Open the task Actions menu > Quality control > Settings
-
Set Max validations per job to above zero. 3 is a good starting number
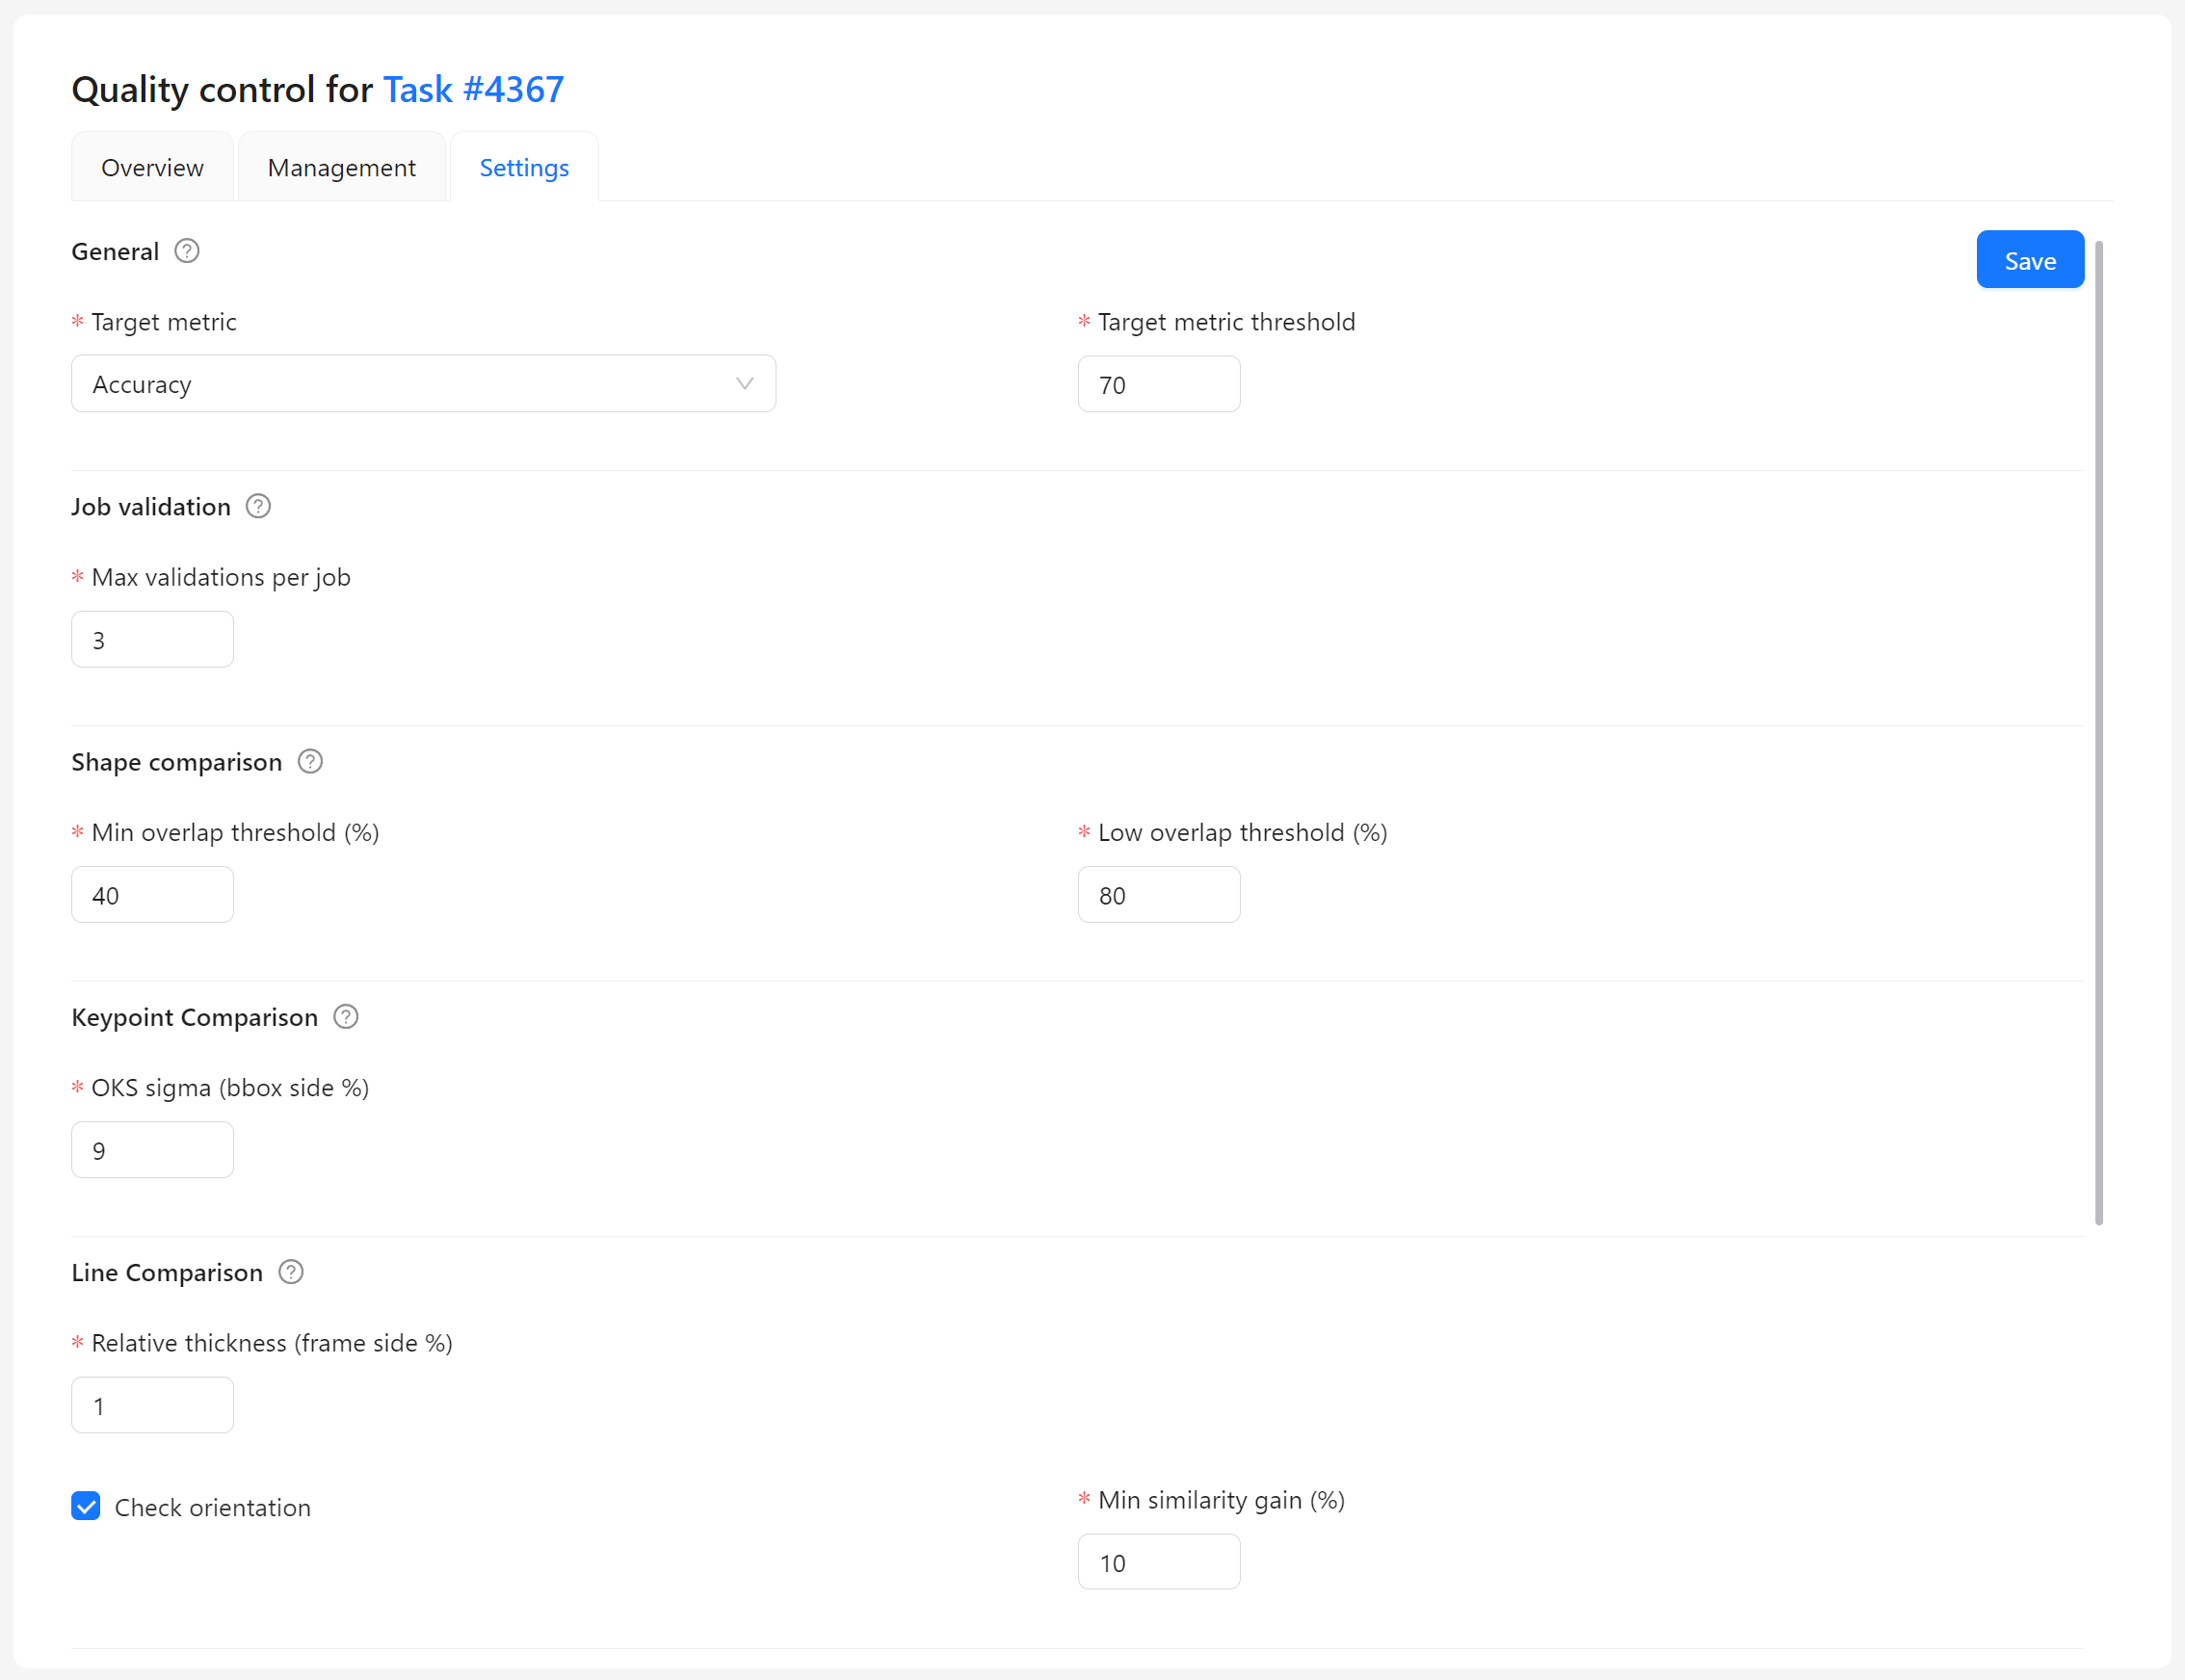
-
Save the updated settings
-
Assign an annotator to an annotation job
-
Annotate the job
-
Mark the job finished using the corresponding button in the menu
-
Once the job is completed, you’ll see the job validation dialog
Each assignee gets no more than the specified number of validation attempts.
Learn more about this functionality in the Immediate Feedback section.
How to check task quality metrics
-
Open the task Actions menu > Quality control
-
(Optional) Request quality metrics computation, and wait for completion
-
Review summaries or detailed reports
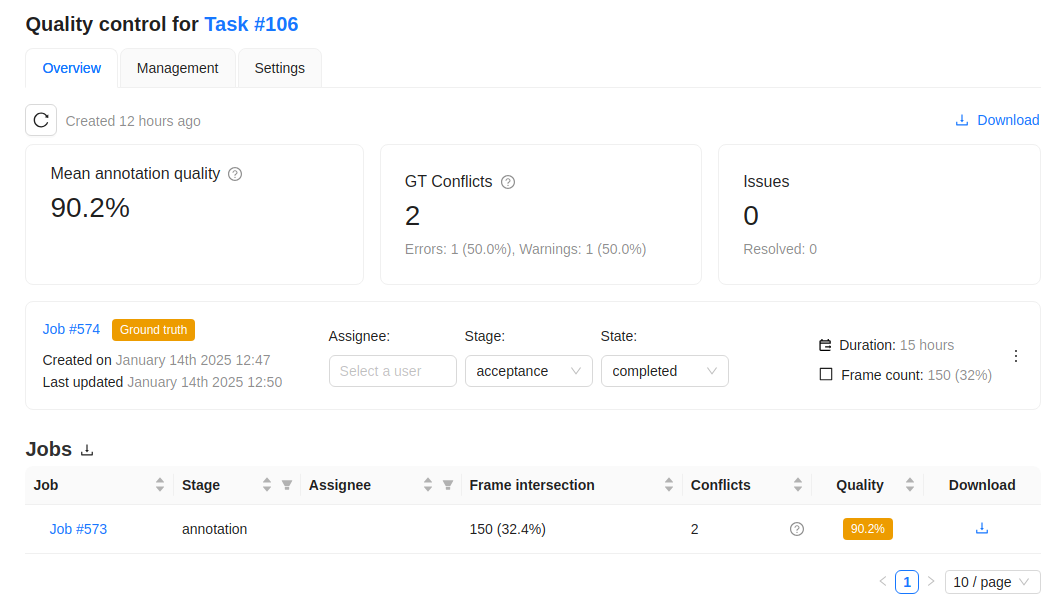
Learn more about this functionality here.
How to review problems found
- Open the task Actions menu > Quality control
- Find an annotation job to be reviewed, it must have at least 1 validation frame
- Select the job link
- Switch to the Review mode
- Enable display of Ground Truth annotations and conflicts
Learn more about this functionality here.
8.2 - Manual QA and Review
Guidelines on evaluating annotation quality in CVAT manually
In the demanding process of annotation, ensuring accuracy is paramount.
CVAT introduces a specialized Review mode, designed to streamline the validation of annotations by pinpointing errors or discrepancies in annotation.
Note
The Review mode is not applicable for 3D tasks.See:
- Review and report issues: review only mode
- Review and report issues: review and correct mode
- Issues navigation and interface
- Manual QA complete video tutorial
Review and report issues: review only mode
Review mode is a user interface (UI) setting where a specialized Issue tool is available. This tool allows you to identify and describe issues with objects or areas within the frame.
Note
While in review mode, all other tools will be hidden.Review mode screen looks like the following:
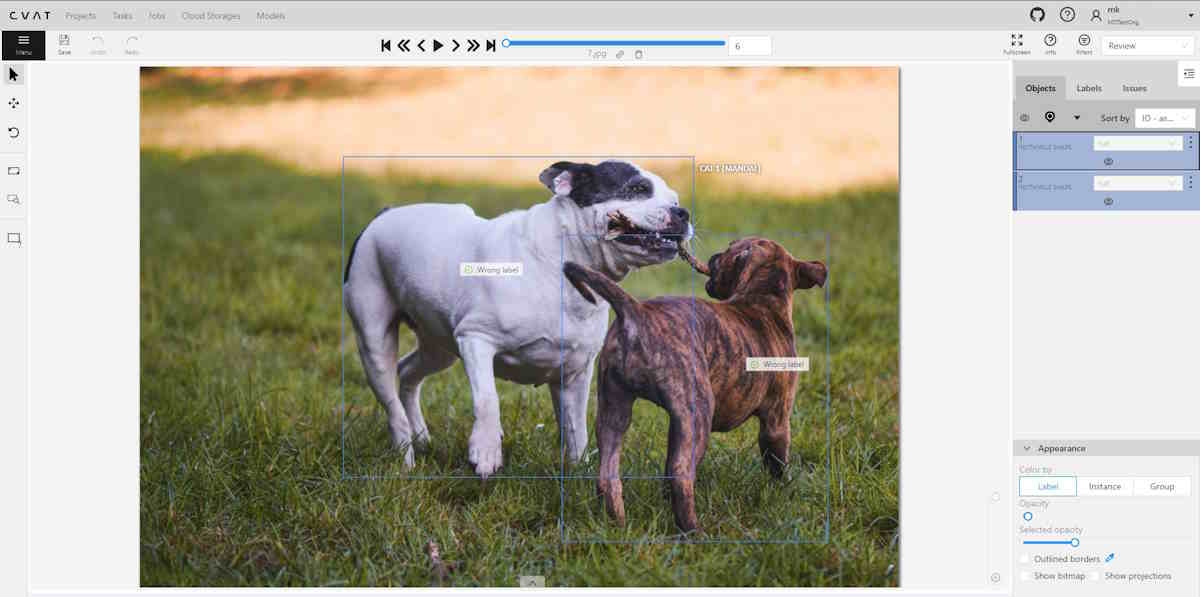
Assigning reviewer
Note
Reviewers can be assigned by project or task owner, assignee, and maintainer.To assign a reviewer to the job, do the following:
-
Log in to the Owner or Maintainer account.
-
(Optional) If the person you wish to assign as a reviewer is not a member of Organization, you need to Invite this person to the Organization.
-
Click on the Assignee field and select the reviewer.
-
From the Stage drop-down list, select Validation.
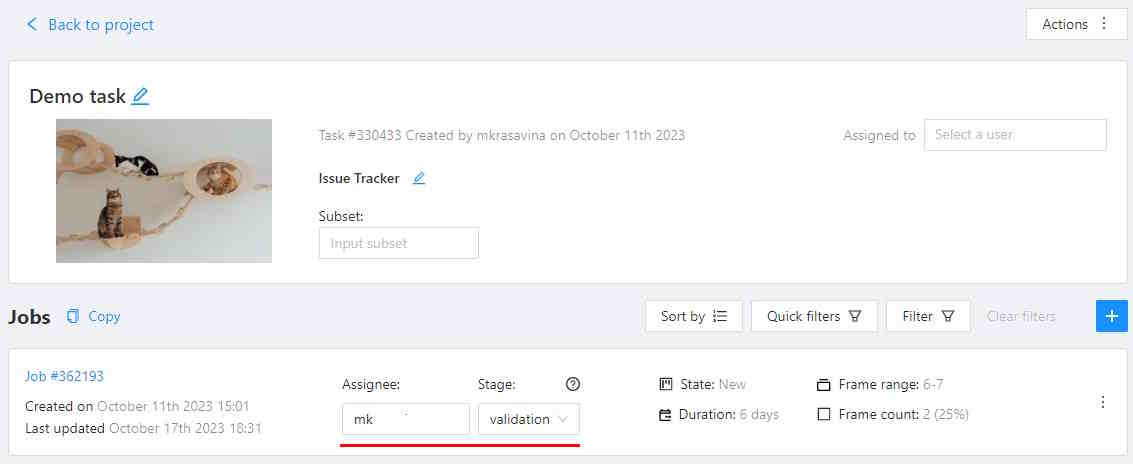
Reporting issues
To report an issue, do the following:
-
Log in to the reviewer’s account.
-
On the Controls sidebar, click Open and issue (
). -
Click on the area of the frame where the issue is occurring, and the Issue report popup will appear.
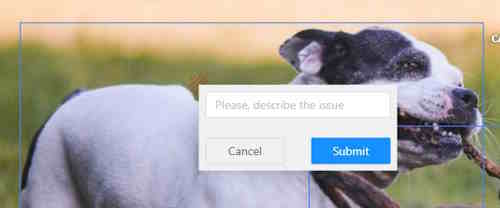
-
In the text field of the Issue report popup, enter the issue description.
-
Click Submit.
Quick issue
The Quick issue function streamlines the review process. It allows reviewers to efficiently select from a list of previously created issues or add a new one, facilitating a faster and more organized review.
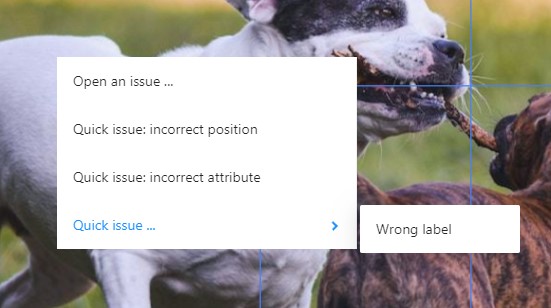
To create a Quick issue do the following:
-
Right-click on the area of the frame where the issue is occurring.
-
From the popup menu select one of the following:
- Open an issue…: to create new issue.
- Quick issue: incorrect position: to report incorrect position of the label.
- Quick issue: incorrect attribute: to report incorrect attribute of the label.
- Quick issue…: to open the list of issues that were reported by you before.
Assigning corrector
Note
Only project owners and maintainers can assign reviewers.To assign a corrector to the job, do the following:
-
Log in to the Owner or Maintainer account.
-
(Optional) If the person you wish to assign as a corrector is not a member of Organization, you need to Invite this person to the Organization.
-
Click on the Assignee field and select the reviewer.
-
From the Stage drop-down list, select Annotation.
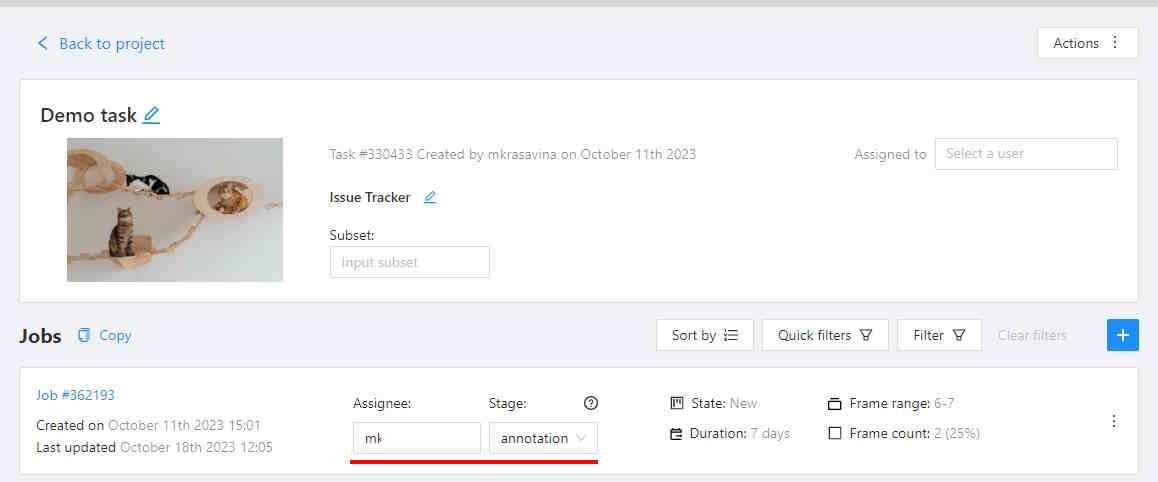
Correcting reported issues
To correct the reported issue, do the following:
-
Log in to the corrector account.
-
Go to the reviewed job and open it.
-
Click on the issue report, to see details of what needs to be corrected.
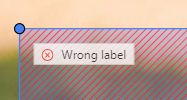
-
Correct annotation.
-
Add a comment to the issue report and click Resolve.
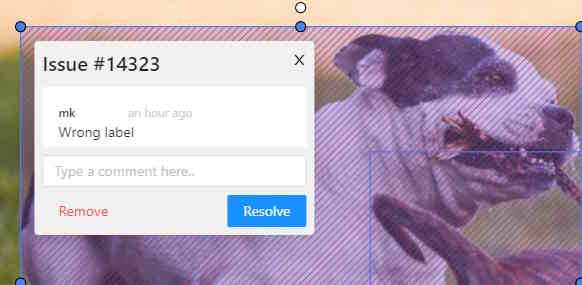
-
After all issues are fixed save work, go to the Menu select the Change the job state and change state to Complete.
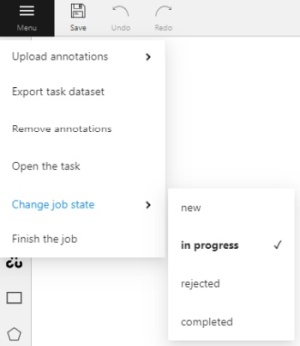
Review and report issues: review and correct mode
The person, assigned as assigned as reviewer can switch to correction mode and correct all annotation issues.
To correct annotation issues as a reviewer, do the following:
-
Log in to the reviewer account.
-
Go to the assigned job and open it.
-
In the top right corner, from the drop-down list, select Standard.
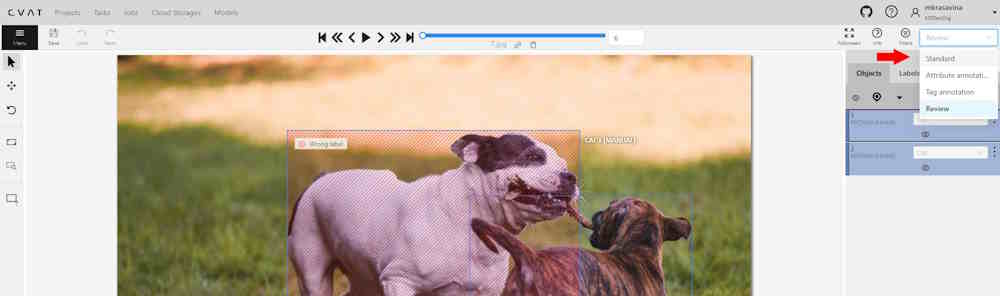
Issues navigation and interface
This section describes navigation, interface and comments section.
Issues tab
The created issue will appear on the Objects sidebar, in the Issues tab.
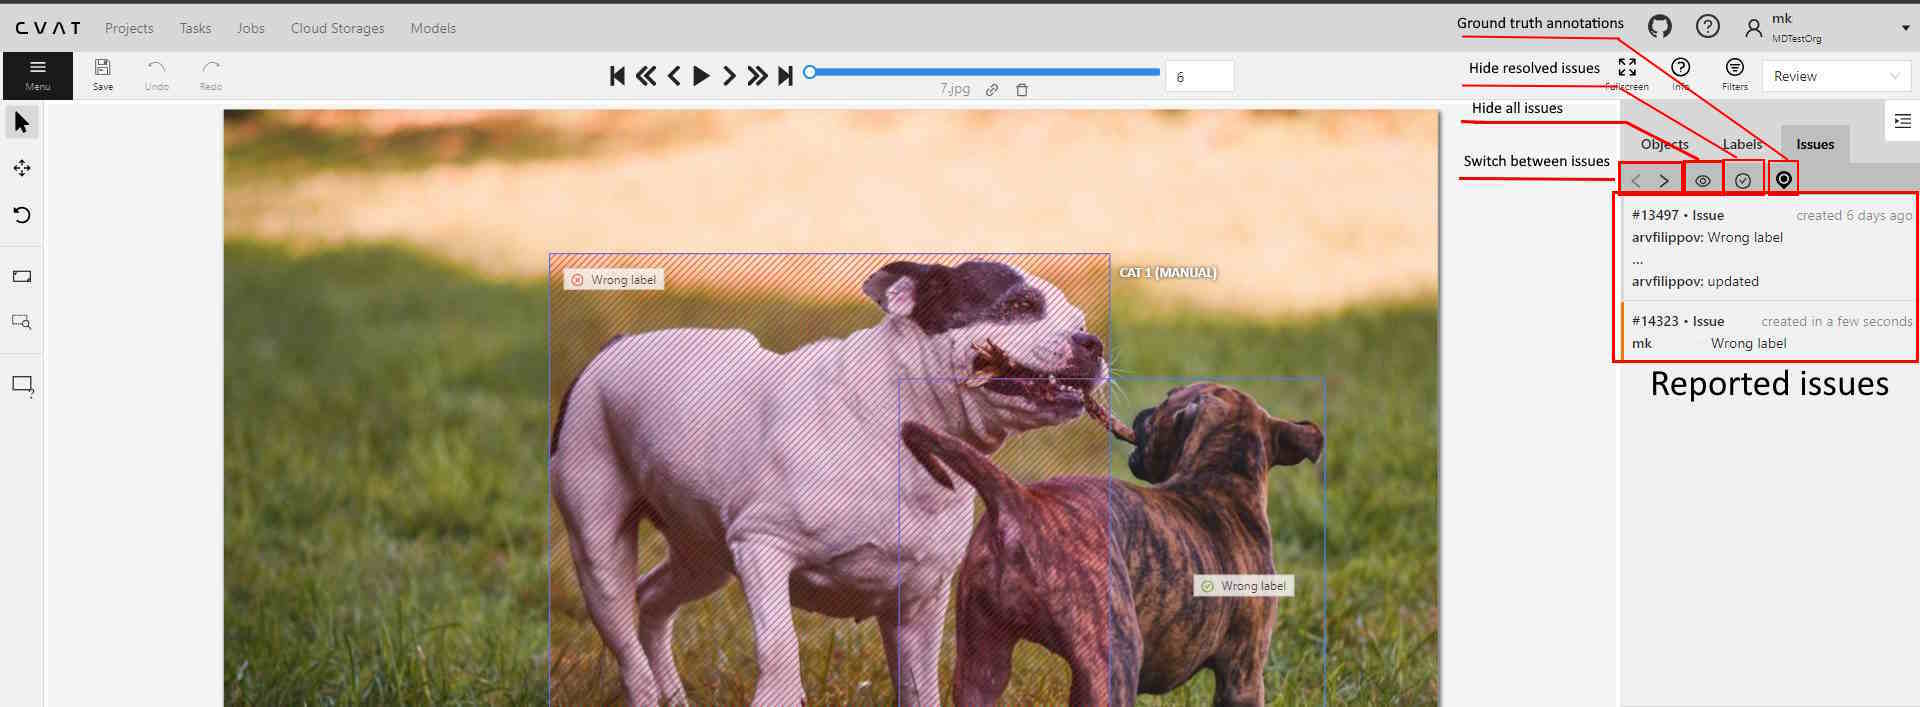
It has has the following elements:
| Element | Description |
|---|---|
| Arrows | You can switch between issues by clicking on arrows |
| Hide all issues | Click on the eye icon to hide all issues |
| Hide resolved issues | Click on the check mark to hide only resolved issues |
| Ground truth | Show ground truth annotations and objects |
Issues workspace
In the workspace, you can click on the issue, and add a comment on the issue, remove (Remove) it, or resolve (Resolve) it.
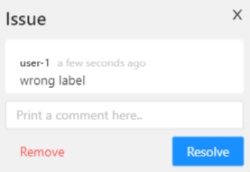
To reopen the resolved issue, click Reopen.
You can easily access multiple issues created in one location by hovering over an issue and scrolling the mouse wheel.
Issues comments
You can add as many comments as needed to the issue.
In the Objects toolbar, only the first and last comments will be displayed
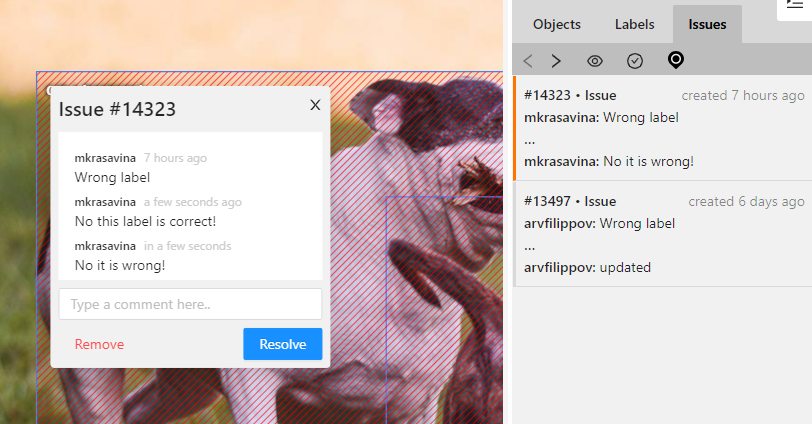
You can copy and paste comments text.
Manual QA complete video tutorial
This video demonstrates the process:
8.3 - Automated QA, Review & Honeypots
Guidelines for assessing annotation quality in CVAT automatically
In CVAT, it’s possible to evaluate the quality of annotation through the creation of a validation subset of images. To estimate the task quality, CVAT compares all other jobs in the task against the established Ground truth job, and calculates annotation quality based on this comparison.
Note
Quality estimation only supports 2d tasks. It supports all the annotation types except 2d cuboids.Note
Quality estimation is available for projects, tasks, and jobs.CVAT has the following features for automated quality control of annotations:
- Validation set configuration for a task
- Job validation on job finish (“Immediate feedback”)
- Review mode for problems found
- Quality analytics
Basics
There are several approaches to quality estimation used in the industry. In CVAT, we can use a method known as Ground Truth or Honeypots. The method assumes there are Ground Truth annotations for images in the dataset. This method is statistical, which means that we can use only a small portion of the whole dataset to estimate quality on the full dataset, so we don’t need to annotate the whole dataset twice. Here we assume that the images in the dataset are similar (represent the same task).
We will call the validation portion of the whole dataset (or a task in CVAT) a validation set. In practice, it is typically expected that annotations in the validation set are carefully validated and curated. It means that they are more expensive - creating them might require expert annotators or just several iterations of annotation and validation. It means that it’s desirable to keep the validation set small enough. At the same time, it must be representative enough to provide reliable estimations. To achieve this, it’s advised that the validation set images are sampled randomly and independently from the full dataset. That is, for the quality assurance to function correctly, the validation set must have some portion of the task frames, and the frames must be chosen randomly.
Depending on the dataset size, data variance, and task complexity, 5-15% of the data is typically good enough for quality estimation, while keeping extra annotation overhead for the Ground Truth acceptable.
For example, in a typical task with 2000 frames, selecting just 5%, which is 100 extra frames to annotate, is enough to estimate the annotation quality. If the task contains only 30 frames, it’s advisable to select 8-10 frames, which is about 30%. It is more than 15%, but in the case of smaller datasets, we need more samples to estimate quality reliably, as data variance is higher.
Ground truth jobs
A Ground Truth job (GT job) is a way to represent the validation set in a CVAT task. This job is similar to regular annotation jobs - you can edit the annotations manually, use auto-annotation features, and import annotations in this job. There can be no more than 1 Ground Truth job in a task.
To enable quality estimation in a task, you need to create a Ground truth job in the task,
annotate it, switch the job stage to acceptance, and set the job state to completed.
Once the Ground Truth job is configured, CVAT will start using this job for quality estimation.
Read more about Ground Truth management here.
Configuring quality estimation
There are 2 key components related to quality estimation configuration: Ground Truth jobs and Quality settings. Ground Truth jobs are configured at the Task level. In this section, we explain how to set up a Ground Truth job. Read more about quality settings here.
Note
A Ground truth job is considered configured if it is at the acceptance stage and in the completed state.A configured Ground Truth job is required for all quality computations in CVAT.
- Go to the task creation page
- Configure basic and advanced parameters according to your requirements, and attach a dataset to be annotated
- Scroll down to the Quality Control section below
- Select one of the validation modes available
- Create the task and open the task page
- Upload or create Ground Truth annotations in the Ground Truth job in the task
- Switch the Ground Truth job into the
acceptancestage andcompletedstate
Note
For already existing tasks only the Ground Truth validation mode is available. If you want
to use Honeypots for your task, you will need to recreate the task.
- Open the task page
- Click +.
- In the Add new job window, fill in the following fields:
- Job type: Use the default parameter Ground truth.
- Frame selection method: Use the default parameter Random.
- Quantity %: Set the desired percentage of frames for the Ground truth job.
Note that when you use Quantity %, the Frames field will be autofilled. - Frame count: Set the desired number of frames for the Ground truth job.
Note that when you use Frames, the Quantity % field will be autofilled. - Seed: (Optional) If you need to make the random selection reproducible, specify this number.
It can be any integer number, the same value will yield the same random selection (given that the
frame number is unchanged).
Note that if you want to use a custom frame sequence, you can do this using the server API instead,
- Click Submit.
The Ground truth job will appear in the jobs list.
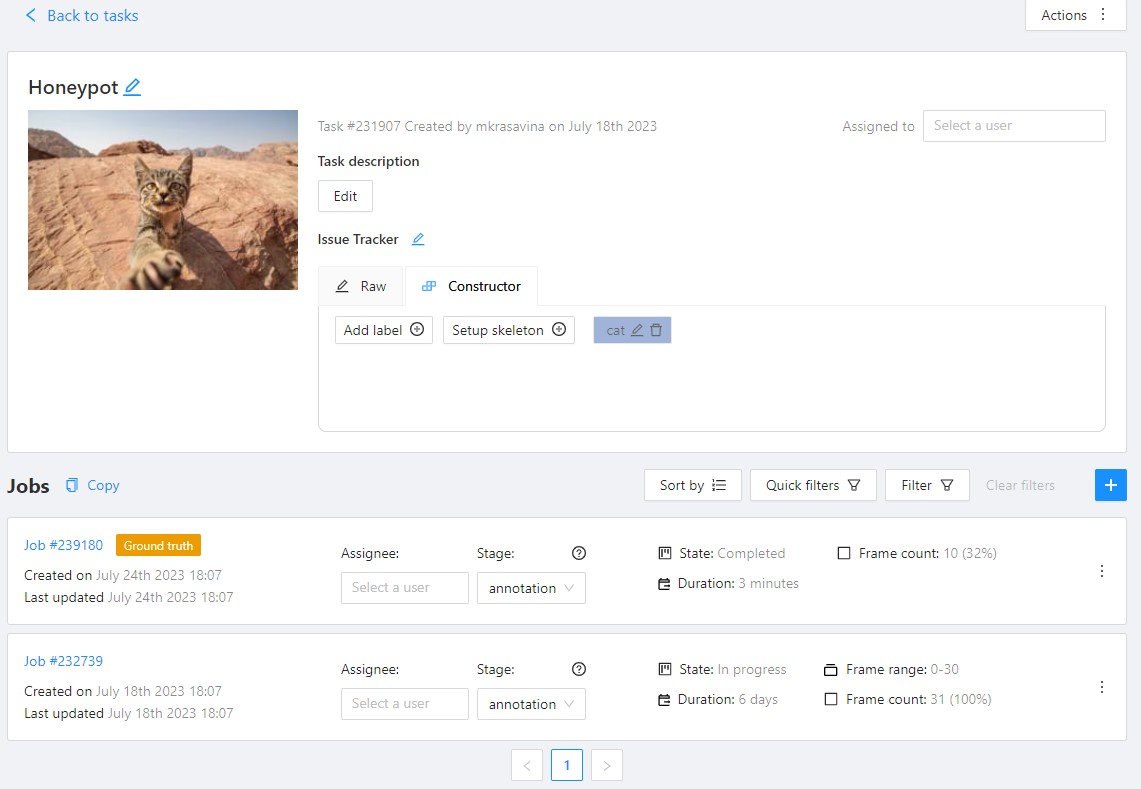
- Annotate frames and save your work or upload annotations.
- Switch the Ground Truth job into the
acceptancestage andcompletedstate
Validation modes
Currently, there are 2 validation modes available for tasks: Ground Truth and Honeypots. These names are often used interchangeably, but in CVAT they have some differences. Both modes rely on the use of Ground Truth annotations in a task, stored in a Ground Truth job, where they can be managed.
Ground Truth
In this mode some of the task frames are selected into the validation set, represented as a separate Ground Truth job. The regular annotation jobs in the task are not affected in any way.
Ground Truth jobs can be created at the task creation automatically or manually at any moment later. They can also be removed manually at any moment. This validation mode is available for any tasks and annotations.
This is a flexible mode that can be enabled or disabled at any moment without any disruptions to the annotation process.
Frame selection
This validation mode can use several frame selection methods.
Random
This is a simple method that selects frames into the validation set randomly, representing the basic approach, described above.
Parameters:
- frame count - the number or percent of the task frames to be used for validation.
Can be specified as an absolute number in the
Frame countfield or a percent in theQuantityfield. If there are both fields on the page, they are linked, which means changing one of them will adjust the other one automatically. - random seed - a number to be used to initialize the random number generator. Can be useful if you want to create a reproducible sequence of frames.
Random per job
This method selects frames into the validation set randomly from each annotation job in the task.
It solves one of the issues with the simple Random method that some of the jobs can get no validation frames, which makes it impossible to estimate quality in such jobs. Note that using this method can result in increased total size of the validation set.
Parameters:
- frame count per job - the percent of the job frames to be used for validation.
This method uses segment size of the task to select the same number of validation frames
in each job, if possible. Can be specified as an absolute number in the
Frame countfield or a percent in theQuantity per jobfield. If there are both fields on the page, they are linked, which means changing one of them will adjust the other one automatically. - random seed - a number to be used to initialize the random number generator. Can be useful if you want to create a reproducible sequence of frames.
Honeypots
In this mode some random frames of the task are selected into the validation set. Then, validation frames are randomly mixed into regular annotation jobs. This mode can also be called “Ground Truth pool”, reflecting the way validation frames are used. This mode can only be used at task creation and cannot be changed later.
The mode has some limitations on the compatible tasks:
- It’s not possible to use it for an already existing task, the task has to be recreated.
- This mode assumes random frame ordering, so it is only available for image annotation tasks and not for ordered sequences like videos.
- Tracks are not supported in such tasks.
The validation set can be managed after the task is created - annotations can be edited, frames can be excluded and restored, and honeypot frames in the regular jobs can be changed. However, it’s not possible to select new validation frames after the task is created. The Ground truth job created for this validation mode cannot be deleted.
Parameters:
- frame count per job (%) - the percent of job frames (segment size) to be added into each
annotation job from the validation set. Can be specified in the
Overhead per jobfield. - total frame count (%) - the percent of the task frames to be included into the validation set.
This value must result in at least
frame count per job*segment sizeframes. Can be specified in theTotal honeypotsfield.
Mode summary
Here is a brief comparison of the validation modes:
| Aspect | Ground Truth | Honeypots |
|---|---|---|
| When can be used | any time | at task creation only |
| Frame management options | exclude, restore | exclude, restore, change honeypots in jobs |
| Ground Truth job management options | create, delete | create |
| Task frame requirements | - | random ordering only |
| Annotations | any | tracks are not supported |
| Minimum validation frames count | - manual and random_uniform - any (but some jobs can get no validation frames)- random_per_job - jobs count * GT frames per job |
not less than honeypots count per job |
| Task annotation import | GT annotations and regular annotations do not affect each other | Annotations are imported both into the GT job and regular jobs. Annotations for validation frames are copied into corresponding honeypot frames. |
| Task annotation export | GT annotations and regular annotations do not affect each other | Annotations for non-validation frames are exported as is. Annotations for validation frames are taken from the GT frames. Honeypot frames are skipped. |
Choosing the right mode
Here are some examples on how to choose between these options. The general advice is to use Ground Truth for better flexibility, but keep in mind that it can require more resources for validation set annotation. Honeypots, on the other hand, can be beneficial if you want to minimize the number of validation images required, but the downside here is that there are some limitations on where this mode can be used.
Example: a video annotation with tracks. In this case there is only 1 option - the Ground Truth mode, so just use it.
Example: an image dataset annotation, image order is not important. Here you can use both options. You can choose Ground Truth for better flexibility in validation. This way, you will have the full control of validation frames in the task, annotation options won’t be limited, and the regular jobs will not be affected in any way. However, if you have a limited budget for the validation (for instance, you have only a small number of validation frames) or you want to allow more scalability (with this approach the number of validation frames doesn’t depend on the number of regular annotation jobs), it makes sense to consider using Honeypots instead.
Quality management
If a task has a validation configured, there are several options to manage validation set images. With any of the validation modes, there will be a special Ground Truth (GT) job in the task.
Validation set management
Validation frames can be managed on the task Quality Management page. Here it’s possible to check the number of validation frames, current validation mode and review the frame details. For each frame you can see the number of uses in the task. When in the Ground Truth mode, this number will be 1 for all frames. With Honeypots, these numbers can be 0, 1 or more.
Frame changes
In both validation modes it’s possible to exclude some of the validation frames from being used for validation. This can be useful if you find that some of the validation frames are “bad”, extra, or if they have incorrect annotations, which you don’t want to fix. Once a frame is marked “excluded”, it will not be used for validation. There is also an option to restore a previously excluded frame if you decide so.
There is an option to exclude or restore frames in bulk mode. To use it, select the frames needed using checkboxes, and click one of the buttons next to the table header.
Ground Truth job management
In the Ground Truth validation mode, there will be an option to remove the Ground Truth job from the task. It can be useful if you want to change validation set frames completely, add more frames, or remove some of the frames for any reason. This is available in the job Actions menu.
In the Honeypots mode, it’s not possible to add or remove the GT job, so it’s not possible to add more validation frames.
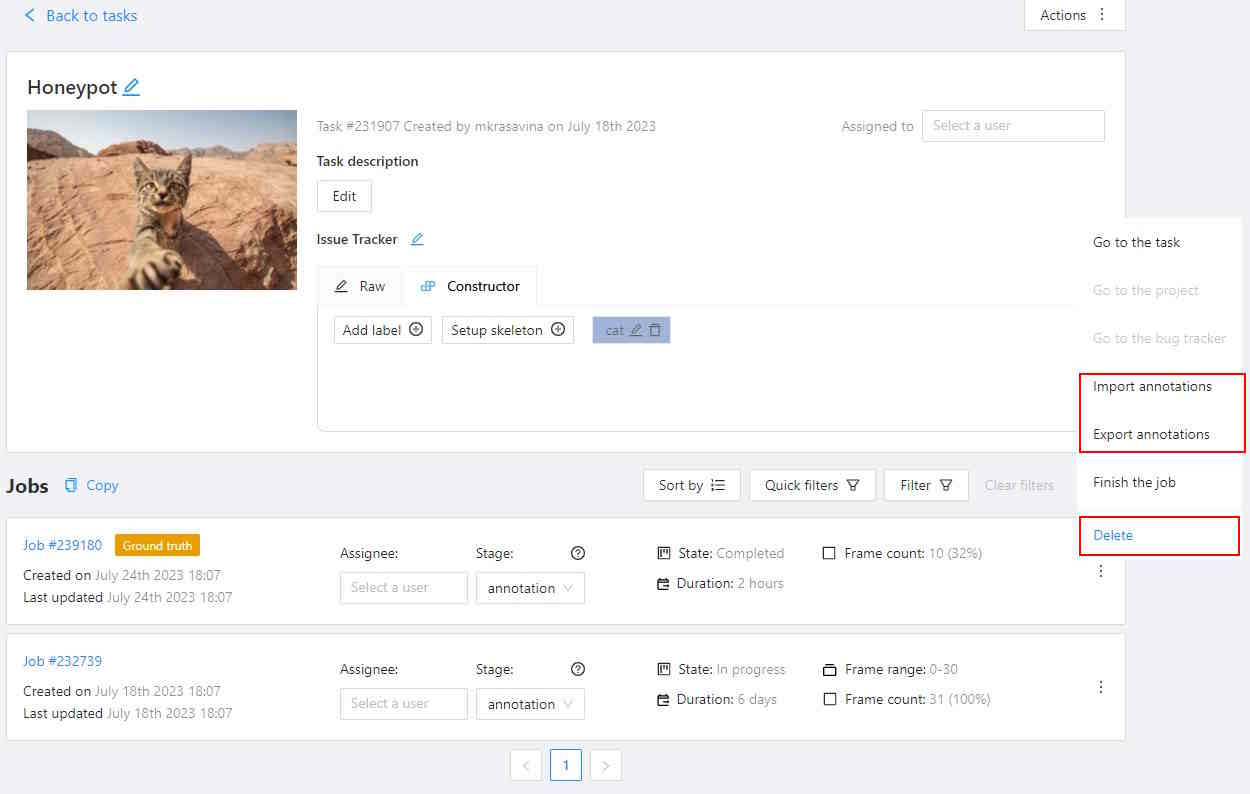
Create
A Ground Truth job can be added manually in a task without a selected validation mode or in a task with the Ground Truth validation mode, after the existing Ground Truth job is deleted manually.
Delete
To delete the Ground Truth job, do the following:
- Open the task and find the Ground Truth job in the jobs list.
- Click on three dots to open the menu.
- From the menu, select Delete.
Note
The Ground truth job in the “Honeypots” task validation mode cannot be deleted.Import annotations
If you want to import annotations into the Ground truth job, do the following:
- Open the task and find the Ground truth job in the jobs list.
- Click on three dots to open the menu.
- From the menu, select Import annotations.
- Select import format and select file.
- Click OK.
Note
If there are imported annotations for the frames that exist in the task, but are not included in the Ground truth job, they will be ignored. This way, you don’t need to worry about “cleaning up” your Ground truth annotations for the whole dataset before importing them. Importing annotations for the frames that are not known in the task still raises errors.Export annotations
To export annotations from the Ground Truth job, do the following:
- Open the task and find a job in the jobs list.
- Click on three dots to open the menu.
- From the menu, select Export annotations.
Annotation management
Annotations for validation frames can be displayed and edited in a special Ground Truth job in the task. You can edit the annotations manually, use auto-annotation features, import and export annotations in this job.
In the Ground Truth task validation mode, annotations of the ground Truth job do not affect other jobs in any way. The Ground Truth job is just a separate job, which can only be changed directly. Annotations from Ground truth jobs are not included in the dataset export, they also cannot be imported during task annotations import or with automatic annotation for the task.
In the Honeypots task validation mode, the annotations of the GT job also do not affect other jobs in any way. However, import and export of task annotations works differently. When importing task annotations, annotations for validation frames will be copied both into GT job frames and into corresponding honeypot frames in annotation jobs. When exporting task annotations, honeypot frames in annotation jobs will be ignored, and validation frames in the resulting dataset will get annotations from the GT job.
Note
That it means that exporting from a task with honeypots and importing the results back will result in changed annotations on the honeypot frames. If you want to backup annotations, use a task backup or export job annotations instead.Import and export of Ground Truth job annotations works the same way in both modes.
Ground Truth jobs are included in task backups, so can be saved and restored this way.
Import, Export, and Delete options are available from the Ground Truth job Actions menu. Read more.
Annotation quality settings
Quality settings provide options to tweak some aspects of annotation comparisons and quality estimation in general. For instance, you can configure which annotation overlap should be considered good enough or how specific annotation types must be compared.
Quality settings can be set up at the Task or the Project level. If a task is not bound to a project, it uses its own quality settings. Tasks inside a project can use individual quality settings or inherit settings from the project they belong to. Read more about quality settings in projects here.
To set up quality settings, open the Quality Settings tab on the Quality Control page for a task or project, available in the Actions menu.
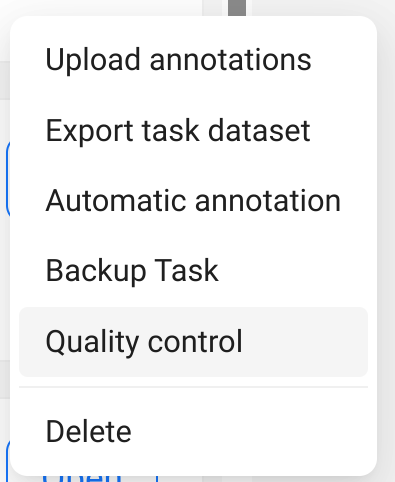
There is a number of parameters available for configuration. Hover the mouse over a ? mark to display a description for a setting.
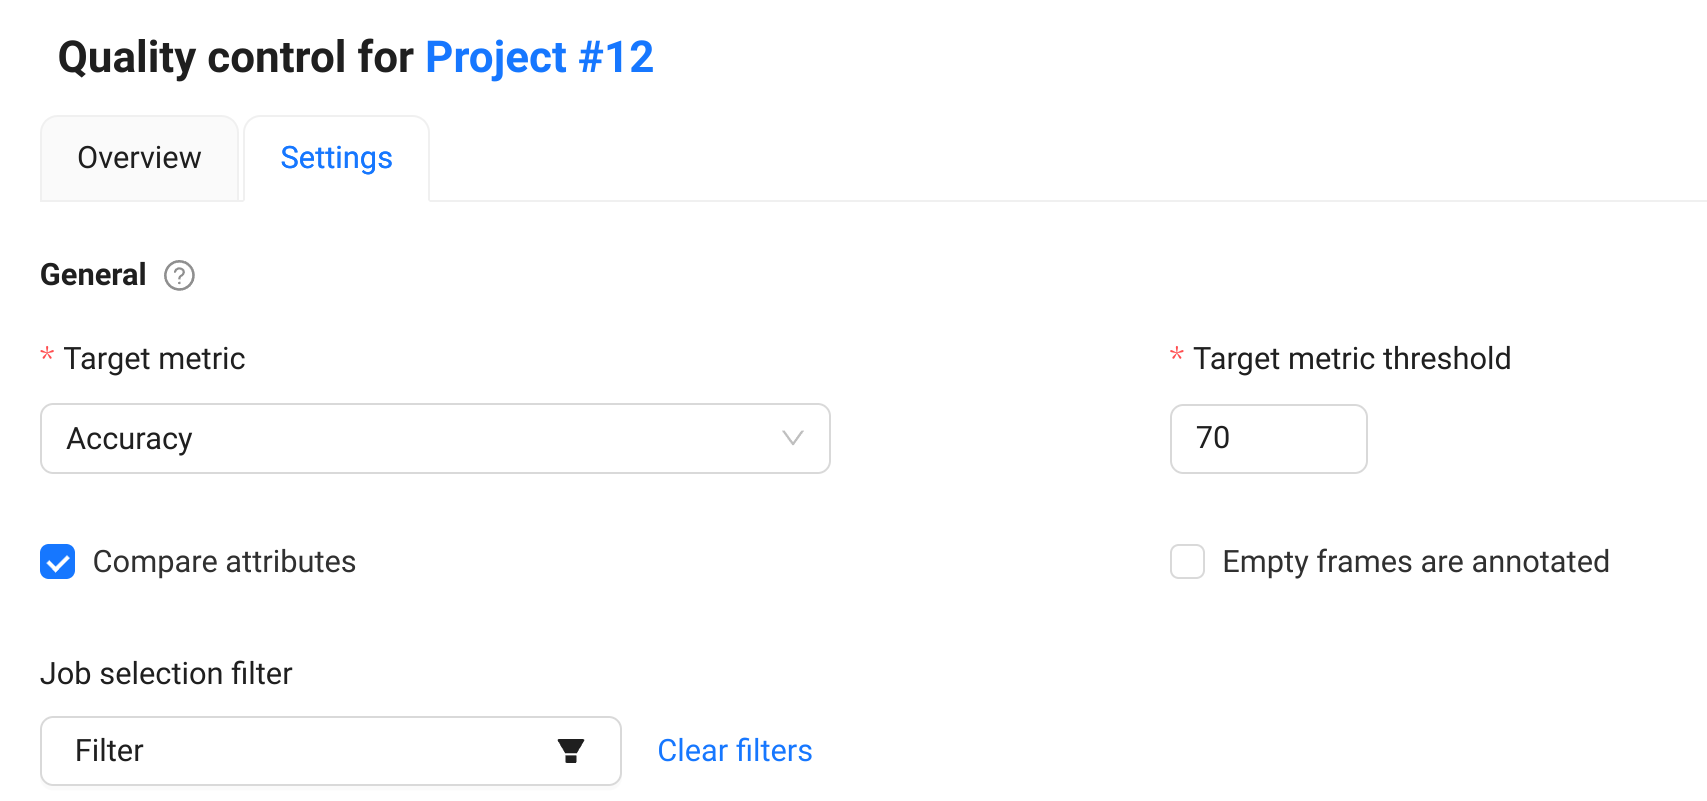
After the settings are updated, remember to save the values using the Save button. The updated settings will take effect on the next quality update.
Annotation quality settings have the following parameters:
| Parameter | Description |
|---|---|
| General reporting | |
| Target metric | The primary metric used for quality estimation. It affects which metric is displayed in the UI and used for overall quality estimation. |
| Job selection filter | The filter for the jobs included in quality computation. Only jobs matching the filter criteria will be included in the quality results. |
| Immediate feedback | |
|---|---|
| Max validations per job | Configures maximum job validations per assignment for the Immediate feedback feature. |
| Target metric threshold | Defines the minimal quality requirements in terms of the selected target metric. Serves as an acceptance threshold for the Immediate feedback feature. |
| Shape matching | |
|---|---|
| Min overlap threshold | Min overlap threshold used for the distinction between matched and unmatched shapes. Used to match all types of annotations. It corresponds to the Intersection over union (IoU) for spatial annotations, such as bounding boxes and masks. |
| Low overlap threshold | Low overlap threshold used for the distinction between strong and weak matches. Only affects Low overlap warnings. It’s supposed that Min similarity threshold <= Low overlap threshold. |
| Empty frames are annotated | Consider frames annotated as “empty” if there are no annotations on a frame. If a frame is empty in both GT and job annotations, it will be considered a matching annotation. |
| Point and Skeleton matching | |
|---|---|
| OKS Sigma | Relative size of points. The percent of the bbox side, used as the radius of the circle around the GT point, where the checked point is expected to be. For boxes with different width and height, the “side” is computed as a geometric mean of the width and height. |
| Point matching | |
|---|---|
| Point size base | When comparing point annotations (including both separate points and point groups), the OKS sigma parameter defines a matching area for each GT point based on the object size. The point size base parameter allows configuring how to determine the object size. If set to image_size, the image size is used. Useful if each point annotation represents a separate object or boxes grouped with points do not represent object boundaries. If set to group_bbox_size, the object size is based on the point group bounding box size. Useful if each point group represents an object or there is a bbox grouped with points, representing the object size. |
| Polyline matching | |
|---|---|
| Relative thickness | Thickness of polylines, relative to the (image area) ^ 0.5. The distance to the boundary around the GT line inside of which the checked line points should be. |
| Check orientation | Indicates that polylines have direction. Used to produce Mismatching direction warnings |
| Min similarity gain (%) | The minimal gain in IoU between the given and reversed line directions to consider the line inverted. Only useful with the Check orientation parameter. |
| Group matching | |
|---|---|
| Compare groups | Enables or disables annotation group checks. This check will produce Group mismatch warnings for grouped annotations, if the annotation groups do not match with the specified threshold. Each annotation within a group is expected to match with a corresponding annotation in a GT group. |
| Min group match threshold | Minimal IoU for groups to be considered matching, used when Compare groups is enabled. |
| Mask and polygon matching | |
|---|---|
| Check object visibility | Check for partially-covered annotations. Masks and polygons will be compared to each other. |
| Min visibility threshold | Minimal visible area percent of the mask annotations (polygons, masks). Used for reporting Covered annotation warnings, useful with the Check object visibility option. |
| Match only visible parts | Use only the visible part of the masks and polygons in comparisons. |
Project quality settings
In CVAT, it is possible to group tasks into projects to share common configurations or establish a logical grouping for datasets. In this section, we explain options for quality management inside projects.
When tasks are inside a project, it can be convenient to reuse the same quality setup for all the project tasks. There is an option to use quality settings from the parent project for all or only for specific tasks inside a project. This is controlled by the corresponding toggle on the Quality control page of the task:

If some of the project tasks have individual settings, a notification is displayed on the project settings page. You can enforce project settings for all the project tasks by clicking the Force project settings button.

By default, new tasks inside a project inherit the quality settings of the project. You can freely switch between these 2 modes without losing the individual configuration for the task.
Updating project quality includes quality computation for all the nested tasks. If the task quality is updated in a specific task manually, project quality has to be recomputed to display relevant values.
Job filtering
Depending on the situation, you may need or don’t need to include specific jobs in the quality report. For example, your workflow may require quality checks only for completed jobs or maybe you want to exclude jobs from a specific task from a project quality report. There is an option to filter which jobs are included in quality computations. You can configure this by changing the Job selection filter in quality settings. Only jobs matching the filter criteria will be included in the quality results. If a filter is changed, quality must be recomputed for the filter to take effect.
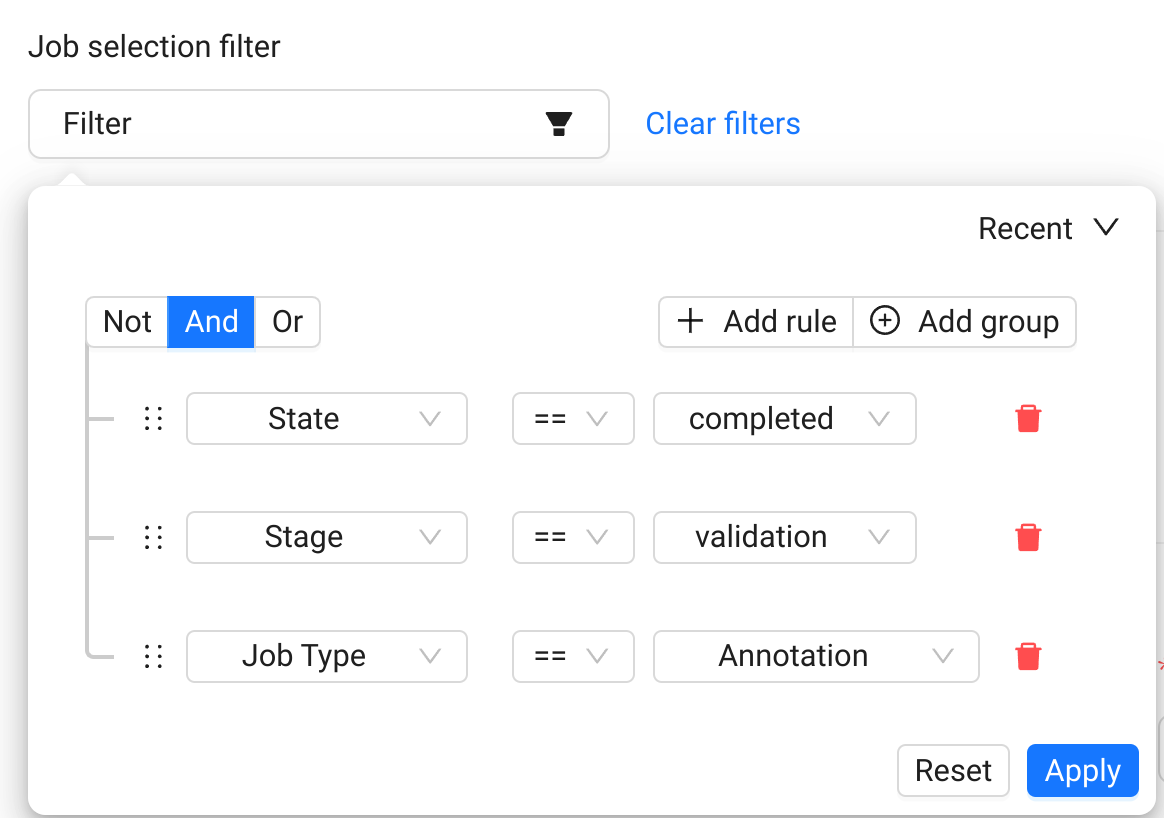
Comparisons
Tags
The equality is used for matching.
Shapes
A pair of shapes is considered matching, if both their shapes and labels match. For each shape, spatial parameters are matched first, then labels are matched.
Each shape type can have their own spatial matching details. Specifically:
-
bounding box - IoU (including rotation). For example, for a pair of bounding boxes it can be visualized this way:

IoU = intersection area / union area. The green part is the intersection, and green, yellow and red ones together are the union. -
polygons, masks - IoU. Polygons and masks are considered interchangeable, which means a mask can be matched with a polygon and vice versa. Polygons and masks in groups are merged into a single object first. If the Match only visible parts option is enabled, objects will be cut to only the visible (non-covered) parts only, which is determined by the shape z order.
-
skeletons - The OKS metric from the COCO dataset is used. Briefly, each skeleton point gets a circular area around, determined by the object size (bounding box side) and relative point size (sigma) values, where this point can be matched with the specified probability. If a bounding box is grouped with the skeleton, it is used for object size computation, otherwise a bounding box of visible points of the skeleton is used.
For example, consider a skeleton with 6 points and a square bounding box attached:

In this example, the Sigma parameter is
0.05(5%) of the bbox side. Areas shown in the green color cover ~68.2% (1 sigma) of the points, corresponding to each GT point. A point on the boundary of such an area will have ~88% of probability to be correct. The blue-colored zone contains ~95% (2 sigma) of the correct points for the corresponding GT point. A point on the boundary of such an area will have ~60% of probability to be correct. These probabilities are then averaged over the visible points of the skeleton, and the resulting values are compared against the Min similarity threshold to determine whether the skeletons are matching. Sigma corresponds to one from the normal distribution. -
points - The OKS metric is used for each point group annotation. Same as for skeletons, OKS Sigma determines relative point sizes. The Point size base setting allows configuring whether points in point groups should use the group bounding box or the image space. Using image space for object size can be useful if you want to treat each point as a separate annotation.
-
polylines - A pair of lines is considered matching if all the points of one line lie within a “hull” of the other one. The “hull” is determined as the area around the polyline, such as if the line had some “thickness”. For example, the black polyline can have a hull shown in the green color:

The line thickness can be configured via the Relative thickness setting. The value is relative to the image side and determines a half of the hull width.
-
ellipses - IoU, described in more detail above.
Note
2D cuboids are not supported.Tracks
Tracks are split into separate shapes and compared on the per-frame basis with other tracks and shapes.
Quality Analytics
Once the quality estimation is enabled in a task and the Ground Truth job is configured, quality analytics becomes available for the task and its jobs.
When you open the Quality Analytics page, it displays quality metrics from the most recent quality estimation. If it’s your first time accessing the page, no quality report will be available yet. The date of the last computation is shown next to the report download button.
If you want to request updating of quality metrics in a task (e.g. after the settings were changed), you can do this by pressing the Refresh button on the task Quality Management > Analytics page.
Note
The process of quality calculation may take up to several hours, depending on the amount of data and labeled objects, and is not updated immediately after task updates.
Once quality metrics are computed, they are available for detailed review on this page. Conflicts can be reviewed in the Review mode of jobs. A job must have at least 1 validation frame (shown in the Frame intersection column) to be included in quality computation.
Analytics page contents
The Analytics page has the following elements:
| Field | Description |
|---|---|
| Mean annotation quality | Displays the average quality of annotations, which includes: counts of the accurate annotations, total task annotations, ground truth annotations, accuracy, precision, and recall. The currently selected Target metric is displayed as the primary score. |
| GT Conflicts | Conflicts identified during quality assessment, including extra or missing annotations. Mouse over the ? icon for a detailed conflict report on your dataset. |
| Issues | Number of opened issues. If no issues were reported, 0 will be shown. |
| Quality report | Quality report in JSON format. |
| Ground truth job data | Information about ground truth job, including date, time, and number of issues. |
| List of jobs | List of all the jobs in the task |

Problem Reporting
CVAT reports 2 possible error types: errors and warnings. Errors affect the resulting quality scores and highlight significant problems in annotations. Warnings do not affect the resulting quality metrics, but they still can highlight significant problems, depending on the project requirements.
| Problem | Type | Description |
|---|---|---|
| Missing annotation | error | No matching annotation found in the regular job annotations. Configured by Min overlap threshold and shape type-specific parameters. |
| Extra annotation | error | No matching annotation found in the GT job annotations. Configured by Min overlap threshold and shape type-specific parameters. |
| Mismatching label | error | A GT and a regular job annotations match, but their labels are different. |
| Low overlap | warning | A GT and a regular job annotations match, but the similarity is low. Configured by Low overlap threshold. |
| Mismatching direction | warning | A GT and a regular lines match, but the lines have different direction. Configured by Compare orientation. |
| Mismatching attributes | warning | A GT and a regular annotations match, but their attributes are different. Configured by Compare attributes. |
| Mismatching groups | warning | A GT and a regular annotation groups do not match. Configured by Compare groups. |
| Covered annotation | warning | The visible part of a regular mask or polygon annotation is too small. The visibility is determined by arranging mask and polygon shapes on the frame in the specified z order. Configured by Check object visibility. |
Quality Reports
For each job included in quality computation there is a quality report downloading button on the Analytics page. There is also a button to download the aggregated task quality report. These buttons provide an option to download a Quality Report for a task or job in JSON format. Such reports can be useful if you want to process quality reported by CVAT automatically in your scripts etc.

Quality Reports contain quality metrics and conflicts, and include all the information available on the quality analytics page. You can find additional quality metrics in these reports, such as mean_iou for shapes, confusion matrices, per-label and per-frame quality estimations.
Additional information on how to compute and use various metrics for dataset quality estimation is available here.
Reviewing GT conflicts
To see GT Conflicts in the CVAT interface, go to Review > Issues > Show ground truth annotations and conflicts.
Ground Truth annotations are displayed with a dotted-line border.
The associated label and the (Ground Truth) marker are shown on hovering.
Upon hovering over an issue on the right-side panel with your mouse, the corresponding annotations are highlighted.
Use arrows in the Issue toolbar to move between GT conflicts.
To create an issue related to the conflict, right-click on the bounding box and from the menu select the type of issue you want to create.
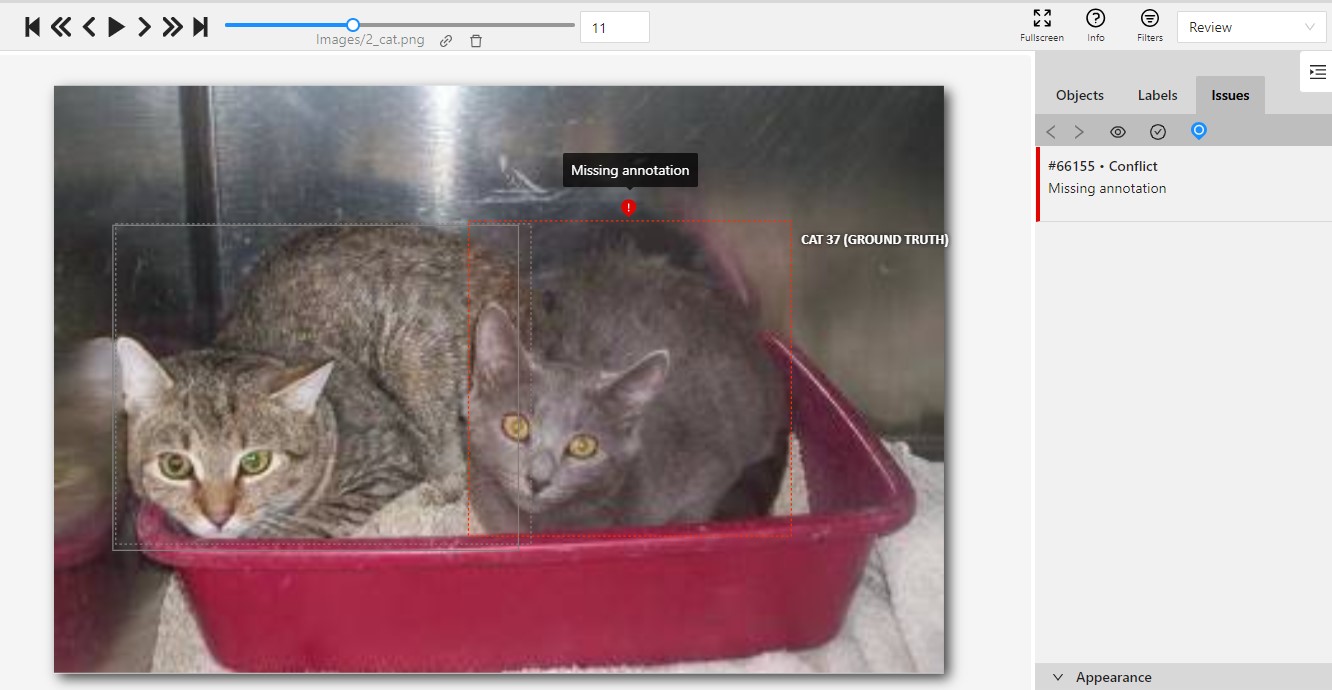
Annotation quality & Honeypot video tutorial
This video demonstrates the process:
8.4 - Consensus-based annotation
Annotate the same data several times to get better annotations
With CVAT you can annotate the same data several times and then merge annotations automatically to obtain more reliable annotations.
Note
Consensus merging only supports 2D tasks. It supports all annotation types except cuboids.Note
Consensus merging is currently available only for tasks and jobs. Projects are not supported.CVAT has the following features related to consensus-based annotation:
- Creation of consensus replica jobs for regular annotation jobs in a task
- Automatic merging for annotations inside consensus replica jobs
Basics
If you want to improve the quality of your annotations, there are several widespread ways to achieve this. One of the methods is called consensus-based annotation or just consensus. In this method, the same data is annotated several times. Once there are several different annotations (“opinions”) for the same objects, they can be merged in order to obtain annotations of higher quality.
Let’s consider an explanatory example. Imagine there is a group of people and you want to learn whether something is true or not from them. To accomplish this, you decided to ask everyone and pick the most popular answer in the end. With such an idea, you can get many possible combinations of votes, including unanimous ones. This strategy is called majority voting - and it requires such a majority to exist. If there is an even number of votes for both options, you don’t have enough information to prefer one of the options to the other, so, in general, it’s desirable to have an odd number of people in the group. With larger groups the method becomes less sensitive to this requirement, as when the voters are independent and the question is meaningful, the answers are less likely to separate evenly between the possible options. This method can also be used if the question has more than 2 possible answers. In this case, there are more possible distributions of the votes, but the same logic can be applied.
Returning back to datasets, consensus annotation works very similar to the example above. Each image is annotated several times, typically by different persons, then the resulting annotations are compared between each other and merged, using majority voting or a different strategy. The key advantage of consensus annotation is that it helps to reduce personal annotator bias in annotation. This improves the quality of annotation by filtering out errors, noise (variance) and outliers in the annotation, leaving only the most representative ones.
Datasets, typically, have a large number of images and objects. This method of annotation requires several different annotations for the whole dataset, so it is expected to have several times of the annotation costs compared to the simple single-annotation approach. Depending on the annotation resources available, budget, and requirements, consensus annotation may or may not be feasible in a particular task.
One application for this approach that can be recommended is Ground Truth annotation. This type of annotation typically requires especially high quality annotations, because it is used to validate model or annotator answers. Ground Truth is typically limited only to a small portion of the whole dataset images, for example 3%. If a 3- or 5-fold consensus is applied to GT annotations, it is possible to obtain more reliable GT annotations for 10-15% of the full dataset annotation cost. Once there is such a reliable GT dataset, it can be used for annotator validation, on the remaining dataset ensuring the quality metrics are representative and objective.
Consensus replica jobs
A Consensus Replica job (replica) is the way to represent one of the annotator “opinions” in CVAT. Consensus replicas work similarly to regular annotation jobs - they can be assigned, annotated, imported and exported. When you decide to merge annotations from replicas, the results will be written to the parent annotation job.
Key properties of consensus replica jobs:
- Replicas are connected to annotation jobs. Each annotation job can have several related replicas.
- Only annotation jobs can have replicas. Ground Truth jobs cannot have replicas.
- Replicas use the same frame range as their parent annotation jobs.
- Annotations in replicas and parent jobs are independent from each other. Modifying a replica doesn’t affect the parent job or other replicas and vice versa. Removing annotations in a parent job doesn’t change annotations in its replicas.
- Replicas are not included in task annotation import or export. Per-job import and export still work for all job types, including replicas.
Read more about merging here.
Workflow
When annotating with consensus, the typical workflow looks this way:
- Create a task with consensus enabled. Optionally, configure validation
- Assign annotators to consensus replicas, wait until all the jobs are completed
- Once all replicas in a parent job are completed, merge annotations
- Review and resolve problems in the parent jobs
How to enable consensus in a task
Consensus annotation is configured at the Task level. It can only be specified at task creation. If you want to enable consensus for one of your existing tasks, you’ll need to recreate the task.
- Go to the task creation page
- Configure basic and advanced parameters according to your requirements, and attach a dataset to be annotated.
- To enable consensus for the task, open the Advanced section and set Consensus Replicas to a value greater than 1.

- Create the task and open the task page
If a task has consensus enabled, you’ll see the Consensus tag in the task summary. Existing Consensus replica jobs will be displayed in the job list under their parent annotation jobs.
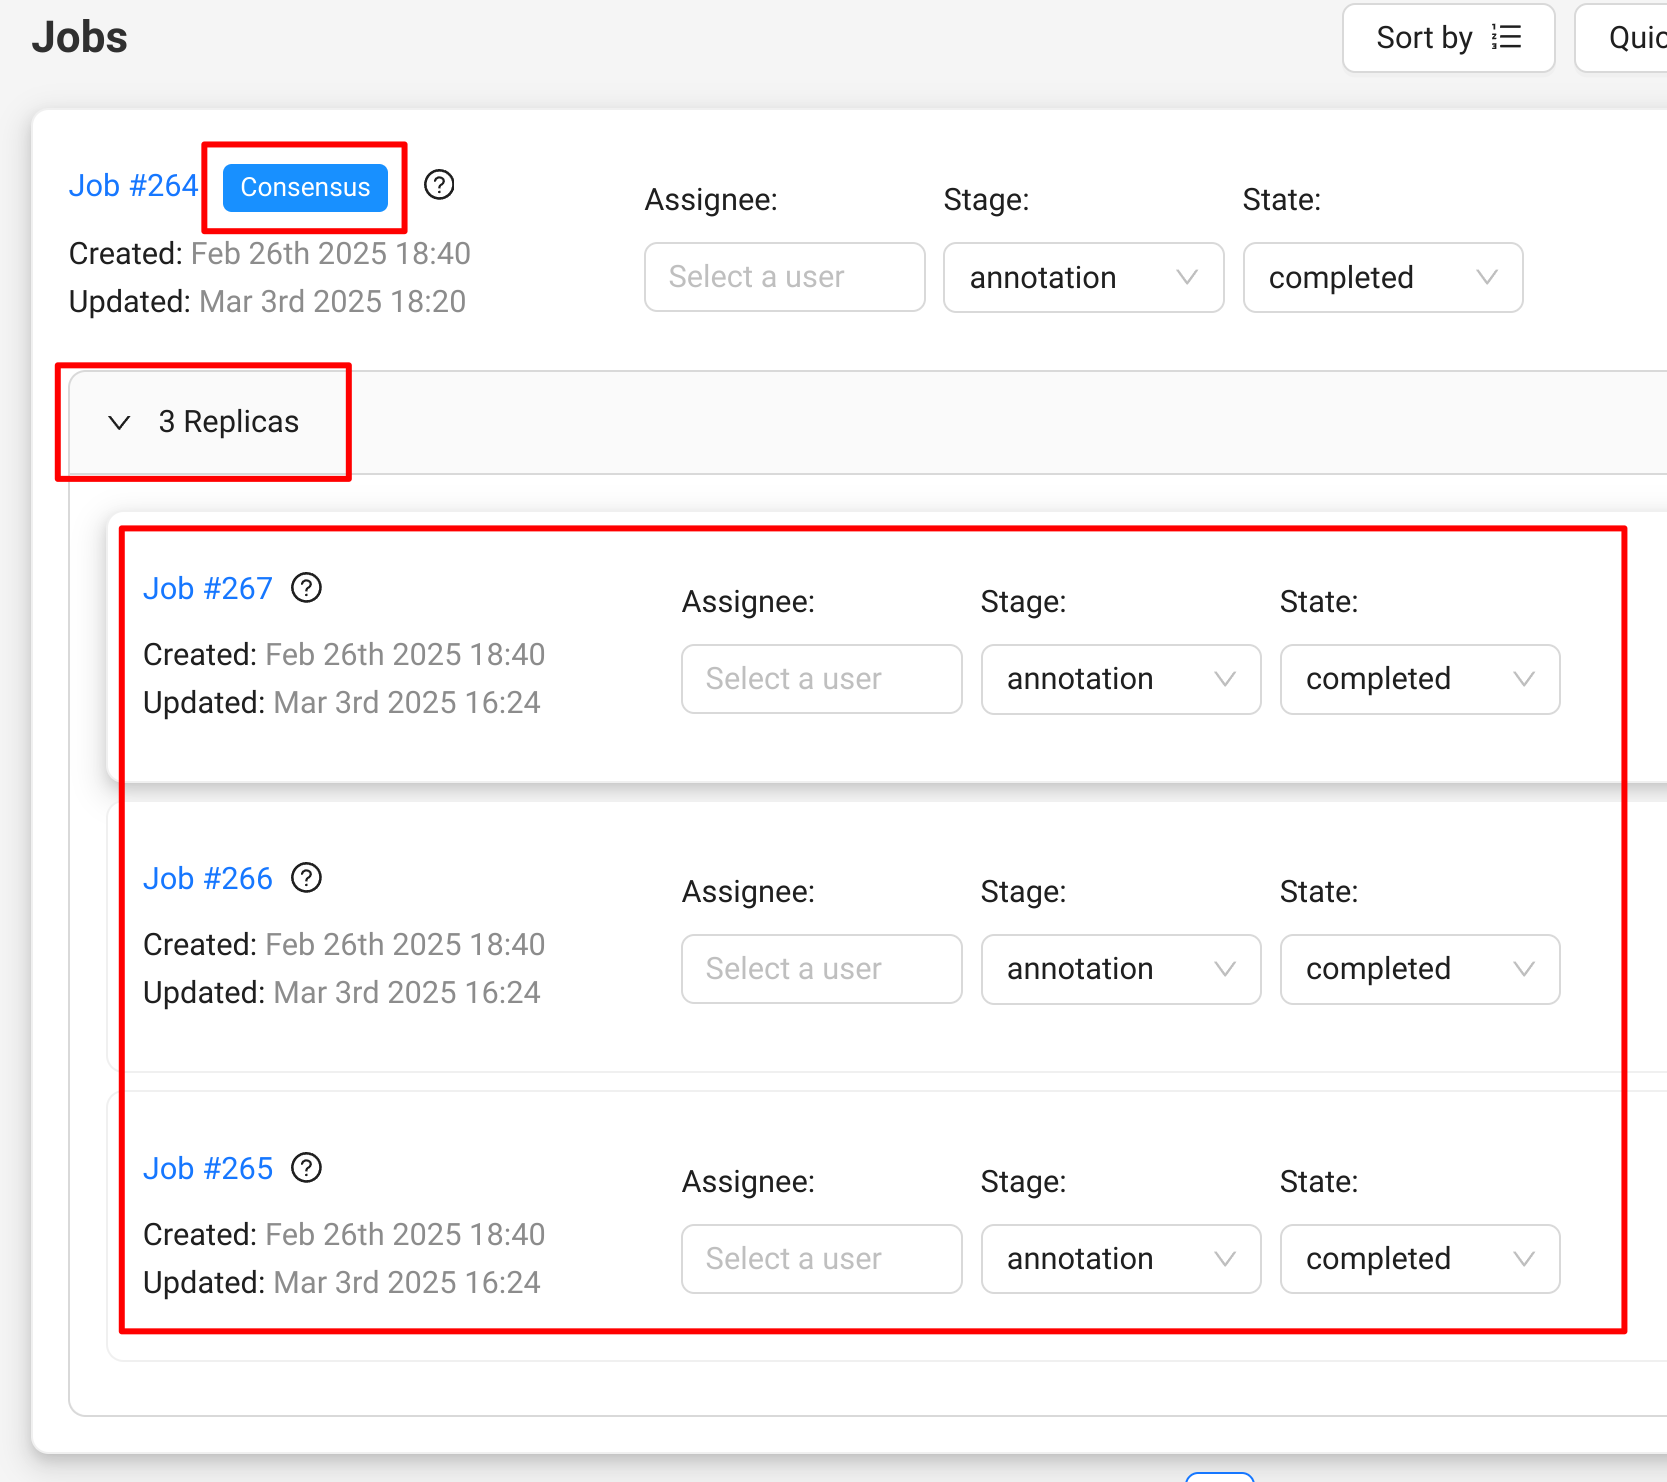
Merging
For a given parent job with related annotated consensus jobs, merging will match annotations between the replicas and save merged annotations into the parent job.
Warning
Please note that merging overrides annotations in the parent job. This operation cannot be undone. Please make sure that the parent job is ready for merging and backup annotations if needed.There are 2 merging options available:
- merge replicas in all available parent jobs in a task
- merge replicas in a specific parent job
Merging is only available for a parent job if it is in the annotation stage and it has at least 1 replica not in the annotation - new stage and state. For simplicity, this can be read as “if there are any annotated replicas in the parent job”.
After merging, parent jobs are switched to the completed state automatically. If you prefer merging at the task level, it is recommended to switch merged parent jobs to the validation stage after they are merged to exclude them from the next merging and avoid losing the reviewed annotations.
How to merge all replicas in a task
- Open the task Actions menu
- Click Merge consensus jobs
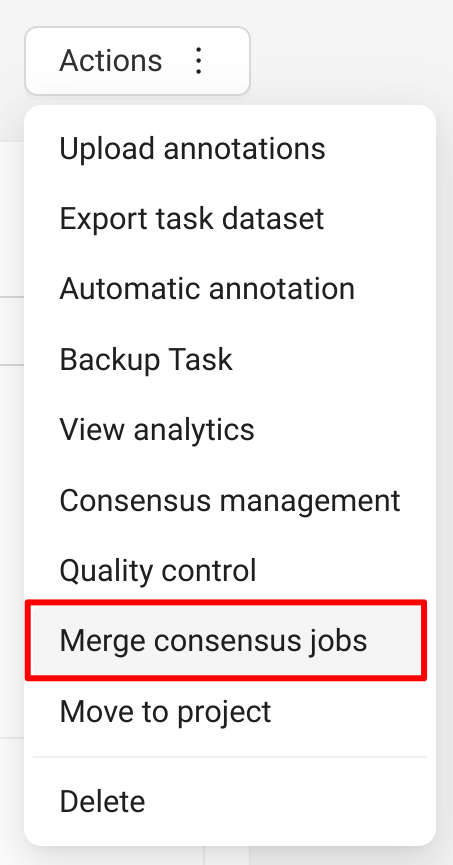
- Click Merge in the dialog window
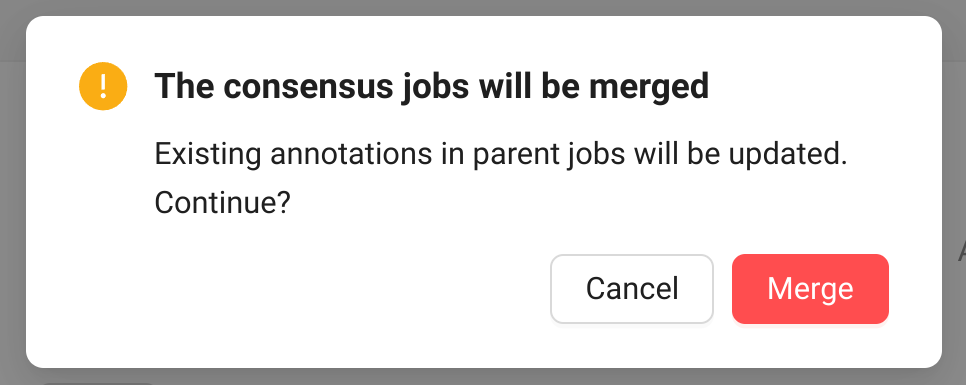
The operation can take some time to be completed. Once it is completed, you will receive a status notification in the top right corner.
How to merge replicas in a specific parent job
- Open the job Actions menu
- Click Merge consensus job
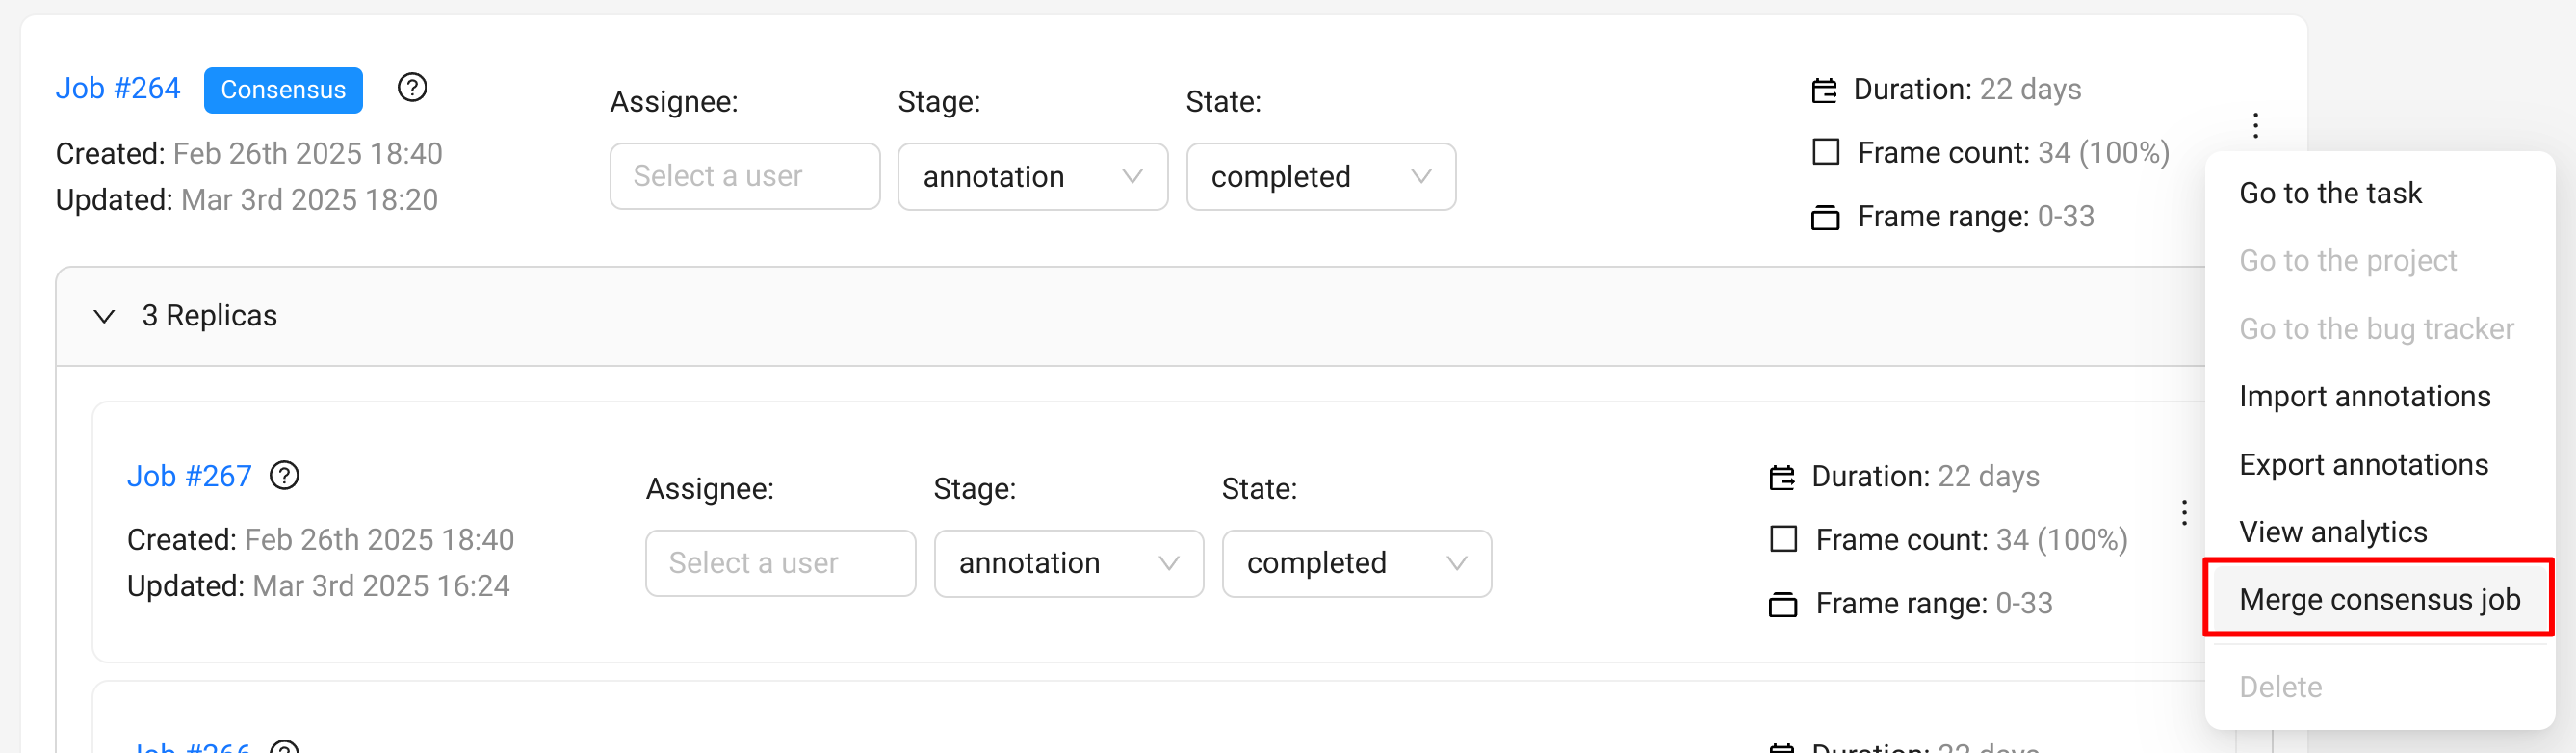
- Click Merge in the dialog window

The operation can take some time to be completed. Once it is completed, you will receive a status notification in the top right corner.
Review and resolve problems
After merging replicas, the parent job will contain merged annotations with consensus scores. These scores help you identify which annotations may need closer review.
Understanding consensus scores
Each merged annotation has two important properties:
- Score: A value from 0 to 1 that indicates the level of agreement between annotators. A score of 1.0 means all replicas agreed on this annotation, while lower scores indicate less agreement between annotators.
- Votes: An approximate number showing how many annotators agreed on this annotation.
This is a UI-only value calculated as
replicas × score. For example, with 5 replicas and a score of 0.8, the votes value would be approximately 4.
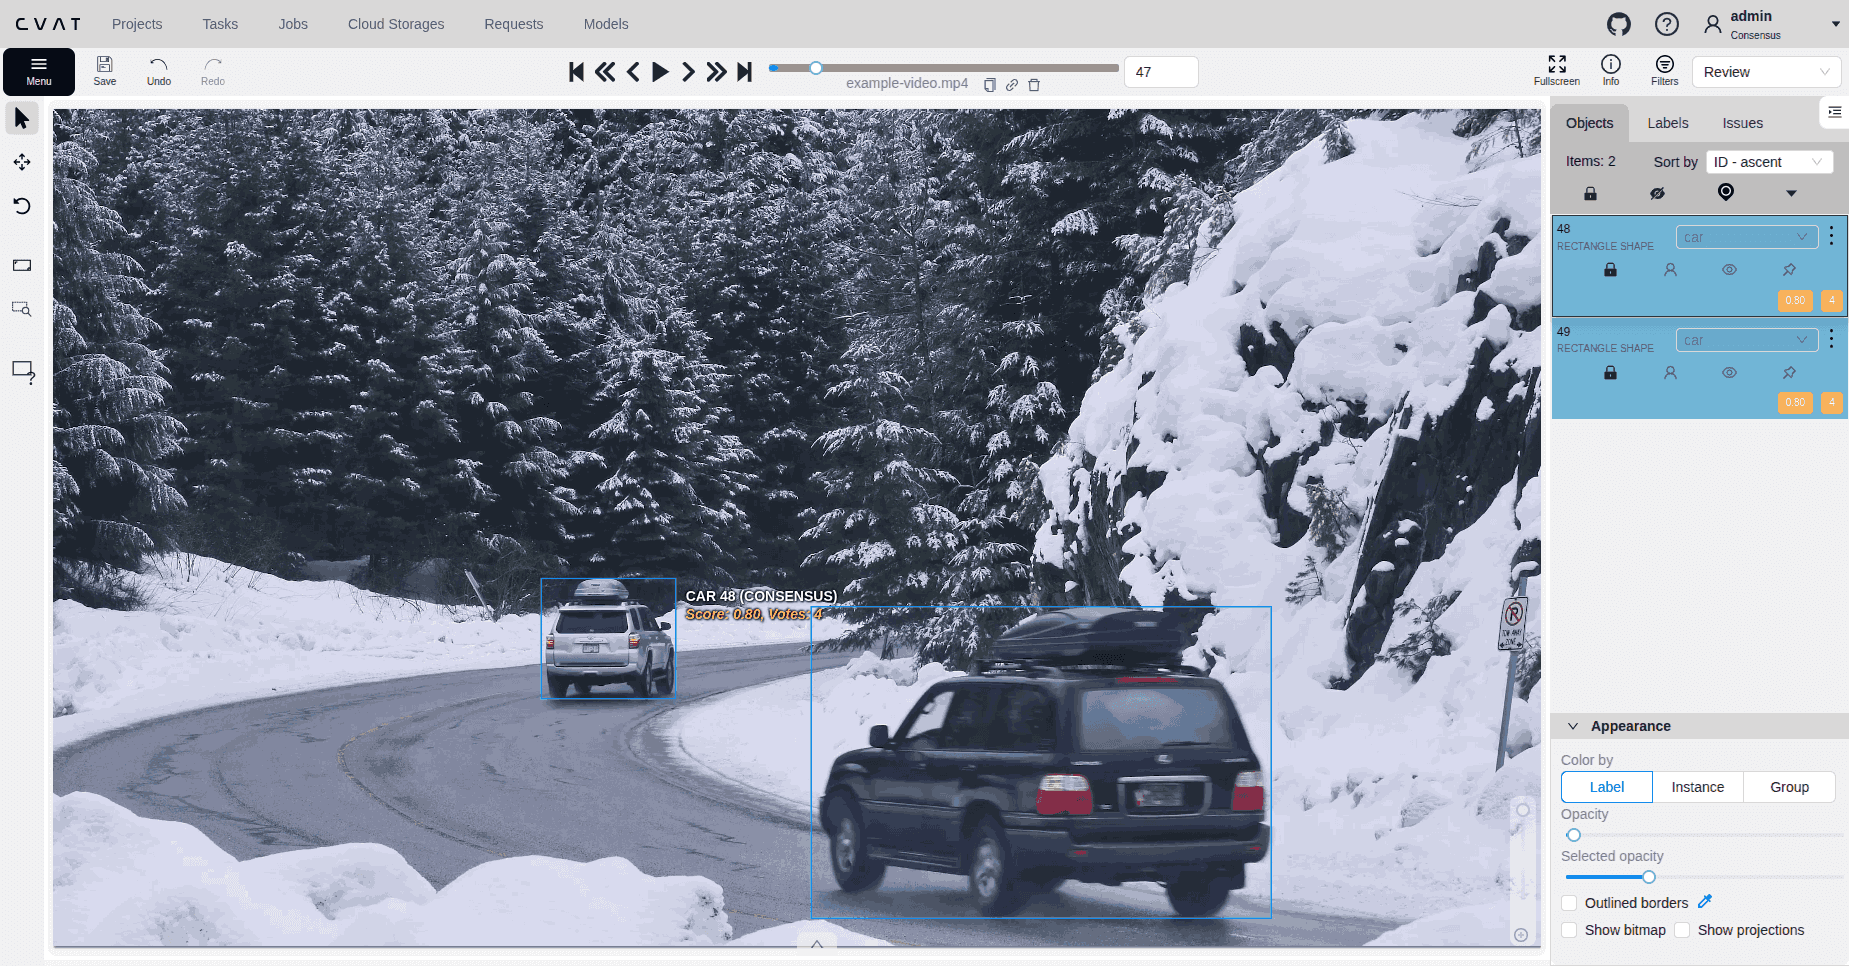
Annotations with lower scores may indicate:
- Ambiguous or difficult-to-annotate objects
- Inconsistent annotation guidelines
- Objects that need closer review
Filtering low-confidence annotations
Before starting manual review, you may want to filter out annotations with low scores to reduce the review workload. To do this:
- Open the merged parent job in the annotation view
- Use the filters panel to filter annotations by score
- Review the filtered annotations and delete those that don’t meet your quality requirements
- Save the annotations
Note
Deleting low-score annotations is optional. You may prefer to review all annotations manually to ensure nothing valuable is removed.Manual review process
Once filtering is complete (or if you skip filtering), proceed with manual review:
-
Open the merged parent job in the annotation view, enable review mode
-
Navigate through annotations using keyboard shortcuts:
- Tab: Go to the next object
- Shift+Tab: Go to the previous object
-
For each annotation, decide on one of the following actions:
- Accept the annotation: If the annotation is correct, simply move to the next object
- Adjust the annotation: If the annotation needs modifications:
- Press L to unlock the object
- Make necessary adjustments (resize, reposition, change attributes, etc.)
- Press L again to lock the object
- Move to the next object
- Delete the annotation: If the annotation is completely wrong:
- Press L to unlock the object
- Press Delete or use the context menu to remove it
- Move to the next object
-
After reviewing all annotations, save your work using Ctrl+S (or Cmd+S on macOS)
Configuration
Merging settings
If you want to tweak some aspects of merging, you can do this on the Consensus Management page. It is available in the task Actions menu. Hover over the ? marks to understand what each field represents.
After you set values for the parameters, click the Save button. The updated settings will take effect on the next merging.
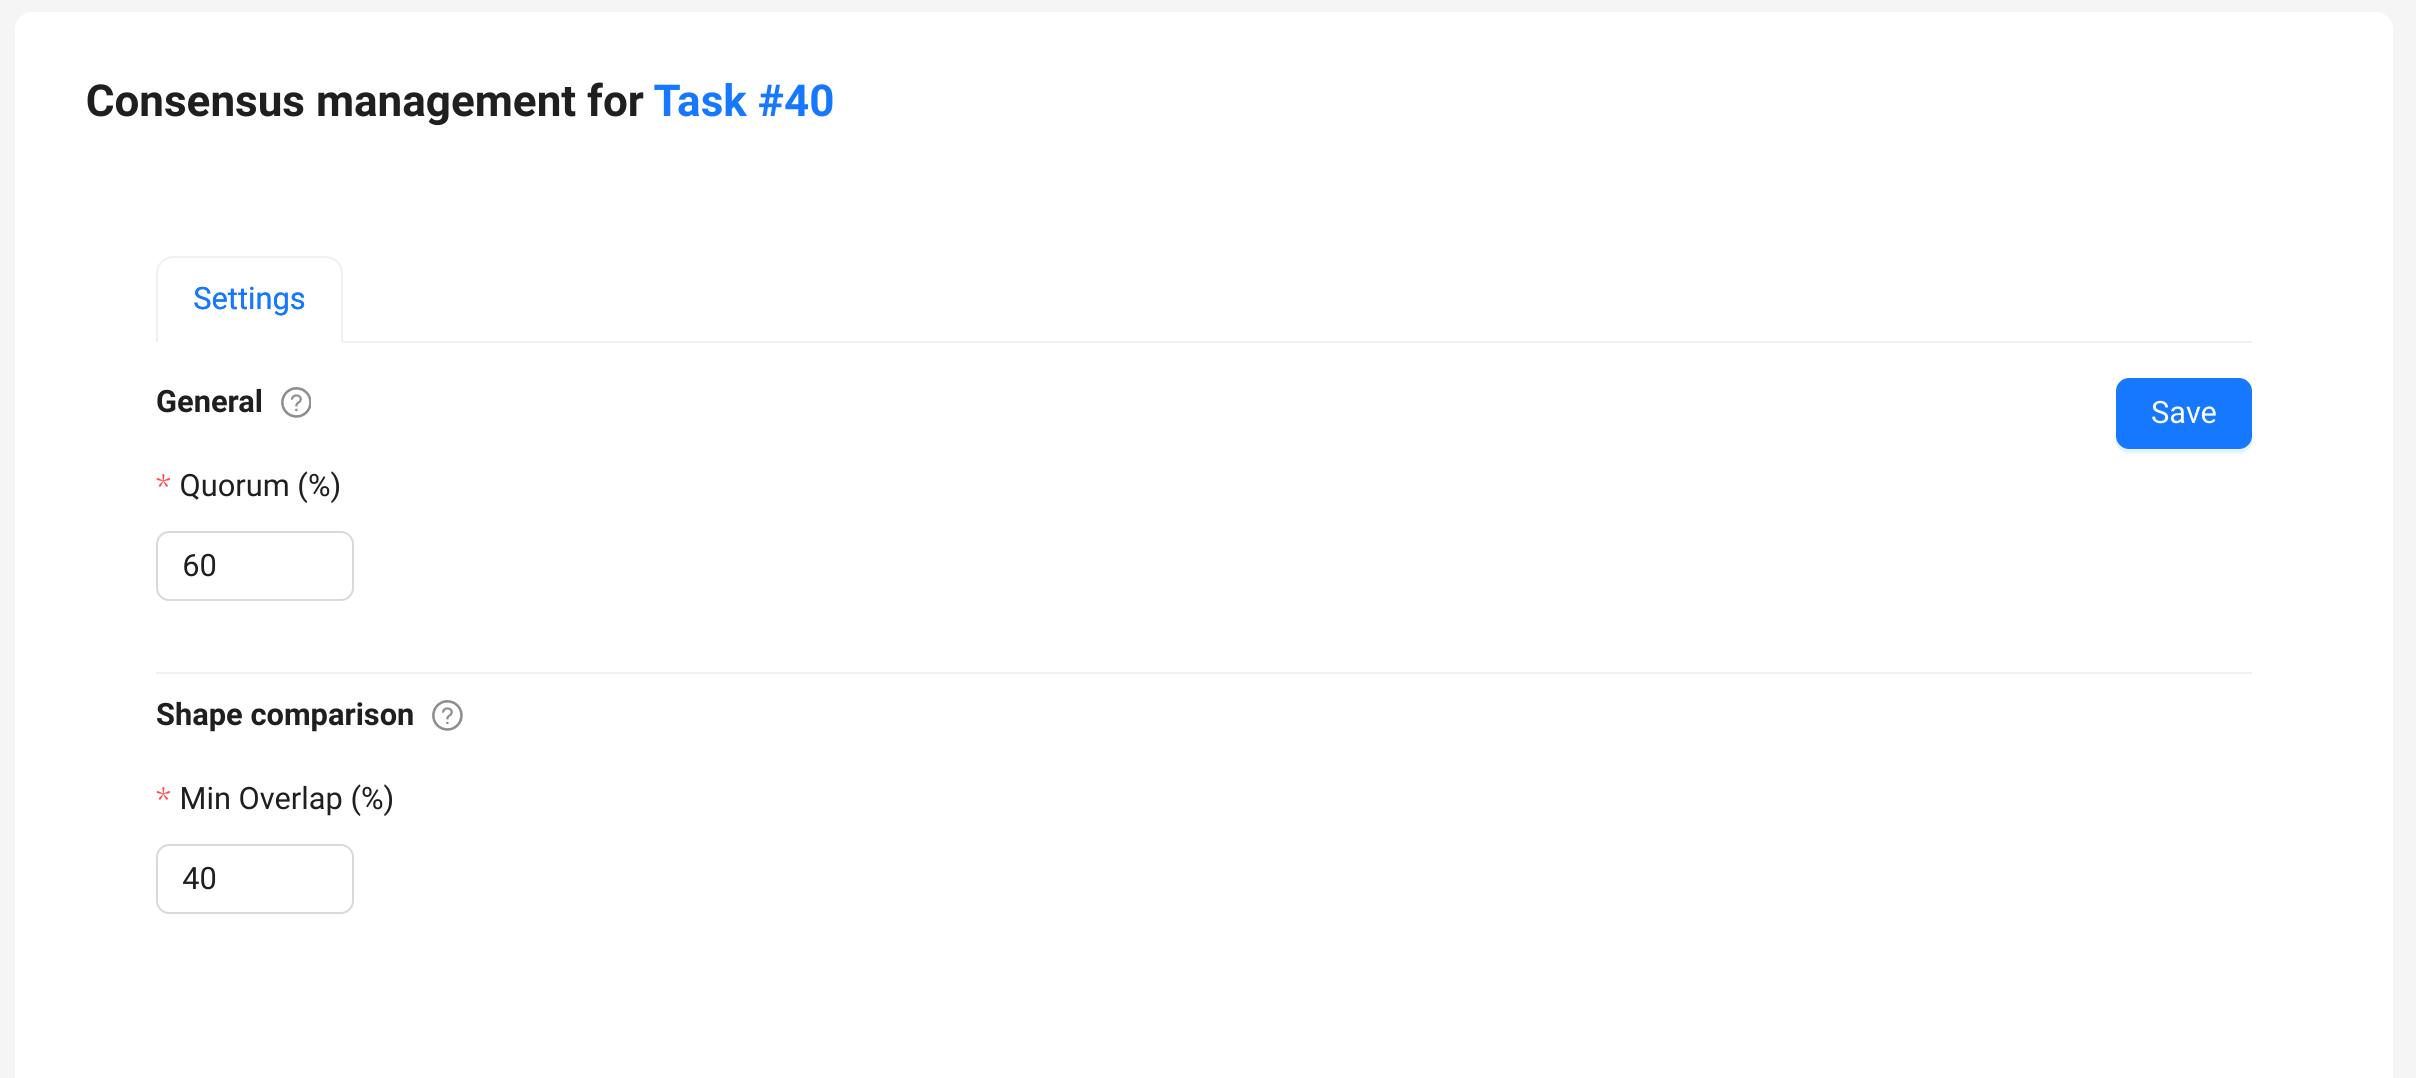
The following parameters are available:
| Shape comparison | |
|---|---|
| Min overlap | Min overlap threshold used for the distinction between matched and unmatched annotations. Used to match all types of annotations. It corresponds to the Intersection over union (IoU) for spatial annotations, such as bounding boxes and masks. Read more about annotation matching here. Keep in mind that quality settings do not affect consensus merging. |
8.5 - Immediate job feedback
Quick responses about job annotation quality
Overview
The basic idea behind this feature is to provide annotators with quick feedback on their performance in a job. When an annotator finishes a job, a dialog is displayed showing the quality of their annotations. The annotator can either agree or disagree with the feedback. If they disagree, they have the option to re-annotate the job and request feedback again.
To ensure transparency with the annotator, the immediate feedback shows the computed score and the minimum required score. Information about the specific errors or frames that have errors is not available to annotators.
Feedback is only available a limited number of times for each assignment, to prevent Ground Truth revealing by annotators. This is controlled by a configurable parameter, so it can be adjusted to the requirements of each project.
How to configure
Immediate feedback settings, such as Target metric, Target metric threshold,
Max validations per job and others, can be configured on the quality settings page.
This feature is considered enabled if the Max validations per job is above 0. You can change
the parameters any time.
Note
This feature requires a configured validation set in the task. Read more in the quality overview section or in the full guide.- Open the task Actions menu > Quality control > Settings
- Set the
Target metricandTarget metric thresholdvalues to what is required in your project. - Set Max validations per job to above zero. 3 is a good starting number.
- Save the updated settings
How to receive a feedback
- Assign an annotator to an annotation job
- Annotate the job
- Mark the job finished using the corresponding button in the menu
- Once the job is completed, you’ll see the job validation dialog
Each assignee gets no more than the specified number of validation attempts.
Note
This functionality is only available in regular annotation jobs. For instance, it’s not possible to use it in Ground Truth jobs.Available feedbacks
There are three types of feedbacks available for different cases:
- Accepted
- Rejected, with an option to fix mistakes
- Finally rejected when the number of attempts is exhausted
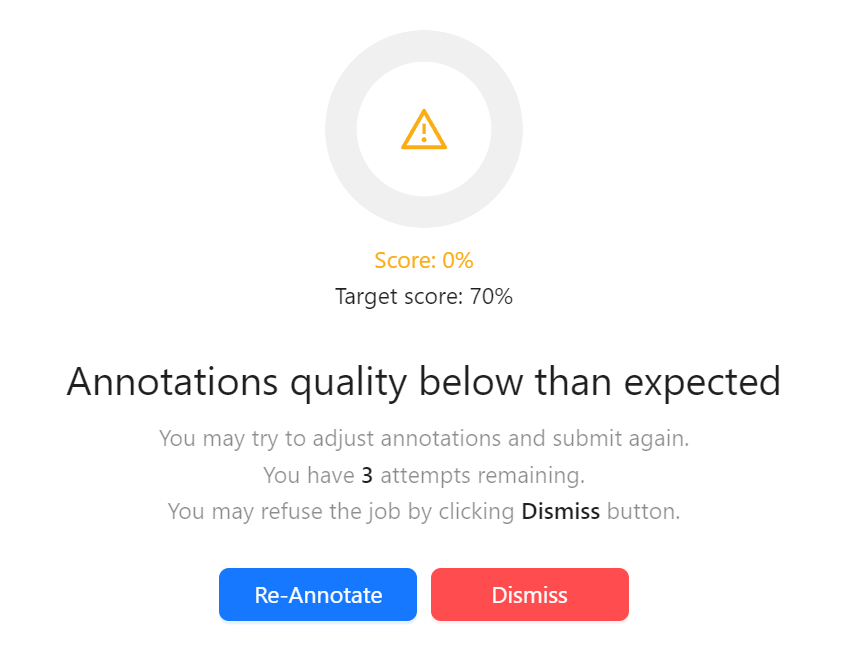
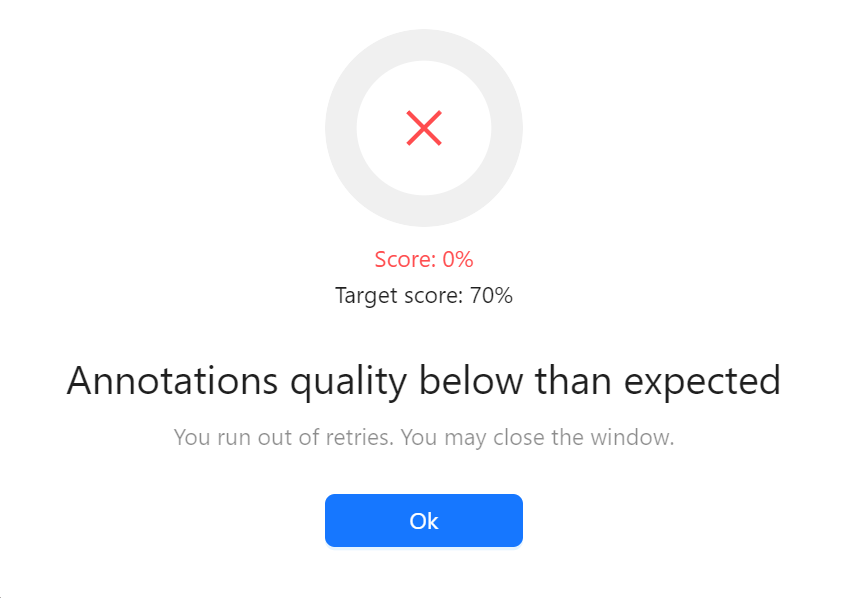
Additional details
Note
Immediate feedback has a default timeout of 20 seconds. Feedback may be unavailable for large jobs or when there are too many immediate feedback requests. In this case annotators do not see any feedback dialogs and annotate jobs as if the feature was disabled.
The number of attempts does not decrease for staff members who have access to a job with ground truth annotations. For instance, if you’re trying to test this feature as the task owner, you may be confused if you see the number of attempts doesn’t decrease.
The number of attempts resets when the job assignee is updated.
8.6 - Analytics
Learn how to access and analyze detailed data and metrics in CVAT Online and Enterprise.
CVAT provides analytics data for projects, tasks, and jobs to help you to track annotation progress and performance metrics at every level. Analytics support a wide range of use cases, including:
- Defining the working time a user spent on a job during a specific period.
- Tracking time spent in each job stage.
- Calculating the total number of ground truth objects in a project.
- Determining the number of ground truth images in a project.
- Checking interpolation rates to assess annotator efficiency.
- Identifying how many objects of a specific label were annotated in a resource.
- Calculating the average annotation speed of a user in a project or task.
- Analyzing how many objects or images were present in removed resources.
Analytics is a paid feature available in CVAT Online (paid tiers) and CVAT Enterprise.
In personal workspaces, analytics are available only to the workspace owner. In organizations, access depends on the user’s organizational role:
- Owners and Maintainers: Full access to all analytics.
- Supervisors: Access only to analytics for visible projects, tasks, and jobs.
- Workers: Access only to analytics for tasks and jobs assigned to them. Workers cannot update the analytics data.
Access
To open analytics:
- Open Projects.
- Open the project menu using
 or open a project and select Actions.
 - Select View analytics.
You can open analytics for a task using the Tasks or Projects pages. To open a task analytics on the Tasks page:
- Open Tasks.
- Open the Actions menu for a task, or open a task and select Actions.
- Select View analytics.
To open a task analytics from a project:
- Open Projects
- Open a project
- Open the Actions menu for a task.
- Select View analytics.
You can open analytics for a job using the Jobs or Tasks pages. To open a job analytics on the Jobs page:
- Open Jobs.
- Open the job menu using button.
- Select View analytics.
To open a job analytics from a task:
- Open Tasks.
- Open a task.
- Open the job menu using button.
- Select View analytics.
Analytics page
The Analytics page displays the data relevant to the specific resource (project, task, or job). Use the link in the page title to return to the corresponding project, task, or job.
Analytics data is not fetched automatically. When you first open the Analytics page, it will be empty. To fetch and display the analytical data, select the Request button.
Note
The analytical data is fetched for all resource children. So, when you request data for a task, the data for all task jobs is also fetched.Once the data is fetched and displayed on the page, you can check its relevance under the page title.
A warning icon ![]() indicates
that the resource was updated after the last analytics update.
indicates
that the resource was updated after the last analytics update.
To update the data, select  button.
The Analytics page includes:
- Summary tab.
- Annotations tab.
- Events tab.
- Date filter.
- Export events button.
The Summary tab provides a statistics overview, while the Annotations and Events tabs contain the detailed data in table form.
To download a CSV file with all event data, select the Export events button.
Summary tab
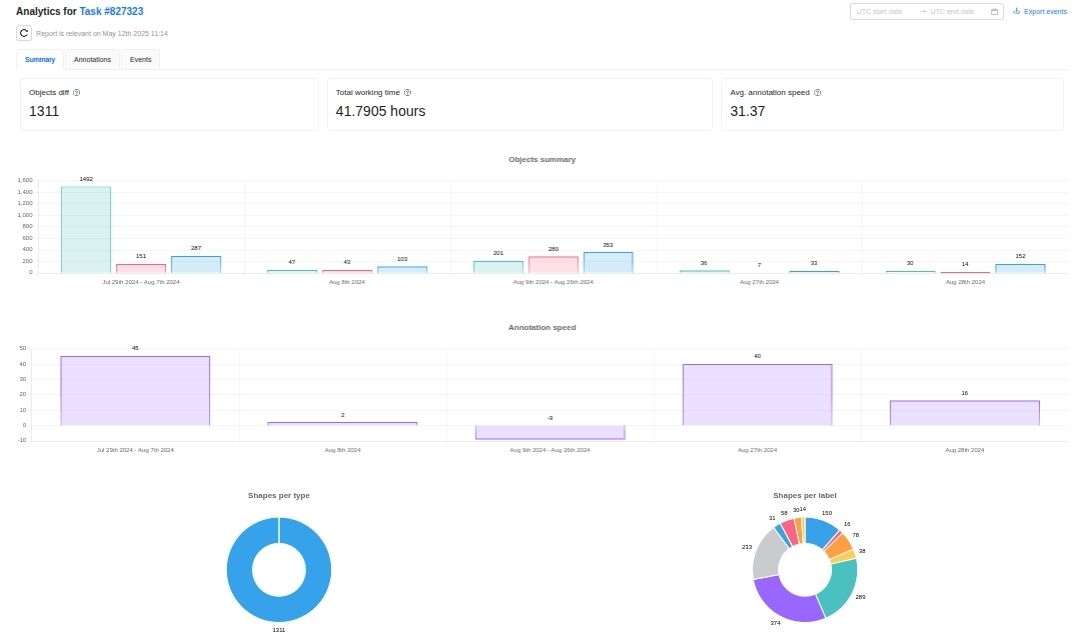
The Summary tab displays the quantitative metrics:
- Objects diff: Difference between created and deleted objects in the selected time period. The value may be negative, if the number of the deleted objects exceeds the number of the created objects during the selected time period.
- Total working time: Total hours spent across all users, based on annotation-related events.
- Avg. annotation speed: Average number of objects annotated per hour. The value may be negative, if the number of the deleted objects exceeds the number of the created objects during the selected time period.
The Summary tab includes charts for object statistics, annotation speed, and diagrams for annotation distribution by labels and types. Hover over a chart or diagram to display tooltips.
Annotations tab
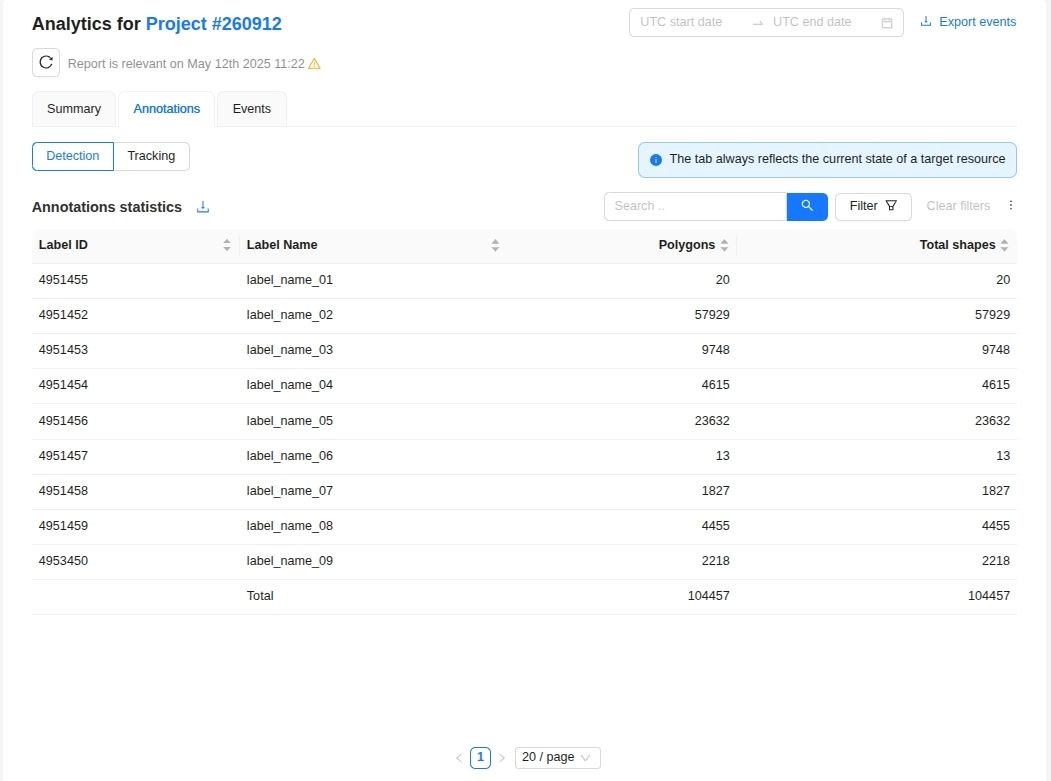
The Annotations tab shows annotation statistics for:
- Shape mode (the Detections tab).
- Track mode (the Tracking tab).
Both tabs always reflect the current state of the resource. Each tab includes a filterable, customizable table (learn how to work with tables).
You can search entries by the Label name column:
- In the search box, enter the value or part of the value to find.
- Select
 button or press Enter.
The Detection tab table contains the columns:
| Column name | Content |
|---|---|
| Label ID | The ID of the label. |
| Label name | The name of the label. |
| Columns with label types names | The number of objects per label type. By default, the columns with zero values are hidden. |
| Total shapes | The total number of all label shapes. |
The Tracking tab table contains the columns:
| Column name | Content |
|---|---|
| Label ID | The ID of the label. |
| Label name | The name of the label. |
| Columns with label type names | The number of objects per label type. By default, the columns with zero values are hidden. |
| Keyframes | The number of the label keyframes. |
| Interpolated | The number of interpolated frames with the label. |
| Tracks | The number of the label tracks. |
| Total objects | The total number of all label objects. |
Events tab
The Events tab displays the following metrics:
- Total objects: Total number of objects in the filtered jobs.
- Total images: Total number of images in the filtered jobs.
- Total working time: Total user time spent.
- Avg. annotation speed: : Average number of objects annotated per hour.
Note
All metrics are recalculated when you apply the date or table filter.The Events tab table contains the aggregated events for the selected resource. Each event is defined by a unique status signature, which is a combination of the job’s assignee, stage, state, and the user who performed the action. As long as this status signature stays the same, all events are combined into one row. For example, if the same user creates two objects in the same job, the Events table will display one event that includes both actions.
However, if the job’s status signature changes (for example, due to an action performed by a different user) the analytics register a new event. As a result, actions that might otherwise be aggregated are instead recorded as separate events in the table.
You can filter the events by date range:
- Select the date filter near the page title.
- Select the first and last dates or enter them in
YYYY-MM-DDformat.
If the date filter is empty, the Events tab shows the metrics and events for the lifetime of the project, task, or job.
To reset the date range, select  button in the date filter.
You can search the table entries by values in Task name, Assignee, Stage, State, User columns:
- In the search box, enter the value or part of the value to find.
- Select button or press Enter.
Other common operations with tables are described in the Working with tables paragraph.
The events table columns:
| Column name | Content |
|---|---|
| Task ID | The ID of the task. If the task exists (the Exists column has the value true), you can select the value to open the task. |
| Task name | The task name. By default, the column is hidden. Select the value to open the task. |
| Job ID | The ID of the job. If the job exists (the Exists column has the value true), you can select the value to open the job. |
| Type | The job (Job ID) type. Possible values: Annotation, Ground truth, Consensus replica. |
| Frame Count | The total number of frames in the job (Job ID) |
| Exists | Indicates if the job (Job ID) existed at the last data fetch. |
| Objects | The total number of existing objects on the job (Job ID) frames |
| Assignee | The job (Job ID) assignee when the event occurred. |
| Stage | The stage of the job (Job ID) when the event occurred. |
| State | The state of the job (Job ID) when the event occurred. |
| User | The name of the user who triggered the event. |
| Working time | Displays the total time in milliseconds spent during the events. By default, the column is hidden. |
| Start UTC time | UTC time when the event started. |
| End UTC time | UTC time when the event finished. By default, the column is hidden. |
| Created objects | The total number of created objects. By default, the column is hidden. |
| Updated objects | The total number of updated objects. By default, the column is hidden. |
| Deleted objects | The total number of deleted objects. By default, the column is hidden. |
Working with tables
The tables in the Annotations and Events tabs support:
-
Exporting the data: select
 button.
Note
Visible columns do not affect the file with exported data. It always contains the complete table with all columns and rows. -
Filtering entries by a custom rule: select Filter, and set filtering criteria. To learn more about how to set a filter, refer to the Filter article.
-
Clearing filters: select Clear filters.
-
Customizing columns:
- Select
 above the right side of the table.
 - Toggle the checkboxes for the columns to display or hide them in the table.
- Select
-
Sorting entries: select the column name to apply sorting. The arrows near the column name indicate the applied sorting order. The arrow up indicates ascending order, the arrow down indicates descending order. You can sort the entries by one column only.
Large tables are split into pages. You can find the pagination controls under the table. You can also change the number of entries per page.
9 - Integrations
This section contains information about the tools that are integrated with CVAT.
9.1 - FiftyOne
![]()
FiftyOne is an open-source tool for building high-quality datasets and computer vision models. FiftyOne supercharges your machine learning workflows by enabling you to visualize datasets and interpret models faster and more effectively.
FiftyOne provides an API to create tasks and jobs, upload data, define label schemas, and download annotations using CVAT, all programmatically in Python. All of the following label types are supported, for both image and video datasets:
- Classifications
- Detections
- Instance segmentations
- Polygons and polylines
- Keypoints
- Scalar fields
- Semantic segmentation
9.2 - CVAT and Human Protocol
The integration of CVAT with HUMAN Protocol offers a groundbreaking approach to data annotation for AI and machine learning projects.
This collaboration combines CVAT’s advanced annotation tools with HUMAN Protocol’s innovative task distribution and compensation system, creating a seamless, efficient workflow for crowdsourcing annotations.
For more details on how to leverage the features of both platforms for your projects, check out these articles:
- CVAT.ai & HUMAN Protocol: A New Dawn in Visual Data Annotation
- Mastering Image Annotation Crowdsourcing for Computer Vision with CVAT.ai and HUMAN Protocol
- Crowdsourcing Annotation with CVAT and Human Protocol: Real Data Experiment Showed Amazing Results
See:
Basic terms
In the realm of computer vision and AI, understanding the roles and components within data annotation projects is crucial.
Here’s a quick overview of basic terms related to CVAT and Human Protocol integration, providing a clear picture of the workflow and participants involved.
| Term | Explanation |
|---|---|
| Requester | An individual or organization that needs data annotated for AI models. |
| Annotator | A person who labels data, such as images or videos, for machine learning. |
| Dataset | A collection of data, often images or videos, used for training AI models. |
Requester: How to get data annotated?
Note
Either you are Requester or Annotator, to access this feature, you’ll need to send a request to HUMAN Protocol.To register and launch a job on the HUMAN Protocol site, follow these steps:
- Create a Requester account on the Human Protocol site.
- Log in to your account and launch a Job.
The job will appear on the Annotators’ dashboard and will be annotated according to the specified requirements and quality standards.
Annotator: How to earn money?
Note
Either you are Requester or Annotator, to access this feature, you’ll need to send a request to HUMAN Protocol.To start earning money on the Human Protocol site, follow these simple steps:
- Register on the Human Protocol site
- Complete KYC process.
- Connect crypto wallet to your account.
- Select job from Data Labeling Jobs menu.
- Annotate.
- After annotation is complete, change job status to Complete.
After the job is reviewed and accepted by the Requester, the money will be deposited into your account.
Video tutorial
10 - System Administration
This section contains documents for system administrators.
10.1 - Community Deployment
Administration guides for the self-hosted CVAT Community edition.
10.1.1 - Basics
This section contains basic documents for system administrators.
10.1.1.1 - Installation Guide
A CVAT installation guide for different operating systems.
Quick installation guide
Before you can use CVAT, you’ll need to get it installed. The document below contains instructions for the most popular operating systems. If your system is not covered by the document it should be relatively straightforward to adapt the instructions below for other systems.
Probably you need to modify the instructions below in case you are behind a proxy server. Proxy is an advanced topic and it is not covered by the guide.
For access from China, read sources for users from China section.
Ubuntu 22.04/20.04 (x86_64/amd64)
-
Open a terminal window. If you don’t know how to open a terminal window on Ubuntu please read the answer.
-
Type commands below into the terminal window to install Docker and Docker Compose. More instructions can be found here.
# Add Docker's official GPG key: sudo apt-get update sudo apt-get install ca-certificates curl sudo install -m 0755 -d /etc/apt/keyrings sudo curl -fsSL https://download.docker.com/linux/ubuntu/gpg -o /etc/apt/keyrings/docker.asc sudo chmod a+r /etc/apt/keyrings/docker.asc # Add the repository to Apt sources: echo \ "deb [arch=$(dpkg --print-architecture) signed-by=/etc/apt/keyrings/docker.asc] https://download.docker.com/linux/ubuntu \ $(. /etc/os-release && echo "${UBUNTU_CODENAME:-$VERSION_CODENAME}") stable" | \ sudo tee /etc/apt/sources.list.d/docker.list > /dev/null sudo apt-get update # Install the Docker packages. sudo apt-get install docker-ce docker-ce-cli containerd.io docker-buildx-plugin docker-compose-plugin -
(Optional) To avoid prefacing Docker commands with
sudo, you can perform the post-installation steps. This involves creating a Unix group nameddockerand adding your current user to this group.sudo groupadd docker sudo usermod -aG docker $USERLog out and log back in (or reboot) so that your group membership is re-evaluated. You can type
groupscommand in a terminal window after that and check ifdockergroup is in its output. -
Clone CVAT source code from the GitHub repository with Git.
Following command will clone the latest develop branch:
git clone https://github.com/cvat-ai/cvat
cd cvat
See alternatives if you want to download one of the release versions or use the
wgetorcurltools. -
To access CVAT over a network or through a different system, export
CVAT_HOSTenvironment variableexport CVAT_HOST=FQDN_or_YOUR-IP-ADDRESS -
Run docker containers. It will take some time to download the latest CVAT and other required images like postgres, redis, and start containers.
docker compose up -d -
(Optional) Use
CVAT_VERSIONenvironment variable to specify the version of CVAT you want to install specific version (e.gv2.1.0,dev). Default behavior:devimages will be pulled for develop branch, and corresponding release images for release versions.CVAT_VERSION=dev docker compose up -d -
Alternative: if you want to build the images locally with unreleased changes see How to pull/build/update CVAT images section
-
You can register a user but by default, it will not have rights even to view the list of tasks. Thus you should create a superuser. The superuser can use an admin panel to assign the correct groups to the user. Please use the command below:
docker exec -it cvat_server bash -ic 'python3 ~/manage.py createsuperuser'Choose a username and a password for your admin account. For more information please read Django documentation.
-
Google Chrome is the only browser that is supported by CVAT. You need to install it as well. Type commands below in a terminal window:
sudo curl https://dl-ssl.google.com/linux/linux_signing_key.pub -o /etc/apt/trusted.gpg.d/google.asc sudo sh -c 'echo "deb [arch=amd64] http://dl.google.com/linux/chrome/deb/ stable main" >> /etc/apt/sources.list.d/google-chrome.list' sudo apt-get update sudo apt-get --no-install-recommends install -y google-chrome-stable -
Open the installed Google Chrome browser and go to localhost:8080. Type your login/password for the superuser on the login page and press the Login button. Now you should be able to create a new annotation task. Please refer to the Tasks section for more details.
Windows 10
-
Install WSL2 (Windows subsystem for Linux) refer to this official guide. WSL2 requires Windows 10, version 2004 or higher. After installing WSL2, install a Linux Distribution of your choice.
-
Download and install Docker Desktop for Windows. Double-click
Docker for Windows Installerto run the installer. More instructions can be found here. Official guide for docker WSL2 backend can be found here. Note: Check that you are specifically using WSL2 backend for Docker. -
In Docker Desktop, go to
Settings >> Resources >> WSL Integration, and enable integration with the Linux Distribution that you chose. -
Download and install Git for Windows. When installing the package please keep all options by default. More information about the package can be found here.
-
Download and install Google Chrome. It is the only browser which is supported by CVAT.
-
Go to windows menu, find the Linux distribution you installed and run it. You should see a terminal window.
-
Clone CVAT source code from the GitHub repository.
The following command will clone the latest develop branch:
git clone https://github.com/cvat-ai/cvat
cd cvat
See alternatives if you want to download one of the release versions.
-
Run docker containers. It will take some time to download the latest CVAT release and other required images like postgres, redis, etc. from DockerHub and create containers.
docker compose up -d -
(Optional) Use
CVAT_VERSIONenvironment variable to specify the version of CVAT you want to install specific version (e.gv2.1.0,dev). Default behavior:devimages will be pulled for develop branch, and corresponding release images for release versions.CVAT_VERSION=dev docker compose up -d -
Alternative: if you want to build the images locally with unreleased changes see How to pull/build/update CVAT images section
-
You can register a user but by default, it will not have rights even to view the list of tasks. Thus you should create a superuser. A superuser can use an admin panel to assign correct groups to other users. Please use the command below:
sudo docker exec -it cvat_server bash -ic 'python3 ~/manage.py createsuperuser'If you don’t have winpty installed or the above command does not work, you may also try the following:
# enter docker image first
docker exec -it cvat_server /bin/bash
# then run
python3 ~/manage.py createsuperuser
Choose a username and a password for your admin account. For more information please read Django documentation.
-
Open the installed Google Chrome browser and go to localhost:8080. Type your login/password for the superuser on the login page and press the Login button. Now you should be able to create a new annotation task. Please refer to the Annotation section for more details.
Mac OS Mojave
-
Download Docker for Mac. Double-click Docker.dmg to open the installer, then drag Moby the whale to the Applications folder. Double-click Docker.app in the Applications folder to start Docker. More instructions can be found here.
-
There are several ways to install Git on a Mac. The easiest is probably to install the Xcode Command Line Tools. On Mavericks (10.9) or above you can do this simply by trying to run git from the Terminal the very first time.
git --versionIf you don’t have it installed already, it will prompt you to install it. More instructions can be found here.
-
Download and install Google Chrome. It is the only browser which is supported by CVAT.
-
Open a terminal window. The terminal app is in the Utilities folder in Applications. To open it, either open your Applications folder, then open Utilities and double-click on Terminal, or press Command - spacebar to launch Spotlight and type “Terminal,” then double-click the search result.
-
Clone CVAT source code from the GitHub repository with Git.
The following command will clone the latest develop branch:
git clone https://github.com/cvat-ai/cvat
cd cvat
See alternatives if you want to download one of the release versions or use the
wgetorcurltools. -
Run docker containers. It will take some time to download the latest CVAT release and other required images like postgres, redis, etc. from DockerHub and create containers.
docker compose up -d -
(Optional) Use
CVAT_VERSIONenvironment variable to specify the version of CVAT you want to install specific version (e.gv2.1.0,dev). Default behavior:devimages will be pulled for develop branch, and corresponding release images for release versions.CVAT_VERSION=dev docker compose up -d -
Alternative: if you want to build the images locally with unreleased changes see How to pull/build/update CVAT images section
-
You can register a user but by default, it will not have rights even to view the list of tasks. Thus you should create a superuser. A superuser can use an admin panel to assign correct groups to other users. Please use the command below:
docker exec -it cvat_server bash -ic 'python3 ~/manage.py createsuperuser'Choose a username and a password for your admin account. For more information please read Django documentation.
-
Open the installed Google Chrome browser and go to localhost:8080. Type your login/password for the superuser on the login page and press the Login button. Now you should be able to create a new annotation task. Please refer to the Annotation section for more details.
Advanced Topics
How to get CVAT source code
Git (Linux, Mac, Windows)
-
Install Git on your system if it’s not already installed
- Ubuntu:
sudo apt-get --no-install-recommends install -y git- Windows: Follow instructions from https://git-scm.com/download/win
-
Clone CVAT source code from the GitHub repository.
The command below will clone the default branch (develop):
git clone https://github.com/cvat-ai/cvat
cd cvat
To clone specific tag, e.g. v2.1.0:
git clone -b v2.1.0 https://github.com/cvat-ai/cvat
cd cvat
Wget (Linux, Mac)
To download latest develop branch:
wget https://github.com/cvat-ai/cvat/archive/refs/heads/develop.zip
unzip develop.zip && mv cvat-develop cvat
cd cvat
To download specific tag:
wget https://github.com/cvat-ai/cvat/archive/refs/tags/v1.7.0.zip
unzip v1.7.0.zip && mv cvat-1.7.0 cvat
cd cvat
Curl (Linux, Mac)
To download the latest develop branch:
curl -LO https://github.com/cvat-ai/cvat/archive/refs/heads/develop.zip
unzip develop.zip && mv cvat-develop cvat
cd cvat
To download specific tag:
curl -LO https://github.com/cvat-ai/cvat/archive/refs/tags/v1.7.0.zip
unzip v1.7.0.zip && mv cvat-1.7.0 cvat
cd cvat
CVAT healthcheck command
The following command allows testing the CVAT container to make sure it works.
docker exec -t cvat_server python manage.py health_check
The expected output of a healthy CVAT container:
Cache backend: default   ... working
DatabaseBackend          ... working
DiskUsage                ... working
MemoryUsage              ... working
MigrationsHealthCheck    ... working
OPAHealthCheck           ... working
Configuring Disk Usage Health Check
CVAT_HEALTH_DISK_USAGE_MAX: This environment variable specifies the maximum allowed disk usage percentage for the volume where CVAT is installed. If the disk usage exceeds this threshold, the DiskUsage health check will fail. The value should be an integer representing a percentage (e.g., 90 for 90%). Read more about how to enable health checks.
Deploying CVAT behind a proxy
If you deploy CVAT behind a proxy and do not plan to use any of serverless functions
for automatic annotation, the exported environment variables
http_proxy, https_proxy and no_proxy should be enough to build images.
Otherwise please create or edit the file ~/.docker/config.json in the home directory of the user
which starts containers and add JSON such as the following:
{
  "proxies": {
    "default": {
      "httpProxy": "http://proxy_server:port",
      "httpsProxy": "http://proxy_server:port",
      "noProxy": "*.test.example.com,.example2.com"
    }
  }
}
These environment variables are set automatically within any container. Please see the Docker documentation for more details.
Using the Traefik dashboard
If you are customizing the docker compose files and you come upon some unexpected issues, using the Traefik dashboard might be very useful to see if the problem is with Traefik configuration, or with some of the services.
You can enable the Traefik dashboard by uncommenting the following lines from docker-compose.yml
services:
  traefik:
    # Uncomment to get Traefik dashboard
    #   - "--entryPoints.dashboard.address=:8090"
    #   - "--api.dashboard=true"
    # labels:
    #   - traefik.enable=true
    #   - traefik.http.routers.dashboard.entrypoints=dashboard
    #   - traefik.http.routers.dashboard.service=api@internal
    #   - traefik.http.routers.dashboard.rule=Host(`${CVAT_HOST:-localhost}`)
and if you are using docker-compose.https.yml, also uncomment these lines
services:
  traefik:
    command:
      # Uncomment to get Traefik dashboard
      # - "--entryPoints.dashboard.address=:8090"
      # - "--api.dashboard=true"
Note that this “insecure” dashboard is not recommended in production (and if your instance is publicly available); if you want to keep the dashboard in production you should read Traefik’s documentation on how to properly secure it.
Additional components
Semi-automatic and automatic annotation
Please follow this guide.
Stop all containers
The command below stops and removes containers and networks created by up.
docker compose down
Use your own domain
If you want to access your instance of CVAT outside of your localhost (on another domain),
you should specify the CVAT_HOST environment variable, like this:
export CVAT_HOST=<YOUR_DOMAIN>
Share path
You can use shared storage for uploading data when you create a task. To do that, you need to mount the shared storage to the CVAT docker container. Example of docker-compose.override.yml for this purpose:
services:
  cvat_server:
    volumes:
      - cvat_share:/home/django/share:ro
  cvat_worker_import:
    volumes:
      - cvat_share:/home/django/share:ro
  cvat_worker_export:
    volumes:
      - cvat_share:/home/django/share:ro
  cvat_worker_annotation:
    volumes:
      - cvat_share:/home/django/share:ro
  cvat_worker_chunks:
    volumes:
      - cvat_share:/home/django/share:ro

volumes:
  cvat_share:
    driver_opts:
      type: none
      device: /mnt/share
      o: bind
You can change the share device path to your actual share.
You can mount your cloud storage as a FUSE and use it later as a share.
Email verification
You can enable email verification for newly registered users. Specify these options in the settings file to configure Django allauth to enable email verification (ACCOUNT_EMAIL_VERIFICATION = ‘mandatory’). Access is denied until the user’s email address is verified.
ACCOUNT_AUTHENTICATION_METHOD = 'username_email'
ACCOUNT_CONFIRM_EMAIL_ON_GET = True
ACCOUNT_EMAIL_REQUIRED = True
ACCOUNT_EMAIL_VERIFICATION = 'mandatory'

# Email backend settings for Django
EMAIL_BACKEND = 'django.core.mail.backends.smtp.EmailBackend'
Also, you need to configure the Django email backend to send emails. This depends on the email server you are using and is not covered in this tutorial, please see Django SMTP backend configuration for details.
Deploy CVAT on the Scaleway public cloud
Please follow this tutorial to install and set up remote access to CVAT on a Scaleway cloud instance with data in a mounted object storage bucket.
Deploy secure CVAT instance with HTTPS
Using Traefik, you can automatically obtain a TLS certificate for your domain from Let’s Encrypt, enabling you to use HTTPS protocol to access your website.
To enable this, first set the CVAT_HOST (the domain of your website) and ACME_EMAIL
(contact email for Let’s Encrypt) environment variables:
export CVAT_HOST=<YOUR_DOMAIN>
export ACME_EMAIL=<YOUR_EMAIL>
Then, use the docker-compose.https.yml file to override the base docker-compose.yml file:
docker compose -f docker-compose.yml -f docker-compose.https.yml up -d
Note
In the firewall, ports 80 and 443 must be open for inbound connections from anyThen, the CVAT instance will be available at your domain on ports 443 (HTTPS) and 80 (HTTP, redirects to 443).
Deploy CVAT with an external database
By default, docker compose up will start a PostgreSQL database server,
which will be used to store CVAT’s data.
If you’d like to use your own PostgreSQL instance instead, you can do so as follows.
Note that CVAT only supports the same major version of PostgreSQL
as is used in docker-compose.yml.
First, define environment variables with database connection settings:
export CVAT_POSTGRES_HOST=<PostgreSQL hostname> # mandatory
export CVAT_POSTGRES_PORT=<PostgreSQL port> # defaults to 5432
export CVAT_POSTGRES_DBNAME=<PostgreSQL database name> # defaults to "cvat"
export CVAT_POSTGRES_USER=<PostgreSQL role name> # defaults to "root"
export CVAT_POSTGRES_PASSWORD=<PostgreSQL role password> # mandatory
Then, add the docker-compose.external_db.yml file to your docker compose up command:
docker compose -f docker-compose.yml -f docker-compose.external_db.yml up -d
How to pull/build/update CVAT images
-
For a CVAT version lower or equal to 2.1.0, you need to pull images using docker because the compose configuration always points to the latest image tag, e.g.
docker pull cvat/server:v1.7.0
docker tag cvat/server:v1.7.0 openvino/cvat_server:latest

docker pull cvat/ui:v1.7.0
docker tag cvat/ui:v1.7.0 openvino/cvat_ui:latest
For CVAT version more than v2.1.0 it’s possible to pull specific version of prebuilt images from DockerHub using
CVAT_VERSIONenvironment variable to specify the version (e.g.dev):CVAT_VERSION=dev docker compose pull -
To build images yourself include
docker-compose.dev.ymlcompose config file todocker composecommand. This can be useful if you want to build a CVAT with some source code changes.docker compose -f docker-compose.yml -f docker-compose.dev.yml build -
To update local images to
latestordevtags run:CVAT_VERSION=dev docker compose pullor
CVAT_VERSION=latest docker compose pull
Troubleshooting
Sources for users from China
If you stay in China, for installation you need to override the following sources.
-
For use
apt updateusing:Pre-compiled packages:
deb https://mirrors.tuna.tsinghua.edu.cn/ubuntu/ focal main restricted universe multiverse
deb https://mirrors.tuna.tsinghua.edu.cn/ubuntu/ focal-updates main restricted universe multiverse
deb https://mirrors.tuna.tsinghua.edu.cn/ubuntu/ focal-backports main restricted universe multiverse
deb https://mirrors.tuna.tsinghua.edu.cn/ubuntu/ focal-security main restricted universe multiverse
Or source packages:
deb-src https://mirrors.tuna.tsinghua.edu.cn/ubuntu/ focal main restricted universe multiverse deb-src https://mirrors.tuna.tsinghua.edu.cn/ubuntu/ focal-updates main restricted universe multiverse deb-src https://mirrors.tuna.tsinghua.edu.cn/ubuntu/ focal-backports main restricted universe multiverse deb-src https://mirrors.tuna.tsinghua.edu.cn/ubuntu/ focal-security main restricted universe multiverse -
Add registry mirrors into
daemon.jsonfile:{ "registry-mirrors": [ "http://f1361db2.m.daocloud.io", "https://docker.mirrors.ustc.edu.cn", "https://hub-mirror.c.163.com", "https://mirror.ccs.tencentyun.com" ] } -
For using
pip:pip config set global.index-url https://pypi.tuna.tsinghua.edu.cn/simple -
For using
npm:npm config set registry https://registry.npm.taobao.org/ -
Instead of
gitusinggitee: -
For replace acceleration source
docker.comrun:curl -fsSL https://download.docker.com/linux/ubuntu/gpg | sudo apt-key add - sudo add-apt-repository \ "deb [arch=amd64] https://download.docker.com/linux/ubuntu \ $(lsb_release -cs) \ -
For replace acceleration source
google.comrun:curl https://dl-ssl.google.com/linux/linux_signing_key.pub | sudo apt-key add -
HTTPS is not working because of a certificate
If you’re having trouble with an SSL connection, to find the cause, you’ll need to get the logs from traefik by running:
docker logs traefik
The logs will help you find out the problem.
If the error is related to a firewall, then:
- Open ports 80 and 443 for inbound connections from any.
- Delete
acme.json. The location should be something like:/var/lib/docker/volumes/cvat_cvat_letsencrypt/_data/acme.json.
After acme.json is removed, stop all cvat docker containers:
docker compose -f docker-compose.yml -f docker-compose.https.yml down
Make sure variables set (with your values):
export CVAT_HOST=<YOUR_DOMAIN>
export ACME_EMAIL=<YOUR_EMAIL>
and restart docker:
docker compose -f docker-compose.yml -f docker-compose.https.yml up -d
CVAT health check failed because of too low free disk space
During CVAT startup, it is possible to get an error like this:
health_check.exceptions.ServiceWarning: warning: <server name> 94.8% disk usage exceeds 90%
This error means that there is not enough free disk space on the CVAT data storage volume.
By default, CVAT requires at least 10% free disk space. If you want to change the default value, it is possible to configure the required amount of free space used in such checks.
Set the environment variable:
export CVAT_HEALTH_DISK_USAGE_MAX=90
and add an extra environment variable to the docker-compose.yml file:
x-backend-env: &backend-env
  CVAT_HEALTH_DISK_USAGE_MAX: '${CVAT_HEALTH_DISK_USAGE_MAX:-90}'
10.1.1.2 - Superuser registration
A CVAT installation guide to create a superuser.
This section is for users who want to be a bit more flexible with CVAT use.
The user you register by default does not have full permissions on the instance,
so you must create a superuser.
The superuser can use Django administration panel
to assign groups (roles) to other users.
Available roles are: user (default), admin, worker.
Prerequisites
Before you register an admin account (superuser), you need to install CVAT locally, see Installation Guide.
Steps of installation are partly different, depending on the type of operation system (OS).
This section starts with Create superuser step that is common for all OS.
Register as a superuser
In the process of installation you need to create a superuser:
- In a terminal run the following command:
docker exec -it cvat_server bash -ic 'python3 ~/manage.py createsuperuser'
- Set up username, email address, and password.
- Go to
localhost:8080, and log in with credentials from step 2. - (Optional) Go to Django administration panel panel to:
- Create/edit/delete users
- Control permissions of users and access to the tool.
To manage users’ permission, in the Django administration panel:
- On the left menu click Users.
- On the main pane click Admin and scroll down to Permissions section.
- Select user groups and add/remove permissions.
Changing a user’s password
As a superuser, you can manually change passwords for other users through the Django administration panel. This is useful when users cannot use the “Forgot password” feature (e.g., when email is not configured or user email addresses are invalid).
To change a user’s password:
- Go to the Django administration panel.
- On the left menu, click Users.
- Click on the username of the user whose password you want to change.
- In the Password field at the top of the user details page, click the link that says this form (within the text “Raw passwords are not stored, so there is no way to see this user’s password, but you can change the password using this form.”).
- Enter and confirm the new password.
- Click Change password to save.
The user can now log in with the new password and change it again in their account settings if desired.
10.1.1.3 - AWS-Deployment Guide
Instructions for deploying CVAT on Nvidia GPU and other AWS machines.
There are two ways of deploying the CVAT.
-
On Nvidia GPU Machine: Tensorflow annotation feature is dependent on GPU hardware. One of the easy ways to launch CVAT with the tf-annotation app is to use AWS P3 instances, which provides the NVIDIA GPU. Read more about P3 instances here. Overall setup instruction is explained in main readme file, except Installing Nvidia drivers. So we need to download the drivers and install it. For Amazon P3 instances, download the Nvidia Drivers from Nvidia website. For more check Installing the NVIDIA Driver on Linux Instances link.
-
On Any other AWS Machine: We can follow the same instruction guide mentioned in the installation instructions. The additional step is to add a security group and rule to allow incoming connections.
For any of above, don’t forget to set the CVAT_HOST environment variable to the exposed
AWS public IP address or hostname:
export CVAT_HOST=your-instance.amazonaws.com
In case of problems with using hostname, you can also use the public IPV4 instead of hostname.
For AWS or any cloud based machines where the instances need to be terminated or stopped,
the public IPV4 and hostname changes with every stop and reboot.
To address this efficiently, avoid using spot instances that cannot be stopped,
since copying the EBS to an AMI and restarting it throws problems.
On the other hand, when a regular instance is stopped and restarted,
the new hostname/IPV4 can be used to set the CVAT_HOST environment variable.
10.1.2 - Advanced
This section contains advanced documents for system administrators.
10.1.2.1 - CVAT Architecture
Description of CVAT architecture and components
This guide is designed to provide a comprehensive overview of the architecture and components of the CVAT and to illustrate how each component interacts within the system.
| Domain | Component | Functionality | Description |
|---|---|---|---|
| Analytics | Vector | Event processing | There are several components that process events (backend, frontend, web UI). All events are sent to a single point - Vector, where they are processed and then redirected to ClickHouse. For more information, see Analytics. |
| ClickHouse | Event database | Stores events. For more information, see Analytics. | |
| Grafana | Dashboards | Data based on the web interface. For more information, see Analytics. | |
| Data storage NFS | RVVX access mode storage is required in case of multi-node deployment. Available with different types of storages: |
Contains data required for CVAT operations | It is necessary to have the capability for multiple mounting (across several nodes) in RWX mode. For more information, see K8 Deployment with Helm |
| Data cache | Apache kvrocks | Used for data caching (queries and search). Suitable for environments that require frequent database queries. | Apache Kvrocks |
| Job queue | Redis | Queue manager | |
| Database | PostgreSQL | Database | A database where data is stored in a structured form. |
| CVAT.ai Components | Ingress Controller (can be disabled) | Routing traffic. | CVAT deployment on Kubernetes with Helm |
| Authorization | Authorization service based on Open Policy Agent. | ||
| Backend CVAT | Backend | Main framework | Main engine, uses Django + Django DRF. |
| Workers | Import Worker | Everything related to loading data - creating tasks, uploading annotations, etc. | |
| Export Worker | Everything related to exporting data - exporting results, creating dumps, etc. | ||
| Annotation Worker | Auto-annotation tasks. | ||
| Utils Worker | Responsible for tracking various file changes and more. | ||
| Analytics Report | Reports and analytics that are displayed in the CVAT interface. | ||
| Quality Report | Analysis and reports on data quality. | ||
| Webhook Worker | Manages webhooks. | ||
| Auto annotation | Auto Annotation Nucio | Microservice application, used for auto annotation. | How to enable auto annotation feature. |
10.1.2.2 - CVAT deployment on Kubernetes with Helm
Instructions for deploying CVAT on a Kubernetes cluster.
Prerequisites
- Installed and configured kubernetes cluster. If you do not already have a cluster, you can create one by using Minikube. How to setup Minikube.
- Installed kubectl
- Installed Helm.
- Installed dependencies
Installing dependencies
To install and/or update run:
helm dependency update
Optional steps
-
Ingress configuration for the Traefik ingress controller is enabled by default.
Note for Minikube use:
- because the Traefik creates its main service with
Loadbalansertype, which involve the assignment of externalIP by Cloud, what never happens on Minikube, you need to explicitly set the externalIP address for the traefic service. Add the following tovalues.override.yamlfile:traefik: service: externalIPs: - "your minikube IP (can be obtained with `minikube ip` command)" - Also ensure that your CVAT ingress appears on your hosts file (/etc/hosts).
You can do this by running this command:
cvat.localis default domainname, you can override it viavalues.override.yaml.echo "$(minikube ip) cvat.local" | sudo tee -a /etc/hosts
- because the Traefik creates its main service with
Configuration
- Create a
values.override.yamlfile in the directory with the CVAT Helm chart (for examplehelm-chart/values.override.yamlif you use the chart from the CVAT repository, or<chart-directory>/values.override.yamlif you pulled the chart from Docker Hub). - Fill
values.override.yamlwith parameters you want to override. - Override postgresql password.
Postgresql password?
Put below into your values.override.yaml
postgresql:
  secret:
    password: <insert_password>
    postgres_password: <insert_postgres_password>
    replication_password: <insert_replication_password>
Or create your own secret and use it with:
postgresql:
   global:
     postgresql:
       existingSecret: <secret>
(Optional) Enable Auto annotation feature
Before starting, ensure that the following prerequisites are met:
- The Nuclio CLI (nuctl) is installed. To install the CLI, simply download the appropriate CLI version to your installation machine.
-
Set
nuclio.enabled: truein yourvalues.override.yaml -
Run
helm dependency updateinhelm-chartdirectory -
Because Nuclio functions are images that need to be pushed and pulled to/from the registry, you need to configure credentials to pull from your preferable registry with the following settings: Options:
-
values.override.yamlfile:registry: loginUrl: someurl credentials: username: someuser password: somepass -
Or you can create a secret with credentials as described in the guide and set
registry.secretName=your-registry-credentials-secret-namein thevalues.override.yamlfile. -
In the case of using Minikube, you can run a local unsecured registry with minikube add-ons:
minikube addons enable registry
minikube addons enable registry-aliases
Before Docker container images can be pushed to your newly created insecure registry, you might have to add its address (
$(minikube ip):5000) to the list of insecure registries to instruct Docker to accept working against it:- Get minikube IP address
MINIKUBE_IP=$(minikube ip) echo "Minikube registry address: $MINIKUBE_IP:5000"- Create a Docker daemon config file:
vim /etc/docker/daemon.json- Add this string to this file:
{ "insecure-registries" : [ "minikube_registry_address:5000" ] }- Restart Docker:
sudo systemctl restart dockerOr you can run registry locally as docker container:
follow the instructions in the Docker documentation
Please note that on MacOS default registry port of 5000 is in use by ControlCenter application. In this case you can just expose registry using different port (for example 5001) in that case you should run registry container with this command
docker run -d -p 5001:5000 --name registry registry:2In that case please change registry port from :5000 to :5001 in subsequent commands (ex. –registry localhost:5001)
You might also need to log into your registry account (docker login) on the installation machine before running the deployment command.
-
-
Create cvat project:
nuctl --namespace <your cvat namespace> create project cvat -
Finally deploy the function, i.e.:
- using minikube registry:
nuctl deploy --project-name cvat --path serverless/tensorflow/faster_rcnn_inception_v2_coco/nuclio --registry $(minikube ip):5000 --run-registry registry.minikube - using Docker hub:
nuctl deploy --project-name cvat --path serverless/tensorflow/faster_rcnn_inception_v2_coco/nuclio --registry docker.io/your_username - using local Docker registry:
nuctl deploy --project-name cvat --path serverless/tensorflow/faster_rcnn_inception_v2_coco/nuclio --registry localhost:5000
- using minikube registry:
Analytics
Analytics is enabled by default, to disable set analytics.enabled: false in your values.override.yaml
Deployment
Make sure you are using correct kubernetes context. You can check it with kubectl config current-context.
Warning
The k8s service name of Open Policy Agent is fixed to opa by default. This is done to be compatible with CVAT 2.0 but limits this helm chart to a single release per namespace. The OPA url currently can´t be set as an environment variable. As soon as this is possible you can set cvat.opa.composeCompatibleServiceName to false in your value.override.yaml and configure the opa url as additional env.There are two ways to get and install the CVAT Helm chart:
Option 1: Install from the CVAT repository
Execute the following command from the repository root directory.
1a. With overrides
helm upgrade -n <desired_namespace> <release_name> -i --create-namespace ./helm-chart -f ./helm-chart/values.yaml -f ./helm-chart/values.override.yaml
1b. Without overrides
helm upgrade -n <desired_namespace> <release_name> -i --create-namespace ./helm-chart -f ./helm-chart/values.yaml
Option 2: Install from Docker Hub (OCI Helm chart)
CVAT Helm charts are also published as OCI artifacts to Docker Hub. You can find available versions on the image tags page:
https://hub.docker.com/r/cvat/cvat/tags
Replace <chart_version> with the version you want to install.
2a. Install directly from the registry
If you already have your override file (for example, values.override.yaml in the current directory):
helm install <release_name> oci://registry-1.docker.io/cvat/cvat --version <chart_version> -n <desired_namespace> --create-namespace -f values.override.yaml
If you don’t use an override file, you can omit -f values.override.yaml.
2b. Pull the chart and install from local directory
If you want to inspect or customize the chart first:
helm pull oci://registry-1.docker.io/cvat/cvat --version <chart_version>
tar -xzf cvat-<chart_version>.tgz
cd cvat
Now you can review values.yaml, create a values.override.yaml file in this directory, and install:
helm install <release_name> \
  . \
  -n <desired_namespace> \
  --create-namespace \
  -f values.yaml \
  -f values.override.yaml
Upgrading an existing release from Docker Hub
helm upgrade <release_name> \
 oci://registry-1.docker.io/cvat/cvat \
 --version <chart_version> \
 -n <desired_namespace> \
 -f values.override.yaml
Post-deployment configuration
- Create super user
How to create superuser?
HELM_RELEASE_NAMESPACE="<desired_namespace>" &&\
HELM_RELEASE_NAME="<release_name>" &&\
BACKEND_POD_NAME=$(kubectl get pod --namespace $HELM_RELEASE_NAMESPACE -l tier=backend,app.kubernetes.io/instance=$HELM_RELEASE_NAME,component=server -o jsonpath='{.items[0].metadata.name}') &&\
kubectl exec -it --namespace $HELM_RELEASE_NAMESPACE $BACKEND_POD_NAME -c cvat-backend -- python manage.py createsuperuser
FAQ
What is kubernetes and how it is working?
What is helm and how it is working?
See https://helm.sh/
How to setup Minikube
- Please follow the official Minikube installation guide
-
minikube start --addons registry,registry-aliases
How to understand what diff will be inflicted by ‘helm upgrade’?
You can use https://github.com/databus23/helm-diff#install for that
I want to use my own postgresql with your chart.
Just set postgresql.enabled to false in the override file, then put the parameters of your database
instance in the external field.
You may also need to configure username, database and password fields
to connect to your own database:
postgresql:
  enabled: false
  external:
    host: postgresql.default.svc.cluster.local
    port: 5432
  auth:
    username: cvat
    database: cvat
  secret:
    password: cvat_postgresql
In example above corresponding secret will be created automatically,
but if you want to use existing secret change secret.create to false and set name of existing secret:
postgresql:
  enabled: false
  external:
    host: postgresql.default.svc.cluster.local
    port: 5432
  secret:
    create: false
    name: "my-postgresql-secret"
The secret must contain the database, username and password
keys to access to the database
like:
apiVersion: v1
kind: Secret
metadata:
  name: "my-postgresql-secret"
  namespace: default
type: generic
stringData:
  database: cvat
  username: cvat
  password: secretpassword
I want to use my own redis with your chart.
Just set redis.enabled to false in the override file, then put the parameters of your Redis
instance in the external field.
You may also need to configure password field to connect to your own Redis:
redis:
  enabled: false
  external:
    host: redis.hostname.local
  secret:
    password: cvat_redis
In the above example the corresponding secret will be created automatically, but if you want to use an existing secret
change secret.create to false and set name of the existing secret:
redis:
  enabled: false
  external:
    host: redis.hostname.local
  secret:
    create: false
    name: "my-redis-secret"
The secret must contain the redis-password key like:
apiVersion: v1
kind: Secret
metadata:
  name: "my-redis-secret"
  namespace: default
type: generic
stringData:
  redis-password: secretpassword
I want to override some settings in values.yaml.
Just create file values.override.yaml and place your changes here, using same structure as in values.yaml.
Then reference it in helm update/install command using -f flag
Why you used external charts to provide redis and postgres?
Because they definitely know what they do better then we are, so we are getting more quality and less support
How to use custom domain name with k8s deployment:
The default value cvat.local may be overridden with --set ingress.hosts[0].host option like this:
helm upgrade -n default cvat -i --create-namespace helm-chart -f helm-chart/values.yaml -f helm-chart/values.override.yaml --set ingress.hosts[0].host=YOUR_FQDN
How to fix fail of helm upgrade due label field is immutable reason?
If an error message like this:
Error: UPGRADE FAILED:cannot patch "cvat-backend-server" with kind Deployment: Deployment.apps "cvat-backend-server" is invalid: spec.selector: Invalid value: v1.LabelSelector{MatchLabels:map[string]string{"app":"cvat-app", "app.kubernetes.io/instance":"cvat", "app.kubernetes.io/managed-by":"Helm", "app.kubernetes.io/name":"cvat", "app.kubernetes.io/version":"latest", "component":"server", "helm.sh/chart":"cvat", "tier":"backend"}, MatchExpressions:[]v1.LabelSelectorRequirement(nil)}: field is immutable
To fix that, delete CVAT Deployments before upgrading
kubectl delete deployments --namespace=foo -l app=cvat-app
How to use existing PersistentVolume to store CVAT data instead of default storage
It is assumed that you have created a PersistentVolumeClaim named my-claim-name
and a PersistentVolume that backing the claim.
Claims must exist in the same namespace as the Pod using the claim.
For details see.
Add these values in the values.override.yaml:
cvat:
  backend:
    permissionFix:
      enabled: false
    defaultStorage:
      enabled: false
    additionalVolumes:
      - name: cvat-backend-data
        persistentVolumeClaim:
          claimName: my-claim-name
10.1.2.3 - Semi-automatic and Automatic Annotation
Information about the installation of components needed for semi-automatic and automatic annotation.
Warning
Do not usedocker compose up.
If you did, make sure all containers are stopped by docker compose down.
-
To bring up cvat with auto annotation tool, from cvat root directory, you need to run:
docker compose -f docker-compose.yml -f components/serverless/docker-compose.serverless.yml up -dIf you did any changes to the Docker Compose files, make sure to add
--buildat the end.To stop the containers, simply run:
docker compose -f docker-compose.yml -f components/serverless/docker-compose.serverless.yml down -
You have to install
nuctlcommand line tool to build and deploy serverless functions. Download version 1.13.0. It is important that the version you download matches the version in docker-compose.serverless.yml. For example, using wget.wget https://github.com/nuclio/nuclio/releases/download/<version>/nuctl-<version>-linux-amd64After downloading the nuclio, give it a proper permission and do a softlink.
sudo chmod +x nuctl-<version>-linux-amd64 sudo ln -sf $(pwd)/nuctl-<version>-linux-amd64 /usr/local/bin/nuctl -
Deploy a couple of functions. This will automatically create a
cvatNuclio project to contain the functions. Commands below should be run only after CVAT has been installed usingdocker composebecause it runs nuclio dashboard which manages all serverless functions../serverless/deploy_cpu.sh serverless/pytorch/facebookresearch/sam/nuclio ./serverless/deploy_cpu.sh serverless/onnx/WongKinYiu/yolov7/nuclioGPU Support
You will need to install Nvidia Container Toolkit. Also you will need to add
--resource-limit nvidia.com/gpu=1 --triggers '{"myHttpTrigger": {"maxWorkers": 1}}'to the nuclio deployment command. You can increase the maxWorker if you have enough GPU memory. As an example, below will run on the GPU:nuctl deploy --project-name cvat \ --path serverless/tensorflow/matterport/mask_rcnn/nuclio \ --platform local --base-image tensorflow/tensorflow:1.15.5-gpu-py3 \ --desc "GPU based implementation of Mask RCNN on Python 3, Keras, and TensorFlow." \ --image cvat/tf.matterport.mask_rcnn_gpu \ --triggers '{"myHttpTrigger": {"maxWorkers": 1}}' \ --resource-limit nvidia.com/gpu=1Note:
- The number of GPU deployed functions will be limited to your GPU memory.
- See deploy_gpu.sh script for more examples.
- For some models (namely SiamMask) you need an Nvidia driver version greater than or equal to 450.80.02.
Note for Windows users:
If you want to use nuclio under Windows CVAT installation you should install Nvidia drivers for WSL according to this instruction and follow the steps up to “2.3 Installing Nvidia drivers”. Important requirement: you should have the latest versions of Docker Desktop, Nvidia drivers for WSL, and the latest updates from the Windows Insider Preview Dev channel.
Troubleshooting Nuclio Functions:
-
You can open nuclio dashboard at localhost:8070. Make sure status of your functions are up and running without any error.
-
Test your deployed DL model as a serverless function. The command below should work on Linux and Mac OS.
image=$(curl https://upload.wikimedia.org/wikipedia/en/7/7d/Lenna_%28test_image%29.png --output - | base64 | tr -d '\n') cat << EOF > /tmp/input.json {"image": "$image"} EOF cat /tmp/input.json | nuctl invoke openvino-omz-public-yolo-v3-tf -c 'application/json'20.07.17 12:07:44.519 nuctl.platform.invoker (I) Executing function {"method": "POST", "url": "http://:57308", "headers": {"Content-Type":["application/json"],"X-Nuclio-Log-Level":["info"],"X-Nuclio-Target":["openvino-omz-public-yolo-v3-tf"]}} 20.07.17 12:07:45.275 nuctl.platform.invoker (I) Got response {"status": "200 OK"} 20.07.17 12:07:45.275 nuctl (I) >>> Start of function logs 20.07.17 12:07:45.275 ino-omz-public-yolo-v3-tf (I) Run yolo-v3-tf model {"worker_id": "0", "time": 1594976864570.9353} 20.07.17 12:07:45.275 nuctl (I) <<< End of function logs > Response headers: Date = Fri, 17 Jul 2020 09:07:45 GMT Content-Type = application/json Content-Length = 100 Server = nuclio > Response body: [ { "confidence": "0.9992254", "label": "person", "points": [ 39, 124, 408, 512 ], "type": "rectangle" } ] -
To check for internal server errors, run
docker ps -ato see the list of containers. Find the container that you are interested, e.g.,nuclio-nuclio-tf-faster-rcnn-inception-v2-coco-gpu. Then check its logs bydocker logs <name of your container>e.g.,docker logs nuclio-nuclio-tf-faster-rcnn-inception-v2-coco-gpu -
To debug a code inside a container, you can use vscode to attach to a container instructions. To apply your changes, make sure to restart the container.
docker restart <name_of_the_container>
10.1.2.4 - CVAT Analytics and monitoring
Instructions for deployment and customization of analytics and monitoring.
CVAT Analytics suite of tools is designed to track and understand users’ behavior, system performance, and for identifying potential issues in your application.
You can also visualize user activity through Grafana, and aggregate user working time by the jobs.
Gathered logs can be additionally filtered for efficient debugging.
By using analytics, you’ll gain valuable insights to optimize your system and enhance user satisfaction.
CVAT analytics are available from the top menu.
Superusers and users with administrator role have access to analytics.
Permission to access analytics can also be granted when editing a user
on admin page by Has access to analytics checkbox.

Note
CVAT analytics and monitoring are available only for on-prem solution.See:
High-level architecture
The CVAT analytics is based on Vector, ClickHouse, and Grafana.

CVAT Analytics
CVAT and its analytics module can be set up locally, for self-hosted solution analytics are enabled by default.
Note
For detailed CVAT installation instructions, see Installation Guide or refer to the CVAT Course for installation videos.All analytics-related features will be launched when you start CVAT containers with the following command:
docker compose up -d
Ports settings
If you cannot access analytics on development environment, see Analytics Ports
Events log structure
Relational database schema with the following fields:
| Field | Description |
|---|---|
| scope | Scope of the event (e.g., zoomin:image, add:annotations, delete:image, update:assignee). |
| obj_name | Object name or None (e.g., task, job, cloudstorage, model, organization). |
| obj_id | Object identifier as in DB or None. |
| obj_val | Value for the event as string or None (e.g., frame number, number of added annotations). |
| source | Who generates the log event (e.g., server, ui). |
| timestamp | Local event time (in general for UI and server, the time is different). |
| count | How many times in the row it occurs. |
| duration | How much time does it take (it can be 0 for events without duration). |
| project_id | Project ID or None. |
| task_id | Task ID or None. |
| job_id | Job ID or None. |
| user_id | User ID or None. |
| user_name | User name or None. |
| user_email | User email or None. |
| org_id | Organization ID or None. |
| org_slug | Organization slug or None. |
| payload | JSON payload or None. Extra fields can be added to the JSON blob. |
Types of supported events
Supported events change the scope of information displayed in Grafana.
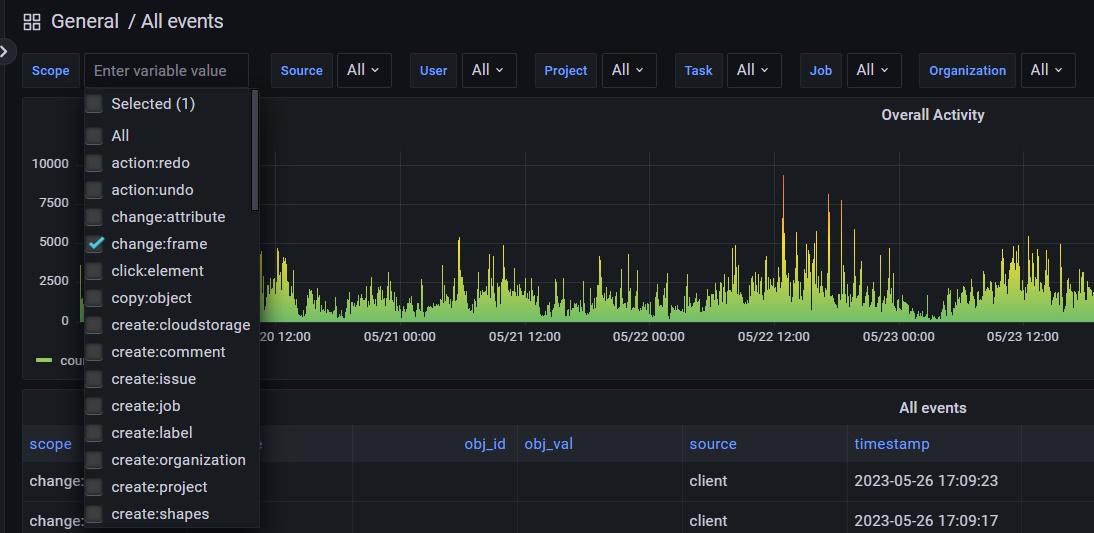
Server events:
-
create:project,update:project,delete:project -
create:task,update:task,delete:task -
create:job,update:job,delete:job -
create:organization,update:organization,delete:organization -
create:user,update:user,delete:user -
create:cloudstorage,update:cloudstorage,delete:cloudstorage -
create:issue,update:issue,delete:issue -
create:comment,update:comment,delete:comment -
create:annotations,update:annotations,delete:annotations -
create:label,update:label,delete:label -
export:dataset,import:dataset -
call:function -
create:membership,update:membership,delete:membership -
create:webhook,update:webhook,delete:webhook -
create:invitation,delete:invitation
Client events:
-
load:cvat -
load:job,save:job -
send:exception -
draw:object,paste:object,copy:object,propagate:object,drag:object,resize:object,delete:object,merge:objects,split:objects,group:objects,slice:object,join:objects -
change:frame -
zoom:image,fit:image,rotate:image -
action:undo,action:redo -
run:annotations_action -
click:element -
debug:info
Working time calculation
Here is a short overview of how CVAT deals with the user’s working time:
-
The user interface collects events when a user interacts with the interface (resizing canvas, drawing objects, clicking buttons, etc) The structure of one single event is described here.
-
The user interface sends these events in bulk to the server. Currently, it uses the following triggers to send events:
- Periodical timer (~90 seconds)
- A user clicks the “Save” button on the annotation view
- A user opens the annotation view
- A user closes the annotation view (but not the tab/browser)
- A user clicks Logout button
-
When events reach the server, it calculates working time based on timestamps of the events.
-
The working time for an event is computed as the sum of the following:
- The difference between the start time of the event and the end time of the previous event, if it is not more than 100 seconds.
- The duration of the event, for events of type
change:frame.
-
After calculation, the server generates
send:working_timeevents with time value in payload. These events may or may not be bound to a certain job/task/project, depending on the client-side events that were used to generate them. -
CVAT saves the event in the database and later these events are used to compute metrics for analytics.
Request id for tracking
Note, that every response to an API request made to the
the server includes a header named X-Request-Id,
for example: X-Request-Id: 6a2b7102-c4b9-4d57-8754-5658132ba37d.
This identifier is also recorded in all server events that occur as a result of the respective request.
For example, when an operation to create a task is performed, other related entities such as labels and attributes are generated on the server in addition to the Task object.
All events associated with this operation will have the same request_id in
the payload field.
Export event data
You can export the event data as a CSV file locally and to cloud storage.
To export the data locally:
-
Initiate the export process by sending a
POSTrequest to/api/events/exportendpoint. The endpoint accepts several query parameters to filter events:org_id,project_id,task_id,job_id,user_id,toandfrom. For more details, see Swagger API Documentation. For example:curl -X POST -u 'user:pass' https://app.cvat.ai/api/events/export?job_id=123 -
You can check the status of the export process by sending a GET request with the
rq_idto the/api/requests/{id}endpoint:curl -I --user 'user:pass' https://app.cvat.ai/api/requests/rq_idOnce the export process finishes, the request returns an object with
"status": "finished"and"result_url": "URL". -
Download the event data file locally using
result_url:curl -u user:password -o path/to/file.csv result_urlThis command will download and save the CSV file to
path/to/file.csvon your local machine.
To save the CSV file with the event data to cloud storage, you can use the
/api/events/export endpoint with cloud_storage_id and location=cloud_storage parameters,
for example:
curl -X POST -u user:password "https://app.cvat.ai/api/events/export?cloud_storage_id=your_cloud_storage_id&location=cloud_storage"
Dashboards
By default, three dashboards are available in CVAT.
To access them, click General, you will be forwarded to the page with available dashboards.
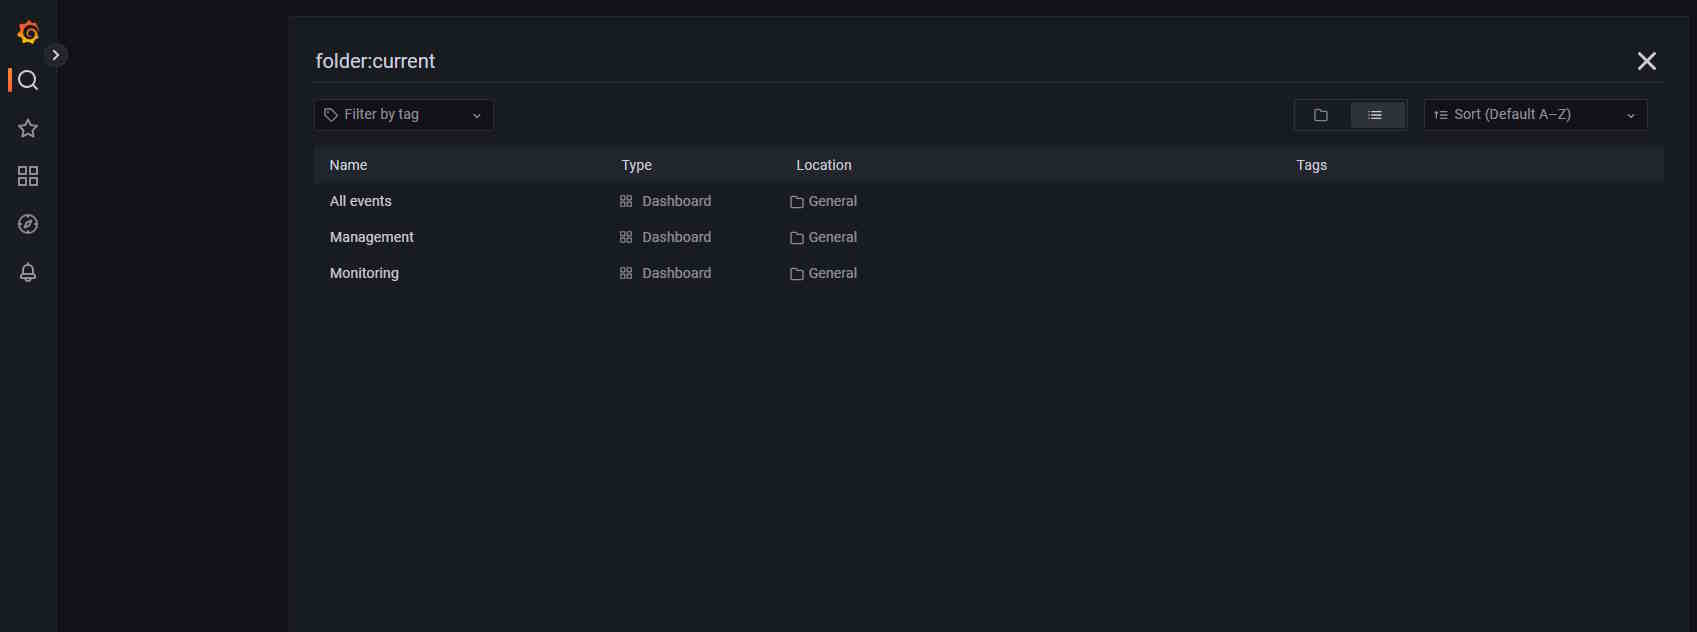
| Dashboard | Description |
|---|---|
| All Events | Dashboard that shows all event logs, timestamps, and source. |
| Management | Dashboard with information about user activities such as working time by job and so on. |
| Monitoring | Dashboard showing server logs, including errors. |
Dashboard: All Events
The dashboard shows all events, their timestamps, and their source.
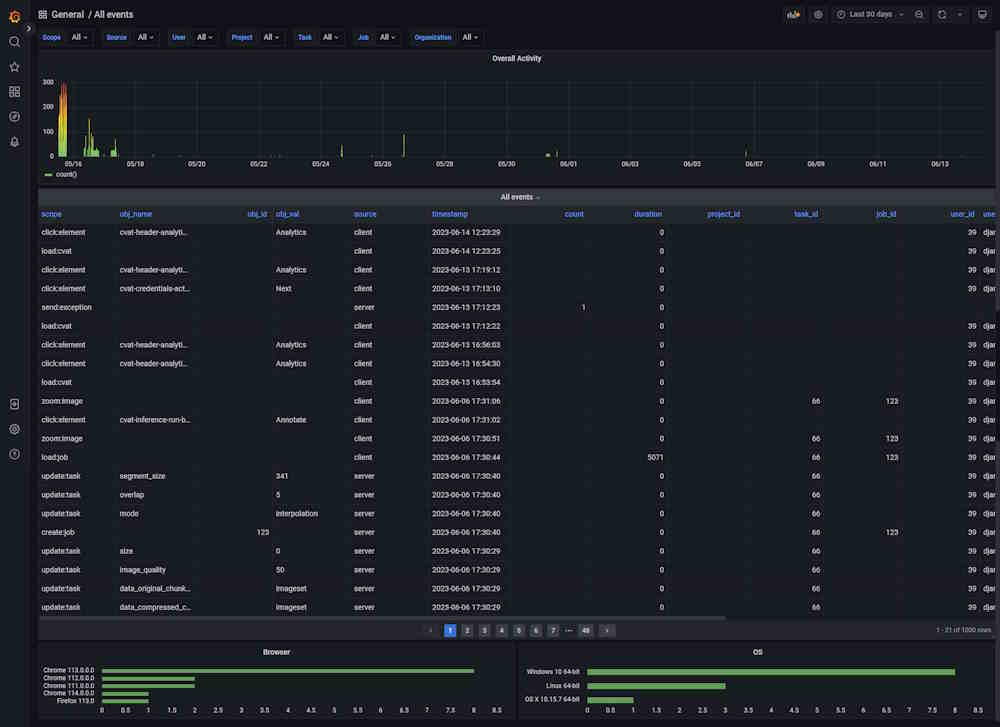
| Element | Description |
|---|---|
| Filters | Can be used as drop-down lists or search fields. Click on the arrow to activate. |
| Overall activity | Graph that shows the overall activity by the selected filters. |
| Scope | Users’ activity, see Types of supported events. |
| obj_name | Object or item related to the Scope. |
| obj_id | Object’s id. Might be empty. |
| source | Source of the event, can be client or server. |
| timestamp | Time when the event happened. |
| count | Common field for all events, not null where it makes sense, for example, the number of saved objects in an annotation. |
| duration | Duration in milliseconds. |
| project_id | Id of the project. |
| project_id | Id of the project. |
| task_id | ID of the task. |
| job_id | ID of the job. |
There are two fields with statistics at the bottom of the dashboard, about browser and OS users use.
Click on the column name to enable a filter.
If you want to inspect the value, hover over it and click on the eye icon.
Dashboard: Management
The dashboard shows user activity.
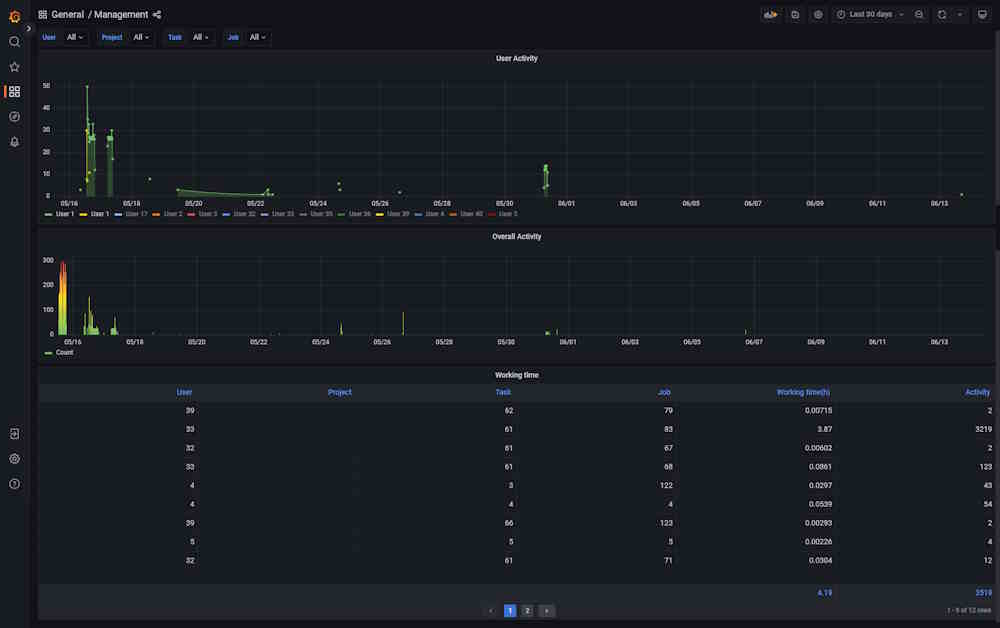
| Element | Description |
|---|---|
| Filters | Can be used as drop-down lists or search fields. Click on the arrow to activate. |
| User activity | Graph that shows when the user was active (data and time), click on the user id below, to see the graph for the dedicated user. |
| Overall activity | Graph shows common activity for all users. |
| User | User ID. |
| Project | Project ID. Might be empty. |
| Task | Task ID. Might be empty. |
| Job | Job ID. Might be empty. |
| Working time(h) | Time spent on task in hours. |
| Activity | Number of events for each user. |
Click on the column name to enable a filter.
If you want to inspect the value, hover over it and click on the eye icon.
Dashboard: Monitoring
The dashboard shows server logs, helps handle errors, and shows user activity.
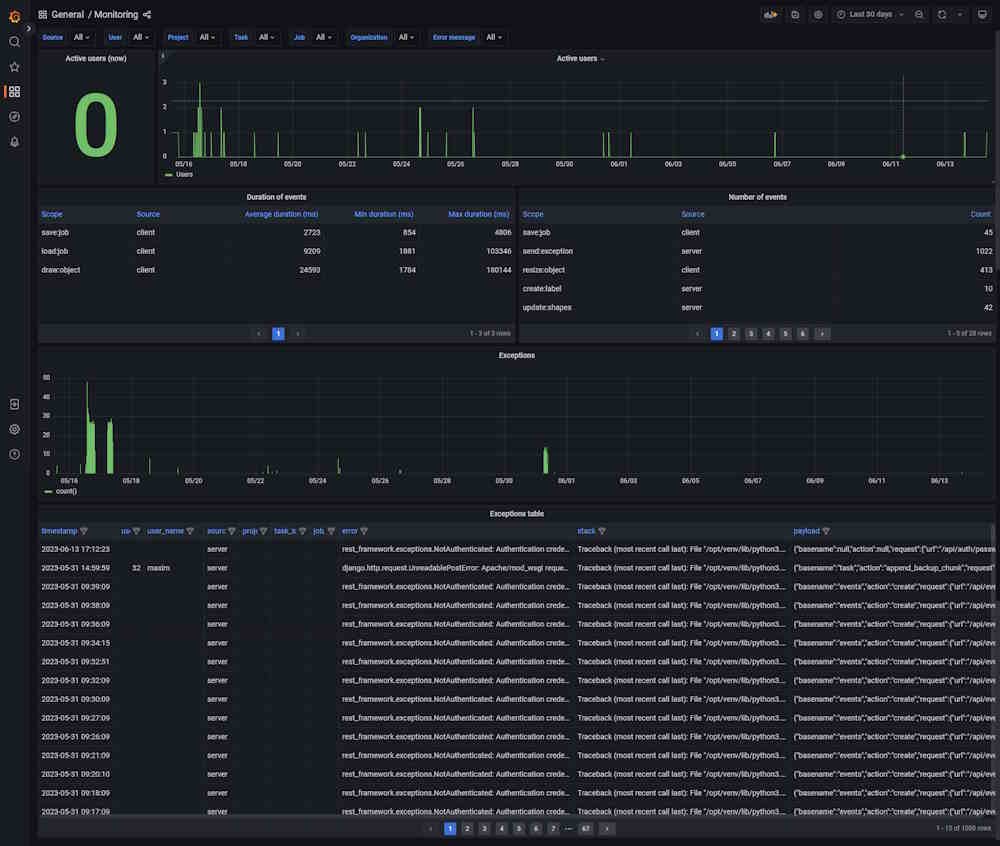
| Element | Description |
|---|---|
| Filters | Can be used as drop-down lists or search fields. Click on the arrow to activate. |
| Active users (now) | Number of active users on an instance. |
| Overall activity | Graph that shows the number of active users. |
| Exceptions | Graph that shows the number of errors that happened in the instance. |
| timestamp | Time when the error happened. |
| user_id | User ID. |
| user_name | User nickname. |
| project_id | Id of the project. Might be empty. |
| task_id | Task ID. Might be empty. |
| job_id | Job ID. Might be empty. |
| error | Error description |
| stack | Error description |
| payload | Error description |
| stack | Stack trace, which is a report of the active stack frames at a certain point in time during the execution. This information is typically used for debugging purposes to locate where an issue occurred. |
| payload | JSON that describes the entire object, which contains several properties. This data in the payload is related to an event that was created as a result of a failed API request. The payload contains information about this event. |
Click on the column name to enable a filter.
If you want to inspect the value, hover over it and click on the eye icon.
Dashboards setup
You can adjust the dashboards. To do this, click on the graph or table name and from the drop-down menu select Edit.
Adjust the query in the editor.
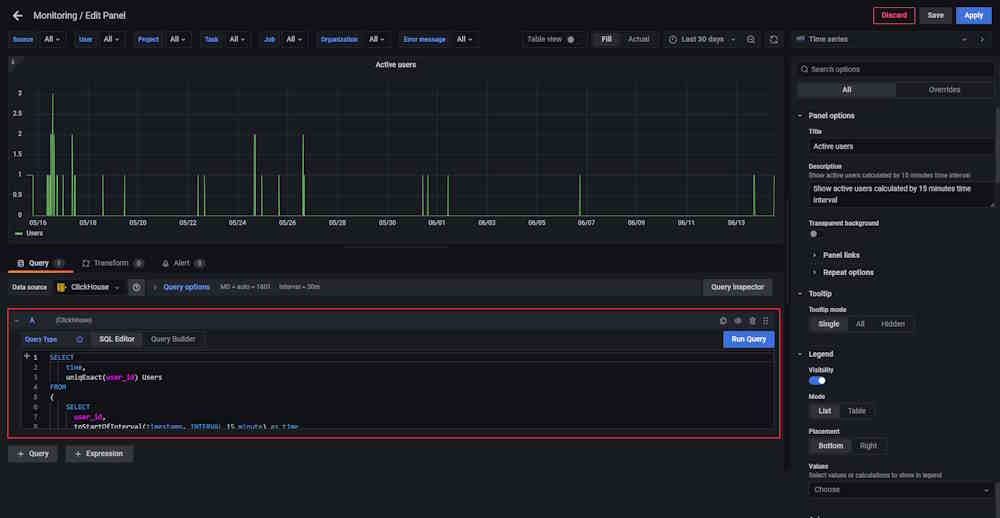
Example of query:
SELECT
time,
uniqExact(user_id) Users
FROM
(
SELECT
user_id,
toStartOfInterval(timestamp, INTERVAL 15 minute) as time
FROM cvat.events
WHERE
user_id IS NOT NULL
GROUP BY
user_id,
time
ORDER BY time ASC WITH FILL STEP toIntervalMinute(15)
)
GROUP BY time
ORDER BY time
Note
By default the updated configuration will not be saved and will be reset to the default parameters after you restart the container.To save the updated configuration, do the following:
-
Update Configuration: Start by making your desired changes in the query.
-
Apply Changes: Once you’ve made your changes, click the Apply button to ensure the changes are implemented.
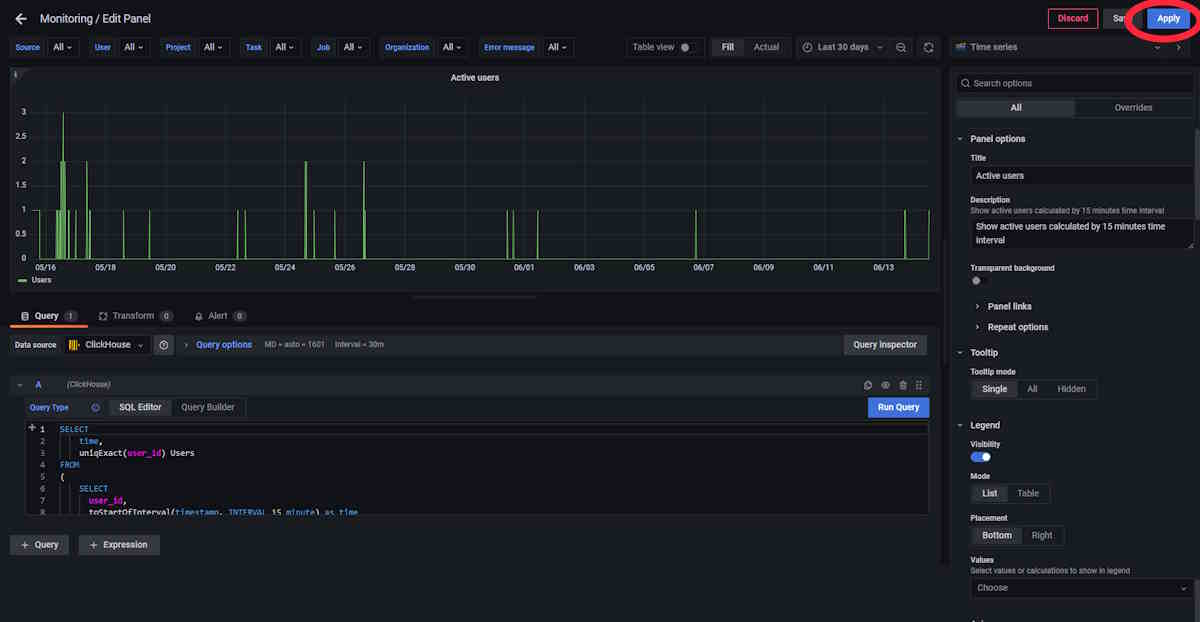
-
Save Configuration: To save your applied changes, on the top of the dashboard, click the Save button.
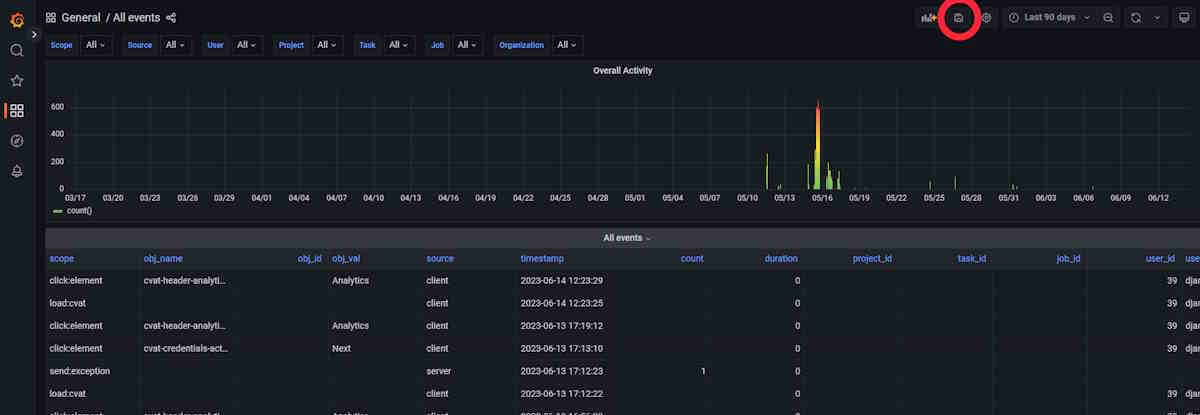
-
Replace Configuration File: After saving, replace the existing Grafana dashboard configuration file is located at
components/analytics/grafana/dashboardswith the new JSON configuration file.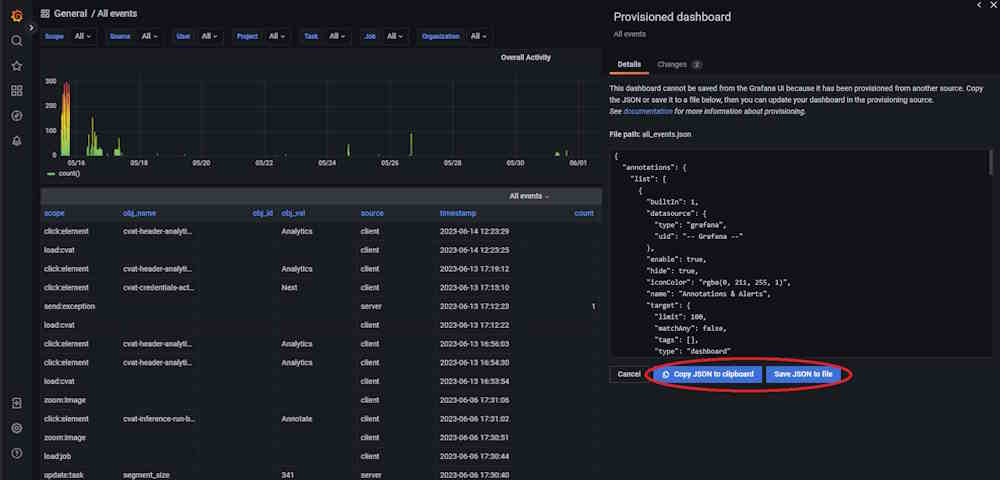
-
Restart Grafana Service: To ensure, that all changes take effect, restart the Grafana service. If you’re using Docker Compose, execute the following command:
docker compose restart cvat_grafana.
For more information, see Grafana Dashboards.
Example of use
This video demonstrates available by default CVAT analytics features.
10.1.2.5 - Mounting cloud storage
Instructions on how to mount an Amazon S3 bucket, Backblaze B2 bucket, Microsoft Azure Blob Storage container or Google Drive as a filesystem.
Amazon S3 bucket as filesystem
Ubuntu 20.04
Mount
-
Install s3fs:
sudo apt install s3fs -
Enter your credentials in a file
${HOME}/.passwd-s3fsand set owner-only permissions:echo ACCESS_KEY_ID:SECRET_ACCESS_KEY > ${HOME}/.passwd-s3fs chmod 600 ${HOME}/.passwd-s3fs -
Uncomment
user_allow_otherin the/etc/fuse.conffile:sudo nano /etc/fuse.conf -
Run s3fs, replace
bucket_name,mount_point:s3fs <bucket_name> <mount_point> -o allow_other -o passwd_file=${HOME}/.passwd-s3fs
For more details see here.
Automatically mount
Follow the first 3 mounting steps above.
Using fstab
-
Create a bash script named
amazon_s3_fuse(e.g in /usr/bin, as root) with this content (replaceuser_nameon whose behalf the disk will be mounted,bucket_name,mount_point,/path/to/.passwd-s3fs):#!/bin/bash sudo -u <user_name> s3fs <bucket_name> <mount_point> -o passwd_file=/path/to/.passwd-s3fs -o allow_other exit 0 -
Give it the execution permission:
sudo chmod +x /usr/bin/amazon_s3_fuse -
Edit
/etc/fstabadding a line like this, replacemount_point):/absolute/path/to/amazon_s3_fuse <mount_point> fuse allow_other,user,_netdev 0 0
Using systemd
-
Create unit file
sudo nano /etc/systemd/system/s3fs.service(replaceuser_name,bucket_name,mount_point,/path/to/.passwd-s3fs):[Unit] Description=FUSE filesystem over Amazon S3 bucket After=network.target [Service] Environment="MOUNT_POINT=<mount_point>" User=<user_name> Group=<user_name> ExecStart=s3fs <bucket_name> ${MOUNT_POINT} -o passwd_file=/path/to/.passwd-s3fs -o allow_other ExecStop=fusermount -u ${MOUNT_POINT} Restart=always Type=forking [Install] WantedBy=multi-user.target -
Update the system configurations, enable unit autorun when the system boots, mount the bucket:
sudo systemctl daemon-reload sudo systemctl enable s3fs.service sudo systemctl start s3fs.service
Check
A file /etc/mtab contains records of currently mounted filesystems.
cat /etc/mtab | grep 's3fs'
Unmount filesystem
fusermount -u <mount_point>
If you used systemd to mount a bucket:
sudo systemctl stop s3fs.service
sudo systemctl disable s3fs.service
Note
Backblaze B2 is S3-compatible and can be mounted using the same s3fs instructions as Amazon S3. Simply configure s3fs with your B2 endpoint URL (e.g.,https://s3.us-west-004.backblazeb2.com)
using the -o url= option along with your B2 Application Keys.
Microsoft Azure Blob Storage container as filesystem
Ubuntu 20.04
Mount
-
Set up the Microsoft package repository.(More here)
wget https://packages.microsoft.com/config/ubuntu/20.04/packages-microsoft-prod.deb sudo dpkg -i packages-microsoft-prod.deb sudo apt-get update -
Install
blobfuseandfuse:sudo apt-get install blobfuse fuseFor more details see here
-
Create environments (replace
account_name,account_key,mount_point):export AZURE_STORAGE_ACCOUNT=<account_name> export AZURE_STORAGE_ACCESS_KEY=<account_key> MOUNT_POINT=<mount_point> -
Create a folder for cache:
sudo mkdir -p /mnt/blobfusetmp -
Make sure the file must be owned by the user who mounts the container:
sudo chown <user> /mnt/blobfusetmp -
Create the mount point, if it doesn’t exists:
mkdir -p ${MOUNT_POINT} -
Uncomment
user_allow_otherin the/etc/fuse.conffile:sudo nano /etc/fuse.conf -
Mount container(replace
your_container):blobfuse ${MOUNT_POINT} --container-name=<your_container> --tmp-path=/mnt/blobfusetmp -o allow_other
Automatically mount
Follow the first 7 mounting steps above.
Using fstab
-
Create configuration file
connection.cfgwith same content, change accountName, select one from accountKey or sasToken and replace with your value:accountName <account-name-here> # Please provide either an account key or a SAS token, and delete the other line. accountKey <account-key-here-delete-next-line> #change authType to specify only 1 sasToken <shared-access-token-here-delete-previous-line> authType <MSI/SAS/SPN/Key/empty> containerName <insert-container-name-here> -
Create a bash script named
azure_fuse(e.g in /usr/bin, as root) with content below (replaceuser_nameon whose behalf the disk will be mounted,mount_point,/path/to/blobfusetmp,/path/to/connection.cfg):#!/bin/bash sudo -u <user_name> blobfuse <mount_point> --tmp-path=/path/to/blobfusetmp --config-file=/path/to/connection.cfg -o allow_other exit 0 -
Give it the execution permission:
sudo chmod +x /usr/bin/azure_fuse -
Edit
/etc/fstabwith the blobfuse script. Add the following line(replace paths):/absolute/path/to/azure_fuse </path/to/desired/mountpoint> fuse allow_other,user,_netdev
Using systemd
-
Create unit file
sudo nano /etc/systemd/system/blobfuse.service. (replaceuser_name,mount_point,container_name,/path/to/connection.cfg):[Unit] Description=FUSE filesystem over Azure Blob Storage container After=network.target [Service] Environment="MOUNT_POINT=<mount_point>" User=<user_name> Group=<user_name> ExecStart=blobfuse ${MOUNT_POINT} --container-name=<container_name> --tmp-path=/mnt/blobfusetmp --config-file=/path/to/connection.cfg -o allow_other ExecStop=fusermount -u ${MOUNT_POINT} Restart=always Type=forking [Install] WantedBy=multi-user.target -
Update the system configurations, enable unit autorun when the system boots, mount the container:
sudo systemctl daemon-reload sudo systemctl enable blobfuse.service sudo systemctl start blobfuse.serviceOr for more detail see here
Check
A file /etc/mtab contains records of currently mounted filesystems.
cat /etc/mtab | grep 'blobfuse'
Unmount filesystem
fusermount -u <mount_point>
If you used systemd to mount a container:
sudo systemctl stop blobfuse.service
sudo systemctl disable blobfuse.service
If you have any mounting problems, check out the answers to common problems
Google Drive as filesystem
Ubuntu 20.04
Mount
To mount a google drive as a filesystem in user space(FUSE) you can use google-drive-ocamlfuse To do this follow the instructions below:
-
Install google-drive-ocamlfuse:
sudo add-apt-repository ppa:alessandro-strada/ppa sudo apt-get update sudo apt-get install google-drive-ocamlfuse -
Run
google-drive-ocamlfusewithout parameters:google-drive-ocamlfuseThis command will create the default application directory (~/.gdfuse/default), containing the configuration file config (see the wiki page for more details about configuration). And it will start a web browser to obtain authorization to access your Google Drive. This will let you modify default configuration before mounting the filesystem.
Then you can choose a local directory to mount your Google Drive (e.g.: ~/GoogleDrive).
-
Create the mount point, if it doesn’t exist(replace mount_point):
mountpoint="<mount_point>" mkdir -p $mountpoint -
Uncomment
user_allow_otherin the/etc/fuse.conffile:sudo nano /etc/fuse.conf -
Mount the filesystem:
google-drive-ocamlfuse -o allow_other $mountpoint
Automatically mount
Follow the first 4 mounting steps above.
Using fstab
-
Create a bash script named gdfuse(e.g in /usr/bin, as root) with this content (replace
user_nameon whose behalf the disk will be mounted,label,mount_point):#!/bin/bash sudo -u <user_name> google-drive-ocamlfuse -o allow_other -label <label> <mount_point> exit 0 -
Give it the execution permission:
sudo chmod +x /usr/bin/gdfuse -
Edit
/etc/fstabadding a line like this, replacemount_point):/absolute/path/to/gdfuse <mount_point> fuse allow_other,user,_netdev 0 0For more details see here
Using systemd
-
Create unit file
sudo nano /etc/systemd/system/google-drive-ocamlfuse.service. (replaceuser_name,label(defaultlabel=default),mount_point):[Unit] Description=FUSE filesystem over Google Drive After=network.target [Service] Environment="MOUNT_POINT=<mount_point>" User=<user_name> Group=<user_name> ExecStart=google-drive-ocamlfuse -label <label> ${MOUNT_POINT} ExecStop=fusermount -u ${MOUNT_POINT} Restart=always Type=forking [Install] WantedBy=multi-user.target -
Update the system configurations, enable unit autorun when the system boots, mount the drive:
sudo systemctl daemon-reload sudo systemctl enable google-drive-ocamlfuse.service sudo systemctl start google-drive-ocamlfuse.serviceFor more details see here
Check
A file /etc/mtab contains records of currently mounted filesystems.
cat /etc/mtab | grep 'google-drive-ocamlfuse'
Unmount filesystem
fusermount -u <mount_point>
If you used systemd to mount a drive:
sudo systemctl stop google-drive-ocamlfuse.service
sudo systemctl disable google-drive-ocamlfuse.service
10.1.2.6 - LDAP Backed Authentication
Allow users to login with credentials from a central source
The creation of settings.py
When integrating LDAP login, we need to create an overlay to the default CVAT settings located in cvat/settings/production.py. This overlay is where we will configure Django to connect to the LDAP server.
The main issue with using LDAP is that different LDAP implementations have different parameters. So the options used for Active Directory backed authentication will differ if you were to be using FreeIPA.
Update docker-compose.override.yml
In your override config you need to passthrough your settings and tell CVAT to
use them by setting the DJANGO_SETTINGS_MODULE variable.
services:
cvat_server:
environment:
DJANGO_SETTINGS_MODULE: settings
volumes:
- ./settings.py:/home/django/settings.py:ro
Active Directory Example
The following example should allow for users to authenticate themselves against
Active Directory. This example requires a dummy user named cvat_bind. The
configuration for the bind account does not need any special permissions.
When updating AUTH_LDAP_BIND_DN, you can write out the account info in two
ways. Both are documented in the config below.
This config is known to work with Windows Server 2022, but should work for older versions and Samba’s implementation of Active Directory.
# We are overlaying production
from cvat.settings.production import *
# Custom code below
import ldap
from django_auth_ldap.config import LDAPSearch
from django_auth_ldap.config import NestedActiveDirectoryGroupType
# Notify CVAT that we are using LDAP authentication
IAM_TYPE = 'LDAP'
# Talking to the LDAP server
AUTH_LDAP_SERVER_URI = "ldap://ad.example.com" # IP Addresses also work
ldap.set_option(ldap.OPT_REFERRALS, 0)
_BASE_DN = "CN=Users,DC=ad,DC=example,DC=com"
# Authenticating with the LDAP server
AUTH_LDAP_BIND_DN = "CN=cvat_bind,%s" % _BASE_DN
# AUTH_LDAP_BIND_DN = "cvat_bind@ad.example.com"
AUTH_LDAP_BIND_PASSWORD = "SuperSecurePassword^21"
AUTH_LDAP_USER_SEARCH = LDAPSearch(
_BASE_DN,
ldap.SCOPE_SUBTREE,
"(sAMAccountName=%(user)s)"
)
AUTH_LDAP_GROUP_SEARCH = LDAPSearch(
_BASE_DN,
ldap.SCOPE_SUBTREE,
"(objectClass=group)"
)
# Mapping Django field names to Active Directory attributes
AUTH_LDAP_USER_ATTR_MAP = {
"user_name": "sAMAccountName",
"first_name": "givenName",
"last_name": "sn",
"email": "mail",
}
# Group Management
AUTH_LDAP_GROUP_TYPE = NestedActiveDirectoryGroupType()
# Register Django LDAP backend
AUTHENTICATION_BACKENDS += ['django_auth_ldap.backend.LDAPBackend']
# Map Active Directory groups to Django/CVAT groups.
AUTH_LDAP_ADMIN_GROUPS = [
'CN=CVAT Admins,%s' % _BASE_DN,
]
AUTH_LDAP_WORKER_GROUPS = [
'CN=CVAT Workers,%s' % _BASE_DN,
]
AUTH_LDAP_USER_GROUPS = [
'CN=CVAT Users,%s' % _BASE_DN,
]
DJANGO_AUTH_LDAP_GROUPS = {
"admin": AUTH_LDAP_ADMIN_GROUPS,
"user": AUTH_LDAP_USER_GROUPS,
"worker": AUTH_LDAP_WORKER_GROUPS,
}
FreeIPA Example
The following example should allow for users to authenticate themselves against
FreeIPA. This example requires a dummy user named cvat_bind. The configuration
for the bind account does not need any special permissions.
When updating AUTH_LDAP_BIND_DN, you can only write the user info in one way,
unlike with Active Directory
This config is known to work with AlmaLinux 8, but may work for other versions and flavors of Enterprise Linux.
# We are overlaying production
from cvat.settings.production import *
# Custom code below
import ldap
from django_auth_ldap.config import LDAPSearch
from django_auth_ldap.config import GroupOfNamesType
# Notify CVAT that we are using LDAP authentication
IAM_TYPE = 'LDAP'
_BASE_DN = "CN=Accounts,DC=ipa,DC=example,DC=com"
# Talking to the LDAP server
AUTH_LDAP_SERVER_URI = "ldap://ipa.example.com" # IP Addresses also work
ldap.set_option(ldap.OPT_REFERRALS, 0)
# Authenticating with the LDAP server
AUTH_LDAP_BIND_DN = "UID=cvat_bind,CN=Users,%s" % _BASE_DN
AUTH_LDAP_BIND_PASSWORD = "SuperSecurePassword^21"
AUTH_LDAP_USER_SEARCH = LDAPSearch(
"CN=Users,%s" % _BASE_DN,
ldap.SCOPE_SUBTREE,
"(uid=%(user)s)"
)
AUTH_LDAP_GROUP_SEARCH = LDAPSearch(
"CN=Groups,%s" % _BASE_DN,
ldap.SCOPE_SUBTREE,
"(objectClass=groupOfNames)"
)
# Mapping Django field names to FreeIPA attributes
AUTH_LDAP_USER_ATTR_MAP = {
"user_name": "uid",
"first_name": "givenName",
"last_name": "sn",
"email": "mail",
}
# Group Management
AUTH_LDAP_GROUP_TYPE = GroupOfNamesType()
# Register Django LDAP backend
AUTHENTICATION_BACKENDS += ['django_auth_ldap.backend.LDAPBackend']
# Map FreeIPA groups to Django/CVAT groups.
AUTH_LDAP_ADMIN_GROUPS = [
'CN=cvat_admins,CN=Groups,%s' % _BASE_DN,
]
AUTH_LDAP_WORKER_GROUPS = [
'CN=cvat_workers,CN=Groups,%s' % _BASE_DN,
]
AUTH_LDAP_USER_GROUPS = [
'CN=cvat_users,CN=Groups,%s' % _BASE_DN,
]
DJANGO_AUTH_LDAP_GROUPS = {
"admin": AUTH_LDAP_ADMIN_GROUPS,
"user": AUTH_LDAP_USER_GROUPS,
"worker": AUTH_LDAP_WORKER_GROUPS,
}
Resources
- Microsoft - LDAP Distinguished Names
- Elements that make up a distinguished name. Used with user/group searches.
- Django LDAP Reference Manual
- Other options that can be used for LDAP authentication in Django.
- Django LDAP guide using Active Directory (Unofficial)
- This is not specific to CVAT but can provide insight about firewall rules.
10.1.2.7 - Backup guide
Instructions on how to backup CVAT data with Docker.
About CVAT data volumes
Docker volumes are used to store all CVAT data:
-
cvat_db: PostgreSQL database files, used to store information about users, tasks, projects, annotations, etc. Mounted intocvat_dbcontainer by/var/lib/postgresql/datapath. -
cvat_data: used to store uploaded and prepared media data. Mounted intocvatcontainer by/home/django/datapath. -
cvat_keys: used to store the Django secret key. Mounted intocvatcontainer by/home/django/keyspath. -
cvat_logs: used to store logs of CVAT backend processes managed by the supervisord service. Mounted intocvatcontainer by/home/django/logspath. -
cvat_events_db: this volume is used to store Clickhouse database files. Mounted intocvat_clickhousecontainer by/var/lib/clickhousepath.
How to backup all CVAT data
All CVAT containers should be stopped before backup:
docker compose stop
Please don’t forget to include all the compose config files that were used in the docker compose command
using the -f parameter.
Backup data:
mkdir backup
docker run --rm --name temp_backup --volumes-from cvat_db -v $(pwd)/backup:/backup ubuntu tar -czvf /backup/cvat_db.tar.gz /var/lib/postgresql/data
docker run --rm --name temp_backup --volumes-from cvat_server -v $(pwd)/backup:/backup ubuntu tar -czvf /backup/cvat_data.tar.gz /home/django/data
docker run --rm --name temp_backup --volumes-from cvat_clickhouse -v $(pwd)/backup:/backup ubuntu tar -czvf /backup/cvat_events_db.tar.gz /var/lib/clickhouse
Make sure the backup archives have been created, the output of ls backup command should look like this:
ls backup
cvat_data.tar.gz cvat_db.tar.gz cvat_events_db.tar.gz
How to restore CVAT from backup
Warning: use exactly the same CVAT version to restore DB. Otherwise it will not work because between CVAT releases the layout of DB can be changed. You always can upgrade CVAT later. It will take care to migrate your data properly internally.
Note: CVAT containers must exist (if no, please follow the installation guide). Stop all CVAT containers:
docker compose stop
Restore data:
cd <path_to_backup_folder>
docker run --rm --name temp_backup --volumes-from cvat_db -v $(pwd):/backup ubuntu bash -c "cd /var/lib/postgresql/data && tar -xvf /backup/cvat_db.tar.gz --strip 4"
docker run --rm --name temp_backup --volumes-from cvat_server -v $(pwd):/backup ubuntu bash -c "cd /home/django/data && tar -xvf /backup/cvat_data.tar.gz --strip 3"
docker run --rm --name temp_backup --volumes-from cvat_clickhouse -v $(pwd):/backup ubuntu bash -c "cd /var/lib/clickhouse && tar -xvf /backup/cvat_events_db.tar.gz --strip 3"
After that run CVAT as usual:
docker compose up -d
Additional resources
10.1.2.8 - Upgrade guide
Instructions for upgrading CVAT deployed with docker compose
Upgrade guide
Note: updating CVAT from version 2.2.0 to version 2.3.0 requires additional manual actions with database data due to upgrading PostgreSQL base image major version. See details here
To upgrade CVAT, follow these steps:
-
It is highly recommended backup all CVAT data before updating, follow the backup guide and backup all CVAT volumes.
-
Go to the previously cloned CVAT directory and stop all CVAT containers with:
docker compose downIf you have included additional components, include all compose configuration files that are used, e.g.:
docker compose -f docker-compose.yml -f components/serverless/docker-compose.serverless.yml down -
Update CVAT source code by any preferable way: clone with git or download zip file from GitHub. Note that you need to download the entire source code, not just the Docker Compose configuration file. Check the installation guide for details.
-
Verify settings: The installation process is changed/modified from version to version and you may need to export some environment variables, for example CVAT_HOST.
-
Update local CVAT images. Pull or build new CVAT images, see How to pull/build/update CVAT images section for details.
-
Start CVAT with:
docker compose up -dWhen CVAT starts, it will upgrade its DB in accordance with the latest schema. It can take time especially if you have a lot of data. Please do not terminate the migration and wait till the process is complete. You can monitor the startup process with the following command:
docker logs cvat_server -f
How to upgrade CVAT from v2.46.0 to v2.47.0.
In version 2.47.0, CVAT upgraded the FFmpeg library it uses to split videos into frames from 4.3.1 to 8.0. There is a small chance that some video files may not be processed differently by the new FFmpeg version.
If one of your tasks is affected, follow the guide in ./utils/ffmpeg_compatibility/README.md
Upgrade CVAT after v2.26.0
In version 2.26.0, CVAT changed the location where the export cache is stored. To clean up the outdated cache, run the command depending on how CVAT is deployed:
docker exec -it cvat_server python manage.py cleanuplegacyexportcache
cvat_backend_pod=$(kubectl get pods -l component=server -o 'jsonpath={.items[0].metadata.name}')
kubectl exec -it ${cvat_backend_pod} -- python manage.py cleanuplegacyexportcache
python manage.py cleanuplegacyexportcache
How to upgrade CVAT from v2.2.0 to v2.3.0.
Step by step commands how to upgrade CVAT from v2.2.0 to v2.3.0. Let’s assume that you have CVAT v2.2.0 working.
docker exec -it cvat_db pg_dumpall > cvat.db.dump
cd cvat
docker compose down
docker volume rm cvat_cvat_db
export CVAT_VERSION="v2.3.0"
cd ..
mv cvat cvat_220
wget https://github.com/cvat-ai/cvat/archive/refs/tags/${CVAT_VERSION}.zip
unzip ${CVAT_VERSION}.zip && mv cvat-${CVAT_VERSION:1} cvat
unset CVAT_VERSION
cd cvat
export CVAT_HOST=cvat.example.com
export ACME_EMAIL=example@example.com
docker compose pull
docker compose up -d cvat_db
docker exec -i cvat_db psql -q -d postgres < ../cvat.db.dump
docker compose -f docker-compose.yml -f docker-compose.dev.yml -f docker-compose.https.yml up -d
How to upgrade CVAT from v1.7.0 to v2.2.0.
Step by step commands how to upgrade CVAT from v1.7.0 to v2.2.0. Let’s assume that you have CVAT v1.7.0 working.
export CVAT_VERSION="v2.2.0"
cd cvat
docker compose down
cd ..
mv cvat cvat_170
wget https://github.com/cvat-ai/cvat/archive/refs/tags/${CVAT_VERSION}.zip
unzip ${CVAT_VERSION}.zip && mv cvat-${CVAT_VERSION:1} cvat
cd cvat
docker pull cvat/server:${CVAT_VERSION}
docker tag cvat/server:${CVAT_VERSION} openvino/cvat_server:latest
docker pull cvat/ui:${CVAT_VERSION}
docker tag cvat/ui:${CVAT_VERSION} openvino/cvat_ui:latest
docker compose up -d
How to upgrade PostgreSQL database base image
-
It is highly recommended backup all CVAT data before updating, follow the backup guide and backup CVAT database volume.
-
Run previously used CVAT version as usual
-
Backup current database with
pg_dumpalltool:docker exec -it cvat_db pg_dumpall > cvat.db.dump -
Stop CVAT:
docker compose down -
Delete current PostgreSQL’s volume, that’s why it’s important to have a backup:
docker volume rm cvat_cvat_db -
Update CVAT source code by any preferable way: clone with git or download zip file from GitHub. Check the installation guide for details.
-
Start database container only:
docker compose up -d cvat_db -
Import PostgreSQL dump into new DB container:
docker exec -i cvat_db psql -q -d postgres < cvat.db.dump -
Start CVAT:
docker compose up -d
10.1.2.9 - Webhooks
CVAT Webhooks: set up and use
Webhooks are user-defined HTTP callbacks that are triggered by specific events. When an event that triggers a webhook occurs, CVAT makes an HTTP request to the URL configured for the webhook. The request will include a payload with information about the event.
CVAT, webhooks can be triggered by a variety of events, such as the creation, deletion, or modification of tasks, jobs, and so on. This makes it easy to set up automated processes that respond to changes made in CVAT.
For example, you can set up webhooks to alert you when a job’s assignee is changed or when a job/task’s status is updated, for instance, when a job is completed and ready for review or has been reviewed. New task creation can also trigger notifications.
These capabilities allow you to keep track of progress and changes in your CVAT workflow instantly.
In CVAT you can create a webhook for a project or organization. You can use CVAT GUI or direct API calls.
See:
- Create Webhook
- Payloads
- Webhook secret
- Ping Webhook
- Webhooks with API calls
- Example of setup and use
Create Webhook
For project
To create a webhook for Project, do the following:
-
Go to the Projects and click on the project’s widget.
-
In the top right corner, click Actions > Setup Webhooks.
-
In the top right corner click +

-
Fill in the Setup webhook form and click Submit.
For organization
To create a webhook for Organization, do the following:
- Create Organization
- Go to the Organization > Settings > Actions > Setup Webhooks.
- In the top right corner click +

- Fill in the Setup webhook form and click Submit.
Webhooks forms
The Setup a webhook forms look like the following.
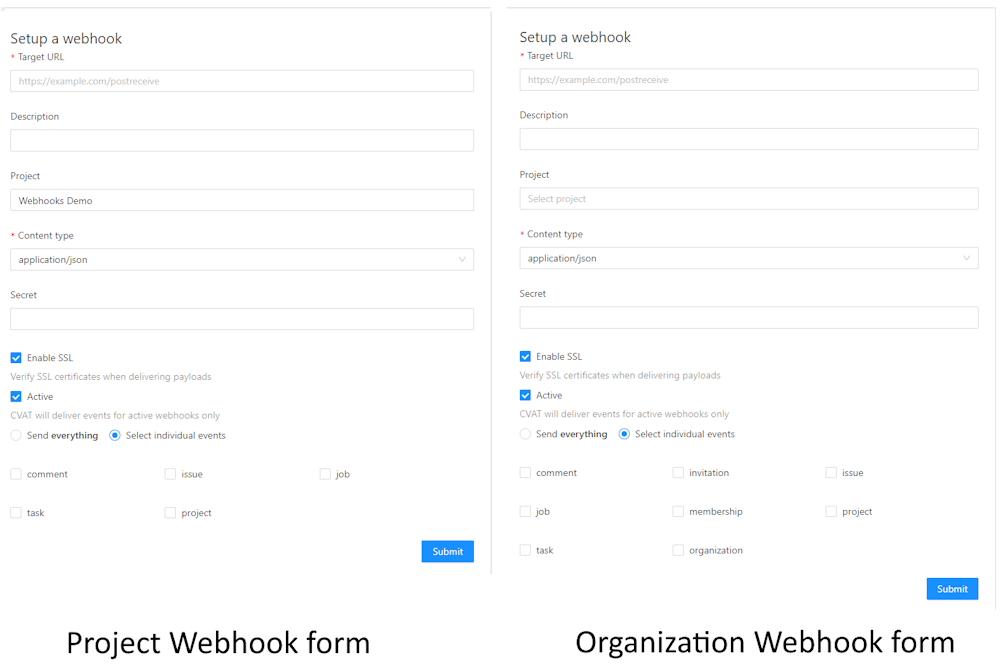
Forms have the following fields:
| Field | Description |
|---|---|
| Target URL | The URL where the event data will be sent. |
| Description | Provides a brief summary of the webhook’s purpose. |
| Project | A drop-down list that lets you select from available projects. |
| Content type | Defines the data type for the payload in the webhook request via the HTTP Content-Type field. |
| Secret | A unique key for verifying the webhook’s origin, ensuring it’s genuinely from CVAT. For more information, see Webhook secret |
| Enable SSL | A checkbox for enabling or disabling SSL verification. |
| Active | Uncheck this box if you want to stop the delivery of specific webhook payloads. |
| Send everything | Check this box to send all event types through the webhook. |
| Specify individual events | Choose this option to send only certain event types. Refer to the List of available events for more information on event types. |
List of events
The following events are available for webhook alerts.
| Resource | Create | Update | Delete | Description |
|---|---|---|---|---|
| Organization | ✅ | Alerts for changes made to an Organization. | ||
| Membership | ✅ | ✅ | Alerts when a member is added to or removed from an organization. | |
| Invitation | ✅ | ✅ | Alerts when an invitation to an Organization is issued or revoked. | |
| Project | ✅ | ✅ | ✅ | Alerts for any actions taken within a project. |
| Task | ✅ | ✅ | ✅ | Alerts for actions related to a task, such as status changes, assignments, etc. |
| Job | ✅ | Alerts for any updates made to a job. | ||
| Issue | ✅ | ✅ | ✅ | Alerts for any activities involving issues. |
| Comment | ✅ | ✅ | ✅ | Alerts for actions involving comments, such as creation, deletion, or modification. |
Payloads
Create event
Webhook payload object for create:<resource> events:
| Key | Type | Description |
|---|---|---|
event |
string |
Identifies the event that triggered the webhook, following the create:<resource> pattern. |
<resource> |
object |
Complete information about the created resource. Refer to the Swagger docs for individual resource details. |
webhook_id |
integer |
The identifier for the webhook that sends the payload. |
sender |
object |
Details about the user that triggered the webhook. |
An example of payload for the create:task event:
{
"event": "create:task",
"task": {
"url": "<http://localhost:8080/api/tasks/15>",
"id": 15,
"name": "task",
"project_id": 7,
"mode": "",
"owner": {
"url": "<http://localhost:8080/api/users/1>",
"id": 1,
"username": "admin1",
"first_name": "Admin",
"last_name": "First"
},
"assignee": null,
"bug_tracker": "",
"created_date": "2022-10-04T08:05:50.419259Z",
"updated_date": "2022-10-04T08:05:50.422917Z",
"overlap": null,
"segment_size": 0,
"status": "annotation",
"labels": \[
{
"id": 28,
"name": "label_0",
"color": "#bde94a",
"attributes": [],
"type": "any",
"sublabels": [],
"has_parent": false
}
\],
"segments": [],
"dimension": "2d",
"subset": "",
"organization": null,
"target_storage": {
"id": 14,
"location": "local",
"cloud_storage_id": null
},
"source_storage": {
"id": 13,
"location": "local",
"cloud_storage_id": null
}
},
"webhook_id": 7,
"sender": {
"url": "<http://localhost:8080/api/users/1>",
"id": 1,
"username": "admin1",
"first_name": "Admin",
"last_name": "First"
}
}
Update event
Webhook payload object for update:<resource> events:
| Key | Type | Description |
|---|---|---|
event |
string |
Identifies the event that triggered the webhook, following the update:<resource> pattern. |
<resource> |
object |
Provides complete information about the updated resource. See the Swagger docs for resource details. |
before_update |
object |
Contains keys of <resource> that were updated, along with their old values. |
webhook_id |
integer |
The identifier for the webhook that dispatched the payload. |
sender |
object |
Details about the user that triggered the webhook. |
An example of update:<resource> event:
{
"event": "update:task",
"task": {
"url": "<http://localhost:8080/api/tasks/15>",
"id": 15,
"name": "new task name",
"project_id": 7,
"mode": "annotation",
"owner": {
"url": "<http://localhost:8080/api/users/1>",
"id": 1,
"username": "admin1",
"first_name": "Admin",
"last_name": "First"
},
"assignee": null,
"bug_tracker": "",
"created_date": "2022-10-04T08:05:50.419259Z",
"updated_date": "2022-10-04T11:04:51.451681Z",
"overlap": 0,
"segment_size": 1,
"status": "annotation",
"labels": \[
{
"id": 28,
"name": "label_0",
"color": "#bde94a",
"attributes": [],
"type": "any",
"sublabels": [],
"has_parent": false
}
\],
"segments": \[
{
"start_frame": 0,
"stop_frame": 0,
"jobs": \[
{
"url": "<http://localhost:8080/api/jobs/19>",
"id": 19,
"assignee": null,
"status": "annotation",
"stage": "annotation",
"state": "new"
}
\]
}
\],
"data_chunk_size": 14,
"data_compressed_chunk_type": "imageset",
"data_original_chunk_type": "imageset",
"size": 1,
"image_quality": 70,
"data": 14,
"dimension": "2d",
"subset": "",
"organization": null,
"target_storage": {
"id": 14,
"location": "local",
"cloud_storage_id": null
},
"source_storage": {
"id": 13,
"location": "local",
"cloud_storage_id": null
}
},
"before_update": {
"name": "task"
},
"webhook_id": 7,
"sender": {
"url": "<http://localhost:8080/api/users/1>",
"id": 1,
"username": "admin1",
"first_name": "Admin",
"last_name": "First"
}
}
Delete event
Webhook payload object for delete:<resource> events:
| Key | Type | Description |
|---|---|---|
event |
string |
Identifies the event that triggered the webhook, following the delete:<resource> pattern. |
<resource> |
object |
Provides complete information about the deleted resource. See the Swagger docs for resource details. |
webhook_id |
integer |
The identifier for the webhook that dispatched the payload. |
sender |
object |
Details about the user that triggered the webhook. |
Here is an example of the payload for the delete:task event:
{
"event": "delete:task",
"task": {
"url": "<http://localhost:8080/api/tasks/15>",
"id": 15,
"name": "task",
"project_id": 7,
"mode": "",
"owner": {
"url": "<http://localhost:8080/api/users/1>",
"id": 1,
"username": "admin1",
"first_name": "Admin",
"last_name": "First"
},
"assignee": null,
"bug_tracker": "",
"created_date": "2022-10-04T08:05:50.419259Z",
"updated_date": "2022-10-04T08:05:50.422917Z",
"overlap": null,
"segment_size": 0,
"status": "annotation",
"labels": \[
{
"id": 28,
"name": "label_0",
"color": "#bde94a",
"attributes": [],
"type": "any",
"sublabels": [],
"has_parent": false
}
\],
"segments": [],
"dimension": "2d",
"subset": "",
"organization": null,
"target_storage": {
"id": 14,
"location": "local",
"cloud_storage_id": null
},
"source_storage": {
"id": 13,
"location": "local",
"cloud_storage_id": null
}
},
"webhook_id": 7,
"sender": {
"url": "<http://localhost:8080/api/users/1>",
"id": 1,
"username": "admin1",
"first_name": "Admin",
"last_name": "First"
}
}
Webhook secret
To validate that webhook requests originate from CVAT, include a secret during the webhook creation process.
This helps ensure the authenticity of incoming webhook requests.
When a secret is provided, CVAT includes an X-Signature-256 header in the webhook request.
This header contains a SHA256 hash of the request body, signed using the secret key.
How it works:
- CVAT computes the SHA256 HMAC of the request body using the
secret. - The computed hash is included in the
X-Signature-256header. - The webhook receiver verifies the request by recalculating the hash using the same
secretand comparing it with the received signature.
Here’s an example of the X-Signature-256 header for a request with an empty body and secret = mykey:
X-Signature-256: e1b24265bf2e0b20c81837993b4f1415f7b68c503114d100a40601eca6a2745f
Verifying webhook signature
You can verify the webhook signature in your webhook receiver service using Python:
# webhook_receiver.py
import hmac
from hashlib import sha256
from flask import Flask, request
app = Flask(__name__)
@app.route("/webhook", methods=["POST"])
def webhook():
secret = "mykey".encode("utf-8")
received_signature = request.headers.get("X-Signature-256", "")
expected_signature = "sha256=" + hmac.new(secret, request.data, digestmod=sha256).hexdigest()
if hmac.compare_digest(received_signature, expected_signature):
return app.response_class(status=200, response="Valid signature")
return app.response_class(status=403, response="Invalid Signature")
if __name__ == "__main__":
app.run(port=5000)
Ping webhook
The Ping webhook feature helps confirm that CVAT can successfully send webhook events to the configured target URL.
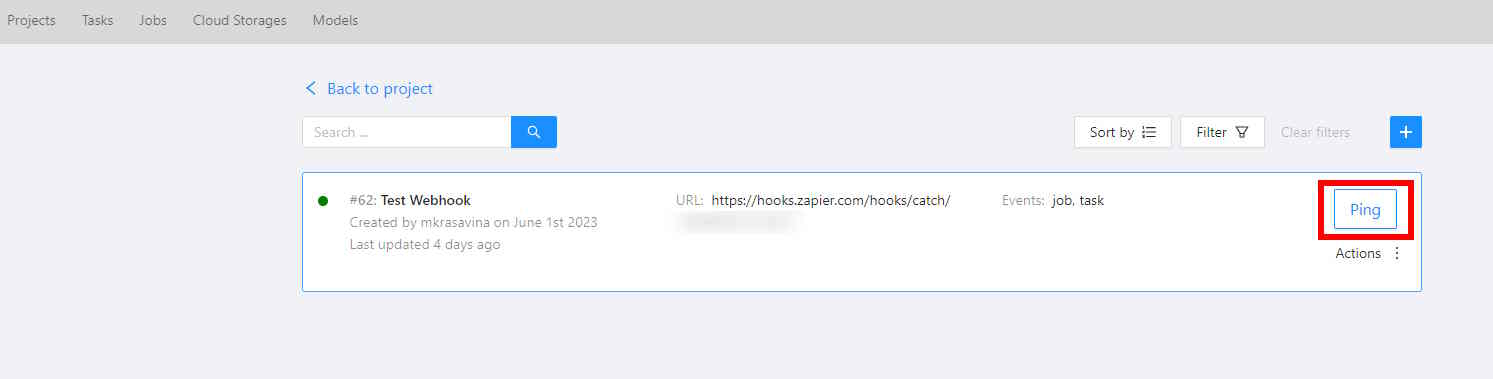
- Click the Ping button in the CVAT UI. Alternatively, send a
POST /webhooks/{id}/pingrequest via the API. - CVAT will send a webhook event to the target URL with basic details.
Ping webhook payload
| Key | Type | Description |
|---|---|---|
event |
string |
Always set to ping. |
webhook |
object |
Contains webhook details (refer to Swagger docs for a complete structure). |
sender |
object |
Includes information about the user who triggered the ping. |
Example ping event payload:
{
"event": "ping",
"webhook": {
"id": 7,
"url": "<http://localhost:8080/api/webhooks/7>",
"target_url": "<https://example.com>",
"description": "",
"type": "project",
"content_type": "application/json",
"is_active": true,
"enable_ssl": true,
"created_date": "2022-10-04T08:05:23.007381Z",
"updated_date": "2022-10-04T08:05:23.007395Z",
"owner": {
"url": "<http://localhost:8080/api/users/1>",
"id": 1,
"username": "admin1",
"first_name": "Admin",
"last_name": "First"
},
"project": 7,
"organization": null,
"events": \[
"create:comment",
"create:issue",
"create:task",
"delete:comment",
"delete:issue",
"delete:task",
"update:comment",
"update:issue",
"update:job",
"update:project",
"update:task"
\],
"last_status": 200,
"last_delivery_date": "2022-10-04T11:04:52.538638Z"
},
"sender": {
"url": "<http://localhost:8080/api/users/1>",
"id": 1,
"username": "admin1",
"first_name": "Admin",
"last_name": "First"
}
}
Webhooks with API calls
You can create and manage webhooks via API calls. Refer to the Swagger API documentation for details.
For implementation examples, check the REST API tests.
Example: setting up email alerts via webhooks
This video demonstrates configuring email alerts for a project using Zapier and Gmail:
10.1.2.10 - Custom Certificates
Use Custom Certificates in CVAT
CVAT use traefik as a reverse proxy to manage SSL certificates. By default, traefik uses Let’s Encrypt to generate SSL certificates. However, you can use your own certificates instead of Let’s Encrypt.
See:
Setup Custom Certificates
Create Certificates Directory
Create a certs directory in the root of the project:
mkdir -p ./certs
Move your certificates to the ./certs directory:
mv /path/to/cert.pem ./certs/cert.pem
mv /path/to/key.pem ./certs/key.pem
Change Traefik Configuration
Create tls.yml in the root of the project directory with the following content:
tls:
stores:
default:
defaultCertificate:
certFile: /certs/cert.pem
keyFile: /certs/key.pem
Edit the docker-compose.https.yml file and change the traefik service configuration as follows:
traefik:
environment:
TRAEFIK_ENTRYPOINTS_web_ADDRESS: :80
TRAEFIK_ENTRYPOINTS_web_HTTP_REDIRECTIONS_ENTRYPOINT_TO: websecure
TRAEFIK_ENTRYPOINTS_web_HTTP_REDIRECTIONS_ENTRYPOINT_SCHEME: https
TRAEFIK_ENTRYPOINTS_websecure_ADDRESS: :443
# Disable Let's Encrypt
# TRAEFIK_CERTIFICATESRESOLVERS_lets-encrypt_ACME_EMAIL: "${ACME_EMAIL:?Please set the ACME_EMAIL env variable}"
# TRAEFIK_CERTIFICATESRESOLVERS_lets-encrypt_ACME_TLSCHALLENGE: "true"
# TRAEFIK_CERTIFICATESRESOLVERS_lets-encrypt_ACME_STORAGE: /letsencrypt/acme.json
ports:
- 80:80
- 443:443
# Add certificates volume and tls.yml rules
volumes:
- ./certs:/certs
- ./tls.yml:/etc/traefik/rules/tls.yml
Start CVAT
Start CVAT with the following command:
docker compose -f docker-compose.yml -f docker-compose.https.yml up -d
10.2 - Enterprise Deployment
Deployment options and infrastructure guides for CVAT Enterprise.
10.2.1 - Deployment with Docker Compose
Instructions for deploying CVAT Enterprise using Docker Compose.
AWS requirements to create, run and manage VMs
IAM user should have the following permissions:
{
"Version": "2012-10-17",
"Statement": [
{
"Effect": "Allow",
"Action": [
"ec2:DescribeInstances",
"ec2:DescribeImages",
"ec2:DescribeInstanceTypes",
"ec2:DescribeKeyPairs",
"ec2:DescribeVpcs",
"ec2:DescribeSubnets",
"ec2:DescribeSecurityGroups",
"ec2:DescribeSecurityGroupRules",
"ec2:DescribeVolumes",
"ec2:DescribeAvailabilityZones",
"ec2:CreateSecurityGroup",
"ec2:AuthorizeSecurityGroupIngress",
"ec2:AuthorizeSecurityGroupEgress",
"ec2:RevokeSecurityGroupIngress",
"ec2:RevokeSecurityGroupEgress",
"ec2:ModifySecurityGroupRules",
"ec2:UpdateSecurityGroupRuleDescriptionsIngress",
"ec2:UpdateSecurityGroupRuleDescriptionsEgress",
"ec2:CreateKeyPair",
"ec2:CreateTags",
"ec2:DescribeAddresses",
"ec2:AllocateAddress",
"ec2:AssociateAddress",
"ec2:RunInstances",
"elasticfilesystem:DescribeFileSystems",
"elasticfilesystem:CreateFileSystem",
"elasticfilesystem:TagResource",
"elasticfilesystem:CreateMountTarget",
"elasticfilesystem:DescribeMountTargets"
],
"Resource": "*"
}
]
}
Currently, the Amazon EC2 Describe* API actions do not support resource-level permissions, so you cannot restrict which individual resources users can view. However, you can apply resource-level permissions on the ec2:RunInstances API action to restrict which resources users can use to launch an instance. The launch fails if users select options that they are not authorized to use. See this guide for details.
Prepare the environment to obtain CVAT Enterprise images (Customer side actions).
How to configure the environment in case non AWS EC2 instance
-
Install AWS CLI. See this guide for additional details. Role name may be like
CvatEnterpriseCustomeror any name which you prefer.curl "https://awscli.amazonaws.com/awscli-exe-linux-x86_64.zip" -o "awscliv2.zip" unzip awscliv2.zip sudo ./aws/install -
Install docker
-
Create aws config folder and config file (Note: the current file will be overwritten):
mkdir -p ~/.aws cat <<EOF > ~/.aws/config [profile CvatEnterpriseCustomer] role_arn = <MUST BE PROVIDED BY CVAT TEAM> source_profile=CvatEnterpriseCustomer external_id = <MUST BE PROVIDED BY CVAT TEAM> EOF -
Create aws credentials file (Note: the current file will be overwritten):
cat <<EOF > ~/.aws/credentials [CvatEnterpriseCustomer] aws_access_key_id = <MUST BE PROVIDED BY CVAT TEAM> aws_secret_access_key = <MUST BE PROVIDED BY CVAT TEAM> EOF -
Verify that the Docker login command succeeds by running the following command:
aws ecr get-login-password --region eu-west-1 --profile CvatEnterpriseCustomer | docker login --username AWS --password-stdin <MUST BE PROVIDED BY CVAT TEAM>
How to configure the environment in case AWS EC2 instance
-
Create an IAM instance profile for Amazon EC2 instance with the following see this guide for additional details.
- Trusted entities:
{ "Version": "2012-10-17", "Statement": [ { "Sid": "Statement1", "Effect": "Allow", "Principal": { "Service": "ec2.amazonaws.com" }, "Action": "sts:AssumeRole" } ] }- Policy
{ "Version": "2012-10-17", "Statement": [ { "Sid": "AllowToAssumeCrossAccountRole", "Effect": "Allow", "Action": "sts:AssumeRole", "Resource": "<MUST BE PROVIDED BY CVAT TEAM>" } ] } -
Provide CVAT team role arn (arn:aws:iam::123456789000:role/AnyPreferableRoleName) to provide access to the CVAT ECR.
-
Create an EC2 instance and attach the IAM role from the step above to the EC2 instance.
-
Login to the instance with SSH.
-
Install AWS CLI. See this guide for additional details. Role name may be like CvatEnterpriseCustomer or any name which you prefer.
curl "https://awscli.amazonaws.com/awscli-exe-linux-x86_64.zip" -o "awscliv2.zip" unzip awscliv2.zip sudo ./aws/install -
Install docker
-
Create aws config folder and config file:
mkdir ~/.aws cat <<EOF > ~/.aws/config [profile CvatEnterpriseCustomer] role_arn = <MUST BE PROVIDED BY CVAT TEAM> credential_source = Ec2InstanceMetadata EOF -
Verify that the Docker login command succeeds by running the following command:
aws ecr get-login-password --region eu-west-1 --profile CvatEnterpriseCustomer | docker login --username AWS --password-stdin <MUST BE PROVIDED BY CVAT TEAM>
Steps how to deploy CVAT on customer managed instance (both EC2 and non EC2)
Customer side actions
-
Clone CVAT repo
git clone https://github.com/cvat-ai/cvat.git && cd cvat -
Place the
docker-compose.enterprise.ymlconfiguration file that you should receive from CVAT team.Modify
docker-compose.enterprise.ymlif needed (e.g. to change default directory to store all CVAT related data). Please consult with CVAT team if you have any questions.volumes: cvat_data: driver_opts: type: none device: /mnt/cvat/data o: bind cvat_db: driver_opts: type: none device: /mnt/cvat/db o: bind cvat_keys: driver_opts: type: none device: /mnt/cvat/keys o: bind cvat_logs: driver_opts: type: none device: /mnt/cvat/logs o: bind cvat_events: driver_opts: type: none device: /mnt/cvat/events o: bind cvat_cache_db: driver_opts: type: none device: /mnt/cvat/cache o: bind -
To simplify deploying, use the following shell script. Don’t forget to change the
CVAT_HOSTvariable in the file (it should be FQDN).#!/usr/bin/env bash set -e aws ecr get-login-password --region eu-west-1 --profile CvatEnterpriseCustomer | docker login --username AWS --password-stdin <MUST BE PROVIDED BY CVAT TEAM> export CVAT_HOST=\<CUSTOM_DOMAIN\> export ACME_EMAIL=support@cvat.ai export CVAT_VERSION='v2.41.0' git fetch origin git checkout ${CVAT_VERSION} docker compose \ -f docker-compose.yml \ -f docker-compose.enterprise.yml \ "$@" -
Run cvat with the following command:
./docker-compose.sh up -d -
Create a superuser:
docker exec -it cvat_server bash -ic 'python3 ~/manage.py createsuperuser'
10.2.2 - Deployment on Kubernetes
Guide for deploying CVAT Enterprise on a Kubernetes cluster.
Prerequisites
-
A Kubernetes cluster kubeVersion >= 1.23.0-0
-
kubectl and Helm installed and configured to use the cluster.
-
The CVAT Enterprise Docker images (server and UI).
-
A private Docker registry, accessible by the Kubernetes cluster. It will be referred to as registry.example below.
-
RWX StorageClass must be configured in the cluster.
Deployment steps
-
Download the Docker images for the desired release.
-
Install AWS CLI. See this guide for additional details. Role name may be like CvatEnterpriseCustomer or any name which you prefer.
curl "https://awscli.amazonaws.com/awscli-exe-linux-x86_64.zip" -o "awscliv2.zip" unzip awscliv2.zip sudo ./aws/install -
Install docker
-
Create aws config folder and config file (Note: the current file will be overwritten)
mkdir -p ~/.aws cat <<EOF > ~/.aws/config [profile CvatEnterpriseCustomer] role_arn = <MUST BE PROVIDED BY CVAT TEAM> source_profile=CvatEnterpriseCustomer external_id = <MUST BE PROVIDED BY CVAT TEAM> EOF -
Create aws credentials file (Note: the current file will be overwritten):
cat <<EOF > ~/.aws/credentials [CvatEnterpriseCustomer] aws_access_key_id = <MUST BE PROVIDED BY CVAT TEAM> aws_secret_access_key = <MUST BE PROVIDED BY CVAT TEAM> EOF -
Verify that the Docker login command succeeds by running the following command:
aws ecr get-login-password --region eu-west-1 --profile CvatEnterpriseCustomer | docker login --username AWS --password-stdin <MUST BE PROVIDED BY CVAT TEAM> -
Pull server and ui images
docker pull <MUST BE PROVIDED BY CVAT TEAM>/cvat/server_ent:vX.Y.Z docker pull <MUST BE PROVIDED BY CVAT TEAM>/cvat/ui_ent:vX.Y.Z
-
-
Upload the images to the registry:
docker login registry.example docker tag <MUST BE PROVIDED BY CVAT TEAM>/cvat/server_ent:vX.Y.Z registry.example/cvat/server_ent:vX.Y.Z docker tag <MUST BE PROVIDED BY CVAT TEAM>/cvat/ui_ent:vX.Y.Z registry.example/cvat/ui_ent:vX.Y.Z docker push registry.example/cvat/server_ent:vX.Y.Z docker push registry.example/cvat/ui_ent:vX.Y.Z -
Check out the open source CVAT repository at the tag corresponding to the desired release.
-
Unpack the archive with the enterprise chart:
tar -xvzf cvat_enterprise-*.tgz -
Create a file named values.override.yml with the necessary settings, which must contain at least the override for CVAT image registry, as shown in the example below. All supported settings can be obtained in the community version of values.yaml, which is used as a subchart of the enterprise chart, and in the enterprise chart archive, which you should obtain from the CVAT team along with these instructions.
-
Add Enterprise-specific settings to
values.override.yml:cvat: cvat: backend: image: registry.example/cvat/server_ent imagePullPolicy: IfNotPresent frontend: image: registry.example/cvat/ui_ent imagePullPolicy: IfNotPresent -
Deploy a Helm release using the chart in the CVAT repository and
values.override.yml:helm upgrade -n dev-ent dev-ent -i --create-namespace ./cvat_enterprise -f ./values.override.yaml
Enabling social account authentication or SSO
- Create an auth_config.yml file based on the following sections:
- Upload it as a secret to the Kubernetes cluster:
kubectl create secret generic cvat-auth-config --from-file=auth_config.yml - Deploy as in the previous section, but with the following settings added to
values.override.yml:cvat: cvat: backend: permissionFix: enabled: false server: additionalVolumes: - name: auth-config secret: secretName: cvat-auth-config additionalVolumeMounts: - mountPath: /home/django/auth_config.yml name: auth-config subPath: auth_config.yml
11 - Developer Documentation
How to interact with CVAT
Overview
In the modern world, it is often necessary to integrate different tools to work together. CVAT provides the following integration layers:
- Server REST API + Swagger schema
- Python client library (SDK)
- REST API client
- High-level wrappers
- Command-line tool (CLI)
In this section, you can find documentation about each separate layer.
Component compatibility
Currently, the only supported configuration is when the server API major and minor versions are the same as SDK and CLI major and minor versions, e.g. server v2.1.* is supported by SDK and CLI v2.1.*. Different versions may have incompatibilities, which lead to some functions in SDK or CLI may not work properly.
11.1 - Server API
Overview
CVAT server provides HTTP REST API for interaction. Each client application - be it a command line tool, browser or a script - all interact with CVAT via HTTP requests and responses:

API schema
You can obtain schema for your server at <yourserver>/api/docs. For example,
the official CVAT.ai application has API documentation here.
Examples
Here you can see how a task is created in CVAT:
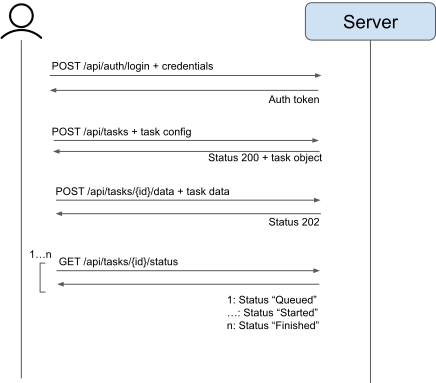
- At first, we have to login
- Then we create a task from its configuration
- Then we send task data (images, videos etc.)
- We wait for data processing and finish
Design principles
Common pattern for our REST API is <VERB> [namespace] <objects> <id> <action>.
VERBcan bePOST,GET,PATCH,PUT,DELETE.namespaceshould scope some specific functionality likeauth,lambda. It is optional in the scheme.- Typical
objectsaretasks,projects,jobs. - When you want to extract a specific object from a collection, just specify its
id. - An
actioncan be used to simplify REST API or provide an endpoint for entities withoutobjectsendpoint likeannotations,data,data/meta. Note: action should not duplicate other endpoints without a reason.
When you’re developing new endpoints, follow these guidelines:
- Use nouns instead of verbs in endpoint paths. For example,
POST /api/tasksinstead ofPOST /api/tasks/create. - Accept and respond with JSON whenever it is possible
- Name collections with plural nouns (e.g.
/tasks,/projects) - Try to keep the API structure flat. Prefer two separate endpoints
for
/projectsand/tasksinstead of/projects/:id1/tasks/:id2. Use filters to extract necessary information like/tasks/:id2?project=:id1. In some cases it is useful to get alltasks. If the structure is hierarchical, it cannot be done easily. Also you have to know both:id1and:id2to get information about the task. Note: for now we acceptGET /tasks/:id2/jobsbut it should be replaced by/jobs?task=:id2in the future. - Handle errors gracefully and return standard error codes (e.g.
201,400) - Allow filtering, sorting, and pagination
- Maintain good security practices
- Cache data to improve performance
- Versioning our APIs. It should be done when you delete an endpoint or modify
its behaviors. Versioning uses a schema with
Acceptheader with vendor media type.
Playground
Sometimes, it may be necessary to send customized requests or
simply test some endpoints available on the server.
It’s possible to send custom requests to a CVAT server directly from
your web browser without special extensions. This can be done at
the Swagger page provided by the server. The page is available at
<cvat_host>/api/swagger (e.g. https://app.cvat.ai/api/swagger).
The Swagger page provides the autogenerated documentation,
supports multiple authentication options and allows sending
custom requests to various server endpoints.
Swagger documentation is visible on allowed hosts. If necessary, the list can be modified by updating the environment
variable in docker-compose.ymlfile with cvat hosted machine IP or domain
name. Example - ALLOWED_HOSTS: 'localhost, 127.0.0.1'.
Make a request to a resource stored on a server and the server will respond with the requested information.
The endpoints are grouped by APIs:
auth- user authentication queriescomments- requests to post/delete comments to issuesissues- update, delete and view problem commentsjobs-requests to manage the joblambda- requests to work with lambda functionprojects- project management queriesreviews-adding and removing the review of the jobserver- server information requeststasks- requests to manage tasksusers- user management queries etc.
In the Models section below you can also find various data structures used in the endpoints.
Each group contains queries related to a different types of HTTP methods such as: GET, POST, PATCH, DELETE, etc.
Different methods are highlighted in different color. Each item has a name and description.
Clicking on an element opens a form with a name, description and settings input field or an example of json values.
To find out more, read swagger specification.
To try to send a request, click Try it now and type Execute.
You’ll get a response in the form of Curl, Request URL and Server response.
Links
11.2 - CVAT Python SDK
Overview
CVAT SDK is a Python library. It provides you access to Python functions and objects that simplify server interaction and provide additional functionality like data validation and serialization.
SDK API includes several layers:
- Low-level API with REST API wrappers. Located at
cvat_sdk.api_client. Read more - High-level API. Located at
cvat_sdk.core. Read more - PyTorch adapter. Located at
cvat_sdk.pytorch. Read more - Auto-annotation API. Located at
cvat_sdk.auto_annotation. Read more - Miscellaneous utilities, grouped by topic.
Located at
cvat_sdk.attributesandcvat_sdk.masks.
In general, the low-level API provides single-request operations, while the high-level one implements composite, multi-request operations, and provides local proxies for server objects. For most uses, the high-level API should be good enough, and it should be the right point to start your integration with CVAT.
The PyTorch adapter is a specialized layer
that represents datasets stored in CVAT as PyTorch Dataset objects.
This enables direct use of such datasets in PyTorch-based machine learning pipelines.
The auto-annotation API is a specialized layer
that lets you automatically annotate CVAT datasets
by running a custom function on the local machine.
See also the auto-annotate command in the CLI.
Installation
To install an official release of CVAT SDK use this command:
pip install cvat-sdk
To use the cvat_sdk.masks module, request the masks extra:
pip install "cvat-sdk[masks]"
To use the PyTorch adapter or the built-in PyTorch-based auto-annotation functions,
request the pytorch extra:
pip install "cvat-sdk[pytorch]"
We support Python versions 3.10 and higher.
Usage
To import package components, use the following code:
For the high-level API:
import cvat_sdk
# or
import cvat_sdk.core
For the low-level API:
import cvat_sdk.api_client
For the PyTorch adapter:
import cvat_sdk.pytorch
11.2.1 - SDK API Reference
11.2.1.1 - APIs
All URIs are relative to http://localhost
| Class | Method | HTTP request | Description |
|---|---|---|---|
| AssetsApi | create | POST /api/assets | Create an asset |
| AssetsApi | destroy | DELETE /api/assets/{uuid} | Delete an asset |
| AssetsApi | retrieve | GET /api/assets/{uuid} | Get an asset |
| AuthApi | create_access_tokens | POST /api/auth/access_tokens | Create a token |
| AuthApi | create_login | POST /api/auth/login | |
| AuthApi | create_logout | POST /api/auth/logout | |
| AuthApi | create_password_change | POST /api/auth/password/change | |
| AuthApi | create_password_reset | POST /api/auth/password/reset | |
| AuthApi | create_password_reset_confirm | POST /api/auth/password/reset/confirm | |
| AuthApi | create_register | POST /api/auth/register | |
| AuthApi | destroy_access_tokens | DELETE /api/auth/access_tokens/{id} | Revoke token |
| AuthApi | list_access_tokens | GET /api/auth/access_tokens | List tokens |
| AuthApi | partial_update_access_tokens | PATCH /api/auth/access_tokens/{id} | Update a token |
| AuthApi | retrieve_access_tokens | GET /api/auth/access_tokens/{id} | Get token details |
| AuthApi | retrieve_access_tokens_self | GET /api/auth/access_tokens/self | Get current token details |
| AuthApi | retrieve_rules | GET /api/auth/rules | |
| CloudstoragesApi | create | POST /api/cloudstorages | Create a cloud storage |
| CloudstoragesApi | destroy | DELETE /api/cloudstorages/{id} | Delete a cloud storage |
| CloudstoragesApi | list | GET /api/cloudstorages | List cloud storages |
| CloudstoragesApi | partial_update | PATCH /api/cloudstorages/{id} | Update a cloud storage |
| CloudstoragesApi | retrieve | GET /api/cloudstorages/{id} | Get cloud storage details |
| CloudstoragesApi | retrieve_actions | GET /api/cloudstorages/{id}/actions | Get allowed actions for a cloud storage |
| CloudstoragesApi | retrieve_content_v2 | GET /api/cloudstorages/{id}/content-v2 | Get cloud storage content |
| CloudstoragesApi | retrieve_preview | GET /api/cloudstorages/{id}/preview | Get a preview image for a cloud storage |
| CloudstoragesApi | retrieve_status | GET /api/cloudstorages/{id}/status | Get the status of a cloud storage |
| CommentsApi | create | POST /api/comments | Create a comment |
| CommentsApi | destroy | DELETE /api/comments/{id} | Delete a comment |
| CommentsApi | list | GET /api/comments | List comments |
| CommentsApi | partial_update | PATCH /api/comments/{id} | Update a comment |
| CommentsApi | retrieve | GET /api/comments/{id} | Get comment details |
| ConsensusApi | create_merge | POST /api/consensus/merges | Create a consensus merge |
| ConsensusApi | list_settings | GET /api/consensus/settings | List consensus settings instances |
| ConsensusApi | partial_update_settings | PATCH /api/consensus/settings/{id} | Update a consensus settings instance |
| ConsensusApi | retrieve_settings | GET /api/consensus/settings/{id} | Get consensus settings instance details |
| EventsApi | create | POST /api/events | Log client events |
| EventsApi | create_export | POST /api/events/export | Initiate a process to export events |
| EventsApi | list | GET /api/events | Get an event log |
| GuidesApi | create | POST /api/guides | Create an annotation guide |
| GuidesApi | destroy | DELETE /api/guides/{id} | Delete an annotation guide |
| GuidesApi | partial_update | PATCH /api/guides/{id} | Update an annotation guide |
| GuidesApi | retrieve | GET /api/guides/{id} | Get annotation guide details |
| InvitationsApi | accept | POST /api/invitations/{key}/accept | Accept an invitation |
| InvitationsApi | create | POST /api/invitations | Create an invitation |
| InvitationsApi | decline | POST /api/invitations/{key}/decline | Decline an invitation |
| InvitationsApi | destroy | DELETE /api/invitations/{key} | Delete an invitation |
| InvitationsApi | list | GET /api/invitations | List invitations |
| InvitationsApi | partial_update | PATCH /api/invitations/{key} | Update an invitation |
| InvitationsApi | resend | POST /api/invitations/{key}/resend | Resend an invitation |
| InvitationsApi | retrieve | GET /api/invitations/{key} | Get invitation details |
| IssuesApi | create | POST /api/issues | Create an issue |
| IssuesApi | destroy | DELETE /api/issues/{id} | Delete an issue |
| IssuesApi | list | GET /api/issues | List issues |
| IssuesApi | partial_update | PATCH /api/issues/{id} | Update an issue |
| IssuesApi | retrieve | GET /api/issues/{id} | Get issue details |
| JobsApi | create | POST /api/jobs | Create a job |
| JobsApi | create_annotations | POST /api/jobs/{id}/annotations/ | Import annotations into a job |
| JobsApi | create_dataset_export | POST /api/jobs/{id}/dataset/export | Initialize process to export resource as a dataset in a specific format |
| JobsApi | destroy | DELETE /api/jobs/{id} | Delete a job |
| JobsApi | destroy_annotations | DELETE /api/jobs/{id}/annotations/ | Delete job annotations |
| JobsApi | list | GET /api/jobs | List jobs |
| JobsApi | partial_update | PATCH /api/jobs/{id} | Update a job |
| JobsApi | partial_update_annotations | PATCH /api/jobs/{id}/annotations/ | Update job annotations |
| JobsApi | partial_update_data_meta | PATCH /api/jobs/{id}/data/meta | Update metainformation for media files in a job |
| JobsApi | partial_update_validation_layout | PATCH /api/jobs/{id}/validation_layout | Allows updating current validation configuration |
| JobsApi | retrieve | GET /api/jobs/{id} | Get job details |
| JobsApi | retrieve_annotations | GET /api/jobs/{id}/annotations/ | Get job annotations |
| JobsApi | retrieve_data | GET /api/jobs/{id}/data | Get data of a job |
| JobsApi | retrieve_data_meta | GET /api/jobs/{id}/data/meta | Get metainformation for media files in a job |
| JobsApi | retrieve_preview | GET /api/jobs/{id}/preview | Get a preview image for a job |
| JobsApi | retrieve_validation_layout | GET /api/jobs/{id}/validation_layout | Allows getting current validation configuration |
| JobsApi | update_annotations | PUT /api/jobs/{id}/annotations/ | Replace job annotations |
| LabelsApi | destroy | DELETE /api/labels/{id} | Delete a label |
| LabelsApi | list | GET /api/labels | List labels |
| LabelsApi | partial_update | PATCH /api/labels/{id} | Update a label |
| LabelsApi | retrieve | GET /api/labels/{id} | Get label details |
| LambdaApi | create_functions | POST /api/lambda/functions/{func_id} | |
| LambdaApi | create_requests | POST /api/lambda/requests | Method calls the function |
| LambdaApi | delete_requests | DELETE /api/lambda/requests/{id} | Method cancels the request |
| LambdaApi | list_functions | GET /api/lambda/functions | Method returns a list of functions |
| LambdaApi | list_requests | GET /api/lambda/requests | Method returns a list of requests |
| LambdaApi | retrieve_functions | GET /api/lambda/functions/{func_id} | Method returns the information about the function |
| LambdaApi | retrieve_requests | GET /api/lambda/requests/{id} | Method returns the status of the request |
| MembershipsApi | destroy | DELETE /api/memberships/{id} | Delete a membership |
| MembershipsApi | list | GET /api/memberships | List memberships |
| MembershipsApi | partial_update | PATCH /api/memberships/{id} | Update a membership |
| MembershipsApi | retrieve | GET /api/memberships/{id} | Get membership details |
| OrganizationsApi | create | POST /api/organizations | Create an organization |
| OrganizationsApi | destroy | DELETE /api/organizations/{id} | Delete an organization |
| OrganizationsApi | list | GET /api/organizations | List organizations |
| OrganizationsApi | partial_update | PATCH /api/organizations/{id} | Update an organization |
| OrganizationsApi | retrieve | GET /api/organizations/{id} | Get organization details |
| ProjectsApi | create | POST /api/projects | Create a project |
| ProjectsApi | create_backup | POST /api/projects/backup/ | Recreate a project from a backup |
| ProjectsApi | create_backup_export | POST /api/projects/{id}/backup/export | Initiate process to backup resource |
| ProjectsApi | create_dataset | POST /api/projects/{id}/dataset/ | Import a dataset into a project |
| ProjectsApi | create_dataset_export | POST /api/projects/{id}/dataset/export | Initialize process to export resource as a dataset in a specific format |
| ProjectsApi | destroy | DELETE /api/projects/{id} | Delete a project |
| ProjectsApi | list | GET /api/projects | List projects |
| ProjectsApi | partial_update | PATCH /api/projects/{id} | Update a project |
| ProjectsApi | retrieve | GET /api/projects/{id} | Get project details |
| ProjectsApi | retrieve_preview | GET /api/projects/{id}/preview | Get a preview image for a project |
| QualityApi | create_report | POST /api/quality/reports | Create a quality report |
| QualityApi | list_conflicts | GET /api/quality/conflicts | List annotation conflicts in a quality report |
| QualityApi | list_reports | GET /api/quality/reports | Method returns a paginated list of quality reports. |
| QualityApi | list_settings | GET /api/quality/settings | List quality settings instances |
| QualityApi | partial_update_settings | PATCH /api/quality/settings/{id} | Update a quality settings instance |
| QualityApi | retrieve_report | GET /api/quality/reports/{id} | Get quality report details |
| QualityApi | retrieve_report_data | GET /api/quality/reports/{id}/data | Get quality report contents |
| QualityApi | retrieve_settings | GET /api/quality/settings/{id} | Get quality settings instance details |
| RequestsApi | create_cancel | POST /api/requests/{id}/cancel | Cancel request |
| RequestsApi | list | GET /api/requests | List requests |
| RequestsApi | retrieve | GET /api/requests/{id} | Get request details |
| SchemaApi | retrieve | GET /api/schema/ | |
| ServerApi | list_share | GET /api/server/share | List files/directories in the mounted share |
| ServerApi | retrieve_about | GET /api/server/about | Get basic CVAT information |
| ServerApi | retrieve_annotation_formats | GET /api/server/annotation/formats | Get supported annotation formats |
| ServerApi | retrieve_plugins | GET /api/server/plugins | Get enabled plugins |
| TasksApi | create | POST /api/tasks | Create a task |
| TasksApi | create_annotations | POST /api/tasks/{id}/annotations/ | Import annotations into a task |
| TasksApi | create_backup | POST /api/tasks/backup/ | Recreate a task from a backup |
| TasksApi | create_backup_export | POST /api/tasks/{id}/backup/export | Initiate process to backup resource |
| TasksApi | create_data | POST /api/tasks/{id}/data/ | Attach data to a task |
| TasksApi | create_dataset_export | POST /api/tasks/{id}/dataset/export | Initialize process to export resource as a dataset in a specific format |
| TasksApi | destroy | DELETE /api/tasks/{id} | Delete a task |
| TasksApi | destroy_annotations | DELETE /api/tasks/{id}/annotations/ | Delete task annotations |
| TasksApi | list | GET /api/tasks | List tasks |
| TasksApi | partial_update | PATCH /api/tasks/{id} | Update a task |
| TasksApi | partial_update_annotations | PATCH /api/tasks/{id}/annotations/ | Update task annotations |
| TasksApi | partial_update_data_meta | PATCH /api/tasks/{id}/data/meta | Update metainformation for media files in a task |
| TasksApi | partial_update_validation_layout | PATCH /api/tasks/{id}/validation_layout | Allows updating current validation configuration |
| TasksApi | retrieve | GET /api/tasks/{id} | Get task details |
| TasksApi | retrieve_annotations | GET /api/tasks/{id}/annotations/ | Get task annotations |
| TasksApi | retrieve_data | GET /api/tasks/{id}/data/ | Get data of a task |
| TasksApi | retrieve_data_meta | GET /api/tasks/{id}/data/meta | Get metainformation for media files in a task |
| TasksApi | retrieve_preview | GET /api/tasks/{id}/preview | Get a preview image for a task |
| TasksApi | retrieve_status | GET /api/tasks/{id}/status | Get the creation status of a task |
| TasksApi | retrieve_validation_layout | GET /api/tasks/{id}/validation_layout | Allows getting current validation configuration |
| TasksApi | update_annotations | PUT /api/tasks/{id}/annotations/ | Replace task annotations |
| UsersApi | destroy | DELETE /api/users/{id} | Delete a user |
| UsersApi | list | GET /api/users | List users |
| UsersApi | partial_update | PATCH /api/users/{id} | Update a user |
| UsersApi | retrieve | GET /api/users/{id} | Get user details |
| UsersApi | retrieve_self | GET /api/users/self | Get details of the current user |
| WebhooksApi | create | POST /api/webhooks | Create a webhook |
| WebhooksApi | create_deliveries_redelivery | POST /api/webhooks/{id}/deliveries/{delivery_id}/redelivery | Redeliver a webhook delivery |
| WebhooksApi | create_ping | POST /api/webhooks/{id}/ping | Send a ping webhook |
| WebhooksApi | destroy | DELETE /api/webhooks/{id} | Delete a webhook |
| WebhooksApi | list | GET /api/webhooks | List webhooks |
| WebhooksApi | list_deliveries | GET /api/webhooks/{id}/deliveries | List deliveries for a webhook |
| WebhooksApi | partial_update | PATCH /api/webhooks/{id} | Update a webhook |
| WebhooksApi | retrieve | GET /api/webhooks/{id} | Get webhook details |
| WebhooksApi | retrieve_deliveries | GET /api/webhooks/{id}/deliveries/{delivery_id} | Get details of a webhook delivery |
| WebhooksApi | retrieve_events | GET /api/webhooks/events | List available webhook events |
| WebhooksApi | update | PUT /api/webhooks/{id} | Replace a webhook |
11.2.1.1.1 - AssetsApi class reference
All URIs are relative to http://localhost
| Method | HTTP request | Description |
|---|---|---|
| create | POST /api/assets | Create an asset |
| destroy | DELETE /api/assets/{uuid} | Delete an asset |
| retrieve | GET /api/assets/{uuid} | Get an asset |
create
create( guide_id, file, **kwargs )
Create an asset
Example
from pprint import pprint
from cvat_sdk.api_client import Configuration, ApiClient, exceptions
from cvat_sdk.api_client.models import *
# Set up an API client
# Read Configuration class docs for more info about parameters and authentication methods
configuration = Configuration(
host = "http://localhost",
username = 'YOUR_USERNAME',
password = 'YOUR_PASSWORD',
)
with ApiClient(configuration) as api_client:
guide_id = 1 # int |
file = open('/path/to/file', 'rb') # file_type |
try:
(data, response) = api_client.assets_api.create(
guide_id,
file,)
pprint(data)
except exceptions.ApiException as e:
print("Exception when calling AssetsApi.create(): %s\n" % e)
Parameters
| Name | Type | Description | Notes |
|---|---|---|---|
| guide_id | int | ||
| file | file_type |
There are also optional kwargs that control the function invocation behavior. Read more here.
Returned values
Returned type: Tuple[AssetRead, urllib3.HTTPResponse].
Returns a tuple with 2 values: (parsed_response, raw_response).
The first value is a model parsed from the response data. The second value is the raw response, which can be useful to get response parameters, such as status code, headers, or raw response data. Read more about invocation parameters and returned values here.
Authentication
accessTokenAuth, basicAuth, csrfAuth, csrfHeaderAuth, sessionAuth, tokenAuth
HTTP request headers
- Content-Type: multipart/form-data
- Accept: application/vnd.cvat+json
HTTP response details
| Status code | Description | Response headers |
|---|---|---|
| 201 | - |
destroy
destroy( uuid, **kwargs )
Delete an asset
Example
from pprint import pprint
from cvat_sdk.api_client import Configuration, ApiClient, exceptions
from cvat_sdk.api_client.models import *
# Set up an API client
# Read Configuration class docs for more info about parameters and authentication methods
configuration = Configuration(
host = "http://localhost",
username = 'YOUR_USERNAME',
password = 'YOUR_PASSWORD',
)
with ApiClient(configuration) as api_client:
uuid = "uuid_example" # str | A UUID string identifying this asset.
try:
api_client.assets_api.destroy(
uuid,)
except exceptions.ApiException as e:
print("Exception when calling AssetsApi.destroy(): %s\n" % e)
Parameters
| Name | Type | Description | Notes |
|---|---|---|---|
| uuid | str | A UUID string identifying this asset. |
There are also optional kwargs that control the function invocation behavior. Read more here.
Returned values
Returned type: Tuple[None, urllib3.HTTPResponse].
Returns a tuple with 2 values: (None, raw_response).
This endpoint does not have any return value, so None is always returned as the first value.
The second value is the raw response, which can be useful to get response parameters, such as
status code, headers, or raw response data. Read more about invocation parameters
and returned values here.
Authentication
accessTokenAuth, basicAuth, csrfAuth, csrfHeaderAuth, sessionAuth, tokenAuth
HTTP request headers
- Content-Type: Not defined
- Accept: Not defined
HTTP response details
| Status code | Description | Response headers |
|---|---|---|
| 204 | The asset has been deleted | - |
retrieve
retrieve( uuid, **kwargs )
Get an asset
Example
from pprint import pprint
from cvat_sdk.api_client import Configuration, ApiClient, exceptions
from cvat_sdk.api_client.models import *
# Set up an API client
# Read Configuration class docs for more info about parameters and authentication methods
configuration = Configuration(
host = "http://localhost",
username = 'YOUR_USERNAME',
password = 'YOUR_PASSWORD',
)
with ApiClient(configuration) as api_client:
uuid = "uuid_example" # str | A UUID string identifying this asset.
try:
api_client.assets_api.retrieve(
uuid,)
except exceptions.ApiException as e:
print("Exception when calling AssetsApi.retrieve(): %s\n" % e)
Parameters
| Name | Type | Description | Notes |
|---|---|---|---|
| uuid | str | A UUID string identifying this asset. |
There are also optional kwargs that control the function invocation behavior. Read more here.
Returned values
Returned type: Tuple[None, urllib3.HTTPResponse].
Returns a tuple with 2 values: (None, raw_response).
This endpoint does not have any return value, so None is always returned as the first value.
The second value is the raw response, which can be useful to get response parameters, such as
status code, headers, or raw response data. Read more about invocation parameters
and returned values here.
Authentication
accessTokenAuth, basicAuth, csrfAuth, csrfHeaderAuth, sessionAuth, tokenAuth
HTTP request headers
- Content-Type: Not defined
- Accept: Not defined
HTTP response details
| Status code | Description | Response headers |
|---|---|---|
| 200 | Asset file | - |
11.2.1.1.2 - AuthApi class reference
All URIs are relative to http://localhost
| Method | HTTP request | Description |
|---|---|---|
| create_access_tokens | POST /api/auth/access_tokens | Create a token |
| create_login | POST /api/auth/login | |
| create_logout | POST /api/auth/logout | |
| create_password_change | POST /api/auth/password/change | |
| create_password_reset | POST /api/auth/password/reset | |
| create_password_reset_confirm | POST /api/auth/password/reset/confirm | |
| create_register | POST /api/auth/register | |
| destroy_access_tokens | DELETE /api/auth/access_tokens/{id} | Revoke token |
| list_access_tokens | GET /api/auth/access_tokens | List tokens |
| partial_update_access_tokens | PATCH /api/auth/access_tokens/{id} | Update a token |
| retrieve_access_tokens | GET /api/auth/access_tokens/{id} | Get token details |
| retrieve_access_tokens_self | GET /api/auth/access_tokens/self | Get current token details |
| retrieve_rules | GET /api/auth/rules |
create_access_tokens
create_access_tokens( access_token_write_request, **kwargs )
Create a token
Example
from pprint import pprint
from cvat_sdk.api_client import Configuration, ApiClient, exceptions
from cvat_sdk.api_client.models import *
# Set up an API client
# Read Configuration class docs for more info about parameters and authentication methods
configuration = Configuration(
host = "http://localhost",
username = 'YOUR_USERNAME',
password = 'YOUR_PASSWORD',
)
with ApiClient(configuration) as api_client:
access_token_write_request = AccessTokenWriteRequest(
name="name_example",
expiry_date=dateutil_parser('1970-01-01T00:00:00.00Z'),
read_only=True,
) # AccessTokenWriteRequest |
try:
(data, response) = api_client.auth_api.create_access_tokens(
access_token_write_request,)
pprint(data)
except exceptions.ApiException as e:
print("Exception when calling AuthApi.create_access_tokens(): %s\n" % e)
Parameters
| Name | Type | Description | Notes |
|---|---|---|---|
| access_token_write_request | AccessTokenWriteRequest |
There are also optional kwargs that control the function invocation behavior. Read more here.
Returned values
Returned type: Tuple[AccessTokenRead, urllib3.HTTPResponse].
Returns a tuple with 2 values: (parsed_response, raw_response).
The first value is a model parsed from the response data. The second value is the raw response, which can be useful to get response parameters, such as status code, headers, or raw response data. Read more about invocation parameters and returned values here.
Authentication
accessTokenAuth, basicAuth, csrfAuth, csrfHeaderAuth, sessionAuth, tokenAuth
HTTP request headers
- Content-Type: application/json
- Accept: application/vnd.cvat+json
HTTP response details
| Status code | Description | Response headers |
|---|---|---|
| 201 | - |
create_login
create_login( login_serializer_ex_request, **kwargs )
Check the credentials and return the REST Token if the credentials are valid and authenticated. If email verification is enabled and the user has the unverified email, an email with a confirmation link will be sent. Calls Django Auth login method to register User ID in Django session framework. Accept the following POST parameters: username, email, password Return the REST Framework Token Object’s key.
Example
from pprint import pprint
from cvat_sdk.api_client import Configuration, ApiClient, exceptions
from cvat_sdk.api_client.models import *
# Set up an API client
# Read Configuration class docs for more info about parameters and authentication methods
configuration = Configuration(
host = "http://localhost",
username = 'YOUR_USERNAME',
password = 'YOUR_PASSWORD',
)
with ApiClient(configuration) as api_client:
login_serializer_ex_request = LoginSerializerExRequest(
username="username_example",
email="email_example",
password="password_example",
) # LoginSerializerExRequest |
try:
(data, response) = api_client.auth_api.create_login(
login_serializer_ex_request,)
pprint(data)
except exceptions.ApiException as e:
print("Exception when calling AuthApi.create_login(): %s\n" % e)
Parameters
| Name | Type | Description | Notes |
|---|---|---|---|
| login_serializer_ex_request | LoginSerializerExRequest |
There are also optional kwargs that control the function invocation behavior. Read more here.
Returned values
Returned type: Tuple[Token, urllib3.HTTPResponse].
Returns a tuple with 2 values: (parsed_response, raw_response).
The first value is a model parsed from the response data. The second value is the raw response, which can be useful to get response parameters, such as status code, headers, or raw response data. Read more about invocation parameters and returned values here.
Authentication
accessTokenAuth, basicAuth, csrfAuth, csrfHeaderAuth, sessionAuth, tokenAuth
HTTP request headers
- Content-Type: application/json
- Accept: application/vnd.cvat+json
HTTP response details
| Status code | Description | Response headers |
|---|---|---|
| 200 | - |
create_logout
create_logout( **kwargs )
Calls Django logout method and delete the Token object assigned to the current User object. Accepts/Returns nothing.
Example
from pprint import pprint
from cvat_sdk.api_client import Configuration, ApiClient, exceptions
from cvat_sdk.api_client.models import *
# Set up an API client
# Read Configuration class docs for more info about parameters and authentication methods
configuration = Configuration(
host = "http://localhost",
username = 'YOUR_USERNAME',
password = 'YOUR_PASSWORD',
)
with ApiClient(configuration) as api_client:
try:
(data, response) = api_client.auth_api.create_logout()
pprint(data)
except exceptions.ApiException as e:
print("Exception when calling AuthApi.create_logout(): %s\n" % e)
Parameters
This endpoint does not need any parameter.
There are also optional kwargs that control the function invocation behavior. Read more here.
Returned values
Returned type: Tuple[RestAuthDetail, urllib3.HTTPResponse].
Returns a tuple with 2 values: (parsed_response, raw_response).
The first value is a model parsed from the response data. The second value is the raw response, which can be useful to get response parameters, such as status code, headers, or raw response data. Read more about invocation parameters and returned values here.
Authentication
accessTokenAuth, basicAuth, csrfAuth, csrfHeaderAuth, sessionAuth, tokenAuth
HTTP request headers
- Content-Type: Not defined
- Accept: application/vnd.cvat+json
HTTP response details
| Status code | Description | Response headers |
|---|---|---|
| 200 | - |
create_password_change
create_password_change( password_change_request, **kwargs )
Calls Django Auth SetPasswordForm save method. Accepts the following POST parameters: new_password1, new_password2 Returns the success/fail message.
Example
from pprint import pprint
from cvat_sdk.api_client import Configuration, ApiClient, exceptions
from cvat_sdk.api_client.models import *
# Set up an API client
# Read Configuration class docs for more info about parameters and authentication methods
configuration = Configuration(
host = "http://localhost",
username = 'YOUR_USERNAME',
password = 'YOUR_PASSWORD',
)
with ApiClient(configuration) as api_client:
password_change_request = PasswordChangeRequest(
old_password="old_password_example",
new_password1="new_password1_example",
new_password2="new_password2_example",
) # PasswordChangeRequest |
try:
(data, response) = api_client.auth_api.create_password_change(
password_change_request,)
pprint(data)
except exceptions.ApiException as e:
print("Exception when calling AuthApi.create_password_change(): %s\n" % e)
Parameters
| Name | Type | Description | Notes |
|---|---|---|---|
| password_change_request | PasswordChangeRequest |
There are also optional kwargs that control the function invocation behavior. Read more here.
Returned values
Returned type: Tuple[RestAuthDetail, urllib3.HTTPResponse].
Returns a tuple with 2 values: (parsed_response, raw_response).
The first value is a model parsed from the response data. The second value is the raw response, which can be useful to get response parameters, such as status code, headers, or raw response data. Read more about invocation parameters and returned values here.
Authentication
basicAuth, csrfAuth, csrfHeaderAuth, sessionAuth, tokenAuth
HTTP request headers
- Content-Type: application/json
- Accept: application/vnd.cvat+json
HTTP response details
| Status code | Description | Response headers |
|---|---|---|
| 200 | - |
create_password_reset
create_password_reset( password_reset_serializer_ex_request, **kwargs )
Calls Django Auth PasswordResetForm save method. Accepts the following POST parameters: email Returns the success/fail message.
Example
from pprint import pprint
from cvat_sdk.api_client import Configuration, ApiClient, exceptions
from cvat_sdk.api_client.models import *
# Set up an API client
# Read Configuration class docs for more info about parameters and authentication methods
configuration = Configuration(
host = "http://localhost",
username = 'YOUR_USERNAME',
password = 'YOUR_PASSWORD',
)
with ApiClient(configuration) as api_client:
password_reset_serializer_ex_request = PasswordResetSerializerExRequest(
email="email_example",
) # PasswordResetSerializerExRequest |
try:
(data, response) = api_client.auth_api.create_password_reset(
password_reset_serializer_ex_request,)
pprint(data)
except exceptions.ApiException as e:
print("Exception when calling AuthApi.create_password_reset(): %s\n" % e)
Parameters
| Name | Type | Description | Notes |
|---|---|---|---|
| password_reset_serializer_ex_request | PasswordResetSerializerExRequest |
There are also optional kwargs that control the function invocation behavior. Read more here.
Returned values
Returned type: Tuple[RestAuthDetail, urllib3.HTTPResponse].
Returns a tuple with 2 values: (parsed_response, raw_response).
The first value is a model parsed from the response data. The second value is the raw response, which can be useful to get response parameters, such as status code, headers, or raw response data. Read more about invocation parameters and returned values here.
Authentication
accessTokenAuth, basicAuth, csrfAuth, csrfHeaderAuth, sessionAuth, tokenAuth
HTTP request headers
- Content-Type: application/json
- Accept: application/vnd.cvat+json
HTTP response details
| Status code | Description | Response headers |
|---|---|---|
| 200 | - |
create_password_reset_confirm
create_password_reset_confirm( password_reset_confirm_request, **kwargs )
Password reset e-mail link is confirmed, therefore this resets the user’s password. Accepts the following POST parameters: token, uid, new_password1, new_password2 Returns the success/fail message.
Example
from pprint import pprint
from cvat_sdk.api_client import Configuration, ApiClient, exceptions
from cvat_sdk.api_client.models import *
# Set up an API client
# Read Configuration class docs for more info about parameters and authentication methods
configuration = Configuration(
host = "http://localhost",
username = 'YOUR_USERNAME',
password = 'YOUR_PASSWORD',
)
with ApiClient(configuration) as api_client:
password_reset_confirm_request = PasswordResetConfirmRequest(
new_password1="new_password1_example",
new_password2="new_password2_example",
uid="uid_example",
token="token_example",
) # PasswordResetConfirmRequest |
try:
(data, response) = api_client.auth_api.create_password_reset_confirm(
password_reset_confirm_request,)
pprint(data)
except exceptions.ApiException as e:
print("Exception when calling AuthApi.create_password_reset_confirm(): %s\n" % e)
Parameters
| Name | Type | Description | Notes |
|---|---|---|---|
| password_reset_confirm_request | PasswordResetConfirmRequest |
There are also optional kwargs that control the function invocation behavior. Read more here.
Returned values
Returned type: Tuple[RestAuthDetail, urllib3.HTTPResponse].
Returns a tuple with 2 values: (parsed_response, raw_response).
The first value is a model parsed from the response data. The second value is the raw response, which can be useful to get response parameters, such as status code, headers, or raw response data. Read more about invocation parameters and returned values here.
Authentication
accessTokenAuth, basicAuth, csrfAuth, csrfHeaderAuth, sessionAuth, tokenAuth
HTTP request headers
- Content-Type: application/json
- Accept: application/vnd.cvat+json
HTTP response details
| Status code | Description | Response headers |
|---|---|---|
| 200 | - |
create_register
create_register( register_serializer_ex_request, **kwargs )
Example
from pprint import pprint
from cvat_sdk.api_client import Configuration, ApiClient, exceptions
from cvat_sdk.api_client.models import *
# Set up an API client
# Read Configuration class docs for more info about parameters and authentication methods
configuration = Configuration(
host = "http://localhost",
username = 'YOUR_USERNAME',
password = 'YOUR_PASSWORD',
)
with ApiClient(configuration) as api_client:
register_serializer_ex_request = RegisterSerializerExRequest(
username="username_example",
email="email_example",
password1="password1_example",
password2="password2_example",
first_name="first_name_example",
last_name="last_name_example",
) # RegisterSerializerExRequest |
try:
(data, response) = api_client.auth_api.create_register(
register_serializer_ex_request,)
pprint(data)
except exceptions.ApiException as e:
print("Exception when calling AuthApi.create_register(): %s\n" % e)
Parameters
| Name | Type | Description | Notes |
|---|---|---|---|
| register_serializer_ex_request | RegisterSerializerExRequest |
There are also optional kwargs that control the function invocation behavior. Read more here.
Returned values
Returned type: Tuple[RegisterSerializerEx, urllib3.HTTPResponse].
Returns a tuple with 2 values: (parsed_response, raw_response).
The first value is a model parsed from the response data. The second value is the raw response, which can be useful to get response parameters, such as status code, headers, or raw response data. Read more about invocation parameters and returned values here.
Authentication
accessTokenAuth, basicAuth, csrfAuth, csrfHeaderAuth, sessionAuth, tokenAuth
HTTP request headers
- Content-Type: application/json
- Accept: application/vnd.cvat+json
HTTP response details
| Status code | Description | Response headers |
|---|---|---|
| 201 | - |
destroy_access_tokens
destroy_access_tokens( id, **kwargs )
Revoke token
Example
from pprint import pprint
from cvat_sdk.api_client import Configuration, ApiClient, exceptions
from cvat_sdk.api_client.models import *
# Set up an API client
# Read Configuration class docs for more info about parameters and authentication methods
configuration = Configuration(
host = "http://localhost",
username = 'YOUR_USERNAME',
password = 'YOUR_PASSWORD',
)
with ApiClient(configuration) as api_client:
id = 1 # int | A unique integer value identifying this API Access Token.
try:
api_client.auth_api.destroy_access_tokens(
id,)
except exceptions.ApiException as e:
print("Exception when calling AuthApi.destroy_access_tokens(): %s\n" % e)
Parameters
| Name | Type | Description | Notes |
|---|---|---|---|
| id | int | A unique integer value identifying this API Access Token. |
There are also optional kwargs that control the function invocation behavior. Read more here.
Returned values
Returned type: Tuple[None, urllib3.HTTPResponse].
Returns a tuple with 2 values: (None, raw_response).
This endpoint does not have any return value, so None is always returned as the first value.
The second value is the raw response, which can be useful to get response parameters, such as
status code, headers, or raw response data. Read more about invocation parameters
and returned values here.
Authentication
accessTokenAuth, basicAuth, csrfAuth, csrfHeaderAuth, sessionAuth, tokenAuth
HTTP request headers
- Content-Type: Not defined
- Accept: Not defined
HTTP response details
| Status code | Description | Response headers |
|---|---|---|
| 204 | The token was successfully revoked | - |
list_access_tokens
list_access_tokens( filter=None, name=None, page=None, page_size=None, search=None, sort=None, **kwargs )
List tokens
Example
from pprint import pprint
from cvat_sdk.api_client import Configuration, ApiClient, exceptions
from cvat_sdk.api_client.models import *
# Set up an API client
# Read Configuration class docs for more info about parameters and authentication methods
configuration = Configuration(
host = "http://localhost",
username = 'YOUR_USERNAME',
password = 'YOUR_PASSWORD',
)
with ApiClient(configuration) as api_client:
filter = "filter_example" # str | JSON Logic filter. This filter can be used to perform complex filtering by grouping rules. For example, using such a filter you can get all resources created by you: - {\"and\":[{\"==\":[{\"var\":\"owner\"},\"<user>\"]}]} Details about the syntax used can be found at the link: https://jsonlogic.com/ Available filter_fields: ['name', 'id', 'created_date', 'updated_date', 'expiry_date', 'last_used_date', 'read_only']. (optional)
name = "name_example" # str | A simple equality filter for the name field (optional)
page = 1 # int | A page number within the paginated result set. (optional)
page_size = 1 # int | Number of results to return per page. (optional)
search = "search_example" # str | A search term. Available search_fields: ('name',) (optional)
sort = "sort_example" # str | Which field to use when ordering the results. Available ordering_fields: ['name', 'id', 'created_date', 'updated_date', 'expiry_date', 'last_used_date', 'read_only'] (optional)
try:
(data, response) = api_client.auth_api.list_access_tokens(
filter=filter,
name=name,
page=page,
page_size=page_size,
search=search,
sort=sort,
)
pprint(data)
except exceptions.ApiException as e:
print("Exception when calling AuthApi.list_access_tokens(): %s\n" % e)
Parameters
| Name | Type | Description | Notes |
|---|---|---|---|
| filter | str | JSON Logic filter. This filter can be used to perform complex filtering by grouping rules. For example, using such a filter you can get all resources created by you: - {"and":[{"==":[{"var":"owner"}," |
[optional] |
| name | str | A simple equality filter for the name field | [optional] |
| page | int | A page number within the paginated result set. | [optional] |
| page_size | int | Number of results to return per page. | [optional] |
| search | str | A search term. Available search_fields: (’name’,) | [optional] |
| sort | str | Which field to use when ordering the results. Available ordering_fields: [’name’, ‘id’, ‘created_date’, ‘updated_date’, ’expiry_date’, ’last_used_date’, ‘read_only’] | [optional] |
There are also optional kwargs that control the function invocation behavior. Read more here.
Returned values
Returned type: Tuple[PaginatedAccessTokenReadList, urllib3.HTTPResponse].
Returns a tuple with 2 values: (parsed_response, raw_response).
The first value is a model parsed from the response data. The second value is the raw response, which can be useful to get response parameters, such as status code, headers, or raw response data. Read more about invocation parameters and returned values here.
Authentication
accessTokenAuth, basicAuth, csrfAuth, csrfHeaderAuth, sessionAuth, tokenAuth
HTTP request headers
- Content-Type: Not defined
- Accept: application/vnd.cvat+json
HTTP response details
| Status code | Description | Response headers |
|---|---|---|
| 200 | - |
partial_update_access_tokens
partial_update_access_tokens( id, patched_access_token_write_request=None, **kwargs )
Update a token
Example
from pprint import pprint
from cvat_sdk.api_client import Configuration, ApiClient, exceptions
from cvat_sdk.api_client.models import *
# Set up an API client
# Read Configuration class docs for more info about parameters and authentication methods
configuration = Configuration(
host = "http://localhost",
username = 'YOUR_USERNAME',
password = 'YOUR_PASSWORD',
)
with ApiClient(configuration) as api_client:
id = 1 # int | A unique integer value identifying this API Access Token.
patched_access_token_write_request = PatchedAccessTokenWriteRequest(
name="name_example",
expiry_date=dateutil_parser('1970-01-01T00:00:00.00Z'),
read_only=True,
) # PatchedAccessTokenWriteRequest | (optional)
try:
(data, response) = api_client.auth_api.partial_update_access_tokens(
id,
patched_access_token_write_request=patched_access_token_write_request,
)
pprint(data)
except exceptions.ApiException as e:
print("Exception when calling AuthApi.partial_update_access_tokens(): %s\n" % e)
Parameters
| Name | Type | Description | Notes |
|---|---|---|---|
| id | int | A unique integer value identifying this API Access Token. | |
| patched_access_token_write_request | PatchedAccessTokenWriteRequest | [optional] |
There are also optional kwargs that control the function invocation behavior. Read more here.
Returned values
Returned type: Tuple[AccessTokenRead, urllib3.HTTPResponse].
Returns a tuple with 2 values: (parsed_response, raw_response).
The first value is a model parsed from the response data. The second value is the raw response, which can be useful to get response parameters, such as status code, headers, or raw response data. Read more about invocation parameters and returned values here.
Authentication
accessTokenAuth, basicAuth, csrfAuth, csrfHeaderAuth, sessionAuth, tokenAuth
HTTP request headers
- Content-Type: application/json
- Accept: application/vnd.cvat+json
HTTP response details
| Status code | Description | Response headers |
|---|---|---|
| 200 | - |
retrieve_access_tokens
retrieve_access_tokens( id, **kwargs )
Get token details
Example
from pprint import pprint
from cvat_sdk.api_client import Configuration, ApiClient, exceptions
from cvat_sdk.api_client.models import *
# Set up an API client
# Read Configuration class docs for more info about parameters and authentication methods
configuration = Configuration(
host = "http://localhost",
username = 'YOUR_USERNAME',
password = 'YOUR_PASSWORD',
)
with ApiClient(configuration) as api_client:
id = 1 # int | A unique integer value identifying this API Access Token.
try:
(data, response) = api_client.auth_api.retrieve_access_tokens(
id,)
pprint(data)
except exceptions.ApiException as e:
print("Exception when calling AuthApi.retrieve_access_tokens(): %s\n" % e)
Parameters
| Name | Type | Description | Notes |
|---|---|---|---|
| id | int | A unique integer value identifying this API Access Token. |
There are also optional kwargs that control the function invocation behavior. Read more here.
Returned values
Returned type: Tuple[AccessTokenRead, urllib3.HTTPResponse].
Returns a tuple with 2 values: (parsed_response, raw_response).
The first value is a model parsed from the response data. The second value is the raw response, which can be useful to get response parameters, such as status code, headers, or raw response data. Read more about invocation parameters and returned values here.
Authentication
accessTokenAuth, basicAuth, csrfAuth, csrfHeaderAuth, sessionAuth, tokenAuth
HTTP request headers
- Content-Type: Not defined
- Accept: application/vnd.cvat+json
HTTP response details
| Status code | Description | Response headers |
|---|---|---|
| 200 | - |
retrieve_access_tokens_self
retrieve_access_tokens_self( **kwargs )
Get current token details
Get details of the token used for the current request. This endpoint is only allowed if the request is performed using an access token.
Example
from pprint import pprint
from cvat_sdk.api_client import Configuration, ApiClient, exceptions
from cvat_sdk.api_client.models import *
# Set up an API client
# Read Configuration class docs for more info about parameters and authentication methods
configuration = Configuration(
host = "http://localhost",
)
with ApiClient(configuration) as api_client:
try:
(data, response) = api_client.auth_api.retrieve_access_tokens_self()
pprint(data)
except exceptions.ApiException as e:
print("Exception when calling AuthApi.retrieve_access_tokens_self(): %s\n" % e)
Parameters
This endpoint does not need any parameter.
There are also optional kwargs that control the function invocation behavior. Read more here.
Returned values
Returned type: Tuple[AccessTokenRead, urllib3.HTTPResponse].
Returns a tuple with 2 values: (parsed_response, raw_response).
The first value is a model parsed from the response data. The second value is the raw response, which can be useful to get response parameters, such as status code, headers, or raw response data. Read more about invocation parameters and returned values here.
Authentication
accessTokenAuth
HTTP request headers
- Content-Type: Not defined
- Accept: application/vnd.cvat+json
HTTP response details
| Status code | Description | Response headers |
|---|---|---|
| 200 | - |
retrieve_rules
retrieve_rules( **kwargs )
Example
from pprint import pprint
from cvat_sdk.api_client import Configuration, ApiClient, exceptions
from cvat_sdk.api_client.models import *
# Set up an API client
# Read Configuration class docs for more info about parameters and authentication methods
configuration = Configuration(
host = "http://localhost",)
with ApiClient(configuration) as api_client:
try:
api_client.auth_api.retrieve_rules()
except exceptions.ApiException as e:
print("Exception when calling AuthApi.retrieve_rules(): %s\n" % e)
Parameters
This endpoint does not need any parameter.
There are also optional kwargs that control the function invocation behavior. Read more here.
Returned values
Returned type: Tuple[None, urllib3.HTTPResponse].
Returns a tuple with 2 values: (None, raw_response).
This endpoint does not have any return value, so None is always returned as the first value.
The second value is the raw response, which can be useful to get response parameters, such as
status code, headers, or raw response data. Read more about invocation parameters
and returned values here.
Authentication
No authentication required
HTTP request headers
- Content-Type: Not defined
- Accept: Not defined
HTTP response details
| Status code | Description | Response headers |
|---|---|---|
| 200 | No response body | - |
11.2.1.1.3 - CloudstoragesApi class reference
All URIs are relative to http://localhost
| Method | HTTP request | Description |
|---|---|---|
| create | POST /api/cloudstorages | Create a cloud storage |
| destroy | DELETE /api/cloudstorages/{id} | Delete a cloud storage |
| list | GET /api/cloudstorages | List cloud storages |
| partial_update | PATCH /api/cloudstorages/{id} | Update a cloud storage |
| retrieve | GET /api/cloudstorages/{id} | Get cloud storage details |
| retrieve_actions | GET /api/cloudstorages/{id}/actions | Get allowed actions for a cloud storage |
| retrieve_content_v2 | GET /api/cloudstorages/{id}/content-v2 | Get cloud storage content |
| retrieve_preview | GET /api/cloudstorages/{id}/preview | Get a preview image for a cloud storage |
| retrieve_status | GET /api/cloudstorages/{id}/status | Get the status of a cloud storage |
create
create( cloud_storage_write_request, x_organization=None, org=None, org_id=None, **kwargs )
Create a cloud storage
Example
from pprint import pprint
from cvat_sdk.api_client import Configuration, ApiClient, exceptions
from cvat_sdk.api_client.models import *
# Set up an API client
# Read Configuration class docs for more info about parameters and authentication methods
configuration = Configuration(
host = "http://localhost",
username = 'YOUR_USERNAME',
password = 'YOUR_PASSWORD',
)
with ApiClient(configuration) as api_client:
cloud_storage_write_request = CloudStorageWriteRequest(
provider_type=ProviderTypeEnum("AWS_S3_BUCKET"),
resource="resource_example",
display_name="display_name_example",
owner=BasicUserRequest(
username="A",
first_name="first_name_example",
last_name="last_name_example",
),
credentials_type=CredentialsTypeEnum("KEY_SECRET_KEY_PAIR"),
session_token="session_token_example",
account_name="account_name_example",
key="key_example",
secret_key="secret_key_example",
connection_string="connection_string_example",
key_file=open('/path/to/file', 'rb'),
specific_attributes="specific_attributes_example",
description="description_example",
manifests=[],
) # CloudStorageWriteRequest |
x_organization = "X-Organization_example" # str | Organization unique slug (optional)
org = "org_example" # str | Organization unique slug (optional)
org_id = 1 # int | Organization identifier (optional)
try:
(data, response) = api_client.cloudstorages_api.create(
cloud_storage_write_request,
x_organization=x_organization,
org=org,
org_id=org_id,
)
pprint(data)
except exceptions.ApiException as e:
print("Exception when calling CloudstoragesApi.create(): %s\n" % e)
Parameters
| Name | Type | Description | Notes |
|---|---|---|---|
| cloud_storage_write_request | CloudStorageWriteRequest | ||
| x_organization | str | Organization unique slug | [optional] |
| org | str | Organization unique slug | [optional] |
| org_id | int | Organization identifier | [optional] |
There are also optional kwargs that control the function invocation behavior. Read more here.
Returned values
Returned type: Tuple[CloudStorageRead, urllib3.HTTPResponse].
Returns a tuple with 2 values: (parsed_response, raw_response).
The first value is a model parsed from the response data. The second value is the raw response, which can be useful to get response parameters, such as status code, headers, or raw response data. Read more about invocation parameters and returned values here.
Authentication
accessTokenAuth, basicAuth, csrfAuth, csrfHeaderAuth, sessionAuth, tokenAuth
HTTP request headers
- Content-Type: application/json, multipart/form-data
- Accept: application/vnd.cvat+json
HTTP response details
| Status code | Description | Response headers |
|---|---|---|
| 201 | - |
destroy
destroy( id, **kwargs )
Delete a cloud storage
Example
from pprint import pprint
from cvat_sdk.api_client import Configuration, ApiClient, exceptions
from cvat_sdk.api_client.models import *
# Set up an API client
# Read Configuration class docs for more info about parameters and authentication methods
configuration = Configuration(
host = "http://localhost",
username = 'YOUR_USERNAME',
password = 'YOUR_PASSWORD',
)
with ApiClient(configuration) as api_client:
id = 1 # int | A unique integer value identifying this cloud storage.
try:
api_client.cloudstorages_api.destroy(
id,)
except exceptions.ApiException as e:
print("Exception when calling CloudstoragesApi.destroy(): %s\n" % e)
Parameters
| Name | Type | Description | Notes |
|---|---|---|---|
| id | int | A unique integer value identifying this cloud storage. |
There are also optional kwargs that control the function invocation behavior. Read more here.
Returned values
Returned type: Tuple[None, urllib3.HTTPResponse].
Returns a tuple with 2 values: (None, raw_response).
This endpoint does not have any return value, so None is always returned as the first value.
The second value is the raw response, which can be useful to get response parameters, such as
status code, headers, or raw response data. Read more about invocation parameters
and returned values here.
Authentication
accessTokenAuth, basicAuth, csrfAuth, csrfHeaderAuth, sessionAuth, tokenAuth
HTTP request headers
- Content-Type: Not defined
- Accept: Not defined
HTTP response details
| Status code | Description | Response headers |
|---|---|---|
| 204 | The cloud storage has been removed | - |
list
list( x_organization=None, credentials_type=None, filter=None, name=None, org=None, org_id=None, owner=None, page=None, page_size=None, provider_type=None, resource=None, search=None, sort=None, **kwargs )
List cloud storages
Example
from pprint import pprint
from cvat_sdk.api_client import Configuration, ApiClient, exceptions
from cvat_sdk.api_client.models import *
# Set up an API client
# Read Configuration class docs for more info about parameters and authentication methods
configuration = Configuration(
host = "http://localhost",
username = 'YOUR_USERNAME',
password = 'YOUR_PASSWORD',
)
with ApiClient(configuration) as api_client:
x_organization = "X-Organization_example" # str | Organization unique slug (optional)
credentials_type = "KEY_SECRET_KEY_PAIR" # str | A simple equality filter for the credentials_type field (optional)
filter = "filter_example" # str | JSON Logic filter. This filter can be used to perform complex filtering by grouping rules. For example, using such a filter you can get all resources created by you: - {\"and\":[{\"==\":[{\"var\":\"owner\"},\"<user>\"]}]} Details about the syntax used can be found at the link: https://jsonlogic.com/ Available filter_fields: ['provider_type', 'name', 'resource', 'credentials_type', 'owner', 'description', 'id']. (optional)
name = "name_example" # str | A simple equality filter for the name field (optional)
org = "org_example" # str | Organization unique slug (optional)
org_id = 1 # int | Organization identifier (optional)
owner = "owner_example" # str | A simple equality filter for the owner field (optional)
page = 1 # int | A page number within the paginated result set. (optional)
page_size = 1 # int | Number of results to return per page. (optional)
provider_type = "AWS_S3_BUCKET" # str | A simple equality filter for the provider_type field (optional)
resource = "resource_example" # str | A simple equality filter for the resource field (optional)
search = "search_example" # str | A search term. Available search_fields: ('provider_type', 'name', 'resource', 'credentials_type', 'owner', 'description') (optional)
sort = "sort_example" # str | Which field to use when ordering the results. Available ordering_fields: ['provider_type', 'name', 'resource', 'credentials_type', 'owner', 'description', 'id'] (optional)
try:
(data, response) = api_client.cloudstorages_api.list(
x_organization=x_organization,
credentials_type=credentials_type,
filter=filter,
name=name,
org=org,
org_id=org_id,
owner=owner,
page=page,
page_size=page_size,
provider_type=provider_type,
resource=resource,
search=search,
sort=sort,
)
pprint(data)
except exceptions.ApiException as e:
print("Exception when calling CloudstoragesApi.list(): %s\n" % e)
Parameters
| Name | Type | Description | Notes |
|---|---|---|---|
| x_organization | str | Organization unique slug | [optional] |
| credentials_type | str | A simple equality filter for the credentials_type field | [optional] |
| filter | str | JSON Logic filter. This filter can be used to perform complex filtering by grouping rules. For example, using such a filter you can get all resources created by you: - {"and":[{"==":[{"var":"owner"}," |
[optional] |
| name | str | A simple equality filter for the name field | [optional] |
| org | str | Organization unique slug | [optional] |
| org_id | int | Organization identifier | [optional] |
| owner | str | A simple equality filter for the owner field | [optional] |
| page | int | A page number within the paginated result set. | [optional] |
| page_size | int | Number of results to return per page. | [optional] |
| provider_type | str | A simple equality filter for the provider_type field | [optional] |
| resource | str | A simple equality filter for the resource field | [optional] |
| search | str | A search term. Available search_fields: (‘provider_type’, ’name’, ‘resource’, ‘credentials_type’, ‘owner’, ‘description’) | [optional] |
| sort | str | Which field to use when ordering the results. Available ordering_fields: [‘provider_type’, ’name’, ‘resource’, ‘credentials_type’, ‘owner’, ‘description’, ‘id’] | [optional] |
There are also optional kwargs that control the function invocation behavior. Read more here.
Returned values
Returned type: Tuple[PaginatedCloudStorageReadList, urllib3.HTTPResponse].
Returns a tuple with 2 values: (parsed_response, raw_response).
The first value is a model parsed from the response data. The second value is the raw response, which can be useful to get response parameters, such as status code, headers, or raw response data. Read more about invocation parameters and returned values here.
Authentication
accessTokenAuth, basicAuth, csrfAuth, csrfHeaderAuth, sessionAuth, tokenAuth
HTTP request headers
- Content-Type: Not defined
- Accept: application/vnd.cvat+json
HTTP response details
| Status code | Description | Response headers |
|---|---|---|
| 200 | - |
partial_update
partial_update( id, patched_cloud_storage_write_request=None, **kwargs )
Update a cloud storage
Example
from pprint import pprint
from cvat_sdk.api_client import Configuration, ApiClient, exceptions
from cvat_sdk.api_client.models import *
# Set up an API client
# Read Configuration class docs for more info about parameters and authentication methods
configuration = Configuration(
host = "http://localhost",
username = 'YOUR_USERNAME',
password = 'YOUR_PASSWORD',
)
with ApiClient(configuration) as api_client:
id = 1 # int | A unique integer value identifying this cloud storage.
patched_cloud_storage_write_request = PatchedCloudStorageWriteRequest(
provider_type=ProviderTypeEnum("AWS_S3_BUCKET"),
resource="resource_example",
display_name="display_name_example",
owner=BasicUserRequest(
username="A",
first_name="first_name_example",
last_name="last_name_example",
),
credentials_type=CredentialsTypeEnum("KEY_SECRET_KEY_PAIR"),
session_token="session_token_example",
account_name="account_name_example",
key="key_example",
secret_key="secret_key_example",
connection_string="connection_string_example",
key_file=open('/path/to/file', 'rb'),
specific_attributes="specific_attributes_example",
description="description_example",
manifests=[],
) # PatchedCloudStorageWriteRequest | (optional)
try:
(data, response) = api_client.cloudstorages_api.partial_update(
id,
patched_cloud_storage_write_request=patched_cloud_storage_write_request,
)
pprint(data)
except exceptions.ApiException as e:
print("Exception when calling CloudstoragesApi.partial_update(): %s\n" % e)
Parameters
| Name | Type | Description | Notes |
|---|---|---|---|
| id | int | A unique integer value identifying this cloud storage. | |
| patched_cloud_storage_write_request | PatchedCloudStorageWriteRequest | [optional] |
There are also optional kwargs that control the function invocation behavior. Read more here.
Returned values
Returned type: Tuple[CloudStorageRead, urllib3.HTTPResponse].
Returns a tuple with 2 values: (parsed_response, raw_response).
The first value is a model parsed from the response data. The second value is the raw response, which can be useful to get response parameters, such as status code, headers, or raw response data. Read more about invocation parameters and returned values here.
Authentication
accessTokenAuth, basicAuth, csrfAuth, csrfHeaderAuth, sessionAuth, tokenAuth
HTTP request headers
- Content-Type: application/json, multipart/form-data
- Accept: application/vnd.cvat+json
HTTP response details
| Status code | Description | Response headers |
|---|---|---|
| 200 | - |
retrieve
retrieve( id, **kwargs )
Get cloud storage details
Example
from pprint import pprint
from cvat_sdk.api_client import Configuration, ApiClient, exceptions
from cvat_sdk.api_client.models import *
# Set up an API client
# Read Configuration class docs for more info about parameters and authentication methods
configuration = Configuration(
host = "http://localhost",
username = 'YOUR_USERNAME',
password = 'YOUR_PASSWORD',
)
with ApiClient(configuration) as api_client:
id = 1 # int | A unique integer value identifying this cloud storage.
try:
(data, response) = api_client.cloudstorages_api.retrieve(
id,)
pprint(data)
except exceptions.ApiException as e:
print("Exception when calling CloudstoragesApi.retrieve(): %s\n" % e)
Parameters
| Name | Type | Description | Notes |
|---|---|---|---|
| id | int | A unique integer value identifying this cloud storage. |
There are also optional kwargs that control the function invocation behavior. Read more here.
Returned values
Returned type: Tuple[CloudStorageRead, urllib3.HTTPResponse].
Returns a tuple with 2 values: (parsed_response, raw_response).
The first value is a model parsed from the response data. The second value is the raw response, which can be useful to get response parameters, such as status code, headers, or raw response data. Read more about invocation parameters and returned values here.
Authentication
accessTokenAuth, basicAuth, csrfAuth, csrfHeaderAuth, sessionAuth, tokenAuth
HTTP request headers
- Content-Type: Not defined
- Accept: application/vnd.cvat+json
HTTP response details
| Status code | Description | Response headers |
|---|---|---|
| 200 | - |
retrieve_actions
retrieve_actions( id, **kwargs )
Get allowed actions for a cloud storage
Method return allowed actions for cloud storage. It’s required for reading/writing
Example
from pprint import pprint
from cvat_sdk.api_client import Configuration, ApiClient, exceptions
from cvat_sdk.api_client.models import *
# Set up an API client
# Read Configuration class docs for more info about parameters and authentication methods
configuration = Configuration(
host = "http://localhost",
username = 'YOUR_USERNAME',
password = 'YOUR_PASSWORD',
)
with ApiClient(configuration) as api_client:
id = 1 # int | A unique integer value identifying this cloud storage.
try:
(data, response) = api_client.cloudstorages_api.retrieve_actions(
id,)
pprint(data)
except exceptions.ApiException as e:
print("Exception when calling CloudstoragesApi.retrieve_actions(): %s\n" % e)
Parameters
| Name | Type | Description | Notes |
|---|---|---|---|
| id | int | A unique integer value identifying this cloud storage. |
There are also optional kwargs that control the function invocation behavior. Read more here.
Returned values
Returned type: Tuple[str, urllib3.HTTPResponse].
Returns a tuple with 2 values: (parsed_response, raw_response).
The first value is a model parsed from the response data. The second value is the raw response, which can be useful to get response parameters, such as status code, headers, or raw response data. Read more about invocation parameters and returned values here.
Authentication
accessTokenAuth, basicAuth, csrfAuth, csrfHeaderAuth, sessionAuth, tokenAuth
HTTP request headers
- Content-Type: Not defined
- Accept: application/vnd.cvat+json
HTTP response details
| Status code | Description | Response headers |
|---|---|---|
| 200 | Cloud Storage actions (GET | PUT |
retrieve_content_v2
retrieve_content_v2( id, manifest_path=None, next_token=None, page_size=None, prefix=None, **kwargs )
Get cloud storage content
Example
from pprint import pprint
from cvat_sdk.api_client import Configuration, ApiClient, exceptions
from cvat_sdk.api_client.models import *
# Set up an API client
# Read Configuration class docs for more info about parameters and authentication methods
configuration = Configuration(
host = "http://localhost",
username = 'YOUR_USERNAME',
password = 'YOUR_PASSWORD',
)
with ApiClient(configuration) as api_client:
id = 1 # int | A unique integer value identifying this cloud storage.
manifest_path = "manifest_path_example" # str | Path to the manifest file in a cloud storage (optional)
next_token = "next_token_example" # str | Used to continue listing files in the bucket (optional)
page_size = 1 # int | (optional)
prefix = "prefix_example" # str | Prefix to filter data (optional)
try:
(data, response) = api_client.cloudstorages_api.retrieve_content_v2(
id,
manifest_path=manifest_path,
next_token=next_token,
page_size=page_size,
prefix=prefix,
)
pprint(data)
except exceptions.ApiException as e:
print("Exception when calling CloudstoragesApi.retrieve_content_v2(): %s\n" % e)
Parameters
| Name | Type | Description | Notes |
|---|---|---|---|
| id | int | A unique integer value identifying this cloud storage. | |
| manifest_path | str | Path to the manifest file in a cloud storage | [optional] |
| next_token | str | Used to continue listing files in the bucket | [optional] |
| page_size | int | [optional] | |
| prefix | str | Prefix to filter data | [optional] |
There are also optional kwargs that control the function invocation behavior. Read more here.
Returned values
Returned type: Tuple[CloudStorageContent, urllib3.HTTPResponse].
Returns a tuple with 2 values: (parsed_response, raw_response).
The first value is a model parsed from the response data. The second value is the raw response, which can be useful to get response parameters, such as status code, headers, or raw response data. Read more about invocation parameters and returned values here.
Authentication
accessTokenAuth, basicAuth, csrfAuth, csrfHeaderAuth, sessionAuth, tokenAuth
HTTP request headers
- Content-Type: Not defined
- Accept: application/vnd.cvat+json
HTTP response details
| Status code | Description | Response headers |
|---|---|---|
| 200 | A manifest content | - |
retrieve_preview
retrieve_preview( id, **kwargs )
Get a preview image for a cloud storage
Example
from pprint import pprint
from cvat_sdk.api_client import Configuration, ApiClient, exceptions
from cvat_sdk.api_client.models import *
# Set up an API client
# Read Configuration class docs for more info about parameters and authentication methods
configuration = Configuration(
host = "http://localhost",
username = 'YOUR_USERNAME',
password = 'YOUR_PASSWORD',
)
with ApiClient(configuration) as api_client:
id = 1 # int | A unique integer value identifying this cloud storage.
try:
api_client.cloudstorages_api.retrieve_preview(
id,)
except exceptions.ApiException as e:
print("Exception when calling CloudstoragesApi.retrieve_preview(): %s\n" % e)
Parameters
| Name | Type | Description | Notes |
|---|---|---|---|
| id | int | A unique integer value identifying this cloud storage. |
There are also optional kwargs that control the function invocation behavior. Read more here.
Returned values
Returned type: Tuple[None, urllib3.HTTPResponse].
Returns a tuple with 2 values: (None, raw_response).
This endpoint does not have any return value, so None is always returned as the first value.
The second value is the raw response, which can be useful to get response parameters, such as
status code, headers, or raw response data. Read more about invocation parameters
and returned values here.
Authentication
accessTokenAuth, basicAuth, csrfAuth, csrfHeaderAuth, sessionAuth, tokenAuth
HTTP request headers
- Content-Type: Not defined
- Accept: Not defined
HTTP response details
| Status code | Description | Response headers |
|---|---|---|
| 200 | Cloud Storage preview | - |
| 400 | Failed to get cloud storage preview | - |
| 404 | Cloud Storage preview not found | - |
retrieve_status
retrieve_status( id, **kwargs )
Get the status of a cloud storage
Example
from pprint import pprint
from cvat_sdk.api_client import Configuration, ApiClient, exceptions
from cvat_sdk.api_client.models import *
# Set up an API client
# Read Configuration class docs for more info about parameters and authentication methods
configuration = Configuration(
host = "http://localhost",
username = 'YOUR_USERNAME',
password = 'YOUR_PASSWORD',
)
with ApiClient(configuration) as api_client:
id = 1 # int | A unique integer value identifying this cloud storage.
try:
(data, response) = api_client.cloudstorages_api.retrieve_status(
id,)
pprint(data)
except exceptions.ApiException as e:
print("Exception when calling CloudstoragesApi.retrieve_status(): %s\n" % e)
Parameters
| Name | Type | Description | Notes |
|---|---|---|---|
| id | int | A unique integer value identifying this cloud storage. |
There are also optional kwargs that control the function invocation behavior. Read more here.
Returned values
Returned type: Tuple[str, urllib3.HTTPResponse].
Returns a tuple with 2 values: (parsed_response, raw_response).
The first value is a model parsed from the response data. The second value is the raw response, which can be useful to get response parameters, such as status code, headers, or raw response data. Read more about invocation parameters and returned values here.
Authentication
accessTokenAuth, basicAuth, csrfAuth, csrfHeaderAuth, sessionAuth, tokenAuth
HTTP request headers
- Content-Type: Not defined
- Accept: application/vnd.cvat+json
HTTP response details
| Status code | Description | Response headers |
|---|---|---|
| 200 | Cloud Storage Status | - |
11.2.1.1.4 - CommentsApi class reference
All URIs are relative to http://localhost
| Method | HTTP request | Description |
|---|---|---|
| create | POST /api/comments | Create a comment |
| destroy | DELETE /api/comments/{id} | Delete a comment |
| list | GET /api/comments | List comments |
| partial_update | PATCH /api/comments/{id} | Update a comment |
| retrieve | GET /api/comments/{id} | Get comment details |
create
create( comment_write_request, x_organization=None, org=None, org_id=None, **kwargs )
Create a comment
Example
from pprint import pprint
from cvat_sdk.api_client import Configuration, ApiClient, exceptions
from cvat_sdk.api_client.models import *
# Set up an API client
# Read Configuration class docs for more info about parameters and authentication methods
configuration = Configuration(
host = "http://localhost",
username = 'YOUR_USERNAME',
password = 'YOUR_PASSWORD',
)
with ApiClient(configuration) as api_client:
comment_write_request = CommentWriteRequest(
issue=1,
message="message_example",
) # CommentWriteRequest |
x_organization = "X-Organization_example" # str | Organization unique slug (optional)
org = "org_example" # str | Organization unique slug (optional)
org_id = 1 # int | Organization identifier (optional)
try:
(data, response) = api_client.comments_api.create(
comment_write_request,
x_organization=x_organization,
org=org,
org_id=org_id,
)
pprint(data)
except exceptions.ApiException as e:
print("Exception when calling CommentsApi.create(): %s\n" % e)
Parameters
| Name | Type | Description | Notes |
|---|---|---|---|
| comment_write_request | CommentWriteRequest | ||
| x_organization | str | Organization unique slug | [optional] |
| org | str | Organization unique slug | [optional] |
| org_id | int | Organization identifier | [optional] |
There are also optional kwargs that control the function invocation behavior. Read more here.
Returned values
Returned type: Tuple[CommentRead, urllib3.HTTPResponse].
Returns a tuple with 2 values: (parsed_response, raw_response).
The first value is a model parsed from the response data. The second value is the raw response, which can be useful to get response parameters, such as status code, headers, or raw response data. Read more about invocation parameters and returned values here.
Authentication
accessTokenAuth, basicAuth, csrfAuth, csrfHeaderAuth, sessionAuth, tokenAuth
HTTP request headers
- Content-Type: application/json
- Accept: application/vnd.cvat+json
HTTP response details
| Status code | Description | Response headers |
|---|---|---|
| 201 | - |
destroy
destroy( id, **kwargs )
Delete a comment
Example
from pprint import pprint
from cvat_sdk.api_client import Configuration, ApiClient, exceptions
from cvat_sdk.api_client.models import *
# Set up an API client
# Read Configuration class docs for more info about parameters and authentication methods
configuration = Configuration(
host = "http://localhost",
username = 'YOUR_USERNAME',
password = 'YOUR_PASSWORD',
)
with ApiClient(configuration) as api_client:
id = 1 # int | A unique integer value identifying this comment.
try:
api_client.comments_api.destroy(
id,)
except exceptions.ApiException as e:
print("Exception when calling CommentsApi.destroy(): %s\n" % e)
Parameters
| Name | Type | Description | Notes |
|---|---|---|---|
| id | int | A unique integer value identifying this comment. |
There are also optional kwargs that control the function invocation behavior. Read more here.
Returned values
Returned type: Tuple[None, urllib3.HTTPResponse].
Returns a tuple with 2 values: (None, raw_response).
This endpoint does not have any return value, so None is always returned as the first value.
The second value is the raw response, which can be useful to get response parameters, such as
status code, headers, or raw response data. Read more about invocation parameters
and returned values here.
Authentication
accessTokenAuth, basicAuth, csrfAuth, csrfHeaderAuth, sessionAuth, tokenAuth
HTTP request headers
- Content-Type: Not defined
- Accept: Not defined
HTTP response details
| Status code | Description | Response headers |
|---|---|---|
| 204 | The comment has been deleted | - |
list
list( x_organization=None, filter=None, frame_id=None, issue_id=None, job_id=None, org=None, org_id=None, owner=None, page=None, page_size=None, search=None, sort=None, **kwargs )
List comments
Example
from pprint import pprint
from cvat_sdk.api_client import Configuration, ApiClient, exceptions
from cvat_sdk.api_client.models import *
# Set up an API client
# Read Configuration class docs for more info about parameters and authentication methods
configuration = Configuration(
host = "http://localhost",
username = 'YOUR_USERNAME',
password = 'YOUR_PASSWORD',
)
with ApiClient(configuration) as api_client:
x_organization = "X-Organization_example" # str | Organization unique slug (optional)
filter = "filter_example" # str | JSON Logic filter. This filter can be used to perform complex filtering by grouping rules. For example, using such a filter you can get all resources created by you: - {\"and\":[{\"==\":[{\"var\":\"owner\"},\"<user>\"]}]} Details about the syntax used can be found at the link: https://jsonlogic.com/ Available filter_fields: ['owner', 'id', 'issue_id', 'frame_id', 'job_id']. (optional)
frame_id = 1 # int | A simple equality filter for the frame_id field (optional)
issue_id = 1 # int | A simple equality filter for the issue_id field (optional)
job_id = 1 # int | A simple equality filter for the job_id field (optional)
org = "org_example" # str | Organization unique slug (optional)
org_id = 1 # int | Organization identifier (optional)
owner = "owner_example" # str | A simple equality filter for the owner field (optional)
page = 1 # int | A page number within the paginated result set. (optional)
page_size = 1 # int | Number of results to return per page. (optional)
search = "search_example" # str | A search term. Available search_fields: ('owner',) (optional)
sort = "sort_example" # str | Which field to use when ordering the results. Available ordering_fields: ['owner', 'id', 'issue_id', 'frame_id', 'job_id'] (optional)
try:
(data, response) = api_client.comments_api.list(
x_organization=x_organization,
filter=filter,
frame_id=frame_id,
issue_id=issue_id,
job_id=job_id,
org=org,
org_id=org_id,
owner=owner,
page=page,
page_size=page_size,
search=search,
sort=sort,
)
pprint(data)
except exceptions.ApiException as e:
print("Exception when calling CommentsApi.list(): %s\n" % e)
Parameters
| Name | Type | Description | Notes |
|---|---|---|---|
| x_organization | str | Organization unique slug | [optional] |
| filter | str | JSON Logic filter. This filter can be used to perform complex filtering by grouping rules. For example, using such a filter you can get all resources created by you: - {"and":[{"==":[{"var":"owner"}," |
[optional] |
| frame_id | int | A simple equality filter for the frame_id field | [optional] |
| issue_id | int | A simple equality filter for the issue_id field | [optional] |
| job_id | int | A simple equality filter for the job_id field | [optional] |
| org | str | Organization unique slug | [optional] |
| org_id | int | Organization identifier | [optional] |
| owner | str | A simple equality filter for the owner field | [optional] |
| page | int | A page number within the paginated result set. | [optional] |
| page_size | int | Number of results to return per page. | [optional] |
| search | str | A search term. Available search_fields: (‘owner’,) | [optional] |
| sort | str | Which field to use when ordering the results. Available ordering_fields: [‘owner’, ‘id’, ‘issue_id’, ‘frame_id’, ‘job_id’] | [optional] |
There are also optional kwargs that control the function invocation behavior. Read more here.
Returned values
Returned type: Tuple[PaginatedCommentReadList, urllib3.HTTPResponse].
Returns a tuple with 2 values: (parsed_response, raw_response).
The first value is a model parsed from the response data. The second value is the raw response, which can be useful to get response parameters, such as status code, headers, or raw response data. Read more about invocation parameters and returned values here.
Authentication
accessTokenAuth, basicAuth, csrfAuth, csrfHeaderAuth, sessionAuth, tokenAuth
HTTP request headers
- Content-Type: Not defined
- Accept: application/vnd.cvat+json
HTTP response details
| Status code | Description | Response headers |
|---|---|---|
| 200 | - |
partial_update
partial_update( id, patched_comment_write_request=None, **kwargs )
Update a comment
Example
from pprint import pprint
from cvat_sdk.api_client import Configuration, ApiClient, exceptions
from cvat_sdk.api_client.models import *
# Set up an API client
# Read Configuration class docs for more info about parameters and authentication methods
configuration = Configuration(
host = "http://localhost",
username = 'YOUR_USERNAME',
password = 'YOUR_PASSWORD',
)
with ApiClient(configuration) as api_client:
id = 1 # int | A unique integer value identifying this comment.
patched_comment_write_request = PatchedCommentWriteRequest(
message="message_example",
) # PatchedCommentWriteRequest | (optional)
try:
(data, response) = api_client.comments_api.partial_update(
id,
patched_comment_write_request=patched_comment_write_request,
)
pprint(data)
except exceptions.ApiException as e:
print("Exception when calling CommentsApi.partial_update(): %s\n" % e)
Parameters
| Name | Type | Description | Notes |
|---|---|---|---|
| id | int | A unique integer value identifying this comment. | |
| patched_comment_write_request | PatchedCommentWriteRequest | [optional] |
There are also optional kwargs that control the function invocation behavior. Read more here.
Returned values
Returned type: Tuple[CommentRead, urllib3.HTTPResponse].
Returns a tuple with 2 values: (parsed_response, raw_response).
The first value is a model parsed from the response data. The second value is the raw response, which can be useful to get response parameters, such as status code, headers, or raw response data. Read more about invocation parameters and returned values here.
Authentication
accessTokenAuth, basicAuth, csrfAuth, csrfHeaderAuth, sessionAuth, tokenAuth
HTTP request headers
- Content-Type: application/json
- Accept: application/vnd.cvat+json
HTTP response details
| Status code | Description | Response headers |
|---|---|---|
| 200 | - |
retrieve
retrieve( id, **kwargs )
Get comment details
Example
from pprint import pprint
from cvat_sdk.api_client import Configuration, ApiClient, exceptions
from cvat_sdk.api_client.models import *
# Set up an API client
# Read Configuration class docs for more info about parameters and authentication methods
configuration = Configuration(
host = "http://localhost",
username = 'YOUR_USERNAME',
password = 'YOUR_PASSWORD',
)
with ApiClient(configuration) as api_client:
id = 1 # int | A unique integer value identifying this comment.
try:
(data, response) = api_client.comments_api.retrieve(
id,)
pprint(data)
except exceptions.ApiException as e:
print("Exception when calling CommentsApi.retrieve(): %s\n" % e)
Parameters
| Name | Type | Description | Notes |
|---|---|---|---|
| id | int | A unique integer value identifying this comment. |
There are also optional kwargs that control the function invocation behavior. Read more here.
Returned values
Returned type: Tuple[CommentRead, urllib3.HTTPResponse].
Returns a tuple with 2 values: (parsed_response, raw_response).
The first value is a model parsed from the response data. The second value is the raw response, which can be useful to get response parameters, such as status code, headers, or raw response data. Read more about invocation parameters and returned values here.
Authentication
accessTokenAuth, basicAuth, csrfAuth, csrfHeaderAuth, sessionAuth, tokenAuth
HTTP request headers
- Content-Type: Not defined
- Accept: application/vnd.cvat+json
HTTP response details
| Status code | Description | Response headers |
|---|---|---|
| 200 | - |
11.2.1.1.5 - ConsensusApi class reference
All URIs are relative to http://localhost
| Method | HTTP request | Description |
|---|---|---|
| create_merge | POST /api/consensus/merges | Create a consensus merge |
| list_settings | GET /api/consensus/settings | List consensus settings instances |
| partial_update_settings | PATCH /api/consensus/settings/{id} | Update a consensus settings instance |
| retrieve_settings | GET /api/consensus/settings/{id} | Get consensus settings instance details |
create_merge
create_merge( consensus_merge_create_request=None, **kwargs )
Create a consensus merge
Example
from pprint import pprint
from cvat_sdk.api_client import Configuration, ApiClient, exceptions
from cvat_sdk.api_client.models import *
# Set up an API client
# Read Configuration class docs for more info about parameters and authentication methods
configuration = Configuration(
host = "http://localhost",
username = 'YOUR_USERNAME',
password = 'YOUR_PASSWORD',
)
with ApiClient(configuration) as api_client:
consensus_merge_create_request = ConsensusMergeCreateRequest(
task_id=1,
job_id=1,
) # ConsensusMergeCreateRequest | (optional)
try:
(data, response) = api_client.consensus_api.create_merge(
consensus_merge_create_request=consensus_merge_create_request,
)
pprint(data)
except exceptions.ApiException as e:
print("Exception when calling ConsensusApi.create_merge(): %s\n" % e)
Parameters
| Name | Type | Description | Notes |
|---|---|---|---|
| consensus_merge_create_request | ConsensusMergeCreateRequest | [optional] |
There are also optional kwargs that control the function invocation behavior. Read more here.
Returned values
Returned type: Tuple[RqId, urllib3.HTTPResponse].
Returns a tuple with 2 values: (parsed_response, raw_response).
The first value is a model parsed from the response data. The second value is the raw response, which can be useful to get response parameters, such as status code, headers, or raw response data. Read more about invocation parameters and returned values here.
Authentication
accessTokenAuth, basicAuth, csrfAuth, csrfHeaderAuth, sessionAuth, tokenAuth
HTTP request headers
- Content-Type: application/json
- Accept: application/vnd.cvat+json
HTTP response details
| Status code | Description | Response headers |
|---|---|---|
| 202 | A consensus merge request has been enqueued, the request id is returned. The request status can be checked by using common requests API: GET /api/requests/<rq_id> | - |
| 400 | Invalid or failed request, check the response data for details | - |
list_settings
list_settings( x_organization=None, filter=None, org=None, org_id=None, page=None, page_size=None, sort=None, task_id=None, **kwargs )
List consensus settings instances
Example
from pprint import pprint
from cvat_sdk.api_client import Configuration, ApiClient, exceptions
from cvat_sdk.api_client.models import *
# Set up an API client
# Read Configuration class docs for more info about parameters and authentication methods
configuration = Configuration(
host = "http://localhost",
username = 'YOUR_USERNAME',
password = 'YOUR_PASSWORD',
)
with ApiClient(configuration) as api_client:
x_organization = "X-Organization_example" # str | Organization unique slug (optional)
filter = "filter_example" # str | JSON Logic filter. This filter can be used to perform complex filtering by grouping rules. For example, using such a filter you can get all resources created by you: - {\"and\":[{\"==\":[{\"var\":\"owner\"},\"<user>\"]}]} Details about the syntax used can be found at the link: https://jsonlogic.com/ Available filter_fields: ['id', 'task_id']. (optional)
org = "org_example" # str | Organization unique slug (optional)
org_id = 1 # int | Organization identifier (optional)
page = 1 # int | A page number within the paginated result set. (optional)
page_size = 1 # int | Number of results to return per page. (optional)
sort = "sort_example" # str | Which field to use when ordering the results. Available ordering_fields: ['id'] (optional)
task_id = 1 # int | A simple equality filter for the task_id field (optional)
try:
(data, response) = api_client.consensus_api.list_settings(
x_organization=x_organization,
filter=filter,
org=org,
org_id=org_id,
page=page,
page_size=page_size,
sort=sort,
task_id=task_id,
)
pprint(data)
except exceptions.ApiException as e:
print("Exception when calling ConsensusApi.list_settings(): %s\n" % e)
Parameters
| Name | Type | Description | Notes |
|---|---|---|---|
| x_organization | str | Organization unique slug | [optional] |
| filter | str | JSON Logic filter. This filter can be used to perform complex filtering by grouping rules. For example, using such a filter you can get all resources created by you: - {"and":[{"==":[{"var":"owner"}," |
[optional] |
| org | str | Organization unique slug | [optional] |
| org_id | int | Organization identifier | [optional] |
| page | int | A page number within the paginated result set. | [optional] |
| page_size | int | Number of results to return per page. | [optional] |
| sort | str | Which field to use when ordering the results. Available ordering_fields: [‘id’] | [optional] |
| task_id | int | A simple equality filter for the task_id field | [optional] |
There are also optional kwargs that control the function invocation behavior. Read more here.
Returned values
Returned type: Tuple[PaginatedConsensusSettingsList, urllib3.HTTPResponse].
Returns a tuple with 2 values: (parsed_response, raw_response).
The first value is a model parsed from the response data. The second value is the raw response, which can be useful to get response parameters, such as status code, headers, or raw response data. Read more about invocation parameters and returned values here.
Authentication
accessTokenAuth, basicAuth, csrfAuth, csrfHeaderAuth, sessionAuth, tokenAuth
HTTP request headers
- Content-Type: Not defined
- Accept: application/vnd.cvat+json
HTTP response details
| Status code | Description | Response headers |
|---|---|---|
| 200 | - |
partial_update_settings
partial_update_settings( id, patched_consensus_settings_request=None, **kwargs )
Update a consensus settings instance
Example
from pprint import pprint
from cvat_sdk.api_client import Configuration, ApiClient, exceptions
from cvat_sdk.api_client.models import *
# Set up an API client
# Read Configuration class docs for more info about parameters and authentication methods
configuration = Configuration(
host = "http://localhost",
username = 'YOUR_USERNAME',
password = 'YOUR_PASSWORD',
)
with ApiClient(configuration) as api_client:
id = 1 # int | An id of a consensus settings instance
patched_consensus_settings_request = PatchedConsensusSettingsRequest(
iou_threshold=0,
) # PatchedConsensusSettingsRequest | (optional)
try:
(data, response) = api_client.consensus_api.partial_update_settings(
id,
patched_consensus_settings_request=patched_consensus_settings_request,
)
pprint(data)
except exceptions.ApiException as e:
print("Exception when calling ConsensusApi.partial_update_settings(): %s\n" % e)
Parameters
| Name | Type | Description | Notes |
|---|---|---|---|
| id | int | An id of a consensus settings instance | |
| patched_consensus_settings_request | PatchedConsensusSettingsRequest | [optional] |
There are also optional kwargs that control the function invocation behavior. Read more here.
Returned values
Returned type: Tuple[ConsensusSettings, urllib3.HTTPResponse].
Returns a tuple with 2 values: (parsed_response, raw_response).
The first value is a model parsed from the response data. The second value is the raw response, which can be useful to get response parameters, such as status code, headers, or raw response data. Read more about invocation parameters and returned values here.
Authentication
accessTokenAuth, basicAuth, csrfAuth, csrfHeaderAuth, sessionAuth, tokenAuth
HTTP request headers
- Content-Type: application/json
- Accept: application/vnd.cvat+json
HTTP response details
| Status code | Description | Response headers |
|---|---|---|
| 200 | - |
retrieve_settings
retrieve_settings( id, **kwargs )
Get consensus settings instance details
Example
from pprint import pprint
from cvat_sdk.api_client import Configuration, ApiClient, exceptions
from cvat_sdk.api_client.models import *
# Set up an API client
# Read Configuration class docs for more info about parameters and authentication methods
configuration = Configuration(
host = "http://localhost",
username = 'YOUR_USERNAME',
password = 'YOUR_PASSWORD',
)
with ApiClient(configuration) as api_client:
id = 1 # int | An id of a consensus settings instance
try:
(data, response) = api_client.consensus_api.retrieve_settings(
id,)
pprint(data)
except exceptions.ApiException as e:
print("Exception when calling ConsensusApi.retrieve_settings(): %s\n" % e)
Parameters
| Name | Type | Description | Notes |
|---|---|---|---|
| id | int | An id of a consensus settings instance |
There are also optional kwargs that control the function invocation behavior. Read more here.
Returned values
Returned type: Tuple[ConsensusSettings, urllib3.HTTPResponse].
Returns a tuple with 2 values: (parsed_response, raw_response).
The first value is a model parsed from the response data. The second value is the raw response, which can be useful to get response parameters, such as status code, headers, or raw response data. Read more about invocation parameters and returned values here.
Authentication
accessTokenAuth, basicAuth, csrfAuth, csrfHeaderAuth, sessionAuth, tokenAuth
HTTP request headers
- Content-Type: Not defined
- Accept: application/vnd.cvat+json
HTTP response details
| Status code | Description | Response headers |
|---|---|---|
| 200 | - |
11.2.1.1.6 - EventsApi class reference
All URIs are relative to http://localhost
| Method | HTTP request | Description |
|---|---|---|
| create | POST /api/events | Log client events |
| create_export | POST /api/events/export | Initiate a process to export events |
| list | GET /api/events | Get an event log |
create
create( client_events_request, x_organization=None, org=None, org_id=None, **kwargs )
Log client events
Sends logs to the Clickhouse if it is connected
Example
from pprint import pprint
from cvat_sdk.api_client import Configuration, ApiClient, exceptions
from cvat_sdk.api_client.models import *
# Set up an API client
# Read Configuration class docs for more info about parameters and authentication methods
configuration = Configuration(
host = "http://localhost",
username = 'YOUR_USERNAME',
password = 'YOUR_PASSWORD',
)
with ApiClient(configuration) as api_client:
client_events_request = ClientEventsRequest(
events=[
EventRequest(
scope="scope_example",
obj_name="obj_name_example",
obj_id=1,
obj_val="obj_val_example",
source="source_example",
timestamp=dateutil_parser('1970-01-01T00:00:00.00Z'),
count=1,
duration=0,
project_id=1,
task_id=1,
job_id=1,
user_id=1,
user_name="user_name_example",
user_email="user_email_example",
org_id=1,
org_slug="org_slug_example",
payload="payload_example",
),
],
previous_event=ClientEventsRequestPreviousEvent(None),
timestamp=dateutil_parser('1970-01-01T00:00:00.00Z'),
) # ClientEventsRequest |
x_organization = "X-Organization_example" # str | Organization unique slug (optional)
org = "org_example" # str | Organization unique slug (optional)
org_id = 1 # int | Organization identifier (optional)
try:
(data, response) = api_client.events_api.create(
client_events_request,
x_organization=x_organization,
org=org,
org_id=org_id,
)
pprint(data)
except exceptions.ApiException as e:
print("Exception when calling EventsApi.create(): %s\n" % e)
Parameters
| Name | Type | Description | Notes |
|---|---|---|---|
| client_events_request | ClientEventsRequest | ||
| x_organization | str | Organization unique slug | [optional] |
| org | str | Organization unique slug | [optional] |
| org_id | int | Organization identifier | [optional] |
There are also optional kwargs that control the function invocation behavior. Read more here.
Returned values
Returned type: Tuple[ClientEvents, urllib3.HTTPResponse].
Returns a tuple with 2 values: (parsed_response, raw_response).
The first value is a model parsed from the response data. The second value is the raw response, which can be useful to get response parameters, such as status code, headers, or raw response data. Read more about invocation parameters and returned values here.
Authentication
accessTokenAuth, basicAuth, csrfAuth, csrfHeaderAuth, sessionAuth, tokenAuth
HTTP request headers
- Content-Type: application/json
- Accept: application/vnd.cvat+json
HTTP response details
| Status code | Description | Response headers |
|---|---|---|
| 201 | - |
create_export
create_export( cloud_storage_id=None, filename=None, _from=None, job_id=None, location=None, org_id=None, project_id=None, task_id=None, to=None, user_id=None, **kwargs )
Initiate a process to export events
Example
from pprint import pprint
from cvat_sdk.api_client import Configuration, ApiClient, exceptions
from cvat_sdk.api_client.models import *
# Set up an API client
# Read Configuration class docs for more info about parameters and authentication methods
configuration = Configuration(
host = "http://localhost",
username = 'YOUR_USERNAME',
password = 'YOUR_PASSWORD',
)
with ApiClient(configuration) as api_client:
cloud_storage_id = 1 # int | Storage id (optional)
filename = "filename_example" # str | Desired output file name (optional)
_from = dateutil_parser('1970-01-01T00:00:00.00Z') # datetime | UTC start date for events filtration. Default is the minimal time. (optional)
job_id = 1 # int | Filter events by job ID (optional)
location = "cloud_storage" # str | Where need to save events file (optional)
org_id = 1 # int | Filter events by organization ID (optional)
project_id = 1 # int | Filter events by project ID (optional)
task_id = 1 # int | Filter events by task ID (optional)
to = dateutil_parser('1970-01-01T00:00:00.00Z') # datetime | UTC end date for events filtration. Default is the current time. (optional)
user_id = 1 # int | Filter events by user ID (optional)
try:
(data, response) = api_client.events_api.create_export(
cloud_storage_id=cloud_storage_id,
filename=filename,
_from=_from,
job_id=job_id,
location=location,
org_id=org_id,
project_id=project_id,
task_id=task_id,
to=to,
user_id=user_id,
)
pprint(data)
except exceptions.ApiException as e:
print("Exception when calling EventsApi.create_export(): %s\n" % e)
Parameters
| Name | Type | Description | Notes |
|---|---|---|---|
| cloud_storage_id | int | Storage id | [optional] |
| filename | str | Desired output file name | [optional] |
| _from | datetime | UTC start date for events filtration. Default is the minimal time. | [optional] |
| job_id | int | Filter events by job ID | [optional] |
| location | str | Where need to save events file | [optional] |
| org_id | int | Filter events by organization ID | [optional] |
| project_id | int | Filter events by project ID | [optional] |
| task_id | int | Filter events by task ID | [optional] |
| to | datetime | UTC end date for events filtration. Default is the current time. | [optional] |
| user_id | int | Filter events by user ID | [optional] |
There are also optional kwargs that control the function invocation behavior. Read more here.
Returned values
Returned type: Tuple[RqId, urllib3.HTTPResponse].
Returns a tuple with 2 values: (parsed_response, raw_response).
The first value is a model parsed from the response data. The second value is the raw response, which can be useful to get response parameters, such as status code, headers, or raw response data. Read more about invocation parameters and returned values here.
Authentication
accessTokenAuth, basicAuth, csrfAuth, csrfHeaderAuth, sessionAuth, tokenAuth
HTTP request headers
- Content-Type: Not defined
- Accept: application/vnd.cvat+json
HTTP response details
| Status code | Description | Response headers |
|---|---|---|
| 202 | - |
list
list( action=None, filename=None, _from=None, job_id=None, org_id=None, project_id=None, query_id=None, task_id=None, to=None, user_id=None, **kwargs )
Get an event log
The log is returned in the CSV format.
Example
from pprint import pprint
from cvat_sdk.api_client import Configuration, ApiClient, exceptions
from cvat_sdk.api_client.models import *
# Set up an API client
# Read Configuration class docs for more info about parameters and authentication methods
configuration = Configuration(
host = "http://localhost",
username = 'YOUR_USERNAME',
password = 'YOUR_PASSWORD',
)
with ApiClient(configuration) as api_client:
action = "download" # str | Used to start downloading process after annotation file had been created (optional) if omitted the server will use the default value of "download"
filename = "filename_example" # str | Desired output file name (optional)
_from = dateutil_parser('1970-01-01T00:00:00.00Z') # datetime | UTC start date for events filtration. Default is the minimal time. (optional)
job_id = 1 # int | Filter events by job ID (optional)
org_id = 1 # int | Filter events by organization ID (optional)
project_id = 1 # int | Filter events by project ID (optional)
query_id = "query_id_example" # str | ID of query request that need to check or download (optional)
task_id = 1 # int | Filter events by task ID (optional)
to = dateutil_parser('1970-01-01T00:00:00.00Z') # datetime | UTC end date for events filtration. Default is the current time. (optional)
user_id = 1 # int | Filter events by user ID (optional)
try:
api_client.events_api.list(
action=action,
filename=filename,
_from=_from,
job_id=job_id,
org_id=org_id,
project_id=project_id,
query_id=query_id,
task_id=task_id,
to=to,
user_id=user_id,
)
except exceptions.ApiException as e:
print("Exception when calling EventsApi.list(): %s\n" % e)
Parameters
| Name | Type | Description | Notes |
|---|---|---|---|
| action | str | Used to start downloading process after annotation file had been created | [optional] if omitted the server will use the default value of “download” |
| filename | str | Desired output file name | [optional] |
| _from | datetime | UTC start date for events filtration. Default is the minimal time. | [optional] |
| job_id | int | Filter events by job ID | [optional] |
| org_id | int | Filter events by organization ID | [optional] |
| project_id | int | Filter events by project ID | [optional] |
| query_id | str | ID of query request that need to check or download | [optional] |
| task_id | int | Filter events by task ID | [optional] |
| to | datetime | UTC end date for events filtration. Default is the current time. | [optional] |
| user_id | int | Filter events by user ID | [optional] |
There are also optional kwargs that control the function invocation behavior. Read more here.
Returned values
Returned type: Tuple[None, urllib3.HTTPResponse].
Returns a tuple with 2 values: (None, raw_response).
This endpoint does not have any return value, so None is always returned as the first value.
The second value is the raw response, which can be useful to get response parameters, such as
status code, headers, or raw response data. Read more about invocation parameters
and returned values here.
Authentication
accessTokenAuth, basicAuth, csrfAuth, csrfHeaderAuth, sessionAuth, tokenAuth
HTTP request headers
- Content-Type: Not defined
- Accept: Not defined
HTTP response details
| Status code | Description | Response headers |
|---|---|---|
| 200 | Download of file started | - |
| 201 | CSV log file is ready for downloading | - |
| 202 | Creating a CSV log file has been started | - |
11.2.1.1.7 - GuidesApi class reference
All URIs are relative to http://localhost
| Method | HTTP request | Description |
|---|---|---|
| create | POST /api/guides | Create an annotation guide |
| destroy | DELETE /api/guides/{id} | Delete an annotation guide |
| partial_update | PATCH /api/guides/{id} | Update an annotation guide |
| retrieve | GET /api/guides/{id} | Get annotation guide details |
create
create( annotation_guide_write_request=None, **kwargs )
Create an annotation guide
The new guide will be bound either to a project or a task, depending on parameters.
Example
from pprint import pprint
from cvat_sdk.api_client import Configuration, ApiClient, exceptions
from cvat_sdk.api_client.models import *
# Set up an API client
# Read Configuration class docs for more info about parameters and authentication methods
configuration = Configuration(
host = "http://localhost",
username = 'YOUR_USERNAME',
password = 'YOUR_PASSWORD',
)
with ApiClient(configuration) as api_client:
annotation_guide_write_request = AnnotationGuideWriteRequest(
task_id=1,
project_id=1,
markdown="markdown_example",
) # AnnotationGuideWriteRequest | (optional)
try:
(data, response) = api_client.guides_api.create(
annotation_guide_write_request=annotation_guide_write_request,
)
pprint(data)
except exceptions.ApiException as e:
print("Exception when calling GuidesApi.create(): %s\n" % e)
Parameters
| Name | Type | Description | Notes |
|---|---|---|---|
| annotation_guide_write_request | AnnotationGuideWriteRequest | [optional] |
There are also optional kwargs that control the function invocation behavior. Read more here.
Returned values
Returned type: Tuple[AnnotationGuideRead, urllib3.HTTPResponse].
Returns a tuple with 2 values: (parsed_response, raw_response).
The first value is a model parsed from the response data. The second value is the raw response, which can be useful to get response parameters, such as status code, headers, or raw response data. Read more about invocation parameters and returned values here.
Authentication
accessTokenAuth, basicAuth, csrfAuth, csrfHeaderAuth, sessionAuth, tokenAuth
HTTP request headers
- Content-Type: application/json
- Accept: application/vnd.cvat+json
HTTP response details
| Status code | Description | Response headers |
|---|---|---|
| 201 | - |
destroy
destroy( id, **kwargs )
Delete an annotation guide
This also deletes all assets attached to the guide.
Example
from pprint import pprint
from cvat_sdk.api_client import Configuration, ApiClient, exceptions
from cvat_sdk.api_client.models import *
# Set up an API client
# Read Configuration class docs for more info about parameters and authentication methods
configuration = Configuration(
host = "http://localhost",
username = 'YOUR_USERNAME',
password = 'YOUR_PASSWORD',
)
with ApiClient(configuration) as api_client:
id = 1 # int | A unique integer value identifying this annotation guide.
try:
api_client.guides_api.destroy(
id,)
except exceptions.ApiException as e:
print("Exception when calling GuidesApi.destroy(): %s\n" % e)
Parameters
| Name | Type | Description | Notes |
|---|---|---|---|
| id | int | A unique integer value identifying this annotation guide. |
There are also optional kwargs that control the function invocation behavior. Read more here.
Returned values
Returned type: Tuple[None, urllib3.HTTPResponse].
Returns a tuple with 2 values: (None, raw_response).
This endpoint does not have any return value, so None is always returned as the first value.
The second value is the raw response, which can be useful to get response parameters, such as
status code, headers, or raw response data. Read more about invocation parameters
and returned values here.
Authentication
accessTokenAuth, basicAuth, csrfAuth, csrfHeaderAuth, sessionAuth, tokenAuth
HTTP request headers
- Content-Type: Not defined
- Accept: Not defined
HTTP response details
| Status code | Description | Response headers |
|---|---|---|
| 204 | The annotation guide has been deleted | - |
partial_update
partial_update( id, patched_annotation_guide_write_request=None, **kwargs )
Update an annotation guide
Example
from pprint import pprint
from cvat_sdk.api_client import Configuration, ApiClient, exceptions
from cvat_sdk.api_client.models import *
# Set up an API client
# Read Configuration class docs for more info about parameters and authentication methods
configuration = Configuration(
host = "http://localhost",
username = 'YOUR_USERNAME',
password = 'YOUR_PASSWORD',
)
with ApiClient(configuration) as api_client:
id = 1 # int | A unique integer value identifying this annotation guide.
patched_annotation_guide_write_request = PatchedAnnotationGuideWriteRequest(
task_id=1,
project_id=1,
markdown="markdown_example",
) # PatchedAnnotationGuideWriteRequest | (optional)
try:
(data, response) = api_client.guides_api.partial_update(
id,
patched_annotation_guide_write_request=patched_annotation_guide_write_request,
)
pprint(data)
except exceptions.ApiException as e:
print("Exception when calling GuidesApi.partial_update(): %s\n" % e)
Parameters
| Name | Type | Description | Notes |
|---|---|---|---|
| id | int | A unique integer value identifying this annotation guide. | |
| patched_annotation_guide_write_request | PatchedAnnotationGuideWriteRequest | [optional] |
There are also optional kwargs that control the function invocation behavior. Read more here.
Returned values
Returned type: Tuple[AnnotationGuideRead, urllib3.HTTPResponse].
Returns a tuple with 2 values: (parsed_response, raw_response).
The first value is a model parsed from the response data. The second value is the raw response, which can be useful to get response parameters, such as status code, headers, or raw response data. Read more about invocation parameters and returned values here.
Authentication
accessTokenAuth, basicAuth, csrfAuth, csrfHeaderAuth, sessionAuth, tokenAuth
HTTP request headers
- Content-Type: application/json
- Accept: application/vnd.cvat+json
HTTP response details
| Status code | Description | Response headers |
|---|---|---|
| 200 | - |
retrieve
retrieve( id, **kwargs )
Get annotation guide details
Example
from pprint import pprint
from cvat_sdk.api_client import Configuration, ApiClient, exceptions
from cvat_sdk.api_client.models import *
# Set up an API client
# Read Configuration class docs for more info about parameters and authentication methods
configuration = Configuration(
host = "http://localhost",
username = 'YOUR_USERNAME',
password = 'YOUR_PASSWORD',
)
with ApiClient(configuration) as api_client:
id = 1 # int | A unique integer value identifying this annotation guide.
try:
(data, response) = api_client.guides_api.retrieve(
id,)
pprint(data)
except exceptions.ApiException as e:
print("Exception when calling GuidesApi.retrieve(): %s\n" % e)
Parameters
| Name | Type | Description | Notes |
|---|---|---|---|
| id | int | A unique integer value identifying this annotation guide. |
There are also optional kwargs that control the function invocation behavior. Read more here.
Returned values
Returned type: Tuple[AnnotationGuideRead, urllib3.HTTPResponse].
Returns a tuple with 2 values: (parsed_response, raw_response).
The first value is a model parsed from the response data. The second value is the raw response, which can be useful to get response parameters, such as status code, headers, or raw response data. Read more about invocation parameters and returned values here.
Authentication
accessTokenAuth, basicAuth, csrfAuth, csrfHeaderAuth, sessionAuth, tokenAuth
HTTP request headers
- Content-Type: Not defined
- Accept: application/vnd.cvat+json
HTTP response details
| Status code | Description | Response headers |
|---|---|---|
| 200 | - |
11.2.1.1.8 - InvitationsApi class reference
All URIs are relative to http://localhost
| Method | HTTP request | Description |
|---|---|---|
| accept | POST /api/invitations/{key}/accept | Accept an invitation |
| create | POST /api/invitations | Create an invitation |
| decline | POST /api/invitations/{key}/decline | Decline an invitation |
| destroy | DELETE /api/invitations/{key} | Delete an invitation |
| list | GET /api/invitations | List invitations |
| partial_update | PATCH /api/invitations/{key} | Update an invitation |
| resend | POST /api/invitations/{key}/resend | Resend an invitation |
| retrieve | GET /api/invitations/{key} | Get invitation details |
accept
accept( key, **kwargs )
Accept an invitation
Example
from pprint import pprint
from cvat_sdk.api_client import Configuration, ApiClient, exceptions
from cvat_sdk.api_client.models import *
# Set up an API client
# Read Configuration class docs for more info about parameters and authentication methods
configuration = Configuration(
host = "http://localhost",
username = 'YOUR_USERNAME',
password = 'YOUR_PASSWORD',
)
with ApiClient(configuration) as api_client:
key = "key_example" # str | A unique value identifying this invitation.
try:
(data, response) = api_client.invitations_api.accept(
key,)
pprint(data)
except exceptions.ApiException as e:
print("Exception when calling InvitationsApi.accept(): %s\n" % e)
Parameters
| Name | Type | Description | Notes |
|---|---|---|---|
| key | str | A unique value identifying this invitation. |
There are also optional kwargs that control the function invocation behavior. Read more here.
Returned values
Returned type: Tuple[AcceptInvitationRead, urllib3.HTTPResponse].
Returns a tuple with 2 values: (parsed_response, raw_response).
The first value is a model parsed from the response data. The second value is the raw response, which can be useful to get response parameters, such as status code, headers, or raw response data. Read more about invocation parameters and returned values here.
Authentication
accessTokenAuth, basicAuth, csrfAuth, csrfHeaderAuth, sessionAuth, tokenAuth
HTTP request headers
- Content-Type: Not defined
- Accept: application/vnd.cvat+json
HTTP response details
| Status code | Description | Response headers |
|---|---|---|
| 200 | The invitation is accepted | - |
| 400 | The invitation is expired or already accepted | - |
create
create( invitation_write_request, x_organization=None, org=None, org_id=None, **kwargs )
Create an invitation
Example
from pprint import pprint
from cvat_sdk.api_client import Configuration, ApiClient, exceptions
from cvat_sdk.api_client.models import *
# Set up an API client
# Read Configuration class docs for more info about parameters and authentication methods
configuration = Configuration(
host = "http://localhost",
username = 'YOUR_USERNAME',
password = 'YOUR_PASSWORD',
)
with ApiClient(configuration) as api_client:
invitation_write_request = InvitationWriteRequest(
role=RoleEnum("worker"),
email="email_example",
) # InvitationWriteRequest |
x_organization = "X-Organization_example" # str | Organization unique slug (optional)
org = "org_example" # str | Organization unique slug (optional)
org_id = 1 # int | Organization identifier (optional)
try:
(data, response) = api_client.invitations_api.create(
invitation_write_request,
x_organization=x_organization,
org=org,
org_id=org_id,
)
pprint(data)
except exceptions.ApiException as e:
print("Exception when calling InvitationsApi.create(): %s\n" % e)
Parameters
| Name | Type | Description | Notes |
|---|---|---|---|
| invitation_write_request | InvitationWriteRequest | ||
| x_organization | str | Organization unique slug | [optional] |
| org | str | Organization unique slug | [optional] |
| org_id | int | Organization identifier | [optional] |
There are also optional kwargs that control the function invocation behavior. Read more here.
Returned values
Returned type: Tuple[InvitationRead, urllib3.HTTPResponse].
Returns a tuple with 2 values: (parsed_response, raw_response).
The first value is a model parsed from the response data. The second value is the raw response, which can be useful to get response parameters, such as status code, headers, or raw response data. Read more about invocation parameters and returned values here.
Authentication
accessTokenAuth, basicAuth, csrfAuth, csrfHeaderAuth, sessionAuth, tokenAuth
HTTP request headers
- Content-Type: application/json
- Accept: application/vnd.cvat+json
HTTP response details
| Status code | Description | Response headers |
|---|---|---|
| 201 | - |
decline
decline( key, **kwargs )
Decline an invitation
Example
from pprint import pprint
from cvat_sdk.api_client import Configuration, ApiClient, exceptions
from cvat_sdk.api_client.models import *
# Set up an API client
# Read Configuration class docs for more info about parameters and authentication methods
configuration = Configuration(
host = "http://localhost",
username = 'YOUR_USERNAME',
password = 'YOUR_PASSWORD',
)
with ApiClient(configuration) as api_client:
key = "key_example" # str | A unique value identifying this invitation.
try:
api_client.invitations_api.decline(
key,)
except exceptions.ApiException as e:
print("Exception when calling InvitationsApi.decline(): %s\n" % e)
Parameters
| Name | Type | Description | Notes |
|---|---|---|---|
| key | str | A unique value identifying this invitation. |
There are also optional kwargs that control the function invocation behavior. Read more here.
Returned values
Returned type: Tuple[None, urllib3.HTTPResponse].
Returns a tuple with 2 values: (None, raw_response).
This endpoint does not have any return value, so None is always returned as the first value.
The second value is the raw response, which can be useful to get response parameters, such as
status code, headers, or raw response data. Read more about invocation parameters
and returned values here.
Authentication
accessTokenAuth, basicAuth, csrfAuth, csrfHeaderAuth, sessionAuth, tokenAuth
HTTP request headers
- Content-Type: Not defined
- Accept: Not defined
HTTP response details
| Status code | Description | Response headers |
|---|---|---|
| 204 | The invitation has been declined | - |
destroy
destroy( key, **kwargs )
Delete an invitation
Example
from pprint import pprint
from cvat_sdk.api_client import Configuration, ApiClient, exceptions
from cvat_sdk.api_client.models import *
# Set up an API client
# Read Configuration class docs for more info about parameters and authentication methods
configuration = Configuration(
host = "http://localhost",
username = 'YOUR_USERNAME',
password = 'YOUR_PASSWORD',
)
with ApiClient(configuration) as api_client:
key = "key_example" # str | A unique value identifying this invitation.
try:
api_client.invitations_api.destroy(
key,)
except exceptions.ApiException as e:
print("Exception when calling InvitationsApi.destroy(): %s\n" % e)
Parameters
| Name | Type | Description | Notes |
|---|---|---|---|
| key | str | A unique value identifying this invitation. |
There are also optional kwargs that control the function invocation behavior. Read more here.
Returned values
Returned type: Tuple[None, urllib3.HTTPResponse].
Returns a tuple with 2 values: (None, raw_response).
This endpoint does not have any return value, so None is always returned as the first value.
The second value is the raw response, which can be useful to get response parameters, such as
status code, headers, or raw response data. Read more about invocation parameters
and returned values here.
Authentication
accessTokenAuth, basicAuth, csrfAuth, csrfHeaderAuth, sessionAuth, tokenAuth
HTTP request headers
- Content-Type: Not defined
- Accept: Not defined
HTTP response details
| Status code | Description | Response headers |
|---|---|---|
| 204 | The invitation has been deleted | - |
list
list( x_organization=None, filter=None, org=None, org_id=None, owner=None, page=None, page_size=None, search=None, sort=None, **kwargs )
List invitations
Example
from pprint import pprint
from cvat_sdk.api_client import Configuration, ApiClient, exceptions
from cvat_sdk.api_client.models import *
# Set up an API client
# Read Configuration class docs for more info about parameters and authentication methods
configuration = Configuration(
host = "http://localhost",
username = 'YOUR_USERNAME',
password = 'YOUR_PASSWORD',
)
with ApiClient(configuration) as api_client:
x_organization = "X-Organization_example" # str | Organization unique slug (optional)
filter = "filter_example" # str | JSON Logic filter. This filter can be used to perform complex filtering by grouping rules. For example, using such a filter you can get all resources created by you: - {\"and\":[{\"==\":[{\"var\":\"owner\"},\"<user>\"]}]} Details about the syntax used can be found at the link: https://jsonlogic.com/ Available filter_fields: ['owner', 'user_id', 'accepted']. (optional)
org = "org_example" # str | Organization unique slug (optional)
org_id = 1 # int | Organization identifier (optional)
owner = "owner_example" # str | A simple equality filter for the owner field (optional)
page = 1 # int | A page number within the paginated result set. (optional)
page_size = 1 # int | Number of results to return per page. (optional)
search = "search_example" # str | A search term. Available search_fields: ('owner',) (optional)
sort = "sort_example" # str | Which field to use when ordering the results. Available ordering_fields: ['owner', 'created_date'] (optional)
try:
(data, response) = api_client.invitations_api.list(
x_organization=x_organization,
filter=filter,
org=org,
org_id=org_id,
owner=owner,
page=page,
page_size=page_size,
search=search,
sort=sort,
)
pprint(data)
except exceptions.ApiException as e:
print("Exception when calling InvitationsApi.list(): %s\n" % e)
Parameters
| Name | Type | Description | Notes |
|---|---|---|---|
| x_organization | str | Organization unique slug | [optional] |
| filter | str | JSON Logic filter. This filter can be used to perform complex filtering by grouping rules. For example, using such a filter you can get all resources created by you: - {"and":[{"==":[{"var":"owner"}," |
[optional] |
| org | str | Organization unique slug | [optional] |
| org_id | int | Organization identifier | [optional] |
| owner | str | A simple equality filter for the owner field | [optional] |
| page | int | A page number within the paginated result set. | [optional] |
| page_size | int | Number of results to return per page. | [optional] |
| search | str | A search term. Available search_fields: (‘owner’,) | [optional] |
| sort | str | Which field to use when ordering the results. Available ordering_fields: [‘owner’, ‘created_date’] | [optional] |
There are also optional kwargs that control the function invocation behavior. Read more here.
Returned values
Returned type: Tuple[PaginatedInvitationReadList, urllib3.HTTPResponse].
Returns a tuple with 2 values: (parsed_response, raw_response).
The first value is a model parsed from the response data. The second value is the raw response, which can be useful to get response parameters, such as status code, headers, or raw response data. Read more about invocation parameters and returned values here.
Authentication
accessTokenAuth, basicAuth, csrfAuth, csrfHeaderAuth, sessionAuth, tokenAuth
HTTP request headers
- Content-Type: Not defined
- Accept: application/vnd.cvat+json
HTTP response details
| Status code | Description | Response headers |
|---|---|---|
| 200 | - |
partial_update
partial_update( key, patched_invitation_write_request=None, **kwargs )
Update an invitation
Example
from pprint import pprint
from cvat_sdk.api_client import Configuration, ApiClient, exceptions
from cvat_sdk.api_client.models import *
# Set up an API client
# Read Configuration class docs for more info about parameters and authentication methods
configuration = Configuration(
host = "http://localhost",
username = 'YOUR_USERNAME',
password = 'YOUR_PASSWORD',
)
with ApiClient(configuration) as api_client:
key = "key_example" # str | A unique value identifying this invitation.
patched_invitation_write_request = PatchedInvitationWriteRequest(
role=RoleEnum("worker"),
email="email_example",
) # PatchedInvitationWriteRequest | (optional)
try:
(data, response) = api_client.invitations_api.partial_update(
key,
patched_invitation_write_request=patched_invitation_write_request,
)
pprint(data)
except exceptions.ApiException as e:
print("Exception when calling InvitationsApi.partial_update(): %s\n" % e)
Parameters
| Name | Type | Description | Notes |
|---|---|---|---|
| key | str | A unique value identifying this invitation. | |
| patched_invitation_write_request | PatchedInvitationWriteRequest | [optional] |
There are also optional kwargs that control the function invocation behavior. Read more here.
Returned values
Returned type: Tuple[InvitationRead, urllib3.HTTPResponse].
Returns a tuple with 2 values: (parsed_response, raw_response).
The first value is a model parsed from the response data. The second value is the raw response, which can be useful to get response parameters, such as status code, headers, or raw response data. Read more about invocation parameters and returned values here.
Authentication
accessTokenAuth, basicAuth, csrfAuth, csrfHeaderAuth, sessionAuth, tokenAuth
HTTP request headers
- Content-Type: application/json
- Accept: application/vnd.cvat+json
HTTP response details
| Status code | Description | Response headers |
|---|---|---|
| 200 | - |
resend
resend( key, **kwargs )
Resend an invitation
Example
from pprint import pprint
from cvat_sdk.api_client import Configuration, ApiClient, exceptions
from cvat_sdk.api_client.models import *
# Set up an API client
# Read Configuration class docs for more info about parameters and authentication methods
configuration = Configuration(
host = "http://localhost",
username = 'YOUR_USERNAME',
password = 'YOUR_PASSWORD',
)
with ApiClient(configuration) as api_client:
key = "key_example" # str | A unique value identifying this invitation.
try:
api_client.invitations_api.resend(
key,)
except exceptions.ApiException as e:
print("Exception when calling InvitationsApi.resend(): %s\n" % e)
Parameters
| Name | Type | Description | Notes |
|---|---|---|---|
| key | str | A unique value identifying this invitation. |
There are also optional kwargs that control the function invocation behavior. Read more here.
Returned values
Returned type: Tuple[None, urllib3.HTTPResponse].
Returns a tuple with 2 values: (None, raw_response).
This endpoint does not have any return value, so None is always returned as the first value.
The second value is the raw response, which can be useful to get response parameters, such as
status code, headers, or raw response data. Read more about invocation parameters
and returned values here.
Authentication
accessTokenAuth, basicAuth, csrfAuth, csrfHeaderAuth, sessionAuth, tokenAuth
HTTP request headers
- Content-Type: Not defined
- Accept: Not defined
HTTP response details
| Status code | Description | Response headers |
|---|---|---|
| 204 | Invitation has been sent | - |
| 400 | The invitation is already accepted | - |
retrieve
retrieve( key, **kwargs )
Get invitation details
Example
from pprint import pprint
from cvat_sdk.api_client import Configuration, ApiClient, exceptions
from cvat_sdk.api_client.models import *
# Set up an API client
# Read Configuration class docs for more info about parameters and authentication methods
configuration = Configuration(
host = "http://localhost",
username = 'YOUR_USERNAME',
password = 'YOUR_PASSWORD',
)
with ApiClient(configuration) as api_client:
key = "key_example" # str | A unique value identifying this invitation.
try:
(data, response) = api_client.invitations_api.retrieve(
key,)
pprint(data)
except exceptions.ApiException as e:
print("Exception when calling InvitationsApi.retrieve(): %s\n" % e)
Parameters
| Name | Type | Description | Notes |
|---|---|---|---|
| key | str | A unique value identifying this invitation. |
There are also optional kwargs that control the function invocation behavior. Read more here.
Returned values
Returned type: Tuple[InvitationRead, urllib3.HTTPResponse].
Returns a tuple with 2 values: (parsed_response, raw_response).
The first value is a model parsed from the response data. The second value is the raw response, which can be useful to get response parameters, such as status code, headers, or raw response data. Read more about invocation parameters and returned values here.
Authentication
accessTokenAuth, basicAuth, csrfAuth, csrfHeaderAuth, sessionAuth, tokenAuth
HTTP request headers
- Content-Type: Not defined
- Accept: application/vnd.cvat+json
HTTP response details
| Status code | Description | Response headers |
|---|---|---|
| 200 | - |
11.2.1.1.9 - IssuesApi class reference
All URIs are relative to http://localhost
| Method | HTTP request | Description |
|---|---|---|
| create | POST /api/issues | Create an issue |
| destroy | DELETE /api/issues/{id} | Delete an issue |
| list | GET /api/issues | List issues |
| partial_update | PATCH /api/issues/{id} | Update an issue |
| retrieve | GET /api/issues/{id} | Get issue details |
create
create( issue_write_request, x_organization=None, org=None, org_id=None, **kwargs )
Create an issue
Example
from pprint import pprint
from cvat_sdk.api_client import Configuration, ApiClient, exceptions
from cvat_sdk.api_client.models import *
# Set up an API client
# Read Configuration class docs for more info about parameters and authentication methods
configuration = Configuration(
host = "http://localhost",
username = 'YOUR_USERNAME',
password = 'YOUR_PASSWORD',
)
with ApiClient(configuration) as api_client:
issue_write_request = IssueWriteRequest(
frame=0,
position=[
3.14,
],
job=1,
assignee=1,
message="message_example",
resolved=True,
) # IssueWriteRequest |
x_organization = "X-Organization_example" # str | Organization unique slug (optional)
org = "org_example" # str | Organization unique slug (optional)
org_id = 1 # int | Organization identifier (optional)
try:
(data, response) = api_client.issues_api.create(
issue_write_request,
x_organization=x_organization,
org=org,
org_id=org_id,
)
pprint(data)
except exceptions.ApiException as e:
print("Exception when calling IssuesApi.create(): %s\n" % e)
Parameters
| Name | Type | Description | Notes |
|---|---|---|---|
| issue_write_request | IssueWriteRequest | ||
| x_organization | str | Organization unique slug | [optional] |
| org | str | Organization unique slug | [optional] |
| org_id | int | Organization identifier | [optional] |
There are also optional kwargs that control the function invocation behavior. Read more here.
Returned values
Returned type: Tuple[IssueRead, urllib3.HTTPResponse].
Returns a tuple with 2 values: (parsed_response, raw_response).
The first value is a model parsed from the response data. The second value is the raw response, which can be useful to get response parameters, such as status code, headers, or raw response data. Read more about invocation parameters and returned values here.
Authentication
accessTokenAuth, basicAuth, csrfAuth, csrfHeaderAuth, sessionAuth, tokenAuth
HTTP request headers
- Content-Type: application/json
- Accept: application/vnd.cvat+json
HTTP response details
| Status code | Description | Response headers |
|---|---|---|
| 201 | - |
destroy
destroy( id, **kwargs )
Delete an issue
Example
from pprint import pprint
from cvat_sdk.api_client import Configuration, ApiClient, exceptions
from cvat_sdk.api_client.models import *
# Set up an API client
# Read Configuration class docs for more info about parameters and authentication methods
configuration = Configuration(
host = "http://localhost",
username = 'YOUR_USERNAME',
password = 'YOUR_PASSWORD',
)
with ApiClient(configuration) as api_client:
id = 1 # int | A unique integer value identifying this issue.
try:
api_client.issues_api.destroy(
id,)
except exceptions.ApiException as e:
print("Exception when calling IssuesApi.destroy(): %s\n" % e)
Parameters
| Name | Type | Description | Notes |
|---|---|---|---|
| id | int | A unique integer value identifying this issue. |
There are also optional kwargs that control the function invocation behavior. Read more here.
Returned values
Returned type: Tuple[None, urllib3.HTTPResponse].
Returns a tuple with 2 values: (None, raw_response).
This endpoint does not have any return value, so None is always returned as the first value.
The second value is the raw response, which can be useful to get response parameters, such as
status code, headers, or raw response data. Read more about invocation parameters
and returned values here.
Authentication
accessTokenAuth, basicAuth, csrfAuth, csrfHeaderAuth, sessionAuth, tokenAuth
HTTP request headers
- Content-Type: Not defined
- Accept: Not defined
HTTP response details
| Status code | Description | Response headers |
|---|---|---|
| 204 | The issue has been deleted | - |
list
list( x_organization=None, assignee=None, filter=None, frame_id=None, job_id=None, org=None, org_id=None, owner=None, page=None, page_size=None, resolved=None, search=None, sort=None, task_id=None, **kwargs )
List issues
Example
from pprint import pprint
from cvat_sdk.api_client import Configuration, ApiClient, exceptions
from cvat_sdk.api_client.models import *
# Set up an API client
# Read Configuration class docs for more info about parameters and authentication methods
configuration = Configuration(
host = "http://localhost",
username = 'YOUR_USERNAME',
password = 'YOUR_PASSWORD',
)
with ApiClient(configuration) as api_client:
x_organization = "X-Organization_example" # str | Organization unique slug (optional)
assignee = "assignee_example" # str | A simple equality filter for the assignee field (optional)
filter = "filter_example" # str | JSON Logic filter. This filter can be used to perform complex filtering by grouping rules. For example, using such a filter you can get all resources created by you: - {\"and\":[{\"==\":[{\"var\":\"owner\"},\"<user>\"]}]} Details about the syntax used can be found at the link: https://jsonlogic.com/ Available filter_fields: ['owner', 'assignee', 'id', 'job_id', 'task_id', 'resolved', 'frame_id']. (optional)
frame_id = 1 # int | A simple equality filter for the frame_id field (optional)
job_id = 1 # int | A simple equality filter for the job_id field (optional)
org = "org_example" # str | Organization unique slug (optional)
org_id = 1 # int | Organization identifier (optional)
owner = "owner_example" # str | A simple equality filter for the owner field (optional)
page = 1 # int | A page number within the paginated result set. (optional)
page_size = 1 # int | Number of results to return per page. (optional)
resolved = True # bool | A simple equality filter for the resolved field (optional)
search = "search_example" # str | A search term. Available search_fields: ('owner', 'assignee') (optional)
sort = "sort_example" # str | Which field to use when ordering the results. Available ordering_fields: ['owner', 'assignee', 'id', 'job_id', 'task_id', 'resolved', 'frame_id'] (optional)
task_id = 1 # int | A simple equality filter for the task_id field (optional)
try:
(data, response) = api_client.issues_api.list(
x_organization=x_organization,
assignee=assignee,
filter=filter,
frame_id=frame_id,
job_id=job_id,
org=org,
org_id=org_id,
owner=owner,
page=page,
page_size=page_size,
resolved=resolved,
search=search,
sort=sort,
task_id=task_id,
)
pprint(data)
except exceptions.ApiException as e:
print("Exception when calling IssuesApi.list(): %s\n" % e)
Parameters
| Name | Type | Description | Notes |
|---|---|---|---|
| x_organization | str | Organization unique slug | [optional] |
| assignee | str | A simple equality filter for the assignee field | [optional] |
| filter | str | JSON Logic filter. This filter can be used to perform complex filtering by grouping rules. For example, using such a filter you can get all resources created by you: - {"and":[{"==":[{"var":"owner"}," |
[optional] |
| frame_id | int | A simple equality filter for the frame_id field | [optional] |
| job_id | int | A simple equality filter for the job_id field | [optional] |
| org | str | Organization unique slug | [optional] |
| org_id | int | Organization identifier | [optional] |
| owner | str | A simple equality filter for the owner field | [optional] |
| page | int | A page number within the paginated result set. | [optional] |
| page_size | int | Number of results to return per page. | [optional] |
| resolved | bool | A simple equality filter for the resolved field | [optional] |
| search | str | A search term. Available search_fields: (‘owner’, ‘assignee’) | [optional] |
| sort | str | Which field to use when ordering the results. Available ordering_fields: [‘owner’, ‘assignee’, ‘id’, ‘job_id’, ’task_id’, ‘resolved’, ‘frame_id’] | [optional] |
| task_id | int | A simple equality filter for the task_id field | [optional] |
There are also optional kwargs that control the function invocation behavior. Read more here.
Returned values
Returned type: Tuple[PaginatedIssueReadList, urllib3.HTTPResponse].
Returns a tuple with 2 values: (parsed_response, raw_response).
The first value is a model parsed from the response data. The second value is the raw response, which can be useful to get response parameters, such as status code, headers, or raw response data. Read more about invocation parameters and returned values here.
Authentication
accessTokenAuth, basicAuth, csrfAuth, csrfHeaderAuth, sessionAuth, tokenAuth
HTTP request headers
- Content-Type: Not defined
- Accept: application/vnd.cvat+json
HTTP response details
| Status code | Description | Response headers |
|---|---|---|
| 200 | - |
partial_update
partial_update( id, patched_issue_write_request=None, **kwargs )
Update an issue
Example
from pprint import pprint
from cvat_sdk.api_client import Configuration, ApiClient, exceptions
from cvat_sdk.api_client.models import *
# Set up an API client
# Read Configuration class docs for more info about parameters and authentication methods
configuration = Configuration(
host = "http://localhost",
username = 'YOUR_USERNAME',
password = 'YOUR_PASSWORD',
)
with ApiClient(configuration) as api_client:
id = 1 # int | A unique integer value identifying this issue.
patched_issue_write_request = PatchedIssueWriteRequest(
position=[
3.14,
],
assignee=1,
resolved=True,
) # PatchedIssueWriteRequest | (optional)
try:
(data, response) = api_client.issues_api.partial_update(
id,
patched_issue_write_request=patched_issue_write_request,
)
pprint(data)
except exceptions.ApiException as e:
print("Exception when calling IssuesApi.partial_update(): %s\n" % e)
Parameters
| Name | Type | Description | Notes |
|---|---|---|---|
| id | int | A unique integer value identifying this issue. | |
| patched_issue_write_request | PatchedIssueWriteRequest | [optional] |
There are also optional kwargs that control the function invocation behavior. Read more here.
Returned values
Returned type: Tuple[IssueRead, urllib3.HTTPResponse].
Returns a tuple with 2 values: (parsed_response, raw_response).
The first value is a model parsed from the response data. The second value is the raw response, which can be useful to get response parameters, such as status code, headers, or raw response data. Read more about invocation parameters and returned values here.
Authentication
accessTokenAuth, basicAuth, csrfAuth, csrfHeaderAuth, sessionAuth, tokenAuth
HTTP request headers
- Content-Type: application/json
- Accept: application/vnd.cvat+json
HTTP response details
| Status code | Description | Response headers |
|---|---|---|
| 200 | - |
retrieve
retrieve( id, **kwargs )
Get issue details
Example
from pprint import pprint
from cvat_sdk.api_client import Configuration, ApiClient, exceptions
from cvat_sdk.api_client.models import *
# Set up an API client
# Read Configuration class docs for more info about parameters and authentication methods
configuration = Configuration(
host = "http://localhost",
username = 'YOUR_USERNAME',
password = 'YOUR_PASSWORD',
)
with ApiClient(configuration) as api_client:
id = 1 # int | A unique integer value identifying this issue.
try:
(data, response) = api_client.issues_api.retrieve(
id,)
pprint(data)
except exceptions.ApiException as e:
print("Exception when calling IssuesApi.retrieve(): %s\n" % e)
Parameters
| Name | Type | Description | Notes |
|---|---|---|---|
| id | int | A unique integer value identifying this issue. |
There are also optional kwargs that control the function invocation behavior. Read more here.
Returned values
Returned type: Tuple[IssueRead, urllib3.HTTPResponse].
Returns a tuple with 2 values: (parsed_response, raw_response).
The first value is a model parsed from the response data. The second value is the raw response, which can be useful to get response parameters, such as status code, headers, or raw response data. Read more about invocation parameters and returned values here.
Authentication
accessTokenAuth, basicAuth, csrfAuth, csrfHeaderAuth, sessionAuth, tokenAuth
HTTP request headers
- Content-Type: Not defined
- Accept: application/vnd.cvat+json
HTTP response details
| Status code | Description | Response headers |
|---|---|---|
| 200 | - |
11.2.1.1.10 - JobsApi class reference
All URIs are relative to http://localhost
| Method | HTTP request | Description |
|---|---|---|
| create | POST /api/jobs | Create a job |
| create_annotations | POST /api/jobs/{id}/annotations/ | Import annotations into a job |
| create_dataset_export | POST /api/jobs/{id}/dataset/export | Initialize process to export resource as a dataset in a specific format |
| destroy | DELETE /api/jobs/{id} | Delete a job |
| destroy_annotations | DELETE /api/jobs/{id}/annotations/ | Delete job annotations |
| list | GET /api/jobs | List jobs |
| partial_update | PATCH /api/jobs/{id} | Update a job |
| partial_update_annotations | PATCH /api/jobs/{id}/annotations/ | Update job annotations |
| partial_update_data_meta | PATCH /api/jobs/{id}/data/meta | Update metainformation for media files in a job |
| partial_update_validation_layout | PATCH /api/jobs/{id}/validation_layout | Allows updating current validation configuration |
| retrieve | GET /api/jobs/{id} | Get job details |
| retrieve_annotations | GET /api/jobs/{id}/annotations/ | Get job annotations |
| retrieve_data | GET /api/jobs/{id}/data | Get data of a job |
| retrieve_data_meta | GET /api/jobs/{id}/data/meta | Get metainformation for media files in a job |
| retrieve_preview | GET /api/jobs/{id}/preview | Get a preview image for a job |
| retrieve_validation_layout | GET /api/jobs/{id}/validation_layout | Allows getting current validation configuration |
| update_annotations | PUT /api/jobs/{id}/annotations/ | Replace job annotations |
create
create( job_write_request, **kwargs )
Create a job
Example
from pprint import pprint
from cvat_sdk.api_client import Configuration, ApiClient, exceptions
from cvat_sdk.api_client.models import *
# Set up an API client
# Read Configuration class docs for more info about parameters and authentication methods
configuration = Configuration(
host = "http://localhost",
username = 'YOUR_USERNAME',
password = 'YOUR_PASSWORD',
)
with ApiClient(configuration) as api_client:
job_write_request = JobWriteRequest(
assignee=1,
stage=JobStage("annotation"),
state=OperationStatus("new"),
type=JobType("annotation"),
task_id=1,
frame_selection_method=FrameSelectionMethod("random_uniform"),
frame_count=1,
frame_share=3.14,
frames_per_job_count=1,
frames_per_job_share=3.14,
random_seed=0,
frames=[
0,
],
) # JobWriteRequest |
try:
(data, response) = api_client.jobs_api.create(
job_write_request,)
pprint(data)
except exceptions.ApiException as e:
print("Exception when calling JobsApi.create(): %s\n" % e)
Parameters
| Name | Type | Description | Notes |
|---|---|---|---|
| job_write_request | JobWriteRequest |
There are also optional kwargs that control the function invocation behavior. Read more here.
Returned values
Returned type: Tuple[JobRead, urllib3.HTTPResponse].
Returns a tuple with 2 values: (parsed_response, raw_response).
The first value is a model parsed from the response data. The second value is the raw response, which can be useful to get response parameters, such as status code, headers, or raw response data. Read more about invocation parameters and returned values here.
Authentication
accessTokenAuth, basicAuth, csrfAuth, csrfHeaderAuth, sessionAuth, tokenAuth
HTTP request headers
- Content-Type: application/json
- Accept: application/vnd.cvat+json
HTTP response details
| Status code | Description | Response headers |
|---|---|---|
| 201 | - |
create_annotations
create_annotations( id, cloud_storage_id=None, filename=None, format=None, location=None, use_default_location=None, annotation_file_request=None, **kwargs )
Import annotations into a job
The request POST /api/jobs/id/annotations initiates a background process to import annotations into a job. Please, use the GET /api/requests/<rq_id> endpoint for checking status of the process. The rq_id parameter can be found in the response on initiating request.
Example
from pprint import pprint
from cvat_sdk.api_client import Configuration, ApiClient, exceptions
from cvat_sdk.api_client.models import *
# Set up an API client
# Read Configuration class docs for more info about parameters and authentication methods
configuration = Configuration(
host = "http://localhost",
username = 'YOUR_USERNAME',
password = 'YOUR_PASSWORD',
)
with ApiClient(configuration) as api_client:
id = 1 # int | A unique integer value identifying this job.
cloud_storage_id = 1 # int | Storage id (optional)
filename = "filename_example" # str | Annotation file name (optional)
format = "format_example" # str | Input format name You can get the list of supported formats at: /server/annotation/formats (optional)
location = "cloud_storage" # str | where to import the annotation from (optional)
use_default_location = True # bool | Use the location that was configured in the task to import annotation (optional) if omitted the server will use the default value of True
annotation_file_request = AnnotationFileRequest(
annotation_file=open('/path/to/file', 'rb'),
) # AnnotationFileRequest | (optional)
try:
api_client.jobs_api.create_annotations(
id,
cloud_storage_id=cloud_storage_id,
filename=filename,
format=format,
location=location,
use_default_location=use_default_location,
annotation_file_request=annotation_file_request,
)
except exceptions.ApiException as e:
print("Exception when calling JobsApi.create_annotations(): %s\n" % e)
Parameters
| Name | Type | Description | Notes |
|---|---|---|---|
| id | int | A unique integer value identifying this job. | |
| cloud_storage_id | int | Storage id | [optional] |
| filename | str | Annotation file name | [optional] |
| format | str | Input format name You can get the list of supported formats at: /server/annotation/formats | [optional] |
| location | str | where to import the annotation from | [optional] |
| use_default_location | bool | Use the location that was configured in the task to import annotation | [optional] if omitted the server will use the default value of True |
| annotation_file_request | AnnotationFileRequest | [optional] |
There are also optional kwargs that control the function invocation behavior. Read more here.
Returned values
Returned type: Tuple[None, urllib3.HTTPResponse].
Returns a tuple with 2 values: (None, raw_response).
This endpoint does not have any return value, so None is always returned as the first value.
The second value is the raw response, which can be useful to get response parameters, such as
status code, headers, or raw response data. Read more about invocation parameters
and returned values here.
Authentication
accessTokenAuth, basicAuth, csrfAuth, csrfHeaderAuth, sessionAuth, tokenAuth
HTTP request headers
- Content-Type: application/json, multipart/form-data
- Accept: application/vnd.cvat+json
HTTP response details
| Status code | Description | Response headers |
|---|---|---|
| 201 | Uploading has finished | - |
| 202 | Uploading has been started | - |
| 405 | Format is not available | - |
create_dataset_export
create_dataset_export( format, id, cloud_storage_id=None, filename=None, location=None, save_images=None, **kwargs )
Initialize process to export resource as a dataset in a specific format
The request POST /api/<projects|tasks|jobs>/id/dataset/export will initialize a background process to export a dataset. To check status of the process please, use GET /api/requests/<rq_id> where rq_id is request ID returned in the response for this endpoint.
Example
from pprint import pprint
from cvat_sdk.api_client import Configuration, ApiClient, exceptions
from cvat_sdk.api_client.models import *
# Set up an API client
# Read Configuration class docs for more info about parameters and authentication methods
configuration = Configuration(
host = "http://localhost",
username = 'YOUR_USERNAME',
password = 'YOUR_PASSWORD',
)
with ApiClient(configuration) as api_client:
format = "format_example" # str | Desired output format name You can get the list of supported formats at: /server/annotation/formats
id = 1 # int | A unique integer value identifying this job.
cloud_storage_id = 1 # int | Storage id (optional)
filename = "filename_example" # str | Desired output file name (optional)
location = "cloud_storage" # str | Where need to save downloaded dataset (optional)
save_images = False # bool | Include images or not (optional) if omitted the server will use the default value of False
try:
(data, response) = api_client.jobs_api.create_dataset_export(
format,
id,
cloud_storage_id=cloud_storage_id,
filename=filename,
location=location,
save_images=save_images,
)
pprint(data)
except exceptions.ApiException as e:
print("Exception when calling JobsApi.create_dataset_export(): %s\n" % e)
Parameters
| Name | Type | Description | Notes |
|---|---|---|---|
| format | str | Desired output format name You can get the list of supported formats at: /server/annotation/formats | |
| id | int | A unique integer value identifying this job. | |
| cloud_storage_id | int | Storage id | [optional] |
| filename | str | Desired output file name | [optional] |
| location | str | Where need to save downloaded dataset | [optional] |
| save_images | bool | Include images or not | [optional] if omitted the server will use the default value of False |
There are also optional kwargs that control the function invocation behavior. Read more here.
Returned values
Returned type: Tuple[RqId, urllib3.HTTPResponse].
Returns a tuple with 2 values: (parsed_response, raw_response).
The first value is a model parsed from the response data. The second value is the raw response, which can be useful to get response parameters, such as status code, headers, or raw response data. Read more about invocation parameters and returned values here.
Authentication
accessTokenAuth, basicAuth, csrfAuth, csrfHeaderAuth, sessionAuth, tokenAuth
HTTP request headers
- Content-Type: Not defined
- Accept: application/vnd.cvat+json
HTTP response details
| Status code | Description | Response headers |
|---|---|---|
| 202 | Exporting has been started | - |
| 405 | Format is not available | - |
| 409 | Exporting is already in progress | - |
destroy
destroy( id, **kwargs )
Delete a job
Related annotations will be deleted as well. Please note, that not every job can be removed. Currently, it is only available for Ground Truth jobs.
Example
from pprint import pprint
from cvat_sdk.api_client import Configuration, ApiClient, exceptions
from cvat_sdk.api_client.models import *
# Set up an API client
# Read Configuration class docs for more info about parameters and authentication methods
configuration = Configuration(
host = "http://localhost",
username = 'YOUR_USERNAME',
password = 'YOUR_PASSWORD',
)
with ApiClient(configuration) as api_client:
id = 1 # int | A unique integer value identifying this job.
try:
api_client.jobs_api.destroy(
id,)
except exceptions.ApiException as e:
print("Exception when calling JobsApi.destroy(): %s\n" % e)
Parameters
| Name | Type | Description | Notes |
|---|---|---|---|
| id | int | A unique integer value identifying this job. |
There are also optional kwargs that control the function invocation behavior. Read more here.
Returned values
Returned type: Tuple[None, urllib3.HTTPResponse].
Returns a tuple with 2 values: (None, raw_response).
This endpoint does not have any return value, so None is always returned as the first value.
The second value is the raw response, which can be useful to get response parameters, such as
status code, headers, or raw response data. Read more about invocation parameters
and returned values here.
Authentication
accessTokenAuth, basicAuth, csrfAuth, csrfHeaderAuth, sessionAuth, tokenAuth
HTTP request headers
- Content-Type: Not defined
- Accept: Not defined
HTTP response details
| Status code | Description | Response headers |
|---|---|---|
| 204 | The job has been deleted | - |
destroy_annotations
destroy_annotations( id, **kwargs )
Delete job annotations
Example
from pprint import pprint
from cvat_sdk.api_client import Configuration, ApiClient, exceptions
from cvat_sdk.api_client.models import *
# Set up an API client
# Read Configuration class docs for more info about parameters and authentication methods
configuration = Configuration(
host = "http://localhost",
username = 'YOUR_USERNAME',
password = 'YOUR_PASSWORD',
)
with ApiClient(configuration) as api_client:
id = 1 # int | A unique integer value identifying this job.
try:
api_client.jobs_api.destroy_annotations(
id,)
except exceptions.ApiException as e:
print("Exception when calling JobsApi.destroy_annotations(): %s\n" % e)
Parameters
| Name | Type | Description | Notes |
|---|---|---|---|
| id | int | A unique integer value identifying this job. |
There are also optional kwargs that control the function invocation behavior. Read more here.
Returned values
Returned type: Tuple[None, urllib3.HTTPResponse].
Returns a tuple with 2 values: (None, raw_response).
This endpoint does not have any return value, so None is always returned as the first value.
The second value is the raw response, which can be useful to get response parameters, such as
status code, headers, or raw response data. Read more about invocation parameters
and returned values here.
Authentication
accessTokenAuth, basicAuth, csrfAuth, csrfHeaderAuth, sessionAuth, tokenAuth
HTTP request headers
- Content-Type: Not defined
- Accept: Not defined
HTTP response details
| Status code | Description | Response headers |
|---|---|---|
| 204 | The annotation has been deleted | - |
list
list( x_organization=None, assignee=None, dimension=None, filter=None, org=None, org_id=None, page=None, page_size=None, parent_job_id=None, project_id=None, project_name=None, search=None, sort=None, stage=None, state=None, task_id=None, task_name=None, type=None, **kwargs )
List jobs
Example
from pprint import pprint
from cvat_sdk.api_client import Configuration, ApiClient, exceptions
from cvat_sdk.api_client.models import *
# Set up an API client
# Read Configuration class docs for more info about parameters and authentication methods
configuration = Configuration(
host = "http://localhost",
username = 'YOUR_USERNAME',
password = 'YOUR_PASSWORD',
)
with ApiClient(configuration) as api_client:
x_organization = "X-Organization_example" # str | Organization unique slug (optional)
assignee = "assignee_example" # str | A simple equality filter for the assignee field (optional)
dimension = "3d" # str | A simple equality filter for the dimension field (optional)
filter = "filter_example" # str | JSON Logic filter. This filter can be used to perform complex filtering by grouping rules. For example, using such a filter you can get all resources created by you: - {\"and\":[{\"==\":[{\"var\":\"owner\"},\"<user>\"]}]} Details about the syntax used can be found at the link: https://jsonlogic.com/ Available filter_fields: ['task_name', 'project_name', 'assignee', 'state', 'stage', 'id', 'task_id', 'project_id', 'updated_date', 'dimension', 'type', 'parent_job_id']. (optional)
org = "org_example" # str | Organization unique slug (optional)
org_id = 1 # int | Organization identifier (optional)
page = 1 # int | A page number within the paginated result set. (optional)
page_size = 1 # int | Number of results to return per page. (optional)
parent_job_id = 1 # int | A simple equality filter for the parent_job_id field (optional)
project_id = 1 # int | A simple equality filter for the project_id field (optional)
project_name = "project_name_example" # str | A simple equality filter for the project_name field (optional)
search = "search_example" # str | A search term. Available search_fields: ('task_name', 'project_name', 'assignee', 'state', 'stage') (optional)
sort = "sort_example" # str | Which field to use when ordering the results. Available ordering_fields: ['task_name', 'project_name', 'assignee', 'state', 'stage', 'id', 'task_id', 'project_id', 'updated_date', 'dimension', 'type', 'parent_job_id'] (optional)
stage = "annotation" # str | A simple equality filter for the stage field (optional)
state = "new" # str | A simple equality filter for the state field (optional)
task_id = 1 # int | A simple equality filter for the task_id field (optional)
task_name = "task_name_example" # str | A simple equality filter for the task_name field (optional)
type = "annotation" # str | A simple equality filter for the type field (optional)
try:
(data, response) = api_client.jobs_api.list(
x_organization=x_organization,
assignee=assignee,
dimension=dimension,
filter=filter,
org=org,
org_id=org_id,
page=page,
page_size=page_size,
parent_job_id=parent_job_id,
project_id=project_id,
project_name=project_name,
search=search,
sort=sort,
stage=stage,
state=state,
task_id=task_id,
task_name=task_name,
type=type,
)
pprint(data)
except exceptions.ApiException as e:
print("Exception when calling JobsApi.list(): %s\n" % e)
Parameters
| Name | Type | Description | Notes |
|---|---|---|---|
| x_organization | str | Organization unique slug | [optional] |
| assignee | str | A simple equality filter for the assignee field | [optional] |
| dimension | str | A simple equality filter for the dimension field | [optional] |
| filter | str | JSON Logic filter. This filter can be used to perform complex filtering by grouping rules. For example, using such a filter you can get all resources created by you: - {"and":[{"==":[{"var":"owner"}," |
[optional] |
| org | str | Organization unique slug | [optional] |
| org_id | int | Organization identifier | [optional] |
| page | int | A page number within the paginated result set. | [optional] |
| page_size | int | Number of results to return per page. | [optional] |
| parent_job_id | int | A simple equality filter for the parent_job_id field | [optional] |
| project_id | int | A simple equality filter for the project_id field | [optional] |
| project_name | str | A simple equality filter for the project_name field | [optional] |
| search | str | A search term. Available search_fields: (’task_name’, ‘project_name’, ‘assignee’, ‘state’, ‘stage’) | [optional] |
| sort | str | Which field to use when ordering the results. Available ordering_fields: [’task_name’, ‘project_name’, ‘assignee’, ‘state’, ‘stage’, ‘id’, ’task_id’, ‘project_id’, ‘updated_date’, ‘dimension’, ’type’, ‘parent_job_id’] | [optional] |
| stage | str | A simple equality filter for the stage field | [optional] |
| state | str | A simple equality filter for the state field | [optional] |
| task_id | int | A simple equality filter for the task_id field | [optional] |
| task_name | str | A simple equality filter for the task_name field | [optional] |
| type | str | A simple equality filter for the type field | [optional] |
There are also optional kwargs that control the function invocation behavior. Read more here.
Returned values
Returned type: Tuple[PaginatedJobReadList, urllib3.HTTPResponse].
Returns a tuple with 2 values: (parsed_response, raw_response).
The first value is a model parsed from the response data. The second value is the raw response, which can be useful to get response parameters, such as status code, headers, or raw response data. Read more about invocation parameters and returned values here.
Authentication
accessTokenAuth, basicAuth, csrfAuth, csrfHeaderAuth, sessionAuth, tokenAuth
HTTP request headers
- Content-Type: Not defined
- Accept: application/vnd.cvat+json
HTTP response details
| Status code | Description | Response headers |
|---|---|---|
| 200 | - |
partial_update
partial_update( id, patched_job_write_request=None, **kwargs )
Update a job
Example
from pprint import pprint
from cvat_sdk.api_client import Configuration, ApiClient, exceptions
from cvat_sdk.api_client.models import *
# Set up an API client
# Read Configuration class docs for more info about parameters and authentication methods
configuration = Configuration(
host = "http://localhost",
username = 'YOUR_USERNAME',
password = 'YOUR_PASSWORD',
)
with ApiClient(configuration) as api_client:
id = 1 # int | A unique integer value identifying this job.
patched_job_write_request = PatchedJobWriteRequest(
assignee=1,
stage=JobStage("annotation"),
state=OperationStatus("new"),
) # PatchedJobWriteRequest | (optional)
try:
(data, response) = api_client.jobs_api.partial_update(
id,
patched_job_write_request=patched_job_write_request,
)
pprint(data)
except exceptions.ApiException as e:
print("Exception when calling JobsApi.partial_update(): %s\n" % e)
Parameters
| Name | Type | Description | Notes |
|---|---|---|---|
| id | int | A unique integer value identifying this job. | |
| patched_job_write_request | PatchedJobWriteRequest | [optional] |
There are also optional kwargs that control the function invocation behavior. Read more here.
Returned values
Returned type: Tuple[JobRead, urllib3.HTTPResponse].
Returns a tuple with 2 values: (parsed_response, raw_response).
The first value is a model parsed from the response data. The second value is the raw response, which can be useful to get response parameters, such as status code, headers, or raw response data. Read more about invocation parameters and returned values here.
Authentication
accessTokenAuth, basicAuth, csrfAuth, csrfHeaderAuth, sessionAuth, tokenAuth
HTTP request headers
- Content-Type: application/json
- Accept: application/vnd.cvat+json
HTTP response details
| Status code | Description | Response headers |
|---|---|---|
| 200 | - |
partial_update_annotations
partial_update_annotations( action, id, patched_labeled_data_request=None, **kwargs )
Update job annotations
Example
from pprint import pprint
from cvat_sdk.api_client import Configuration, ApiClient, exceptions
from cvat_sdk.api_client.models import *
# Set up an API client
# Read Configuration class docs for more info about parameters and authentication methods
configuration = Configuration(
host = "http://localhost",
username = 'YOUR_USERNAME',
password = 'YOUR_PASSWORD',
)
with ApiClient(configuration) as api_client:
action = "create" # str |
id = 1 # int | A unique integer value identifying this job.
patched_labeled_data_request = PatchedLabeledDataRequest(
version=0,
tags=[
LabeledImageRequest(
id=1,
frame=0,
label_id=0,
group=0,
source="manual",
attributes=[
AttributeValRequest(
spec_id=1,
value="value_example",
),
],
),
],
shapes=[
LabeledShapeRequest(
type=ShapeType("rectangle"),
occluded=False,
outside=False,
z_order=0,
rotation=0.0,
points=[
3.14,
],
id=1,
frame=0,
label_id=0,
group=0,
source="manual",
attributes=[
AttributeValRequest(
spec_id=1,
value="value_example",
),
],
score=1.0,
elements=[
SubLabeledShapeRequest(
type=ShapeType("rectangle"),
occluded=False,
outside=False,
z_order=0,
rotation=0.0,
points=[
3.14,
],
id=1,
frame=0,
label_id=0,
group=0,
source="manual",
attributes=[
AttributeValRequest(
spec_id=1,
value="value_example",
),
],
score=1.0,
),
],
),
],
tracks=[
LabeledTrackRequest(
id=1,
frame=0,
label_id=0,
group=0,
source="manual",
shapes=[
TrackedShapeRequest(
type=ShapeType("rectangle"),
occluded=False,
outside=False,
z_order=0,
rotation=0.0,
points=[
3.14,
],
id=1,
frame=0,
attributes=[
AttributeValRequest(
spec_id=1,
value="value_example",
),
],
),
],
attributes=[
AttributeValRequest(
spec_id=1,
value="value_example",
),
],
elements=[
SubLabeledTrackRequest(
id=1,
frame=0,
label_id=0,
group=0,
source="manual",
shapes=[
TrackedShapeRequest(
type=ShapeType("rectangle"),
occluded=False,
outside=False,
z_order=0,
rotation=0.0,
points=[
3.14,
],
id=1,
frame=0,
attributes=[
AttributeValRequest(
spec_id=1,
value="value_example",
),
],
),
],
attributes=[
AttributeValRequest(
spec_id=1,
value="value_example",
),
],
),
],
),
],
) # PatchedLabeledDataRequest | (optional)
try:
api_client.jobs_api.partial_update_annotations(
action,
id,
patched_labeled_data_request=patched_labeled_data_request,
)
except exceptions.ApiException as e:
print("Exception when calling JobsApi.partial_update_annotations(): %s\n" % e)
Parameters
| Name | Type | Description | Notes |
|---|---|---|---|
| action | str | ||
| id | int | A unique integer value identifying this job. | |
| patched_labeled_data_request | PatchedLabeledDataRequest | [optional] |
There are also optional kwargs that control the function invocation behavior. Read more here.
Returned values
Returned type: Tuple[None, urllib3.HTTPResponse].
Returns a tuple with 2 values: (None, raw_response).
This endpoint does not have any return value, so None is always returned as the first value.
The second value is the raw response, which can be useful to get response parameters, such as
status code, headers, or raw response data. Read more about invocation parameters
and returned values here.
Authentication
accessTokenAuth, basicAuth, csrfAuth, csrfHeaderAuth, sessionAuth, tokenAuth
HTTP request headers
- Content-Type: application/json, multipart/form-data
- Accept: Not defined
HTTP response details
| Status code | Description | Response headers |
|---|---|---|
| 200 | Annotations successfully uploaded | - |
partial_update_data_meta
partial_update_data_meta( id, patched_job_data_meta_write_request=None, **kwargs )
Update metainformation for media files in a job
Example
from pprint import pprint
from cvat_sdk.api_client import Configuration, ApiClient, exceptions
from cvat_sdk.api_client.models import *
# Set up an API client
# Read Configuration class docs for more info about parameters and authentication methods
configuration = Configuration(
host = "http://localhost",
username = 'YOUR_USERNAME',
password = 'YOUR_PASSWORD',
)
with ApiClient(configuration) as api_client:
id = 1 # int | A unique integer value identifying this job.
patched_job_data_meta_write_request = PatchedJobDataMetaWriteRequest(
deleted_frames=[
0,
],
) # PatchedJobDataMetaWriteRequest | (optional)
try:
(data, response) = api_client.jobs_api.partial_update_data_meta(
id,
patched_job_data_meta_write_request=patched_job_data_meta_write_request,
)
pprint(data)
except exceptions.ApiException as e:
print("Exception when calling JobsApi.partial_update_data_meta(): %s\n" % e)
Parameters
| Name | Type | Description | Notes |
|---|---|---|---|
| id | int | A unique integer value identifying this job. | |
| patched_job_data_meta_write_request | PatchedJobDataMetaWriteRequest | [optional] |
There are also optional kwargs that control the function invocation behavior. Read more here.
Returned values
Returned type: Tuple[DataMetaRead, urllib3.HTTPResponse].
Returns a tuple with 2 values: (parsed_response, raw_response).
The first value is a model parsed from the response data. The second value is the raw response, which can be useful to get response parameters, such as status code, headers, or raw response data. Read more about invocation parameters and returned values here.
Authentication
accessTokenAuth, basicAuth, csrfAuth, csrfHeaderAuth, sessionAuth, tokenAuth
HTTP request headers
- Content-Type: application/json
- Accept: application/vnd.cvat+json
HTTP response details
| Status code | Description | Response headers |
|---|---|---|
| 200 | - |
partial_update_validation_layout
partial_update_validation_layout( id, patched_job_validation_layout_write_request=None, **kwargs )
Allows updating current validation configuration
WARNING: this operation is not protected from race conditions. It’s up to the user to ensure no parallel calls to this operation happen. It affects image access, including exports with images, backups, chunk downloading etc.
Example
from pprint import pprint
from cvat_sdk.api_client import Configuration, ApiClient, exceptions
from cvat_sdk.api_client.models import *
# Set up an API client
# Read Configuration class docs for more info about parameters and authentication methods
configuration = Configuration(
host = "http://localhost",
username = 'YOUR_USERNAME',
password = 'YOUR_PASSWORD',
)
with ApiClient(configuration) as api_client:
id = 1 # int | A unique integer value identifying this job.
patched_job_validation_layout_write_request = PatchedJobValidationLayoutWriteRequest(
frame_selection_method=None,
honeypot_real_frames=[
0,
],
) # PatchedJobValidationLayoutWriteRequest | (optional)
try:
(data, response) = api_client.jobs_api.partial_update_validation_layout(
id,
patched_job_validation_layout_write_request=patched_job_validation_layout_write_request,
)
pprint(data)
except exceptions.ApiException as e:
print("Exception when calling JobsApi.partial_update_validation_layout(): %s\n" % e)
Parameters
| Name | Type | Description | Notes |
|---|---|---|---|
| id | int | A unique integer value identifying this job. | |
| patched_job_validation_layout_write_request | PatchedJobValidationLayoutWriteRequest | [optional] |
There are also optional kwargs that control the function invocation behavior. Read more here.
Returned values
Returned type: Tuple[JobValidationLayoutRead, urllib3.HTTPResponse].
Returns a tuple with 2 values: (parsed_response, raw_response).
The first value is a model parsed from the response data. The second value is the raw response, which can be useful to get response parameters, such as status code, headers, or raw response data. Read more about invocation parameters and returned values here.
Authentication
accessTokenAuth, basicAuth, csrfAuth, csrfHeaderAuth, sessionAuth, tokenAuth
HTTP request headers
- Content-Type: application/json
- Accept: application/vnd.cvat+json
HTTP response details
| Status code | Description | Response headers |
|---|---|---|
| 200 | - |
retrieve
retrieve( id, **kwargs )
Get job details
Example
from pprint import pprint
from cvat_sdk.api_client import Configuration, ApiClient, exceptions
from cvat_sdk.api_client.models import *
# Set up an API client
# Read Configuration class docs for more info about parameters and authentication methods
configuration = Configuration(
host = "http://localhost",
username = 'YOUR_USERNAME',
password = 'YOUR_PASSWORD',
)
with ApiClient(configuration) as api_client:
id = 1 # int | A unique integer value identifying this job.
try:
(data, response) = api_client.jobs_api.retrieve(
id,)
pprint(data)
except exceptions.ApiException as e:
print("Exception when calling JobsApi.retrieve(): %s\n" % e)
Parameters
| Name | Type | Description | Notes |
|---|---|---|---|
| id | int | A unique integer value identifying this job. |
There are also optional kwargs that control the function invocation behavior. Read more here.
Returned values
Returned type: Tuple[JobRead, urllib3.HTTPResponse].
Returns a tuple with 2 values: (parsed_response, raw_response).
The first value is a model parsed from the response data. The second value is the raw response, which can be useful to get response parameters, such as status code, headers, or raw response data. Read more about invocation parameters and returned values here.
Authentication
accessTokenAuth, basicAuth, csrfAuth, csrfHeaderAuth, sessionAuth, tokenAuth
HTTP request headers
- Content-Type: Not defined
- Accept: application/vnd.cvat+json
HTTP response details
| Status code | Description | Response headers |
|---|---|---|
| 200 | - |
retrieve_annotations
retrieve_annotations( id, action=None, cloud_storage_id=None, filename=None, format=None, location=None, **kwargs )
Get job annotations
Deprecation warning: Utilizing this endpoint to export job dataset in a specific format is no longer possible. Consider using new API: - POST /api/jobs/<job_id>/dataset/export?save_images=True to initiate export process - GET /api/requests/<rq_id> to check process status, where rq_id is request id returned on initializing request - GET result_url to download a prepared file, where result_url can be found in the response on checking status request
Example
from pprint import pprint
from cvat_sdk.api_client import Configuration, ApiClient, exceptions
from cvat_sdk.api_client.models import *
# Set up an API client
# Read Configuration class docs for more info about parameters and authentication methods
configuration = Configuration(
host = "http://localhost",
username = 'YOUR_USERNAME',
password = 'YOUR_PASSWORD',
)
with ApiClient(configuration) as api_client:
id = 1 # int | A unique integer value identifying this job.
action = "action_example" # str | This parameter is no longer supported (optional)
cloud_storage_id = 1 # int | This parameter is no longer supported (optional)
filename = "filename_example" # str | This parameter is no longer supported (optional)
format = "format_example" # str | This parameter is no longer supported (optional)
location = "cloud_storage" # str | This parameter is no longer supported (optional)
try:
(data, response) = api_client.jobs_api.retrieve_annotations(
id,
action=action,
cloud_storage_id=cloud_storage_id,
filename=filename,
format=format,
location=location,
)
pprint(data)
except exceptions.ApiException as e:
print("Exception when calling JobsApi.retrieve_annotations(): %s\n" % e)
Parameters
| Name | Type | Description | Notes |
|---|---|---|---|
| id | int | A unique integer value identifying this job. | |
| action | str | This parameter is no longer supported | [optional] |
| cloud_storage_id | int | This parameter is no longer supported | [optional] |
| filename | str | This parameter is no longer supported | [optional] |
| format | str | This parameter is no longer supported | [optional] |
| location | str | This parameter is no longer supported | [optional] |
There are also optional kwargs that control the function invocation behavior. Read more here.
Returned values
Returned type: Tuple[LabeledData, urllib3.HTTPResponse].
Returns a tuple with 2 values: (parsed_response, raw_response).
The first value is a model parsed from the response data. The second value is the raw response, which can be useful to get response parameters, such as status code, headers, or raw response data. Read more about invocation parameters and returned values here.
Authentication
accessTokenAuth, basicAuth, csrfAuth, csrfHeaderAuth, sessionAuth, tokenAuth
HTTP request headers
- Content-Type: Not defined
- Accept: application/vnd.cvat+json
HTTP response details
| Status code | Description | Response headers |
|---|---|---|
| 200 | - | |
| 410 | API endpoint no longer handles dataset exporting process | - |
retrieve_data
retrieve_data( id, type, index=None, number=None, quality=None, **kwargs )
Get data of a job
Example
from pprint import pprint
from cvat_sdk.api_client import Configuration, ApiClient, exceptions
from cvat_sdk.api_client.models import *
# Set up an API client
# Read Configuration class docs for more info about parameters and authentication methods
configuration = Configuration(
host = "http://localhost",
username = 'YOUR_USERNAME',
password = 'YOUR_PASSWORD',
)
with ApiClient(configuration) as api_client:
id = 1 # int | A unique integer value identifying this job.
type = "chunk" # str | Specifies the type of the requested data
index = 1 # int | A unique number value identifying chunk, starts from 0 for each job (optional)
number = 1 # int | A unique number value identifying chunk or frame. The numbers are the same as for the task. Deprecated for chunks in favor of 'index' (optional)
quality = "compressed" # str | Specifies the quality level of the requested data (optional)
try:
(data, response) = api_client.jobs_api.retrieve_data(
id,
type,
index=index,
number=number,
quality=quality,
)
pprint(data)
except exceptions.ApiException as e:
print("Exception when calling JobsApi.retrieve_data(): %s\n" % e)
Parameters
| Name | Type | Description | Notes |
|---|---|---|---|
| id | int | A unique integer value identifying this job. | |
| type | str | Specifies the type of the requested data | |
| index | int | A unique number value identifying chunk, starts from 0 for each job | [optional] |
| number | int | A unique number value identifying chunk or frame. The numbers are the same as for the task. Deprecated for chunks in favor of ‘index’ | [optional] |
| quality | str | Specifies the quality level of the requested data | [optional] |
There are also optional kwargs that control the function invocation behavior. Read more here.
Returned values
Returned type: Tuple[file_type, urllib3.HTTPResponse].
Returns a tuple with 2 values: (parsed_response, raw_response).
The first value is a model parsed from the response data. The second value is the raw response, which can be useful to get response parameters, such as status code, headers, or raw response data. Read more about invocation parameters and returned values here.
Authentication
accessTokenAuth, basicAuth, csrfAuth, csrfHeaderAuth, sessionAuth, tokenAuth
HTTP request headers
- Content-Type: Not defined
- Accept: application/vnd.cvat+json
HTTP response details
| Status code | Description | Response headers |
|---|---|---|
| 200 | Data of a specific type | - |
retrieve_data_meta
retrieve_data_meta( id, **kwargs )
Get metainformation for media files in a job
Example
from pprint import pprint
from cvat_sdk.api_client import Configuration, ApiClient, exceptions
from cvat_sdk.api_client.models import *
# Set up an API client
# Read Configuration class docs for more info about parameters and authentication methods
configuration = Configuration(
host = "http://localhost",
username = 'YOUR_USERNAME',
password = 'YOUR_PASSWORD',
)
with ApiClient(configuration) as api_client:
id = 1 # int | A unique integer value identifying this job.
try:
(data, response) = api_client.jobs_api.retrieve_data_meta(
id,)
pprint(data)
except exceptions.ApiException as e:
print("Exception when calling JobsApi.retrieve_data_meta(): %s\n" % e)
Parameters
| Name | Type | Description | Notes |
|---|---|---|---|
| id | int | A unique integer value identifying this job. |
There are also optional kwargs that control the function invocation behavior. Read more here.
Returned values
Returned type: Tuple[DataMetaRead, urllib3.HTTPResponse].
Returns a tuple with 2 values: (parsed_response, raw_response).
The first value is a model parsed from the response data. The second value is the raw response, which can be useful to get response parameters, such as status code, headers, or raw response data. Read more about invocation parameters and returned values here.
Authentication
accessTokenAuth, basicAuth, csrfAuth, csrfHeaderAuth, sessionAuth, tokenAuth
HTTP request headers
- Content-Type: Not defined
- Accept: application/vnd.cvat+json
HTTP response details
| Status code | Description | Response headers |
|---|---|---|
| 200 | - |
retrieve_preview
retrieve_preview( id, **kwargs )
Get a preview image for a job
Example
from pprint import pprint
from cvat_sdk.api_client import Configuration, ApiClient, exceptions
from cvat_sdk.api_client.models import *
# Set up an API client
# Read Configuration class docs for more info about parameters and authentication methods
configuration = Configuration(
host = "http://localhost",
username = 'YOUR_USERNAME',
password = 'YOUR_PASSWORD',
)
with ApiClient(configuration) as api_client:
id = 1 # int | A unique integer value identifying this job.
try:
api_client.jobs_api.retrieve_preview(
id,)
except exceptions.ApiException as e:
print("Exception when calling JobsApi.retrieve_preview(): %s\n" % e)
Parameters
| Name | Type | Description | Notes |
|---|---|---|---|
| id | int | A unique integer value identifying this job. |
There are also optional kwargs that control the function invocation behavior. Read more here.
Returned values
Returned type: Tuple[None, urllib3.HTTPResponse].
Returns a tuple with 2 values: (None, raw_response).
This endpoint does not have any return value, so None is always returned as the first value.
The second value is the raw response, which can be useful to get response parameters, such as
status code, headers, or raw response data. Read more about invocation parameters
and returned values here.
Authentication
accessTokenAuth, basicAuth, csrfAuth, csrfHeaderAuth, sessionAuth, tokenAuth
HTTP request headers
- Content-Type: Not defined
- Accept: Not defined
HTTP response details
| Status code | Description | Response headers |
|---|---|---|
| 200 | Job image preview | - |
retrieve_validation_layout
retrieve_validation_layout( id, **kwargs )
Allows getting current validation configuration
Example
from pprint import pprint
from cvat_sdk.api_client import Configuration, ApiClient, exceptions
from cvat_sdk.api_client.models import *
# Set up an API client
# Read Configuration class docs for more info about parameters and authentication methods
configuration = Configuration(
host = "http://localhost",
username = 'YOUR_USERNAME',
password = 'YOUR_PASSWORD',
)
with ApiClient(configuration) as api_client:
id = 1 # int | A unique integer value identifying this job.
try:
(data, response) = api_client.jobs_api.retrieve_validation_layout(
id,)
pprint(data)
except exceptions.ApiException as e:
print("Exception when calling JobsApi.retrieve_validation_layout(): %s\n" % e)
Parameters
| Name | Type | Description | Notes |
|---|---|---|---|
| id | int | A unique integer value identifying this job. |
There are also optional kwargs that control the function invocation behavior. Read more here.
Returned values
Returned type: Tuple[JobValidationLayoutRead, urllib3.HTTPResponse].
Returns a tuple with 2 values: (parsed_response, raw_response).
The first value is a model parsed from the response data. The second value is the raw response, which can be useful to get response parameters, such as status code, headers, or raw response data. Read more about invocation parameters and returned values here.
Authentication
accessTokenAuth, basicAuth, csrfAuth, csrfHeaderAuth, sessionAuth, tokenAuth
HTTP request headers
- Content-Type: Not defined
- Accept: application/vnd.cvat+json
HTTP response details
| Status code | Description | Response headers |
|---|---|---|
| 200 | - |
update_annotations
update_annotations( id, labeled_data_request=None, **kwargs )
Replace job annotations
Example
from pprint import pprint
from cvat_sdk.api_client import Configuration, ApiClient, exceptions
from cvat_sdk.api_client.models import *
# Set up an API client
# Read Configuration class docs for more info about parameters and authentication methods
configuration = Configuration(
host = "http://localhost",
username = 'YOUR_USERNAME',
password = 'YOUR_PASSWORD',
)
with ApiClient(configuration) as api_client:
id = 1 # int | A unique integer value identifying this job.
labeled_data_request = LabeledDataRequest(
version=0,
tags=[
LabeledImageRequest(
id=1,
frame=0,
label_id=0,
group=0,
source="manual",
attributes=[
AttributeValRequest(
spec_id=1,
value="value_example",
),
],
),
],
shapes=[
LabeledShapeRequest(
type=ShapeType("rectangle"),
occluded=False,
outside=False,
z_order=0,
rotation=0.0,
points=[
3.14,
],
id=1,
frame=0,
label_id=0,
group=0,
source="manual",
attributes=[
AttributeValRequest(
spec_id=1,
value="value_example",
),
],
score=1.0,
elements=[
SubLabeledShapeRequest(
type=ShapeType("rectangle"),
occluded=False,
outside=False,
z_order=0,
rotation=0.0,
points=[
3.14,
],
id=1,
frame=0,
label_id=0,
group=0,
source="manual",
attributes=[
AttributeValRequest(
spec_id=1,
value="value_example",
),
],
score=1.0,
),
],
),
],
tracks=[
LabeledTrackRequest(
id=1,
frame=0,
label_id=0,
group=0,
source="manual",
shapes=[
TrackedShapeRequest(
type=ShapeType("rectangle"),
occluded=False,
outside=False,
z_order=0,
rotation=0.0,
points=[
3.14,
],
id=1,
frame=0,
attributes=[
AttributeValRequest(
spec_id=1,
value="value_example",
),
],
),
],
attributes=[
AttributeValRequest(
spec_id=1,
value="value_example",
),
],
elements=[
SubLabeledTrackRequest(
id=1,
frame=0,
label_id=0,
group=0,
source="manual",
shapes=[
TrackedShapeRequest(
type=ShapeType("rectangle"),
occluded=False,
outside=False,
z_order=0,
rotation=0.0,
points=[
3.14,
],
id=1,
frame=0,
attributes=[
AttributeValRequest(
spec_id=1,
value="value_example",
),
],
),
],
attributes=[
AttributeValRequest(
spec_id=1,
value="value_example",
),
],
),
],
),
],
) # LabeledDataRequest | (optional)
try:
api_client.jobs_api.update_annotations(
id,
labeled_data_request=labeled_data_request,
)
except exceptions.ApiException as e:
print("Exception when calling JobsApi.update_annotations(): %s\n" % e)
Parameters
| Name | Type | Description | Notes |
|---|---|---|---|
| id | int | A unique integer value identifying this job. | |
| labeled_data_request | LabeledDataRequest | [optional] |
There are also optional kwargs that control the function invocation behavior. Read more here.
Returned values
Returned type: Tuple[None, urllib3.HTTPResponse].
Returns a tuple with 2 values: (None, raw_response).
This endpoint does not have any return value, so None is always returned as the first value.
The second value is the raw response, which can be useful to get response parameters, such as
status code, headers, or raw response data. Read more about invocation parameters
and returned values here.
Authentication
accessTokenAuth, basicAuth, csrfAuth, csrfHeaderAuth, sessionAuth, tokenAuth
HTTP request headers
- Content-Type: application/json, multipart/form-data
- Accept: Not defined
HTTP response details
| Status code | Description | Response headers |
|---|---|---|
| 200 | Annotations have been replaced | - |
11.2.1.1.11 - LabelsApi class reference
All URIs are relative to http://localhost
| Method | HTTP request | Description |
|---|---|---|
| destroy | DELETE /api/labels/{id} | Delete a label |
| list | GET /api/labels | List labels |
| partial_update | PATCH /api/labels/{id} | Update a label |
| retrieve | GET /api/labels/{id} | Get label details |
destroy
destroy( id, **kwargs )
Delete a label
To delete a sublabel, please use the PATCH method of the parent label.
Example
from pprint import pprint
from cvat_sdk.api_client import Configuration, ApiClient, exceptions
from cvat_sdk.api_client.models import *
# Set up an API client
# Read Configuration class docs for more info about parameters and authentication methods
configuration = Configuration(
host = "http://localhost",
username = 'YOUR_USERNAME',
password = 'YOUR_PASSWORD',
)
with ApiClient(configuration) as api_client:
id = 1 # int | A unique integer value identifying this label.
try:
api_client.labels_api.destroy(
id,)
except exceptions.ApiException as e:
print("Exception when calling LabelsApi.destroy(): %s\n" % e)
Parameters
| Name | Type | Description | Notes |
|---|---|---|---|
| id | int | A unique integer value identifying this label. |
There are also optional kwargs that control the function invocation behavior. Read more here.
Returned values
Returned type: Tuple[None, urllib3.HTTPResponse].
Returns a tuple with 2 values: (None, raw_response).
This endpoint does not have any return value, so None is always returned as the first value.
The second value is the raw response, which can be useful to get response parameters, such as
status code, headers, or raw response data. Read more about invocation parameters
and returned values here.
Authentication
accessTokenAuth, basicAuth, csrfAuth, csrfHeaderAuth, sessionAuth, tokenAuth
HTTP request headers
- Content-Type: Not defined
- Accept: Not defined
HTTP response details
| Status code | Description | Response headers |
|---|---|---|
| 204 | The label has been deleted | - |
list
list( x_organization=None, color=None, filter=None, job_id=None, name=None, org=None, org_id=None, page=None, page_size=None, parent=None, parent_id=None, project_id=None, search=None, sort=None, task_id=None, type=None, **kwargs )
List labels
Example
from pprint import pprint
from cvat_sdk.api_client import Configuration, ApiClient, exceptions
from cvat_sdk.api_client.models import *
# Set up an API client
# Read Configuration class docs for more info about parameters and authentication methods
configuration = Configuration(
host = "http://localhost",
username = 'YOUR_USERNAME',
password = 'YOUR_PASSWORD',
)
with ApiClient(configuration) as api_client:
x_organization = "X-Organization_example" # str | Organization unique slug (optional)
color = "color_example" # str | A simple equality filter for the color field (optional)
filter = "filter_example" # str | JSON Logic filter. This filter can be used to perform complex filtering by grouping rules. For example, using such a filter you can get all resources created by you: - {\"and\":[{\"==\":[{\"var\":\"owner\"},\"<user>\"]}]} Details about the syntax used can be found at the link: https://jsonlogic.com/ Available filter_fields: ['name', 'parent', 'id', 'type', 'color', 'parent_id']. (optional)
job_id = 1 # int | A simple equality filter for job id (optional)
name = "name_example" # str | A simple equality filter for the name field (optional)
org = "org_example" # str | Organization unique slug (optional)
org_id = 1 # int | Organization identifier (optional)
page = 1 # int | A page number within the paginated result set. (optional)
page_size = 1 # int | Number of results to return per page. (optional)
parent = "parent_example" # str | A simple equality filter for the parent field (optional)
parent_id = 1 # int | A simple equality filter for the parent_id field (optional)
project_id = 1 # int | A simple equality filter for project id (optional)
search = "search_example" # str | A search term. Available search_fields: ('name', 'parent') (optional)
sort = "sort_example" # str | Which field to use when ordering the results. Available ordering_fields: ['name', 'parent', 'id', 'type', 'color', 'parent_id'] (optional)
task_id = 1 # int | A simple equality filter for task id (optional)
type = "any" # str | A simple equality filter for the type field (optional)
try:
(data, response) = api_client.labels_api.list(
x_organization=x_organization,
color=color,
filter=filter,
job_id=job_id,
name=name,
org=org,
org_id=org_id,
page=page,
page_size=page_size,
parent=parent,
parent_id=parent_id,
project_id=project_id,
search=search,
sort=sort,
task_id=task_id,
type=type,
)
pprint(data)
except exceptions.ApiException as e:
print("Exception when calling LabelsApi.list(): %s\n" % e)
Parameters
| Name | Type | Description | Notes |
|---|---|---|---|
| x_organization | str | Organization unique slug | [optional] |
| color | str | A simple equality filter for the color field | [optional] |
| filter | str | JSON Logic filter. This filter can be used to perform complex filtering by grouping rules. For example, using such a filter you can get all resources created by you: - {"and":[{"==":[{"var":"owner"}," |
[optional] |
| job_id | int | A simple equality filter for job id | [optional] |
| name | str | A simple equality filter for the name field | [optional] |
| org | str | Organization unique slug | [optional] |
| org_id | int | Organization identifier | [optional] |
| page | int | A page number within the paginated result set. | [optional] |
| page_size | int | Number of results to return per page. | [optional] |
| parent | str | A simple equality filter for the parent field | [optional] |
| parent_id | int | A simple equality filter for the parent_id field | [optional] |
| project_id | int | A simple equality filter for project id | [optional] |
| search | str | A search term. Available search_fields: (’name’, ‘parent’) | [optional] |
| sort | str | Which field to use when ordering the results. Available ordering_fields: [’name’, ‘parent’, ‘id’, ’type’, ‘color’, ‘parent_id’] | [optional] |
| task_id | int | A simple equality filter for task id | [optional] |
| type | str | A simple equality filter for the type field | [optional] |
There are also optional kwargs that control the function invocation behavior. Read more here.
Returned values
Returned type: Tuple[PaginatedLabelList, urllib3.HTTPResponse].
Returns a tuple with 2 values: (parsed_response, raw_response).
The first value is a model parsed from the response data. The second value is the raw response, which can be useful to get response parameters, such as status code, headers, or raw response data. Read more about invocation parameters and returned values here.
Authentication
accessTokenAuth, basicAuth, csrfAuth, csrfHeaderAuth, sessionAuth, tokenAuth
HTTP request headers
- Content-Type: Not defined
- Accept: application/vnd.cvat+json
HTTP response details
| Status code | Description | Response headers |
|---|---|---|
| 200 | - |
partial_update
partial_update( id, patched_label_request=None, **kwargs )
Update a label
To modify a sublabel, please use the PATCH method of the parent label.
Example
from pprint import pprint
from cvat_sdk.api_client import Configuration, ApiClient, exceptions
from cvat_sdk.api_client.models import *
# Set up an API client
# Read Configuration class docs for more info about parameters and authentication methods
configuration = Configuration(
host = "http://localhost",
username = 'YOUR_USERNAME',
password = 'YOUR_PASSWORD',
)
with ApiClient(configuration) as api_client:
id = 1 # int | A unique integer value identifying this label.
patched_label_request = PatchedLabelRequest(
id=1,
name="name_example",
color="color_example",
attributes=[
AttributeRequest(
id=1,
name="name_example",
mutable=True,
input_type=InputTypeEnum("checkbox"),
default_value="default_value_example",
values=[
"values_example",
],
),
],
deleted=True,
type=None,
svg="svg_example",
sublabels=[
SublabelRequest(
id=1,
name="name_example",
color="color_example",
attributes=[
AttributeRequest(
id=1,
name="name_example",
mutable=True,
input_type=InputTypeEnum("checkbox"),
default_value="default_value_example",
values=[
"values_example",
],
),
],
type=None,
has_parent=True,
),
],
) # PatchedLabelRequest | (optional)
try:
(data, response) = api_client.labels_api.partial_update(
id,
patched_label_request=patched_label_request,
)
pprint(data)
except exceptions.ApiException as e:
print("Exception when calling LabelsApi.partial_update(): %s\n" % e)
Parameters
| Name | Type | Description | Notes |
|---|---|---|---|
| id | int | A unique integer value identifying this label. | |
| patched_label_request | PatchedLabelRequest | [optional] |
There are also optional kwargs that control the function invocation behavior. Read more here.
Returned values
Returned type: Tuple[Label, urllib3.HTTPResponse].
Returns a tuple with 2 values: (parsed_response, raw_response).
The first value is a model parsed from the response data. The second value is the raw response, which can be useful to get response parameters, such as status code, headers, or raw response data. Read more about invocation parameters and returned values here.
Authentication
accessTokenAuth, basicAuth, csrfAuth, csrfHeaderAuth, sessionAuth, tokenAuth
HTTP request headers
- Content-Type: application/json
- Accept: application/vnd.cvat+json
HTTP response details
| Status code | Description | Response headers |
|---|---|---|
| 200 | - |
retrieve
retrieve( id, **kwargs )
Get label details
Example
from pprint import pprint
from cvat_sdk.api_client import Configuration, ApiClient, exceptions
from cvat_sdk.api_client.models import *
# Set up an API client
# Read Configuration class docs for more info about parameters and authentication methods
configuration = Configuration(
host = "http://localhost",
username = 'YOUR_USERNAME',
password = 'YOUR_PASSWORD',
)
with ApiClient(configuration) as api_client:
id = 1 # int | A unique integer value identifying this label.
try:
(data, response) = api_client.labels_api.retrieve(
id,)
pprint(data)
except exceptions.ApiException as e:
print("Exception when calling LabelsApi.retrieve(): %s\n" % e)
Parameters
| Name | Type | Description | Notes |
|---|---|---|---|
| id | int | A unique integer value identifying this label. |
There are also optional kwargs that control the function invocation behavior. Read more here.
Returned values
Returned type: Tuple[Label, urllib3.HTTPResponse].
Returns a tuple with 2 values: (parsed_response, raw_response).
The first value is a model parsed from the response data. The second value is the raw response, which can be useful to get response parameters, such as status code, headers, or raw response data. Read more about invocation parameters and returned values here.
Authentication
accessTokenAuth, basicAuth, csrfAuth, csrfHeaderAuth, sessionAuth, tokenAuth
HTTP request headers
- Content-Type: Not defined
- Accept: application/vnd.cvat+json
HTTP response details
| Status code | Description | Response headers |
|---|---|---|
| 200 | - |
11.2.1.1.12 - LambdaApi class reference
All URIs are relative to http://localhost
| Method | HTTP request | Description |
|---|---|---|
| create_functions | POST /api/lambda/functions/{func_id} | |
| create_requests | POST /api/lambda/requests | Method calls the function |
| delete_requests | DELETE /api/lambda/requests/{id} | Method cancels the request |
| list_functions | GET /api/lambda/functions | Method returns a list of functions |
| list_requests | GET /api/lambda/requests | Method returns a list of requests |
| retrieve_functions | GET /api/lambda/functions/{func_id} | Method returns the information about the function |
| retrieve_requests | GET /api/lambda/requests/{id} | Method returns the status of the request |
create_functions
create_functions( func_id, online_function_call_request=None, **kwargs )
Allows to execute a function for immediate computation. Intended for short-lived executions, useful for interactive calls. When executed for interactive annotation, the job id must be specified in the ‘job’ input field. The task id is not required in this case, but if it is specified, it must match the job task id.
Example
from pprint import pprint
from cvat_sdk.api_client import Configuration, ApiClient, exceptions
from cvat_sdk.api_client.models import *
# Set up an API client
# Read Configuration class docs for more info about parameters and authentication methods
configuration = Configuration(
host = "http://localhost",
username = 'YOUR_USERNAME',
password = 'YOUR_PASSWORD',
)
with ApiClient(configuration) as api_client:
func_id = "2" # str |
online_function_call_request = OnlineFunctionCallRequest(
job=1,
task=1,
) # OnlineFunctionCallRequest | (optional)
try:
api_client.lambda_api.create_functions(
func_id,
online_function_call_request=online_function_call_request,
)
except exceptions.ApiException as e:
print("Exception when calling LambdaApi.create_functions(): %s\n" % e)
Parameters
| Name | Type | Description | Notes |
|---|---|---|---|
| func_id | str | ||
| online_function_call_request | OnlineFunctionCallRequest | [optional] |
There are also optional kwargs that control the function invocation behavior. Read more here.
Returned values
Returned type: Tuple[None, urllib3.HTTPResponse].
Returns a tuple with 2 values: (None, raw_response).
This endpoint does not have any return value, so None is always returned as the first value.
The second value is the raw response, which can be useful to get response parameters, such as
status code, headers, or raw response data. Read more about invocation parameters
and returned values here.
Authentication
accessTokenAuth, basicAuth, csrfAuth, csrfHeaderAuth, sessionAuth, tokenAuth
HTTP request headers
- Content-Type: application/json
- Accept: Not defined
HTTP response details
| Status code | Description | Response headers |
|---|---|---|
| 200 | Returns function invocation results | - |
create_requests
create_requests( function_call_request, x_organization=None, org=None, org_id=None, **kwargs )
Method calls the function
Example
from pprint import pprint
from cvat_sdk.api_client import Configuration, ApiClient, exceptions
from cvat_sdk.api_client.models import *
# Set up an API client
# Read Configuration class docs for more info about parameters and authentication methods
configuration = Configuration(
host = "http://localhost",
username = 'YOUR_USERNAME',
password = 'YOUR_PASSWORD',
)
with ApiClient(configuration) as api_client:
function_call_request = FunctionCallRequest(
function="function_example",
task=1,
job=1,
max_distance=1,
threshold=3.14,
cleanup=False,
conv_mask_to_poly=True,
conv_mask_to_poly=True,
mapping={
"key": LabelMappingEntryRequest(
name="name_example",
attributes={
"key": "key_example",
},
sublabels={
"key": SublabelMappingEntryRequest(
name="name_example",
attributes={
"key": "key_example",
},
),
},
),
},
) # FunctionCallRequest |
x_organization = "X-Organization_example" # str | Organization unique slug (optional)
org = "org_example" # str | Organization unique slug (optional)
org_id = 1 # int | Organization identifier (optional)
try:
(data, response) = api_client.lambda_api.create_requests(
function_call_request,
x_organization=x_organization,
org=org,
org_id=org_id,
)
pprint(data)
except exceptions.ApiException as e:
print("Exception when calling LambdaApi.create_requests(): %s\n" % e)
Parameters
| Name | Type | Description | Notes |
|---|---|---|---|
| function_call_request | FunctionCallRequest | ||
| x_organization | str | Organization unique slug | [optional] |
| org | str | Organization unique slug | [optional] |
| org_id | int | Organization identifier | [optional] |
There are also optional kwargs that control the function invocation behavior. Read more here.
Returned values
Returned type: Tuple[FunctionCall, urllib3.HTTPResponse].
Returns a tuple with 2 values: (parsed_response, raw_response).
The first value is a model parsed from the response data. The second value is the raw response, which can be useful to get response parameters, such as status code, headers, or raw response data. Read more about invocation parameters and returned values here.
Authentication
accessTokenAuth, basicAuth, csrfAuth, csrfHeaderAuth, sessionAuth, tokenAuth
HTTP request headers
- Content-Type: application/json
- Accept: application/vnd.cvat+json
HTTP response details
| Status code | Description | Response headers |
|---|---|---|
| 200 | - |
delete_requests
delete_requests( id, **kwargs )
Method cancels the request
Example
from pprint import pprint
from cvat_sdk.api_client import Configuration, ApiClient, exceptions
from cvat_sdk.api_client.models import *
# Set up an API client
# Read Configuration class docs for more info about parameters and authentication methods
configuration = Configuration(
host = "http://localhost",
username = 'YOUR_USERNAME',
password = 'YOUR_PASSWORD',
)
with ApiClient(configuration) as api_client:
id = "id_example" # str | Request id
try:
api_client.lambda_api.delete_requests(
id,)
except exceptions.ApiException as e:
print("Exception when calling LambdaApi.delete_requests(): %s\n" % e)
Parameters
| Name | Type | Description | Notes |
|---|---|---|---|
| id | str | Request id |
There are also optional kwargs that control the function invocation behavior. Read more here.
Returned values
Returned type: Tuple[None, urllib3.HTTPResponse].
Returns a tuple with 2 values: (None, raw_response).
This endpoint does not have any return value, so None is always returned as the first value.
The second value is the raw response, which can be useful to get response parameters, such as
status code, headers, or raw response data. Read more about invocation parameters
and returned values here.
Authentication
accessTokenAuth, basicAuth, csrfAuth, csrfHeaderAuth, sessionAuth, tokenAuth
HTTP request headers
- Content-Type: Not defined
- Accept: Not defined
HTTP response details
| Status code | Description | Response headers |
|---|---|---|
| 204 | No response body | - |
list_functions
list_functions( **kwargs )
Method returns a list of functions
Example
from pprint import pprint
from cvat_sdk.api_client import Configuration, ApiClient, exceptions
from cvat_sdk.api_client.models import *
# Set up an API client
# Read Configuration class docs for more info about parameters and authentication methods
configuration = Configuration(
host = "http://localhost",
username = 'YOUR_USERNAME',
password = 'YOUR_PASSWORD',
)
with ApiClient(configuration) as api_client:
try:
api_client.lambda_api.list_functions()
except exceptions.ApiException as e:
print("Exception when calling LambdaApi.list_functions(): %s\n" % e)
Parameters
This endpoint does not need any parameter.
There are also optional kwargs that control the function invocation behavior. Read more here.
Returned values
Returned type: Tuple[None, urllib3.HTTPResponse].
Returns a tuple with 2 values: (None, raw_response).
This endpoint does not have any return value, so None is always returned as the first value.
The second value is the raw response, which can be useful to get response parameters, such as
status code, headers, or raw response data. Read more about invocation parameters
and returned values here.
Authentication
accessTokenAuth, basicAuth, csrfAuth, csrfHeaderAuth, sessionAuth, tokenAuth
HTTP request headers
- Content-Type: Not defined
- Accept: Not defined
HTTP response details
| Status code | Description | Response headers |
|---|---|---|
| 200 | No response body | - |
list_requests
list_requests( **kwargs )
Method returns a list of requests
Example
from pprint import pprint
from cvat_sdk.api_client import Configuration, ApiClient, exceptions
from cvat_sdk.api_client.models import *
# Set up an API client
# Read Configuration class docs for more info about parameters and authentication methods
configuration = Configuration(
host = "http://localhost",
username = 'YOUR_USERNAME',
password = 'YOUR_PASSWORD',
)
with ApiClient(configuration) as api_client:
try:
(data, response) = api_client.lambda_api.list_requests()
pprint(data)
except exceptions.ApiException as e:
print("Exception when calling LambdaApi.list_requests(): %s\n" % e)
Parameters
This endpoint does not need any parameter.
There are also optional kwargs that control the function invocation behavior. Read more here.
Returned values
Returned type: Tuple[list[FunctionCall], urllib3.HTTPResponse].
Returns a tuple with 2 values: (parsed_response, raw_response).
The first value is a model parsed from the response data. The second value is the raw response, which can be useful to get response parameters, such as status code, headers, or raw response data. Read more about invocation parameters and returned values here.
Authentication
accessTokenAuth, basicAuth, csrfAuth, csrfHeaderAuth, sessionAuth, tokenAuth
HTTP request headers
- Content-Type: Not defined
- Accept: application/vnd.cvat+json
HTTP response details
| Status code | Description | Response headers |
|---|---|---|
| 200 | - |
retrieve_functions
retrieve_functions( func_id, **kwargs )
Method returns the information about the function
Example
from pprint import pprint
from cvat_sdk.api_client import Configuration, ApiClient, exceptions
from cvat_sdk.api_client.models import *
# Set up an API client
# Read Configuration class docs for more info about parameters and authentication methods
configuration = Configuration(
host = "http://localhost",
username = 'YOUR_USERNAME',
password = 'YOUR_PASSWORD',
)
with ApiClient(configuration) as api_client:
func_id = "2" # str |
try:
(data, response) = api_client.lambda_api.retrieve_functions(
func_id,)
pprint(data)
except exceptions.ApiException as e:
print("Exception when calling LambdaApi.retrieve_functions(): %s\n" % e)
Parameters
| Name | Type | Description | Notes |
|---|---|---|---|
| func_id | str |
There are also optional kwargs that control the function invocation behavior. Read more here.
Returned values
Returned type: Tuple[dict[str, typing.Union[typing.Any, none_type]], urllib3.HTTPResponse].
Returns a tuple with 2 values: (parsed_response, raw_response).
The first value is a model parsed from the response data. The second value is the raw response, which can be useful to get response parameters, such as status code, headers, or raw response data. Read more about invocation parameters and returned values here.
Authentication
accessTokenAuth, basicAuth, csrfAuth, csrfHeaderAuth, sessionAuth, tokenAuth
HTTP request headers
- Content-Type: Not defined
- Accept: application/vnd.cvat+json
HTTP response details
| Status code | Description | Response headers |
|---|---|---|
| 200 | Information about the function | - |
retrieve_requests
retrieve_requests( id, **kwargs )
Method returns the status of the request
Example
from pprint import pprint
from cvat_sdk.api_client import Configuration, ApiClient, exceptions
from cvat_sdk.api_client.models import *
# Set up an API client
# Read Configuration class docs for more info about parameters and authentication methods
configuration = Configuration(
host = "http://localhost",
username = 'YOUR_USERNAME',
password = 'YOUR_PASSWORD',
)
with ApiClient(configuration) as api_client:
id = "id_example" # str | Request id
try:
(data, response) = api_client.lambda_api.retrieve_requests(
id,)
pprint(data)
except exceptions.ApiException as e:
print("Exception when calling LambdaApi.retrieve_requests(): %s\n" % e)
Parameters
| Name | Type | Description | Notes |
|---|---|---|---|
| id | str | Request id |
There are also optional kwargs that control the function invocation behavior. Read more here.
Returned values
Returned type: Tuple[FunctionCall, urllib3.HTTPResponse].
Returns a tuple with 2 values: (parsed_response, raw_response).
The first value is a model parsed from the response data. The second value is the raw response, which can be useful to get response parameters, such as status code, headers, or raw response data. Read more about invocation parameters and returned values here.
Authentication
accessTokenAuth, basicAuth, csrfAuth, csrfHeaderAuth, sessionAuth, tokenAuth
HTTP request headers
- Content-Type: Not defined
- Accept: application/vnd.cvat+json
HTTP response details
| Status code | Description | Response headers |
|---|---|---|
| 200 | - |
11.2.1.1.13 - MembershipsApi class reference
All URIs are relative to http://localhost
| Method | HTTP request | Description |
|---|---|---|
| destroy | DELETE /api/memberships/{id} | Delete a membership |
| list | GET /api/memberships | List memberships |
| partial_update | PATCH /api/memberships/{id} | Update a membership |
| retrieve | GET /api/memberships/{id} | Get membership details |
destroy
destroy( id, **kwargs )
Delete a membership
Example
from pprint import pprint
from cvat_sdk.api_client import Configuration, ApiClient, exceptions
from cvat_sdk.api_client.models import *
# Set up an API client
# Read Configuration class docs for more info about parameters and authentication methods
configuration = Configuration(
host = "http://localhost",
username = 'YOUR_USERNAME',
password = 'YOUR_PASSWORD',
)
with ApiClient(configuration) as api_client:
id = 1 # int | A unique integer value identifying this membership.
try:
api_client.memberships_api.destroy(
id,)
except exceptions.ApiException as e:
print("Exception when calling MembershipsApi.destroy(): %s\n" % e)
Parameters
| Name | Type | Description | Notes |
|---|---|---|---|
| id | int | A unique integer value identifying this membership. |
There are also optional kwargs that control the function invocation behavior. Read more here.
Returned values
Returned type: Tuple[None, urllib3.HTTPResponse].
Returns a tuple with 2 values: (None, raw_response).
This endpoint does not have any return value, so None is always returned as the first value.
The second value is the raw response, which can be useful to get response parameters, such as
status code, headers, or raw response data. Read more about invocation parameters
and returned values here.
Authentication
accessTokenAuth, basicAuth, csrfAuth, csrfHeaderAuth, sessionAuth, tokenAuth
HTTP request headers
- Content-Type: Not defined
- Accept: Not defined
HTTP response details
| Status code | Description | Response headers |
|---|---|---|
| 204 | The membership has been deleted | - |
list
list( x_organization=None, filter=None, org=None, org_id=None, page=None, page_size=None, role=None, search=None, sort=None, user=None, **kwargs )
List memberships
Example
from pprint import pprint
from cvat_sdk.api_client import Configuration, ApiClient, exceptions
from cvat_sdk.api_client.models import *
# Set up an API client
# Read Configuration class docs for more info about parameters and authentication methods
configuration = Configuration(
host = "http://localhost",
username = 'YOUR_USERNAME',
password = 'YOUR_PASSWORD',
)
with ApiClient(configuration) as api_client:
x_organization = "X-Organization_example" # str | Organization unique slug (optional)
filter = "filter_example" # str | JSON Logic filter. This filter can be used to perform complex filtering by grouping rules. For example, using such a filter you can get all resources created by you: - {\"and\":[{\"==\":[{\"var\":\"owner\"},\"<user>\"]}]} Details about the syntax used can be found at the link: https://jsonlogic.com/ Available filter_fields: ['user', 'role', 'id']. (optional)
org = "org_example" # str | Organization unique slug (optional)
org_id = 1 # int | Organization identifier (optional)
page = 1 # int | A page number within the paginated result set. (optional)
page_size = 1 # int | Number of results to return per page. (optional)
role = "worker" # str | A simple equality filter for the role field (optional)
search = "search_example" # str | A search term. Available search_fields: ('user', 'role') (optional)
sort = "sort_example" # str | Which field to use when ordering the results. Available ordering_fields: ['user', 'role', 'id'] (optional)
user = "user_example" # str | A simple equality filter for the user field (optional)
try:
(data, response) = api_client.memberships_api.list(
x_organization=x_organization,
filter=filter,
org=org,
org_id=org_id,
page=page,
page_size=page_size,
role=role,
search=search,
sort=sort,
user=user,
)
pprint(data)
except exceptions.ApiException as e:
print("Exception when calling MembershipsApi.list(): %s\n" % e)
Parameters
| Name | Type | Description | Notes |
|---|---|---|---|
| x_organization | str | Organization unique slug | [optional] |
| filter | str | JSON Logic filter. This filter can be used to perform complex filtering by grouping rules. For example, using such a filter you can get all resources created by you: - {"and":[{"==":[{"var":"owner"}," |
[optional] |
| org | str | Organization unique slug | [optional] |
| org_id | int | Organization identifier | [optional] |
| page | int | A page number within the paginated result set. | [optional] |
| page_size | int | Number of results to return per page. | [optional] |
| role | str | A simple equality filter for the role field | [optional] |
| search | str | A search term. Available search_fields: (‘user’, ‘role’) | [optional] |
| sort | str | Which field to use when ordering the results. Available ordering_fields: [‘user’, ‘role’, ‘id’] | [optional] |
| user | str | A simple equality filter for the user field | [optional] |
There are also optional kwargs that control the function invocation behavior. Read more here.
Returned values
Returned type: Tuple[PaginatedMembershipReadList, urllib3.HTTPResponse].
Returns a tuple with 2 values: (parsed_response, raw_response).
The first value is a model parsed from the response data. The second value is the raw response, which can be useful to get response parameters, such as status code, headers, or raw response data. Read more about invocation parameters and returned values here.
Authentication
accessTokenAuth, basicAuth, csrfAuth, csrfHeaderAuth, sessionAuth, tokenAuth
HTTP request headers
- Content-Type: Not defined
- Accept: application/vnd.cvat+json
HTTP response details
| Status code | Description | Response headers |
|---|---|---|
| 200 | - |
partial_update
partial_update( id, patched_membership_write_request=None, **kwargs )
Update a membership
Example
from pprint import pprint
from cvat_sdk.api_client import Configuration, ApiClient, exceptions
from cvat_sdk.api_client.models import *
# Set up an API client
# Read Configuration class docs for more info about parameters and authentication methods
configuration = Configuration(
host = "http://localhost",
username = 'YOUR_USERNAME',
password = 'YOUR_PASSWORD',
)
with ApiClient(configuration) as api_client:
id = 1 # int | A unique integer value identifying this membership.
patched_membership_write_request = PatchedMembershipWriteRequest(
role=RoleEnum("worker"),
) # PatchedMembershipWriteRequest | (optional)
try:
(data, response) = api_client.memberships_api.partial_update(
id,
patched_membership_write_request=patched_membership_write_request,
)
pprint(data)
except exceptions.ApiException as e:
print("Exception when calling MembershipsApi.partial_update(): %s\n" % e)
Parameters
| Name | Type | Description | Notes |
|---|---|---|---|
| id | int | A unique integer value identifying this membership. | |
| patched_membership_write_request | PatchedMembershipWriteRequest | [optional] |
There are also optional kwargs that control the function invocation behavior. Read more here.
Returned values
Returned type: Tuple[MembershipRead, urllib3.HTTPResponse].
Returns a tuple with 2 values: (parsed_response, raw_response).
The first value is a model parsed from the response data. The second value is the raw response, which can be useful to get response parameters, such as status code, headers, or raw response data. Read more about invocation parameters and returned values here.
Authentication
accessTokenAuth, basicAuth, csrfAuth, csrfHeaderAuth, sessionAuth, tokenAuth
HTTP request headers
- Content-Type: application/json
- Accept: application/vnd.cvat+json
HTTP response details
| Status code | Description | Response headers |
|---|---|---|
| 200 | - |
retrieve
retrieve( id, **kwargs )
Get membership details
Example
from pprint import pprint
from cvat_sdk.api_client import Configuration, ApiClient, exceptions
from cvat_sdk.api_client.models import *
# Set up an API client
# Read Configuration class docs for more info about parameters and authentication methods
configuration = Configuration(
host = "http://localhost",
username = 'YOUR_USERNAME',
password = 'YOUR_PASSWORD',
)
with ApiClient(configuration) as api_client:
id = 1 # int | A unique integer value identifying this membership.
try:
(data, response) = api_client.memberships_api.retrieve(
id,)
pprint(data)
except exceptions.ApiException as e:
print("Exception when calling MembershipsApi.retrieve(): %s\n" % e)
Parameters
| Name | Type | Description | Notes |
|---|---|---|---|
| id | int | A unique integer value identifying this membership. |
There are also optional kwargs that control the function invocation behavior. Read more here.
Returned values
Returned type: Tuple[MembershipRead, urllib3.HTTPResponse].
Returns a tuple with 2 values: (parsed_response, raw_response).
The first value is a model parsed from the response data. The second value is the raw response, which can be useful to get response parameters, such as status code, headers, or raw response data. Read more about invocation parameters and returned values here.
Authentication
accessTokenAuth, basicAuth, csrfAuth, csrfHeaderAuth, sessionAuth, tokenAuth
HTTP request headers
- Content-Type: Not defined
- Accept: application/vnd.cvat+json
HTTP response details
| Status code | Description | Response headers |
|---|---|---|
| 200 | - |
11.2.1.1.14 - OrganizationsApi class reference
All URIs are relative to http://localhost
| Method | HTTP request | Description |
|---|---|---|
| create | POST /api/organizations | Create an organization |
| destroy | DELETE /api/organizations/{id} | Delete an organization |
| list | GET /api/organizations | List organizations |
| partial_update | PATCH /api/organizations/{id} | Update an organization |
| retrieve | GET /api/organizations/{id} | Get organization details |
create
create( organization_write_request, **kwargs )
Create an organization
Example
from pprint import pprint
from cvat_sdk.api_client import Configuration, ApiClient, exceptions
from cvat_sdk.api_client.models import *
# Set up an API client
# Read Configuration class docs for more info about parameters and authentication methods
configuration = Configuration(
host = "http://localhost",
username = 'YOUR_USERNAME',
password = 'YOUR_PASSWORD',
)
with ApiClient(configuration) as api_client:
organization_write_request = OrganizationWriteRequest(
slug="z",
name="name_example",
description="description_example",
contact={},
) # OrganizationWriteRequest |
try:
(data, response) = api_client.organizations_api.create(
organization_write_request,)
pprint(data)
except exceptions.ApiException as e:
print("Exception when calling OrganizationsApi.create(): %s\n" % e)
Parameters
| Name | Type | Description | Notes |
|---|---|---|---|
| organization_write_request | OrganizationWriteRequest |
There are also optional kwargs that control the function invocation behavior. Read more here.
Returned values
Returned type: Tuple[OrganizationRead, urllib3.HTTPResponse].
Returns a tuple with 2 values: (parsed_response, raw_response).
The first value is a model parsed from the response data. The second value is the raw response, which can be useful to get response parameters, such as status code, headers, or raw response data. Read more about invocation parameters and returned values here.
Authentication
accessTokenAuth, basicAuth, csrfAuth, csrfHeaderAuth, sessionAuth, tokenAuth
HTTP request headers
- Content-Type: application/json
- Accept: application/vnd.cvat+json
HTTP response details
| Status code | Description | Response headers |
|---|---|---|
| 201 | - |
destroy
destroy( id, **kwargs )
Delete an organization
Example
from pprint import pprint
from cvat_sdk.api_client import Configuration, ApiClient, exceptions
from cvat_sdk.api_client.models import *
# Set up an API client
# Read Configuration class docs for more info about parameters and authentication methods
configuration = Configuration(
host = "http://localhost",
username = 'YOUR_USERNAME',
password = 'YOUR_PASSWORD',
)
with ApiClient(configuration) as api_client:
id = 1 # int | A unique integer value identifying this organization.
try:
api_client.organizations_api.destroy(
id,)
except exceptions.ApiException as e:
print("Exception when calling OrganizationsApi.destroy(): %s\n" % e)
Parameters
| Name | Type | Description | Notes |
|---|---|---|---|
| id | int | A unique integer value identifying this organization. |
There are also optional kwargs that control the function invocation behavior. Read more here.
Returned values
Returned type: Tuple[None, urllib3.HTTPResponse].
Returns a tuple with 2 values: (None, raw_response).
This endpoint does not have any return value, so None is always returned as the first value.
The second value is the raw response, which can be useful to get response parameters, such as
status code, headers, or raw response data. Read more about invocation parameters
and returned values here.
Authentication
accessTokenAuth, basicAuth, csrfAuth, csrfHeaderAuth, sessionAuth, tokenAuth
HTTP request headers
- Content-Type: Not defined
- Accept: Not defined
HTTP response details
| Status code | Description | Response headers |
|---|---|---|
| 204 | The organization has been deleted | - |
list
list( filter=None, name=None, owner=None, page=None, page_size=None, search=None, slug=None, sort=None, **kwargs )
List organizations
Example
from pprint import pprint
from cvat_sdk.api_client import Configuration, ApiClient, exceptions
from cvat_sdk.api_client.models import *
# Set up an API client
# Read Configuration class docs for more info about parameters and authentication methods
configuration = Configuration(
host = "http://localhost",
username = 'YOUR_USERNAME',
password = 'YOUR_PASSWORD',
)
with ApiClient(configuration) as api_client:
filter = "filter_example" # str | JSON Logic filter. This filter can be used to perform complex filtering by grouping rules. For example, using such a filter you can get all resources created by you: - {\"and\":[{\"==\":[{\"var\":\"owner\"},\"<user>\"]}]} Details about the syntax used can be found at the link: https://jsonlogic.com/ Available filter_fields: ['name', 'owner', 'slug', 'id']. (optional)
name = "name_example" # str | A simple equality filter for the name field (optional)
owner = "owner_example" # str | A simple equality filter for the owner field (optional)
page = 1 # int | A page number within the paginated result set. (optional)
page_size = 1 # int | Number of results to return per page. (optional)
search = "search_example" # str | A search term. Available search_fields: ('name', 'owner', 'slug') (optional)
slug = "slug_example" # str | A simple equality filter for the slug field (optional)
sort = "sort_example" # str | Which field to use when ordering the results. Available ordering_fields: ['name', 'owner', 'slug', 'id'] (optional)
try:
(data, response) = api_client.organizations_api.list(
filter=filter,
name=name,
owner=owner,
page=page,
page_size=page_size,
search=search,
slug=slug,
sort=sort,
)
pprint(data)
except exceptions.ApiException as e:
print("Exception when calling OrganizationsApi.list(): %s\n" % e)
Parameters
| Name | Type | Description | Notes |
|---|---|---|---|
| filter | str | JSON Logic filter. This filter can be used to perform complex filtering by grouping rules. For example, using such a filter you can get all resources created by you: - {"and":[{"==":[{"var":"owner"}," |
[optional] |
| name | str | A simple equality filter for the name field | [optional] |
| owner | str | A simple equality filter for the owner field | [optional] |
| page | int | A page number within the paginated result set. | [optional] |
| page_size | int | Number of results to return per page. | [optional] |
| search | str | A search term. Available search_fields: (’name’, ‘owner’, ‘slug’) | [optional] |
| slug | str | A simple equality filter for the slug field | [optional] |
| sort | str | Which field to use when ordering the results. Available ordering_fields: [’name’, ‘owner’, ‘slug’, ‘id’] | [optional] |
There are also optional kwargs that control the function invocation behavior. Read more here.
Returned values
Returned type: Tuple[PaginatedOrganizationReadList, urllib3.HTTPResponse].
Returns a tuple with 2 values: (parsed_response, raw_response).
The first value is a model parsed from the response data. The second value is the raw response, which can be useful to get response parameters, such as status code, headers, or raw response data. Read more about invocation parameters and returned values here.
Authentication
accessTokenAuth, basicAuth, csrfAuth, csrfHeaderAuth, sessionAuth, tokenAuth
HTTP request headers
- Content-Type: Not defined
- Accept: application/vnd.cvat+json
HTTP response details
| Status code | Description | Response headers |
|---|---|---|
| 200 | - |
partial_update
partial_update( id, patched_organization_write_request=None, **kwargs )
Update an organization
Example
from pprint import pprint
from cvat_sdk.api_client import Configuration, ApiClient, exceptions
from cvat_sdk.api_client.models import *
# Set up an API client
# Read Configuration class docs for more info about parameters and authentication methods
configuration = Configuration(
host = "http://localhost",
username = 'YOUR_USERNAME',
password = 'YOUR_PASSWORD',
)
with ApiClient(configuration) as api_client:
id = 1 # int | A unique integer value identifying this organization.
patched_organization_write_request = PatchedOrganizationWriteRequest(
slug="z",
name="name_example",
description="description_example",
contact={},
) # PatchedOrganizationWriteRequest | (optional)
try:
(data, response) = api_client.organizations_api.partial_update(
id,
patched_organization_write_request=patched_organization_write_request,
)
pprint(data)
except exceptions.ApiException as e:
print("Exception when calling OrganizationsApi.partial_update(): %s\n" % e)
Parameters
| Name | Type | Description | Notes |
|---|---|---|---|
| id | int | A unique integer value identifying this organization. | |
| patched_organization_write_request | PatchedOrganizationWriteRequest | [optional] |
There are also optional kwargs that control the function invocation behavior. Read more here.
Returned values
Returned type: Tuple[OrganizationRead, urllib3.HTTPResponse].
Returns a tuple with 2 values: (parsed_response, raw_response).
The first value is a model parsed from the response data. The second value is the raw response, which can be useful to get response parameters, such as status code, headers, or raw response data. Read more about invocation parameters and returned values here.
Authentication
accessTokenAuth, basicAuth, csrfAuth, csrfHeaderAuth, sessionAuth, tokenAuth
HTTP request headers
- Content-Type: application/json
- Accept: application/vnd.cvat+json
HTTP response details
| Status code | Description | Response headers |
|---|---|---|
| 200 | - |
retrieve
retrieve( id, **kwargs )
Get organization details
Example
from pprint import pprint
from cvat_sdk.api_client import Configuration, ApiClient, exceptions
from cvat_sdk.api_client.models import *
# Set up an API client
# Read Configuration class docs for more info about parameters and authentication methods
configuration = Configuration(
host = "http://localhost",
username = 'YOUR_USERNAME',
password = 'YOUR_PASSWORD',
)
with ApiClient(configuration) as api_client:
id = 1 # int | A unique integer value identifying this organization.
try:
(data, response) = api_client.organizations_api.retrieve(
id,)
pprint(data)
except exceptions.ApiException as e:
print("Exception when calling OrganizationsApi.retrieve(): %s\n" % e)
Parameters
| Name | Type | Description | Notes |
|---|---|---|---|
| id | int | A unique integer value identifying this organization. |
There are also optional kwargs that control the function invocation behavior. Read more here.
Returned values
Returned type: Tuple[OrganizationRead, urllib3.HTTPResponse].
Returns a tuple with 2 values: (parsed_response, raw_response).
The first value is a model parsed from the response data. The second value is the raw response, which can be useful to get response parameters, such as status code, headers, or raw response data. Read more about invocation parameters and returned values here.
Authentication
accessTokenAuth, basicAuth, csrfAuth, csrfHeaderAuth, sessionAuth, tokenAuth
HTTP request headers
- Content-Type: Not defined
- Accept: application/vnd.cvat+json
HTTP response details
| Status code | Description | Response headers |
|---|---|---|
| 200 | - |
11.2.1.1.15 - ProjectsApi class reference
All URIs are relative to http://localhost
| Method | HTTP request | Description |
|---|---|---|
| create | POST /api/projects | Create a project |
| create_backup | POST /api/projects/backup/ | Recreate a project from a backup |
| create_backup_export | POST /api/projects/{id}/backup/export | Initiate process to backup resource |
| create_dataset | POST /api/projects/{id}/dataset/ | Import a dataset into a project |
| create_dataset_export | POST /api/projects/{id}/dataset/export | Initialize process to export resource as a dataset in a specific format |
| destroy | DELETE /api/projects/{id} | Delete a project |
| list | GET /api/projects | List projects |
| partial_update | PATCH /api/projects/{id} | Update a project |
| retrieve | GET /api/projects/{id} | Get project details |
| retrieve_preview | GET /api/projects/{id}/preview | Get a preview image for a project |
create
create( project_write_request, x_organization=None, org=None, org_id=None, **kwargs )
Create a project
Example
from pprint import pprint
from cvat_sdk.api_client import Configuration, ApiClient, exceptions
from cvat_sdk.api_client.models import *
# Set up an API client
# Read Configuration class docs for more info about parameters and authentication methods
configuration = Configuration(
host = "http://localhost",
username = 'YOUR_USERNAME',
password = 'YOUR_PASSWORD',
)
with ApiClient(configuration) as api_client:
project_write_request = ProjectWriteRequest(
name="name_example",
labels=[
PatchedLabelRequest(
id=1,
name="name_example",
color="color_example",
attributes=[
AttributeRequest(
id=1,
name="name_example",
mutable=True,
input_type=InputTypeEnum("checkbox"),
default_value="default_value_example",
values=[
"values_example",
],
),
],
deleted=True,
type=None,
svg="svg_example",
sublabels=[
SublabelRequest(
id=1,
name="name_example",
color="color_example",
attributes=[
AttributeRequest(
id=1,
name="name_example",
mutable=True,
input_type=InputTypeEnum("checkbox"),
default_value="default_value_example",
values=[
"values_example",
],
),
],
type=None,
has_parent=True,
),
],
),
],
owner_id=1,
assignee_id=1,
bug_tracker="bug_tracker_example",
target_storage=PatchedProjectWriteRequestTargetStorage(None),
source_storage=PatchedProjectWriteRequestTargetStorage(None),
) # ProjectWriteRequest |
x_organization = "X-Organization_example" # str | Organization unique slug (optional)
org = "org_example" # str | Organization unique slug (optional)
org_id = 1 # int | Organization identifier (optional)
try:
(data, response) = api_client.projects_api.create(
project_write_request,
x_organization=x_organization,
org=org,
org_id=org_id,
)
pprint(data)
except exceptions.ApiException as e:
print("Exception when calling ProjectsApi.create(): %s\n" % e)
Parameters
| Name | Type | Description | Notes |
|---|---|---|---|
| project_write_request | ProjectWriteRequest | ||
| x_organization | str | Organization unique slug | [optional] |
| org | str | Organization unique slug | [optional] |
| org_id | int | Organization identifier | [optional] |
There are also optional kwargs that control the function invocation behavior. Read more here.
Returned values
Returned type: Tuple[ProjectRead, urllib3.HTTPResponse].
Returns a tuple with 2 values: (parsed_response, raw_response).
The first value is a model parsed from the response data. The second value is the raw response, which can be useful to get response parameters, such as status code, headers, or raw response data. Read more about invocation parameters and returned values here.
Authentication
accessTokenAuth, basicAuth, csrfAuth, csrfHeaderAuth, sessionAuth, tokenAuth
HTTP request headers
- Content-Type: application/json
- Accept: application/vnd.cvat+json
HTTP response details
| Status code | Description | Response headers |
|---|---|---|
| 201 | - |
create_backup
create_backup( x_organization=None, cloud_storage_id=None, filename=None, location=None, org=None, org_id=None, project_file_request=None, **kwargs )
Recreate a project from a backup
The backup import process is as follows: The first request POST /api/projects/backup schedules a background job on the server in which the process of creating a project from the uploaded backup is carried out. To check the status of the import process, use GET /api/requests/rq_id, where rq_id is the request ID obtained from the response to the previous request. Once the import completes successfully, the response will contain the ID of the newly created project in the result_id field.
Example
from pprint import pprint
from cvat_sdk.api_client import Configuration, ApiClient, exceptions
from cvat_sdk.api_client.models import *
# Set up an API client
# Read Configuration class docs for more info about parameters and authentication methods
configuration = Configuration(
host = "http://localhost",
username = 'YOUR_USERNAME',
password = 'YOUR_PASSWORD',
)
with ApiClient(configuration) as api_client:
x_organization = "X-Organization_example" # str | Organization unique slug (optional)
cloud_storage_id = 1 # int | Storage id (optional)
filename = "filename_example" # str | Backup file name (optional)
location = "local" # str | Where to import the backup file from (optional) if omitted the server will use the default value of "local"
org = "org_example" # str | Organization unique slug (optional)
org_id = 1 # int | Organization identifier (optional)
project_file_request = ProjectFileRequest(
project_file=open('/path/to/file', 'rb'),
) # ProjectFileRequest | (optional)
try:
(data, response) = api_client.projects_api.create_backup(
x_organization=x_organization,
cloud_storage_id=cloud_storage_id,
filename=filename,
location=location,
org=org,
org_id=org_id,
project_file_request=project_file_request,
)
pprint(data)
except exceptions.ApiException as e:
print("Exception when calling ProjectsApi.create_backup(): %s\n" % e)
Parameters
| Name | Type | Description | Notes |
|---|---|---|---|
| x_organization | str | Organization unique slug | [optional] |
| cloud_storage_id | int | Storage id | [optional] |
| filename | str | Backup file name | [optional] |
| location | str | Where to import the backup file from | [optional] if omitted the server will use the default value of “local” |
| org | str | Organization unique slug | [optional] |
| org_id | int | Organization identifier | [optional] |
| project_file_request | ProjectFileRequest | [optional] |
There are also optional kwargs that control the function invocation behavior. Read more here.
Returned values
Returned type: Tuple[RqId, urllib3.HTTPResponse].
Returns a tuple with 2 values: (parsed_response, raw_response).
The first value is a model parsed from the response data. The second value is the raw response, which can be useful to get response parameters, such as status code, headers, or raw response data. Read more about invocation parameters and returned values here.
Authentication
accessTokenAuth, basicAuth, csrfAuth, csrfHeaderAuth, sessionAuth, tokenAuth
HTTP request headers
- Content-Type: application/json, multipart/form-data
- Accept: application/vnd.cvat+json
HTTP response details
| Status code | Description | Response headers |
|---|---|---|
| 202 | Import of the backup file has started | - |
create_backup_export
create_backup_export( id, cloud_storage_id=None, filename=None, lightweight=None, location=None, **kwargs )
Initiate process to backup resource
The request POST /api/<projects|tasks>/id/backup/export will initialize a background process to backup a resource. To check status of the process please, use GET /api/requests/<rq_id> where rq_id is request ID returned in the response for this endpoint.
Example
from pprint import pprint
from cvat_sdk.api_client import Configuration, ApiClient, exceptions
from cvat_sdk.api_client.models import *
# Set up an API client
# Read Configuration class docs for more info about parameters and authentication methods
configuration = Configuration(
host = "http://localhost",
username = 'YOUR_USERNAME',
password = 'YOUR_PASSWORD',
)
with ApiClient(configuration) as api_client:
id = 1 # int | A unique integer value identifying this project.
cloud_storage_id = 1 # int | Storage id (optional)
filename = "filename_example" # str | Backup file name (optional)
lightweight = True # bool | Makes a lightweight backup (without media files) for tasks whose media is located in cloud storage (optional) if omitted the server will use the default value of True
location = "cloud_storage" # str | Where need to save downloaded backup (optional)
try:
(data, response) = api_client.projects_api.create_backup_export(
id,
cloud_storage_id=cloud_storage_id,
filename=filename,
lightweight=lightweight,
location=location,
)
pprint(data)
except exceptions.ApiException as e:
print("Exception when calling ProjectsApi.create_backup_export(): %s\n" % e)
Parameters
| Name | Type | Description | Notes |
|---|---|---|---|
| id | int | A unique integer value identifying this project. | |
| cloud_storage_id | int | Storage id | [optional] |
| filename | str | Backup file name | [optional] |
| lightweight | bool | Makes a lightweight backup (without media files) for tasks whose media is located in cloud storage | [optional] if omitted the server will use the default value of True |
| location | str | Where need to save downloaded backup | [optional] |
There are also optional kwargs that control the function invocation behavior. Read more here.
Returned values
Returned type: Tuple[RqId, urllib3.HTTPResponse].
Returns a tuple with 2 values: (parsed_response, raw_response).
The first value is a model parsed from the response data. The second value is the raw response, which can be useful to get response parameters, such as status code, headers, or raw response data. Read more about invocation parameters and returned values here.
Authentication
accessTokenAuth, basicAuth, csrfAuth, csrfHeaderAuth, sessionAuth, tokenAuth
HTTP request headers
- Content-Type: Not defined
- Accept: application/vnd.cvat+json
HTTP response details
| Status code | Description | Response headers |
|---|---|---|
| 202 | Creating a backup file has been started | - |
| 400 | Wrong query parameters were passed | - |
| 409 | The backup process has already been initiated and is not yet finished | - |
create_dataset
create_dataset( id, cloud_storage_id=None, filename=None, format=None, location=None, dataset_file_request=None, **kwargs )
Import a dataset into a project
The request POST /api/projects/id/dataset initiates a background process to import dataset into a project. Please, use the GET /api/requests/<rq_id> endpoint for checking status of the process. The rq_id parameter can be found in the response on initiating request.
Example
from pprint import pprint
from cvat_sdk.api_client import Configuration, ApiClient, exceptions
from cvat_sdk.api_client.models import *
# Set up an API client
# Read Configuration class docs for more info about parameters and authentication methods
configuration = Configuration(
host = "http://localhost",
username = 'YOUR_USERNAME',
password = 'YOUR_PASSWORD',
)
with ApiClient(configuration) as api_client:
id = 1 # int | A unique integer value identifying this project.
cloud_storage_id = 1 # int | Storage id (optional)
filename = "filename_example" # str | Dataset file name (optional)
format = "format_example" # str | Desired dataset format name You can get the list of supported formats at: /server/annotation/formats (optional)
location = "cloud_storage" # str | Where to import the dataset from (optional)
dataset_file_request = DatasetFileRequest(
dataset_file=open('/path/to/file', 'rb'),
) # DatasetFileRequest | (optional)
try:
(data, response) = api_client.projects_api.create_dataset(
id,
cloud_storage_id=cloud_storage_id,
filename=filename,
format=format,
location=location,
dataset_file_request=dataset_file_request,
)
pprint(data)
except exceptions.ApiException as e:
print("Exception when calling ProjectsApi.create_dataset(): %s\n" % e)
Parameters
| Name | Type | Description | Notes |
|---|---|---|---|
| id | int | A unique integer value identifying this project. | |
| cloud_storage_id | int | Storage id | [optional] |
| filename | str | Dataset file name | [optional] |
| format | str | Desired dataset format name You can get the list of supported formats at: /server/annotation/formats | [optional] |
| location | str | Where to import the dataset from | [optional] |
| dataset_file_request | DatasetFileRequest | [optional] |
There are also optional kwargs that control the function invocation behavior. Read more here.
Returned values
Returned type: Tuple[RqId, urllib3.HTTPResponse].
Returns a tuple with 2 values: (parsed_response, raw_response).
The first value is a model parsed from the response data. The second value is the raw response, which can be useful to get response parameters, such as status code, headers, or raw response data. Read more about invocation parameters and returned values here.
Authentication
accessTokenAuth, basicAuth, csrfAuth, csrfHeaderAuth, sessionAuth, tokenAuth
HTTP request headers
- Content-Type: application/json, multipart/form-data
- Accept: application/vnd.cvat+json
HTTP response details
| Status code | Description | Response headers |
|---|---|---|
| 202 | Importing has been started | - |
| 400 | Failed to import dataset | - |
| 405 | Format is not available | - |
create_dataset_export
create_dataset_export( format, id, cloud_storage_id=None, filename=None, location=None, save_images=None, **kwargs )
Initialize process to export resource as a dataset in a specific format
The request POST /api/<projects|tasks|jobs>/id/dataset/export will initialize a background process to export a dataset. To check status of the process please, use GET /api/requests/<rq_id> where rq_id is request ID returned in the response for this endpoint.
Example
from pprint import pprint
from cvat_sdk.api_client import Configuration, ApiClient, exceptions
from cvat_sdk.api_client.models import *
# Set up an API client
# Read Configuration class docs for more info about parameters and authentication methods
configuration = Configuration(
host = "http://localhost",
username = 'YOUR_USERNAME',
password = 'YOUR_PASSWORD',
)
with ApiClient(configuration) as api_client:
format = "format_example" # str | Desired output format name You can get the list of supported formats at: /server/annotation/formats
id = 1 # int | A unique integer value identifying this project.
cloud_storage_id = 1 # int | Storage id (optional)
filename = "filename_example" # str | Desired output file name (optional)
location = "cloud_storage" # str | Where need to save downloaded dataset (optional)
save_images = False # bool | Include images or not (optional) if omitted the server will use the default value of False
try:
(data, response) = api_client.projects_api.create_dataset_export(
format,
id,
cloud_storage_id=cloud_storage_id,
filename=filename,
location=location,
save_images=save_images,
)
pprint(data)
except exceptions.ApiException as e:
print("Exception when calling ProjectsApi.create_dataset_export(): %s\n" % e)
Parameters
| Name | Type | Description | Notes |
|---|---|---|---|
| format | str | Desired output format name You can get the list of supported formats at: /server/annotation/formats | |
| id | int | A unique integer value identifying this project. | |
| cloud_storage_id | int | Storage id | [optional] |
| filename | str | Desired output file name | [optional] |
| location | str | Where need to save downloaded dataset | [optional] |
| save_images | bool | Include images or not | [optional] if omitted the server will use the default value of False |
There are also optional kwargs that control the function invocation behavior. Read more here.
Returned values
Returned type: Tuple[RqId, urllib3.HTTPResponse].
Returns a tuple with 2 values: (parsed_response, raw_response).
The first value is a model parsed from the response data. The second value is the raw response, which can be useful to get response parameters, such as status code, headers, or raw response data. Read more about invocation parameters and returned values here.
Authentication
accessTokenAuth, basicAuth, csrfAuth, csrfHeaderAuth, sessionAuth, tokenAuth
HTTP request headers
- Content-Type: Not defined
- Accept: application/vnd.cvat+json
HTTP response details
| Status code | Description | Response headers |
|---|---|---|
| 202 | Exporting has been started | - |
| 405 | Format is not available | - |
| 409 | Exporting is already in progress | - |
destroy
destroy( id, **kwargs )
Delete a project
Example
from pprint import pprint
from cvat_sdk.api_client import Configuration, ApiClient, exceptions
from cvat_sdk.api_client.models import *
# Set up an API client
# Read Configuration class docs for more info about parameters and authentication methods
configuration = Configuration(
host = "http://localhost",
username = 'YOUR_USERNAME',
password = 'YOUR_PASSWORD',
)
with ApiClient(configuration) as api_client:
id = 1 # int | A unique integer value identifying this project.
try:
api_client.projects_api.destroy(
id,)
except exceptions.ApiException as e:
print("Exception when calling ProjectsApi.destroy(): %s\n" % e)
Parameters
| Name | Type | Description | Notes |
|---|---|---|---|
| id | int | A unique integer value identifying this project. |
There are also optional kwargs that control the function invocation behavior. Read more here.
Returned values
Returned type: Tuple[None, urllib3.HTTPResponse].
Returns a tuple with 2 values: (None, raw_response).
This endpoint does not have any return value, so None is always returned as the first value.
The second value is the raw response, which can be useful to get response parameters, such as
status code, headers, or raw response data. Read more about invocation parameters
and returned values here.
Authentication
accessTokenAuth, basicAuth, csrfAuth, csrfHeaderAuth, sessionAuth, tokenAuth
HTTP request headers
- Content-Type: Not defined
- Accept: Not defined
HTTP response details
| Status code | Description | Response headers |
|---|---|---|
| 204 | The project has been deleted | - |
list
list( x_organization=None, assignee=None, filter=None, name=None, org=None, org_id=None, owner=None, page=None, page_size=None, search=None, sort=None, status=None, **kwargs )
List projects
Example
from pprint import pprint
from cvat_sdk.api_client import Configuration, ApiClient, exceptions
from cvat_sdk.api_client.models import *
# Set up an API client
# Read Configuration class docs for more info about parameters and authentication methods
configuration = Configuration(
host = "http://localhost",
username = 'YOUR_USERNAME',
password = 'YOUR_PASSWORD',
)
with ApiClient(configuration) as api_client:
x_organization = "X-Organization_example" # str | Organization unique slug (optional)
assignee = "assignee_example" # str | A simple equality filter for the assignee field (optional)
filter = "filter_example" # str | JSON Logic filter. This filter can be used to perform complex filtering by grouping rules. For example, using such a filter you can get all resources created by you: - {\"and\":[{\"==\":[{\"var\":\"owner\"},\"<user>\"]}]} Details about the syntax used can be found at the link: https://jsonlogic.com/ Available filter_fields: ['name', 'owner', 'assignee', 'status', 'id', 'updated_date']. (optional)
name = "name_example" # str | A simple equality filter for the name field (optional)
org = "org_example" # str | Organization unique slug (optional)
org_id = 1 # int | Organization identifier (optional)
owner = "owner_example" # str | A simple equality filter for the owner field (optional)
page = 1 # int | A page number within the paginated result set. (optional)
page_size = 1 # int | Number of results to return per page. (optional)
search = "search_example" # str | A search term. Available search_fields: ('name', 'owner', 'assignee', 'status') (optional)
sort = "sort_example" # str | Which field to use when ordering the results. Available ordering_fields: ['name', 'owner', 'assignee', 'status', 'id', 'updated_date'] (optional)
status = "annotation" # str | A simple equality filter for the status field (optional)
try:
(data, response) = api_client.projects_api.list(
x_organization=x_organization,
assignee=assignee,
filter=filter,
name=name,
org=org,
org_id=org_id,
owner=owner,
page=page,
page_size=page_size,
search=search,
sort=sort,
status=status,
)
pprint(data)
except exceptions.ApiException as e:
print("Exception when calling ProjectsApi.list(): %s\n" % e)
Parameters
| Name | Type | Description | Notes |
|---|---|---|---|
| x_organization | str | Organization unique slug | [optional] |
| assignee | str | A simple equality filter for the assignee field | [optional] |
| filter | str | JSON Logic filter. This filter can be used to perform complex filtering by grouping rules. For example, using such a filter you can get all resources created by you: - {"and":[{"==":[{"var":"owner"}," |
[optional] |
| name | str | A simple equality filter for the name field | [optional] |
| org | str | Organization unique slug | [optional] |
| org_id | int | Organization identifier | [optional] |
| owner | str | A simple equality filter for the owner field | [optional] |
| page | int | A page number within the paginated result set. | [optional] |
| page_size | int | Number of results to return per page. | [optional] |
| search | str | A search term. Available search_fields: (’name’, ‘owner’, ‘assignee’, ‘status’) | [optional] |
| sort | str | Which field to use when ordering the results. Available ordering_fields: [’name’, ‘owner’, ‘assignee’, ‘status’, ‘id’, ‘updated_date’] | [optional] |
| status | str | A simple equality filter for the status field | [optional] |
There are also optional kwargs that control the function invocation behavior. Read more here.
Returned values
Returned type: Tuple[PaginatedProjectReadList, urllib3.HTTPResponse].
Returns a tuple with 2 values: (parsed_response, raw_response).
The first value is a model parsed from the response data. The second value is the raw response, which can be useful to get response parameters, such as status code, headers, or raw response data. Read more about invocation parameters and returned values here.
Authentication
accessTokenAuth, basicAuth, csrfAuth, csrfHeaderAuth, sessionAuth, tokenAuth
HTTP request headers
- Content-Type: Not defined
- Accept: application/vnd.cvat+json
HTTP response details
| Status code | Description | Response headers |
|---|---|---|
| 200 | - |
partial_update
partial_update( id, patched_project_write_request=None, **kwargs )
Update a project
Example
from pprint import pprint
from cvat_sdk.api_client import Configuration, ApiClient, exceptions
from cvat_sdk.api_client.models import *
# Set up an API client
# Read Configuration class docs for more info about parameters and authentication methods
configuration = Configuration(
host = "http://localhost",
username = 'YOUR_USERNAME',
password = 'YOUR_PASSWORD',
)
with ApiClient(configuration) as api_client:
id = 1 # int | A unique integer value identifying this project.
patched_project_write_request = PatchedProjectWriteRequest(
name="name_example",
labels=[
PatchedLabelRequest(
id=1,
name="name_example",
color="color_example",
attributes=[
AttributeRequest(
id=1,
name="name_example",
mutable=True,
input_type=InputTypeEnum("checkbox"),
default_value="default_value_example",
values=[
"values_example",
],
),
],
deleted=True,
type=None,
svg="svg_example",
sublabels=[
SublabelRequest(
id=1,
name="name_example",
color="color_example",
attributes=[
AttributeRequest(
id=1,
name="name_example",
mutable=True,
input_type=InputTypeEnum("checkbox"),
default_value="default_value_example",
values=[
"values_example",
],
),
],
type=None,
has_parent=True,
),
],
),
],
owner_id=1,
assignee_id=1,
bug_tracker="bug_tracker_example",
target_storage=PatchedProjectWriteRequestTargetStorage(None),
source_storage=PatchedProjectWriteRequestTargetStorage(None),
organization_id=1,
) # PatchedProjectWriteRequest | (optional)
try:
(data, response) = api_client.projects_api.partial_update(
id,
patched_project_write_request=patched_project_write_request,
)
pprint(data)
except exceptions.ApiException as e:
print("Exception when calling ProjectsApi.partial_update(): %s\n" % e)
Parameters
| Name | Type | Description | Notes |
|---|---|---|---|
| id | int | A unique integer value identifying this project. | |
| patched_project_write_request | PatchedProjectWriteRequest | [optional] |
There are also optional kwargs that control the function invocation behavior. Read more here.
Returned values
Returned type: Tuple[ProjectRead, urllib3.HTTPResponse].
Returns a tuple with 2 values: (parsed_response, raw_response).
The first value is a model parsed from the response data. The second value is the raw response, which can be useful to get response parameters, such as status code, headers, or raw response data. Read more about invocation parameters and returned values here.
Authentication
accessTokenAuth, basicAuth, csrfAuth, csrfHeaderAuth, sessionAuth, tokenAuth
HTTP request headers
- Content-Type: application/json
- Accept: application/vnd.cvat+json
HTTP response details
| Status code | Description | Response headers |
|---|---|---|
| 200 | - |
retrieve
retrieve( id, **kwargs )
Get project details
Example
from pprint import pprint
from cvat_sdk.api_client import Configuration, ApiClient, exceptions
from cvat_sdk.api_client.models import *
# Set up an API client
# Read Configuration class docs for more info about parameters and authentication methods
configuration = Configuration(
host = "http://localhost",
username = 'YOUR_USERNAME',
password = 'YOUR_PASSWORD',
)
with ApiClient(configuration) as api_client:
id = 1 # int | A unique integer value identifying this project.
try:
(data, response) = api_client.projects_api.retrieve(
id,)
pprint(data)
except exceptions.ApiException as e:
print("Exception when calling ProjectsApi.retrieve(): %s\n" % e)
Parameters
| Name | Type | Description | Notes |
|---|---|---|---|
| id | int | A unique integer value identifying this project. |
There are also optional kwargs that control the function invocation behavior. Read more here.
Returned values
Returned type: Tuple[ProjectRead, urllib3.HTTPResponse].
Returns a tuple with 2 values: (parsed_response, raw_response).
The first value is a model parsed from the response data. The second value is the raw response, which can be useful to get response parameters, such as status code, headers, or raw response data. Read more about invocation parameters and returned values here.
Authentication
accessTokenAuth, basicAuth, csrfAuth, csrfHeaderAuth, sessionAuth, tokenAuth
HTTP request headers
- Content-Type: Not defined
- Accept: application/vnd.cvat+json
HTTP response details
| Status code | Description | Response headers |
|---|---|---|
| 200 | - |
retrieve_preview
retrieve_preview( id, **kwargs )
Get a preview image for a project
Example
from pprint import pprint
from cvat_sdk.api_client import Configuration, ApiClient, exceptions
from cvat_sdk.api_client.models import *
# Set up an API client
# Read Configuration class docs for more info about parameters and authentication methods
configuration = Configuration(
host = "http://localhost",
username = 'YOUR_USERNAME',
password = 'YOUR_PASSWORD',
)
with ApiClient(configuration) as api_client:
id = 1 # int | A unique integer value identifying this project.
try:
api_client.projects_api.retrieve_preview(
id,)
except exceptions.ApiException as e:
print("Exception when calling ProjectsApi.retrieve_preview(): %s\n" % e)
Parameters
| Name | Type | Description | Notes |
|---|---|---|---|
| id | int | A unique integer value identifying this project. |
There are also optional kwargs that control the function invocation behavior. Read more here.
Returned values
Returned type: Tuple[None, urllib3.HTTPResponse].
Returns a tuple with 2 values: (None, raw_response).
This endpoint does not have any return value, so None is always returned as the first value.
The second value is the raw response, which can be useful to get response parameters, such as
status code, headers, or raw response data. Read more about invocation parameters
and returned values here.
Authentication
accessTokenAuth, basicAuth, csrfAuth, csrfHeaderAuth, sessionAuth, tokenAuth
HTTP request headers
- Content-Type: Not defined
- Accept: Not defined
HTTP response details
| Status code | Description | Response headers |
|---|---|---|
| 200 | Project image preview | - |
| 404 | Project image preview not found | - |
11.2.1.1.16 - QualityApi class reference
All URIs are relative to http://localhost
| Method | HTTP request | Description |
|---|---|---|
| create_report | POST /api/quality/reports | Create a quality report |
| list_conflicts | GET /api/quality/conflicts | List annotation conflicts in a quality report |
| list_reports | GET /api/quality/reports | Method returns a paginated list of quality reports. |
| list_settings | GET /api/quality/settings | List quality settings instances |
| partial_update_settings | PATCH /api/quality/settings/{id} | Update a quality settings instance |
| retrieve_report | GET /api/quality/reports/{id} | Get quality report details |
| retrieve_report_data | GET /api/quality/reports/{id}/data | Get quality report contents |
| retrieve_settings | GET /api/quality/settings/{id} | Get quality settings instance details |
create_report
create_report( rq_id=None, quality_report_create_request=None, **kwargs )
Create a quality report
Deprecation warning: Utilizing this endpoint to check the computation status is no longer possible. Consider using common requests API: GET /api/requests/<rq_id>
Example
from pprint import pprint
from cvat_sdk.api_client import Configuration, ApiClient, exceptions
from cvat_sdk.api_client.models import *
# Set up an API client
# Read Configuration class docs for more info about parameters and authentication methods
configuration = Configuration(
host = "http://localhost",
username = 'YOUR_USERNAME',
password = 'YOUR_PASSWORD',
)
with ApiClient(configuration) as api_client:
rq_id = "rq_id_example" # str | The report creation request id. Can be specified to check the report creation status. (optional)
quality_report_create_request = QualityReportCreateRequest(
task_id=1,
project_id=1,
) # QualityReportCreateRequest | (optional)
try:
(data, response) = api_client.quality_api.create_report(
rq_id=rq_id,
quality_report_create_request=quality_report_create_request,
)
pprint(data)
except exceptions.ApiException as e:
print("Exception when calling QualityApi.create_report(): %s\n" % e)
Parameters
| Name | Type | Description | Notes |
|---|---|---|---|
| rq_id | str | The report creation request id. Can be specified to check the report creation status. | [optional] |
| quality_report_create_request | QualityReportCreateRequest | [optional] |
There are also optional kwargs that control the function invocation behavior. Read more here.
Returned values
Returned type: Tuple[QualityReport, urllib3.HTTPResponse].
Returns a tuple with 2 values: (parsed_response, raw_response).
The first value is a model parsed from the response data. The second value is the raw response, which can be useful to get response parameters, such as status code, headers, or raw response data. Read more about invocation parameters and returned values here.
Authentication
accessTokenAuth, basicAuth, csrfAuth, csrfHeaderAuth, sessionAuth, tokenAuth
HTTP request headers
- Content-Type: application/json
- Accept: application/vnd.cvat+json
HTTP response details
| Status code | Description | Response headers |
|---|---|---|
| 201 | - | |
| 202 | A quality report request has been enqueued, the request id is returned. The request status can be checked at this endpoint by passing the rq_id as the query parameter. If the request id is specified, this response means the quality report request is queued or is being processed. | - |
| 400 | Invalid or failed request, check the response data for details | - |
list_conflicts
list_conflicts( x_organization=None, filter=None, frame=None, job_id=None, org=None, org_id=None, page=None, page_size=None, project_id=None, report_id=None, severity=None, sort=None, task_id=None, type=None, **kwargs )
List annotation conflicts in a quality report
Example
from pprint import pprint
from cvat_sdk.api_client import Configuration, ApiClient, exceptions
from cvat_sdk.api_client.models import *
# Set up an API client
# Read Configuration class docs for more info about parameters and authentication methods
configuration = Configuration(
host = "http://localhost",
username = 'YOUR_USERNAME',
password = 'YOUR_PASSWORD',
)
with ApiClient(configuration) as api_client:
x_organization = "X-Organization_example" # str | Organization unique slug (optional)
filter = "filter_example" # str | JSON Logic filter. This filter can be used to perform complex filtering by grouping rules. For example, using such a filter you can get all resources created by you: - {\"and\":[{\"==\":[{\"var\":\"owner\"},\"<user>\"]}]} Details about the syntax used can be found at the link: https://jsonlogic.com/ Available filter_fields: ['id', 'frame', 'type', 'job_id', 'task_id', 'project_id', 'severity']. (optional)
frame = 1 # int | A simple equality filter for the frame field (optional)
job_id = 1 # int | A simple equality filter for the job_id field (optional)
org = "org_example" # str | Organization unique slug (optional)
org_id = 1 # int | Organization identifier (optional)
page = 1 # int | A page number within the paginated result set. (optional)
page_size = 1 # int | Number of results to return per page. (optional)
project_id = 1 # int | A simple equality filter for the project_id field (optional)
report_id = 1 # int | A simple equality filter for report id (optional)
severity = "warning" # str | A simple equality filter for the severity field (optional)
sort = "sort_example" # str | Which field to use when ordering the results. Available ordering_fields: ['id', 'frame', 'type', 'job_id', 'task_id', 'project_id', 'severity'] (optional)
task_id = 1 # int | A simple equality filter for the task_id field (optional)
type = "missing_annotation" # str | A simple equality filter for the type field (optional)
try:
(data, response) = api_client.quality_api.list_conflicts(
x_organization=x_organization,
filter=filter,
frame=frame,
job_id=job_id,
org=org,
org_id=org_id,
page=page,
page_size=page_size,
project_id=project_id,
report_id=report_id,
severity=severity,
sort=sort,
task_id=task_id,
type=type,
)
pprint(data)
except exceptions.ApiException as e:
print("Exception when calling QualityApi.list_conflicts(): %s\n" % e)
Parameters
| Name | Type | Description | Notes |
|---|---|---|---|
| x_organization | str | Organization unique slug | [optional] |
| filter | str | JSON Logic filter. This filter can be used to perform complex filtering by grouping rules. For example, using such a filter you can get all resources created by you: - {"and":[{"==":[{"var":"owner"}," |
[optional] |
| frame | int | A simple equality filter for the frame field | [optional] |
| job_id | int | A simple equality filter for the job_id field | [optional] |
| org | str | Organization unique slug | [optional] |
| org_id | int | Organization identifier | [optional] |
| page | int | A page number within the paginated result set. | [optional] |
| page_size | int | Number of results to return per page. | [optional] |
| project_id | int | A simple equality filter for the project_id field | [optional] |
| report_id | int | A simple equality filter for report id | [optional] |
| severity | str | A simple equality filter for the severity field | [optional] |
| sort | str | Which field to use when ordering the results. Available ordering_fields: [‘id’, ‘frame’, ’type’, ‘job_id’, ’task_id’, ‘project_id’, ‘severity’] | [optional] |
| task_id | int | A simple equality filter for the task_id field | [optional] |
| type | str | A simple equality filter for the type field | [optional] |
There are also optional kwargs that control the function invocation behavior. Read more here.
Returned values
Returned type: Tuple[PaginatedAnnotationConflictList, urllib3.HTTPResponse].
Returns a tuple with 2 values: (parsed_response, raw_response).
The first value is a model parsed from the response data. The second value is the raw response, which can be useful to get response parameters, such as status code, headers, or raw response data. Read more about invocation parameters and returned values here.
Authentication
accessTokenAuth, basicAuth, csrfAuth, csrfHeaderAuth, sessionAuth, tokenAuth
HTTP request headers
- Content-Type: Not defined
- Accept: application/vnd.cvat+json
HTTP response details
| Status code | Description | Response headers |
|---|---|---|
| 200 | - |
list_reports
list_reports( x_organization=None, filter=None, job_id=None, org=None, org_id=None, page=None, page_size=None, parent_id=None, project_id=None, sort=None, target=None, task_id=None, **kwargs )
Method returns a paginated list of quality reports.
Please note that children reports are included by default if the "task_id", "project_id" filters are used. If you want to restrict the list of results to a specific report type, use the "target" parameter. The "parent_id" filter includes all the nested reports recursively. For instance, if the "parent_id" is a project report, all the related task and job reports will be returned. Please note that a report can be reused in several parent reports, but the "parent_id" field in responses will include only the first parent report id. The "parent_id" filter still returns all the relevant nested reports, even though the response "parent_id" values may be different from the requested one.
Example
from pprint import pprint
from cvat_sdk.api_client import Configuration, ApiClient, exceptions
from cvat_sdk.api_client.models import *
# Set up an API client
# Read Configuration class docs for more info about parameters and authentication methods
configuration = Configuration(
host = "http://localhost",
username = 'YOUR_USERNAME',
password = 'YOUR_PASSWORD',
)
with ApiClient(configuration) as api_client:
x_organization = "X-Organization_example" # str | Organization unique slug (optional)
filter = "filter_example" # str | JSON Logic filter. This filter can be used to perform complex filtering by grouping rules. For example, using such a filter you can get all resources created by you: - {\"and\":[{\"==\":[{\"var\":\"owner\"},\"<user>\"]}]} Details about the syntax used can be found at the link: https://jsonlogic.com/ Available filter_fields: ['id', 'job_id', 'task_id', 'project_id', 'created_date', 'gt_last_updated', 'target_last_updated']. (optional)
job_id = 1 # int | A simple equality filter for the job_id field (optional)
org = "org_example" # str | Organization unique slug (optional)
org_id = 1 # int | Organization identifier (optional)
page = 1 # int | A page number within the paginated result set. (optional)
page_size = 1 # int | Number of results to return per page. (optional)
parent_id = 1 # int | A simple equality filter for parent id (optional)
project_id = 1 # int | A simple equality filter for project id (optional)
sort = "sort_example" # str | Which field to use when ordering the results. Available ordering_fields: ['id', 'job_id', 'task_id', 'project_id', 'created_date', 'gt_last_updated', 'target_last_updated'] (optional)
target = "job" # str | A simple equality filter for target (optional)
task_id = 1 # int | A simple equality filter for task id (optional)
try:
(data, response) = api_client.quality_api.list_reports(
x_organization=x_organization,
filter=filter,
job_id=job_id,
org=org,
org_id=org_id,
page=page,
page_size=page_size,
parent_id=parent_id,
project_id=project_id,
sort=sort,
target=target,
task_id=task_id,
)
pprint(data)
except exceptions.ApiException as e:
print("Exception when calling QualityApi.list_reports(): %s\n" % e)
Parameters
| Name | Type | Description | Notes |
|---|---|---|---|
| x_organization | str | Organization unique slug | [optional] |
| filter | str | JSON Logic filter. This filter can be used to perform complex filtering by grouping rules. For example, using such a filter you can get all resources created by you: - {"and":[{"==":[{"var":"owner"}," |
[optional] |
| job_id | int | A simple equality filter for the job_id field | [optional] |
| org | str | Organization unique slug | [optional] |
| org_id | int | Organization identifier | [optional] |
| page | int | A page number within the paginated result set. | [optional] |
| page_size | int | Number of results to return per page. | [optional] |
| parent_id | int | A simple equality filter for parent id | [optional] |
| project_id | int | A simple equality filter for project id | [optional] |
| sort | str | Which field to use when ordering the results. Available ordering_fields: [‘id’, ‘job_id’, ’task_id’, ‘project_id’, ‘created_date’, ‘gt_last_updated’, ’target_last_updated’] | [optional] |
| target | str | A simple equality filter for target | [optional] |
| task_id | int | A simple equality filter for task id | [optional] |
There are also optional kwargs that control the function invocation behavior. Read more here.
Returned values
Returned type: Tuple[PaginatedQualityReportList, urllib3.HTTPResponse].
Returns a tuple with 2 values: (parsed_response, raw_response).
The first value is a model parsed from the response data. The second value is the raw response, which can be useful to get response parameters, such as status code, headers, or raw response data. Read more about invocation parameters and returned values here.
Authentication
accessTokenAuth, basicAuth, csrfAuth, csrfHeaderAuth, sessionAuth, tokenAuth
HTTP request headers
- Content-Type: Not defined
- Accept: application/vnd.cvat+json
HTTP response details
| Status code | Description | Response headers |
|---|---|---|
| 200 | - |
list_settings
list_settings( x_organization=None, filter=None, inherit=None, org=None, org_id=None, page=None, page_size=None, parent_type=None, project_id=None, sort=None, task_id=None, **kwargs )
List quality settings instances
Please note that child task settings are included by default if the "project_id" filter is used. If you want to restrict results only to a specific parent type, use the "parent_type" parameter.
Example
from pprint import pprint
from cvat_sdk.api_client import Configuration, ApiClient, exceptions
from cvat_sdk.api_client.models import *
# Set up an API client
# Read Configuration class docs for more info about parameters and authentication methods
configuration = Configuration(
host = "http://localhost",
username = 'YOUR_USERNAME',
password = 'YOUR_PASSWORD',
)
with ApiClient(configuration) as api_client:
x_organization = "X-Organization_example" # str | Organization unique slug (optional)
filter = "filter_example" # str | JSON Logic filter. This filter can be used to perform complex filtering by grouping rules. For example, using such a filter you can get all resources created by you: - {\"and\":[{\"==\":[{\"var\":\"owner\"},\"<user>\"]}]} Details about the syntax used can be found at the link: https://jsonlogic.com/ Available filter_fields: ['id', 'task_id', 'project_id', 'inherit', 'created_date', 'updated_date']. (optional)
inherit = True # bool | A simple equality filter for the inherit field (optional)
org = "org_example" # str | Organization unique slug (optional)
org_id = 1 # int | Organization identifier (optional)
page = 1 # int | A page number within the paginated result set. (optional)
page_size = 1 # int | Number of results to return per page. (optional)
parent_type = "project" # str | A simple equality filter for parent instance type (optional)
project_id = 1 # int | A simple equality filter for project id (optional)
sort = "sort_example" # str | Which field to use when ordering the results. Available ordering_fields: ['id', 'task_id', 'project_id', 'inherit', 'created_date', 'updated_date'] (optional)
task_id = 1 # int | A simple equality filter for the task_id field (optional)
try:
(data, response) = api_client.quality_api.list_settings(
x_organization=x_organization,
filter=filter,
inherit=inherit,
org=org,
org_id=org_id,
page=page,
page_size=page_size,
parent_type=parent_type,
project_id=project_id,
sort=sort,
task_id=task_id,
)
pprint(data)
except exceptions.ApiException as e:
print("Exception when calling QualityApi.list_settings(): %s\n" % e)
Parameters
| Name | Type | Description | Notes |
|---|---|---|---|
| x_organization | str | Organization unique slug | [optional] |
| filter | str | JSON Logic filter. This filter can be used to perform complex filtering by grouping rules. For example, using such a filter you can get all resources created by you: - {"and":[{"==":[{"var":"owner"}," |
[optional] |
| inherit | bool | A simple equality filter for the inherit field | [optional] |
| org | str | Organization unique slug | [optional] |
| org_id | int | Organization identifier | [optional] |
| page | int | A page number within the paginated result set. | [optional] |
| page_size | int | Number of results to return per page. | [optional] |
| parent_type | str | A simple equality filter for parent instance type | [optional] |
| project_id | int | A simple equality filter for project id | [optional] |
| sort | str | Which field to use when ordering the results. Available ordering_fields: [‘id’, ’task_id’, ‘project_id’, ‘inherit’, ‘created_date’, ‘updated_date’] | [optional] |
| task_id | int | A simple equality filter for the task_id field | [optional] |
There are also optional kwargs that control the function invocation behavior. Read more here.
Returned values
Returned type: Tuple[PaginatedQualitySettingsList, urllib3.HTTPResponse].
Returns a tuple with 2 values: (parsed_response, raw_response).
The first value is a model parsed from the response data. The second value is the raw response, which can be useful to get response parameters, such as status code, headers, or raw response data. Read more about invocation parameters and returned values here.
Authentication
accessTokenAuth, basicAuth, csrfAuth, csrfHeaderAuth, sessionAuth, tokenAuth
HTTP request headers
- Content-Type: Not defined
- Accept: application/vnd.cvat+json
HTTP response details
| Status code | Description | Response headers |
|---|---|---|
| 200 | - |
partial_update_settings
partial_update_settings( id, patched_quality_settings_request=None, **kwargs )
Update a quality settings instance
Example
from pprint import pprint
from cvat_sdk.api_client import Configuration, ApiClient, exceptions
from cvat_sdk.api_client.models import *
# Set up an API client
# Read Configuration class docs for more info about parameters and authentication methods
configuration = Configuration(
host = "http://localhost",
username = 'YOUR_USERNAME',
password = 'YOUR_PASSWORD',
)
with ApiClient(configuration) as api_client:
id = 1 # int | An id of a quality settings instance
patched_quality_settings_request = PatchedQualitySettingsRequest(
job_filter="job_filter_example",
inherit=True,
target_metric=None,
target_metric_threshold=0,
max_validations_per_job=0,
iou_threshold=0.4,
oks_sigma=0.09,
point_size_base=None,
line_thickness=0.01,
low_overlap_threshold=0.8,
compare_line_orientation=True,
line_orientation_threshold=0.1,
compare_groups=True,
group_match_threshold=0.5,
check_covered_annotations=True,
object_visibility_threshold=0.05,
panoptic_comparison=True,
compare_attributes=True,
empty_is_annotated=False,
) # PatchedQualitySettingsRequest | (optional)
try:
(data, response) = api_client.quality_api.partial_update_settings(
id,
patched_quality_settings_request=patched_quality_settings_request,
)
pprint(data)
except exceptions.ApiException as e:
print("Exception when calling QualityApi.partial_update_settings(): %s\n" % e)
Parameters
| Name | Type | Description | Notes |
|---|---|---|---|
| id | int | An id of a quality settings instance | |
| patched_quality_settings_request | PatchedQualitySettingsRequest | [optional] |
There are also optional kwargs that control the function invocation behavior. Read more here.
Returned values
Returned type: Tuple[QualitySettings, urllib3.HTTPResponse].
Returns a tuple with 2 values: (parsed_response, raw_response).
The first value is a model parsed from the response data. The second value is the raw response, which can be useful to get response parameters, such as status code, headers, or raw response data. Read more about invocation parameters and returned values here.
Authentication
accessTokenAuth, basicAuth, csrfAuth, csrfHeaderAuth, sessionAuth, tokenAuth
HTTP request headers
- Content-Type: application/json
- Accept: application/vnd.cvat+json
HTTP response details
| Status code | Description | Response headers |
|---|---|---|
| 200 | - |
retrieve_report
retrieve_report( id, **kwargs )
Get quality report details
Example
from pprint import pprint
from cvat_sdk.api_client import Configuration, ApiClient, exceptions
from cvat_sdk.api_client.models import *
# Set up an API client
# Read Configuration class docs for more info about parameters and authentication methods
configuration = Configuration(
host = "http://localhost",
username = 'YOUR_USERNAME',
password = 'YOUR_PASSWORD',
)
with ApiClient(configuration) as api_client:
id = 1 # int | A unique integer value identifying this quality report.
try:
(data, response) = api_client.quality_api.retrieve_report(
id,)
pprint(data)
except exceptions.ApiException as e:
print("Exception when calling QualityApi.retrieve_report(): %s\n" % e)
Parameters
| Name | Type | Description | Notes |
|---|---|---|---|
| id | int | A unique integer value identifying this quality report. |
There are also optional kwargs that control the function invocation behavior. Read more here.
Returned values
Returned type: Tuple[QualityReport, urllib3.HTTPResponse].
Returns a tuple with 2 values: (parsed_response, raw_response).
The first value is a model parsed from the response data. The second value is the raw response, which can be useful to get response parameters, such as status code, headers, or raw response data. Read more about invocation parameters and returned values here.
Authentication
accessTokenAuth, basicAuth, csrfAuth, csrfHeaderAuth, sessionAuth, tokenAuth
HTTP request headers
- Content-Type: Not defined
- Accept: application/vnd.cvat+json
HTTP response details
| Status code | Description | Response headers |
|---|---|---|
| 200 | - |
retrieve_report_data
retrieve_report_data( id, format=None, **kwargs )
Get quality report contents
Example
from pprint import pprint
from cvat_sdk.api_client import Configuration, ApiClient, exceptions
from cvat_sdk.api_client.models import *
# Set up an API client
# Read Configuration class docs for more info about parameters and authentication methods
configuration = Configuration(
host = "http://localhost",
username = 'YOUR_USERNAME',
password = 'YOUR_PASSWORD',
)
with ApiClient(configuration) as api_client:
id = 1 # int | A unique integer value identifying this quality report.
format = "json" # str | (optional) if omitted the server will use the default value of "json"
try:
(data, response) = api_client.quality_api.retrieve_report_data(
id,
format=format,
)
pprint(data)
except exceptions.ApiException as e:
print("Exception when calling QualityApi.retrieve_report_data(): %s\n" % e)
Parameters
| Name | Type | Description | Notes |
|---|---|---|---|
| id | int | A unique integer value identifying this quality report. | |
| format | str | [optional] if omitted the server will use the default value of “json” |
There are also optional kwargs that control the function invocation behavior. Read more here.
Returned values
Returned type: Tuple[file_type, urllib3.HTTPResponse].
Returns a tuple with 2 values: (parsed_response, raw_response).
The first value is a model parsed from the response data. The second value is the raw response, which can be useful to get response parameters, such as status code, headers, or raw response data. Read more about invocation parameters and returned values here.
Authentication
accessTokenAuth, basicAuth, csrfAuth, csrfHeaderAuth, sessionAuth, tokenAuth
HTTP request headers
- Content-Type: Not defined
- Accept: application/vnd.cvat+json
HTTP response details
| Status code | Description | Response headers |
|---|---|---|
| 200 | - |
retrieve_settings
retrieve_settings( id, **kwargs )
Get quality settings instance details
Example
from pprint import pprint
from cvat_sdk.api_client import Configuration, ApiClient, exceptions
from cvat_sdk.api_client.models import *
# Set up an API client
# Read Configuration class docs for more info about parameters and authentication methods
configuration = Configuration(
host = "http://localhost",
username = 'YOUR_USERNAME',
password = 'YOUR_PASSWORD',
)
with ApiClient(configuration) as api_client:
id = 1 # int | An id of a quality settings instance
try:
(data, response) = api_client.quality_api.retrieve_settings(
id,)
pprint(data)
except exceptions.ApiException as e:
print("Exception when calling QualityApi.retrieve_settings(): %s\n" % e)
Parameters
| Name | Type | Description | Notes |
|---|---|---|---|
| id | int | An id of a quality settings instance |
There are also optional kwargs that control the function invocation behavior. Read more here.
Returned values
Returned type: Tuple[QualitySettings, urllib3.HTTPResponse].
Returns a tuple with 2 values: (parsed_response, raw_response).
The first value is a model parsed from the response data. The second value is the raw response, which can be useful to get response parameters, such as status code, headers, or raw response data. Read more about invocation parameters and returned values here.
Authentication
accessTokenAuth, basicAuth, csrfAuth, csrfHeaderAuth, sessionAuth, tokenAuth
HTTP request headers
- Content-Type: Not defined
- Accept: application/vnd.cvat+json
HTTP response details
| Status code | Description | Response headers |
|---|---|---|
| 200 | - |
11.2.1.1.17 - RequestsApi class reference
All URIs are relative to http://localhost
| Method | HTTP request | Description |
|---|---|---|
| create_cancel | POST /api/requests/{id}/cancel | Cancel request |
| list | GET /api/requests | List requests |
| retrieve | GET /api/requests/{id} | Get request details |
create_cancel
create_cancel( id, **kwargs )
Cancel request
Example
from pprint import pprint
from cvat_sdk.api_client import Configuration, ApiClient, exceptions
from cvat_sdk.api_client.models import *
# Set up an API client
# Read Configuration class docs for more info about parameters and authentication methods
configuration = Configuration(
host = "http://localhost",
username = 'YOUR_USERNAME',
password = 'YOUR_PASSWORD',
)
with ApiClient(configuration) as api_client:
id = "id_example" # str |
try:
api_client.requests_api.create_cancel(
id,)
except exceptions.ApiException as e:
print("Exception when calling RequestsApi.create_cancel(): %s\n" % e)
Parameters
| Name | Type | Description | Notes |
|---|---|---|---|
| id | str |
There are also optional kwargs that control the function invocation behavior. Read more here.
Returned values
Returned type: Tuple[None, urllib3.HTTPResponse].
Returns a tuple with 2 values: (None, raw_response).
This endpoint does not have any return value, so None is always returned as the first value.
The second value is the raw response, which can be useful to get response parameters, such as
status code, headers, or raw response data. Read more about invocation parameters
and returned values here.
Authentication
accessTokenAuth, basicAuth, csrfAuth, csrfHeaderAuth, sessionAuth, tokenAuth
HTTP request headers
- Content-Type: Not defined
- Accept: Not defined
HTTP response details
| Status code | Description | Response headers |
|---|---|---|
| 200 | The request has been cancelled | - |
list
list( action=None, filter=None, format=None, job_id=None, org=None, page=None, page_size=None, project_id=None, sort=None, status=None, subresource=None, target=None, task_id=None, **kwargs )
List requests
Example
from pprint import pprint
from cvat_sdk.api_client import Configuration, ApiClient, exceptions
from cvat_sdk.api_client.models import *
# Set up an API client
# Read Configuration class docs for more info about parameters and authentication methods
configuration = Configuration(
host = "http://localhost",
username = 'YOUR_USERNAME',
password = 'YOUR_PASSWORD',
)
with ApiClient(configuration) as api_client:
action = "action_example" # str | A simple equality filter for the action field (optional)
filter = "filter_example" # str | JSON Logic filter. This filter can be used to perform complex filtering by grouping rules. Details about the syntax used can be found at the link: https://jsonlogic.com/ Available filter_fields: ['status', 'project_id', 'task_id', 'job_id', 'action', 'target', 'subresource', 'format']. (optional)
format = "format_example" # str | A simple equality filter for the format field (optional)
job_id = 1 # int | A simple equality filter for the job_id field (optional)
org = "org_example" # str | A simple equality filter for the org field (optional)
page = 1 # int | A page number within the paginated result set. (optional)
page_size = 1 # int | Number of results to return per page. (optional)
project_id = 1 # int | A simple equality filter for the project_id field (optional)
sort = "sort_example" # str | Which field to use when ordering the results. Available ordering_fields: ['created_date', 'status', 'action'] (optional)
status = "queued" # str | A simple equality filter for the status field (optional)
subresource = "subresource_example" # str | A simple equality filter for the subresource field (optional)
target = "target_example" # str | A simple equality filter for the target field (optional)
task_id = 1 # int | A simple equality filter for the task_id field (optional)
try:
(data, response) = api_client.requests_api.list(
action=action,
filter=filter,
format=format,
job_id=job_id,
org=org,
page=page,
page_size=page_size,
project_id=project_id,
sort=sort,
status=status,
subresource=subresource,
target=target,
task_id=task_id,
)
pprint(data)
except exceptions.ApiException as e:
print("Exception when calling RequestsApi.list(): %s\n" % e)
Parameters
| Name | Type | Description | Notes |
|---|---|---|---|
| action | str | A simple equality filter for the action field | [optional] |
| filter | str | JSON Logic filter. This filter can be used to perform complex filtering by grouping rules. Details about the syntax used can be found at the link: https://jsonlogic.com/ Available filter_fields: [‘status’, ‘project_id’, ’task_id’, ‘job_id’, ‘action’, ’target’, ‘subresource’, ‘format’]. | [optional] |
| format | str | A simple equality filter for the format field | [optional] |
| job_id | int | A simple equality filter for the job_id field | [optional] |
| org | str | A simple equality filter for the org field | [optional] |
| page | int | A page number within the paginated result set. | [optional] |
| page_size | int | Number of results to return per page. | [optional] |
| project_id | int | A simple equality filter for the project_id field | [optional] |
| sort | str | Which field to use when ordering the results. Available ordering_fields: [‘created_date’, ‘status’, ‘action’] | [optional] |
| status | str | A simple equality filter for the status field | [optional] |
| subresource | str | A simple equality filter for the subresource field | [optional] |
| target | str | A simple equality filter for the target field | [optional] |
| task_id | int | A simple equality filter for the task_id field | [optional] |
There are also optional kwargs that control the function invocation behavior. Read more here.
Returned values
Returned type: Tuple[PaginatedRequestList, urllib3.HTTPResponse].
Returns a tuple with 2 values: (parsed_response, raw_response).
The first value is a model parsed from the response data. The second value is the raw response, which can be useful to get response parameters, such as status code, headers, or raw response data. Read more about invocation parameters and returned values here.
Authentication
accessTokenAuth, basicAuth, csrfAuth, csrfHeaderAuth, sessionAuth, tokenAuth
HTTP request headers
- Content-Type: Not defined
- Accept: application/vnd.cvat+json
HTTP response details
| Status code | Description | Response headers |
|---|---|---|
| 200 | - |
retrieve
retrieve( id, **kwargs )
Get request details
Example
from pprint import pprint
from cvat_sdk.api_client import Configuration, ApiClient, exceptions
from cvat_sdk.api_client.models import *
# Set up an API client
# Read Configuration class docs for more info about parameters and authentication methods
configuration = Configuration(
host = "http://localhost",
username = 'YOUR_USERNAME',
password = 'YOUR_PASSWORD',
)
with ApiClient(configuration) as api_client:
id = "id_example" # str |
try:
(data, response) = api_client.requests_api.retrieve(
id,)
pprint(data)
except exceptions.ApiException as e:
print("Exception when calling RequestsApi.retrieve(): %s\n" % e)
Parameters
| Name | Type | Description | Notes |
|---|---|---|---|
| id | str |
There are also optional kwargs that control the function invocation behavior. Read more here.
Returned values
Returned type: Tuple[Request, urllib3.HTTPResponse].
Returns a tuple with 2 values: (parsed_response, raw_response).
The first value is a model parsed from the response data. The second value is the raw response, which can be useful to get response parameters, such as status code, headers, or raw response data. Read more about invocation parameters and returned values here.
Authentication
accessTokenAuth, basicAuth, csrfAuth, csrfHeaderAuth, sessionAuth, tokenAuth
HTTP request headers
- Content-Type: Not defined
- Accept: application/vnd.cvat+json
HTTP response details
| Status code | Description | Response headers |
|---|---|---|
| 200 | - |
11.2.1.1.18 - SchemaApi class reference
All URIs are relative to http://localhost
| Method | HTTP request | Description |
|---|---|---|
| retrieve | GET /api/schema/ |
retrieve
retrieve( lang=None, scheme=None, **kwargs )
OpenApi3 schema for this API. Format can be selected via content negotiation. - YAML: application/vnd.oai.openapi - JSON: application/vnd.oai.openapi+json
Example
from pprint import pprint
from cvat_sdk.api_client import Configuration, ApiClient, exceptions
from cvat_sdk.api_client.models import *
# Set up an API client
# Read Configuration class docs for more info about parameters and authentication methods
configuration = Configuration(
host = "http://localhost",
username = 'YOUR_USERNAME',
password = 'YOUR_PASSWORD',
)
with ApiClient(configuration) as api_client:
lang = "af" # str | (optional)
scheme = "json" # str | (optional)
try:
(data, response) = api_client.schema_api.retrieve(
lang=lang,
scheme=scheme,
)
pprint(data)
except exceptions.ApiException as e:
print("Exception when calling SchemaApi.retrieve(): %s\n" % e)
Parameters
| Name | Type | Description | Notes |
|---|---|---|---|
| lang | str | [optional] | |
| scheme | str | [optional] |
There are also optional kwargs that control the function invocation behavior. Read more here.
Returned values
Returned type: Tuple[dict[str, typing.Union[typing.Any, none_type]], urllib3.HTTPResponse].
Returns a tuple with 2 values: (parsed_response, raw_response).
The first value is a model parsed from the response data. The second value is the raw response, which can be useful to get response parameters, such as status code, headers, or raw response data. Read more about invocation parameters and returned values here.
Authentication
accessTokenAuth, basicAuth, csrfAuth, csrfHeaderAuth, sessionAuth, tokenAuth
HTTP request headers
- Content-Type: Not defined
- Accept: application/vnd.oai.openapi, application/yaml, application/vnd.oai.openapi+json, application/json
HTTP response details
| Status code | Description | Response headers |
|---|---|---|
| 200 | - |
11.2.1.1.19 - ServerApi class reference
All URIs are relative to http://localhost
| Method | HTTP request | Description |
|---|---|---|
| list_share | GET /api/server/share | List files/directories in the mounted share |
| retrieve_about | GET /api/server/about | Get basic CVAT information |
| retrieve_annotation_formats | GET /api/server/annotation/formats | Get supported annotation formats |
| retrieve_plugins | GET /api/server/plugins | Get enabled plugins |
list_share
list_share( directory=None, search=None, **kwargs )
List files/directories in the mounted share
Example
from pprint import pprint
from cvat_sdk.api_client import Configuration, ApiClient, exceptions
from cvat_sdk.api_client.models import *
# Set up an API client
# Read Configuration class docs for more info about parameters and authentication methods
configuration = Configuration(
host = "http://localhost",
username = 'YOUR_USERNAME',
password = 'YOUR_PASSWORD',
)
with ApiClient(configuration) as api_client:
directory = "directory_example" # str | Directory to browse (optional)
search = "search_example" # str | Search for specific files (optional)
try:
(data, response) = api_client.server_api.list_share(
directory=directory,
search=search,
)
pprint(data)
except exceptions.ApiException as e:
print("Exception when calling ServerApi.list_share(): %s\n" % e)
Parameters
| Name | Type | Description | Notes |
|---|---|---|---|
| directory | str | Directory to browse | [optional] |
| search | str | Search for specific files | [optional] |
There are also optional kwargs that control the function invocation behavior. Read more here.
Returned values
Returned type: Tuple[list[FileInfo], urllib3.HTTPResponse].
Returns a tuple with 2 values: (parsed_response, raw_response).
The first value is a model parsed from the response data. The second value is the raw response, which can be useful to get response parameters, such as status code, headers, or raw response data. Read more about invocation parameters and returned values here.
Authentication
accessTokenAuth, basicAuth, csrfAuth, csrfHeaderAuth, sessionAuth, tokenAuth
HTTP request headers
- Content-Type: Not defined
- Accept: application/vnd.cvat+json
HTTP response details
| Status code | Description | Response headers |
|---|---|---|
| 200 | - |
retrieve_about
retrieve_about( **kwargs )
Get basic CVAT information
Example
from pprint import pprint
from cvat_sdk.api_client import Configuration, ApiClient, exceptions
from cvat_sdk.api_client.models import *
# Set up an API client
# Read Configuration class docs for more info about parameters and authentication methods
configuration = Configuration(
host = "http://localhost",
username = 'YOUR_USERNAME',
password = 'YOUR_PASSWORD',
)
with ApiClient(configuration) as api_client:
try:
(data, response) = api_client.server_api.retrieve_about()
pprint(data)
except exceptions.ApiException as e:
print("Exception when calling ServerApi.retrieve_about(): %s\n" % e)
Parameters
This endpoint does not need any parameter.
There are also optional kwargs that control the function invocation behavior. Read more here.
Returned values
Returned type: Tuple[About, urllib3.HTTPResponse].
Returns a tuple with 2 values: (parsed_response, raw_response).
The first value is a model parsed from the response data. The second value is the raw response, which can be useful to get response parameters, such as status code, headers, or raw response data. Read more about invocation parameters and returned values here.
Authentication
accessTokenAuth, basicAuth, csrfAuth, csrfHeaderAuth, sessionAuth, tokenAuth
HTTP request headers
- Content-Type: Not defined
- Accept: application/vnd.cvat+json
HTTP response details
| Status code | Description | Response headers |
|---|---|---|
| 200 | - |
retrieve_annotation_formats
retrieve_annotation_formats( **kwargs )
Get supported annotation formats
Example
from pprint import pprint
from cvat_sdk.api_client import Configuration, ApiClient, exceptions
from cvat_sdk.api_client.models import *
# Set up an API client
# Read Configuration class docs for more info about parameters and authentication methods
configuration = Configuration(
host = "http://localhost",
username = 'YOUR_USERNAME',
password = 'YOUR_PASSWORD',
)
with ApiClient(configuration) as api_client:
try:
(data, response) = api_client.server_api.retrieve_annotation_formats()
pprint(data)
except exceptions.ApiException as e:
print("Exception when calling ServerApi.retrieve_annotation_formats(): %s\n" % e)
Parameters
This endpoint does not need any parameter.
There are also optional kwargs that control the function invocation behavior. Read more here.
Returned values
Returned type: Tuple[DatasetFormats, urllib3.HTTPResponse].
Returns a tuple with 2 values: (parsed_response, raw_response).
The first value is a model parsed from the response data. The second value is the raw response, which can be useful to get response parameters, such as status code, headers, or raw response data. Read more about invocation parameters and returned values here.
Authentication
accessTokenAuth, basicAuth, csrfAuth, csrfHeaderAuth, sessionAuth, tokenAuth
HTTP request headers
- Content-Type: Not defined
- Accept: application/vnd.cvat+json
HTTP response details
| Status code | Description | Response headers |
|---|---|---|
| 200 | - |
retrieve_plugins
retrieve_plugins( **kwargs )
Get enabled plugins
Example
from pprint import pprint
from cvat_sdk.api_client import Configuration, ApiClient, exceptions
from cvat_sdk.api_client.models import *
# Set up an API client
# Read Configuration class docs for more info about parameters and authentication methods
configuration = Configuration(
host = "http://localhost",
username = 'YOUR_USERNAME',
password = 'YOUR_PASSWORD',
)
with ApiClient(configuration) as api_client:
try:
(data, response) = api_client.server_api.retrieve_plugins()
pprint(data)
except exceptions.ApiException as e:
print("Exception when calling ServerApi.retrieve_plugins(): %s\n" % e)
Parameters
This endpoint does not need any parameter.
There are also optional kwargs that control the function invocation behavior. Read more here.
Returned values
Returned type: Tuple[Plugins, urllib3.HTTPResponse].
Returns a tuple with 2 values: (parsed_response, raw_response).
The first value is a model parsed from the response data. The second value is the raw response, which can be useful to get response parameters, such as status code, headers, or raw response data. Read more about invocation parameters and returned values here.
Authentication
accessTokenAuth, basicAuth, csrfAuth, csrfHeaderAuth, sessionAuth, tokenAuth
HTTP request headers
- Content-Type: Not defined
- Accept: application/vnd.cvat+json
HTTP response details
| Status code | Description | Response headers |
|---|---|---|
| 200 | - |
11.2.1.1.20 - TasksApi class reference
All URIs are relative to http://localhost
| Method | HTTP request | Description |
|---|---|---|
| create | POST /api/tasks | Create a task |
| create_annotations | POST /api/tasks/{id}/annotations/ | Import annotations into a task |
| create_backup | POST /api/tasks/backup/ | Recreate a task from a backup |
| create_backup_export | POST /api/tasks/{id}/backup/export | Initiate process to backup resource |
| create_data | POST /api/tasks/{id}/data/ | Attach data to a task |
| create_dataset_export | POST /api/tasks/{id}/dataset/export | Initialize process to export resource as a dataset in a specific format |
| destroy | DELETE /api/tasks/{id} | Delete a task |
| destroy_annotations | DELETE /api/tasks/{id}/annotations/ | Delete task annotations |
| list | GET /api/tasks | List tasks |
| partial_update | PATCH /api/tasks/{id} | Update a task |
| partial_update_annotations | PATCH /api/tasks/{id}/annotations/ | Update task annotations |
| partial_update_data_meta | PATCH /api/tasks/{id}/data/meta | Update metainformation for media files in a task |
| partial_update_validation_layout | PATCH /api/tasks/{id}/validation_layout | Allows updating current validation configuration |
| retrieve | GET /api/tasks/{id} | Get task details |
| retrieve_annotations | GET /api/tasks/{id}/annotations/ | Get task annotations |
| retrieve_data | GET /api/tasks/{id}/data/ | Get data of a task |
| retrieve_data_meta | GET /api/tasks/{id}/data/meta | Get metainformation for media files in a task |
| retrieve_preview | GET /api/tasks/{id}/preview | Get a preview image for a task |
| retrieve_status | GET /api/tasks/{id}/status | Get the creation status of a task |
| retrieve_validation_layout | GET /api/tasks/{id}/validation_layout | Allows getting current validation configuration |
| update_annotations | PUT /api/tasks/{id}/annotations/ | Replace task annotations |
create
create( task_write_request, x_organization=None, org=None, org_id=None, **kwargs )
Create a task
The new task will not have any attached images or videos. To attach them, use the /api/tasks/
Example
from pprint import pprint
from cvat_sdk.api_client import Configuration, ApiClient, exceptions
from cvat_sdk.api_client.models import *
# Set up an API client
# Read Configuration class docs for more info about parameters and authentication methods
configuration = Configuration(
host = "http://localhost",
username = 'YOUR_USERNAME',
password = 'YOUR_PASSWORD',
)
with ApiClient(configuration) as api_client:
task_write_request = TaskWriteRequest(
name="name_example",
project_id=1,
owner_id=1,
assignee_id=1,
bug_tracker="bug_tracker_example",
overlap=0,
segment_size=0,
labels=[
PatchedLabelRequest(
id=1,
name="name_example",
color="color_example",
attributes=[
AttributeRequest(
id=1,
name="name_example",
mutable=True,
input_type=InputTypeEnum("checkbox"),
default_value="default_value_example",
values=[
"values_example",
],
),
],
deleted=True,
type=None,
svg="svg_example",
sublabels=[
SublabelRequest(
id=1,
name="name_example",
color="color_example",
attributes=[
AttributeRequest(
id=1,
name="name_example",
mutable=True,
input_type=InputTypeEnum("checkbox"),
default_value="default_value_example",
values=[
"values_example",
],
),
],
type=None,
has_parent=True,
),
],
),
],
subset="subset_example",
target_storage=StorageRequest(
location=LocationEnum("cloud_storage"),
cloud_storage_id=1,
),
source_storage=StorageRequest(
location=LocationEnum("cloud_storage"),
cloud_storage_id=1,
),
consensus_replicas=0,
) # TaskWriteRequest |
x_organization = "X-Organization_example" # str | Organization unique slug (optional)
org = "org_example" # str | Organization unique slug (optional)
org_id = 1 # int | Organization identifier (optional)
try:
(data, response) = api_client.tasks_api.create(
task_write_request,
x_organization=x_organization,
org=org,
org_id=org_id,
)
pprint(data)
except exceptions.ApiException as e:
print("Exception when calling TasksApi.create(): %s\n" % e)
Parameters
| Name | Type | Description | Notes |
|---|---|---|---|
| task_write_request | TaskWriteRequest | ||
| x_organization | str | Organization unique slug | [optional] |
| org | str | Organization unique slug | [optional] |
| org_id | int | Organization identifier | [optional] |
There are also optional kwargs that control the function invocation behavior. Read more here.
Returned values
Returned type: Tuple[TaskRead, urllib3.HTTPResponse].
Returns a tuple with 2 values: (parsed_response, raw_response).
The first value is a model parsed from the response data. The second value is the raw response, which can be useful to get response parameters, such as status code, headers, or raw response data. Read more about invocation parameters and returned values here.
Authentication
accessTokenAuth, basicAuth, csrfAuth, csrfHeaderAuth, sessionAuth, tokenAuth
HTTP request headers
- Content-Type: application/json
- Accept: application/vnd.cvat+json
HTTP response details
| Status code | Description | Response headers |
|---|---|---|
| 201 | - |
create_annotations
create_annotations( id, cloud_storage_id=None, filename=None, format=None, location=None, use_default_location=None, annotation_file_request=None, **kwargs )
Import annotations into a task
The request POST /api/tasks/id/annotations initiates a background process to import annotations into a task. Please, use the GET /api/requests/<rq_id> endpoint for checking status of the process. The rq_id parameter can be found in the response on initiating request.
Example
from pprint import pprint
from cvat_sdk.api_client import Configuration, ApiClient, exceptions
from cvat_sdk.api_client.models import *
# Set up an API client
# Read Configuration class docs for more info about parameters and authentication methods
configuration = Configuration(
host = "http://localhost",
username = 'YOUR_USERNAME',
password = 'YOUR_PASSWORD',
)
with ApiClient(configuration) as api_client:
id = 1 # int | A unique integer value identifying this task.
cloud_storage_id = 1 # int | Storage id (optional)
filename = "filename_example" # str | Annotation file name (optional)
format = "format_example" # str | Input format name You can get the list of supported formats at: /server/annotation/formats (optional)
location = "cloud_storage" # str | where to import the annotation from (optional)
use_default_location = True # bool | Use the location that was configured in task to import annotations (optional) if omitted the server will use the default value of True
annotation_file_request = AnnotationFileRequest(
annotation_file=open('/path/to/file', 'rb'),
) # AnnotationFileRequest | (optional)
try:
api_client.tasks_api.create_annotations(
id,
cloud_storage_id=cloud_storage_id,
filename=filename,
format=format,
location=location,
use_default_location=use_default_location,
annotation_file_request=annotation_file_request,
)
except exceptions.ApiException as e:
print("Exception when calling TasksApi.create_annotations(): %s\n" % e)
Parameters
| Name | Type | Description | Notes |
|---|---|---|---|
| id | int | A unique integer value identifying this task. | |
| cloud_storage_id | int | Storage id | [optional] |
| filename | str | Annotation file name | [optional] |
| format | str | Input format name You can get the list of supported formats at: /server/annotation/formats | [optional] |
| location | str | where to import the annotation from | [optional] |
| use_default_location | bool | Use the location that was configured in task to import annotations | [optional] if omitted the server will use the default value of True |
| annotation_file_request | AnnotationFileRequest | [optional] |
There are also optional kwargs that control the function invocation behavior. Read more here.
Returned values
Returned type: Tuple[None, urllib3.HTTPResponse].
Returns a tuple with 2 values: (None, raw_response).
This endpoint does not have any return value, so None is always returned as the first value.
The second value is the raw response, which can be useful to get response parameters, such as
status code, headers, or raw response data. Read more about invocation parameters
and returned values here.
Authentication
accessTokenAuth, basicAuth, csrfAuth, csrfHeaderAuth, sessionAuth, tokenAuth
HTTP request headers
- Content-Type: application/json, multipart/form-data
- Accept: application/vnd.cvat+json
HTTP response details
| Status code | Description | Response headers |
|---|---|---|
| 201 | Uploading has finished | - |
| 202 | Uploading has been started | - |
| 405 | Format is not available | - |
create_backup
create_backup( x_organization=None, cloud_storage_id=None, filename=None, location=None, org=None, org_id=None, task_file_request=None, **kwargs )
Recreate a task from a backup
The backup import process is as follows: The first request POST /api/tasks/backup creates a background job on the server in which the process of a task creating from an uploaded backup is carried out. To check the status of the import process, use GET /api/requests/rq_id, where rq_id is the request ID obtained from the response to the previous request. Once the import completes successfully, the response will contain the ID of the newly created task in the result_id field.
Example
from pprint import pprint
from cvat_sdk.api_client import Configuration, ApiClient, exceptions
from cvat_sdk.api_client.models import *
# Set up an API client
# Read Configuration class docs for more info about parameters and authentication methods
configuration = Configuration(
host = "http://localhost",
username = 'YOUR_USERNAME',
password = 'YOUR_PASSWORD',
)
with ApiClient(configuration) as api_client:
x_organization = "X-Organization_example" # str | Organization unique slug (optional)
cloud_storage_id = 1 # int | Storage id (optional)
filename = "filename_example" # str | Backup file name (optional)
location = "local" # str | Where to import the backup file from (optional) if omitted the server will use the default value of "local"
org = "org_example" # str | Organization unique slug (optional)
org_id = 1 # int | Organization identifier (optional)
task_file_request = TaskFileRequest(
task_file=open('/path/to/file', 'rb'),
) # TaskFileRequest | (optional)
try:
(data, response) = api_client.tasks_api.create_backup(
x_organization=x_organization,
cloud_storage_id=cloud_storage_id,
filename=filename,
location=location,
org=org,
org_id=org_id,
task_file_request=task_file_request,
)
pprint(data)
except exceptions.ApiException as e:
print("Exception when calling TasksApi.create_backup(): %s\n" % e)
Parameters
| Name | Type | Description | Notes |
|---|---|---|---|
| x_organization | str | Organization unique slug | [optional] |
| cloud_storage_id | int | Storage id | [optional] |
| filename | str | Backup file name | [optional] |
| location | str | Where to import the backup file from | [optional] if omitted the server will use the default value of “local” |
| org | str | Organization unique slug | [optional] |
| org_id | int | Organization identifier | [optional] |
| task_file_request | TaskFileRequest | [optional] |
There are also optional kwargs that control the function invocation behavior. Read more here.
Returned values
Returned type: Tuple[RqId, urllib3.HTTPResponse].
Returns a tuple with 2 values: (parsed_response, raw_response).
The first value is a model parsed from the response data. The second value is the raw response, which can be useful to get response parameters, such as status code, headers, or raw response data. Read more about invocation parameters and returned values here.
Authentication
accessTokenAuth, basicAuth, csrfAuth, csrfHeaderAuth, sessionAuth, tokenAuth
HTTP request headers
- Content-Type: application/json, multipart/form-data
- Accept: application/vnd.cvat+json
HTTP response details
| Status code | Description | Response headers |
|---|---|---|
| 202 | Import of the backup file has started | - |
create_backup_export
create_backup_export( id, cloud_storage_id=None, filename=None, lightweight=None, location=None, **kwargs )
Initiate process to backup resource
The request POST /api/<projects|tasks>/id/backup/export will initialize a background process to backup a resource. To check status of the process please, use GET /api/requests/<rq_id> where rq_id is request ID returned in the response for this endpoint.
Example
from pprint import pprint
from cvat_sdk.api_client import Configuration, ApiClient, exceptions
from cvat_sdk.api_client.models import *
# Set up an API client
# Read Configuration class docs for more info about parameters and authentication methods
configuration = Configuration(
host = "http://localhost",
username = 'YOUR_USERNAME',
password = 'YOUR_PASSWORD',
)
with ApiClient(configuration) as api_client:
id = 1 # int | A unique integer value identifying this task.
cloud_storage_id = 1 # int | Storage id (optional)
filename = "filename_example" # str | Backup file name (optional)
lightweight = True # bool | Makes a lightweight backup (without media files) for tasks whose media is located in cloud storage (optional) if omitted the server will use the default value of True
location = "cloud_storage" # str | Where need to save downloaded backup (optional)
try:
(data, response) = api_client.tasks_api.create_backup_export(
id,
cloud_storage_id=cloud_storage_id,
filename=filename,
lightweight=lightweight,
location=location,
)
pprint(data)
except exceptions.ApiException as e:
print("Exception when calling TasksApi.create_backup_export(): %s\n" % e)
Parameters
| Name | Type | Description | Notes |
|---|---|---|---|
| id | int | A unique integer value identifying this task. | |
| cloud_storage_id | int | Storage id | [optional] |
| filename | str | Backup file name | [optional] |
| lightweight | bool | Makes a lightweight backup (without media files) for tasks whose media is located in cloud storage | [optional] if omitted the server will use the default value of True |
| location | str | Where need to save downloaded backup | [optional] |
There are also optional kwargs that control the function invocation behavior. Read more here.
Returned values
Returned type: Tuple[RqId, urllib3.HTTPResponse].
Returns a tuple with 2 values: (parsed_response, raw_response).
The first value is a model parsed from the response data. The second value is the raw response, which can be useful to get response parameters, such as status code, headers, or raw response data. Read more about invocation parameters and returned values here.
Authentication
accessTokenAuth, basicAuth, csrfAuth, csrfHeaderAuth, sessionAuth, tokenAuth
HTTP request headers
- Content-Type: Not defined
- Accept: application/vnd.cvat+json
HTTP response details
| Status code | Description | Response headers |
|---|---|---|
| 202 | Creating a backup file has been started | - |
| 400 | Wrong query parameters were passed | - |
| 409 | The backup process has already been initiated and is not yet finished | - |
create_data
create_data( id, upload_finish=None, upload_multiple=None, upload_start=None, data_request=None, **kwargs )
Attach data to a task
Allows to upload data (images, video, etc.) to a task. Supports the TUS open file uploading protocol (https://tus.io/). Supports the following protocols: 1. A single Data request and 2.1. An Upload-Start request 2.2.a. Regular TUS protocol requests (Upload-Length + Chunks) 2.2.b. Upload-Multiple requests 2.3. An Upload-Finish request Requests: - Data - POST, no extra headers or ‘Upload-Start’ + ‘Upload-Finish’ headers. Contains data in the body. - Upload-Start - POST, has an ‘Upload-Start’ header. No body is expected. - Upload-Length - POST, has an ‘Upload-Length’ header (see the TUS specification) - Chunk - HEAD/PATCH (see the TUS specification). Sent to /data/GET /api/requests/<rq_id>, where rq_id is request ID returned for this request. Once data is attached to a task, it cannot be detached or replaced.
Example
from pprint import pprint
from cvat_sdk.api_client import Configuration, ApiClient, exceptions
from cvat_sdk.api_client.models import *
# Set up an API client
# Read Configuration class docs for more info about parameters and authentication methods
configuration = Configuration(
host = "http://localhost",
username = 'YOUR_USERNAME',
password = 'YOUR_PASSWORD',
)
with ApiClient(configuration) as api_client:
id = 1 # int | A unique integer value identifying this task.
upload_finish = True # bool | Finishes data upload. Can be combined with Upload-Start header to create task data with one request (optional)
upload_multiple = True # bool | Indicates that data with this request are single or multiple files that should be attached to a task (optional)
upload_start = True # bool | Initializes data upload. Optionally, can include upload metadata in the request body. (optional)
data_request = DataRequest(
chunk_size=0,
image_quality=0,
start_frame=0,
stop_frame=0,
frame_filter="frame_filter_example",
client_files=[],
server_files=[],
remote_files=[],
use_zip_chunks=False,
server_files_exclude=[],
cloud_storage_id=1,
use_cache=False,
copy_data=False,
storage_method=StorageMethod("cache"),
sorting_method=SortingMethod("lexicographical"),
filename_pattern="filename_pattern_example",
job_file_mapping=[
[
"a",
],
],
upload_file_order=[
"upload_file_order_example",
],
validation_params=DataRequestValidationParams(None),
) # DataRequest | (optional)
try:
(data, response) = api_client.tasks_api.create_data(
id,
upload_finish=upload_finish,
upload_multiple=upload_multiple,
upload_start=upload_start,
data_request=data_request,
)
pprint(data)
except exceptions.ApiException as e:
print("Exception when calling TasksApi.create_data(): %s\n" % e)
Parameters
| Name | Type | Description | Notes |
|---|---|---|---|
| id | int | A unique integer value identifying this task. | |
| upload_finish | bool | Finishes data upload. Can be combined with Upload-Start header to create task data with one request | [optional] |
| upload_multiple | bool | Indicates that data with this request are single or multiple files that should be attached to a task | [optional] |
| upload_start | bool | Initializes data upload. Optionally, can include upload metadata in the request body. | [optional] |
| data_request | DataRequest | [optional] |
There are also optional kwargs that control the function invocation behavior. Read more here.
Returned values
Returned type: Tuple[DataResponse, urllib3.HTTPResponse].
Returns a tuple with 2 values: (parsed_response, raw_response).
The first value is a model parsed from the response data. The second value is the raw response, which can be useful to get response parameters, such as status code, headers, or raw response data. Read more about invocation parameters and returned values here.
Authentication
accessTokenAuth, basicAuth, csrfAuth, csrfHeaderAuth, sessionAuth, tokenAuth
HTTP request headers
- Content-Type: application/json, multipart/form-data
- Accept: application/vnd.cvat+json
HTTP response details
| Status code | Description | Response headers |
|---|---|---|
| 202 | Request to attach a data to a task has been accepted | - |
create_dataset_export
create_dataset_export( format, id, cloud_storage_id=None, filename=None, location=None, save_images=None, **kwargs )
Initialize process to export resource as a dataset in a specific format
The request POST /api/<projects|tasks|jobs>/id/dataset/export will initialize a background process to export a dataset. To check status of the process please, use GET /api/requests/<rq_id> where rq_id is request ID returned in the response for this endpoint.
Example
from pprint import pprint
from cvat_sdk.api_client import Configuration, ApiClient, exceptions
from cvat_sdk.api_client.models import *
# Set up an API client
# Read Configuration class docs for more info about parameters and authentication methods
configuration = Configuration(
host = "http://localhost",
username = 'YOUR_USERNAME',
password = 'YOUR_PASSWORD',
)
with ApiClient(configuration) as api_client:
format = "format_example" # str | Desired output format name You can get the list of supported formats at: /server/annotation/formats
id = 1 # int | A unique integer value identifying this task.
cloud_storage_id = 1 # int | Storage id (optional)
filename = "filename_example" # str | Desired output file name (optional)
location = "cloud_storage" # str | Where need to save downloaded dataset (optional)
save_images = False # bool | Include images or not (optional) if omitted the server will use the default value of False
try:
(data, response) = api_client.tasks_api.create_dataset_export(
format,
id,
cloud_storage_id=cloud_storage_id,
filename=filename,
location=location,
save_images=save_images,
)
pprint(data)
except exceptions.ApiException as e:
print("Exception when calling TasksApi.create_dataset_export(): %s\n" % e)
Parameters
| Name | Type | Description | Notes |
|---|---|---|---|
| format | str | Desired output format name You can get the list of supported formats at: /server/annotation/formats | |
| id | int | A unique integer value identifying this task. | |
| cloud_storage_id | int | Storage id | [optional] |
| filename | str | Desired output file name | [optional] |
| location | str | Where need to save downloaded dataset | [optional] |
| save_images | bool | Include images or not | [optional] if omitted the server will use the default value of False |
There are also optional kwargs that control the function invocation behavior. Read more here.
Returned values
Returned type: Tuple[RqId, urllib3.HTTPResponse].
Returns a tuple with 2 values: (parsed_response, raw_response).
The first value is a model parsed from the response data. The second value is the raw response, which can be useful to get response parameters, such as status code, headers, or raw response data. Read more about invocation parameters and returned values here.
Authentication
accessTokenAuth, basicAuth, csrfAuth, csrfHeaderAuth, sessionAuth, tokenAuth
HTTP request headers
- Content-Type: Not defined
- Accept: application/vnd.cvat+json
HTTP response details
| Status code | Description | Response headers |
|---|---|---|
| 202 | Exporting has been started | - |
| 405 | Format is not available | - |
| 409 | Exporting is already in progress | - |
destroy
destroy( id, **kwargs )
Delete a task
All attached jobs, annotations and data will be deleted as well.
Example
from pprint import pprint
from cvat_sdk.api_client import Configuration, ApiClient, exceptions
from cvat_sdk.api_client.models import *
# Set up an API client
# Read Configuration class docs for more info about parameters and authentication methods
configuration = Configuration(
host = "http://localhost",
username = 'YOUR_USERNAME',
password = 'YOUR_PASSWORD',
)
with ApiClient(configuration) as api_client:
id = 1 # int | A unique integer value identifying this task.
try:
api_client.tasks_api.destroy(
id,)
except exceptions.ApiException as e:
print("Exception when calling TasksApi.destroy(): %s\n" % e)
Parameters
| Name | Type | Description | Notes |
|---|---|---|---|
| id | int | A unique integer value identifying this task. |
There are also optional kwargs that control the function invocation behavior. Read more here.
Returned values
Returned type: Tuple[None, urllib3.HTTPResponse].
Returns a tuple with 2 values: (None, raw_response).
This endpoint does not have any return value, so None is always returned as the first value.
The second value is the raw response, which can be useful to get response parameters, such as
status code, headers, or raw response data. Read more about invocation parameters
and returned values here.
Authentication
accessTokenAuth, basicAuth, csrfAuth, csrfHeaderAuth, sessionAuth, tokenAuth
HTTP request headers
- Content-Type: Not defined
- Accept: Not defined
HTTP response details
| Status code | Description | Response headers |
|---|---|---|
| 204 | The task has been deleted | - |
destroy_annotations
destroy_annotations( id, **kwargs )
Delete task annotations
Example
from pprint import pprint
from cvat_sdk.api_client import Configuration, ApiClient, exceptions
from cvat_sdk.api_client.models import *
# Set up an API client
# Read Configuration class docs for more info about parameters and authentication methods
configuration = Configuration(
host = "http://localhost",
username = 'YOUR_USERNAME',
password = 'YOUR_PASSWORD',
)
with ApiClient(configuration) as api_client:
id = 1 # int | A unique integer value identifying this task.
try:
api_client.tasks_api.destroy_annotations(
id,)
except exceptions.ApiException as e:
print("Exception when calling TasksApi.destroy_annotations(): %s\n" % e)
Parameters
| Name | Type | Description | Notes |
|---|---|---|---|
| id | int | A unique integer value identifying this task. |
There are also optional kwargs that control the function invocation behavior. Read more here.
Returned values
Returned type: Tuple[None, urllib3.HTTPResponse].
Returns a tuple with 2 values: (None, raw_response).
This endpoint does not have any return value, so None is always returned as the first value.
The second value is the raw response, which can be useful to get response parameters, such as
status code, headers, or raw response data. Read more about invocation parameters
and returned values here.
Authentication
accessTokenAuth, basicAuth, csrfAuth, csrfHeaderAuth, sessionAuth, tokenAuth
HTTP request headers
- Content-Type: Not defined
- Accept: Not defined
HTTP response details
| Status code | Description | Response headers |
|---|---|---|
| 204 | The annotation has been deleted | - |
list
list( x_organization=None, assignee=None, dimension=None, filter=None, mode=None, name=None, org=None, org_id=None, owner=None, page=None, page_size=None, project_id=None, project_name=None, search=None, sort=None, status=None, subset=None, tracker_link=None, validation_mode=None, **kwargs )
List tasks
Example
from pprint import pprint
from cvat_sdk.api_client import Configuration, ApiClient, exceptions
from cvat_sdk.api_client.models import *
# Set up an API client
# Read Configuration class docs for more info about parameters and authentication methods
configuration = Configuration(
host = "http://localhost",
username = 'YOUR_USERNAME',
password = 'YOUR_PASSWORD',
)
with ApiClient(configuration) as api_client:
x_organization = "X-Organization_example" # str | Organization unique slug (optional)
assignee = "assignee_example" # str | A simple equality filter for the assignee field (optional)
dimension = "3d" # str | A simple equality filter for the dimension field (optional)
filter = "filter_example" # str | JSON Logic filter. This filter can be used to perform complex filtering by grouping rules. For example, using such a filter you can get all resources created by you: - {\"and\":[{\"==\":[{\"var\":\"owner\"},\"<user>\"]}]} Details about the syntax used can be found at the link: https://jsonlogic.com/ Available filter_fields: ['project_name', 'name', 'owner', 'status', 'assignee', 'subset', 'mode', 'dimension', 'tracker_link', 'validation_mode', 'id', 'project_id', 'updated_date']. There are few examples for complex filtering tasks: - Get all tasks from 1,2,3 projects - { \"and\" : [{ \"in\" : [{ \"var\" : \"project_id\" }, [1, 2, 3]]}]} - Get all completed tasks from 1 project - { \"and\": [{ \"==\": [{ \"var\" : \"status\" }, \"completed\"]}, { \"==\" : [{ \"var\" : \"project_id\"}, 1]}]} (optional)
mode = "mode_example" # str | A simple equality filter for the mode field (optional)
name = "name_example" # str | A simple equality filter for the name field (optional)
org = "org_example" # str | Organization unique slug (optional)
org_id = 1 # int | Organization identifier (optional)
owner = "owner_example" # str | A simple equality filter for the owner field (optional)
page = 1 # int | A page number within the paginated result set. (optional)
page_size = 1 # int | Number of results to return per page. (optional)
project_id = 1 # int | A simple equality filter for the project_id field (optional)
project_name = "project_name_example" # str | A simple equality filter for the project_name field (optional)
search = "search_example" # str | A search term. Available search_fields: ('project_name', 'name', 'owner', 'status', 'assignee', 'subset', 'mode', 'dimension', 'tracker_link', 'validation_mode') (optional)
sort = "sort_example" # str | Which field to use when ordering the results. Available ordering_fields: ['project_name', 'name', 'owner', 'status', 'assignee', 'subset', 'mode', 'dimension', 'tracker_link', 'validation_mode', 'id', 'project_id', 'updated_date'] (optional)
status = "annotation" # str | A simple equality filter for the status field (optional)
subset = "subset_example" # str | A simple equality filter for the subset field (optional)
tracker_link = "tracker_link_example" # str | A simple equality filter for the tracker_link field (optional)
validation_mode = "gt" # str | A simple equality filter for the validation_mode field (optional)
try:
(data, response) = api_client.tasks_api.list(
x_organization=x_organization,
assignee=assignee,
dimension=dimension,
filter=filter,
mode=mode,
name=name,
org=org,
org_id=org_id,
owner=owner,
page=page,
page_size=page_size,
project_id=project_id,
project_name=project_name,
search=search,
sort=sort,
status=status,
subset=subset,
tracker_link=tracker_link,
validation_mode=validation_mode,
)
pprint(data)
except exceptions.ApiException as e:
print("Exception when calling TasksApi.list(): %s\n" % e)
Parameters
| Name | Type | Description | Notes |
|---|---|---|---|
| x_organization | str | Organization unique slug | [optional] |
| assignee | str | A simple equality filter for the assignee field | [optional] |
| dimension | str | A simple equality filter for the dimension field | [optional] |
| filter | str | JSON Logic filter. This filter can be used to perform complex filtering by grouping rules. For example, using such a filter you can get all resources created by you: - {"and":[{"==":[{"var":"owner"}," |
[optional] |
| mode | str | A simple equality filter for the mode field | [optional] |
| name | str | A simple equality filter for the name field | [optional] |
| org | str | Organization unique slug | [optional] |
| org_id | int | Organization identifier | [optional] |
| owner | str | A simple equality filter for the owner field | [optional] |
| page | int | A page number within the paginated result set. | [optional] |
| page_size | int | Number of results to return per page. | [optional] |
| project_id | int | A simple equality filter for the project_id field | [optional] |
| project_name | str | A simple equality filter for the project_name field | [optional] |
| search | str | A search term. Available search_fields: (‘project_name’, ’name’, ‘owner’, ‘status’, ‘assignee’, ‘subset’, ‘mode’, ‘dimension’, ’tracker_link’, ‘validation_mode’) | [optional] |
| sort | str | Which field to use when ordering the results. Available ordering_fields: [‘project_name’, ’name’, ‘owner’, ‘status’, ‘assignee’, ‘subset’, ‘mode’, ‘dimension’, ’tracker_link’, ‘validation_mode’, ‘id’, ‘project_id’, ‘updated_date’] | [optional] |
| status | str | A simple equality filter for the status field | [optional] |
| subset | str | A simple equality filter for the subset field | [optional] |
| tracker_link | str | A simple equality filter for the tracker_link field | [optional] |
| validation_mode | str | A simple equality filter for the validation_mode field | [optional] |
There are also optional kwargs that control the function invocation behavior. Read more here.
Returned values
Returned type: Tuple[PaginatedTaskReadList, urllib3.HTTPResponse].
Returns a tuple with 2 values: (parsed_response, raw_response).
The first value is a model parsed from the response data. The second value is the raw response, which can be useful to get response parameters, such as status code, headers, or raw response data. Read more about invocation parameters and returned values here.
Authentication
accessTokenAuth, basicAuth, csrfAuth, csrfHeaderAuth, sessionAuth, tokenAuth
HTTP request headers
- Content-Type: Not defined
- Accept: application/vnd.cvat+json
HTTP response details
| Status code | Description | Response headers |
|---|---|---|
| 200 | - |
partial_update
partial_update( id, patched_task_write_request=None, **kwargs )
Update a task
Example
from pprint import pprint
from cvat_sdk.api_client import Configuration, ApiClient, exceptions
from cvat_sdk.api_client.models import *
# Set up an API client
# Read Configuration class docs for more info about parameters and authentication methods
configuration = Configuration(
host = "http://localhost",
username = 'YOUR_USERNAME',
password = 'YOUR_PASSWORD',
)
with ApiClient(configuration) as api_client:
id = 1 # int | A unique integer value identifying this task.
patched_task_write_request = PatchedTaskWriteRequest(
name="name_example",
project_id=1,
owner_id=1,
assignee_id=1,
bug_tracker="bug_tracker_example",
labels=[
PatchedLabelRequest(
id=1,
name="name_example",
color="color_example",
attributes=[
AttributeRequest(
id=1,
name="name_example",
mutable=True,
input_type=InputTypeEnum("checkbox"),
default_value="default_value_example",
values=[
"values_example",
],
),
],
deleted=True,
type=None,
svg="svg_example",
sublabels=[
SublabelRequest(
id=1,
name="name_example",
color="color_example",
attributes=[
AttributeRequest(
id=1,
name="name_example",
mutable=True,
input_type=InputTypeEnum("checkbox"),
default_value="default_value_example",
values=[
"values_example",
],
),
],
type=None,
has_parent=True,
),
],
),
],
subset="subset_example",
target_storage=StorageRequest(
location=LocationEnum("cloud_storage"),
cloud_storage_id=1,
),
source_storage=StorageRequest(
location=LocationEnum("cloud_storage"),
cloud_storage_id=1,
),
organization_id=1,
) # PatchedTaskWriteRequest | (optional)
try:
(data, response) = api_client.tasks_api.partial_update(
id,
patched_task_write_request=patched_task_write_request,
)
pprint(data)
except exceptions.ApiException as e:
print("Exception when calling TasksApi.partial_update(): %s\n" % e)
Parameters
| Name | Type | Description | Notes |
|---|---|---|---|
| id | int | A unique integer value identifying this task. | |
| patched_task_write_request | PatchedTaskWriteRequest | [optional] |
There are also optional kwargs that control the function invocation behavior. Read more here.
Returned values
Returned type: Tuple[TaskRead, urllib3.HTTPResponse].
Returns a tuple with 2 values: (parsed_response, raw_response).
The first value is a model parsed from the response data. The second value is the raw response, which can be useful to get response parameters, such as status code, headers, or raw response data. Read more about invocation parameters and returned values here.
Authentication
accessTokenAuth, basicAuth, csrfAuth, csrfHeaderAuth, sessionAuth, tokenAuth
HTTP request headers
- Content-Type: application/json
- Accept: application/vnd.cvat+json
HTTP response details
| Status code | Description | Response headers |
|---|---|---|
| 200 | - |
partial_update_annotations
partial_update_annotations( action, id, patched_labeled_data_request=None, **kwargs )
Update task annotations
Example
from pprint import pprint
from cvat_sdk.api_client import Configuration, ApiClient, exceptions
from cvat_sdk.api_client.models import *
# Set up an API client
# Read Configuration class docs for more info about parameters and authentication methods
configuration = Configuration(
host = "http://localhost",
username = 'YOUR_USERNAME',
password = 'YOUR_PASSWORD',
)
with ApiClient(configuration) as api_client:
action = "create" # str |
id = 1 # int | A unique integer value identifying this task.
patched_labeled_data_request = PatchedLabeledDataRequest(
version=0,
tags=[
LabeledImageRequest(
id=1,
frame=0,
label_id=0,
group=0,
source="manual",
attributes=[
AttributeValRequest(
spec_id=1,
value="value_example",
),
],
),
],
shapes=[
LabeledShapeRequest(
type=ShapeType("rectangle"),
occluded=False,
outside=False,
z_order=0,
rotation=0.0,
points=[
3.14,
],
id=1,
frame=0,
label_id=0,
group=0,
source="manual",
attributes=[
AttributeValRequest(
spec_id=1,
value="value_example",
),
],
score=1.0,
elements=[
SubLabeledShapeRequest(
type=ShapeType("rectangle"),
occluded=False,
outside=False,
z_order=0,
rotation=0.0,
points=[
3.14,
],
id=1,
frame=0,
label_id=0,
group=0,
source="manual",
attributes=[
AttributeValRequest(
spec_id=1,
value="value_example",
),
],
score=1.0,
),
],
),
],
tracks=[
LabeledTrackRequest(
id=1,
frame=0,
label_id=0,
group=0,
source="manual",
shapes=[
TrackedShapeRequest(
type=ShapeType("rectangle"),
occluded=False,
outside=False,
z_order=0,
rotation=0.0,
points=[
3.14,
],
id=1,
frame=0,
attributes=[
AttributeValRequest(
spec_id=1,
value="value_example",
),
],
),
],
attributes=[
AttributeValRequest(
spec_id=1,
value="value_example",
),
],
elements=[
SubLabeledTrackRequest(
id=1,
frame=0,
label_id=0,
group=0,
source="manual",
shapes=[
TrackedShapeRequest(
type=ShapeType("rectangle"),
occluded=False,
outside=False,
z_order=0,
rotation=0.0,
points=[
3.14,
],
id=1,
frame=0,
attributes=[
AttributeValRequest(
spec_id=1,
value="value_example",
),
],
),
],
attributes=[
AttributeValRequest(
spec_id=1,
value="value_example",
),
],
),
],
),
],
) # PatchedLabeledDataRequest | (optional)
try:
(data, response) = api_client.tasks_api.partial_update_annotations(
action,
id,
patched_labeled_data_request=patched_labeled_data_request,
)
pprint(data)
except exceptions.ApiException as e:
print("Exception when calling TasksApi.partial_update_annotations(): %s\n" % e)
Parameters
| Name | Type | Description | Notes |
|---|---|---|---|
| action | str | ||
| id | int | A unique integer value identifying this task. | |
| patched_labeled_data_request | PatchedLabeledDataRequest | [optional] |
There are also optional kwargs that control the function invocation behavior. Read more here.
Returned values
Returned type: Tuple[LabeledData, urllib3.HTTPResponse].
Returns a tuple with 2 values: (parsed_response, raw_response).
The first value is a model parsed from the response data. The second value is the raw response, which can be useful to get response parameters, such as status code, headers, or raw response data. Read more about invocation parameters and returned values here.
Authentication
accessTokenAuth, basicAuth, csrfAuth, csrfHeaderAuth, sessionAuth, tokenAuth
HTTP request headers
- Content-Type: application/json, multipart/form-data
- Accept: application/vnd.cvat+json
HTTP response details
| Status code | Description | Response headers |
|---|---|---|
| 200 | - |
partial_update_data_meta
partial_update_data_meta( id, patched_data_meta_write_request=None, **kwargs )
Update metainformation for media files in a task
Example
from pprint import pprint
from cvat_sdk.api_client import Configuration, ApiClient, exceptions
from cvat_sdk.api_client.models import *
# Set up an API client
# Read Configuration class docs for more info about parameters and authentication methods
configuration = Configuration(
host = "http://localhost",
username = 'YOUR_USERNAME',
password = 'YOUR_PASSWORD',
)
with ApiClient(configuration) as api_client:
id = 1 # int | A unique integer value identifying this task.
patched_data_meta_write_request = PatchedDataMetaWriteRequest(
deleted_frames=[
0,
],
cloud_storage_id=1,
) # PatchedDataMetaWriteRequest | (optional)
try:
(data, response) = api_client.tasks_api.partial_update_data_meta(
id,
patched_data_meta_write_request=patched_data_meta_write_request,
)
pprint(data)
except exceptions.ApiException as e:
print("Exception when calling TasksApi.partial_update_data_meta(): %s\n" % e)
Parameters
| Name | Type | Description | Notes |
|---|---|---|---|
| id | int | A unique integer value identifying this task. | |
| patched_data_meta_write_request | PatchedDataMetaWriteRequest | [optional] |
There are also optional kwargs that control the function invocation behavior. Read more here.
Returned values
Returned type: Tuple[DataMetaRead, urllib3.HTTPResponse].
Returns a tuple with 2 values: (parsed_response, raw_response).
The first value is a model parsed from the response data. The second value is the raw response, which can be useful to get response parameters, such as status code, headers, or raw response data. Read more about invocation parameters and returned values here.
Authentication
accessTokenAuth, basicAuth, csrfAuth, csrfHeaderAuth, sessionAuth, tokenAuth
HTTP request headers
- Content-Type: application/json
- Accept: application/vnd.cvat+json
HTTP response details
| Status code | Description | Response headers |
|---|---|---|
| 200 | - |
partial_update_validation_layout
partial_update_validation_layout( id, patched_task_validation_layout_write_request=None, **kwargs )
Allows updating current validation configuration
WARNING: this operation is not protected from race conditions. It’s up to the user to ensure no parallel calls to this operation happen. It affects image access, including exports with images, backups, chunk downloading etc.
Example
from pprint import pprint
from cvat_sdk.api_client import Configuration, ApiClient, exceptions
from cvat_sdk.api_client.models import *
# Set up an API client
# Read Configuration class docs for more info about parameters and authentication methods
configuration = Configuration(
host = "http://localhost",
username = 'YOUR_USERNAME',
password = 'YOUR_PASSWORD',
)
with ApiClient(configuration) as api_client:
id = 1 # int | A unique integer value identifying this task.
patched_task_validation_layout_write_request = PatchedTaskValidationLayoutWriteRequest(
disabled_frames=[
0,
],
frame_selection_method=None,
honeypot_real_frames=[
0,
],
) # PatchedTaskValidationLayoutWriteRequest | (optional)
try:
(data, response) = api_client.tasks_api.partial_update_validation_layout(
id,
patched_task_validation_layout_write_request=patched_task_validation_layout_write_request,
)
pprint(data)
except exceptions.ApiException as e:
print("Exception when calling TasksApi.partial_update_validation_layout(): %s\n" % e)
Parameters
| Name | Type | Description | Notes |
|---|---|---|---|
| id | int | A unique integer value identifying this task. | |
| patched_task_validation_layout_write_request | PatchedTaskValidationLayoutWriteRequest | [optional] |
There are also optional kwargs that control the function invocation behavior. Read more here.
Returned values
Returned type: Tuple[TaskValidationLayoutRead, urllib3.HTTPResponse].
Returns a tuple with 2 values: (parsed_response, raw_response).
The first value is a model parsed from the response data. The second value is the raw response, which can be useful to get response parameters, such as status code, headers, or raw response data. Read more about invocation parameters and returned values here.
Authentication
accessTokenAuth, basicAuth, csrfAuth, csrfHeaderAuth, sessionAuth, tokenAuth
HTTP request headers
- Content-Type: application/json
- Accept: application/vnd.cvat+json
HTTP response details
| Status code | Description | Response headers |
|---|---|---|
| 200 | - |
retrieve
retrieve( id, **kwargs )
Get task details
Example
from pprint import pprint
from cvat_sdk.api_client import Configuration, ApiClient, exceptions
from cvat_sdk.api_client.models import *
# Set up an API client
# Read Configuration class docs for more info about parameters and authentication methods
configuration = Configuration(
host = "http://localhost",
username = 'YOUR_USERNAME',
password = 'YOUR_PASSWORD',
)
with ApiClient(configuration) as api_client:
id = 1 # int | A unique integer value identifying this task.
try:
(data, response) = api_client.tasks_api.retrieve(
id,)
pprint(data)
except exceptions.ApiException as e:
print("Exception when calling TasksApi.retrieve(): %s\n" % e)
Parameters
| Name | Type | Description | Notes |
|---|---|---|---|
| id | int | A unique integer value identifying this task. |
There are also optional kwargs that control the function invocation behavior. Read more here.
Returned values
Returned type: Tuple[TaskRead, urllib3.HTTPResponse].
Returns a tuple with 2 values: (parsed_response, raw_response).
The first value is a model parsed from the response data. The second value is the raw response, which can be useful to get response parameters, such as status code, headers, or raw response data. Read more about invocation parameters and returned values here.
Authentication
accessTokenAuth, basicAuth, csrfAuth, csrfHeaderAuth, sessionAuth, tokenAuth
HTTP request headers
- Content-Type: Not defined
- Accept: application/vnd.cvat+json
HTTP response details
| Status code | Description | Response headers |
|---|---|---|
| 200 | - |
retrieve_annotations
retrieve_annotations( id, **kwargs )
Get task annotations
Example
from pprint import pprint
from cvat_sdk.api_client import Configuration, ApiClient, exceptions
from cvat_sdk.api_client.models import *
# Set up an API client
# Read Configuration class docs for more info about parameters and authentication methods
configuration = Configuration(
host = "http://localhost",
username = 'YOUR_USERNAME',
password = 'YOUR_PASSWORD',
)
with ApiClient(configuration) as api_client:
id = 1 # int | A unique integer value identifying this task.
try:
(data, response) = api_client.tasks_api.retrieve_annotations(
id,)
pprint(data)
except exceptions.ApiException as e:
print("Exception when calling TasksApi.retrieve_annotations(): %s\n" % e)
Parameters
| Name | Type | Description | Notes |
|---|---|---|---|
| id | int | A unique integer value identifying this task. |
There are also optional kwargs that control the function invocation behavior. Read more here.
Returned values
Returned type: Tuple[LabeledData, urllib3.HTTPResponse].
Returns a tuple with 2 values: (parsed_response, raw_response).
The first value is a model parsed from the response data. The second value is the raw response, which can be useful to get response parameters, such as status code, headers, or raw response data. Read more about invocation parameters and returned values here.
Authentication
accessTokenAuth, basicAuth, csrfAuth, csrfHeaderAuth, sessionAuth, tokenAuth
HTTP request headers
- Content-Type: Not defined
- Accept: application/vnd.cvat+json
HTTP response details
| Status code | Description | Response headers |
|---|---|---|
| 200 | - | |
| 400 | Exporting without data is not allowed | - |
| 410 | API endpoint no longer handles exporting process | - |
retrieve_data
retrieve_data( id, type, number=None, quality=None, **kwargs )
Get data of a task
Example
from pprint import pprint
from cvat_sdk.api_client import Configuration, ApiClient, exceptions
from cvat_sdk.api_client.models import *
# Set up an API client
# Read Configuration class docs for more info about parameters and authentication methods
configuration = Configuration(
host = "http://localhost",
username = 'YOUR_USERNAME',
password = 'YOUR_PASSWORD',
)
with ApiClient(configuration) as api_client:
id = 1 # int | A unique integer value identifying this task.
type = "chunk" # str | Specifies the type of the requested data
number = 1 # int | A unique number value identifying chunk or frame (optional)
quality = "compressed" # str | Specifies the quality level of the requested data (optional)
try:
api_client.tasks_api.retrieve_data(
id,
type,
number=number,
quality=quality,
)
except exceptions.ApiException as e:
print("Exception when calling TasksApi.retrieve_data(): %s\n" % e)
Parameters
| Name | Type | Description | Notes |
|---|---|---|---|
| id | int | A unique integer value identifying this task. | |
| type | str | Specifies the type of the requested data | |
| number | int | A unique number value identifying chunk or frame | [optional] |
| quality | str | Specifies the quality level of the requested data | [optional] |
There are also optional kwargs that control the function invocation behavior. Read more here.
Returned values
Returned type: Tuple[None, urllib3.HTTPResponse].
Returns a tuple with 2 values: (None, raw_response).
This endpoint does not have any return value, so None is always returned as the first value.
The second value is the raw response, which can be useful to get response parameters, such as
status code, headers, or raw response data. Read more about invocation parameters
and returned values here.
Authentication
accessTokenAuth, basicAuth, csrfAuth, csrfHeaderAuth, sessionAuth, tokenAuth
HTTP request headers
- Content-Type: Not defined
- Accept: Not defined
HTTP response details
| Status code | Description | Response headers |
|---|---|---|
| 200 | Data of a specific type | * X-Checksum - Data checksum, applicable for chunks only * X-Updated-Date - Data update date, applicable for chunks only |
retrieve_data_meta
retrieve_data_meta( id, **kwargs )
Get metainformation for media files in a task
Example
from pprint import pprint
from cvat_sdk.api_client import Configuration, ApiClient, exceptions
from cvat_sdk.api_client.models import *
# Set up an API client
# Read Configuration class docs for more info about parameters and authentication methods
configuration = Configuration(
host = "http://localhost",
username = 'YOUR_USERNAME',
password = 'YOUR_PASSWORD',
)
with ApiClient(configuration) as api_client:
id = 1 # int | A unique integer value identifying this task.
try:
(data, response) = api_client.tasks_api.retrieve_data_meta(
id,)
pprint(data)
except exceptions.ApiException as e:
print("Exception when calling TasksApi.retrieve_data_meta(): %s\n" % e)
Parameters
| Name | Type | Description | Notes |
|---|---|---|---|
| id | int | A unique integer value identifying this task. |
There are also optional kwargs that control the function invocation behavior. Read more here.
Returned values
Returned type: Tuple[DataMetaRead, urllib3.HTTPResponse].
Returns a tuple with 2 values: (parsed_response, raw_response).
The first value is a model parsed from the response data. The second value is the raw response, which can be useful to get response parameters, such as status code, headers, or raw response data. Read more about invocation parameters and returned values here.
Authentication
accessTokenAuth, basicAuth, csrfAuth, csrfHeaderAuth, sessionAuth, tokenAuth
HTTP request headers
- Content-Type: Not defined
- Accept: application/vnd.cvat+json
HTTP response details
| Status code | Description | Response headers |
|---|---|---|
| 200 | - |
retrieve_preview
retrieve_preview( id, **kwargs )
Get a preview image for a task
Example
from pprint import pprint
from cvat_sdk.api_client import Configuration, ApiClient, exceptions
from cvat_sdk.api_client.models import *
# Set up an API client
# Read Configuration class docs for more info about parameters and authentication methods
configuration = Configuration(
host = "http://localhost",
username = 'YOUR_USERNAME',
password = 'YOUR_PASSWORD',
)
with ApiClient(configuration) as api_client:
id = 1 # int | A unique integer value identifying this task.
try:
api_client.tasks_api.retrieve_preview(
id,)
except exceptions.ApiException as e:
print("Exception when calling TasksApi.retrieve_preview(): %s\n" % e)
Parameters
| Name | Type | Description | Notes |
|---|---|---|---|
| id | int | A unique integer value identifying this task. |
There are also optional kwargs that control the function invocation behavior. Read more here.
Returned values
Returned type: Tuple[None, urllib3.HTTPResponse].
Returns a tuple with 2 values: (None, raw_response).
This endpoint does not have any return value, so None is always returned as the first value.
The second value is the raw response, which can be useful to get response parameters, such as
status code, headers, or raw response data. Read more about invocation parameters
and returned values here.
Authentication
accessTokenAuth, basicAuth, csrfAuth, csrfHeaderAuth, sessionAuth, tokenAuth
HTTP request headers
- Content-Type: Not defined
- Accept: Not defined
HTTP response details
| Status code | Description | Response headers |
|---|---|---|
| 200 | Task image preview | - |
| 404 | Task image preview not found | - |
retrieve_status
retrieve_status( id, **kwargs )
Get the creation status of a task
This method is deprecated and will be removed in one of the next releases. To check status of task creation, use new common API for managing background operations: GET /api/requests/?action=create&task_id=<task_id>
Example
from pprint import pprint
from cvat_sdk.api_client import Configuration, ApiClient, exceptions
from cvat_sdk.api_client.models import *
# Set up an API client
# Read Configuration class docs for more info about parameters and authentication methods
configuration = Configuration(
host = "http://localhost",
username = 'YOUR_USERNAME',
password = 'YOUR_PASSWORD',
)
with ApiClient(configuration) as api_client:
id = 1 # int | A unique integer value identifying this task.
try:
(data, response) = api_client.tasks_api.retrieve_status(
id,)
pprint(data)
except exceptions.ApiException as e:
print("Exception when calling TasksApi.retrieve_status(): %s\n" % e)
Parameters
| Name | Type | Description | Notes |
|---|---|---|---|
| id | int | A unique integer value identifying this task. |
There are also optional kwargs that control the function invocation behavior. Read more here.
Returned values
Returned type: Tuple[RqStatus, urllib3.HTTPResponse].
Returns a tuple with 2 values: (parsed_response, raw_response).
The first value is a model parsed from the response data. The second value is the raw response, which can be useful to get response parameters, such as status code, headers, or raw response data. Read more about invocation parameters and returned values here.
Authentication
accessTokenAuth, basicAuth, csrfAuth, csrfHeaderAuth, sessionAuth, tokenAuth
HTTP request headers
- Content-Type: Not defined
- Accept: application/vnd.cvat+json
HTTP response details
| Status code | Description | Response headers |
|---|---|---|
| 200 | - |
retrieve_validation_layout
retrieve_validation_layout( id, **kwargs )
Allows getting current validation configuration
Example
from pprint import pprint
from cvat_sdk.api_client import Configuration, ApiClient, exceptions
from cvat_sdk.api_client.models import *
# Set up an API client
# Read Configuration class docs for more info about parameters and authentication methods
configuration = Configuration(
host = "http://localhost",
username = 'YOUR_USERNAME',
password = 'YOUR_PASSWORD',
)
with ApiClient(configuration) as api_client:
id = 1 # int | A unique integer value identifying this task.
try:
(data, response) = api_client.tasks_api.retrieve_validation_layout(
id,)
pprint(data)
except exceptions.ApiException as e:
print("Exception when calling TasksApi.retrieve_validation_layout(): %s\n" % e)
Parameters
| Name | Type | Description | Notes |
|---|---|---|---|
| id | int | A unique integer value identifying this task. |
There are also optional kwargs that control the function invocation behavior. Read more here.
Returned values
Returned type: Tuple[TaskValidationLayoutRead, urllib3.HTTPResponse].
Returns a tuple with 2 values: (parsed_response, raw_response).
The first value is a model parsed from the response data. The second value is the raw response, which can be useful to get response parameters, such as status code, headers, or raw response data. Read more about invocation parameters and returned values here.
Authentication
accessTokenAuth, basicAuth, csrfAuth, csrfHeaderAuth, sessionAuth, tokenAuth
HTTP request headers
- Content-Type: Not defined
- Accept: application/vnd.cvat+json
HTTP response details
| Status code | Description | Response headers |
|---|---|---|
| 200 | - |
update_annotations
update_annotations( id, labeled_data_request=None, **kwargs )
Replace task annotations
Example
from pprint import pprint
from cvat_sdk.api_client import Configuration, ApiClient, exceptions
from cvat_sdk.api_client.models import *
# Set up an API client
# Read Configuration class docs for more info about parameters and authentication methods
configuration = Configuration(
host = "http://localhost",
username = 'YOUR_USERNAME',
password = 'YOUR_PASSWORD',
)
with ApiClient(configuration) as api_client:
id = 1 # int | A unique integer value identifying this task.
labeled_data_request = LabeledDataRequest(
version=0,
tags=[
LabeledImageRequest(
id=1,
frame=0,
label_id=0,
group=0,
source="manual",
attributes=[
AttributeValRequest(
spec_id=1,
value="value_example",
),
],
),
],
shapes=[
LabeledShapeRequest(
type=ShapeType("rectangle"),
occluded=False,
outside=False,
z_order=0,
rotation=0.0,
points=[
3.14,
],
id=1,
frame=0,
label_id=0,
group=0,
source="manual",
attributes=[
AttributeValRequest(
spec_id=1,
value="value_example",
),
],
score=1.0,
elements=[
SubLabeledShapeRequest(
type=ShapeType("rectangle"),
occluded=False,
outside=False,
z_order=0,
rotation=0.0,
points=[
3.14,
],
id=1,
frame=0,
label_id=0,
group=0,
source="manual",
attributes=[
AttributeValRequest(
spec_id=1,
value="value_example",
),
],
score=1.0,
),
],
),
],
tracks=[
LabeledTrackRequest(
id=1,
frame=0,
label_id=0,
group=0,
source="manual",
shapes=[
TrackedShapeRequest(
type=ShapeType("rectangle"),
occluded=False,
outside=False,
z_order=0,
rotation=0.0,
points=[
3.14,
],
id=1,
frame=0,
attributes=[
AttributeValRequest(
spec_id=1,
value="value_example",
),
],
),
],
attributes=[
AttributeValRequest(
spec_id=1,
value="value_example",
),
],
elements=[
SubLabeledTrackRequest(
id=1,
frame=0,
label_id=0,
group=0,
source="manual",
shapes=[
TrackedShapeRequest(
type=ShapeType("rectangle"),
occluded=False,
outside=False,
z_order=0,
rotation=0.0,
points=[
3.14,
],
id=1,
frame=0,
attributes=[
AttributeValRequest(
spec_id=1,
value="value_example",
),
],
),
],
attributes=[
AttributeValRequest(
spec_id=1,
value="value_example",
),
],
),
],
),
],
) # LabeledDataRequest | (optional)
try:
api_client.tasks_api.update_annotations(
id,
labeled_data_request=labeled_data_request,
)
except exceptions.ApiException as e:
print("Exception when calling TasksApi.update_annotations(): %s\n" % e)
Parameters
| Name | Type | Description | Notes |
|---|---|---|---|
| id | int | A unique integer value identifying this task. | |
| labeled_data_request | LabeledDataRequest | [optional] |
There are also optional kwargs that control the function invocation behavior. Read more here.
Returned values
Returned type: Tuple[None, urllib3.HTTPResponse].
Returns a tuple with 2 values: (None, raw_response).
This endpoint does not have any return value, so None is always returned as the first value.
The second value is the raw response, which can be useful to get response parameters, such as
status code, headers, or raw response data. Read more about invocation parameters
and returned values here.
Authentication
accessTokenAuth, basicAuth, csrfAuth, csrfHeaderAuth, sessionAuth, tokenAuth
HTTP request headers
- Content-Type: application/json, multipart/form-data
- Accept: Not defined
HTTP response details
| Status code | Description | Response headers |
|---|---|---|
| 200 | Annotations have been replaced | - |
11.2.1.1.21 - UsersApi class reference
All URIs are relative to http://localhost
| Method | HTTP request | Description |
|---|---|---|
| destroy | DELETE /api/users/{id} | Delete a user |
| list | GET /api/users | List users |
| partial_update | PATCH /api/users/{id} | Update a user |
| retrieve | GET /api/users/{id} | Get user details |
| retrieve_self | GET /api/users/self | Get details of the current user |
destroy
destroy( id, **kwargs )
Delete a user
Example
from pprint import pprint
from cvat_sdk.api_client import Configuration, ApiClient, exceptions
from cvat_sdk.api_client.models import *
# Set up an API client
# Read Configuration class docs for more info about parameters and authentication methods
configuration = Configuration(
host = "http://localhost",
username = 'YOUR_USERNAME',
password = 'YOUR_PASSWORD',
)
with ApiClient(configuration) as api_client:
id = 1 # int | A unique integer value identifying this user.
try:
api_client.users_api.destroy(
id,)
except exceptions.ApiException as e:
print("Exception when calling UsersApi.destroy(): %s\n" % e)
Parameters
| Name | Type | Description | Notes |
|---|---|---|---|
| id | int | A unique integer value identifying this user. |
There are also optional kwargs that control the function invocation behavior. Read more here.
Returned values
Returned type: Tuple[None, urllib3.HTTPResponse].
Returns a tuple with 2 values: (None, raw_response).
This endpoint does not have any return value, so None is always returned as the first value.
The second value is the raw response, which can be useful to get response parameters, such as
status code, headers, or raw response data. Read more about invocation parameters
and returned values here.
Authentication
accessTokenAuth, basicAuth, csrfAuth, csrfHeaderAuth, sessionAuth, tokenAuth
HTTP request headers
- Content-Type: Not defined
- Accept: Not defined
HTTP response details
| Status code | Description | Response headers |
|---|---|---|
| 204 | The user has been deleted | - |
list
list( x_organization=None, filter=None, first_name=None, is_active=None, last_name=None, org=None, org_id=None, page=None, page_size=None, search=None, sort=None, username=None, **kwargs )
List users
Example
from pprint import pprint
from cvat_sdk.api_client import Configuration, ApiClient, exceptions
from cvat_sdk.api_client.models import *
# Set up an API client
# Read Configuration class docs for more info about parameters and authentication methods
configuration = Configuration(
host = "http://localhost",
username = 'YOUR_USERNAME',
password = 'YOUR_PASSWORD',
)
with ApiClient(configuration) as api_client:
x_organization = "X-Organization_example" # str | Organization unique slug (optional)
filter = "filter_example" # str | JSON Logic filter. This filter can be used to perform complex filtering by grouping rules. For example, using such a filter you can get all resources created by you: - {\"and\":[{\"==\":[{\"var\":\"owner\"},\"<user>\"]}]} Details about the syntax used can be found at the link: https://jsonlogic.com/ Available filter_fields: ['username', 'first_name', 'last_name', 'id', 'is_active']. (optional)
first_name = "first_name_example" # str | A simple equality filter for the first_name field (optional)
is_active = True # bool | A simple equality filter for the is_active field (optional)
last_name = "last_name_example" # str | A simple equality filter for the last_name field (optional)
org = "org_example" # str | Organization unique slug (optional)
org_id = 1 # int | Organization identifier (optional)
page = 1 # int | A page number within the paginated result set. (optional)
page_size = 1 # int | Number of results to return per page. (optional)
search = "search_example" # str | A search term. Available search_fields: ('username', 'first_name', 'last_name') (optional)
sort = "sort_example" # str | Which field to use when ordering the results. Available ordering_fields: ['username', 'first_name', 'last_name', 'id', 'is_active'] (optional)
username = "username_example" # str | A simple equality filter for the username field (optional)
try:
(data, response) = api_client.users_api.list(
x_organization=x_organization,
filter=filter,
first_name=first_name,
is_active=is_active,
last_name=last_name,
org=org,
org_id=org_id,
page=page,
page_size=page_size,
search=search,
sort=sort,
username=username,
)
pprint(data)
except exceptions.ApiException as e:
print("Exception when calling UsersApi.list(): %s\n" % e)
Parameters
| Name | Type | Description | Notes |
|---|---|---|---|
| x_organization | str | Organization unique slug | [optional] |
| filter | str | JSON Logic filter. This filter can be used to perform complex filtering by grouping rules. For example, using such a filter you can get all resources created by you: - {"and":[{"==":[{"var":"owner"}," |
[optional] |
| first_name | str | A simple equality filter for the first_name field | [optional] |
| is_active | bool | A simple equality filter for the is_active field | [optional] |
| last_name | str | A simple equality filter for the last_name field | [optional] |
| org | str | Organization unique slug | [optional] |
| org_id | int | Organization identifier | [optional] |
| page | int | A page number within the paginated result set. | [optional] |
| page_size | int | Number of results to return per page. | [optional] |
| search | str | A search term. Available search_fields: (‘username’, ‘first_name’, ’last_name’) | [optional] |
| sort | str | Which field to use when ordering the results. Available ordering_fields: [‘username’, ‘first_name’, ’last_name’, ‘id’, ‘is_active’] | [optional] |
| username | str | A simple equality filter for the username field | [optional] |
There are also optional kwargs that control the function invocation behavior. Read more here.
Returned values
Returned type: Tuple[PaginatedMetaUserList, urllib3.HTTPResponse].
Returns a tuple with 2 values: (parsed_response, raw_response).
The first value is a model parsed from the response data. The second value is the raw response, which can be useful to get response parameters, such as status code, headers, or raw response data. Read more about invocation parameters and returned values here.
Authentication
accessTokenAuth, basicAuth, csrfAuth, csrfHeaderAuth, sessionAuth, tokenAuth
HTTP request headers
- Content-Type: Not defined
- Accept: application/vnd.cvat+json
HTTP response details
| Status code | Description | Response headers |
|---|---|---|
| 200 | - |
partial_update
partial_update( id, patched_user_request=None, **kwargs )
Update a user
Example
from pprint import pprint
from cvat_sdk.api_client import Configuration, ApiClient, exceptions
from cvat_sdk.api_client.models import *
# Set up an API client
# Read Configuration class docs for more info about parameters and authentication methods
configuration = Configuration(
host = "http://localhost",
username = 'YOUR_USERNAME',
password = 'YOUR_PASSWORD',
)
with ApiClient(configuration) as api_client:
id = 1 # int | A unique integer value identifying this user.
patched_user_request = PatchedUserRequest(
username="A",
first_name="first_name_example",
last_name="last_name_example",
email="email_example",
groups=[
"groups_example",
],
is_staff=True,
is_superuser=True,
is_active=True,
) # PatchedUserRequest | (optional)
try:
(data, response) = api_client.users_api.partial_update(
id,
patched_user_request=patched_user_request,
)
pprint(data)
except exceptions.ApiException as e:
print("Exception when calling UsersApi.partial_update(): %s\n" % e)
Parameters
| Name | Type | Description | Notes |
|---|---|---|---|
| id | int | A unique integer value identifying this user. | |
| patched_user_request | PatchedUserRequest | [optional] |
There are also optional kwargs that control the function invocation behavior. Read more here.
Returned values
Returned type: Tuple[MetaUser, urllib3.HTTPResponse].
Returns a tuple with 2 values: (parsed_response, raw_response).
The first value is a model parsed from the response data. The second value is the raw response, which can be useful to get response parameters, such as status code, headers, or raw response data. Read more about invocation parameters and returned values here.
Authentication
accessTokenAuth, basicAuth, csrfAuth, csrfHeaderAuth, sessionAuth, tokenAuth
HTTP request headers
- Content-Type: application/json
- Accept: application/vnd.cvat+json
HTTP response details
| Status code | Description | Response headers |
|---|---|---|
| 200 | - |
retrieve
retrieve( id, **kwargs )
Get user details
Example
from pprint import pprint
from cvat_sdk.api_client import Configuration, ApiClient, exceptions
from cvat_sdk.api_client.models import *
# Set up an API client
# Read Configuration class docs for more info about parameters and authentication methods
configuration = Configuration(
host = "http://localhost",
username = 'YOUR_USERNAME',
password = 'YOUR_PASSWORD',
)
with ApiClient(configuration) as api_client:
id = 1 # int | A unique integer value identifying this user.
try:
(data, response) = api_client.users_api.retrieve(
id,)
pprint(data)
except exceptions.ApiException as e:
print("Exception when calling UsersApi.retrieve(): %s\n" % e)
Parameters
| Name | Type | Description | Notes |
|---|---|---|---|
| id | int | A unique integer value identifying this user. |
There are also optional kwargs that control the function invocation behavior. Read more here.
Returned values
Returned type: Tuple[MetaUser, urllib3.HTTPResponse].
Returns a tuple with 2 values: (parsed_response, raw_response).
The first value is a model parsed from the response data. The second value is the raw response, which can be useful to get response parameters, such as status code, headers, or raw response data. Read more about invocation parameters and returned values here.
Authentication
accessTokenAuth, basicAuth, csrfAuth, csrfHeaderAuth, sessionAuth, tokenAuth
HTTP request headers
- Content-Type: Not defined
- Accept: application/vnd.cvat+json
HTTP response details
| Status code | Description | Response headers |
|---|---|---|
| 200 | - |
retrieve_self
retrieve_self( **kwargs )
Get details of the current user
Method returns an instance of a user who is currently authenticated
Example
from pprint import pprint
from cvat_sdk.api_client import Configuration, ApiClient, exceptions
from cvat_sdk.api_client.models import *
# Set up an API client
# Read Configuration class docs for more info about parameters and authentication methods
configuration = Configuration(
host = "http://localhost",
username = 'YOUR_USERNAME',
password = 'YOUR_PASSWORD',
)
with ApiClient(configuration) as api_client:
try:
(data, response) = api_client.users_api.retrieve_self()
pprint(data)
except exceptions.ApiException as e:
print("Exception when calling UsersApi.retrieve_self(): %s\n" % e)
Parameters
This endpoint does not need any parameter.
There are also optional kwargs that control the function invocation behavior. Read more here.
Returned values
Returned type: Tuple[MetaUser, urllib3.HTTPResponse].
Returns a tuple with 2 values: (parsed_response, raw_response).
The first value is a model parsed from the response data. The second value is the raw response, which can be useful to get response parameters, such as status code, headers, or raw response data. Read more about invocation parameters and returned values here.
Authentication
accessTokenAuth, basicAuth, csrfAuth, csrfHeaderAuth, sessionAuth, tokenAuth
HTTP request headers
- Content-Type: Not defined
- Accept: application/vnd.cvat+json
HTTP response details
| Status code | Description | Response headers |
|---|---|---|
| 200 | - |
11.2.1.1.22 - WebhooksApi class reference
All URIs are relative to http://localhost
| Method | HTTP request | Description |
|---|---|---|
| create | POST /api/webhooks | Create a webhook |
| create_deliveries_redelivery | POST /api/webhooks/{id}/deliveries/{delivery_id}/redelivery | Redeliver a webhook delivery |
| create_ping | POST /api/webhooks/{id}/ping | Send a ping webhook |
| destroy | DELETE /api/webhooks/{id} | Delete a webhook |
| list | GET /api/webhooks | List webhooks |
| list_deliveries | GET /api/webhooks/{id}/deliveries | List deliveries for a webhook |
| partial_update | PATCH /api/webhooks/{id} | Update a webhook |
| retrieve | GET /api/webhooks/{id} | Get webhook details |
| retrieve_deliveries | GET /api/webhooks/{id}/deliveries/{delivery_id} | Get details of a webhook delivery |
| retrieve_events | GET /api/webhooks/events | List available webhook events |
| update | PUT /api/webhooks/{id} | Replace a webhook |
create
create( webhook_write_request, x_organization=None, org=None, org_id=None, **kwargs )
Create a webhook
Example
from pprint import pprint
from cvat_sdk.api_client import Configuration, ApiClient, exceptions
from cvat_sdk.api_client.models import *
# Set up an API client
# Read Configuration class docs for more info about parameters and authentication methods
configuration = Configuration(
host = "http://localhost",
username = 'YOUR_USERNAME',
password = 'YOUR_PASSWORD',
)
with ApiClient(configuration) as api_client:
webhook_write_request = WebhookWriteRequest(
target_url="target_url_example",
description="description_example",
type=WebhookType("organization"),
content_type=WebhookContentType("application/json"),
secret="secret_example",
is_active=True,
enable_ssl=True,
project_id=1,
events=[
EventsEnum("create:comment"),
],
) # WebhookWriteRequest |
x_organization = "X-Organization_example" # str | Organization unique slug (optional)
org = "org_example" # str | Organization unique slug (optional)
org_id = 1 # int | Organization identifier (optional)
try:
(data, response) = api_client.webhooks_api.create(
webhook_write_request,
x_organization=x_organization,
org=org,
org_id=org_id,
)
pprint(data)
except exceptions.ApiException as e:
print("Exception when calling WebhooksApi.create(): %s\n" % e)
Parameters
| Name | Type | Description | Notes |
|---|---|---|---|
| webhook_write_request | WebhookWriteRequest | ||
| x_organization | str | Organization unique slug | [optional] |
| org | str | Organization unique slug | [optional] |
| org_id | int | Organization identifier | [optional] |
There are also optional kwargs that control the function invocation behavior. Read more here.
Returned values
Returned type: Tuple[WebhookRead, urllib3.HTTPResponse].
Returns a tuple with 2 values: (parsed_response, raw_response).
The first value is a model parsed from the response data. The second value is the raw response, which can be useful to get response parameters, such as status code, headers, or raw response data. Read more about invocation parameters and returned values here.
Authentication
accessTokenAuth, basicAuth, csrfAuth, csrfHeaderAuth, sessionAuth, tokenAuth
HTTP request headers
- Content-Type: application/json
- Accept: application/vnd.cvat+json
HTTP response details
| Status code | Description | Response headers |
|---|---|---|
| 201 | - |
create_deliveries_redelivery
create_deliveries_redelivery( delivery_id, id, **kwargs )
Redeliver a webhook delivery
Example
from pprint import pprint
from cvat_sdk.api_client import Configuration, ApiClient, exceptions
from cvat_sdk.api_client.models import *
# Set up an API client
# Read Configuration class docs for more info about parameters and authentication methods
configuration = Configuration(
host = "http://localhost",
username = 'YOUR_USERNAME',
password = 'YOUR_PASSWORD',
)
with ApiClient(configuration) as api_client:
delivery_id = "4" # str |
id = 1 # int | A unique integer value identifying this webhook.
try:
api_client.webhooks_api.create_deliveries_redelivery(
delivery_id,
id,)
except exceptions.ApiException as e:
print("Exception when calling WebhooksApi.create_deliveries_redelivery(): %s\n" % e)
Parameters
| Name | Type | Description | Notes |
|---|---|---|---|
| delivery_id | str | ||
| id | int | A unique integer value identifying this webhook. |
There are also optional kwargs that control the function invocation behavior. Read more here.
Returned values
Returned type: Tuple[None, urllib3.HTTPResponse].
Returns a tuple with 2 values: (None, raw_response).
This endpoint does not have any return value, so None is always returned as the first value.
The second value is the raw response, which can be useful to get response parameters, such as
status code, headers, or raw response data. Read more about invocation parameters
and returned values here.
Authentication
accessTokenAuth, basicAuth, csrfAuth, csrfHeaderAuth, sessionAuth, tokenAuth
HTTP request headers
- Content-Type: Not defined
- Accept: Not defined
HTTP response details
| Status code | Description | Response headers |
|---|---|---|
| 200 | No response body | - |
create_ping
create_ping( id, **kwargs )
Send a ping webhook
Example
from pprint import pprint
from cvat_sdk.api_client import Configuration, ApiClient, exceptions
from cvat_sdk.api_client.models import *
# Set up an API client
# Read Configuration class docs for more info about parameters and authentication methods
configuration = Configuration(
host = "http://localhost",
username = 'YOUR_USERNAME',
password = 'YOUR_PASSWORD',
)
with ApiClient(configuration) as api_client:
id = 1 # int | A unique integer value identifying this webhook.
try:
(data, response) = api_client.webhooks_api.create_ping(
id,)
pprint(data)
except exceptions.ApiException as e:
print("Exception when calling WebhooksApi.create_ping(): %s\n" % e)
Parameters
| Name | Type | Description | Notes |
|---|---|---|---|
| id | int | A unique integer value identifying this webhook. |
There are also optional kwargs that control the function invocation behavior. Read more here.
Returned values
Returned type: Tuple[WebhookDeliveryRead, urllib3.HTTPResponse].
Returns a tuple with 2 values: (parsed_response, raw_response).
The first value is a model parsed from the response data. The second value is the raw response, which can be useful to get response parameters, such as status code, headers, or raw response data. Read more about invocation parameters and returned values here.
Authentication
accessTokenAuth, basicAuth, csrfAuth, csrfHeaderAuth, sessionAuth, tokenAuth
HTTP request headers
- Content-Type: Not defined
- Accept: application/vnd.cvat+json
HTTP response details
| Status code | Description | Response headers |
|---|---|---|
| 200 | - |
destroy
destroy( id, **kwargs )
Delete a webhook
Example
from pprint import pprint
from cvat_sdk.api_client import Configuration, ApiClient, exceptions
from cvat_sdk.api_client.models import *
# Set up an API client
# Read Configuration class docs for more info about parameters and authentication methods
configuration = Configuration(
host = "http://localhost",
username = 'YOUR_USERNAME',
password = 'YOUR_PASSWORD',
)
with ApiClient(configuration) as api_client:
id = 1 # int | A unique integer value identifying this webhook.
try:
api_client.webhooks_api.destroy(
id,)
except exceptions.ApiException as e:
print("Exception when calling WebhooksApi.destroy(): %s\n" % e)
Parameters
| Name | Type | Description | Notes |
|---|---|---|---|
| id | int | A unique integer value identifying this webhook. |
There are also optional kwargs that control the function invocation behavior. Read more here.
Returned values
Returned type: Tuple[None, urllib3.HTTPResponse].
Returns a tuple with 2 values: (None, raw_response).
This endpoint does not have any return value, so None is always returned as the first value.
The second value is the raw response, which can be useful to get response parameters, such as
status code, headers, or raw response data. Read more about invocation parameters
and returned values here.
Authentication
accessTokenAuth, basicAuth, csrfAuth, csrfHeaderAuth, sessionAuth, tokenAuth
HTTP request headers
- Content-Type: Not defined
- Accept: Not defined
HTTP response details
| Status code | Description | Response headers |
|---|---|---|
| 204 | The webhook has been deleted | - |
list
list( x_organization=None, filter=None, org=None, org_id=None, owner=None, page=None, page_size=None, project_id=None, search=None, sort=None, target_url=None, type=None, **kwargs )
List webhooks
Example
from pprint import pprint
from cvat_sdk.api_client import Configuration, ApiClient, exceptions
from cvat_sdk.api_client.models import *
# Set up an API client
# Read Configuration class docs for more info about parameters and authentication methods
configuration = Configuration(
host = "http://localhost",
username = 'YOUR_USERNAME',
password = 'YOUR_PASSWORD',
)
with ApiClient(configuration) as api_client:
x_organization = "X-Organization_example" # str | Organization unique slug (optional)
filter = "filter_example" # str | JSON Logic filter. This filter can be used to perform complex filtering by grouping rules. For example, using such a filter you can get all resources created by you: - {\"and\":[{\"==\":[{\"var\":\"owner\"},\"<user>\"]}]} Details about the syntax used can be found at the link: https://jsonlogic.com/ Available filter_fields: ['target_url', 'owner', 'type', 'description', 'id', 'project_id', 'updated_date']. (optional)
org = "org_example" # str | Organization unique slug (optional)
org_id = 1 # int | Organization identifier (optional)
owner = "owner_example" # str | A simple equality filter for the owner field (optional)
page = 1 # int | A page number within the paginated result set. (optional)
page_size = 1 # int | Number of results to return per page. (optional)
project_id = 1 # int | A simple equality filter for the project_id field (optional)
search = "search_example" # str | A search term. Available search_fields: ('target_url', 'owner', 'type', 'description') (optional)
sort = "sort_example" # str | Which field to use when ordering the results. Available ordering_fields: ['target_url', 'owner', 'type', 'description', 'id', 'project_id', 'updated_date'] (optional)
target_url = "target_url_example" # str | A simple equality filter for the target_url field (optional)
type = "organization" # str | A simple equality filter for the type field (optional)
try:
(data, response) = api_client.webhooks_api.list(
x_organization=x_organization,
filter=filter,
org=org,
org_id=org_id,
owner=owner,
page=page,
page_size=page_size,
project_id=project_id,
search=search,
sort=sort,
target_url=target_url,
type=type,
)
pprint(data)
except exceptions.ApiException as e:
print("Exception when calling WebhooksApi.list(): %s\n" % e)
Parameters
| Name | Type | Description | Notes |
|---|---|---|---|
| x_organization | str | Organization unique slug | [optional] |
| filter | str | JSON Logic filter. This filter can be used to perform complex filtering by grouping rules. For example, using such a filter you can get all resources created by you: - {"and":[{"==":[{"var":"owner"}," |
[optional] |
| org | str | Organization unique slug | [optional] |
| org_id | int | Organization identifier | [optional] |
| owner | str | A simple equality filter for the owner field | [optional] |
| page | int | A page number within the paginated result set. | [optional] |
| page_size | int | Number of results to return per page. | [optional] |
| project_id | int | A simple equality filter for the project_id field | [optional] |
| search | str | A search term. Available search_fields: (’target_url’, ‘owner’, ’type’, ‘description’) | [optional] |
| sort | str | Which field to use when ordering the results. Available ordering_fields: [’target_url’, ‘owner’, ’type’, ‘description’, ‘id’, ‘project_id’, ‘updated_date’] | [optional] |
| target_url | str | A simple equality filter for the target_url field | [optional] |
| type | str | A simple equality filter for the type field | [optional] |
There are also optional kwargs that control the function invocation behavior. Read more here.
Returned values
Returned type: Tuple[PaginatedWebhookReadList, urllib3.HTTPResponse].
Returns a tuple with 2 values: (parsed_response, raw_response).
The first value is a model parsed from the response data. The second value is the raw response, which can be useful to get response parameters, such as status code, headers, or raw response data. Read more about invocation parameters and returned values here.
Authentication
accessTokenAuth, basicAuth, csrfAuth, csrfHeaderAuth, sessionAuth, tokenAuth
HTTP request headers
- Content-Type: Not defined
- Accept: application/vnd.cvat+json
HTTP response details
| Status code | Description | Response headers |
|---|---|---|
| 200 | - |
list_deliveries
list_deliveries( id, page=None, page_size=None, **kwargs )
List deliveries for a webhook
Example
from pprint import pprint
from cvat_sdk.api_client import Configuration, ApiClient, exceptions
from cvat_sdk.api_client.models import *
# Set up an API client
# Read Configuration class docs for more info about parameters and authentication methods
configuration = Configuration(
host = "http://localhost",
username = 'YOUR_USERNAME',
password = 'YOUR_PASSWORD',
)
with ApiClient(configuration) as api_client:
id = 1 # int | A unique integer value identifying this webhook.
page = 1 # int | A page number within the paginated result set. (optional)
page_size = 1 # int | Number of results to return per page. (optional)
try:
(data, response) = api_client.webhooks_api.list_deliveries(
id,
page=page,
page_size=page_size,
)
pprint(data)
except exceptions.ApiException as e:
print("Exception when calling WebhooksApi.list_deliveries(): %s\n" % e)
Parameters
| Name | Type | Description | Notes |
|---|---|---|---|
| id | int | A unique integer value identifying this webhook. | |
| page | int | A page number within the paginated result set. | [optional] |
| page_size | int | Number of results to return per page. | [optional] |
There are also optional kwargs that control the function invocation behavior. Read more here.
Returned values
Returned type: Tuple[PaginatedWebhookDeliveryReadList, urllib3.HTTPResponse].
Returns a tuple with 2 values: (parsed_response, raw_response).
The first value is a model parsed from the response data. The second value is the raw response, which can be useful to get response parameters, such as status code, headers, or raw response data. Read more about invocation parameters and returned values here.
Authentication
accessTokenAuth, basicAuth, csrfAuth, csrfHeaderAuth, sessionAuth, tokenAuth
HTTP request headers
- Content-Type: Not defined
- Accept: application/vnd.cvat+json
HTTP response details
| Status code | Description | Response headers |
|---|---|---|
| 200 | - |
partial_update
partial_update( id, patched_webhook_write_request=None, **kwargs )
Update a webhook
Example
from pprint import pprint
from cvat_sdk.api_client import Configuration, ApiClient, exceptions
from cvat_sdk.api_client.models import *
# Set up an API client
# Read Configuration class docs for more info about parameters and authentication methods
configuration = Configuration(
host = "http://localhost",
username = 'YOUR_USERNAME',
password = 'YOUR_PASSWORD',
)
with ApiClient(configuration) as api_client:
id = 1 # int | A unique integer value identifying this webhook.
patched_webhook_write_request = PatchedWebhookWriteRequest(
target_url="target_url_example",
description="description_example",
content_type=WebhookContentType("application/json"),
secret="secret_example",
is_active=True,
enable_ssl=True,
events=[
EventsEnum("create:comment"),
],
) # PatchedWebhookWriteRequest | (optional)
try:
(data, response) = api_client.webhooks_api.partial_update(
id,
patched_webhook_write_request=patched_webhook_write_request,
)
pprint(data)
except exceptions.ApiException as e:
print("Exception when calling WebhooksApi.partial_update(): %s\n" % e)
Parameters
| Name | Type | Description | Notes |
|---|---|---|---|
| id | int | A unique integer value identifying this webhook. | |
| patched_webhook_write_request | PatchedWebhookWriteRequest | [optional] |
There are also optional kwargs that control the function invocation behavior. Read more here.
Returned values
Returned type: Tuple[WebhookRead, urllib3.HTTPResponse].
Returns a tuple with 2 values: (parsed_response, raw_response).
The first value is a model parsed from the response data. The second value is the raw response, which can be useful to get response parameters, such as status code, headers, or raw response data. Read more about invocation parameters and returned values here.
Authentication
accessTokenAuth, basicAuth, csrfAuth, csrfHeaderAuth, sessionAuth, tokenAuth
HTTP request headers
- Content-Type: application/json
- Accept: application/vnd.cvat+json
HTTP response details
| Status code | Description | Response headers |
|---|---|---|
| 200 | - |
retrieve
retrieve( id, **kwargs )
Get webhook details
Example
from pprint import pprint
from cvat_sdk.api_client import Configuration, ApiClient, exceptions
from cvat_sdk.api_client.models import *
# Set up an API client
# Read Configuration class docs for more info about parameters and authentication methods
configuration = Configuration(
host = "http://localhost",
username = 'YOUR_USERNAME',
password = 'YOUR_PASSWORD',
)
with ApiClient(configuration) as api_client:
id = 1 # int | A unique integer value identifying this webhook.
try:
(data, response) = api_client.webhooks_api.retrieve(
id,)
pprint(data)
except exceptions.ApiException as e:
print("Exception when calling WebhooksApi.retrieve(): %s\n" % e)
Parameters
| Name | Type | Description | Notes |
|---|---|---|---|
| id | int | A unique integer value identifying this webhook. |
There are also optional kwargs that control the function invocation behavior. Read more here.
Returned values
Returned type: Tuple[WebhookRead, urllib3.HTTPResponse].
Returns a tuple with 2 values: (parsed_response, raw_response).
The first value is a model parsed from the response data. The second value is the raw response, which can be useful to get response parameters, such as status code, headers, or raw response data. Read more about invocation parameters and returned values here.
Authentication
accessTokenAuth, basicAuth, csrfAuth, csrfHeaderAuth, sessionAuth, tokenAuth
HTTP request headers
- Content-Type: Not defined
- Accept: application/vnd.cvat+json
HTTP response details
| Status code | Description | Response headers |
|---|---|---|
| 200 | - |
retrieve_deliveries
retrieve_deliveries( delivery_id, id, **kwargs )
Get details of a webhook delivery
Example
from pprint import pprint
from cvat_sdk.api_client import Configuration, ApiClient, exceptions
from cvat_sdk.api_client.models import *
# Set up an API client
# Read Configuration class docs for more info about parameters and authentication methods
configuration = Configuration(
host = "http://localhost",
username = 'YOUR_USERNAME',
password = 'YOUR_PASSWORD',
)
with ApiClient(configuration) as api_client:
delivery_id = "4" # str |
id = 1 # int | A unique integer value identifying this webhook.
try:
(data, response) = api_client.webhooks_api.retrieve_deliveries(
delivery_id,
id,)
pprint(data)
except exceptions.ApiException as e:
print("Exception when calling WebhooksApi.retrieve_deliveries(): %s\n" % e)
Parameters
| Name | Type | Description | Notes |
|---|---|---|---|
| delivery_id | str | ||
| id | int | A unique integer value identifying this webhook. |
There are also optional kwargs that control the function invocation behavior. Read more here.
Returned values
Returned type: Tuple[WebhookDeliveryRead, urllib3.HTTPResponse].
Returns a tuple with 2 values: (parsed_response, raw_response).
The first value is a model parsed from the response data. The second value is the raw response, which can be useful to get response parameters, such as status code, headers, or raw response data. Read more about invocation parameters and returned values here.
Authentication
accessTokenAuth, basicAuth, csrfAuth, csrfHeaderAuth, sessionAuth, tokenAuth
HTTP request headers
- Content-Type: Not defined
- Accept: application/vnd.cvat+json
HTTP response details
| Status code | Description | Response headers |
|---|---|---|
| 200 | - |
retrieve_events
retrieve_events( type=None, **kwargs )
List available webhook events
Example
from pprint import pprint
from cvat_sdk.api_client import Configuration, ApiClient, exceptions
from cvat_sdk.api_client.models import *
# Set up an API client
# Read Configuration class docs for more info about parameters and authentication methods
configuration = Configuration(
host = "http://localhost",
username = 'YOUR_USERNAME',
password = 'YOUR_PASSWORD',
)
with ApiClient(configuration) as api_client:
type = "type_example" # str | Type of webhook (optional)
try:
(data, response) = api_client.webhooks_api.retrieve_events(
type=type,
)
pprint(data)
except exceptions.ApiException as e:
print("Exception when calling WebhooksApi.retrieve_events(): %s\n" % e)
Parameters
| Name | Type | Description | Notes |
|---|---|---|---|
| type | str | Type of webhook | [optional] |
There are also optional kwargs that control the function invocation behavior. Read more here.
Returned values
Returned type: Tuple[Events, urllib3.HTTPResponse].
Returns a tuple with 2 values: (parsed_response, raw_response).
The first value is a model parsed from the response data. The second value is the raw response, which can be useful to get response parameters, such as status code, headers, or raw response data. Read more about invocation parameters and returned values here.
Authentication
accessTokenAuth, basicAuth, csrfAuth, csrfHeaderAuth, sessionAuth, tokenAuth
HTTP request headers
- Content-Type: Not defined
- Accept: application/vnd.cvat+json
HTTP response details
| Status code | Description | Response headers |
|---|---|---|
| 200 | - |
update
update( id, webhook_write_request, **kwargs )
Replace a webhook
Example
from pprint import pprint
from cvat_sdk.api_client import Configuration, ApiClient, exceptions
from cvat_sdk.api_client.models import *
# Set up an API client
# Read Configuration class docs for more info about parameters and authentication methods
configuration = Configuration(
host = "http://localhost",
username = 'YOUR_USERNAME',
password = 'YOUR_PASSWORD',
)
with ApiClient(configuration) as api_client:
id = 1 # int | A unique integer value identifying this webhook.
webhook_write_request = WebhookWriteRequest(
target_url="target_url_example",
description="description_example",
type=WebhookType("organization"),
content_type=WebhookContentType("application/json"),
secret="secret_example",
is_active=True,
enable_ssl=True,
project_id=1,
events=[
EventsEnum("create:comment"),
],
) # WebhookWriteRequest |
try:
(data, response) = api_client.webhooks_api.update(
id,
webhook_write_request,)
pprint(data)
except exceptions.ApiException as e:
print("Exception when calling WebhooksApi.update(): %s\n" % e)
Parameters
| Name | Type | Description | Notes |
|---|---|---|---|
| id | int | A unique integer value identifying this webhook. | |
| webhook_write_request | WebhookWriteRequest |
There are also optional kwargs that control the function invocation behavior. Read more here.
Returned values
Returned type: Tuple[WebhookRead, urllib3.HTTPResponse].
Returns a tuple with 2 values: (parsed_response, raw_response).
The first value is a model parsed from the response data. The second value is the raw response, which can be useful to get response parameters, such as status code, headers, or raw response data. Read more about invocation parameters and returned values here.
Authentication
accessTokenAuth, basicAuth, csrfAuth, csrfHeaderAuth, sessionAuth, tokenAuth
HTTP request headers
- Content-Type: application/json
- Accept: application/vnd.cvat+json
HTTP response details
| Status code | Description | Response headers |
|---|---|---|
| 200 | - |
11.2.1.2 - Models
11.2.1.2.1 - About class reference
Properties
| Name | Type | Description | Notes |
|---|---|---|---|
| name | str | ||
| description | str | ||
| version | str | ||
| logo_url | str | ||
| subtitle | str |
11.2.1.2.2 - AcceptInvitationRead class reference
Properties
| Name | Type | Description | Notes |
|---|---|---|---|
| organization_slug | str |
11.2.1.2.3 - AccessTokenRead class reference
Properties
| Name | Type | Description | Notes |
|---|---|---|---|
| id | int | [optional] [readonly] | |
| name | str | A free-form name for the token. | [optional] [readonly] |
| created_date | datetime | [optional] [readonly] | |
| updated_date | datetime | [optional] [readonly] | |
| expiry_date | datetime, none_type | Once the token expires, clients cannot use it anymore. | [optional] [readonly] |
| last_used_date | datetime, none_type | The last use date of the token. This field is NOT updated after each user request. The minimum expected resolution should be 1 day. | [optional] [readonly] |
| read_only | bool | [optional] [readonly] | |
| owner | BasicUser | [optional] | |
| value | str | The raw value of the token. Must be saved by the user, returned only once | [optional] |
11.2.1.2.4 - AccessTokenWriteRequest class reference
Properties
| Name | Type | Description | Notes |
|---|---|---|---|
| name | str | A free-form name for the token. Doesn’t have to be unique | |
| expiry_date | datetime, none_type | Once the token expires, clients cannot use it anymore. If not set, the token will not expire. | [optional] |
| read_only | bool | [optional] |
11.2.1.2.5 - AnnotationConflict class reference
Properties
| Name | Type | Description | Notes |
|---|---|---|---|
| annotation_ids | [AnnotationId] | ||
| id | int | [optional] [readonly] | |
| frame | int | [optional] [readonly] | |
| type | bool, date, datetime, dict, float, int, list, str, none_type | [optional] [readonly] | |
| report_id | int | [optional] [readonly] | |
| severity | bool, date, datetime, dict, float, int, list, str, none_type | [optional] [readonly] |
11.2.1.2.6 - AnnotationConflictAnnotationType class reference
- `tag` - TAG * `shape` - SHAPE * `track` - TRACK
Properties
| Name | Type | Description | Notes |
|---|---|---|---|
| value | str | * tag - TAG * shape - SHAPE * track - TRACK |
must be one of [“tag”, “shape”, “track”, ] |
11.2.1.2.7 - AnnotationConflictSeverity class reference
- `warning` - WARNING * `error` - ERROR
Properties
| Name | Type | Description | Notes |
|---|---|---|---|
| value | str | * warning - WARNING * error - ERROR |
must be one of [“warning”, “error”, ] |
11.2.1.2.8 - AnnotationConflictType class reference
- `missing_annotation` - MISSING_ANNOTATION * `extra_annotation` - EXTRA_ANNOTATION * `mismatching_label` - MISMATCHING_LABEL * `low_overlap` - LOW_OVERLAP * `mismatching_direction` - MISMATCHING_DIRECTION * `mismatching_attributes` - MISMATCHING_ATTRIBUTES * `mismatching_groups` - MISMATCHING_GROUPS * `covered_annotation` - COVERED_ANNOTATION
Properties
| Name | Type | Description | Notes |
|---|---|---|---|
| value | str | * missing_annotation - MISSING_ANNOTATION * extra_annotation - EXTRA_ANNOTATION * mismatching_label - MISMATCHING_LABEL * low_overlap - LOW_OVERLAP * mismatching_direction - MISMATCHING_DIRECTION * mismatching_attributes - MISMATCHING_ATTRIBUTES * mismatching_groups - MISMATCHING_GROUPS * covered_annotation - COVERED_ANNOTATION |
must be one of [“missing_annotation”, “extra_annotation”, “mismatching_label”, “low_overlap”, “mismatching_direction”, “mismatching_attributes”, “mismatching_groups”, “covered_annotation”, ] |
11.2.1.2.9 - AnnotationFileRequest class reference
Properties
| Name | Type | Description | Notes |
|---|---|---|---|
| annotation_file | file_type |
11.2.1.2.10 - AnnotationGuideRead class reference
Properties
| Name | Type | Description | Notes |
|---|---|---|---|
| id | int | [optional] [readonly] | |
| task_id | int, none_type | [optional] [readonly] | |
| project_id | int, none_type | [optional] [readonly] | |
| created_date | datetime | [optional] [readonly] | |
| updated_date | datetime | [optional] [readonly] | |
| markdown | str | [optional] [readonly] |
11.2.1.2.11 - AnnotationGuideWriteRequest class reference
Properties
| Name | Type | Description | Notes |
|---|---|---|---|
| task_id | int, none_type | [optional] | |
| project_id | int, none_type | [optional] | |
| markdown | str | [optional] |
11.2.1.2.12 - AnnotationId class reference
Properties
| Name | Type | Description | Notes |
|---|---|---|---|
| obj_id | int | [optional] [readonly] | |
| job_id | int | [optional] [readonly] | |
| type | bool, date, datetime, dict, float, int, list, str, none_type | [optional] [readonly] | |
| shape_type | AnnotationIdShapeType | [optional] |
11.2.1.2.13 - AnnotationIdShapeType class reference
Properties
| Name | Type | Description | Notes |
|---|
11.2.1.2.14 - AssetRead class reference
Properties
| Name | Type | Description | Notes |
|---|---|---|---|
| filename | str | ||
| uuid | str | [optional] [readonly] | |
| created_date | datetime | [optional] [readonly] | |
| owner | BasicUser | [optional] | |
| guide_id | int | [optional] [readonly] |
11.2.1.2.15 - Attribute class reference
Properties
| Name | Type | Description | Notes |
|---|---|---|---|
| name | str | ||
| mutable | bool | ||
| input_type | InputTypeEnum | ||
| values | [str] | ||
| id | int | [optional] | |
| default_value | str | [optional] |
11.2.1.2.16 - AttributeRequest class reference
Properties
| Name | Type | Description | Notes |
|---|---|---|---|
| name | str | ||
| mutable | bool | ||
| input_type | InputTypeEnum | ||
| values | [str] | ||
| id | int | [optional] | |
| default_value | str | [optional] |
11.2.1.2.17 - AttributeVal class reference
Properties
| Name | Type | Description | Notes |
|---|---|---|---|
| spec_id | int | ||
| value | str |
11.2.1.2.18 - AttributeValRequest class reference
Properties
| Name | Type | Description | Notes |
|---|---|---|---|
| spec_id | int | ||
| value | str |
11.2.1.2.19 - BasicOrganization class reference
Properties
| Name | Type | Description | Notes |
|---|---|---|---|
| id | int | [optional] [readonly] | |
| slug | str | [optional] [readonly] |
11.2.1.2.20 - BasicUser class reference
Properties
| Name | Type | Description | Notes |
|---|---|---|---|
| username | str | Required. 150 characters or fewer. Letters, digits and @/./+/-/_ only. | |
| url | str | [optional] [readonly] | |
| id | int | [optional] [readonly] | |
| first_name | str | [optional] | |
| last_name | str | [optional] |
11.2.1.2.21 - BasicUserRequest class reference
Properties
| Name | Type | Description | Notes |
|---|---|---|---|
| username | str | Required. 150 characters or fewer. Letters, digits and @/./+/-/_ only. | |
| first_name | str | [optional] | |
| last_name | str | [optional] |
11.2.1.2.22 - Chapter class reference
Properties
| Name | Type | Description | Notes |
|---|---|---|---|
| id | int | ||
| start | int | ||
| stop | int | ||
| metadata | ChapterMetadata |
11.2.1.2.23 - ChapterMetadata class reference
Properties
| Name | Type | Description | Notes |
|---|---|---|---|
| title | str | [optional] |
11.2.1.2.24 - ChunkType class reference
- `video` - VIDEO * `imageset` - IMAGESET * `list` - LIST
Properties
| Name | Type | Description | Notes |
|---|---|---|---|
| value | str | * video - VIDEO * imageset - IMAGESET * list - LIST |
must be one of [“video”, “imageset”, “list”, ] |
11.2.1.2.25 - ClientEvents class reference
Properties
| Name | Type | Description | Notes |
|---|---|---|---|
| timestamp | datetime | ||
| events | [Event] | [optional] if omitted the server will use the default value of [] |
11.2.1.2.26 - ClientEventsRequest class reference
Properties
| Name | Type | Description | Notes |
|---|---|---|---|
| timestamp | datetime | ||
| events | [EventRequest] | [optional] if omitted the server will use the default value of [] | |
| previous_event | ClientEventsRequestPreviousEvent | [optional] |
11.2.1.2.27 - ClientEventsRequestPreviousEvent class reference
Properties
| Name | Type | Description | Notes |
|---|---|---|---|
| scope | str | ||
| timestamp | datetime | ||
| obj_name | str, none_type | [optional] | |
| obj_id | int, none_type | [optional] | |
| obj_val | str, none_type | [optional] | |
| source | str, none_type | [optional] | |
| count | int, none_type | [optional] | |
| duration | int | [optional] if omitted the server will use the default value of 0 | |
| project_id | int, none_type | [optional] | |
| task_id | int, none_type | [optional] | |
| job_id | int, none_type | [optional] | |
| user_id | int, none_type | [optional] | |
| user_name | str, none_type | [optional] | |
| user_email | str, none_type | [optional] | |
| org_id | int, none_type | [optional] | |
| org_slug | str, none_type | [optional] | |
| payload | str, none_type | [optional] |
11.2.1.2.28 - CloudStorageContent class reference
Properties
| Name | Type | Description | Notes |
|---|---|---|---|
| content | [FileInfo] | ||
| next | str, none_type | This token is used to continue listing files in the bucket. | [optional] |
11.2.1.2.29 - CloudStorageRead class reference
Properties
| Name | Type | Description | Notes |
|---|---|---|---|
| provider_type | ProviderTypeEnum | ||
| resource | str | ||
| display_name | str | ||
| credentials_type | CredentialsTypeEnum | ||
| id | int | [optional] [readonly] | |
| owner | CloudStorageReadOwner | [optional] | |
| manifests | [str] | [optional] if omitted the server will use the default value of [] | |
| created_date | datetime | [optional] [readonly] | |
| updated_date | datetime | [optional] [readonly] | |
| specific_attributes | str | [optional] | |
| description | str | [optional] | |
| organization | int, none_type | [optional] [readonly] |
11.2.1.2.30 - CloudStorageReadOwner class reference
Properties
| Name | Type | Description | Notes |
|---|---|---|---|
| username | str | Required. 150 characters or fewer. Letters, digits and @/./+/-/_ only. | |
| url | str | [optional] [readonly] | |
| id | int | [optional] [readonly] | |
| first_name | str | [optional] | |
| last_name | str | [optional] |
11.2.1.2.31 - CloudStorageWriteRequest class reference
Properties
| Name | Type | Description | Notes |
|---|---|---|---|
| provider_type | ProviderTypeEnum | ||
| resource | str | ||
| display_name | str | ||
| credentials_type | CredentialsTypeEnum | ||
| owner | BasicUserRequest | [optional] | |
| session_token | str | [optional] | |
| account_name | str | [optional] | |
| key | str | [optional] | |
| secret_key | str | [optional] | |
| connection_string | str | [optional] | |
| key_file | file_type | [optional] | |
| specific_attributes | str | [optional] | |
| description | str | [optional] | |
| manifests | [str] | [optional] if omitted the server will use the default value of [] |
11.2.1.2.32 - CommentRead class reference
Properties
| Name | Type | Description | Notes |
|---|---|---|---|
| id | int | [optional] [readonly] | |
| issue | int | [optional] [readonly] | |
| owner | CloudStorageReadOwner | [optional] | |
| message | str | [optional] [readonly] | |
| created_date | datetime | [optional] [readonly] | |
| updated_date | datetime | [optional] [readonly] |
11.2.1.2.33 - CommentsSummary class reference
Properties
| Name | Type | Description | Notes |
|---|---|---|---|
| count | int | [optional] if omitted the server will use the default value of 0 | |
| url | str | [optional] [readonly] |
11.2.1.2.34 - CommentWriteRequest class reference
Properties
| Name | Type | Description | Notes |
|---|---|---|---|
| issue | int | ||
| message | str | [optional] |
11.2.1.2.35 - ConsensusMergeCreateRequest class reference
Properties
| Name | Type | Description | Notes |
|---|---|---|---|
| task_id | int | [optional] | |
| job_id | int | [optional] |
11.2.1.2.36 - ConsensusSettings class reference
Properties
| Name | Type | Description | Notes |
|---|---|---|---|
| id | int | [optional] [readonly] | |
| task_id | int | [optional] [readonly] | |
| iou_threshold | float | Pairwise annotation matching IoU threshold | [optional] |
11.2.1.2.37 - CredentialsTypeEnum class reference
- `KEY_SECRET_KEY_PAIR` - KEY_SECRET_KEY_PAIR * `ACCOUNT_NAME_TOKEN_PAIR` - ACCOUNT_NAME_TOKEN_PAIR * `KEY_FILE_PATH` - KEY_FILE_PATH * `ANONYMOUS_ACCESS` - ANONYMOUS_ACCESS * `CONNECTION_STRING` - CONNECTION_STRING
Properties
| Name | Type | Description | Notes |
|---|---|---|---|
| value | str | * KEY_SECRET_KEY_PAIR - KEY_SECRET_KEY_PAIR * ACCOUNT_NAME_TOKEN_PAIR - ACCOUNT_NAME_TOKEN_PAIR * KEY_FILE_PATH - KEY_FILE_PATH * ANONYMOUS_ACCESS - ANONYMOUS_ACCESS * CONNECTION_STRING - CONNECTION_STRING |
must be one of [“KEY_SECRET_KEY_PAIR”, “ACCOUNT_NAME_TOKEN_PAIR”, “KEY_FILE_PATH”, “ANONYMOUS_ACCESS”, “CONNECTION_STRING”, ] |
11.2.1.2.38 - DataMetaRead class reference
Properties
| Name | Type | Description | Notes |
|---|---|---|---|
| chunks_updated_date | datetime | ||
| image_quality | int | ||
| frames | [FrameMeta], none_type | ||
| deleted_frames | [int] | ||
| chapters | [Chapter], none_type | [optional] | |
| chunk_size | int, none_type | [optional] [readonly] | |
| size | int | The number of frames included. Deleted frames do not affect this value. | [optional] [readonly] |
| start_frame | int | [optional] [readonly] | |
| stop_frame | int | [optional] [readonly] | |
| frame_filter | str | [optional] [readonly] | |
| included_frames | [int], none_type | A list of valid frame ids. The None value means all frames are included. | [optional] |
| storage | bool, date, datetime, dict, float, int, list, str, none_type | [optional] [readonly] | |
| cloud_storage_id | int, none_type | [optional] [readonly] |
11.2.1.2.39 - DataRequest class reference
Read more about parameters here: https://docs.cvat.ai/docs/manual/basics/create-annotation-task/#advanced-configuration
Properties
| Name | Type | Description | Notes |
|---|---|---|---|
| image_quality | int | Image quality to use during annotation | |
| chunk_size | int, none_type | Maximum number of frames per chunk | [optional] |
| start_frame | int | First frame index | [optional] |
| stop_frame | int | Last frame index | [optional] |
| frame_filter | str | Frame filter. The only supported syntax is: ‘step=N’ | [optional] |
| client_files | [file_type] | Uploaded files. Must contain all files from job_file_mapping if job_file_mapping is not empty. | [optional] if omitted the server will use the default value of [] |
| server_files | [str] | Paths to files from a file share mounted on the server, or from a cloud storage. Must contain all files from job_file_mapping if job_file_mapping is not empty. | [optional] if omitted the server will use the default value of [] |
| remote_files | [str] | Direct download URLs for files. Must contain all files from job_file_mapping if job_file_mapping is not empty. | [optional] if omitted the server will use the default value of [] |
| use_zip_chunks | bool | When true, video chunks will be represented as zip archives with decoded video frames. When false, video chunks are represented as video segments | [optional] if omitted the server will use the default value of False |
| server_files_exclude | [str] | Paths to files and directories from a file share mounted on the server, or from a cloud storage that should be excluded from the directories specified in server_files. This option cannot be used together with filename_pattern. The server_files_exclude parameter cannot be used to exclude a part of dataset from an archive. Examples: Exclude all files from subfolder ‘sub/sub_1/sub_2’and single file ‘sub/image.jpg’ from specified folder: server_files = [‘sub/’], server_files_exclude = [‘sub/sub_1/sub_2/’, ‘sub/image.jpg’] Exclude all cloud storage files with prefix ‘sub’ from the content of manifest file: server_files = [‘manifest.jsonl’], server_files_exclude = [‘sub/’] | [optional] if omitted the server will use the default value of [] |
| cloud_storage_id | int, none_type | If not null, the files referenced by server_files will be retrieved from the cloud storage with the specified ID. The cloud storages applicable depend on the context. In the user sandbox, only the user sandbox cloud storages can be used. In an organization, only the organization cloud storages can be used. | [optional] |
| use_cache | bool | Enable or disable task data chunk caching for the task. Read more: https://docs.cvat.ai/docs/manual/advanced/data_on_fly/ | [optional] if omitted the server will use the default value of False |
| copy_data | bool | Copy data from the server file share to CVAT during the task creation. This will create a copy of the data, making the server independent from the file share availability | [optional] if omitted the server will use the default value of False |
| storage_method | StorageMethod | [optional] | |
| sorting_method | SortingMethod | [optional] | |
| filename_pattern | str, none_type | A filename filter for cloud storage files listed in the manifest. Supports fnmatch wildcards. Read more: https://docs.python.org/3/library/fnmatch.html | [optional] |
| job_file_mapping | [[str]] | Represents a file-to-job mapping. Useful to specify a custom job configuration during task creation. This option is not compatible with most other job split-related options. Files in the jobs must not overlap or repeat. Job file mapping files must be a subset of the input files. If directories are specified in server_files, all files obtained by recursive search in the specified directories will be used as input files. In case of missing items in the input files, an error will be raised. Example: [ ["file1.jpg", "file2.jpg"], # job #1 files ["file3.png"], # job #2 files ["file4.jpg", "file5.png", "file6.bmp"], # job #3 files ] | [optional] |
| upload_file_order | [str] | Allows to specify file order for client_file uploads. Only valid with the "predefined" sorting method selected. To state that the input files are sent in the correct order, pass an empty list. If you want to send files in an arbitrary order and reorder them afterwards on the server, pass the list of file names in the required order. | [optional] |
| validation_params | DataRequestValidationParams | [optional] |
11.2.1.2.40 - DataRequestValidationParams class reference
Properties
| Name | Type | Description | Notes |
|---|---|---|---|
| mode | ValidationMode | ||
| frame_selection_method | FrameSelectionMethod | ||
| random_seed | int | The seed value for the random number generator. The same value will produce the same frame sets. Applicable only to random frame selection methods. By default, a random value is used. | [optional] |
| frames | [str] | The list of file names to be included in the validation set. Applicable only to the "manual" frame selection method. Can only be used for images. | [optional] |
| frame_count | int | The number of frames to be included in the validation set. Applicable only to the "random_uniform" frame selection method | [optional] |
| frame_share | float | The share of frames to be included in the validation set. Applicable only to the "random_uniform" frame selection method | [optional] |
| frames_per_job_count | int | The number of frames to be included in the validation set from each annotation job. Applicable only to the "random_per_job" frame selection method | [optional] |
| frames_per_job_share | float | The share of frames to be included in the validation set from each annotation job. Applicable only to the "random_per_job" frame selection method | [optional] |
11.2.1.2.41 - DataResponse class reference
Properties
| Name | Type | Description | Notes |
|---|---|---|---|
| rq_id | str | Request id | [optional] |
11.2.1.2.42 - DatasetFileRequest class reference
Properties
| Name | Type | Description | Notes |
|---|---|---|---|
| dataset_file | file_type |
11.2.1.2.43 - DatasetFormat class reference
Properties
| Name | Type | Description | Notes |
|---|---|---|---|
| name | str | ||
| ext | str | ||
| version | str | ||
| enabled | bool | ||
| dimension | str |
11.2.1.2.44 - DatasetFormats class reference
Properties
| Name | Type | Description | Notes |
|---|---|---|---|
| importers | [DatasetFormat] | ||
| exporters | [DatasetFormat] |
11.2.1.2.45 - Event class reference
Properties
| Name | Type | Description | Notes |
|---|---|---|---|
| scope | str | ||
| timestamp | datetime | ||
| obj_name | str, none_type | [optional] | |
| obj_id | int, none_type | [optional] | |
| obj_val | str, none_type | [optional] | |
| source | str, none_type | [optional] | |
| count | int, none_type | [optional] | |
| duration | int | [optional] if omitted the server will use the default value of 0 | |
| project_id | int, none_type | [optional] | |
| task_id | int, none_type | [optional] | |
| job_id | int, none_type | [optional] | |
| user_id | int, none_type | [optional] | |
| user_name | str, none_type | [optional] | |
| user_email | str, none_type | [optional] | |
| org_id | int, none_type | [optional] | |
| org_slug | str, none_type | [optional] | |
| payload | str, none_type | [optional] |
11.2.1.2.46 - EventRequest class reference
Properties
| Name | Type | Description | Notes |
|---|---|---|---|
| scope | str | ||
| timestamp | datetime | ||
| obj_name | str, none_type | [optional] | |
| obj_id | int, none_type | [optional] | |
| obj_val | str, none_type | [optional] | |
| source | str, none_type | [optional] | |
| count | int, none_type | [optional] | |
| duration | int | [optional] if omitted the server will use the default value of 0 | |
| project_id | int, none_type | [optional] | |
| task_id | int, none_type | [optional] | |
| job_id | int, none_type | [optional] | |
| user_id | int, none_type | [optional] | |
| user_name | str, none_type | [optional] | |
| user_email | str, none_type | [optional] | |
| org_id | int, none_type | [optional] | |
| org_slug | str, none_type | [optional] | |
| payload | str, none_type | [optional] |
11.2.1.2.47 - Events class reference
Properties
| Name | Type | Description | Notes |
|---|---|---|---|
| webhook_type | WebhookType | ||
| events | [EventsEnum] |
11.2.1.2.48 - EventsEnum class reference
- `create:comment` - CREATE:COMMENT * `create:invitation` - CREATE:INVITATION * `create:issue` - CREATE:ISSUE * `create:job` - CREATE:JOB * `create:membership` - CREATE:MEMBERSHIP * `create:project` - CREATE:PROJECT * `create:task` - CREATE:TASK * `delete:comment` - DELETE:COMMENT * `delete:invitation` - DELETE:INVITATION * `delete:issue` - DELETE:ISSUE * `delete:job` - DELETE:JOB * `delete:membership` - DELETE:MEMBERSHIP * `delete:organization` - DELETE:ORGANIZATION * `delete:project` - DELETE:PROJECT * `delete:task` - DELETE:TASK * `update:comment` - UPDATE:COMMENT * `update:issue` - UPDATE:ISSUE * `update:job` - UPDATE:JOB * `update:membership` - UPDATE:MEMBERSHIP * `update:organization` - UPDATE:ORGANIZATION * `update:project` - UPDATE:PROJECT * `update:task` - UPDATE:TASK
Properties
| Name | Type | Description | Notes |
|---|---|---|---|
| value | str | * create:comment - CREATE:COMMENT * create:invitation - CREATE:INVITATION * create:issue - CREATE:ISSUE * create:job - CREATE:JOB * create:membership - CREATE:MEMBERSHIP * create:project - CREATE:PROJECT * create:task - CREATE:TASK * delete:comment - DELETE:COMMENT * delete:invitation - DELETE:INVITATION * delete:issue - DELETE:ISSUE * delete:job - DELETE:JOB * delete:membership - DELETE:MEMBERSHIP * delete:organization - DELETE:ORGANIZATION * delete:project - DELETE:PROJECT * delete:task - DELETE:TASK * update:comment - UPDATE:COMMENT * update:issue - UPDATE:ISSUE * update:job - UPDATE:JOB * update:membership - UPDATE:MEMBERSHIP * update:organization - UPDATE:ORGANIZATION * update:project - UPDATE:PROJECT * update:task - UPDATE:TASK |
must be one of [“create:comment”, “create:invitation”, “create:issue”, “create:job”, “create:membership”, “create:project”, “create:task”, “delete:comment”, “delete:invitation”, “delete:issue”, “delete:job”, “delete:membership”, “delete:organization”, “delete:project”, “delete:task”, “update:comment”, “update:issue”, “update:job”, “update:membership”, “update:organization”, “update:project”, “update:task”, ] |
11.2.1.2.49 - FileInfo class reference
Properties
| Name | Type | Description | Notes |
|---|---|---|---|
| name | str | ||
| type | FileInfoTypeEnum | ||
| mime_type | str |
11.2.1.2.50 - FileInfoTypeEnum class reference
- `REG` - REG * `DIR` - DIR
Properties
| Name | Type | Description | Notes |
|---|---|---|---|
| value | str | * REG - REG * DIR - DIR |
must be one of [“REG”, “DIR”, ] |
11.2.1.2.51 - FrameMeta class reference
Properties
| Name | Type | Description | Notes |
|---|---|---|---|
| width | int | ||
| height | int | ||
| name | str | ||
| related_files | int | ||
| has_related_context | bool | [optional] [readonly] |
11.2.1.2.52 - FrameSelectionMethod class reference
- `random_uniform` - RANDOM_UNIFORM * `random_per_job` - RANDOM_PER_JOB * `manual` - MANUAL
Properties
| Name | Type | Description | Notes |
|---|---|---|---|
| value | str | * random_uniform - RANDOM_UNIFORM * random_per_job - RANDOM_PER_JOB * manual - MANUAL |
must be one of [“random_uniform”, “random_per_job”, “manual”, ] |
11.2.1.2.53 - FunctionCall class reference
Properties
| Name | Type | Description | Notes |
|---|---|---|---|
| id | str | Request id | |
| function | FunctionCallParams | ||
| status | str, none_type | ||
| enqueued | datetime, none_type | ||
| started | datetime, none_type | ||
| ended | datetime, none_type | ||
| progress | int, none_type | [optional] if omitted the server will use the default value of 0 | |
| exc_info | str, none_type | [optional] |
11.2.1.2.54 - FunctionCallParams class reference
Properties
| Name | Type | Description | Notes |
|---|---|---|---|
| id | str, none_type | The name of the function | |
| task | int, none_type | The id of the task | |
| threshold | float, none_type | ||
| job | int | The id of the job | [optional] |
11.2.1.2.55 - FunctionCallRequest class reference
Properties
| Name | Type | Description | Notes |
|---|---|---|---|
| function | str | The name of the function to execute | |
| task | int | The id of the task to be annotated | |
| job | int | The id of the job to be annotated | [optional] |
| max_distance | int | [optional] | |
| threshold | float | [optional] | |
| cleanup | bool | Whether existing annotations should be removed | [optional] if omitted the server will use the default value of False |
| conv_mask_to_poly | bool | Deprecated; use conv_mask_to_poly instead | [optional] |
| conv_mask_to_poly | bool | Convert mask shapes to polygons | [optional] |
| mapping | {str: (LabelMappingEntryRequest,)} | Label mapping from the model to the task labels | [optional] |
11.2.1.2.56 - InputTypeEnum class reference
- `checkbox` - CHECKBOX * `radio` - RADIO * `number` - NUMBER * `text` - TEXT * `select` - SELECT
Properties
| Name | Type | Description | Notes |
|---|---|---|---|
| value | str | * checkbox - CHECKBOX * radio - RADIO * number - NUMBER * text - TEXT * select - SELECT |
must be one of [“checkbox”, “radio”, “number”, “text”, “select”, ] |
11.2.1.2.57 - InvitationRead class reference
Properties
| Name | Type | Description | Notes |
|---|---|---|---|
| owner | CloudStorageReadOwner | ||
| role | RoleEnum | ||
| user | BasicUser | ||
| organization | int | ||
| organization_info | BasicOrganization | ||
| key | str | [optional] [readonly] | |
| created_date | datetime | [optional] [readonly] | |
| expired | bool, none_type | [optional] [readonly] |
11.2.1.2.58 - InvitationWriteRequest class reference
Properties
| Name | Type | Description | Notes |
|---|---|---|---|
| role | RoleEnum | ||
| str |
11.2.1.2.59 - IssueRead class reference
Properties
| Name | Type | Description | Notes |
|---|---|---|---|
| position | [float] | ||
| comments | CommentsSummary | ||
| id | int | [optional] [readonly] | |
| frame | int | [optional] [readonly] | |
| job | int | [optional] [readonly] | |
| owner | CloudStorageReadOwner | [optional] | |
| assignee | CloudStorageReadOwner | [optional] | |
| created_date | datetime, none_type | [optional] [readonly] | |
| updated_date | datetime, none_type | [optional] [readonly] | |
| resolved | bool | [optional] [readonly] |
11.2.1.2.60 - IssuesSummary class reference
Properties
| Name | Type | Description | Notes |
|---|---|---|---|
| url | str | [optional] [readonly] | |
| count | int | [optional] [readonly] |
11.2.1.2.61 - IssueWriteRequest class reference
Properties
| Name | Type | Description | Notes |
|---|---|---|---|
| frame | int | ||
| position | [float] | ||
| job | int | ||
| message | str | ||
| assignee | int, none_type | [optional] | |
| resolved | bool | [optional] |
11.2.1.2.62 - JobRead class reference
Properties
| Name | Type | Description | Notes |
|---|---|---|---|
| issues | IssuesSummary | ||
| labels | LabelsSummary | ||
| url | str | [optional] [readonly] | |
| id | int | [optional] [readonly] | |
| task_id | int | [optional] [readonly] | |
| task_name | str, none_type | [optional] [readonly] | |
| project_id | int, none_type | [optional] [readonly] | |
| project_name | str, none_type | [optional] [readonly] | |
| assignee | JobReadAssignee | [optional] | |
| guide_id | int, none_type | [optional] [readonly] | |
| dimension | str | [optional] [readonly] | |
| bug_tracker | str, none_type | [optional] [readonly] | |
| status | bool, date, datetime, dict, float, int, list, str, none_type | [optional] [readonly] | |
| stage | bool, date, datetime, dict, float, int, list, str, none_type | [optional] [readonly] | |
| state | bool, date, datetime, dict, float, int, list, str, none_type | [optional] [readonly] | |
| mode | str | [optional] [readonly] | |
| frame_count | int | [optional] [readonly] | |
| start_frame | int | [optional] [readonly] | |
| stop_frame | int | [optional] [readonly] | |
| data_chunk_size | int, none_type | [optional] [readonly] | |
| data_compressed_chunk_type | bool, date, datetime, dict, float, int, list, str, none_type | [optional] [readonly] | |
| data_original_chunk_type | bool, date, datetime, dict, float, int, list, str, none_type | [optional] [readonly] | |
| created_date | datetime | [optional] [readonly] | |
| updated_date | datetime | [optional] [readonly] | |
| type | bool, date, datetime, dict, float, int, list, str, none_type | [optional] [readonly] | |
| organization | int, none_type | [optional] [readonly] | |
| target_storage | JobReadTargetStorage | [optional] | |
| source_storage | JobReadTargetStorage | [optional] | |
| assignee_updated_date | datetime, none_type | [optional] [readonly] | |
| parent_job_id | int, none_type | [optional] [readonly] | |
| consensus_replicas | int | [optional] [readonly] | |
| replicas_count | int | [optional] [readonly] |
11.2.1.2.63 - JobReadAssignee class reference
Properties
| Name | Type | Description | Notes |
|---|---|---|---|
| username | str | Required. 150 characters or fewer. Letters, digits and @/./+/-/_ only. | |
| url | str | [optional] [readonly] | |
| id | int | [optional] [readonly] | |
| first_name | str | [optional] | |
| last_name | str | [optional] |
11.2.1.2.64 - JobReadTargetStorage class reference
Properties
| Name | Type | Description | Notes |
|---|---|---|---|
| id | int | [optional] [readonly] | |
| location | LocationEnum | [optional] | |
| cloud_storage_id | int, none_type | [optional] |
11.2.1.2.65 - JobsSummary class reference
Properties
| Name | Type | Description | Notes |
|---|---|---|---|
| completed | int, none_type | ||
| validation | int, none_type | ||
| count | int | [optional] if omitted the server will use the default value of 0 | |
| url | str | [optional] [readonly] |
11.2.1.2.66 - JobStage class reference
- `annotation` - ANNOTATION * `validation` - VALIDATION * `acceptance` - ACCEPTANCE
Properties
| Name | Type | Description | Notes |
|---|---|---|---|
| value | str | * annotation - ANNOTATION * validation - VALIDATION * acceptance - ACCEPTANCE |
must be one of [“annotation”, “validation”, “acceptance”, ] |
11.2.1.2.67 - JobStatus class reference
- `annotation` - ANNOTATION * `validation` - VALIDATION * `completed` - COMPLETED
Properties
| Name | Type | Description | Notes |
|---|---|---|---|
| value | str | * annotation - ANNOTATION * validation - VALIDATION * completed - COMPLETED |
must be one of [“annotation”, “validation”, “completed”, ] |
11.2.1.2.68 - JobType class reference
- `annotation` - ANNOTATION * `ground_truth` - GROUND_TRUTH * `consensus_replica` - CONSENSUS_REPLICA
Properties
| Name | Type | Description | Notes |
|---|---|---|---|
| value | str | * annotation - ANNOTATION * ground_truth - GROUND_TRUTH * consensus_replica - CONSENSUS_REPLICA |
must be one of [“annotation”, “ground_truth”, “consensus_replica”, ] |
11.2.1.2.69 - JobValidationLayoutRead class reference
Properties
| Name | Type | Description | Notes |
|---|---|---|---|
| honeypot_count | int | [optional] | |
| honeypot_frames | [int] | The list of frame ids for honeypots in the job | [optional] |
| honeypot_real_frames | [int] | The list of real (validation) frame ids for honeypots in the job | [optional] |
11.2.1.2.70 - JobWriteRequest class reference
Properties
| Name | Type | Description | Notes |
|---|---|---|---|
| type | JobType | ||
| task_id | int | ||
| assignee | int, none_type | [optional] | |
| stage | JobStage | [optional] | |
| state | OperationStatus | [optional] | |
| frame_selection_method | FrameSelectionMethod | [optional] | |
| frame_count | int | The number of frames included in the GT job. Applicable only to the "random_uniform" frame selection method | [optional] |
| frame_share | float | The share of frames included in the GT job. Applicable only to the "random_uniform" frame selection method | [optional] |
| frames_per_job_count | int | The number of frames included in the GT job from each annotation job. Applicable only to the "random_per_job" frame selection method | [optional] |
| frames_per_job_share | float | The share of frames included in the GT job from each annotation job. Applicable only to the "random_per_job" frame selection method | [optional] |
| random_seed | int | The seed value for the random number generator. The same value will produce the same frame sets. Applicable only to random frame selection methods. By default, a random value is used. | [optional] |
| frames | [int] | The list of frame ids. Applicable only to the "manual" frame selection method | [optional] |
11.2.1.2.71 - Label class reference
Properties
| Name | Type | Description | Notes |
|---|---|---|---|
| name | str | ||
| id | int | [optional] | |
| color | str | The hex value for the RGB color. Will be generated automatically, unless specified explicitly. | [optional] |
| attributes | [Attribute] | The list of attributes. If you want to remove an attribute, you need to recreate the label and specify the remaining attributes. | [optional] if omitted the server will use the default value of [] |
| type | bool, date, datetime, dict, float, int, list, str, none_type | Associated annotation type for this label * any - ANY * cuboid - CUBOID * ellipse - ELLIPSE * mask - MASK * points - POINTS * polygon - POLYGON * polyline - POLYLINE * rectangle - RECTANGLE * skeleton - SKELETON * tag - TAG |
[optional] |
| svg | str | [optional] | |
| sublabels | **[Sublabel]** | [optional] | |
| project_id | int, none_type | [optional] [readonly] | |
| task_id | int, none_type | [optional] [readonly] | |
| parent_id | int, none_type | [optional] [readonly] | |
| has_parent | bool | [optional] [readonly] |
11.2.1.2.72 - LabeledData class reference
Properties
| Name | Type | Description | Notes |
|---|---|---|---|
| version | int | [optional] if omitted the server will use the default value of 0 | |
| tags | [LabeledImage] | [optional] if omitted the server will use the default value of [] | |
| shapes | [LabeledShape] | [optional] if omitted the server will use the default value of [] | |
| tracks | [LabeledTrack] | [optional] if omitted the server will use the default value of [] |
11.2.1.2.73 - LabeledDataRequest class reference
Properties
| Name | Type | Description | Notes |
|---|---|---|---|
| version | int | [optional] if omitted the server will use the default value of 0 | |
| tags | [LabeledImageRequest] | [optional] if omitted the server will use the default value of [] | |
| shapes | [LabeledShapeRequest] | [optional] if omitted the server will use the default value of [] | |
| tracks | [LabeledTrackRequest] | [optional] if omitted the server will use the default value of [] |
11.2.1.2.74 - LabeledImage class reference
Properties
| Name | Type | Description | Notes |
|---|---|---|---|
| frame | int | ||
| label_id | int | ||
| id | int, none_type | [optional] | |
| group | int, none_type | [optional] | |
| source | str | [optional] if omitted the server will use the default value of “manual” | |
| attributes | [AttributeVal] | [optional] if omitted the server will use the default value of [] |
11.2.1.2.75 - LabeledImageRequest class reference
Properties
| Name | Type | Description | Notes |
|---|---|---|---|
| frame | int | ||
| label_id | int | ||
| id | int, none_type | [optional] | |
| group | int, none_type | [optional] | |
| source | str | [optional] if omitted the server will use the default value of “manual” | |
| attributes | [AttributeValRequest] | [optional] if omitted the server will use the default value of [] |
11.2.1.2.76 - LabeledShape class reference
Properties
| Name | Type | Description | Notes |
|---|---|---|---|
| type | ShapeType | ||
| frame | int | ||
| label_id | int | ||
| occluded | bool | [optional] if omitted the server will use the default value of False | |
| outside | bool | [optional] if omitted the server will use the default value of False | |
| z_order | int | [optional] if omitted the server will use the default value of 0 | |
| rotation | float | [optional] if omitted the server will use the default value of 0.0 | |
| points | [float] | [optional] | |
| id | int, none_type | [optional] | |
| group | int, none_type | [optional] | |
| source | str | [optional] if omitted the server will use the default value of “manual” | |
| attributes | [AttributeVal] | [optional] if omitted the server will use the default value of [] | |
| score | float | [optional] if omitted the server will use the default value of 1.0 | |
| elements | [SubLabeledShape] | [optional] |
11.2.1.2.77 - LabeledShapeRequest class reference
Properties
| Name | Type | Description | Notes |
|---|---|---|---|
| type | ShapeType | ||
| frame | int | ||
| label_id | int | ||
| occluded | bool | [optional] if omitted the server will use the default value of False | |
| outside | bool | [optional] if omitted the server will use the default value of False | |
| z_order | int | [optional] if omitted the server will use the default value of 0 | |
| rotation | float | [optional] if omitted the server will use the default value of 0.0 | |
| points | [float] | [optional] | |
| id | int, none_type | [optional] | |
| group | int, none_type | [optional] | |
| source | str | [optional] if omitted the server will use the default value of “manual” | |
| attributes | [AttributeValRequest] | [optional] if omitted the server will use the default value of [] | |
| score | float | [optional] if omitted the server will use the default value of 1.0 | |
| elements | [SubLabeledShapeRequest] | [optional] |
11.2.1.2.78 - LabeledTrack class reference
Properties
| Name | Type | Description | Notes |
|---|---|---|---|
| frame | int | ||
| label_id | int | ||
| shapes | [TrackedShape] | ||
| id | int, none_type | [optional] | |
| group | int, none_type | [optional] | |
| source | str | [optional] if omitted the server will use the default value of “manual” | |
| attributes | [AttributeVal] | [optional] if omitted the server will use the default value of [] | |
| elements | [SubLabeledTrack] | [optional] |
11.2.1.2.79 - LabeledTrackRequest class reference
Properties
| Name | Type | Description | Notes |
|---|---|---|---|
| frame | int | ||
| label_id | int | ||
| shapes | [TrackedShapeRequest] | ||
| id | int, none_type | [optional] | |
| group | int, none_type | [optional] | |
| source | str | [optional] if omitted the server will use the default value of “manual” | |
| attributes | [AttributeValRequest] | [optional] if omitted the server will use the default value of [] | |
| elements | [SubLabeledTrackRequest] | [optional] |
11.2.1.2.80 - LabelMappingEntryRequest class reference
Properties
| Name | Type | Description | Notes |
|---|---|---|---|
| name | str | ||
| attributes | {str: (str,)} | [optional] | |
| sublabels | {str: (SublabelMappingEntryRequest,)} | Label mapping for from the model to the task sublabels within a parent label | [optional] |
11.2.1.2.81 - LabelsSummary class reference
Properties
| Name | Type | Description | Notes |
|---|---|---|---|
| url | str | [optional] [readonly] |
11.2.1.2.82 - LabelType class reference
- `any` - ANY * `cuboid` - CUBOID * `ellipse` - ELLIPSE * `mask` - MASK * `points` - POINTS * `polygon` - POLYGON * `polyline` - POLYLINE * `rectangle` - RECTANGLE * `skeleton` - SKELETON * `tag` - TAG
Properties
| Name | Type | Description | Notes |
|---|---|---|---|
| value | str | * any - ANY * cuboid - CUBOID * ellipse - ELLIPSE * mask - MASK * points - POINTS * polygon - POLYGON * polyline - POLYLINE * rectangle - RECTANGLE * skeleton - SKELETON * tag - TAG |
must be one of [“any”, “cuboid”, “ellipse”, “mask”, “points”, “polygon”, “polyline”, “rectangle”, “skeleton”, “tag”, ] |
11.2.1.2.83 - LocationEnum class reference
- `cloud_storage` - CLOUD_STORAGE * `local` - LOCAL
Properties
| Name | Type | Description | Notes |
|---|---|---|---|
| value | str | * cloud_storage - CLOUD_STORAGE * local - LOCAL |
must be one of [“cloud_storage”, “local”, ] |
11.2.1.2.84 - LoginSerializerExRequest class reference
Properties
| Name | Type | Description | Notes |
|---|---|---|---|
| password | str | ||
| username | str | [optional] | |
| str | [optional] |
11.2.1.2.85 - MembershipRead class reference
Properties
| Name | Type | Description | Notes |
|---|---|---|---|
| user | BasicUser | ||
| id | int | [optional] [readonly] | |
| organization | int | [optional] [readonly] | |
| is_active | bool | [optional] [readonly] | |
| joined_date | datetime, none_type | [optional] [readonly] | |
| role | bool, date, datetime, dict, float, int, list, str, none_type | [optional] [readonly] | |
| invitation | str, none_type | [optional] [readonly] |
11.2.1.2.86 - MetaUser class reference
Properties
| Name | Type | Description | Notes |
|---|---|---|---|
| url | str | [optional] [readonly] | |
| id | int | [optional] [readonly] | |
| first_name | str | [optional] | |
| last_name | str | [optional] | |
| str | [optional] | ||
| is_staff | bool | Designates whether the user can log into this admin site. | [optional] |
| is_superuser | bool | Designates that this user has all permissions without explicitly assigning them. | [optional] |
| is_active | bool | Designates whether this user should be treated as active. Unselect this instead of deleting accounts. | [optional] |
| last_login | datetime, none_type | [optional] [readonly] | |
| date_joined | datetime | [optional] [readonly] | |
| has_analytics_access | bool | [optional] [readonly] | |
| username | str | Required. 150 characters or fewer. Letters, digits and @/./+/-/_ only. | [optional] |
| groups | [str] | [optional] |
11.2.1.2.87 - NullEnum class reference
Properties
| Name | Type | Description | Notes |
|---|---|---|---|
| value | str | must be one of [“null”, ] |
11.2.1.2.88 - OnlineFunctionCallRequest class reference
Properties
| Name | Type | Description | Notes |
|---|---|---|---|
| job | int | [optional] | |
| task | int | [optional] |
11.2.1.2.89 - OperationStatus class reference
- `new` - NEW * `in progress` - IN_PROGRESS * `completed` - COMPLETED * `rejected` - REJECTED
Properties
| Name | Type | Description | Notes |
|---|---|---|---|
| value | str | * new - NEW * in progress - IN_PROGRESS * completed - COMPLETED * rejected - REJECTED |
must be one of [“new”, “in progress”, “completed”, “rejected”, ] |
11.2.1.2.90 - OrganizationRead class reference
Properties
| Name | Type | Description | Notes |
|---|---|---|---|
| owner | CloudStorageReadOwner | ||
| id | int | [optional] [readonly] | |
| slug | str | [optional] [readonly] | |
| name | str | [optional] [readonly] | |
| description | str | [optional] [readonly] | |
| created_date | datetime | [optional] [readonly] | |
| updated_date | datetime | [optional] [readonly] | |
| contact | {str: (bool, date, datetime, dict, float, int, list, str, none_type)} | [optional] [readonly] |
11.2.1.2.91 - OrganizationWriteRequest class reference
Properties
| Name | Type | Description | Notes |
|---|---|---|---|
| slug | str | ||
| name | str | [optional] | |
| description | str | [optional] | |
| contact | {str: (bool, date, datetime, dict, float, int, list, str, none_type)} | [optional] |
11.2.1.2.92 - PaginatedAccessTokenReadList class reference
Properties
| Name | Type | Description | Notes |
|---|---|---|---|
| count | int | ||
| results | [AccessTokenRead] | ||
| next | str, none_type | [optional] | |
| previous | str, none_type | [optional] |
11.2.1.2.93 - PaginatedAnnotationConflictList class reference
Properties
| Name | Type | Description | Notes |
|---|---|---|---|
| count | int | ||
| results | [AnnotationConflict] | ||
| next | str, none_type | [optional] | |
| previous | str, none_type | [optional] |
11.2.1.2.94 - PaginatedCloudStorageReadList class reference
Properties
| Name | Type | Description | Notes |
|---|---|---|---|
| count | int | ||
| results | [CloudStorageRead] | ||
| next | str, none_type | [optional] | |
| previous | str, none_type | [optional] |
11.2.1.2.95 - PaginatedCommentReadList class reference
Properties
| Name | Type | Description | Notes |
|---|---|---|---|
| count | int | ||
| results | [CommentRead] | ||
| next | str, none_type | [optional] | |
| previous | str, none_type | [optional] |
11.2.1.2.96 - PaginatedConsensusSettingsList class reference
Properties
| Name | Type | Description | Notes |
|---|---|---|---|
| count | int | ||
| results | [ConsensusSettings] | ||
| next | str, none_type | [optional] | |
| previous | str, none_type | [optional] |
11.2.1.2.97 - PaginatedInvitationReadList class reference
Properties
| Name | Type | Description | Notes |
|---|---|---|---|
| count | int | ||
| results | [InvitationRead] | ||
| next | str, none_type | [optional] | |
| previous | str, none_type | [optional] |
11.2.1.2.98 - PaginatedIssueReadList class reference
Properties
| Name | Type | Description | Notes |
|---|---|---|---|
| count | int | ||
| results | [IssueRead] | ||
| next | str, none_type | [optional] | |
| previous | str, none_type | [optional] |
11.2.1.2.99 - PaginatedJobReadList class reference
Properties
| Name | Type | Description | Notes |
|---|---|---|---|
| count | int | ||
| results | [JobRead] | ||
| next | str, none_type | [optional] | |
| previous | str, none_type | [optional] |
11.2.1.2.100 - PaginatedLabelList class reference
Properties
| Name | Type | Description | Notes |
|---|---|---|---|
| count | int | ||
| results | [Label] | ||
| next | str, none_type | [optional] | |
| previous | str, none_type | [optional] |
11.2.1.2.101 - PaginatedMembershipReadList class reference
Properties
| Name | Type | Description | Notes |
|---|---|---|---|
| count | int | ||
| results | [MembershipRead] | ||
| next | str, none_type | [optional] | |
| previous | str, none_type | [optional] |
11.2.1.2.102 - PaginatedMetaUserList class reference
Properties
| Name | Type | Description | Notes |
|---|---|---|---|
| count | int | ||
| results | [MetaUser] | ||
| next | str, none_type | [optional] | |
| previous | str, none_type | [optional] |
11.2.1.2.103 - PaginatedOrganizationReadList class reference
Properties
| Name | Type | Description | Notes |
|---|---|---|---|
| count | int | ||
| results | [OrganizationRead] | ||
| next | str, none_type | [optional] | |
| previous | str, none_type | [optional] |
11.2.1.2.104 - PaginatedProjectReadList class reference
Properties
| Name | Type | Description | Notes |
|---|---|---|---|
| count | int | ||
| results | [ProjectRead] | ||
| next | str, none_type | [optional] | |
| previous | str, none_type | [optional] |
11.2.1.2.105 - PaginatedQualityReportList class reference
Properties
| Name | Type | Description | Notes |
|---|---|---|---|
| count | int | ||
| results | [QualityReport] | ||
| next | str, none_type | [optional] | |
| previous | str, none_type | [optional] |
11.2.1.2.106 - PaginatedQualitySettingsList class reference
Properties
| Name | Type | Description | Notes |
|---|---|---|---|
| count | int | ||
| results | [QualitySettings] | ||
| next | str, none_type | [optional] | |
| previous | str, none_type | [optional] |
11.2.1.2.107 - PaginatedRequestList class reference
Properties
| Name | Type | Description | Notes |
|---|---|---|---|
| count | int | ||
| results | [Request] | ||
| next | str, none_type | [optional] | |
| previous | str, none_type | [optional] |
11.2.1.2.108 - PaginatedTaskReadList class reference
Properties
| Name | Type | Description | Notes |
|---|---|---|---|
| count | int | ||
| results | [TaskRead] | ||
| next | str, none_type | [optional] | |
| previous | str, none_type | [optional] |
11.2.1.2.109 - PaginatedWebhookDeliveryReadList class reference
Properties
| Name | Type | Description | Notes |
|---|---|---|---|
| count | int | ||
| results | [WebhookDeliveryRead] | ||
| next | str, none_type | [optional] | |
| previous | str, none_type | [optional] |
11.2.1.2.110 - PaginatedWebhookReadList class reference
Properties
| Name | Type | Description | Notes |
|---|---|---|---|
| count | int | ||
| results | [WebhookRead] | ||
| next | str, none_type | [optional] | |
| previous | str, none_type | [optional] |
11.2.1.2.111 - PasswordChangeRequest class reference
Properties
| Name | Type | Description | Notes |
|---|---|---|---|
| old_password | str | ||
| new_password1 | str | ||
| new_password2 | str |
11.2.1.2.112 - PasswordResetConfirmRequest class reference
Serializer for confirming a password reset attempt.
Properties
| Name | Type | Description | Notes |
|---|---|---|---|
| new_password1 | str | ||
| new_password2 | str | ||
| uid | str | ||
| token | str |
11.2.1.2.113 - PasswordResetSerializerExRequest class reference
Serializer for requesting a password reset e-mail.
Properties
| Name | Type | Description | Notes |
|---|---|---|---|
| str |
11.2.1.2.114 - PatchedAccessTokenWriteRequest class reference
Properties
| Name | Type | Description | Notes |
|---|---|---|---|
| name | str | A free-form name for the token. Doesn’t have to be unique | [optional] |
| expiry_date | datetime, none_type | Once the token expires, clients cannot use it anymore. If not set, the token will not expire. | [optional] |
| read_only | bool | [optional] |
11.2.1.2.115 - PatchedAnnotationGuideWriteRequest class reference
Properties
| Name | Type | Description | Notes |
|---|---|---|---|
| task_id | int, none_type | [optional] | |
| project_id | int, none_type | [optional] | |
| markdown | str | [optional] |
11.2.1.2.116 - PatchedCloudStorageWriteRequest class reference
Properties
| Name | Type | Description | Notes |
|---|---|---|---|
| provider_type | ProviderTypeEnum | [optional] | |
| resource | str | [optional] | |
| display_name | str | [optional] | |
| owner | BasicUserRequest | [optional] | |
| credentials_type | CredentialsTypeEnum | [optional] | |
| session_token | str | [optional] | |
| account_name | str | [optional] | |
| key | str | [optional] | |
| secret_key | str | [optional] | |
| connection_string | str | [optional] | |
| key_file | file_type | [optional] | |
| specific_attributes | str | [optional] | |
| description | str | [optional] | |
| manifests | [str] | [optional] if omitted the server will use the default value of [] |
11.2.1.2.117 - PatchedCommentWriteRequest class reference
Properties
| Name | Type | Description | Notes |
|---|---|---|---|
| message | str | [optional] |
11.2.1.2.118 - PatchedConsensusSettingsRequest class reference
Properties
| Name | Type | Description | Notes |
|---|---|---|---|
| iou_threshold | float | Pairwise annotation matching IoU threshold | [optional] |
11.2.1.2.119 - PatchedDataMetaWriteRequest class reference
Properties
| Name | Type | Description | Notes |
|---|---|---|---|
| deleted_frames | [int] | [optional] | |
| cloud_storage_id | int, none_type | [optional] |
11.2.1.2.120 - PatchedInvitationWriteRequest class reference
Properties
| Name | Type | Description | Notes |
|---|---|---|---|
| role | RoleEnum | [optional] | |
| str | [optional] |
11.2.1.2.121 - PatchedIssueWriteRequest class reference
Properties
| Name | Type | Description | Notes |
|---|---|---|---|
| position | [float] | [optional] | |
| assignee | int, none_type | [optional] | |
| resolved | bool | [optional] |
11.2.1.2.122 - PatchedJobDataMetaWriteRequest class reference
Properties
| Name | Type | Description | Notes |
|---|---|---|---|
| deleted_frames | [int] | [optional] |
11.2.1.2.123 - PatchedJobValidationLayoutWriteRequest class reference
Properties
| Name | Type | Description | Notes |
|---|---|---|---|
| frame_selection_method | bool, date, datetime, dict, float, int, list, str, none_type | The method to use for frame selection of new real frames for honeypots in the job * random_uniform - RANDOM_UNIFORM * random_per_job - RANDOM_PER_JOB * manual - MANUAL |
[optional] |
| honeypot_real_frames | [int] | The list of frame ids. Applicable only to the "manual" frame selection method | [optional] |
11.2.1.2.124 - PatchedJobWriteRequest class reference
Properties
| Name | Type | Description | Notes |
|---|---|---|---|
| assignee | int, none_type | [optional] | |
| stage | JobStage | [optional] | |
| state | OperationStatus | [optional] |
11.2.1.2.125 - PatchedLabeledDataRequest class reference
Properties
| Name | Type | Description | Notes |
|---|---|---|---|
| version | int | [optional] if omitted the server will use the default value of 0 | |
| tags | [LabeledImageRequest] | [optional] if omitted the server will use the default value of [] | |
| shapes | [LabeledShapeRequest] | [optional] if omitted the server will use the default value of [] | |
| tracks | [LabeledTrackRequest] | [optional] if omitted the server will use the default value of [] |
11.2.1.2.126 - PatchedLabelRequest class reference
Properties
| Name | Type | Description | Notes |
|---|---|---|---|
| id | int | [optional] | |
| name | str | [optional] | |
| color | str | The hex value for the RGB color. Will be generated automatically, unless specified explicitly. | [optional] |
| attributes | [AttributeRequest] | The list of attributes. If you want to remove an attribute, you need to recreate the label and specify the remaining attributes. | [optional] if omitted the server will use the default value of [] |
| deleted | bool | Delete the label. Only applicable in the PATCH methods of a project or a task. | [optional] |
| type | bool, date, datetime, dict, float, int, list, str, none_type | Associated annotation type for this label * any - ANY * cuboid - CUBOID * ellipse - ELLIPSE * mask - MASK * points - POINTS * polygon - POLYGON * polyline - POLYLINE * rectangle - RECTANGLE * skeleton - SKELETON * tag - TAG |
[optional] |
| svg | str | [optional] | |
| sublabels | **[SublabelRequest]** | [optional] |
11.2.1.2.127 - PatchedMembershipWriteRequest class reference
Properties
| Name | Type | Description | Notes |
|---|---|---|---|
| role | RoleEnum | [optional] |
11.2.1.2.128 - PatchedOrganizationWriteRequest class reference
Properties
| Name | Type | Description | Notes |
|---|---|---|---|
| slug | str | [optional] | |
| name | str | [optional] | |
| description | str | [optional] | |
| contact | {str: (bool, date, datetime, dict, float, int, list, str, none_type)} | [optional] |
11.2.1.2.129 - PatchedProjectWriteRequest class reference
Properties
| Name | Type | Description | Notes |
|---|---|---|---|
| name | str | [optional] | |
| labels | [PatchedLabelRequest] | [optional] if omitted the server will use the default value of [] | |
| owner_id | int, none_type | [optional] | |
| assignee_id | int, none_type | [optional] | |
| bug_tracker | str | [optional] | |
| target_storage | PatchedProjectWriteRequestTargetStorage | [optional] | |
| source_storage | PatchedProjectWriteRequestTargetStorage | [optional] | |
| organization_id | int, none_type | [optional] |
11.2.1.2.130 - PatchedProjectWriteRequestTargetStorage class reference
Properties
| Name | Type | Description | Notes |
|---|---|---|---|
| location | LocationEnum | [optional] | |
| cloud_storage_id | int, none_type | [optional] |
11.2.1.2.131 - PatchedQualitySettingsRequest class reference
Properties
| Name | Type | Description | Notes |
|---|---|---|---|
| job_filter | str | A JSON-based logic expression used to filter jobs for quality validation. The filter supports various terms to specify conditions on job: [‘assignee’, ‘id’, ‘stage’, ‘state’, ’task_id’, ’task_name’, ’type’] | [optional] |
| inherit | bool | Allow using project settings when computing task quality. Only applicable to task quality settings inside projects | [optional] |
| target_metric | bool, date, datetime, dict, float, int, list, str, none_type | The primary metric used for quality estimation * accuracy - ACCURACY * precision - PRECISION * recall - RECALL |
[optional] |
| target_metric_threshold | float | Defines the minimal quality requirements in terms of the selected target metric. | [optional] |
| max_validations_per_job | int | The maximum number of job validation attempts for the job assignee. The job can be automatically accepted if the job quality is above the required threshold, defined by the target threshold parameter. | [optional] |
| iou_threshold | float | Used for distinction between matched / unmatched shapes | [optional] if omitted the server will use the default value of 0.4 |
| oks_sigma | float | Like IoU threshold, but for points. The percent of the bbox side, used as the radius of the circle around the GT point, where the checked point is expected to be. For boxes with different width and height, the "side" is computed as a geometric mean of the width and height. Read more: https://cocodataset.org/#keypoints-eval | [optional] if omitted the server will use the default value of 0.09 |
| point_size_base | bool, date, datetime, dict, float, int, list, str, none_type | When comparing point annotations (including both separate points and point groups), the OKS sigma parameter defines matching area for each GT point based to the object size. The point size base parameter allows to configure how to determine the object size. If image_size, the image size is used. Useful if each point annotation represents a separate object or boxes grouped with points do not represent object boundaries. If group_bbox_size, the object size is based on the point group bbox size. Useful if each point group represents an object or there is a bbox grouped with points, representing the object size. * image_size - IMAGE_SIZE * group_bbox_size - GROUP_BBOX_SIZE |
[optional] |
| line_thickness | float | Thickness of polylines, relatively to the (image area) ^ 0.5. The distance to the boundary around the GT line, inside of which the checked line points should be | [optional] if omitted the server will use the default value of 0.01 |
| low_overlap_threshold | float | Used for distinction between strong / weak (low_overlap) matches | [optional] if omitted the server will use the default value of 0.8 |
| compare_line_orientation | bool | Enables or disables polyline orientation comparison | [optional] if omitted the server will use the default value of True |
| line_orientation_threshold | float | The minimal gain in the GT IoU between the given and reversed line directions to consider the line inverted. Only used when the ‘compare_line_orientation’ parameter is true | [optional] if omitted the server will use the default value of 0.1 |
| compare_groups | bool | Enables or disables annotation group checks | [optional] if omitted the server will use the default value of True |
| group_match_threshold | float | Minimal IoU for groups to be considered matching. Only used when the ‘compare_groups’ parameter is true | [optional] if omitted the server will use the default value of 0.5 |
| check_covered_annotations | bool | Check for partially-covered annotations, useful in segmentation tasks | [optional] if omitted the server will use the default value of True |
| object_visibility_threshold | float | Minimal visible area percent of the spatial annotations (polygons, masks) for reporting covered annotations. Only used when the ‘object_visibility_threshold’ parameter is true | [optional] if omitted the server will use the default value of 0.05 |
| panoptic_comparison | bool | Use only the visible part of the masks and polygons in comparisons | [optional] if omitted the server will use the default value of True |
| compare_attributes | bool | Enables or disables annotation attribute comparison | [optional] if omitted the server will use the default value of True |
| empty_is_annotated | bool | Consider empty frames annotated as "empty". This affects target metrics like accuracy in cases there are no annotations. If disabled, frames without annotations are counted as not matching (accuracy is 0). If enabled, accuracy will be 1 instead. This will also add virtual annotations to empty frames in the comparison results. | [optional] if omitted the server will use the default value of False |
11.2.1.2.132 - PatchedTaskValidationLayoutWriteRequest class reference
Properties
| Name | Type | Description | Notes |
|---|---|---|---|
| disabled_frames | [int] | The list of frame ids to be excluded from validation | [optional] |
| frame_selection_method | bool, date, datetime, dict, float, int, list, str, none_type | The method to use for frame selection of new real frames for honeypots in the task * random_uniform - RANDOM_UNIFORM * random_per_job - RANDOM_PER_JOB * manual - MANUAL |
[optional] |
| honeypot_real_frames | [int] | The list of frame ids. Applicable only to the "manual" frame selection method | [optional] |
11.2.1.2.133 - PatchedTaskWriteRequest class reference
Properties
| Name | Type | Description | Notes |
|---|---|---|---|
| name | str | [optional] | |
| project_id | int, none_type | [optional] | |
| owner_id | int, none_type | [optional] | |
| assignee_id | int, none_type | [optional] | |
| bug_tracker | str | [optional] | |
| labels | [PatchedLabelRequest] | [optional] | |
| subset | str | [optional] | |
| target_storage | StorageRequest | [optional] | |
| source_storage | StorageRequest | [optional] | |
| organization_id | int, none_type | [optional] |
11.2.1.2.134 - PatchedUserRequest class reference
Properties
| Name | Type | Description | Notes |
|---|---|---|---|
| username | str | Required. 150 characters or fewer. Letters, digits and @/./+/-/_ only. | [optional] |
| first_name | str | [optional] | |
| last_name | str | [optional] | |
| str | [optional] | ||
| groups | [str] | [optional] | |
| is_staff | bool | Designates whether the user can log into this admin site. | [optional] |
| is_superuser | bool | Designates that this user has all permissions without explicitly assigning them. | [optional] |
| is_active | bool | Designates whether this user should be treated as active. Unselect this instead of deleting accounts. | [optional] |
11.2.1.2.135 - PatchedWebhookWriteRequest class reference
Properties
| Name | Type | Description | Notes |
|---|---|---|---|
| target_url | str | [optional] | |
| description | str | [optional] | |
| content_type | WebhookContentType | [optional] | |
| secret | str | [optional] | |
| is_active | bool | [optional] | |
| enable_ssl | bool | [optional] | |
| events | [EventsEnum] | [optional] |
11.2.1.2.136 - Plugins class reference
Properties
| Name | Type | Description | Notes |
|---|---|---|---|
| analytics | bool | ||
| models | bool |
11.2.1.2.137 - ProjectFileRequest class reference
Properties
| Name | Type | Description | Notes |
|---|---|---|---|
| project_file | file_type |
11.2.1.2.138 - ProjectRead class reference
Properties
| Name | Type | Description | Notes |
|---|---|---|---|
| tasks | TasksSummary | ||
| labels | LabelsSummary | ||
| url | str | [optional] [readonly] | |
| id | int | [optional] [readonly] | |
| name | str | [optional] [readonly] | |
| owner | JobReadAssignee | [optional] | |
| assignee | JobReadAssignee | [optional] | |
| guide_id | int, none_type | [optional] | |
| bug_tracker | str | [optional] [readonly] | |
| task_subsets | [str] | [optional] [readonly] | |
| created_date | datetime | [optional] [readonly] | |
| updated_date | datetime | [optional] [readonly] | |
| status | bool, date, datetime, dict, float, int, list, str, none_type | [optional] [readonly] | |
| dimension | str, none_type | [optional] [readonly] | |
| organization | int, none_type | [optional] [readonly] | |
| organization_id | int, none_type | [optional] [readonly] | |
| target_storage | ProjectReadTargetStorage | [optional] | |
| source_storage | ProjectReadTargetStorage | [optional] | |
| assignee_updated_date | datetime, none_type | [optional] [readonly] |
11.2.1.2.139 - ProjectReadTargetStorage class reference
Properties
| Name | Type | Description | Notes |
|---|---|---|---|
| id | int | [optional] [readonly] | |
| location | LocationEnum | [optional] | |
| cloud_storage_id | int, none_type | [optional] |
11.2.1.2.140 - ProjectWriteRequest class reference
Properties
| Name | Type | Description | Notes |
|---|---|---|---|
| name | str | ||
| labels | [PatchedLabelRequest] | [optional] if omitted the server will use the default value of [] | |
| owner_id | int, none_type | [optional] | |
| assignee_id | int, none_type | [optional] | |
| bug_tracker | str | [optional] | |
| target_storage | PatchedProjectWriteRequestTargetStorage | [optional] | |
| source_storage | PatchedProjectWriteRequestTargetStorage | [optional] |
11.2.1.2.141 - ProviderTypeEnum class reference
- `AWS_S3_BUCKET` - Amazon S3 * `AZURE_CONTAINER` - Azure Blob Storage * `GOOGLE_CLOUD_STORAGE` - Google Cloud Storage
Properties
| Name | Type | Description | Notes |
|---|---|---|---|
| value | str | * AWS_S3_BUCKET - Amazon S3 * AZURE_CONTAINER - Azure Blob Storage * GOOGLE_CLOUD_STORAGE - Google Cloud Storage |
must be one of [“AWS_S3_BUCKET”, “AZURE_CONTAINER”, “GOOGLE_CLOUD_STORAGE”, ] |
11.2.1.2.142 - QualityPointSizeBase class reference
- `image_size` - IMAGE_SIZE * `group_bbox_size` - GROUP_BBOX_SIZE
Properties
| Name | Type | Description | Notes |
|---|---|---|---|
| value | str | * image_size - IMAGE_SIZE * group_bbox_size - GROUP_BBOX_SIZE |
must be one of [“image_size”, “group_bbox_size”, ] |
11.2.1.2.143 - QualityReport class reference
Properties
| Name | Type | Description | Notes |
|---|---|---|---|
| target | QualityReportTarget | ||
| summary | QualityReportSummary | ||
| id | int | [optional] [readonly] | |
| job_id | int, none_type | [optional] [readonly] | |
| task_id | int, none_type | [optional] [readonly] | |
| project_id | int, none_type | [optional] [readonly] | |
| parent_id | int, none_type | [optional] [readonly] | |
| created_date | datetime | [optional] [readonly] | |
| target_last_updated | datetime | [optional] [readonly] | |
| gt_last_updated | datetime, none_type | [optional] [readonly] | |
| assignee | JobReadAssignee | [optional] |
11.2.1.2.144 - QualityReportCreateRequest class reference
Properties
| Name | Type | Description | Notes |
|---|---|---|---|
| task_id | int | [optional] | |
| project_id | int | [optional] |
11.2.1.2.145 - QualityReportJobsSummary class reference
Properties
| Name | Type | Description | Notes |
|---|---|---|---|
| total | int | Non-GT jobs in included tasks | |
| excluded | int | Jobs excluded by filters | |
| not_checkable | int | Included jobs without validation frames | |
| included | int | Included job count = total - excluded |
11.2.1.2.146 - QualityReportSummary class reference
Properties
| Name | Type | Description | Notes |
|---|---|---|---|
| total_frames | int | ||
| validation_frames | int | ||
| validation_frame_share | float | ||
| conflict_count | int | ||
| warning_count | int | ||
| error_count | int | ||
| conflicts_by_type | {str: (int,)} | ||
| valid_count | int | ||
| ds_count | int | ||
| gt_count | int | ||
| total_count | int | ||
| accuracy | float | ||
| precision | float | ||
| recall | float | ||
| frame_count | int | Deprecated. Use ‘validation_frames’ instead | [optional] |
| frame_share | float | Deprecated. Use ‘validation_frame_share’ instead | [optional] |
| tasks | QualityReportSummaryTasks | [optional] | |
| jobs | QualityReportSummaryJobs | [optional] |
11.2.1.2.147 - QualityReportSummaryJobs class reference
Included only in task and project reports
Properties
| Name | Type | Description | Notes |
|---|---|---|---|
| total | int | Non-GT jobs in included tasks | |
| excluded | int | Jobs excluded by filters | |
| not_checkable | int | Included jobs without validation frames | |
| included | int | Included job count = total - excluded |
11.2.1.2.148 - QualityReportSummaryTasks class reference
Included only in project reports
Properties
| Name | Type | Description | Notes |
|---|---|---|---|
| total | int | Total task count | |
| custom | int | Tasks with individual settings | |
| not_configured | int | Tasks with validation not configured | |
| excluded | int | Tasks excluded by filters | |
| included | int | Included task count = total - custom - non_configured - excluded |
11.2.1.2.149 - QualityReportTarget class reference
- `job` - JOB * `task` - TASK * `project` - PROJECT
Properties
| Name | Type | Description | Notes |
|---|---|---|---|
| value | str | * job - JOB * task - TASK * project - PROJECT |
must be one of [“job”, “task”, “project”, ] |
11.2.1.2.150 - QualityReportTasksSummary class reference
Properties
| Name | Type | Description | Notes |
|---|---|---|---|
| total | int | Total task count | |
| custom | int | Tasks with individual settings | |
| not_configured | int | Tasks with validation not configured | |
| excluded | int | Tasks excluded by filters | |
| included | int | Included task count = total - custom - non_configured - excluded |
11.2.1.2.151 - QualitySettings class reference
Properties
| Name | Type | Description | Notes |
|---|---|---|---|
| id | int | [optional] [readonly] | |
| task_id | int, none_type | [optional] | |
| project_id | int, none_type | [optional] | |
| job_filter | str | A JSON-based logic expression used to filter jobs for quality validation. The filter supports various terms to specify conditions on job: [‘assignee’, ‘id’, ‘stage’, ‘state’, ’task_id’, ’task_name’, ’type’] | [optional] |
| inherit | bool | Allow using project settings when computing task quality. Only applicable to task quality settings inside projects | [optional] |
| target_metric | bool, date, datetime, dict, float, int, list, str, none_type | The primary metric used for quality estimation * accuracy - ACCURACY * precision - PRECISION * recall - RECALL |
[optional] |
| target_metric_threshold | float | Defines the minimal quality requirements in terms of the selected target metric. | [optional] |
| max_validations_per_job | int | The maximum number of job validation attempts for the job assignee. The job can be automatically accepted if the job quality is above the required threshold, defined by the target threshold parameter. | [optional] |
| iou_threshold | float | Used for distinction between matched / unmatched shapes | [optional] if omitted the server will use the default value of 0.4 |
| oks_sigma | float | Like IoU threshold, but for points. The percent of the bbox side, used as the radius of the circle around the GT point, where the checked point is expected to be. For boxes with different width and height, the "side" is computed as a geometric mean of the width and height. Read more: https://cocodataset.org/#keypoints-eval | [optional] if omitted the server will use the default value of 0.09 |
| point_size_base | bool, date, datetime, dict, float, int, list, str, none_type | When comparing point annotations (including both separate points and point groups), the OKS sigma parameter defines matching area for each GT point based to the object size. The point size base parameter allows to configure how to determine the object size. If image_size, the image size is used. Useful if each point annotation represents a separate object or boxes grouped with points do not represent object boundaries. If group_bbox_size, the object size is based on the point group bbox size. Useful if each point group represents an object or there is a bbox grouped with points, representing the object size. * image_size - IMAGE_SIZE * group_bbox_size - GROUP_BBOX_SIZE |
[optional] |
| line_thickness | float | Thickness of polylines, relatively to the (image area) ^ 0.5. The distance to the boundary around the GT line, inside of which the checked line points should be | [optional] if omitted the server will use the default value of 0.01 |
| low_overlap_threshold | float | Used for distinction between strong / weak (low_overlap) matches | [optional] if omitted the server will use the default value of 0.8 |
| compare_line_orientation | bool | Enables or disables polyline orientation comparison | [optional] if omitted the server will use the default value of True |
| line_orientation_threshold | float | The minimal gain in the GT IoU between the given and reversed line directions to consider the line inverted. Only used when the ‘compare_line_orientation’ parameter is true | [optional] if omitted the server will use the default value of 0.1 |
| compare_groups | bool | Enables or disables annotation group checks | [optional] if omitted the server will use the default value of True |
| group_match_threshold | float | Minimal IoU for groups to be considered matching. Only used when the ‘compare_groups’ parameter is true | [optional] if omitted the server will use the default value of 0.5 |
| check_covered_annotations | bool | Check for partially-covered annotations, useful in segmentation tasks | [optional] if omitted the server will use the default value of True |
| object_visibility_threshold | float | Minimal visible area percent of the spatial annotations (polygons, masks) for reporting covered annotations. Only used when the ‘object_visibility_threshold’ parameter is true | [optional] if omitted the server will use the default value of 0.05 |
| panoptic_comparison | bool | Use only the visible part of the masks and polygons in comparisons | [optional] if omitted the server will use the default value of True |
| compare_attributes | bool | Enables or disables annotation attribute comparison | [optional] if omitted the server will use the default value of True |
| empty_is_annotated | bool | Consider empty frames annotated as "empty". This affects target metrics like accuracy in cases there are no annotations. If disabled, frames without annotations are counted as not matching (accuracy is 0). If enabled, accuracy will be 1 instead. This will also add virtual annotations to empty frames in the comparison results. | [optional] if omitted the server will use the default value of False |
| created_date | datetime | [optional] [readonly] | |
| updated_date | datetime | [optional] [readonly] |
11.2.1.2.152 - QualityTargetMetric class reference
- `accuracy` - ACCURACY * `precision` - PRECISION * `recall` - RECALL
Properties
| Name | Type | Description | Notes |
|---|---|---|---|
| value | str | * accuracy - ACCURACY * precision - PRECISION * recall - RECALL |
must be one of [“accuracy”, “precision”, “recall”, ] |
11.2.1.2.153 - RegisterSerializerEx class reference
Properties
| Name | Type | Description | Notes |
|---|---|---|---|
| username | str | ||
| str | [optional] | ||
| first_name | str | [optional] | |
| last_name | str | [optional] | |
| email_verification_required | bool | [optional] [readonly] | |
| key | str, none_type | [optional] [readonly] |
11.2.1.2.154 - RegisterSerializerExRequest class reference
Properties
| Name | Type | Description | Notes |
|---|---|---|---|
| username | str | ||
| password1 | str | ||
| password2 | str | ||
| str | [optional] | ||
| first_name | str | [optional] | |
| last_name | str | [optional] |
11.2.1.2.155 - Request class reference
Properties
| Name | Type | Description | Notes |
|---|---|---|---|
| status | RequestStatus | ||
| id | str | ||
| operation | RequestDataOperation | ||
| created_date | datetime | ||
| message | str | [optional] [readonly] | |
| progress | float, none_type | [optional] [readonly] | |
| started_date | datetime, none_type | [optional] | |
| finished_date | datetime, none_type | [optional] | |
| expiry_date | datetime, none_type | [optional] [readonly] | |
| owner | RequestOwner | [optional] | |
| result_url | str, none_type | [optional] | |
| result_id | int, none_type | [optional] |
11.2.1.2.156 - RequestDataOperation class reference
Properties
| Name | Type | Description | Notes |
|---|---|---|---|
| type | str | ||
| target | str | ||
| project_id | int, none_type | [optional] | |
| task_id | int, none_type | [optional] | |
| job_id | int, none_type | [optional] | |
| format | str, none_type | [optional] | |
| function_id | str, none_type | [optional] | |
| lightweight | bool, none_type | [optional] |
11.2.1.2.157 - RequestOwner class reference
Properties
| Name | Type | Description | Notes |
|---|---|---|---|
| username | str | Required. 150 characters or fewer. Letters, digits and @/./+/-/_ only. | |
| id | int | [optional] [readonly] |
11.2.1.2.158 - RequestStatus class reference
- `queued` - Queued * `started` - Started * `failed` - Failed * `finished` - Finished
Properties
| Name | Type | Description | Notes |
|---|---|---|---|
| value | str | * queued - Queued * started - Started * failed - Failed * finished - Finished |
must be one of [“queued”, “started”, “failed”, “finished”, ] |
11.2.1.2.159 - RestAuthDetail class reference
Properties
| Name | Type | Description | Notes |
|---|---|---|---|
| detail | str | [optional] [readonly] |
11.2.1.2.160 - RoleEnum class reference
- `worker` - Worker * `supervisor` - Supervisor * `maintainer` - Maintainer * `owner` - Owner
Properties
| Name | Type | Description | Notes |
|---|---|---|---|
| value | str | * worker - Worker * supervisor - Supervisor * maintainer - Maintainer * owner - Owner |
must be one of [“worker”, “supervisor”, “maintainer”, “owner”, ] |
11.2.1.2.161 - RqId class reference
Properties
| Name | Type | Description | Notes |
|---|---|---|---|
| rq_id | str | Request id |
11.2.1.2.162 - RqStatus class reference
Properties
| Name | Type | Description | Notes |
|---|---|---|---|
| state | RqStatusStateEnum | ||
| message | str | [optional] if omitted the server will use the default value of "" | |
| progress | float | [optional] if omitted the server will use the default value of 0.0 |
11.2.1.2.163 - RqStatusStateEnum class reference
- `Queued` - Queued * `Started` - Started * `Finished` - Finished * `Failed` - Failed
Properties
| Name | Type | Description | Notes |
|---|---|---|---|
| value | str | * Queued - Queued * Started - Started * Finished - Finished * Failed - Failed |
must be one of [“Queued”, “Started”, “Finished”, “Failed”, ] |
11.2.1.2.164 - ShapeType class reference
- `rectangle` - RECTANGLE * `polygon` - POLYGON * `polyline` - POLYLINE * `points` - POINTS * `ellipse` - ELLIPSE * `cuboid` - CUBOID * `mask` - MASK * `skeleton` - SKELETON
Properties
| Name | Type | Description | Notes |
|---|---|---|---|
| value | str | * rectangle - RECTANGLE * polygon - POLYGON * polyline - POLYLINE * points - POINTS * ellipse - ELLIPSE * cuboid - CUBOID * mask - MASK * skeleton - SKELETON |
must be one of [“rectangle”, “polygon”, “polyline”, “points”, “ellipse”, “cuboid”, “mask”, “skeleton”, ] |
11.2.1.2.165 - SortingMethod class reference
- `lexicographical` - LEXICOGRAPHICAL * `natural` - NATURAL * `predefined` - PREDEFINED * `random` - RANDOM
Properties
| Name | Type | Description | Notes |
|---|---|---|---|
| value | str | * lexicographical - LEXICOGRAPHICAL * natural - NATURAL * predefined - PREDEFINED * random - RANDOM |
must be one of [“lexicographical”, “natural”, “predefined”, “random”, ] |
11.2.1.2.166 - Storage class reference
Properties
| Name | Type | Description | Notes |
|---|---|---|---|
| id | int | [optional] [readonly] | |
| location | LocationEnum | [optional] | |
| cloud_storage_id | int, none_type | [optional] |
11.2.1.2.167 - StorageMethod class reference
- `cache` - CACHE * `file_system` - FILE_SYSTEM
Properties
| Name | Type | Description | Notes |
|---|---|---|---|
| value | str | * cache - CACHE * file_system - FILE_SYSTEM |
must be one of [“cache”, “file_system”, ] |
11.2.1.2.168 - StorageRequest class reference
Properties
| Name | Type | Description | Notes |
|---|---|---|---|
| location | LocationEnum | [optional] | |
| cloud_storage_id | int, none_type | [optional] |
11.2.1.2.169 - StorageType class reference
- `cloud_storage` - CLOUD_STORAGE * `local` - LOCAL * `share` - SHARE
Properties
| Name | Type | Description | Notes |
|---|---|---|---|
| value | str | * cloud_storage - CLOUD_STORAGE * local - LOCAL * share - SHARE |
must be one of [“cloud_storage”, “local”, “share”, ] |
11.2.1.2.170 - Sublabel class reference
Properties
| Name | Type | Description | Notes |
|---|---|---|---|
| name | str | ||
| id | int | [optional] | |
| color | str | The hex value for the RGB color. Will be generated automatically, unless specified explicitly. | [optional] |
| attributes | [Attribute] | The list of attributes. If you want to remove an attribute, you need to recreate the label and specify the remaining attributes. | [optional] if omitted the server will use the default value of [] |
| type | bool, date, datetime, dict, float, int, list, str, none_type | Associated annotation type for this label * any - ANY * cuboid - CUBOID * ellipse - ELLIPSE * mask - MASK * points - POINTS * polygon - POLYGON * polyline - POLYLINE * rectangle - RECTANGLE * skeleton - SKELETON * tag - TAG |
[optional] |
| has_parent | bool | [optional] |
11.2.1.2.171 - SubLabeledShape class reference
Properties
| Name | Type | Description | Notes |
|---|---|---|---|
| type | ShapeType | ||
| frame | int | ||
| label_id | int | ||
| occluded | bool | [optional] if omitted the server will use the default value of False | |
| outside | bool | [optional] if omitted the server will use the default value of False | |
| z_order | int | [optional] if omitted the server will use the default value of 0 | |
| rotation | float | [optional] if omitted the server will use the default value of 0.0 | |
| points | [float] | [optional] | |
| id | int, none_type | [optional] | |
| group | int, none_type | [optional] | |
| source | str | [optional] if omitted the server will use the default value of “manual” | |
| attributes | [AttributeVal] | [optional] if omitted the server will use the default value of [] | |
| score | float | [optional] if omitted the server will use the default value of 1.0 |
11.2.1.2.172 - SubLabeledShapeRequest class reference
Properties
| Name | Type | Description | Notes |
|---|---|---|---|
| type | ShapeType | ||
| frame | int | ||
| label_id | int | ||
| occluded | bool | [optional] if omitted the server will use the default value of False | |
| outside | bool | [optional] if omitted the server will use the default value of False | |
| z_order | int | [optional] if omitted the server will use the default value of 0 | |
| rotation | float | [optional] if omitted the server will use the default value of 0.0 | |
| points | [float] | [optional] | |
| id | int, none_type | [optional] | |
| group | int, none_type | [optional] | |
| source | str | [optional] if omitted the server will use the default value of “manual” | |
| attributes | [AttributeValRequest] | [optional] if omitted the server will use the default value of [] | |
| score | float | [optional] if omitted the server will use the default value of 1.0 |
11.2.1.2.173 - SubLabeledTrack class reference
Properties
| Name | Type | Description | Notes |
|---|---|---|---|
| frame | int | ||
| label_id | int | ||
| shapes | [TrackedShape] | ||
| id | int, none_type | [optional] | |
| group | int, none_type | [optional] | |
| source | str | [optional] if omitted the server will use the default value of “manual” | |
| attributes | [AttributeVal] | [optional] if omitted the server will use the default value of [] |
11.2.1.2.174 - SubLabeledTrackRequest class reference
Properties
| Name | Type | Description | Notes |
|---|---|---|---|
| frame | int | ||
| label_id | int | ||
| shapes | [TrackedShapeRequest] | ||
| id | int, none_type | [optional] | |
| group | int, none_type | [optional] | |
| source | str | [optional] if omitted the server will use the default value of “manual” | |
| attributes | [AttributeValRequest] | [optional] if omitted the server will use the default value of [] |
11.2.1.2.175 - SublabelMappingEntryRequest class reference
Properties
| Name | Type | Description | Notes |
|---|---|---|---|
| name | str | ||
| attributes | {str: (str,)} | [optional] |
11.2.1.2.176 - SublabelRequest class reference
Properties
| Name | Type | Description | Notes |
|---|---|---|---|
| name | str | ||
| id | int | [optional] | |
| color | str | The hex value for the RGB color. Will be generated automatically, unless specified explicitly. | [optional] |
| attributes | [AttributeRequest] | The list of attributes. If you want to remove an attribute, you need to recreate the label and specify the remaining attributes. | [optional] if omitted the server will use the default value of [] |
| type | bool, date, datetime, dict, float, int, list, str, none_type | Associated annotation type for this label * any - ANY * cuboid - CUBOID * ellipse - ELLIPSE * mask - MASK * points - POINTS * polygon - POLYGON * polyline - POLYLINE * rectangle - RECTANGLE * skeleton - SKELETON * tag - TAG |
[optional] |
| has_parent | bool | [optional] |
11.2.1.2.177 - TaskFileRequest class reference
Properties
| Name | Type | Description | Notes |
|---|---|---|---|
| task_file | file_type |
11.2.1.2.178 - TaskRead class reference
Properties
| Name | Type | Description | Notes |
|---|---|---|---|
| jobs | JobsSummary | ||
| labels | LabelsSummary | ||
| url | str | [optional] [readonly] | |
| id | int | [optional] [readonly] | |
| name | str | [optional] [readonly] | |
| project_id | int, none_type | [optional] | |
| project_name | str, none_type | [optional] [readonly] | |
| mode | str | [optional] [readonly] | |
| owner | CloudStorageReadOwner | [optional] | |
| assignee | CloudStorageReadOwner | [optional] | |
| bug_tracker | str | [optional] [readonly] | |
| created_date | datetime | [optional] [readonly] | |
| updated_date | datetime | [optional] [readonly] | |
| overlap | int, none_type | [optional] [readonly] | |
| segment_size | int | [optional] [readonly] | |
| status | bool, date, datetime, dict, float, int, list, str, none_type | [optional] [readonly] | |
| data_chunk_size | int, none_type | [optional] [readonly] | |
| data_original_chunk_type | bool, date, datetime, dict, float, int, list, str, none_type | [optional] [readonly] | |
| data_compressed_chunk_type | bool, date, datetime, dict, float, int, list, str, none_type | [optional] [readonly] | |
| data_cloud_storage_id | int, none_type | [optional] [readonly] | |
| guide_id | int, none_type | [optional] | |
| size | int | [optional] [readonly] | |
| image_quality | int | [optional] [readonly] | |
| data | int, none_type | [optional] [readonly] | |
| dimension | str | [optional] | |
| subset | str | [optional] [readonly] | |
| organization_id | int, none_type | [optional] [readonly] | |
| organization | int, none_type | [optional] [readonly] | |
| target_storage | JobReadTargetStorage | [optional] | |
| source_storage | JobReadTargetStorage | [optional] | |
| assignee_updated_date | datetime, none_type | [optional] [readonly] | |
| validation_mode | str, none_type | Describes how the task validation is performed. Configured at task creation | [optional] |
| consensus_enabled | bool | [optional] [readonly] |
11.2.1.2.179 - TasksSummary class reference
Properties
| Name | Type | Description | Notes |
|---|---|---|---|
| count | int | [optional] if omitted the server will use the default value of 0 | |
| url | str | [optional] [readonly] |
11.2.1.2.180 - TaskValidationLayoutRead class reference
Properties
| Name | Type | Description | Notes |
|---|---|---|---|
| mode | TaskValidationLayoutReadMode | [optional] | |
| frames_per_job_count | int, none_type | [optional] [readonly] | |
| validation_frames | [int] | The list of frame ids to be used for validation | [optional] |
| disabled_frames | [int] | The list of frame ids excluded from validation | [optional] |
| honeypot_count | int | [optional] | |
| honeypot_frames | [int] | The list of frame ids for all honeypots in the task | [optional] |
| honeypot_real_frames | [int] | The list of real (validation) frame ids for all honeypots in the task | [optional] |
11.2.1.2.181 - TaskValidationLayoutReadMode class reference
Properties
| Name | Type | Description | Notes |
|---|
11.2.1.2.182 - TaskWriteRequest class reference
Properties
| Name | Type | Description | Notes |
|---|---|---|---|
| name | str | ||
| project_id | int, none_type | [optional] | |
| owner_id | int, none_type | [optional] | |
| assignee_id | int, none_type | [optional] | |
| bug_tracker | str | [optional] | |
| overlap | int, none_type | [optional] | |
| segment_size | int | [optional] | |
| labels | [PatchedLabelRequest] | [optional] | |
| subset | str | [optional] | |
| target_storage | StorageRequest | [optional] | |
| source_storage | StorageRequest | [optional] | |
| consensus_replicas | int | The number of consensus replica jobs for each annotation job. Configured at task creation | [optional] if omitted the server will use the default value of 0 |
11.2.1.2.183 - Token class reference
Serializer for Token model.
Properties
| Name | Type | Description | Notes |
|---|---|---|---|
| key | str |
11.2.1.2.184 - TrackedShape class reference
Properties
| Name | Type | Description | Notes |
|---|---|---|---|
| type | ShapeType | ||
| frame | int | ||
| occluded | bool | [optional] if omitted the server will use the default value of False | |
| outside | bool | [optional] if omitted the server will use the default value of False | |
| z_order | int | [optional] if omitted the server will use the default value of 0 | |
| rotation | float | [optional] if omitted the server will use the default value of 0.0 | |
| points | [float] | [optional] | |
| id | int, none_type | [optional] | |
| attributes | [AttributeVal] | [optional] if omitted the server will use the default value of [] |
11.2.1.2.185 - TrackedShapeRequest class reference
Properties
| Name | Type | Description | Notes |
|---|---|---|---|
| type | ShapeType | ||
| frame | int | ||
| occluded | bool | [optional] if omitted the server will use the default value of False | |
| outside | bool | [optional] if omitted the server will use the default value of False | |
| z_order | int | [optional] if omitted the server will use the default value of 0 | |
| rotation | float | [optional] if omitted the server will use the default value of 0.0 | |
| points | [float] | [optional] | |
| id | int, none_type | [optional] | |
| attributes | [AttributeValRequest] | [optional] if omitted the server will use the default value of [] |
11.2.1.2.186 - User class reference
Properties
| Name | Type | Description | Notes |
|---|---|---|---|
| username | str | Required. 150 characters or fewer. Letters, digits and @/./+/-/_ only. | |
| groups | [str] | ||
| url | str | [optional] [readonly] | |
| id | int | [optional] [readonly] | |
| first_name | str | [optional] | |
| last_name | str | [optional] | |
| str | [optional] | ||
| is_staff | bool | Designates whether the user can log into this admin site. | [optional] |
| is_superuser | bool | Designates that this user has all permissions without explicitly assigning them. | [optional] |
| is_active | bool | Designates whether this user should be treated as active. Unselect this instead of deleting accounts. | [optional] |
| last_login | datetime, none_type | [optional] [readonly] | |
| date_joined | datetime | [optional] [readonly] | |
| has_analytics_access | bool | [optional] [readonly] |
11.2.1.2.187 - UserIdentifiers class reference
Properties
| Name | Type | Description | Notes |
|---|---|---|---|
| username | str | Required. 150 characters or fewer. Letters, digits and @/./+/-/_ only. | |
| id | int | [optional] [readonly] |
11.2.1.2.188 - ValidationMode class reference
- `gt` - GT * `gt_pool` - GT_POOL
Properties
| Name | Type | Description | Notes |
|---|---|---|---|
| value | str | * gt - GT * gt_pool - GT_POOL |
must be one of [“gt”, “gt_pool”, ] |
11.2.1.2.189 - ValidationParamsRequest class reference
Properties
| Name | Type | Description | Notes |
|---|---|---|---|
| mode | ValidationMode | ||
| frame_selection_method | FrameSelectionMethod | ||
| random_seed | int | The seed value for the random number generator. The same value will produce the same frame sets. Applicable only to random frame selection methods. By default, a random value is used. | [optional] |
| frames | [str] | The list of file names to be included in the validation set. Applicable only to the "manual" frame selection method. Can only be used for images. | [optional] |
| frame_count | int | The number of frames to be included in the validation set. Applicable only to the "random_uniform" frame selection method | [optional] |
| frame_share | float | The share of frames to be included in the validation set. Applicable only to the "random_uniform" frame selection method | [optional] |
| frames_per_job_count | int | The number of frames to be included in the validation set from each annotation job. Applicable only to the "random_per_job" frame selection method | [optional] |
| frames_per_job_share | float | The share of frames to be included in the validation set from each annotation job. Applicable only to the "random_per_job" frame selection method | [optional] |
11.2.1.2.190 - WebhookContentType class reference
- `application/json` - JSON
Properties
| Name | Type | Description | Notes |
|---|---|---|---|
| value | str | * application/json - JSON |
defaults to “application/json”, must be one of [“application/json”, ] |
11.2.1.2.191 - WebhookDeliveryRead class reference
Properties
| Name | Type | Description | Notes |
|---|---|---|---|
| id | int | [optional] [readonly] | |
| webhook_id | int | [optional] [readonly] | |
| event | str | [optional] [readonly] | |
| status_code | int, none_type | [optional] [readonly] | |
| redelivery | bool | [optional] [readonly] | |
| created_date | datetime | [optional] [readonly] | |
| updated_date | datetime | [optional] [readonly] | |
| changed_fields | str | [optional] [readonly] | |
| request | {str: (bool, date, datetime, dict, float, int, list, str, none_type)} | [optional] [readonly] | |
| response | {str: (bool, date, datetime, dict, float, int, list, str, none_type)} | [optional] [readonly] |
11.2.1.2.192 - WebhookRead class reference
Properties
| Name | Type | Description | Notes |
|---|---|---|---|
| type | WebhookType | ||
| content_type | WebhookContentType | ||
| id | int | [optional] [readonly] | |
| url | str | [optional] [readonly] | |
| target_url | str | [optional] [readonly] | |
| description | str | [optional] [readonly] | |
| is_active | bool | [optional] [readonly] | |
| enable_ssl | bool | [optional] [readonly] | |
| created_date | datetime | [optional] [readonly] | |
| updated_date | datetime | [optional] [readonly] | |
| owner | JobReadAssignee | [optional] | |
| project_id | int, none_type | [optional] | |
| organization | int, none_type | [optional] [readonly] | |
| events | [EventsEnum] | [optional] [readonly] | |
| last_status | int | [optional] [readonly] | |
| last_delivery_date | datetime | [optional] [readonly] |
11.2.1.2.193 - WebhookType class reference
- `organization` - ORGANIZATION * `project` - PROJECT
Properties
| Name | Type | Description | Notes |
|---|---|---|---|
| value | str | * organization - ORGANIZATION * project - PROJECT |
must be one of [“organization”, “project”, ] |
11.2.1.2.194 - WebhookWriteRequest class reference
Properties
| Name | Type | Description | Notes |
|---|---|---|---|
| target_url | str | ||
| type | WebhookType | ||
| events | [EventsEnum] | ||
| description | str | [optional] | |
| content_type | WebhookContentType | [optional] | |
| secret | str | [optional] | |
| is_active | bool | [optional] | |
| enable_ssl | bool | [optional] | |
| project_id | int, none_type | [optional] |
11.2.2 - Low-level API
Overview
The low-level API is useful if you need to work directly with REST API, but want to have data validation and syntax assistance from your code editor. The code on this layer is autogenerated.
Code of this component is located in cvat_sdk.api_client.
Example
Let’s see how a task with local files can be created. We will use the basic auth to make things simpler.
from time import sleep
from cvat_sdk.api_client import Configuration, ApiClient, models, apis, exceptions
configuration = Configuration(
host="http://localhost",
username='YOUR_USERNAME',
password='YOUR_PASSWORD',
)
# Enter a context with an instance of the API client
with ApiClient(configuration) as api_client:
# Parameters can be passed as a plain dict with JSON-serialized data
# or as model objects (from cvat_sdk.api_client.models), including
# mixed variants.
#
# In case of dicts, keys must be the same as members of models.I<ModelName>
# interfaces and values must be convertible to the corresponding member
# value types (e.g. a date or string enum value can be parsed from a string).
#
# In case of model objects, data must be of the corresponding
# models.<ModelName> types.
#
# Let's use a dict here. It should look like models.ITaskWriteRequest
task_spec = {
'name': 'example task',
"labels": [{
"name": "car",
"color": "#ff00ff",
"attributes": [
{
"name": "a",
"mutable": True,
"input_type": "number",
"default_value": "5",
"values": ["4", "5", "6"]
}
]
}],
}
try:
# Apis can be accessed as ApiClient class members
# We use different models for input and output data. For input data,
# models are typically called like "*Request". Output data models have
# no suffix.
(task, response) = api_client.tasks_api.create(task_spec)
except exceptions.ApiException as e:
# We can catch the basic exception type, or a derived type
print("Exception when trying to create a task: %s\n" % e)
# Here we will use models instead of a dict
task_data = models.DataRequest(
image_quality=75,
client_files=[
open('image1.jpg', 'rb'),
open('image2.jpg', 'rb'),
],
)
# If we pass binary file objects, we need to specify content type.
(result, response) = api_client.tasks_api.create_data(task.id,
data_request=task_data,
_content_type="multipart/form-data",
# we can choose to check the response status manually
# and disable the response data parsing
_check_status=False, _parse_response=False
)
assert response.status == 202, response.msg
# Wait till task data is processed
for _ in range(100):
request_details, response = api_client.requests_api.retrieve(result.rq_id)
status, message = request_details.status, request_details.message
if status.value in {'finished', 'failed'}:
break
sleep(0.1)
assert status.value == 'finished', status.message
# Update the task object and check the task size
(task, _) = api_client.tasks_api.retrieve(task.id)
assert task.size == 4
ApiClient and configuration
The starting point in the low-level API is the cvat_sdk.api_client.ApiClient class.
It encapsulates session and connection logic, manages headers and cookies,
and provides access to various APIs.
To create an instance of ApiClient, you need to set up a cvat_sdk.api_client.Configuration
object and pass it to the ApiClient class constructor. Additional connection-specific
options, such as extra headers and cookies can be specified in the class constructor.
ApiClient implements the context manager protocol. Typically, you create ApiClient this way:
from cvat_sdk.api_client import ApiClient, Configuration
configuration = Configuration(host="http://localhost")
with ApiClient(configuration) as api_client:
...
After creating an ApiClient instance, you can send requests to various server endpoints
via *_api member properties and directly, using the rest_client member.
Read more about API wrappers below.
Typically, the first thing you do with ApiClient is log in.
Read more about authentication options below.
Authentication
CVAT supports 3 authentication options:
- Personal Access Token (PAT) authentication, with an access token value
- Basic authentication, with a username and a password
- Session authentication, with a session ID and a CSRF token
- Legacy token authentication, with an API key (deprecated)
Personal Access Token (PAT) authentication requires a token that can be configured in the user settings section in the UI. It is the recommended authentication option for most API clients. Read more.
Basic authentication requires a username and password pair. For better security it’s recommended to use other authentication options instead.
Session authentication requires a session ID and a CSRF token, which can be obtained after
logging in via the /api/auth/login endpoint using the basic authentication credentials.
Legacy token authentication (deprecated) requires an API key, which can be obtained
after logging in via the /api/auth/login endpoint using the basic authentication credentials.
Authentication credentials for an ApiClient instance can be specified in a Configuration object:
configuration = Configuration(
access_token="<token value>",
...
)
with ApiClient(configuration) as api_client:
...
configuration = Configuration(
username="YOUR_USERNAME",
password="YOUR_PASSWORD",
...
)
with ApiClient(configuration) as api_client:
...
configuration = Configuration(
api_key={
"sessionAuth": "<sessionid cookie value>",
"csrfAuth": "<csrftoken cookie value>",
},
...
)
with ApiClient(configuration) as api_client:
...
Warning
This authentication option is deprecated and will be removed in future.
configuration = Configuration(
api_key={
"tokenAuth": "Token <api key value>",
},
...
)
with ApiClient(configuration) as api_client:
...
Session authentication and token authentication tokens can be received by logging in
using the ApiClient.auth_api.create_login() function. Then, the authentication keys
can be set in the ApiClient instance.
from cvat_sdk.api_client import models
(auth, _) = api_client.auth_api.create_login(
models.LoginSerializerExRequest(username="username", password="password")
)
# Set up required headers
assert "sessionid" in api_client.cookies # managed by ApiClient automatically
api_client.set_default_header("X-CSRFToken", api_client.cookies["csrftoken"].value)
api_client.set_default_header("Origin", api_client.build_origin_header())
Warning
This authentication option is deprecated and will be removed in future.
from cvat_sdk.api_client import models
(auth, _) = api_client.auth_api.create_login(
models.LoginSerializerExRequest(username="username", password="password")
)
api_client.set_default_header("Authorization", "Token " + auth.key)
API wrappers
API endpoints are grouped by tags into separate classes in the cvat_sdk.api_client.apis package.
APIs can be accessed as ApiClient object members:
api_client.auth_api.<operation>(...)
api_client.tasks_api.<operation>(...)
And APIs can be instantiated directly like this:
from cvat_sdk.api_client import ApiClient, apis
api_client = ApiClient(...)
auth_api = apis.AuthApi(api_client)
auth_api.<operation>(...)
tasks_api = apis.TasksApi(api_client)
tasks_api.<operation>(...)
For each operation, the API wrapper class has a corresponding <operation>_endpoint member.
This member represents the endpoint as a first-class object, which provides metainformation
about the endpoint, such as the relative URL of the endpoint, parameter names,
types and their placement in the request. It also allows to pass the operation to other
functions and invoke it from there.
For a typical server entity like Task, Project, Job etc., the *Api classes provide methods
that reflect Create-Read-Update-Delete (CRUD) operations: create, retrieve, list, update,
partial_update, delete. The set of available operations depends on the entity type.
You can find the list of the available APIs and their documentation here.
Models
Requests and responses can include data. It can be represented as plain Python
data structures and model classes (or models). In CVAT API, model for requests and responses
are separated: the request models have the Request suffix in the name, while the response
models have no suffix. Models can be found in the cvat_sdk.api_client.models package.
Models can be instantiated like this:
from cvat_sdk.api_client import models
user_model = models.User(...)
Model parameters can be passed as models, or as plain Python data structures. This rule applies recursively, starting from the method parameters. In particular, this means you can pass a dict into a method or into a model constructor, and corresponding fields will be parsed from this data automatically:
task_spec = models.TaskWriteRequest(
name='example task',
labels=[
models.PatchedLabelRequest(
name="car",
color="#ff00ff",
attributes=[
model.AttributeRequest(
name="a",
mutable=True,
input_type="number",
default_value="5",
values=["4", "5", "6"]
)
]
)
],
)
api_client.tasks_api.create(task_spec)
Is equivalent to:
api_client.tasks_api.create({
'name': 'example task',
"labels": [{
"name": "car",
"color": "#ff00ff",
"attributes": [
{
"name": "a",
"mutable": True,
"input_type": "number",
"default_value": "5",
"values": ["4", "5", "6"]
}
]
}],
})
You can mix these variants.
Most models provide corresponding interface classes called like I<model name>. They can be
used to implement your own classes or describe APIs. They just provide type annotations
and descriptions for model fields.
You can export model values to plain Python dicts using the to_dict() method and
the cvat_sdk.api_client.model_utils.to_json() function.
You can find the list of the available models and their documentation here.
Sending requests
To send a request to a server endpoint, you need to obtain an instance of the corresponding *Api
class. You can find summary about available API classes and supported endpoints
here. The *Api instance object allows to send requests to the relevant
server endpoints.
By default, all operations return 2 objects: the parsed response data and the response itself.
The first returned value is a model parsed from the response data. If a method does
not have any return value, None is always returned as the first value. You can control
automatic parsing using the _parse_response method kwarg. When disabled, None is returned.
The second value is the raw response, which can be useful to get response parameters, such as
status code, headers, or raw response data. By default, the status code of the response is
checked to be positive. In the case of request failure, an exception is raised by default.
This behavior can be controlled by the _check_status method kwarg. If the status is not
checked, you will need to manually check the response status code and perform actions needed.
A typical endpoint call looks like this:
from cvat_sdk.api_client import ApiClient, apis
with ApiClient(...) as api_client:
...
(data, response) = api_client.tasks_api.list()
# process the response ...
Operation parameters can be passed as positional or keyword arguments. API methods provide extra common arguments which control invocation logic:
_parse_response(bool) - Allows to enable and disable response data parsing. When enabled, the response data is parsed into a model or a basic type and returned as the first value. When disabled, the response is not parsed, andNoneis returned. Can be useful, for instance, if you need to parse data manually, or if you expect an error in the response. Default isTrue._check_status(bool) - Allows to enable or disable response status checks. When enabled, the response status code is checked to be positive as defined in the HTTP standards. In the case of negative status, an exception is raised. Default isTrue._validate_inputs(bool): specifies if type checking should be done on the data sent to the server. Default isTrue._validate_outputs(bool): specifies if type checking should be done on the data received from the server. Default isTrue._request_timeout(None | int | float | Tuple[int | float, int | float]) - Allows to control timeouts. If one number is provided, it will be the total request timeout. It can also be a tuple with (connection, read) timeouts. Default isNone, which means no timeout._content_type(None | str) - Allows to specify theContent-Typeheader value for the request. Endpoints can support different content types and behave differently depending on the value. For file uploads_content_type="multipart/form-data"must be specified. Read more about file uploads here. Default isapplication/json.
Note
The API is autogenerated. In some cases the server API schema may be incomplete or underspecified. Please report to us all the problems found. A typical problem is that a response data can’t be parsed automatically due to the incorrect schema. In this case, the simplest workaround is to disable response parsing using the_parse_response=False
method argument.
You can find many examples of API client usage in REST API tests here.
Organizations
To create resource in the context of an organization, use one of these method arguments:
org- The unique organization slugorg_id- The organization id
...
(task, response) = api_client.tasks_api.create(task_spec, org_id=org_id)
Paginated responses
There are several endpoints that allow to request multiple server entities. Typically, these
endpoints are called list_.... When there are lots of data, the responses can be paginated to
reduce server load. If an endpoint returns paginated data, a single page is returned per request.
In some cases all entries need to be retrieved. CVAT doesn’t provide specific API or parameters
for this, so the solution is to write a loop to collect and join data from multiple requests.
SDK provides an utility function for this at cvat_sdk.core.helpers.get_paginated_collection().
Example:
from cvat_sdk.core.helpers import get_paginated_collection
...
project_tasks = get_paginated_collection(
api_client.projects_api.list_tasks_endpoint,
id=project_id,
)
Binary data in requests and responses
At the moment, sending and receiving binary data - such as files - can be difficult via the low-level SDK API. Please use the following recommendations.
Sending data
By default, requests use the application/json content type, which is a text type.
However, it’s inefficient to send binary data in this encoding, and the data passed
won’t be converted automatically. If you need to send files or other binary data,
please specify _content_type="multipart/form-data" in the request parameters:
Example:
(result, response) = api_client.tasks_api.create_data(
id=42,
data_request=models.DataRequest(
client_files=[
open("image.jpg", 'rb')
],
image_quality=70,
),
_content_type="multipart/form-data", # required
)
Please also note that if there are complex fields in the data (such as nested lists or dicts),
they, in turn, cannot be encoded as multipart/form-data, so the recommended solution is to
split fields into files and others, and send them in different requests with different content
types:
Example:
data = {
'client_files': [...], # a list of binary files
'image_quality': ..., # a simple type - int
'job_file_mapping': [...], # a complex type - list
}
# Initialize uploading
api_client.tasks_api.create_data(
id=42,
data_request=models.DataRequest(image_quality=data["image_quality"]),
upload_start=True,
)
# Upload binary data
api_client.tasks_api.create_data(
id=42,
data_request=models.DataRequest(
client_files=data.pop("client_files"),
image_quality=data["image_quality"],
),
upload_multiple=True,
_content_type="multipart/form-data",
)
# Finalize the uploading and send the remaining fields
api_client.tasks_api.create_data(
id=42,
data_request=models.DataRequest(**data),
upload_finish=True,
)
Receiving data
Receiving binary files can also be difficult with the low-level API. To avoid unexpected
behavior, it is recommended to specify _parse_response=False in the request parameters.
In this case, SDK will not try to parse models from responses, and the response data
can be fetched directly from the response:
import json
from http import HTTPStatus
from time import sleep
from urllib.parse import parse_qsl, urlparse
from cvat_sdk.api_client import ApiClient, Configuration, models
interval = 1
with ApiClient(
configuration=Configuration(host="<cvat_host>", username="<username>", password="<password>")
) as api_client:
# Initiate the process to export a task as a dataset
(_, response) = api_client.tasks_api.create_dataset_export(
id=task_id,
format="COCO 1.0",
save_images=True,
_parse_response=False,
)
assert response.status == HTTPStatus.ACCEPTED
# Obtain the background request ID from the server response
rq_id = json.loads(response.data).get("rq_id")
assert rq_id, "The rq_id parameter was not found in the server response"
# Check the status of the background process
while True:
(background_request, response) = api_client.requests_api.retrieve(rq_id)
assert response.status == HTTPStatus.OK
process_status = background_request.status.value
if process_status in (
models.RequestStatus.allowed_values[("value",)]["FINISHED"],
models.RequestStatus.allowed_values[("value",)]["FAILED"],
):
break
sleep(interval)
if process_status != models.RequestStatus.allowed_values[("value",)]["FINISHED"]:
exception_msg = f"Export failed with status: {process_status}"
if background_request.message:
exception_msg += f". Details: {background_request.message}"
assert False, exception_msg
# Download a prepared file
result_url = background_request.result_url
assert result_url, "No 'result_url' in the server response"
parsed_result_url = urlparse(result_url)
query_params = parse_qsl(parsed_result_url.query)
_, response = api_client.call_api(
parsed_result_url.path,
method="GET",
query_params=query_params,
auth_settings=api_client.configuration.auth_settings(),
_parse_response=False,
)
# Save the resulting file
with open("output_file.zip", "wb") as output_file:
while (chunk := response.read(8192)):
output_file.write(chunk)
Different versions of API endpoints
The cloudstorages/id/content REST API endpoint
Warning
Theretrieve_content method of cloudstorages_api will be deprecated in 2.5.0 version.
We recommend using retrieve_content_v2 method that matches to revised API when using SDK.
For backward compatibility, we continue to support the prior interface version until version 2.6.0 is released.
Here you can find the example how to get the bucket content using new method retrieve_content_v2.
from pprint import pprint
from cvat_sdk.api_client import ApiClient, Configuration
next_token = None
files, prefixes = [], []
prefix = ""
with ApiClient(
configuration=Configuration(host=BASE_URL, username=user, password=password)
) as api_client:
while True:
data, response = api_client.cloudstorages_api.retrieve_content_v2(
cloud_storage_id,
**({"prefix": prefix} if prefix else {}),
**({"next_token": next_token} if next_token else {}),
)
# the data will have the following structure:
# {'content': [
# {'mime_type': <image|video|archive|pdf|DIR>, 'name': <name>, 'type': <REG|DIR>},
# ],
# 'next': <next_token_string|None>}
files.extend(
[
prefix + f["name"]
for f in data["content"]
if str(f["type"]) == "REG"
]
)
prefixes.extend(
[
prefix + f["name"]
for f in data["content"]
if str(f["type"]) == "DIR"
]
)
next_token = data["next"]
if next_token:
continue
if not len(prefixes):
break
prefix = f"{prefixes.pop()}/"
pprint(files) # ['sub/image_1.jpg', 'image_2.jpg']
Sending custom requests
Sometimes you might need sending a custom request while using the ApiClient.
Typically, it’s desirable to make this request using the same configuration
and authentication parameters as regular requests sent via the ApiClient instance.
One particularly useful example for this is dataset export. When exporting a dataset,
you receive a download URL from the server after the file is prepared
(see example in receiving data). This URL requires authentication,
but it can’t be made via the regular ApiClient endpoint methods.
There are several options to make such a custom request via an ApiClient instance:
- use
api_client.call_api() - use
api_client.request()
Alternatively, it’s also possible to make a request using a custom backend for requests, while
keeping the existing authentication of the ApiClient.
This option provides higher-level interface and allows better integration with other
ApiClient-related interfaces, such as Endpoint.
from urllib.parse import parse_qsl, urlparse
with ApiClient(...) as api_client:
parsed_url = urlparse("<custom URL>")
query_params = parse_qsl(parsed_url.query)
_, response = api_client.call_api(
parsed_url.path,
method="GET",
query_params=query_params,
_parse_response=False,
)
# process response.data ...
This option provides a low-level interface and allows more customization. It can be useful
if you need to reuse the existing connection configuration of the ApiClient
instance, such as connection pool, timeouts, etc. In order to keep the existing
authentication parameters of the ApiClient instance, you
can use the functions api_client.get_common_headers() and api_client.update_params_for_auth().
with ApiClient(...) as api_client:
headers = api_client.get_common_headers()
api_client.update_params_for_auth(headers=headers, queries=[], method="GET")
response = api_client.request(
"GET",
"<custom URL>",
headers=headers,
_parse_response=False,
)
# process response.data ...
It is possible make a custom request using your own backend - for example, using the requests
library. In order to keep the existing authentication parameters of the ApiClient instance, you
can use the functions api_client.get_common_headers() and api_client.update_params_for_auth().
import requests
with ApiClient(...) as api_client:
headers = api_client.get_common_headers()
query_params = []
api_client.update_params_for_auth(headers=headers, queries=query_params, method="GET")
response = requests.get("<custom URL>", params=query_params, headers=headers)
# process the response ...
11.2.3 - High-level API
Overview
This layer provides high-level APIs, allowing easier access to server operations. API includes Repositories and Entities. Repositories provide management operations for Entities. Entities represent objects on the server (e.g. projects, tasks, jobs etc) and simplify interaction with them. The key difference from the low-level API is that operations on this layer are not limited by a single server request per operation and encapsulate low-level request machinery behind a high-level object-oriented API.
The code of this component is located in the cvat_sdk.core package.
Example
from cvat_sdk import make_client, models
from cvat_sdk.core.proxies.tasks import ResourceType, Task
# Create a Client instance bound to a local server and authenticate using basic auth
with make_client("http://localhost", credentials=('user', 'password')) as client:
# Let's create a new task.
# Fill in task parameters first.
# Models are used the same way as in the layer 1.
task_spec = {
"name": "example task",
"labels": [
{
"name": "car",
"color": "#ff00ff",
"attributes": [
{
"name": "a",
"mutable": True,
"input_type": "number",
"default_value": "5",
"values": ["4", "5", "6"],
}
],
}
],
}
# Now we can create a task using a task repository method.
# Repositories can be accessed as the Client class members.
# In this case we use 2 local images as the task data.
task = client.tasks.create_from_data(
spec=task_spec,
resource_type=ResourceType.LOCAL,
resources=['image1.jpg', 'image2.png'],
)
# The returned task object is already up-to-date with its server counterpart.
# Now we can access task fields. The fields are read-only and can be optional.
# Let's check that we have 2 images in the task data.
assert task.size == 2
# If an object is modified on the server, the local object is not updated automatically.
# To reflect the latest changes, the local object needs to be fetch()-ed.
task.fetch()
# Let's obtain another task. Again, it can be done via the task repository.
# Suppose we have already created the task earlier and know the task id.
task2 = client.tasks.retrieve(42)
# The task object fields can be update()-d. Note that the set of fields that can be
# modified can be different from what is available for reading.
task2.update({'name': 'my task'})
# And the task can also be remove()-d from the server. The local copy will remain
# untouched.
task2.remove()
Client
The cvat_sdk.core.client.Client class provides session management, implements
authentication operations and simplifies access to server APIs.
It is the starting point for using CVAT SDK.
A Client instance allows you to:
- configure connection options with the
Configclass - check server API compatibility with the current SDK version
- manage user session with the
login(),logout()and other methods - obtain high-level server object wrappers with the
users,tasks,jobsand other members - reach lower-level APIs to send raw requests, typically via the
apimember of the object
An instance of Client can be created directly by calling the class constructor
or with the utility function cvat_sdk.core.client.make_client() which can handle
some configuration for you. A Client can be configured with
the cvat_sdk.core.client.Config class instance. A Config object can be passed to
the Client constructor and then it will be available in the Client.config field.
The Client class implements the context manager protocol.
When the context is closed, the session is finished, and the user is logged out
automatically. Otherwise, these actions can be done with the close() and logout() methods.
You can create and start using a Client instance this way:
from cvat_sdk import make_client
with make_client("https://app.cvat.ai", credentials=("user", "password")) as client:
...
The make_client() function handles configuration and object creation for you.
It also allows to authenticate right after the object is created.
If you need to configure Client parameters, you can do this:
from cvat_sdk import Config, Client
config = Config()
# set up some config fields ...
with Client("https://app.cvat.ai", config=config) as client:
client.login(("user", "password"))
...
Note
Historically, the SDK has allowed the URL scheme (http: or https:)
to be omitted, and would attempt to automatically detect the protocol.
This behavior is deprecated due to being inherently insecure,
and will be removed in a future version.
To avoid future breakage, make sure to specify the scheme explicitly.
When the server is located, its version is checked. If an unsupported version is found,
an error can be raised or suppressed (controlled by config.allow_unsupported_server).
If the error is suppressed, some SDK functions may not work as expected with this server.
By default, a warning is raised and the error is suppressed.
Authentication
High-level SDK supports 2 authentication options:
- Personal Access Token (PAT) authentication, with an access token value
- Password authentication, with a username and a password
Personal Access Token (PAT) authentication requires a token that can be configured in the user settings section in the UI. It is the recommended authentication option for most API clients. Read more.
Password authentication requires a username and password pair. For better security it’s recommended to use a Personal Access Token (PAT) instead, if possible.
from cvat_sdk import make_client
with make_client("https://app.cvat.ai", access_token="token") as client:
...
from cvat_sdk import make_client
with make_client("https://app.cvat.ai", credentials=("user", "password")) as client:
...
With the make_client() function, the Client object create will perform authentication
automatically for you. If you want more fine-grained control over the requests,
there are several methods available:
client.login()- logs the user in using the specified credentialsclient.logout()- logs the user outclient.has_credentials()- allows to check whether theclientobject is authenticated
Example:
from cvat_sdk.core.client import Client, AccessTokenCredentials
with Client("https://app.cvat.ai") as client:
client.login(AccessTokenCredentials("token"))
# ...
If the Client is used as a context manager (with the with keyword), it automatically calls
logout() before exiting.
Users and organizations
All Client operations rely on the server API and depend on the current user
rights. This affects the set of available APIs, objects and actions. For example, a regular user
can only see and modify their tasks and jobs, while an admin user can see all the tasks etc.
Operations are also affected by the current organization context,
which can be set with the organization_slug property of Client instances.
The organization context affects which entities are visible,
and where new entities are created.
Set organization_slug to an organization’s slug (short name)
to make subsequent operations work in the context of that organization:
client.organization_slug = 'myorg'
# create a task in the organization
task = client.tasks.create_from_data(...)
You can also set organization_slug to an empty string
to work in the context of the user’s personal workspace.
By default, it is set to None,
which means that both personal and organizational entities are visible,
while new entities are created in the personal workspace.
To temporarily set the organization slug, use the organization_context function:
with client.organization_context('myorg'):
task = client.tasks.create_from_data(...)
# the slug is now reset to its previous value
Entities and Repositories
Entities represent objects on the server. They provide read access to object fields and implement additional relevant operations, including both the general Read-Update-Delete and object-specific ones. The set of available general operations depends on the object type.
Repositories provide management operations for corresponding Entities. You don’t
need to create Repository objects manually. To obtain a Repository object, use the
corresponding Client instance member:
client.projects
client.tasks
client.jobs
client.users
...
An Entity can be created on the server with the corresponding Repository method create():
task = client.tasks.create(<task config>)
We can retrieve server objects using the retrieve() and list() methods of the Repository:
job = client.jobs.retrieve(<job id>)
tasks = client.tasks.list()
After calling these functions, we obtain local objects representing their server counterparts.
Object fields can be updated with the update() method. Note that the set of fields that can be
modified can be different from what is available for reading.
job.update({'stage': 'validation'})
The server object will be updated and the local object will reflect the latest object state after calling this operation.
Note that local objects may fall out of sync with their server counterparts for different reasons.
If you need to update the local object with the latest server state, use the fetch() method:
# obtain 2 local copies of the same job
job_ref1 = client.jobs.retrieve(1)
job_ref2 = client.jobs.retrieve(1)
# update the server object with the first reference
job_ref1.update(...)
# job_ref2 is outdated now
job_ref2.fetch()
# job_ref2 is synced
Finally, if you need to remove the object from the server, you can use the remove() method.
The server object will be removed, but the local copy of the object will remain untouched.
task = client.tasks.retrieve(<task id>)
task.remove()
Repositories can also provide group operations over entities. For instance, you can retrieve
all available objects using the list() Repository method. The list of available
Entity and Repository operations depends on the object type.
You can learn more about entity members and how model parameters are passed to functions here.
The implementation for these components is located in cvat_sdk.core.proxies.
11.2.4 - PyTorch adapter
Overview
This layer provides functionality that enables you to treat CVAT projects and tasks as PyTorch datasets.
The code of this layer is located in the cvat_sdk.pytorch package.
To use it, you must install the cvat_sdk distribution with the pytorch extra.
Example
import torch
import torchvision.models
from cvat_sdk import make_client
from cvat_sdk.pytorch import ProjectVisionDataset, ExtractSingleLabelIndex
# create a PyTorch model
model = torchvision.models.resnet34(
weights=torchvision.models.ResNet34_Weights.IMAGENET1K_V1)
model.eval()
# log into the CVAT server
with make_client("http://localhost", credentials=('user', 'password')) as client:
# get the dataset comprising all tasks for the Validation subset of project 12345
dataset = ProjectVisionDataset(client, project_id=12345,
include_subsets=['Validation'],
# use transforms that fit our neural network
transform=torchvision.models.ResNet34_Weights.IMAGENET1K_V1.transforms(),
target_transform=ExtractSingleLabelIndex())
# print the number of images in the dataset (in other words, the number of frames
# in the included tasks)
print(len(dataset))
# get a sample from the dataset
image, target = dataset[0]
# evaluate the network on the sample and compare the output to the target
output = model(image)
if torch.equal(output, target):
print("correct prediction")
else:
print("incorrect prediction")
Datasets
The key components of this layer are the dataset classes,
ProjectVisionDataset and TaskVisionDataset,
representing data & annotations contained in a CVAT project or task, respectively.
Both of them are subclasses of the torch.utils.data.Dataset abstract class.
The interface of Dataset is essentially that of a sequence
whose elements are samples from the dataset.
In the case of TaskVisionDataset, each sample represents a frame from the task
and its associated annotations.
The order of the samples is the same as the order of frames in the task.
Deleted frames are omitted.
In the case of ProjectVisionDataset,
each sample is a sample from one of the project’s tasks,
as if obtained from a TaskVisionDataset instance created for that task.
The full sequence of samples is built by concatenating the sequences of samples
from all included tasks in an unspecified order
that is guaranteed to be consistent between executions.
For details on what tasks are included, see Task filtering.
Construction
Both dataset classes are instantiated by passing in an instance of cvat_sdk.Client
and the ID of the project or task:
dataset = ProjectVisionDataset(client, 123)
dataset = TaskVisionDataset(client, 456)
The referenced project or task must contain image data. Video data is currently not supported.
The constructors of these classes also support several keyword-only parameters:
-
transforms,transform,target_transform: see Transform support. -
label_name_to_index: see Label index assignment. -
task_filter,include_subsets(ProjectVisionDatasetonly): see Task filtering. -
update_policy: see Caching.
During construction, the dataset objects either populate or validate the local data cache (see Caching for details). Any necessary requests to the CVAT server are performed at this time. After construction, the objects make no more network requests.
Sample format
Indexing a dataset produces a sample. A sample has the form of a tuple with the following components:
sample[0](PIL.Image.Image): the image.sample[1](cvat_sdk.pytorch.Target): the annotations and auxiliary data.
The target object contains the following attributes:
target.annotations.tags(list[cvat_sdk.models.LabeledImage]): tag annotations associated with the current frame.target.annotations.shapes(list[cvat_sdk.models.LabeledShape]): shape annotations associated with the current frame.target.label_id_to_index(Mapping[int, int]): see Label index assignment.
Note that track annotations are currently inaccessible.
Transform support
The dataset classes support torchvision-like transforms that you can supply to preprocess each sample before it’s returned. You can use this to convert the samples to a more convenient format or to preprocess the data. The transforms are supplied via the following constructor parameters:
transforms: a callable that accepts two arguments (the image and the target) and returns a tuple with two elements.transform: a callable that accepts an image.target_transform: a callable that accepts a target.
Let the sample value prior to any transformations be (image, target).
Here is what indexing the dataset will return for various combinations of
supplied transforms:
transforms:transforms(image, target).transform:(transform(image), target).target_transform:(image, target_transform(target)).transformandtarget_transform:(transform(image), target_transform(target)).
transforms cannot be supplied at the same time
as either transform or target_transform.
The cvat_sdk.pytorch module contains some target transform classes
that are intended for common use cases.
See Transforms.
Label index assignment
The annotation model classes (LabeledImage and LabeledShape)
reference labels by their IDs on the CVAT server.
This is usually not very useful for machine learning code,
since those IDs are unpredictable and will be different between different projects,
even if semantically the set of labels is the same.
Therefore, the dataset classes assign to each label a unique index that
is intended to be a project-independent identifier.
These indices are accessible via the label_id_to_index attribute
on each sample’s target.
This attribute maps IDs on the server to the assigned index.
The mapping is the same for every sample.
By default, the dataset classes arrange all label IDs in an unspecified order that remains consistent across executions, and assign them sequential indices, starting with 0.
You can override this behavior and specify your own label indices
with the label_name_to_index constructor parameter.
This parameter accepts a mapping from label name to index.
The mapping must contain a key for each label in the project/task.
When this parameter is specified, label indices are assigned
by looking up each label’s name in the provided mapping and using the result.
Task filtering
Note: this section applies only to ProjectVisionDataset.
By default, a ProjectVisionDataset includes samples
from every task belonging to the project.
You can change this using the following constructor parameters:
-
task_filter(Callable[[models.ITaskRead], bool]): if set, the callable will be called for every task, with an instance ofITaskReadcorresponding to that task passed as the argument. Only tasks for whichTrueis returned will be included. -
include_subsets(Container[str]): if set, only tasks whose subset is a member of the container will be included.
Both parameters can be set, in which case tasks must fulfill both criteria to be included.
Caching
The images and annotations of a dataset can be substantial in size,
so they are not downloaded from the server every time a dataset object is created.
Instead, they are loaded from a cache on the local file system,
which is maintained during dataset object construction
according to the policy set by the update_policy constructor parameter.
The available policies are:
-
UpdatePolicy.IF_MISSING_OR_STALE: If some data is already cached, query the server to determine if it is out of date. If so, discard it. Then, download all necessary data that is missing from the cache and cache it.This is the default policy.
-
UpdatePolicy.NEVER: If some necessary data is missing from the cache, raise an exception. Don’t make any network requests.Note that this policy permits the use of stale data.
By default, the cache is located in a platform-specific per-user directory.
You can change this location with the cache_dir setting in the Client configuration.
Transforms
The layer provides some classes whose instances are callables
suitable for usage with the target_transform dataset constructor parameter
that are intended to simplify working with CVAT datasets in common scenarios.
ExtractBoundingBoxes
Intended for object detection tasks.
Constructor parameters:
-
include_shape_types(Iterable[str]). The values must be from the following list:"ellipse""points""polygon""polyline""rectangle"
Effect: Gathers all shape annotations from the input target object
whose types are contained in the value of include_shape_types.
Then returns a dictionary with the following string keys
(where N is the number of gathered shapes):
-
"boxes"(a floating-point tensor of shapeNx4). Each row represents the bounding box the corresponding shape in the following format:[x_min, y_min, x_max, y_max]. -
"labels"(an integer tensor of shapeN). Each element is the index of the label of the corresponding shape.
Example:
ExtractBoundingBoxes(include_shape_types=['rectangle', 'ellipse'])
ExtractSingleLabelIndex
Intended for image classification tasks.
Constructor parameters: None.
Effect: If the input target object contains no tag annotations
or more than one tag annotation, raises ValueError.
Otherwise, returns the index of the label in the solitary tag annotation
as a zero-dimensional tensor.
Example:
ExtractSingleLabelIndex()
11.2.5 - Auto-annotation API
Overview
This layer provides functionality that allows you to automate the process of annotating a CVAT dataset by delegating this process (or parts of it) to a program running on a machine under your control.
To make use of this delegation, you must implement an “auto-annotation function”, or “AA function” for short. This is a Python object that implements one of the protocols defined by this layer. The particular protocol implemented defines which part of the annotation process the AA function will be able to automate.
An AA function may be used in one of the following modes:
-
Immediate mode. This involves annotating a specific CVAT task by passing the AA function to a driver, along with the identifier of the task and optional additional parameters. This may be done either:
-
programmatically (consult the “Auto-annotation driver” section (TODO)); or
-
via the CVAT CLI (consult the description of the
task auto-annotatecommand in the CLI documentation).
-
-
Agent mode. This involves registering the AA function with the CVAT server (creating a resource on the server known as a “native function”) and then running one or more agent processes.
This makes the AA function usable from the CVAT UI. CVAT users can choose to use the native function as the model when using CVAT’s AI tools. When they do, the agents detect this, and process their requests by calling appropriate methods on the corresponding AA function.
Depending on how you create the native function, it’ll be accessible to only you, or your organization.
For more details, consult the descriptions of the
function create-nativeandfunction run-agentcommands in the CLI documentation.
This SDK layer can be divided into several parts:
-
The interface, containing the protocols that an AA function must implement, as well as helpers for use by such functions. Consult Auto-annotation interface.
-
The driver, containing functionality to annotate a CVAT dataset using an AA function. Consult Auto-annotation driver.
-
Predefined AA functions based on torchvision. Consult Predefined AA functions.
While not part of the SDK, there are also additional predefined AA functions in the CVAT source repository. Consult Additional AA functions.
Example
An AA function may be implemented in any way that is appropriate for your use case. However, a typical AA function will be based on a machine learning model and consist of the following basic elements:
-
Code to load the ML model.
-
A specification defining which protocol the AA function implements, as well as static properties of the AA function (such as a description of the annotations that the AA function can produce).
-
Code to convert data from SDK data structures to a format the ML model can understand.
-
Code to run the ML model.
-
Code to convert resulting annotations to SDK data structures.
The following code snippet shows an example AA function implementation (specifically, a detection function), as well as code that creates an instance of the function and uses it for auto-annotation.
from typing import List
import PIL.Image
import torchvision.models
from cvat_sdk import make_client
import cvat_sdk.models as models
import cvat_sdk.auto_annotation as cvataa
class TorchvisionDetectionFunction:
def __init__(self, model_name: str, weights_name: str, **kwargs) -> None:
# load the ML model
weights_enum = torchvision.models.get_model_weights(model_name)
self._weights = weights_enum[weights_name]
self._transforms = self._weights.transforms()
self._model = torchvision.models.get_model(model_name, weights=self._weights, **kwargs)
self._model.eval()
@property
def spec(self) -> cvataa.DetectionFunctionSpec:
# describe the annotations
return cvataa.DetectionFunctionSpec(
labels=[
cvataa.label_spec(cat, i, type="rectangle")
for i, cat in enumerate(self._weights.meta["categories"])
if cat != "N/A"
]
)
def detect(
self, context: cvataa.DetectionFunctionContext, image: PIL.Image.Image
) -> list[models.LabeledShapeRequest]:
# determine the threshold for filtering results
conf_threshold = context.conf_threshold or 0
# convert the input into a form the model can understand
transformed_image = [self._transforms(image)]
# run the ML model
results = self._model(transformed_image)
# convert the results into the form SDK requires
return [
cvataa.rectangle(label.item(), [x.item() for x in box])
for result in results
for box, label, score in zip(result["boxes"], result["labels"], result["scores"])
if score >= conf_threshold
]
# log into the CVAT server
with make_client("http://localhost", credentials=("user", "password")) as client:
# create a function that uses Faster R-CNN
func = TorchvisionDetectionFunction("fasterrcnn_resnet50_fpn_v2", "DEFAULT", box_score_thresh=0.5)
# annotate task 12345 using the function
cvataa.annotate_task(client, 12345, func)
Auto-annotation interface
This part of the auto-annotation layer defines the protocols that an AA function must implement.
Detection function protocol
A detection function is a type of AA function that accepts an image and returns a list of shapes found in that image.
A detection function can be used in the following ways:
-
In immediate mode, the AA function is run for every image in a given CVAT task, and the resulting lists of shapes are combined and uploaded to CVAT.
-
In agent mode, the AA function can be used from the CVAT UI to either annotate a complete task (similar to immediate mode) or a single frame in a task.
A detection function must have two attributes, spec and detect.
spec must contain the AA function’s specification,
which is an instance of DetectionFunctionSpec.
DetectionFunctionSpec must be initialized with a sequence of PatchedLabelRequest objects
that represent the labels that the AA function knows about.
See the docstring of DetectionFunctionSpec for more information on the constraints
that these objects must follow.
BadFunctionError will be raised if any constraint violations are detected.
detect must be a function/method accepting two parameters:
-
context(DetectionFunctionContext). Contains invocation parameters and information about the current image. The following fields are available:frame_name(str). The file name of the frame on the CVAT server.conf_threshold(float | None). The confidence threshold that the function should use to filter objects. IfNone, the function may apply a default threshold at its discretion.
-
image(PIL.Image.Image). Contains image data.
detect must return a sequence of LabeledImageRequest and/or LabeledShapeRequest objects,
representing tags/shapes found in the image.
See the docstring of DetectionFunctionSpec for more information on the constraints
that these objects must follow.
The same AA function may be used with any dataset that contain labels with the same name as the AA function’s specification. The way it works is that the driver matches labels between the spec and the dataset, and replaces the label IDs in the tag & shape objects with those defined in the dataset.
For example, suppose the AA function’s spec defines the following labels:
| Name | ID |
|---|---|
bat |
0 |
rat |
1 |
And the dataset defines the following labels:
| Name | ID |
|---|---|
bat |
100 |
cat |
101 |
rat |
102 |
Then suppose detect returns a shape with label_id equal to 1.
The driver will see that it refers to the rat label, and replace it with 102,
since that’s the ID this label has in the dataset.
The same logic is used for sublabel and attribute IDs.
Helper factory functions
The CVAT API model types used in the detection function protocol are somewhat unwieldy to work with, so it’s recommended to use the helper factory functions provided by this layer. These helpers instantiate an object of their corresponding model type, passing their arguments to the model constructor and sometimes setting some attributes to fixed values.
The following helpers are available for building specifications:
| Name | Model type | Fixed attributes |
|---|---|---|
label_spec |
PatchedLabelRequest |
- |
skeleton_label_spec |
PatchedLabelRequest |
type="skeleton" |
keypoint_spec |
SublabelRequest |
type="points" |
attribute_spec |
AttributeRequest |
mutable=False |
checkbox_attribute_spec |
AttributeRequest |
mutable=False, input_type="checkbox", values=[] |
number_attribute_spec |
AttributeRequest |
mutable=False, input_type="number" |
radio_attribute_spec |
AttributeRequest |
mutable=False, input_type="radio" |
select_attribute_spec |
AttributeRequest |
mutable=False, input_type="select" |
text_attribute_spec |
AttributeRequest |
mutable=False, input_type="number", values=[] |
For number_attribute_spec,
it’s recommended to use the cvat_sdk.attributes.number_attribute_values function
to create the values argument, since this function will enforce the constraints expected
for attribute specs of this type.
For example:
cvataa.number_attribute_spec("size", 1, number_attribute_values(0, 10))
The following helpers are available for use in detect:
| Name | Model type | Fixed attributes |
|---|---|---|
tag |
LabeledImageRequest |
frame=0 |
shape |
LabeledShapeRequest |
frame=0 |
mask |
LabeledShapeRequest |
frame=0, type="mask" |
polygon |
LabeledShapeRequest |
frame=0, type="polygon" |
rectangle |
LabeledShapeRequest |
frame=0, type="rectangle" |
skeleton |
LabeledShapeRequest |
frame=0, type="skeleton" |
keypoint |
SubLabeledShapeRequest |
frame=0, type="points" |
For mask, it is recommended to create the points list using
the cvat_sdk.masks.encode_mask function, which will convert a bitmap into a
list in the format that CVAT expects. For example:
cvataa.mask(my_label, encode_mask(
my_mask, # boolean 2D array, same size as the input image
[x1, y1, x2, y2], # top left and bottom right coordinates of the mask
))
To create shapes with attributes,
it’s recommended to use the cvat_sdk.attributes.attribute_vals_from_dict function,
which returns a list of objects that can be passed to an attributes argument:
cvataa.rectangle(
my_label, [x1, y2, x2, y2],
attributes=attribute_vals_from_dict({my_attr1: val1, my_attr2: val2})
)
Tracking function protocol
A tracking function is a type of AA function that analyzes an image with one or more shapes on it, and then predicts the positions of those shapes on subsequent images.
A tracking function can only be used in agent mode. When used with a tracking function, an agent will use it to process requests from the AI tracking tools in the CVAT UI.
Warning
Currently, only one agent should be run for each tracking function. If multiple agents for one tracking function are run at the same time, CVAT users may experience intermittent “Tracking state not found” errors when using the function.A tracking function must have three attributes, spec, init_tracking_state, and track.
It may also optionally have a preprocess_image attribute.
spec must contain the AA function’s specification,
which is an instance of TrackingFunctionSpec.
This specification must be initialized with a single supported_shape_types parameter,
defining which types of shapes the AA function is able to track.
For example:
spec = cvataa.TrackingFunctionSpec(supported_shape_types=["rectangle"])
init_tracking_state must be a function accepting the following parameters:
-
context(TrackingFunctionShapeContext). An object with information about the shape being tracked. See details below. -
pp_image(type varies). A preprocessed image. Consult the description ofpreprocess_imagefor more details. -
shape(TrackableShape). A shape within the preprocessed image.TrackableShapeis a minimal version of theLabeledShapeSDK model, containing only thetypeandpointsfields. The shape’stypeis guaranteed to be one of the types listed in thesupported_shape_typesfield of the spec.
init_tracking_state must analyze the shape and create a state object containing
any information that the AA function will need to predict its location on a subsequent image.
It must then return this object.
init_tracking_state must not modify either pp_image or shape.
track must be a function accepting the following parameters:
-
context(TrackingFunctionShapeContext). An object with information about the shape being tracked. See details below. -
pp_image(type varies). A preprocessed image. Consult the description ofpreprocess_imagefor more details. This image will have the same dimensions as those of the image used to create thestateobject. -
state(type varies). The object returned by a previous call toinit_tracking_state.
track must locate the shape that was used to create the state object
on the new preprocessed image.
If it is able to do that, it must return its prediction as a new TrackableShape object.
This object must have the same value of type as the original shape.
If track is unable to locate the shape, it must return None.
track may modify state as needed to improve prediction accuracy on subsequent frames.
It must not modify pp_image.
A TrackingFunctionShapeContext object passed to both init_tracking_state and track
will have the following field:
original_shape_type(str). The type of the shape being tracked. Ininit_tracking_state, this is the same asshape.type. Intrack, this is the type of the shape thatstatewas created from.
preprocess_image, if implemented, must accept the following parameters:
-
context(TrackingFunctionContext). This is currently a dummy object and should be ignored. In future versions, this may contain additional information. -
image(PIL.Image.Image). An image that will be used to either start or continue tracking.
preprocess_image must perform any analysis on the image that the function can perform
independently of the shapes being tracked
and return an object representing the results of that analysis.
This object will be passed as pp_image to init_tracking_state and track.
If preprocess_image is not implemented, then the pp_image object will be the original image.
In other words, the default implementation is:
def preprocess_image(context, image):
return image
Auto-annotation driver
The annotate_task function uses a detection function to annotate a CVAT task.
It must be called as follows:
annotate_task(<client>, <task ID>, <AA function>, <optional arguments...>)
The supplied client will be used to make all API calls.
By default, new annotations will be appended to the old ones.
Use clear_existing=True to remove old annotations instead.
If a detection function declares a label that has no matching label in the task,
then by default, BadFunctionError is raised, and auto-annotation is aborted.
If you use allow_unmatched_label=True, then such labels will be ignored,
and any shapes referring to them will be dropped.
Same logic applies to sublabels and attributes.
It’s possible to pass a custom confidence threshold to the function via the
conf_threshold parameter.
annotate_task will raise a BadFunctionError exception
if it detects that the function violated the detection function protocol.
Predefined AA functions
This layer includes several predefined detection functions. You can use them as-is, or as a base on which to build your own.
These AA functions use models from the
the torchvision library.
To use them, install CVAT SDK with the pytorch extra:
$ pip install "cvat-sdk[pytorch]"
Each function is implemented as a dedicated module
to allow usage via the CLI auto-annotate command.
Usage from Python:
from cvat_sdk.auto_annotation.functions.torchvision_<task> import create as create_torchvision
annotate_task(<client>, <task ID>, create_torchvision(<model name>, ...))
Usage from the CLI:
cvat-cli auto-annotate "<task ID>" \
--function-module "cvat_sdk.auto_annotation.functions.torchvision_<task>" \
-p model_name=str:"<model name>" ...
The create function in each module accepts the following parameters:
model_name(str) - the name of the model, such asfasterrcnn_resnet50_fpn_v2. This parameter is required.weights_name(str) - the name of a weights enum value for the model, such asCOCO_V1. Defaults toDEFAULT.
It also accepts arbitrary additional parameters, which are passed directly to the model constructor.
The following section describe each available function.
cvat_sdk.auto_annotation.function.torchvision_classification
This AA function uses torchvision’s classification models. It produces tag annotations. For each frame, the function will output one tag whose label has the highest probability, as long as that probability is greater or equal to the input confidence threshold. If it is lower, the function will output nothing.
cvat_sdk.auto_annotation.functions.torchvision_detection
This AA function uses torchvision’s object detection models. It produces rectangle annotations.
cvat_sdk.auto_annotation.functions.torchvision_instance_segmentation
This AA function uses torchvision’s instance segmentation models.
It produces mask or polygon annotations (depending on the value of conv_mask_to_poly).
cvat_sdk.auto_annotation.functions.torchvision_keypoint_detection
This AA function uses torchvision’s keypoint detection models. It produces skeleton annotations. Keypoints which the model marks as invisible will be marked as occluded in CVAT.
Additional AA functions
The CVAT source repository contains additional predefined auto-annotation functions that are built on top of other computer vision libraries.
The following libraries and models are currently covered:
- Hugging Face Transformers: all models that are usable with the image classification, object detection and image segmentation pipelines.
- Segment Anything Model 2 (SAM2).
- Ultralytics: all numbered YOLO models (YOLOv3, YOLOv5, and so on).
See the ai-models directory
for usage information.
11.2.6 - Developer guide
Overview
This package contains manually written and autogenerated files. We store only sources in the repository. To get the full package, one need to generate missing package files.
Layout of the cvat-sdk directory
gen/- generator filescvat_sdk/- Python package rootcvat_sdk/api_client- autogenerated low-level package codecvat_sdk/core- high-level package code
How to generate package code
-
Install generator dependencies:
pip install -r cvat-sdk/gen/requirements.txt -
Generate package code (call from the package root directory!):
./cvat-sdk/gen/generate.sh -
Install the packages:
pip install ./cvat-sdk ./cvat-cliIf you want to edit package files, install them with
-e:pip install -e ./cvat-sdk -e ./cvat-cli
How to edit templates
If you want to edit templates, obtain them from the generator first:
docker run --rm -v $PWD:/local \
openapitools/openapi-generator-cli author template \
-o /local/generator_templates -g python
Then, you can copy the modified version of the template you need into
the gen/templates/openapi-generator/ directory.
Relevant links:
How to test
API client tests are integrated into REST API tests in /tests/python/rest_api
and SDK tests are placed next to them in /tests/python/sdk.
To execute, run:
pytest tests/python/rest_api tests/python/sdk
SDK API design decisions
The generated ApiClient code is modified from what openapi-generator does by default.
Changes are mostly focused on better user experience - including better
usage patterns and simpler/faster ways to achieve results.
Modifications
-
Added Python type annotations for return types and class members. This change required us to implement a custom post-processing script, which converts generated types into correct type annotations. The types generated by default are supposed to work with the API implementation (parameter validation and parsing), but they are not applicable as type annotations (they have incorrect syntax). Custom post-processing allowed us to make these types correct type annotations. Other possible solutions:
- There is the
python-experimentalAPI generator, which may solve some issues, but it is unstable and requires python 3.9. Our API works with 3.7, which is the lowest supported version now. - Custom templates - partially works, but only in limited cases
(model fields). It’s very hard to maintain the template code and
logic for this. Only
ifchecks andforloops are available in mustache templates, which is not enough for annotation generation.
- There is the
-
Separate APIs are embedded into the general
APIClientclass. Now we have:with ApiClient(config) as api_client: result1 = api_client.foo_api.operation1() result2 = api_client.bar_api.operation2()This showed to be more convenient than the default:
with ApiClient(config) as api_client: foo_api = FooApi(api_client) result1 = foo_api.operation1() result2 = foo_api.operation2() bar_api = BarApi(api_client) result3 = bar_api.operation3() result4 = bar_api.operation4()This also required custom post-processing. Operation Ids are supposed to be unique in the OpenAPI / Swagger specification. Therefore, we can’t generate such schema on the server, nor we can’t expect it to be supported in the API generator.
-
Operations have IDs like
<api>/<method>_<object>. This also showed to be more readable and more natural than DRF-spectacular’s default<api>/<object>_<method>. -
Server operations have different types for input and output values. While it can be expected that an endpoint with POST/PUT methods available (like
createorpartial_update) has the same type for input and output (because it looks natural), it also leads to the situation, in which there are lots of read-/write-only fields, and it becomes hard for understanding. This clear type separation is supposed to make it simpler for users. -
Added cookie management in the
ApiClientclass. -
Added interface classes for models to simplify class member usage and lookup.
-
Dicts can be passed into API methods and model constructors instead of models. They are automatically parsed as models. In the original implementation, the user is required to pass a
Configurationobject each time, which is clumsy and adds little sense.
11.3 - Command line interface (CLI)
Overview
A simple command line interface for working with CVAT. At the moment it implements a basic feature set but may serve as the starting point for a more comprehensive CVAT administration tool in the future.
The following subcommands are supported:
-
Projects:
create- create a new projectdelete- delete projectsls- list all projects
-
Tasks:
create- create a new taskcreate-from-backup- create a task from a backup filedelete- delete tasksls- list all tasksframes- download frames from a taskexport-dataset- export a task as a datasetimport-dataset- import annotations into a task from a datasetbackup- back up a taskauto-annotate- automatically annotate a task using a local function
-
Functions (Enterprise/Cloud only):
create-native- create a function that can be powered by an agentdelete- delete a functionrun-agent- process requests for a native function
Installation
To install an official release of CVAT CLI, use this command:
pip install cvat-cli
We support Python versions 3.10 and higher.
Usage
The general form of a CLI command is:
$ cvat-cli <common options> <resource> <action> <options>
where:
<common options>are options shared between all subcommands;<resource>is a CVAT resource, such astask;<action>is the action to do with the resource, such ascreate;<options>is any options specific to a particular resource and action.
You can list available subcommands and options using the --help option:
$ cvat-cli --help # get help on available common options and resources
$ cvat-cli <resource> --help # get help on actions for the given resource
$ cvat-cli <resource> <action> --help # get help on action-specific options
The CLI implements alias subcommands for some task actions, so that,
for example, cvat-cli ls works the same way as cvat-cli task ls. These
aliases are provided for backwards compatibility and are deprecated.
Use the task <action> form instead.
Authentication
CLI supports 2 authentication options:
- Personal Access Token (PAT) authentication, with an access token value
- Password authentication, with a username and a password
Personal Access Token (PAT) authentication requires a token that can be configured in the user settings section in the UI. It is the recommended authentication option for most clients. Read more.
Password authentication requires a username and password pair. For better security it’s recommended to use a Personal Access Token (PAT) instead, if possible.
A Personal Access Token can only be used via the CVAT_ACCESS_TOKEN environment variable.
This variable is prioritized over other environment variables used for authentication.
export CVAT_ACCESS_TOKEN="token value"
cvat-cli task ls
Credentials can be specified via the --auth global CLI parameter. The password can
be passed after the colon (:) separator or via the PASS environment variable.
For better security, it’s recommended to use the PASS environment variable or
Personal Access Tokens.
cvat-cli --auth "username:password" task ls
export PASS="password"
cvat-cli --auth "username" task ls
The --auth parameter can also be omitted. In this case, the CLI will try to use the current
OS user as the username. If the PASS environment variable is configured, it’s value will be used
for the password. Otherwise, the password will be requested for input.
cvat-cli task ls
Examples - tasks
Create
Description of the options you can find in Creating an annotation task section.
For create a task you need file contain labels in the json format, you can create a JSON label specification
by using the label constructor.
Example JSON labels file
[
{
"name": "cat",
"attributes": []
},
{
"name": "dog",
"attributes": []
}
]
- Create a task named “new task” on the default server
http://localhost, labels from the file “labels.json” and local images “file1.jpg” and “file2.jpg”, the task will be created as current user:cvat-cli task create "new task" --labels labels.json local file1.jpg file2.jpg - Create a task named “task 1” on the server
https://example.comlabels from the file “labels.json” and local image “image1.jpg”, the task will be created as user “user-1”:cvat-cli --server-host https://example.com --auth user-1 task create "task 1" \ --labels labels.json local image1.jpg - Create a task named “task 1” on the default server, with labels from “labels.json”
and local image “file1.jpg”, as the current user, in organization “myorg”:
cvat-cli --org myorg task create "task 1" --labels labels.json local file1.jpg - Create a task named “task 1”, labels from the project with id 1 and with a remote video file,
the task will be created as user “user-1”:
cvat-cli --auth user-1:password task create "task 1" --project_id 1 \ remote https://github.com/opencv/opencv/blob/master/samples/data/vtest.avi?raw=true - Create a task named “task 1 sort random”, with labels “cat” and “dog”, with chunk size 8,
with sorting-method random, frame step 10, copy the data on the CVAT server,
with use zip chunks and the video file will be taken from the shared resource:
cvat-cli task create "task 1 sort random" --labels '[{"name": "cat"},{"name": "dog"}]' --chunk_size 8 \ --sorting-method random --frame_step 10 --copy_data --use_zip_chunks share //share/dataset_1/video.avi - Create a task named “task from dataset_1”, labels from the file “labels.json”, with link to bug tracker,
image quality will be reduced to 75, annotation in the format “CVAT 1.1” will be taken
from the file “annotation.xml”, the data will be loaded from “dataset_1/images/”,
the task will be created as user “user-2”, and the password will need to be entered additionally:
cvat-cli --auth user-2 task create "task from dataset_1" --labels labels.json \ --bug_tracker https://bug-tracker.com/0001 --image_quality 75 --annotation_path annotation.xml \ --annotation_format "CVAT 1.1" local dataset_1/images/ - Create a task named “segmented task 1”, labels from the file “labels.json”, with overlay size 5,
segment size 100, with frames 5 through 705, using cache and with a remote video file:
cvat-cli task create "segmented task 1" --labels labels.json --overlap 5 --segment_size 100 \ --start_frame 5 --stop_frame 705 --use_cache \ remote https://github.com/opencv/opencv/blob/master/samples/data/vtest.avi?raw=true - Create a task named “task with filtered cloud storage data”, with filename_pattern
test_images/*.jpegand using the data from the cloud storage resource described in the manifest.jsonl:cvat-cli task create "task with filtered cloud storage data" --labels '[{"name": "car"}]'\ --use_cache --cloud_storage_id 1 --filename_pattern "test_images/*.jpeg" share manifest.jsonl - Create a task named “task with filtered cloud storage data” using all data from the cloud storage resource
described in the manifest.jsonl by specifying filename_pattern
*:cvat-cli task create "task with filtered cloud storage data" --labels '[{"name": "car"}]'\ --use_cache --cloud_storage_id 1 --filename_pattern "*" share manifest.jsonl
Delete
- Delete tasks with IDs “100”, “101”, “102” , the command will be executed from “user-1” having delete permissions:
cvat-cli --auth user-1:password task delete 100 101 102
List
- List all tasks:
cvat-cli task ls - List all tasks in organization “myorg”:
cvat-cli --org myorg task ls - Save list of all tasks into file “list_of_tasks.json”:
cvat-cli task ls --json > list_of_tasks.json
Frames
- Save frame 12, 15, 22 from task with id 119, into “images” folder with compressed quality:
cvat-cli task frames --outdir images --quality compressed 119 12 15 22
Export as a dataset
- Export annotation task with id 103, in the format
CVAT for images 1.1and save to the file “output.zip”:cvat-cli task export-dataset --format "CVAT for images 1.1" 103 output.zip - Export annotation task with id 104, in the format
COCO 1.0and save to the file “output.zip”:cvat-cli task export-dataset --format "COCO 1.0" 104 output.zip
Import annotations from a dataset
- Import annotation into task with id 105, in the format
CVAT 1.1from the file “annotation.xml”:cvat-cli task import-dataset --format "CVAT 1.1" 105 annotation.xml
Back up a task
- Back up task with id 136 to file “task_136.zip”:
cvat-cli task backup 136 task_136.zip
Create from backup
- Create a task from backup file “task_backup.zip”:
cvat-cli task create-from-backup task_backup.zip
Auto-annotate
This command provides a command-line interface to the auto-annotation API.
It can auto-annotate using AA functions implemented in one of the following ways:
-
As a Python module directly implementing the AA function protocol. Such a module must define the required attributes at the module level.
For example:
import cvat_sdk.auto_annotation as cvataa spec = cvataa.DetectionFunctionSpec(...) def detect(context, image): ... -
As a Python module implementing a factory function named
create. This function must return an object implementing the AA function protocol. Any parameters specified on the command line using the-poption will be passed tocreate.For example:
import cvat_sdk.auto_annotation as cvataa class _MyFunction: def __init__(...): ... spec = cvataa.DetectionFunctionSpec(...) def detect(context, image): ... def create(...) -> cvataa.DetectionFunction: return _MyFunction(...)
-
Annotate the task with id 137 with the predefined torchvision detection function, which is parameterized:
cvat-cli task auto-annotate 137 --function-module cvat_sdk.auto_annotation.functions.torchvision_detection \ -p model_name=str:fasterrcnn_resnet50_fpn_v2 -p box_score_thresh=float:0.5 -
Annotate the task with id 138 with an AA function defined in
my_func.py:cvat-cli task auto-annotate 138 --function-file path/to/my_func.py
Note that this command does not modify the Python module search path. If your function module needs to import other local modules, you must add your module directory to the search path if it isn’t there already.
- Annotate the task with id 139 with a function defined in the
my_funcmodule located in themy-projectdirectory, letting it import other modules from that directory.PYTHONPATH=path/to/my-project cvat-cli task auto-annotate 139 --function-module my_func
Examples - projects
Create
While creating a project, you may optionally define its labels.
The project create command accepts labels in the same format as the task create command;
see that command’s examples for more information.
- Create a project named “new project” on the default server
http://localhost, with labels from the file “labels.json”:cvat-cli project create "new project" --labels labels.json - Create a project from a dataset in the COCO format:
cvat-cli project create "new project" --dataset_file coco.zip --dataset_format "COCO 1.0"
Delete
- Delete projects with IDs “100”, “101”, “102”:
cvat-cli project delete 100 101 102
List
- List all projects:
cvat-cli project ls - Save list of all projects into file “list_of_projects.json”:
cvat-cli project ls --json > list_of_projects.json
Examples - functions
Note: The functionality described in this section can only be used with the CVAT Enterprise or CVAT Cloud.
Create
-
Create a function that uses a detection model from torchvision and run an agent for it:
cvat-cli function create-native "Faster R-CNN" \ --function-module cvat_sdk.auto_annotation.functions.torchvision_detection \ -p model_name=str:fasterrcnn_resnet50_fpn_v2 cvat-cli function run-agent <ID printed by previous command> \ --function-module cvat_sdk.auto_annotation.functions.torchvision_detection \ -p model_name=str:fasterrcnn_resnet50_fpn_v2 -
Create and run an SAM2 tracking function:
cvat-cli function create-native "SAM2" \ --function-file=<CVAT_DIR>/ai-models/tracker/sam2/func.py \ -p model_id=str:facebook/sam2.1-hiera-tiny cvat-cli function run-agent <ID printed by previous command> \ --function-file=<CVAT_DIR>/ai-models/tracker/sam2/func.py \ -p model_id=str:facebook/sam2.1-hiera-tiny
These commands accept functions that implement the
auto-annotation function interface
from the SDK, same as the task auto-annotate command.
See that command’s examples for information on how to implement these functions
and specify them in the command line.
For detailed SAM2 setup instructions, see the SAM2 Tracker documentation.
Delete
- Delete functions with IDs 100 and 101:
cvat-cli function delete 100 101
11.4 - Access Tokens
Use access tokens for enhanced security when integrating with CVAT API
Overview
When interacting with the API, there are several authentication options available in CVAT:
- Basic authentication, with a username and a password
- Legacy token authentication, with an API key (deprecated)
- Session authentication, with a session ID and a CSRF token
- Personal Access Token (PAT) authentication, with an access token value
Personal Access Token (PAT) is an authentication option dedicated to CLI, SDK and Server API clients. To authenticate using this method, you need an access token that can be created and configured in the user settings section in the UI. It is the recommended authentication option for CVAT API interaction and integrations.
Compared to the other authentication options, PATs provide a more convenient, controlled, and secure way to authenticate requests from the CLI, scripts, and 3rd-party applications. They improve the security of your account by allowing you to use separate credentials for each application and by removing the need to use the password. Tokens can be created and revoked at any time by a user request. The security is further improved by configuring the allowed operations and setting expiration dates for each token.
Warning
Please take special care to store the tokens securely. While CVAT takes extra steps to improve the security of the tokens, their security is primarily the user’s responsibility. It’s recommended to configure each token to only allow the required operations and to have an expiration date. Avoid sharing your tokens with other people. If you think a token might have been leaked, revoke the token immediately.How to manage Personal Access Tokens
It’s possible to create, edit, and revoke tokens. The tokens can be created, edited, and revoked at any time by a user request. You can configure the name, expiration date, and permissions for each token.
It’s recommended to always specify the expiration date for tokens. Please note that unused tokens are automatically considered “stale” and removed after some time period of inactivity (1 year by default).
Note
When using a self-hosted version, the staleness period can be configured via theACCESS_TOKEN_STALE_PERIOD setting.
Note
When using a self-hosted version, the maximum number of tokens per user can be configured via theMAX_ACCESS_TOKENS_PER_USER setting.
Note
CVAT Online users can have up to 50 Personal Access Tokens.Permissions
It’s possible to configure allowed operations for a token. Currently, there is an option to make a token read-only or read/write capable. A read-only token will only be allowed to make safe requests that do not modify the server state.
Warning
For security reasons, token-authenticated clients are not allowed to modify tokens and user details, regardless of the configuration.How to create a Personal Access Token
- Open the user settings page
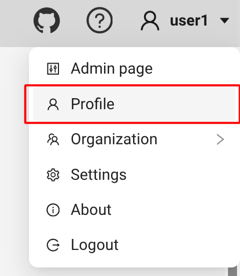
- Navigate to the “Security” section
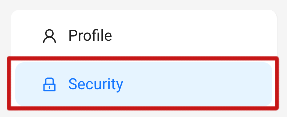
- Create a new token using the “+” button
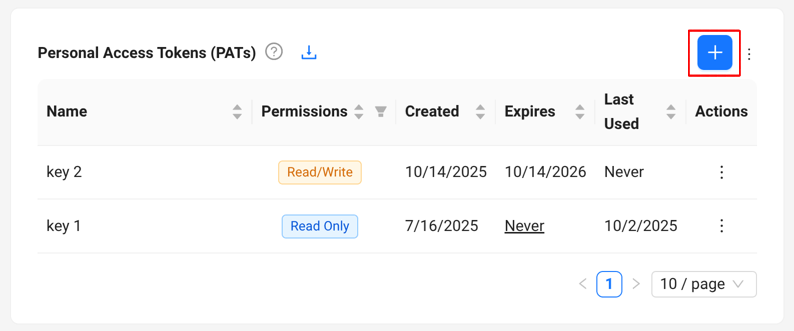
- Configure the name, expiration date, and permissions for the new token. Once ready, click “Save”.
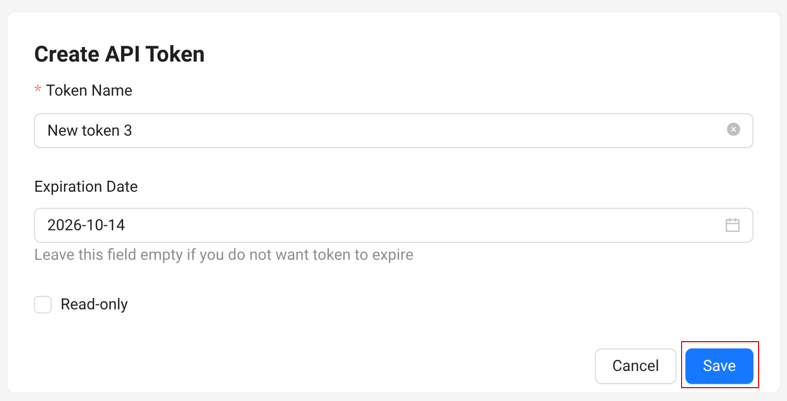
- You will be shown the new token. Make sure to securely save this value, it will not be available in CVAT after the dialog window is closed.
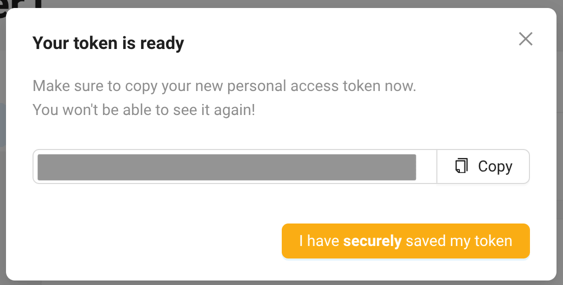
- Once the value is saved, close the dialog window.
The new token is ready for use.
How to edit a Personal Access Token
- Open the user settings page
- Navigate to the “Security” section
- Click the “Edit” button for the token.
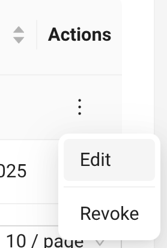
- The token editing page will be displayed. Here you can configure token name, permissions, and expiration date.
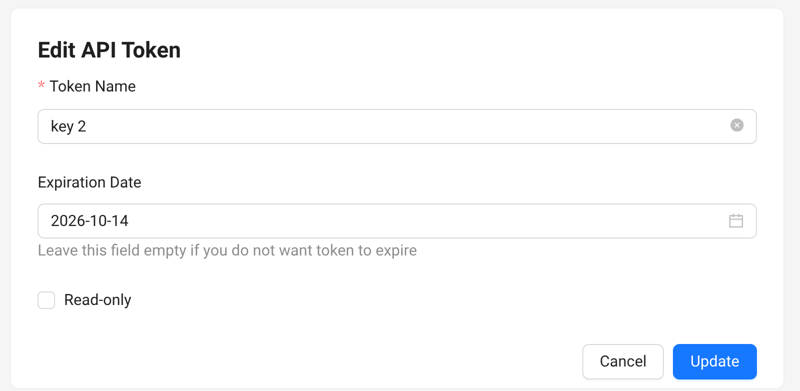
- After the required changes are made, click the “Update” button to confirm the updates.
How to revoke Personal Access Tokens
Revocation allows you to prevent further uses of a token. Once a token is revoked, it cannot be restored.
- Open the user settings page
- Navigate to the “Security” section
- Click the “Revoke” button for the token.
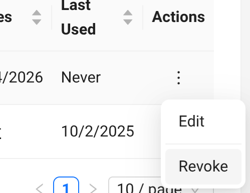
- Confirm revocation in the dialog

The token will not be available for use anymore.
How to use Personal Access Tokens
Once you have a Personal Access Token, it can be used for authentication in CVAT.
To authenticate a server HTTP API request with a token, the Authorization header
must be specified. The value has to include the Bearer prefix:
Authorization: Bearer token_value.
Example: sending a request via the requests Python library
import requests
token = "..."
response = requests.get(
"https://app.cvat.ai/api/tasks",
headers={"Authorization": "Bearer " + token}
)
print(response.json()["results"])
Personal Access Tokens can also be used for authentication in other CVAT components:
- in the low-level and high-level API of the CVAT SDK
- in the CVAT CLI
12 - Frequently asked questions
Answers to frequently asked questions
How to migrate data from CVAT.org to CVAT Online
Please follow the export tasks and projects guide to download an archive with data which corresponds to your task or project. The backup for a project will have all tasks which are inside the project. Thus you don’t need to export them separately.
Please follow the import tasks and projects guide to upload your backup with a task or project to a CVAT instance.
See a quick demo below. It is really a simple process. If your data is huge, it may take some time. Please be patient.
How to upgrade CVAT
Before upgrading, please follow the backup guide and backup all CVAT volumes.
Follow the upgrade guide.
How to change default CVAT hostname or port
To change the hostname, simply set the CVAT_HOST environment variable
export CVAT_HOST=<YOUR_HOSTNAME_OR_IP>
NOTE, if you’re using docker compose with sudo to run CVAT, then please add the -E (or --preserve-env)
flag to preserve the user environment variable which set above to take effect in your docker containers:
sudo -E docker compose up -d
If you want to change the default web application port, change the ports part of traefik service configuration
in docker-compose.yml
services:
traefik:
...
...
ports:
- <YOUR_WEB_PORTAL_PORT>:8080
- 8090:8090
Note that changing the port does not make sense if you are using HTTPS - port 443 is conventionally used for HTTPS connections, and is needed for Let’s Encrypt TLS challenge.
How to configure connected share folder on Windows
Follow the Docker manual and configure the directory that you want to use as a shared directory:
After that, it should be possible to use this directory as a CVAT share:
services:
cvat_server:
volumes:
- cvat_share:/home/django/share:ro
cvat_worker_import:
volumes:
- cvat_share:/home/django/share:ro
cvat_worker_export:
volumes:
- cvat_share:/home/django/share:ro
cvat_worker_annotation:
volumes:
- cvat_share:/home/django/share:ro
cvat_worker_chunks:
volumes:
- cvat_share:/home/django/share:ro
volumes:
cvat_share:
driver_opts:
type: none
device: /d/my_cvat_share
o: bind
Where are uploaded images/videos stored
The uploaded data is stored in the cvat_data docker volume:
volumes:
- cvat_data:/home/django/data
Where are annotations stored
Annotations are stored in the PostgreSQL database. The database files are stored in the cvat_db docker volume:
volumes:
- cvat_db:/var/lib/postgresql/data
How to install CVAT on Windows 10 Home
Follow this guide.
I do not have the Analytics tab on the header section. How can I add analytics
You should build CVAT images with ‘Analytics’ component.
How to upload annotations to an entire task from UI when there are multiple jobs in the task
You can upload annotation for a multi-job task from the Dashboard view or the Task view. Uploading of annotation from the Annotation view only affects the current job.
How to specify multiple hostnames
To do this, you will need to edit traefik.http.<router>.cvat.rule docker label for both the
cvat and cvat_ui services, like so
(see the documentation on Traefik rules for more details):
cvat_server:
labels:
traefik.http.routers.cvat.rule:
(Host(`example1.com`) || Host(`example2.com`)) &&
(PathPrefix(`/api/`) || PathPrefix(`/static/`) || PathPrefix(`/admin`)
|| PathPrefix(`/django-rq`))
cvat_ui:
labels:
traefik.http.routers.cvat-ui.rule: Host(`example1.com`) || Host(`example2.com`)
How to create a task with multiple jobs
Set the segment size when you create a new task, this option is available in the Advanced configuration section.
How to transfer CVAT to another machine
Follow the backup/restore guide.
How to load your own DL model into CVAT
See the information here in the Serverless tutorial.
My server uses a custom SSL certificate and I don’t want to check it.
You can call control SSL certificate check with the --insecure CLI argument.
For SDK, you can specify ssl_verify = True/False in the cvat_sdk.core.client.Config object.
13 - Contributing to CVAT Community
This section contains documents for CVAT developers.
Please take a moment to review this document in order to make the contribution process easy and effective for everyone involved.
Following these guidelines helps to communicate that you respect the time of the developers managing and developing this open source project. In return, they should reciprocate that respect in addressing your issue or assessing patches and features.
13.1 - Development environment
Installing a development environment for different operating systems.
Setup the dependencies:
-
Install necessary dependencies:
Ubuntu 22.04/20.04
sudo apt-get update && sudo apt-get --no-install-recommends install -y build-essential curl git python3-dev python3-pip python3-venv python3-tk libldap2-dev libsasl2-dev libgeos-dev cargo# Install Node.js 20 curl -fsSL https://deb.nodesource.com/setup_20.x | sudo bash - sudo apt-get install -y nodejs sudo npm -g install corepack # ensure corepack is installedMacOS 10.15
brew install git python pyenv redis curl openssl node sqlite3 geos rustArch Linux
# Update the system and AUR (you can use any other AUR helper of choice) first: sudo pacman -Syyu pikaur -Syu# Install the required dependencies: sudo pacman -S base-devel curl git redis cmake gcc python python-pip tk libldap libsasl pkgconf ffmpeg geos openldap rust# CVAT supports only Python 3.10, so install it if you don’t have it: pikaur -S python310# Install Node.js and npm sudo pacman -S nodejs-lts-gallium npm sudo npm -g install corepack # ensure corepack is installed
Migration to Yarn Modern
We have updated our Yarn version from Classic (1.x) to Modern. If you are still using CVAT with Yarn Classic you need to first migrate:
# If yarn --version shows 1.x
# remove old yarn
sudo npm uninstall -g yarn
# Ensure corepack is installed
sudo npm install -g corepack
# Enable new yarn
yarn --version # should show 4.x
-
Install Chrome
-
Install VS Code.
-
Install the following VScode extensions:
-
Make sure to use Python 3.10.0 or higher
python3 --version -
Install CVAT on your local host:
git clone https://github.com/cvat-ai/cvat cd cvat && mkdir logs keys python3 -m venv .env . .env/bin/activate pip install -U pip wheel setuptools pip install --no-binary lxml,xmlsec -r cvat/requirements/development.txt -r dev/requirements.txtNote that the
.txtfiles in thecvat/requirementsdirectory have pinned dependencies intended for the main target OS/Python version (the one used in the main Dockerfile). If you’re unable to install those dependency versions, you can substitute the corresponding.infiles instead. That way, you’re more likely to be able to install the dependencies, but their versions might not correspond to those used in production.Note for Mac users
If you have any problems with installing dependencies from
cvat/requirements/*.txt, you may need to reinstall your system python In some cases after system update it can be configured incorrectly and cannot compile some native modulesMake sure Homebrew lib path is in
DYLD_LIBRARY_PATH. For Apple Silicon:export DYLD_LIBRARY_PATH=/opt/homebrew/lib:$DYLD_LIBRARY_PATHHomebrew will install FFMpeg 5.0 by default, which does not work, so you should install 4.X. You can install older 4.X FFMpeg using Homebrew like that:
cd "$(brew --repo homebrew/core)" git checkout addd616edc9134f057e33694c420f4900be59db8 brew unlink ffmpeg HOMEBREW_NO_AUTO_UPDATE=1 brew install ffmpeg git checkout masterif you are still facing error
Running setup.py install for av ... error, you may try more radical variantcd "$(brew --repo homebrew/core)" git checkout addd616edc9134f057e33694c420f4900be59db8 brew uninstall ffmpeg --force HOMEBREW_NO_AUTO_UPDATE=1 brew install ffmpeg git checkout masterIf you faced with error
Failed building wheel for h5py, you may need installhdf5brew install hdf5 export HDF5_DIR="$(brew --prefix hdf5)" pip install --no-binary=h5py h5pyIf you faced with error
OSError: Could not find library geos_c or load any of its variants ['libgeos_c.so.1', 'libgeos_c.so']. You may fix this usingsudo ln -s /opt/homebrew/lib/libgeos_c.dylib /usr/local/libNote for Arch Linux users
Because PyAV as of version 10.0.0 already works with FFMPEG5, you may consider changing the
avversion requirement in/cvat/cvat/requirements/base.txtto 10.0.0 or higher.Perform this action before installing cvat requirements from the list mentioned above.
-
Install Docker Engine and Docker Compose
-
Start service dependencies:
docker compose -f docker-compose.yml -f docker-compose.dev.yml up -d --build \ cvat_opa cvat_db cvat_redis_inmem cvat_redis_ondisk cvat_serverNote: this runs an extra copy of the CVAT server in order to supply rules to OPA. If you update the OPA rules, rerun this command to recreate the server image and container.
Note: to stop these services, use
docker compose -f docker-compose.yml -f docker-compose.dev.yml down. You can add-vto remove the data, as well. -
Apply migrations and create a super user for CVAT:
python manage.py migrate python manage.py migrateredis python manage.py collectstatic python manage.py syncperiodicjobs python manage.py createsuperuser -
Install npm packages for UI (run the following command from CVAT root directory):
corepack enable yarn yarn --immutableNote for Mac users
If you faced with errorNode Sass does not yet support your current environment: OS X 64-bit with Unsupported runtime (57), read this article Node Sass does not yet support your current environment
Run CVAT
-
Start npm UI debug server (run the following command from CVAT root directory):
- If you want to run CVAT in localhost:
yarn run start:cvat-ui - If you want to access CVAT from outside of your host:
CVAT_UI_HOST='<YOUR_HOST_IP>' CVAT_UI_PORT='<YOUR_PORT>' yarn run start:cvat-ui
- If you want to run CVAT in localhost:
-
Open a new terminal window.
-
Run VScode from the virtual environment (run the following command from CVAT root directory):
source .env/bin/activate && code -
Inside VScode, Open CVAT root dir
-
Select
server: debugconfiguration and run it (F5) to run REST server and its workers -
Make sure that
Uncaught Exceptionsoption under breakpoints section is unchecked -
If you choose to run CVAT in localhost: Select
server: chromeconfiguration and run it (F5) to open CVAT in Chrome -
Alternative: If you changed CVAT_UI_HOST just enter
<YOUR_HOST_IP>:3000in your browser.
Note for Mac users
You may have a permission denied problem starting the server because AirPlay Receiver running on port 5000/7000.
Turn off AirPlay Receiver: Go to System Settings → General → AirDrop & Handoff → Untick Airplay Receiver.
You have done! Now it is possible to insert breakpoints and debug server and client of the tool. Instructions for running tests locally are available here.
Note for Windows users
You develop CVAT under WSL (Windows subsystem for Linux) following next steps.
-
Install WSL using this guide.
-
Following this guide install Ubuntu 18.04 Linux distribution for WSL.
-
Run Ubuntu using start menu link or execute next command
wsl -d Ubuntu-18.04 -
Install the VS Code extension for WSL, which helps you to open VS Code correctly inside WSL. You can find the extension here.
-
Run all commands from this installation guide in WSL Ubuntu shell.
-
You might have to manually start the redis server in wsl before you can start the configuration inside Visual Studio Code. You can do this with
sudo service redis-server start. Alternatively you can also use a redis docker image instead of using the redis-server locally.
Note for Mac users
- You might have to manually start the redis server. You can do this with
redis-server. Alternatively you can also use a redis docker image instead of using the redis-server locally.
Note for Arch Linux users
- You need to start
redisanddockerservices manually in order to begin debugging/running tests:sudo systemctl start redis.service sudo systemctl start docker.service
CVAT Analytics Ports
In case you cannot access analytics, check if the following ports are open:
cvat_vector:
ports:
- '8282:80'
cvat_clickhouse:
ports:
- '8123:8123'
In addition, you can completely disable analytics if you don’t need it by deleting the following data from launch.json:
"DJANGO_LOG_SERVER_HOST": "localhost",
"DJANGO_LOG_SERVER_PORT": "8282"
Analytics on GitHub: Analytics Components
13.2 - Setup additional components in development environment
Deploying a DL model as a serverless function and Cypress tests.
DL models as serverless functions
Follow this guide to install Nuclio:
- You have to install
nuctlcommand line tool to build and deploy serverless functions. - The simplest way to explore Nuclio is to run its graphical user interface (GUI) of the Nuclio dashboard. All you need in order to run the dashboard is Docker. See nuclio documentation for more details.
- Deploy a couple of functions.
This will automatically create a
cvatNuclio project to contain the functions.
./serverless/deploy_cpu.sh serverless/pytorch/facebookresearch/sam/nuclio
./serverless/deploy_cpu.sh serverless/onnx/WongKinYiu/yolov7/nuclio
- Display a list of running serverless functions using
nuctlcommand or see them in nuclio dashboard:
nuctl get function
NAMESPACE | NAME | PROJECT | STATE | NODE PORT | REPLICAS
nuclio | pth-facebookresearch-sam-vit-h | cvat | ready | 55274 | 1/1
nuclio | onnx-wongkinyiu-yolov7 | cvat | ready | 57308 | 1/1
- Test your deployed DL model as a serverless function. The command below should work on Linux and Mac OS.
image=$(curl https://upload.wikimedia.org/wikipedia/en/7/7d/Lenna_%28test_image%29.png --output - | base64 | tr -d '\n')
cat << EOF > /tmp/input.json
{"image": "$image"}
EOF
cat /tmp/input.json | nuctl invoke openvino-omz-public-yolo-v3-tf -c 'application/json'
23.05.11 22:14:17.275 nuctl.platform.invoker (I) Executing function {"method": "POST", "url": "http://0.0.0.0:32771", "bodyLength": 631790, "headers": {"Content-Type":["application/json"],"X-Nuclio-Log-Level":["info"],"X-Nuclio-Target":["openvino-omz-public-yolo-v3-tf"]}}
23.05.11 22:14:17.788 nuctl.platform.invoker (I) Got response {"status": "200 OK"}
23.05.11 22:14:17.789 nuctl (I) >>> Start of function logs
23.05.11 22:14:17.789 ino-omz-public-yolo-v3-tf (I) Run yolo-v3-tf model {"worker_id": "0", "time": 1683828857301.8765}
23.05.11 22:14:17.789 nuctl (I) <<< End of function logs
> Response headers:
Server = nuclio
Date = Thu, 11 May 2023 18:14:17 GMT
Content-Type = application/json
Content-Length = 100
> Response body:
[
{
"confidence": "0.9992254",
"label": "person",
"points": [
39,
124,
408,
512
],
"type": "rectangle"
}
]
Run Cypress tests
- Install Cypress as described in the documentation.
- Run cypress tests:
cd <cvat_local_repository>/tests
<cypress_installation_directory>/node_modules/.bin/cypress run --headless --browser chrome
For more information, see the documentation.
13.3 - Coding style
Information about coding style that is used in CVAT development.
We use the Airbnb JavaScript Style Guide for JavaScript/TypeScript code with a little exception - we prefer 4 spaces for indentation of nested blocks and statements.
For Python, we use Black and
isort to enforce the coding style and autoformat files.
You can use dev/format_python_code.sh to apply these formatters.
13.4 - Branching model
Information about the branching model that is used in the project.
The project uses a successful Git branching model. Thus it has a couple of branches. Some of them are described below:
-
origin/masterto be the main branch where the source code of HEAD always reflects a production-ready state -
origin/developto be the main branch where the source code of HEAD always reflects a state with the latest delivered development changes for the next release. Some would call this the “integration branch”.
13.5 - Using the issue tracker
Information and rules for using the issue tracker.
The issue tracker is the preferred channel for bug reports, features requests and submitting pull requests, but please respect the following restrictions:
-
Please do not use the issue tracker for personal support requests (use Stack Overflow).
-
Please do not derail or troll issues. Keep the discussion on topic and respect the opinions of others.
13.6 - Bug reports
Guidelines and an example of how to report a bug.
A bug is a demonstrable problem that is caused by the code in the repository. Good bug reports are extremely helpful - thank you!
Guidelines for bug reports:
-
Use the GitHub issue search — check if the issue has already been reported.
-
Check if the issue has been fixed — try to reproduce it using the latest
developbranch in the repository. -
Isolate the problem — ideally create a reduced test case.
A good bug report shouldn’t leave others needing to chase you up for more information. Please try to be as detailed as possible in your report. What is your environment? What steps will reproduce the issue? What browser(s) and OS experience the problem? What would you expect to be the outcome? All these details will help people to fix any potential bugs.
Example:
Short and descriptive example bug report title
A summary of the issue and the browser/OS environment in which it occurs. If suitable, include the steps required to reproduce the bug.
- This is the first step
- This is the second step
- Further steps, etc.
Any other information you want to share that is relevant to the issue being reported. This might include the lines of code that you have identified as causing the bug, and potential solutions (and your opinions on their merits).
13.7 - Feature requests
Information on requesting new features.
Feature requests are welcome. But take a moment to find out whether your idea fits with the scope and aims of the project. It’s up to you to make a strong case to convince the project’s developers of the merits of this feature. Please provide as much detail and context as possible.
13.8 - Pull requests
Instructions on how to create a pull request.
Good pull requests - patches, improvements, new features - are a fantastic help. They should remain focused in scope and avoid containing unrelated commits.
Please ask first before embarking on any significant pull request (e.g. implementing features, refactoring code, porting to a different language), otherwise you risk spending a lot of time working on something that the project’s developers might not want to merge into the project.
Please adhere to the coding conventions used throughout a project (indentation, accurate comments, etc.) and any other requirements (such as test coverage).
Follow this process if you’d like your work considered for inclusion in the project:
-
Fork the project, clone your fork, and configure the remotes:
# Clone your fork of the repo into the current directory git clone https://github.com/<your-username>/<repo-name> # Navigate to the newly cloned directory cd <repo-name> # Assign the original repo to a remote called "upstream" git remote add upstream https://github.com/<upstream-owner>/<repo-name> -
If you cloned a while ago, get the latest changes from upstream:
git checkout <dev-branch> git pull upstream <dev-branch> -
Create a new topic branch (off the main project development branch) to contain your feature, change, or fix:
git checkout -b <topic-branch-name> -
Commit your changes in logical chunks. Please adhere to these git commit message guidelines or your code is unlikely be merged into the main project. Use Git’s interactive rebase feature to tidy up your commits before making them public.
-
Locally merge (or rebase) the upstream development branch into your topic branch:
git pull [--rebase] upstream <dev-branch> -
Push your topic branch up to your fork:
git push origin <topic-branch-name> -
Open a Pull Request with a clear title and description.
IMPORTANT: By submitting a patch, you agree to allow the project owner to license your work under the same license as that used by the project.
13.9 - How to add a new annotation format support
Instructions on adding support for new annotation formats. This section on GitHub.
- Add a python script to
dataset_manager/formats - Add an import statement to registry.py.
- Implement some importers and exporters as the format requires.
Each format is supported by an importer and exporter.
It can be a function or a class decorated with
importer or exporter from registry.py.
Examples:
@importer(name="MyFormat", version="1.0", ext="ZIP")
def my_importer(file_object, task_data, **options):
...
@importer(name="MyFormat", version="2.0", ext="XML")
class my_importer(file_object, task_data, **options):
def __call__(self, file_object, task_data, **options):
...
@exporter(name="MyFormat", version="1.0", ext="ZIP"):
def my_exporter(file_object, task_data, **options):
...
Each decorator defines format parameters such as:
-
name
-
version
-
file extension. For the
importerit can be a comma-separated list. These parameters are combined to produce a visible name. It can be set explicitly by thedisplay_nameargument.
Importer arguments:
- file_object - a file with annotations or dataset
- task_data - an instance of
TaskDataclass.
Exporter arguments:
-
file_object - a file for annotations or dataset
-
task_data - an instance of
TaskDataclass. -
options - format-specific options.
save_imagesis the option to distinguish if dataset or just annotations are requested.
TaskData provides
many task properties and interfaces to add and read task annotations.
Public members:
-
TaskData. Attribute - class,
namedtuple('Attribute', 'name, value') -
TaskData. LabeledShape - class,
namedtuple('LabeledShape', 'type, frame, label, points, occluded, attributes, group, z_order') -
TrackedShape -
namedtuple('TrackedShape', 'type, points, occluded, frame, attributes, outside, keyframe, z_order') -
Track - class,
namedtuple('Track', 'label, group, shapes') -
Tag - class,
namedtuple('Tag', 'frame, label, attributes, group') -
Frame - class,
namedtuple('Frame', 'frame, name, width, height, labeled_shapes, tags') -
TaskData. shapes - property, an iterator over
LabeledShapeobjects -
TaskData. tracks - property, an iterator over
Trackobjects -
TaskData. tags - property, an iterator over
Tagobjects -
TaskData. meta - property, a dictionary with task information
-
TaskData. group_by_frame() - method, returns an iterator over
Frameobjects, which groups annotation objects by frame. Note thatTrackedShapes will be represented asLabeledShapes. -
TaskData. add_tag(tag) - method, tag should be an instance of the
Tagclass -
TaskData. add_shape(shape) - method, shape should be an instance of the
Shapeclass -
TaskData. add_track(track) - method, track should be an instance of the
Trackclass
Sample exporter code:
...
# dump meta info if necessary
...
# iterate over all frames
for frame_annotation in task_data.group_by_frame():
# get frame info
image_name = frame_annotation.name
image_width = frame_annotation.width
image_height = frame_annotation.height
# iterate over all shapes on the frame
for shape in frame_annotation.labeled_shapes:
label = shape.label
xtl = shape.points[0]
ytl = shape.points[1]
xbr = shape.points[2]
ybr = shape.points[3]
# iterate over shape attributes
for attr in shape.attributes:
attr_name = attr.name
attr_value = attr.value
...
# dump annotation code
file_object.write(...)
...
Sample importer code:
...
#read file_object
...
for parsed_shape in parsed_shapes:
shape = task_data.LabeledShape(
type="rectangle",
points=[0, 0, 100, 100],
occluded=False,
attributes=[],
label="car",
outside=False,
frame=99,
)
task_data.add_shape(shape)
Format specifications
13.10 - Server Profiling
Tutorial about how to profile the server
Below you can find just quick overview of the Django Silk profiler. Please read Silk documentation for more information about its features.
Silk is a live profiling and inspection tool for the Django framework. Silk intercepts and stores HTTP requests and database queries before presenting them in a user interface for further inspection:
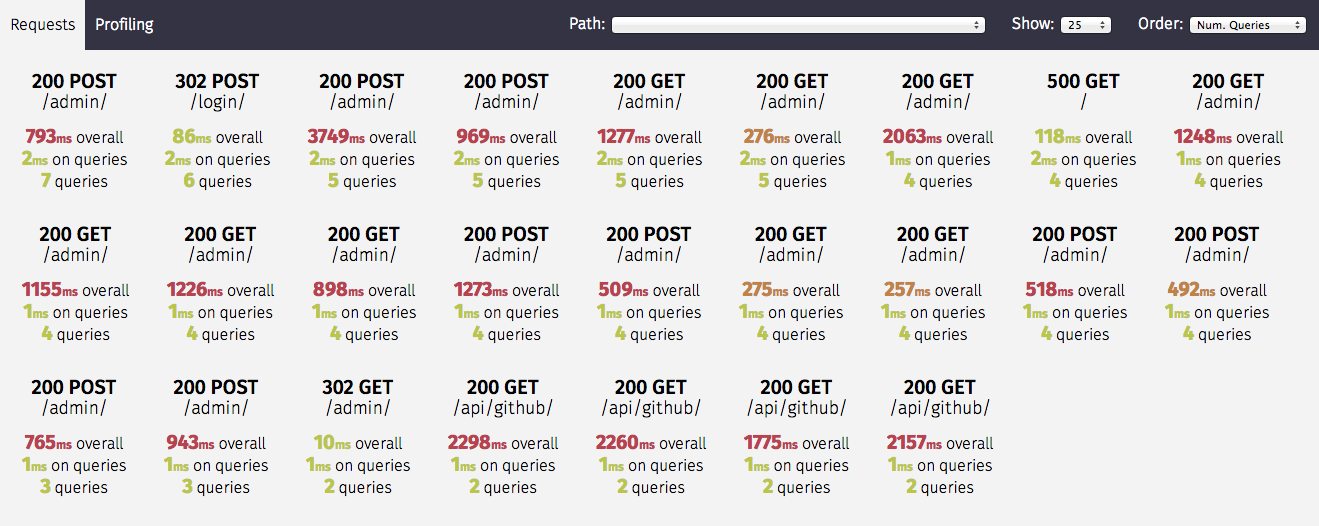
Primary features:
- Request Inspection
- SQL Inspection
- Profiling of python code
Silk is available in the development configuration of CVAT server for authenticated users: http://localhost:3000/profiler/.
13.11 - Running tests
Instructions on how to run all existence tests.
E2E tests
Initial steps:
- Run CVAT instance:
docker compose \ -f docker-compose.yml \ -f docker-compose.dev.yml \ -f components/serverless/docker-compose.serverless.yml \ -f tests/docker-compose.minio.yml \ -f tests/docker-compose.file_share.yml up -d - Add test user in CVAT:
docker exec -i cvat_server \ /bin/bash -c \ "echo \"from django.contrib.auth.models import User; User.objects.create_superuser('admin', 'admin@localhost.company', '12qwaszx')\" | python3 ~/manage.py shell" - Install npm dependencies:
cd tests yarn --immutable
If you want to get a code coverage report, instrument the code:
yarn --immutable
yarn run coverage
Running tests
yarn run cypress:run:chrome
yarn run cypress:run:chrome:canvas3d
REST API, SDK and CLI tests
Initial steps
- Follow this guide to prepare
cvat-sdkandcvat-clisource code - Install all necessary requirements before running REST API tests:
pip install -e ./cvat-sdk -e ./cvat-cli -r ./tests/python/requirements.txt - Stop any other CVAT containers which you run previously. They keep ports which are used by containers for the testing system.
Running tests
Run all REST API tests:
pytest ./tests/python
This command will automatically start all necessary docker containers.
If you want to start/stop these containers without running tests use special options for it:
pytest ./tests/python --start-services
pytest ./tests/python --stop-services
If you need to rebuild your CVAT images add --rebuild option:
pytest ./tests/python --rebuild
If you want to get a code coverage report, use special option for it:
COVERAGE_PROCESS_START=.coveragerc pytest ./tests/python --rebuild --cov --cov-report xml
Debugging
Currently, this is only supported in deployments based on Docker Compose, which should be enough to fix errors arising in REST API tests.
To debug a server deployed with Docker, you need to do the following:
-
Adjust env variables in the
docker-compose.dev.ymlfile for your test case -
Rebuild the images and start the test containers:
CVAT_DEBUG_ENABLED=yes pytest --rebuild --start-services tests/python
Now, you can use VS Code tasks to attach to the running server containers. To attach to a container, run one of the following tasks:
REST API tests: Attach to serverfor the server containerREST API tests: Attach to RQ lowfor the low priority queue workerREST API tests: Attach to RQ defaultfor the default priority queue worker
If you have a custom development environment setup, you need to adjust
host-remote path mappings in the .vscode/launch.json:
...
"pathMappings": [
{
"localRoot": "${workspaceFolder}/my_venv",
"remoteRoot": "/opt/venv",
},
{
"localRoot": "/some/other/path",
"remoteRoot": "/some/container/path",
}
]
Extra options:
- If you want the server to wait for a debugger on startup,
use the
CVAT_DEBUG_WAIT_CLIENTenvironment variable:CVAT_DEBUG_WAIT_CLIENT=yes pytest ... - If you want to change the default debugging ports, check the
*_DEBUG_PORTvariables in thedocker-compose.dev.yml
Server unit tests
Initial steps
- If you run unit tests on Linux, ensure that
poppler-utilsandunrarare installed on your system:sudo apt-get update sudo apt-get install -y poppler-utils unrar - Install necessary Python dependencies:
pip install -r cvat/requirements/testing.txt - Build CVAT server image
docker compose -f docker-compose.yml -f docker-compose.dev.yml build cvat_server - Run cvat_opa container
docker compose -f docker-compose.yml -f docker-compose.dev.yml up -d cvat_opa
Running tests
- Python tests
python manage.py test --settings cvat.settings.testing cvat/apps -v 2
If you want to get a code coverage report, run the next command:
coverage run manage.py test --settings cvat.settings.testing cvat/apps -v 2
Debugging
- Run
server: testsdebug task in VSCode - If you want to debug particular tests then change the configuration
of the corresponding task in
./vscode/launch.json, for example:{ "name": "server: tests", "type": "python", "request": "launch", "justMyCode": false, "stopOnEntry": false, "python": "${command:python.interpreterPath}", "program": "${workspaceRoot}/manage.py", "args": [ "test", "--settings", "cvat.settings.testing", "cvat/apps/engine", "-v", "2", "-k", "test_api_v2_projects_", ], "django": true, "cwd": "${workspaceFolder}", "env": {}, "console": "internalConsole" }
IAM and Open Policy Agent tests
Generate tests
python cvat/apps/iam/rules/tests/generate_tests.py
Run testing
- In a Docker container
docker compose run --rm -v "$PWD:/mnt/src:ro" -w /mnt/src \
cvat_opa test -v cvat/apps/*/rules
- or execute OPA directly
curl -L -o opa https://openpolicyagent.org/downloads/v0.63.0/opa_linux_amd64_static
chmod +x ./opa
./opa test cvat/apps/*/rules
Linting Rego
The Rego policies in this project are linted using Regal.
- In a Docker container
docker run --rm -v ${PWD}:/mnt/src:ro -w /mnt/src \
ghcr.io/styrainc/regal:0.11.0 \
lint cvat/apps/*/rules
- or execute Regal directly
curl -L -o regal https://github.com/StyraInc/regal/releases/download/v0.11.0/regal_Linux_x86_64
chmod +x ./regal
./regal lint cvat/apps/*/rules
13.12 - Repository structure
How to find the components needed
CVAT stores all its components is a single (“monolithic”) repository. An explanation of CVAT components is available here.
Here is the list of the main directories and files in the repository:
./- Various common files for the repository.github/- GitHub configuration files.vscode/- VS Code configuration filescomponents/- optional server servicescvat/- server source codeapps/- server modules sourcesrequirements/- server Python package requirementssettings/- server configurations
cvat-canvas/- UI package, responsible for the annotation canvascvat-canvas3d/- UI package, responsible for the annotation canvas for 3Dcvat-cli/- CLI utilitycvat-core/- UI package, responsible for server interactioncvat-data/- UI package, responsible for media data decodingcvat-sdk/- Python SDK packagecvat-ui/- UI package, responsible for UI elementshelm-chart/- Helm configuration for deployment on Kubernetesserverless/- AI modelssite/- Documentation website sourcesassets/- Media contentcontent/- Documentation pages
supervisord/- supervisord deployment configurationtests/- End-to-end testscypress/- UI end-to-end testspython/- Tests for server, SDK, CLI and other Python components
utils/- Additional tools and utility scriptsdataset_manifest/- Python library and a tool to create dataset manifest filesdicom_converter/- Script to convert DICOM data to CVAT-compatible format
docker-compose*.yml- Docker Compose local deployment configurationDockerfile*- Docker image descriptionsmanage.py- Django utility to manipulate server components