Automated QA, Review & Honeypots
In CVAT, it’s possible to evaluate the quality of annotation through the creation of a validation subset of images. To estimate the task quality, CVAT compares all other jobs in the task against the established Ground truth job, and calculates annotation quality based on this comparison.
Note
Quality estimation only supports 2d tasks. It supports all the annotation types except 2d cuboids.Note
Quality estimation is available for projects, tasks, and jobs.CVAT has the following features for automated quality control of annotations:
- Validation set configuration for a task
- Job validation on job finish (“Immediate feedback”)
- Review mode for problems found
- Quality analytics
Basics
There are several approaches to quality estimation used in the industry. In CVAT, we can use a method known as Ground Truth or Honeypots. The method assumes there are Ground Truth annotations for images in the dataset. This method is statistical, which means that we can use only a small portion of the whole dataset to estimate quality on the full dataset, so we don’t need to annotate the whole dataset twice. Here we assume that the images in the dataset are similar (represent the same task).
We will call the validation portion of the whole dataset (or a task in CVAT) a validation set. In practice, it is typically expected that annotations in the validation set are carefully validated and curated. It means that they are more expensive - creating them might require expert annotators or just several iterations of annotation and validation. It means that it’s desirable to keep the validation set small enough. At the same time, it must be representative enough to provide reliable estimations. To achieve this, it’s advised that the validation set images are sampled randomly and independently from the full dataset. That is, for the quality assurance to function correctly, the validation set must have some portion of the task frames, and the frames must be chosen randomly.
Depending on the dataset size, data variance, and task complexity, 5-15% of the data is typically good enough for quality estimation, while keeping extra annotation overhead for the Ground Truth acceptable.
For example, in a typical task with 2000 frames, selecting just 5%, which is 100 extra frames to annotate, is enough to estimate the annotation quality. If the task contains only 30 frames, it’s advisable to select 8-10 frames, which is about 30%. It is more than 15%, but in the case of smaller datasets, we need more samples to estimate quality reliably, as data variance is higher.
Ground truth jobs
A Ground Truth job (GT job) is a way to represent the validation set in a CVAT task. This job is similar to regular annotation jobs - you can edit the annotations manually, use auto-annotation features, and import annotations in this job. There can be no more than 1 Ground Truth job in a task.
To enable quality estimation in a task, you need to create a Ground truth job in the task,
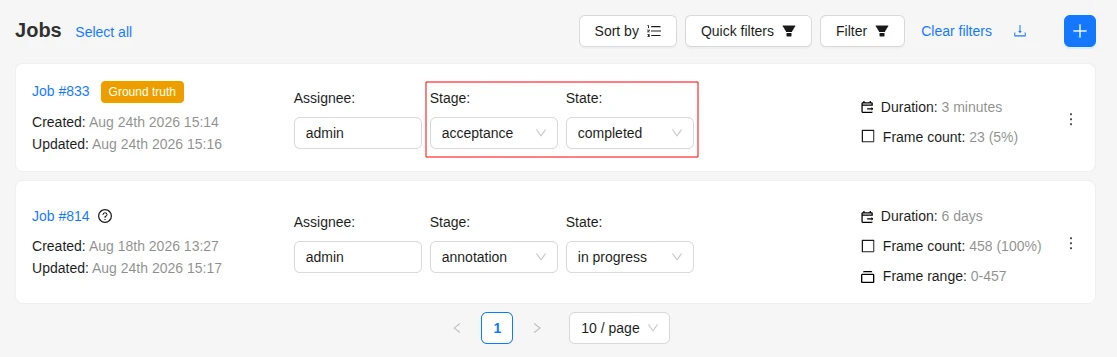
annotate it, switch the job stage to acceptance, and set the job state to completed.
Once the Ground Truth job is configured, CVAT will start using this job for quality estimation.
Read more about Ground Truth management here.
Configuring quality estimation
There are 2 key components related to quality estimation configuration: Ground Truth jobs and quality requirements. Ground Truth jobs are configured at the Task level. In this section, we explain how to set up a Ground Truth job. Read more about quality settings here.
Note
A Ground truth job is considered configured if it is at the acceptance stage and in the completed state.A configured Ground Truth job is required for all quality computations in CVAT.
- Go to the task creation page
- Configure basic and advanced parameters according to your requirements, and attach a dataset to be annotated
- Scroll down to the Quality Control section below
- Select one of the validation modes available
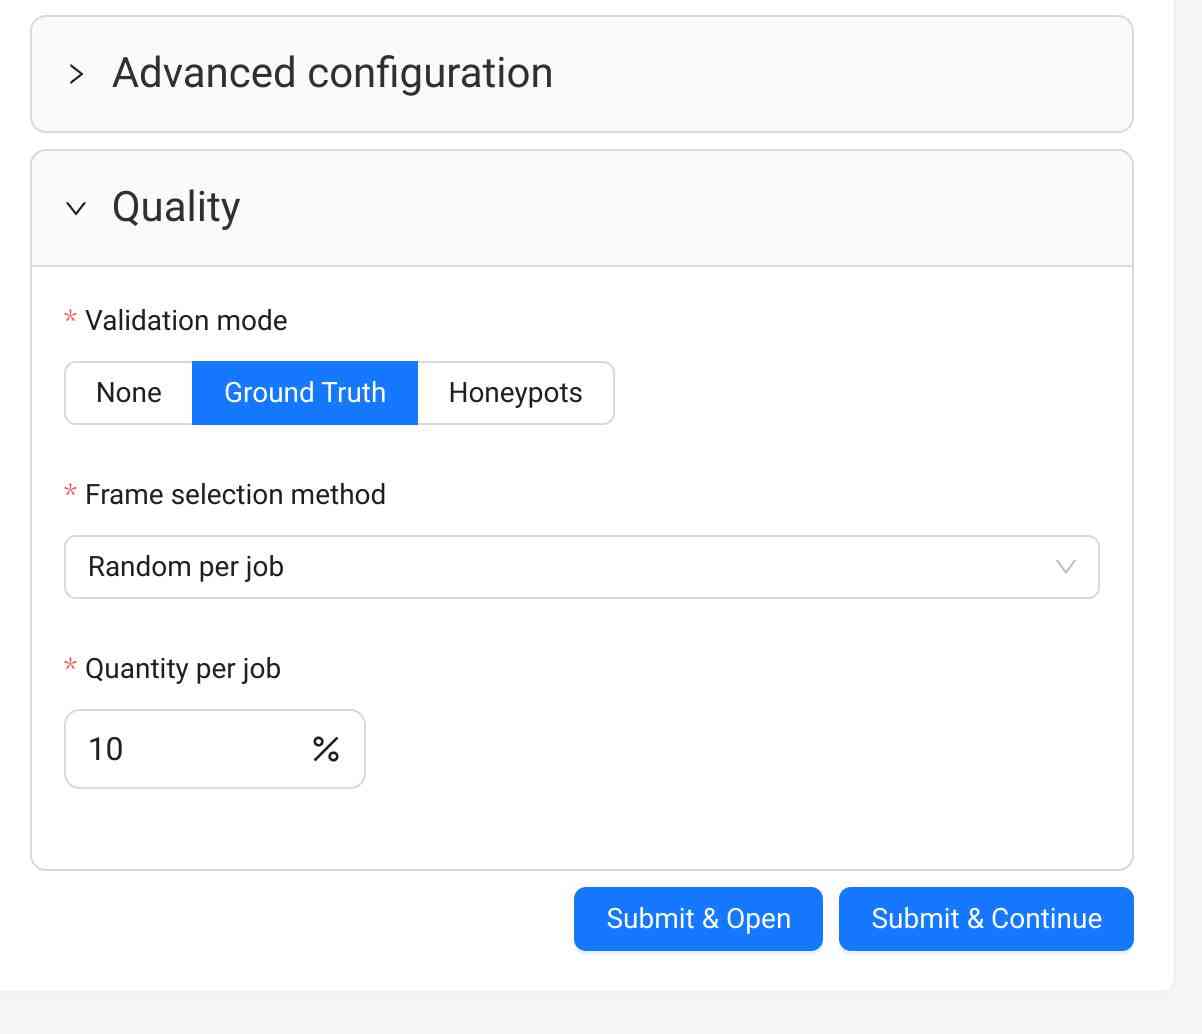
- Create the task and open the task page
- Upload or create Ground Truth annotations in the Ground Truth job in the task
- Switch the Ground Truth job into the
acceptancestage andcompletedstate
Note
For already existing tasks only the Ground Truth validation mode is available. If you want
to use Honeypots for your task, you will need to recreate the task.
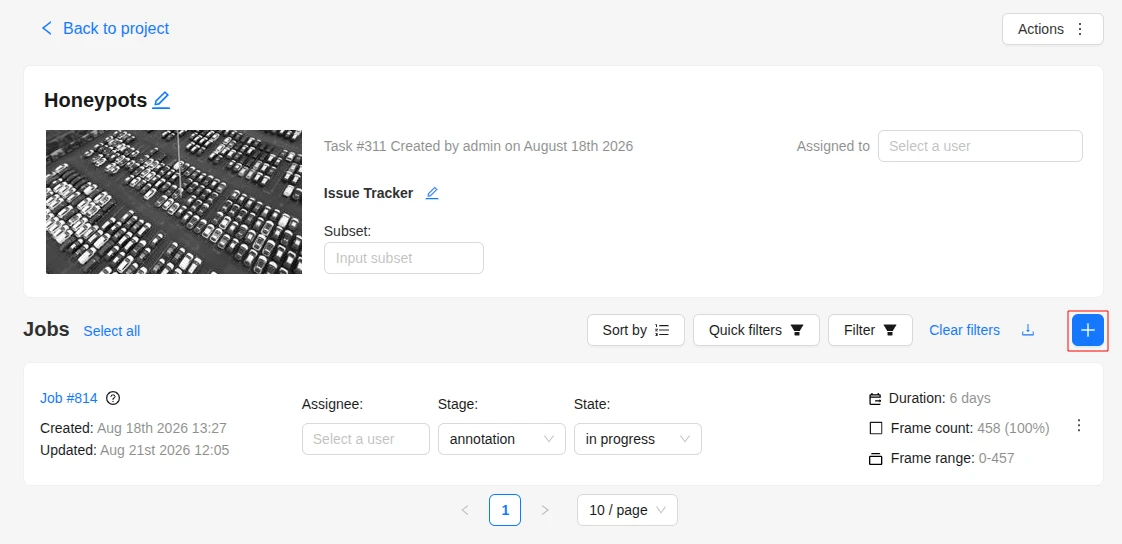
- Open the task page
- Click +.
- In the Add new job window, fill in the following fields:
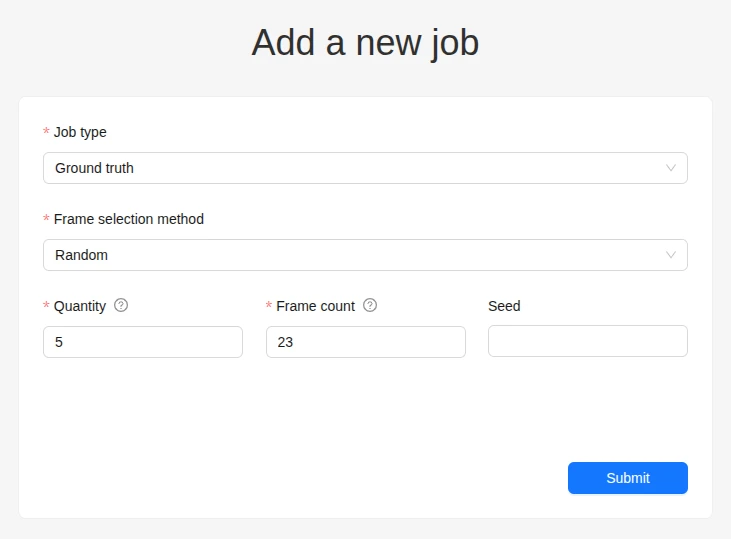
- Job type: Use the default parameter Ground truth.
- Frame selection method: Use the default parameter Random.
- Quantity %: Set the desired percentage of frames for the Ground truth job.
Note that when you use Quantity %, the Frames field will be autofilled. - Frame count: Set the desired number of frames for the Ground truth job.
Note that when you use Frames, the Quantity % field will be autofilled. - Seed: (Optional) If you need to make the random selection reproducible, specify this number.
It can be any integer number, the same value will yield the same random selection (given that the
frame number is unchanged).
Note that if you want to use a custom frame sequence, you can do this using the server API instead,
- Click Submit.
The Ground truth job will appear in the jobs list.
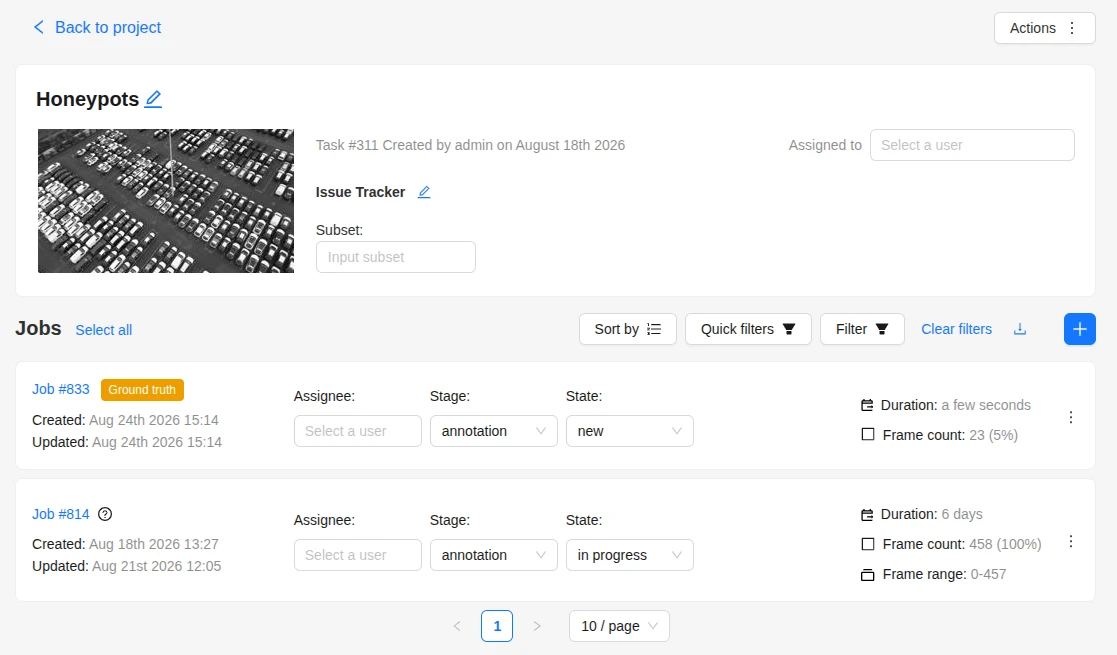
- Annotate frames and save your work or upload annotations.
- Switch the Ground Truth job into the
acceptancestage andcompletedstate
Validation modes
Currently, there are 2 validation modes available for tasks: Ground Truth and Honeypots. These names are often used interchangeably, but in CVAT they have some differences. Both modes rely on the use of Ground Truth annotations in a task, stored in a Ground Truth job, where they can be managed.
Ground Truth
In this mode some of the task frames are selected into the validation set, represented as a separate Ground Truth job. The regular annotation jobs in the task are not affected in any way.
Ground Truth jobs can be created at the task creation automatically or manually at any moment later. They can also be removed manually at any moment. This validation mode is available for any tasks and annotations.
This is a flexible mode that can be enabled or disabled at any moment without any disruptions to the annotation process.
Frame selection
This validation mode can use several frame selection methods.
Random
This is a simple method that selects frames into the validation set randomly, representing the basic approach, described above.
Parameters:
- frame count - the number or percent of the task frames to be used for validation.
Can be specified as an absolute number in the
Frame countfield or a percent in theQuantityfield. If there are both fields on the page, they are linked, which means changing one of them will adjust the other one automatically. - random seed - a number to be used to initialize the random number generator. Can be useful if you want to create a reproducible sequence of frames.
Random per job
This method selects frames into the validation set randomly from each annotation job in the task.
It solves one of the issues with the simple Random method that some of the jobs can get no validation frames, which makes it impossible to estimate quality in such jobs. Note that using this method can result in increased total size of the validation set.
Parameters:
- frame count per job - the percent of the job frames to be used for validation.
This method uses segment size of the task to select the same number of validation frames
in each job, if possible. Can be specified as an absolute number in the
Frame countfield or a percent in theQuantity per jobfield. If there are both fields on the page, they are linked, which means changing one of them will adjust the other one automatically. - random seed - a number to be used to initialize the random number generator. Can be useful if you want to create a reproducible sequence of frames.
Honeypots
In this mode some random frames of the task are selected into the validation set. Then, validation frames are randomly mixed into regular annotation jobs. This mode can also be called “Ground Truth pool”, reflecting the way validation frames are used. This mode can only be used at task creation and cannot be changed later.
The mode has some limitations on the compatible tasks:
- It’s not possible to use it for an already existing task, the task has to be recreated.
- This mode assumes random frame ordering, so it is only available for image annotation tasks and not for ordered sequences like videos.
- Tracks are not supported in such tasks.
The validation set can be managed after the task is created - annotations can be edited, frames can be excluded and restored, and honeypot frames in the regular jobs can be changed. However, it’s not possible to select new validation frames after the task is created. The Ground truth job created for this validation mode cannot be deleted.
Parameters:
- frame count per job (%) - the percent of job frames (segment size) to be added into each
annotation job from the validation set. Can be specified in the
Overhead per jobfield. - total frame count (%) - the percent of the task frames to be included into the validation set.
This value must result in at least
frame count per job*segment sizeframes. Can be specified in theTotal honeypotsfield.
Mode summary
Here is a brief comparison of the validation modes:
| Aspect | Ground Truth | Honeypots |
|---|---|---|
| When can be used | any time | at task creation only |
| Frame management options | exclude, restore | exclude, restore, change honeypots in jobs |
| Ground Truth job management options | create, delete | create |
| Task frame requirements | - | random ordering only |
| Annotations | any | tracks are not supported |
| Minimum validation frames count | - manual and random_uniform - any (but some jobs can get no validation frames)- random_per_job - jobs count * GT frames per job |
not less than honeypots count per job |
| Task annotation import | GT annotations and regular annotations do not affect each other | Annotations are imported both into the GT job and regular jobs. Annotations for validation frames are copied into corresponding honeypot frames. |
| Task annotation export | GT annotations and regular annotations do not affect each other | Annotations for non-validation frames are exported as is. Annotations for validation frames are taken from the GT frames. Honeypot frames are skipped. |
Choosing the right mode
Here are some examples on how to choose between these options. The general advice is to use Ground Truth for better flexibility, but keep in mind that it can require more resources for validation set annotation. Honeypots, on the other hand, can be beneficial if you want to minimize the number of validation images required, but the downside here is that there are some limitations on where this mode can be used.
Example: a video annotation with tracks. In this case there is only 1 option - the Ground Truth mode, so just use it.
Example: an image dataset annotation, image order is not important. Here you can use both options. You can choose Ground Truth for better flexibility in validation. This way, you will have the full control of validation frames in the task, annotation options won’t be limited, and the regular jobs will not be affected in any way. However, if you have a limited budget for the validation (for instance, you have only a small number of validation frames) or you want to allow more scalability (with this approach the number of validation frames doesn’t depend on the number of regular annotation jobs), it makes sense to consider using Honeypots instead.
Quality management
If a task has a validation configured, there are several options to manage validation set images. With any of the validation modes, there will be a special Ground Truth (GT) job in the task.
Validation set management
Validation frames can be managed on the task Quality Management page. Here it’s possible to check the number of validation frames, current validation mode and review the frame details. For each frame you can see the number of uses in the task. When in the Ground Truth mode, this number will be 1 for all frames. With Honeypots, these numbers can be 0, 1 or more.
Frame changes
In both validation modes it’s possible to exclude some of the validation frames from being used for validation. This can be useful if you find that some of the validation frames are “bad”, extra, or if they have incorrect annotations, which you don’t want to fix. Once a frame is marked “excluded”, it will not be used for validation. There is also an option to restore a previously excluded frame if you decide so.
There is an option to exclude or restore frames in bulk mode. To use it, select the frames needed using checkboxes, and click one of the buttons next to the table header.
Ground Truth job management
In the Ground Truth validation mode, there will be an option to remove the Ground Truth job from the task. It can be useful if you want to change validation set frames completely, add more frames, or remove some of the frames for any reason. This is available in the job Actions menu.
In the Honeypots mode, it’s not possible to add or remove the GT job, so it’s not possible to add more validation frames.
Create
A Ground Truth job can be added manually in a task without a selected validation mode or in a task with the Ground Truth validation mode, after the existing Ground Truth job is deleted manually.
Delete
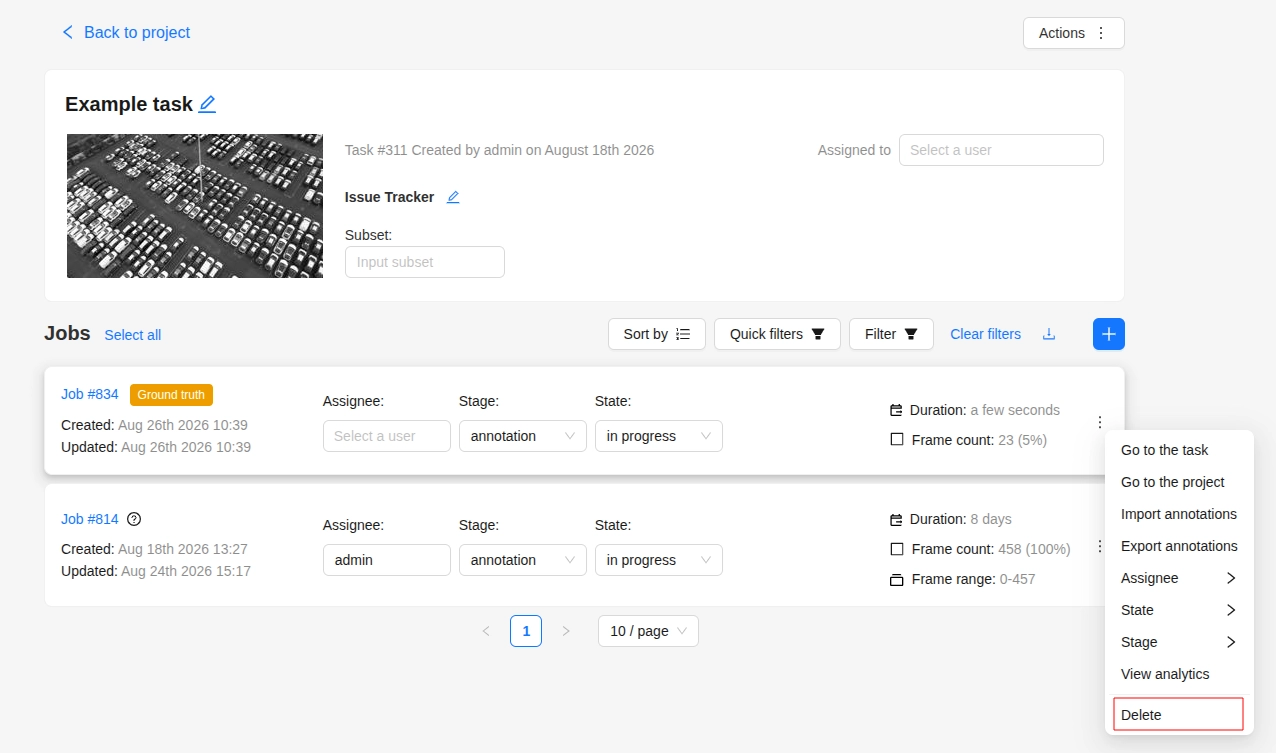
To delete the Ground Truth job, do the following:
- Open the task and find the Ground Truth job in the jobs list.
- Click on three dots to open the menu.
- From the menu, select Delete.
Note
The Ground truth job in the “Honeypots” task validation mode cannot be deleted.Import annotations
If you want to import annotations into the Ground truth job, do the following:
- Open the task and find the Ground truth job in the jobs list.
- Click on three dots to open the menu.
- From the menu, select Import annotations.
- Select import format and select file.
- Click OK.
Note
If there are imported annotations for the frames that exist in the task, but are not included in the Ground truth job, they will be ignored. This way, you don’t need to worry about “cleaning up” your Ground truth annotations for the whole dataset before importing them. Importing annotations for the frames that are not known in the task still raises errors.Export annotations
To export annotations from the Ground Truth job, do the following:
- Open the task and find a job in the jobs list.
- Click on three dots to open the menu.
- From the menu, select Export annotations.
Annotation management
Annotations for validation frames can be displayed and edited in a special Ground Truth job in the task. You can edit the annotations manually, use auto-annotation features, import and export annotations in this job.
In the Ground Truth task validation mode, annotations of the ground Truth job do not affect other jobs in any way. The Ground Truth job is just a separate job, which can only be changed directly. Annotations from Ground truth jobs are not included in the dataset export, they also cannot be imported during task annotations import or with automatic annotation for the task.
In the Honeypots task validation mode, the annotations of the GT job also do not affect other jobs in any way. However, import and export of task annotations works differently. When importing task annotations, annotations for validation frames will be copied both into GT job frames and into corresponding honeypot frames in annotation jobs. When exporting task annotations, honeypot frames in annotation jobs will be ignored, and validation frames in the resulting dataset will get annotations from the GT job.
Note
That it means that exporting from a task with honeypots and importing the results back will result in changed annotations on the honeypot frames. If you want to backup annotations, use a task backup or export job annotations instead.Import and export of Ground Truth job annotations works the same way in both modes.
Ground Truth jobs are included in task backups, so can be saved and restored this way.
Import, Export, and Delete options are available from the Ground Truth job Actions menu. Read more.
Annotation quality settings
Quality settings can be set up at the task or project level. If a task is not bound to a project, it uses its own settings. Tasks inside a project can use individual settings or inherit the project settings. Read more about project settings here.
To configure them, open a task or project Actions menu, select Quality control, and open the Settings tab.
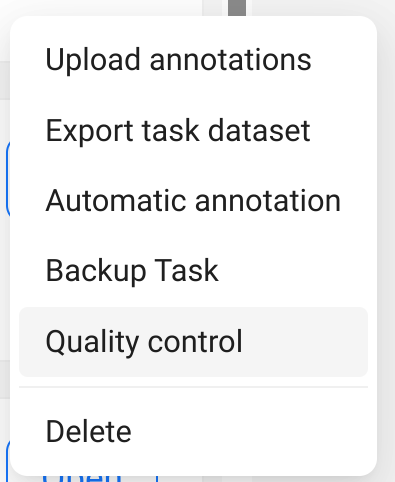
The Settings tab has the following sections:
- General contains the Job selection filter. Only matching annotation and consensus-replica jobs are included in the next quality report.
- Job validation contains Max validations per job. A value above zero enables Immediate feedback for the task.
- Requirements configuration defines the criteria used to evaluate annotations.
Requirements configuration
A quality requirement defines which annotations to check and the minimum score they must achieve. For example, you can require at least 90% recall for car bounding boxes while using a different threshold for pedestrians.
Each enabled quality requirement has its own annotation type, target metric, threshold,
filter, and comparison options. CVAT provides non-removable base requirements for supported
annotation types. You can rename a base requirement, change its settings, or disable it.
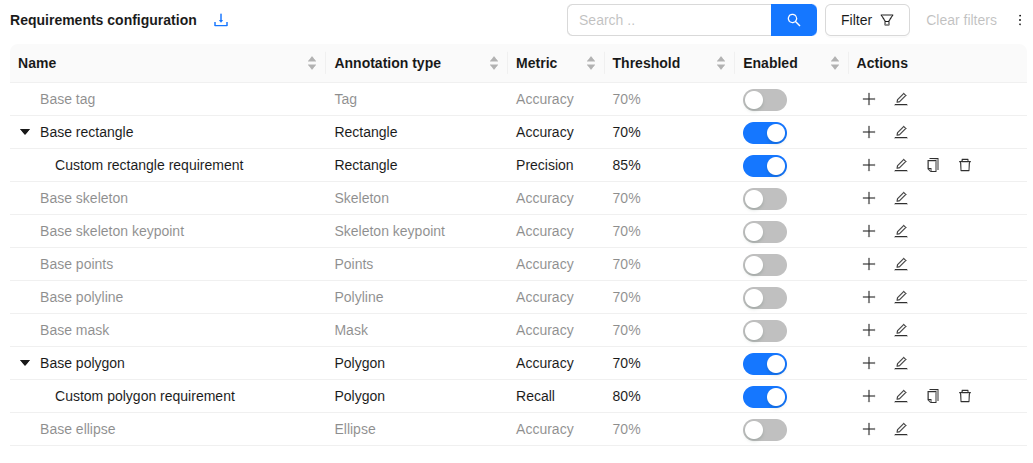
The table shows the requirement hierarchy, target annotation type, metric, threshold, and enabled state. Use the arrow beside a row to expand its child requirements. The actions in each row let you create a child rule, edit the rule, and, for custom rules, copy or delete it.
Root requirements and custom rules
Root requirements are at the top of the hierarchy. CVAT creates one for every supported annotation type, and they cannot be deleted. They are useful as broad defaults, such as “all rectangles must reach 70% accuracy”. Disable a root requirement when that annotation type must not participate in the report or immediate feedback.
Use + button on a root or custom requirement to add a child. The parent and target
annotation type are fixed for a child rule. Give the child a descriptive name and use its
filter and comparison options to define a narrower check. For example, a root rectangle
requirement can have a child rule for the vehicle label with a higher score threshold.
Custom requirements can be copied when you need a similar rule and deleted when no longer
needed.

Inheritance
Children inherit their target annotation type, target metric, threshold, comparison options, and attribute-comparison configuration from their parent. This avoids repeating the same comparison policy for every label or subset of annotations.
Change a value in a parent to update the effective value for descendants that have not overridden it. A child can override its metric, threshold, and applicable comparison options when it needs a more specific policy. Overridden fields show a revert control; use it to return to the parent value. A child requirement always keeps its parent and annotation type.
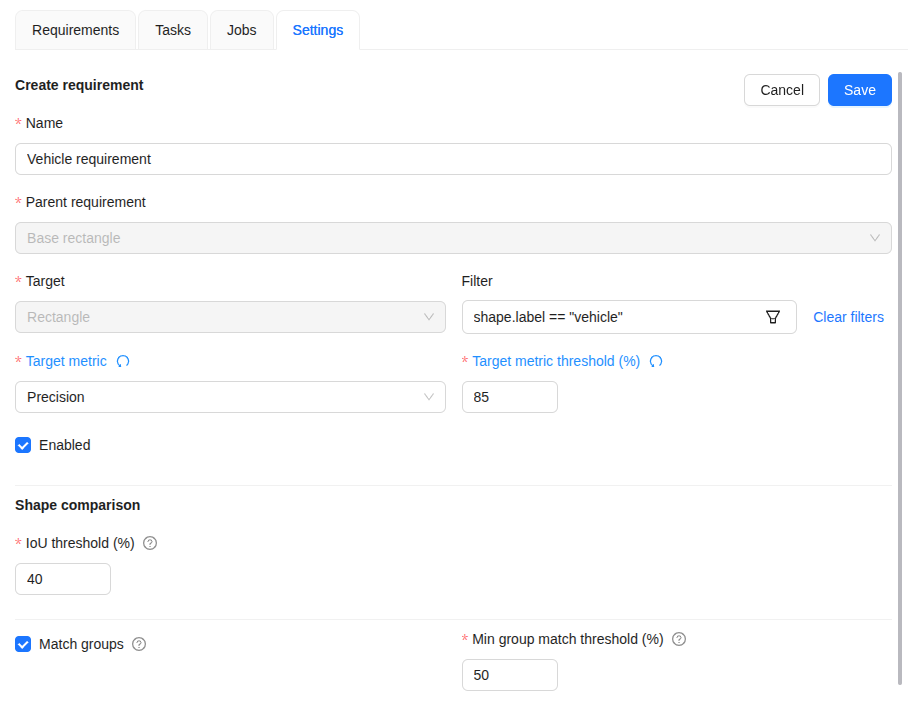
Annotation filters
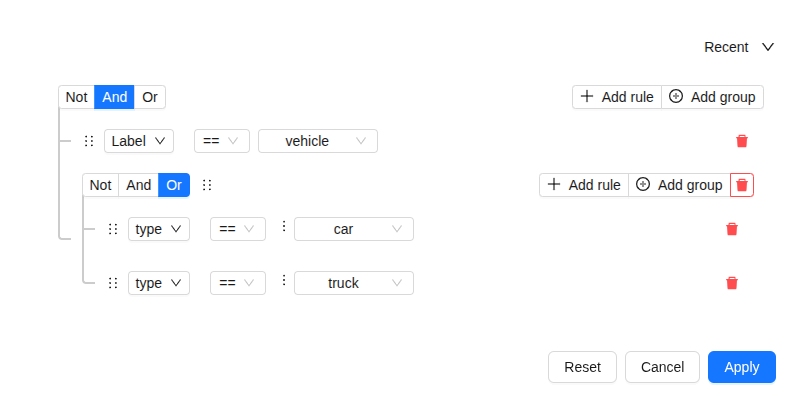
The Filter control selects the annotations evaluated by a requirement. Use it to narrow a rule by label, annotation type, area, source, visibility, track properties, or label-specific attributes. Combine rules in the filter builder to describe the subset that the requirement must evaluate.
Parent filters are displayed alongside the current filter. They are always applied to child
requirements, so a child can only narrow its parent’s scope. For example, a parent filtered
to vehicle annotations can have a child filtered to vehicle annotations with a specific
attribute value; the child cannot include annotations outside the parent’s filter.
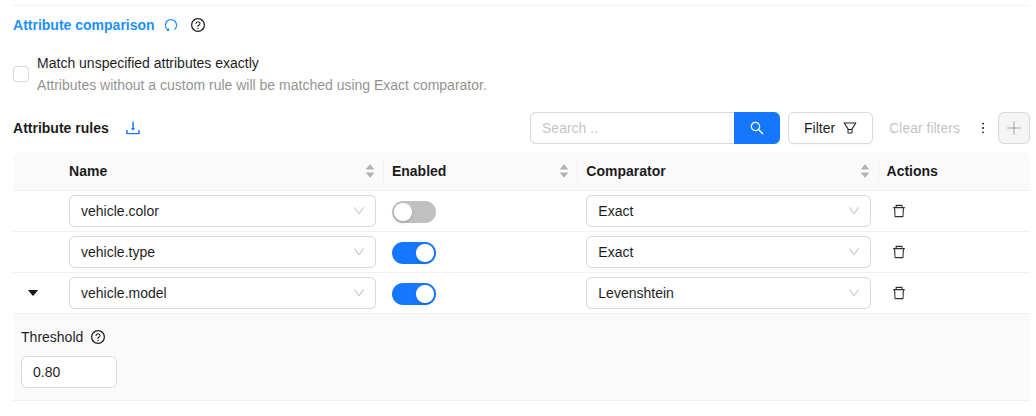
Attribute rules
Use Attribute comparison when matching annotations must also verify attribute values. Enable Match unspecified attributes exactly to compare every attribute without a custom rule using the Exact comparator. This is useful when all attributes are part of the expected annotation result.
Add an Attribute rule when one attribute needs different handling. Select the attribute, enable or disable its comparison, then choose either Exact or Levenshtein. The Levenshtein comparator accepts similar text values and exposes a normalized similarity threshold from 0 to 1. Attribute rules, like the rest of the comparison configuration, can be inherited and overridden by child requirements.
Comparison options
When editing a requirement, set its Target metric and Target metric threshold to define its completion condition. The remaining form sections configure comparison behavior for shapes, groups, object visibility, points and skeletons, polylines, and attributes. Inherited controls can be overridden or reverted to the parent value. Hover the ? icon next to a control for a detailed description.
The available controls depend on the requirement target:
| Group | Parameter | Description |
|---|---|---|
| General | Name | A unique name for the requirement. |
| General | Target | The annotation type that the requirement evaluates. Child requirements inherit this from their parent. |
| General | Filter | Limits the annotations evaluated by the requirement. Child filters are applied in addition to their parent filters. |
| General | Target metric | The metric used to evaluate the requirement. |
| General | Target metric threshold | The minimum target-metric score required to complete the requirement. |
| General | Enabled | Includes or excludes the requirement from reports and immediate feedback. |
| Shape comparison | IoU threshold | The minimum overlap used to distinguish matching and unmatched spatial annotations. Applies to rectangles, ellipses, polygons, masks, and polylines. |
| Shape comparison | OKS threshold | The minimum OKS value used to distinguish matching and unmatched points, skeletons, and skeleton keypoints. |
| Shape comparison | Point size | The point “size”, relative to the object size. Determines the size of the area used to match points, skeletons, and skeleton keypoints. Read more in Point matching. |
| Shape comparison | Point size base | Uses either the image size or the group bounding-box size as the reference for point size. |
| Shape comparison | Line thickness | The relative thickness of the area used to match polylines. |
| Shape comparison | Panoptic comparison | Uses only the visible parts of masks and polygons for comparison. |
| Polyline comparison | Match orientation | Checks whether matching polylines have the same direction. |
| Polyline comparison | Line orientation threshold | The minimum IoU gain between the original and reversed line directions required to report an orientation mismatch. |
| Visibility comparison | Check covered annotations | Checks for partially covered polygon and mask annotations. |
| Visibility comparison | Object visibility threshold | The minimum visible area for polygon and mask annotations. |
| Group comparison | Match groups | Enables annotation-group matching. |
| Group comparison | Min group match threshold | The minimum IoU required for groups to be considered matching. |
| Attribute comparison | Match unspecified attributes exactly | Matches every attribute without an explicit rule using the Exact comparator. |
| Attribute comparison | Attribute rules | Configures a comparator for individual attributes. The Levenshtein comparator also has a similarity threshold. |
Save the settings after editing them. Changes apply when the next quality report is calculated; they do not alter existing reports. Open the Requirements tab to see the results. A requirement passes when its score meets or exceeds its threshold.
Quality target metrics
The target metric determines what a requirement measures. CVAT matches annotations against ground truth, then calculates a score. Higher scores indicate better quality.
Choose a metric
The descriptions below refer to micro scores, calculated from the combined annotation counts. You can also evaluate each label separately, as explained in the next section.
| Metric | What it measures | When to use it |
|---|---|---|
| Accuracy | The share of correct annotation comparisons. | To measure overall correctness. |
| Precision | The share of actual annotations that are correct. | When extra or incorrectly labeled annotations are costly. |
| Recall | The share of ground-truth annotations found correctly. | When missing objects is costly. |
| Jaccard Index | Correct matches relative to the combined actual and expected annotations, counting each correct match once. | To account for both extra and missing annotations. |
| Dice Coefficient | Twice the correct matches divided by the sum of actual and expected annotations. | To balance precision and recall in one score. |
For example, if ground truth contains 10 cars and an annotator correctly marks 8 cars with no extra annotations, precision is 100%, recall is 80%, Jaccard Index is 80%, and Dice Coefficient is about 88.9%. A recall requirement with a 90% threshold would fail.
Choose how to combine labels
Each metric offers three ways to combine results across labels:
| Option | How the score is calculated | When to use it |
|---|---|---|
| Micro average | Calculates one score from the combined annotation counts. This is the default. | To evaluate annotations overall; frequent labels have more influence. |
| Macro average | Calculates a score for each label, then takes their arithmetic mean. | To give rare and frequent labels equal importance. |
| Worst label | Takes the lowest per-label score. | To require every evaluated label to meet the threshold. |
For example, suppose ground truth contains 90 cars and 10 pedestrians. The annotator correctly marks all 90 cars but only 5 pedestrians. Recall is 100% for cars and 50% for pedestrians:
- Micro average:
95 / 100 = 95%. - Macro average:
(100% + 50%) / 2 = 75%. - Worst label:
50%, for pedestrians.
With an 80% recall threshold, the micro requirement passes, while the macro and worst-label requirements fail. Choose worst label if good results for cars must not hide missed pedestrians.
Empty labels are excluded from both macro average and worst-label scores. A label is empty when it is absent from both the actual annotations and ground truth for the evaluated requirement. It does not count toward the number of labels in the macro average and cannot be selected as the worst label, even if its per-label metrics are displayed in the confusion matrix. In the example above, an unused bicycle label would leave macro recall at 75% and worst-label recall at 50%.
Labels with annotations on only one side are still included: for example, a label present in ground truth but entirely missed by the annotator has 0% recall. If a metric has a zero denominator for an included label, its score is 0%. If there are no applicable annotation samples for the requirement, the report shows Not computed.
Metric formulas
For micro scores, V is the number of correct matches, D is the number of actual annotations,
G is the number of ground-truth annotations, and T is the total number of annotation comparison
outcomes, including unmatched annotations.
Per-label scores treat the selected label as the positive class and all other labels as negative:
TP(true positives): correct matches for the label.FP(false positives): annotations assigned to the label without a matching ground-truth annotation of that label.FN(false negatives): ground-truth annotations of the label without a matching actual annotation of that label.TN(true negatives): comparison outcomes involving neither an actual nor an expected annotation of the label.
| Metric | Micro score | Per-label score used by macro average and worst label |
|---|---|---|
| Accuracy | V / T |
(TP + TN) / (TP + TN + FP + FN) |
| Precision | V / D |
TP / (TP + FP) |
| Recall | V / G |
TP / (TP + FN) |
| Jaccard Index | V / (D + G - V) |
TP / (TP + FP + FN) |
| Dice Coefficient | 2 * V / (D + G) |
2 * TP / (2 * TP + FP + FN) |
Project quality settings
In CVAT, it is possible to group tasks into projects to share common configurations or establish a logical grouping for datasets. In this section, we explain options for quality management inside projects.
When tasks are inside a project, it can be convenient to reuse the same quality setup for all the project tasks. There is an option to use quality settings from the parent project for all or only for specific tasks inside a project. This is controlled by the corresponding toggle on the Quality control page of the task:

If some of the project tasks have individual settings, a notification is displayed on the project settings page. You can enforce project settings for all the project tasks by clicking the Force project settings button.

By default, new tasks inside a project inherit the quality settings of the project. You can freely switch between these 2 modes without losing the individual configuration for the task.
Updating project quality includes quality computation for all the nested tasks. If the task quality is updated in a specific task manually, project quality has to be recomputed to display relevant values.
Job filtering
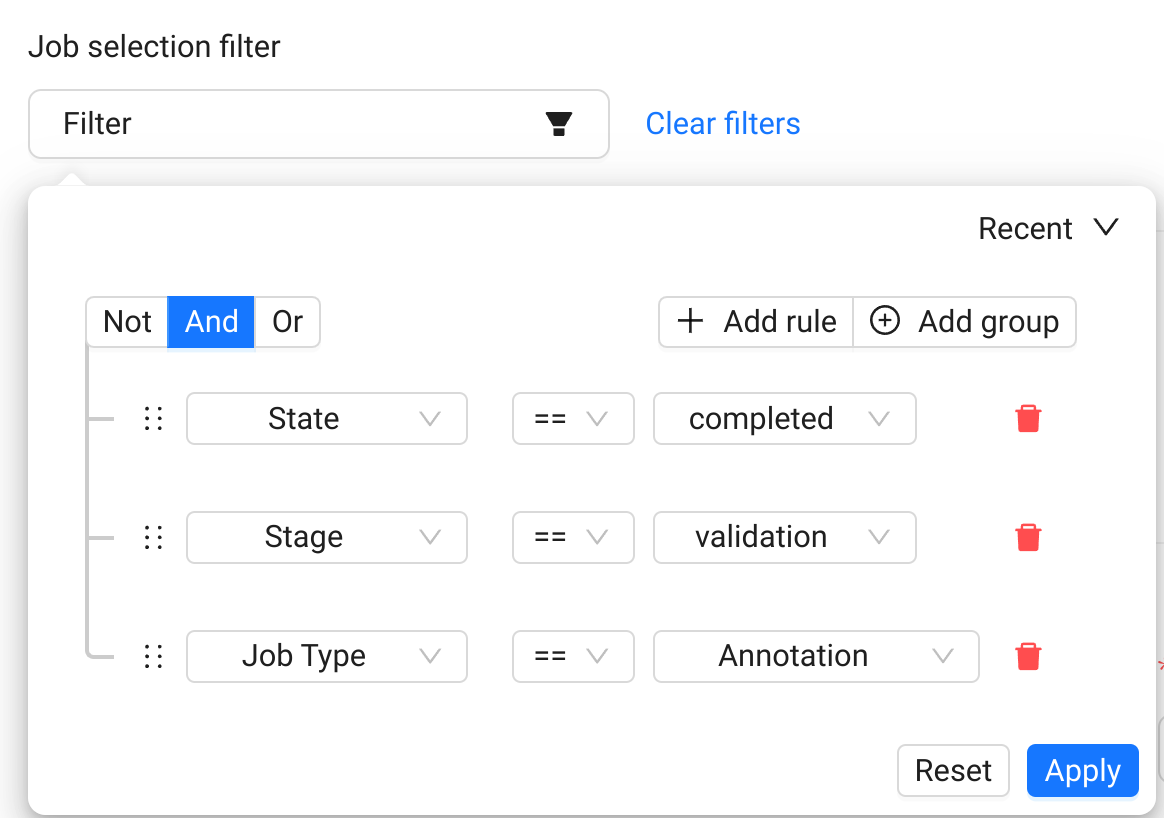
Depending on the situation, you may need or don’t need to include specific jobs in the quality report. For example, your workflow may require quality checks only for completed jobs or maybe you want to exclude jobs from a specific task from a project quality report. There is an option to filter which jobs are included in quality computations. You can configure this by changing the Job selection filter in quality settings. Only jobs matching the filter criteria will be included in the quality results. If a filter is changed, quality must be recomputed for the filter to take effect.
Comparisons
Tags
The equality is used for matching.
Shapes
A pair of shapes is considered matching, if both their shapes and labels match. For each shape, spatial parameters are matched first, then labels are matched.
Each shape type can have their own spatial matching details. Specifically:
-
bounding box - IoU (including rotation). For example, for a pair of bounding boxes it can be visualized this way:

IoU = intersection area / union area. The green part is the intersection, and green, yellow and red ones together are the union. -
polygons, masks - IoU. Polygons and masks are considered interchangeable, which means a mask can be matched with a polygon and vice versa. Polygons and masks in groups are merged into a single object first. If Panoptic comparison is enabled, objects will be cut to only the visible (non-covered) parts only, which is determined by the shape z order.
-
skeletons - The OKS metric from the COCO dataset is used. Each skeleton point gets a circular area around, determined by the object size (bounding box side) and Point size values, where this point can be matched. If a bounding box is grouped with the skeleton, it is used for object size computation, otherwise a bounding box of visible points of the skeleton is used. The exact formulas are described in Point matching.
-
points - The OKS metric is used for each point group annotation. Same as for skeletons, Point size determines relative point sizes. The Point size base setting allows configuring whether points in point groups should use the group bounding box or the image space. Using image space for object size can be useful if you want to treat each point as a separate annotation. Read more in Point matching.
-
polylines - A pair of lines is considered matching if all the points of one line lie within a “hull” of the other one. The “hull” is determined as the area around the polyline, such as if the line had some “thickness”. For example, the black polyline can have a hull shown in the green color:

The line thickness can be configured via the Line thickness setting. The value is relative to the image side and determines a half of the hull width.
-
ellipses - IoU, described in more detail above.
Note
2D cuboids are not supported.Point matching
Points, skeletons, and skeleton keypoints are matched using the OKS (Object Keypoint Similarity) metric, following the COCO approach. For a GT point and a checked point, the OKS is computed as:
OKS = exp(-d^2 / (2 * s^2 * k^2)), k = 2 * sigma
where:
dis the distance between the points, in pixelssis the object size, in pixels, computed assqrt(object area)sigmais the Point size value, a fraction of the object size
The object area depends on the annotation type:
- for skeletons, it’s the area of the mean bounding box of the compared GT and checked skeletons
- for points and skeleton keypoints, it depends on the Point size base setting: Image size - the image area, Group bbox size - the area of the mean bounding box of the compared GT and checked objects (point groups or skeletons). Single points without a group are always compared in the image space.
The bounding box of an object is the bounding box of all its visible parts, including the grouped bounding boxes, if any. When the object bounding boxes are used, the objects are not matched, if their bounding boxes don’t overlap.
In COCO, sigma is the standard deviation of the keypoint position in human annotations,
relative to the object size, measured for each keypoint type in redundantly annotated images.
With CVAT, such values can be estimated from a consensus-based annotation round on a set of images.
The OKS formula models the annotation errors using the normal distribution with the doubled
standard deviation (k = 2 * sigma). This is an empirical constant chosen in COCO to make
the similarity values perceptually meaningful: small annotation errors still get high similarity.
At the distances of 1, 2, and 3 sigma * s from the GT point, the OKS is 0.88, 0.61,
and 0.32 respectively. CVAT uses the same constant, so the Point size has the same meaning
as in COCO, and COCO sigma values can be used as a reference.
After the OKS is computed for a pair of annotations, the Overlap threshold t
is used to determine if they match:
- single points and skeleton keypoints are matched, if their
OKS >= t - skeletons and point annotations with multiple points are matched, if the mean OKS of
their points is
>= t. The mean is computed over the points present in any of the compared annotations (including occluded points): a point present only in one of the annotations getsOKS = 0.
For single points and skeleton keypoints, it means that a checked point is matched, if it is inside the circle around the GT point with the radius:
r = 2 * sigma * s * sqrt(-2 * ln(t))
For example, with the Point size of 5%, the Point size base set to Group bbox size,
the Overlap threshold of 80% and a skeleton bounding box of 200x200 pixels,
the radius is 2 * 0.05 * 200 * sqrt(-2 * ln(0.8)) = ~13.4 pixels.
Larger point sizes and smaller thresholds give larger matching areas.
With the threshold of ~88%, the radius is exactly sigma * s.
For skeletons and point annotations with multiple points, the mean OKS is used, so the radii of individual points can’t be derived easily. A point can be further from the GT point, if the other points of the object are closer to their GT points.
For example, consider a skeleton with 6 points and a square bounding box attached:

In this example, the Point size is 5% of the bbox side.
The green circles have the radius of sigma * s, the OKS on their boundaries is ~0.88.
Following the normal distribution, ~68% of human annotations are expected to be within
such circles around the GT points, and ~95% are expected to be within the circles of
the doubled radius, where the OKS is ~0.61 (in practice, the values are typically higher).
The OKS values of the skeleton points are then averaged to get the skeleton similarity.
Tracks
Tracks are split into separate shapes and compared on the per-frame basis with other tracks and shapes.
Quality Analytics
Once quality estimation is enabled in a task and its Ground Truth job is configured, quality reports are available for the task and its jobs. Projects can also have an aggregated report for their tasks and jobs.
Open the task or project Actions menu > Quality control and select the Requirements tab. Select Calculate a new quality report. If no report has been calculated yet, the page shows a prompt instead of an empty table. The date of the most recent report and a download action appear after the report is available.
Note
The process of quality calculation may take up to several hours, depending on the amount of data and labeled objects, and is not updated immediately after task updates.Analytics page contents
The Requirements tab shows every enabled requirement, its target metric, score, and
whether it meets the threshold. A score of N/A with a warning icon means CVAT could
not calculate that requirement, for example because there were no applicable annotations.
Hover the icon to see the reason. A requirement that cannot be calculated is not treated
as failed.
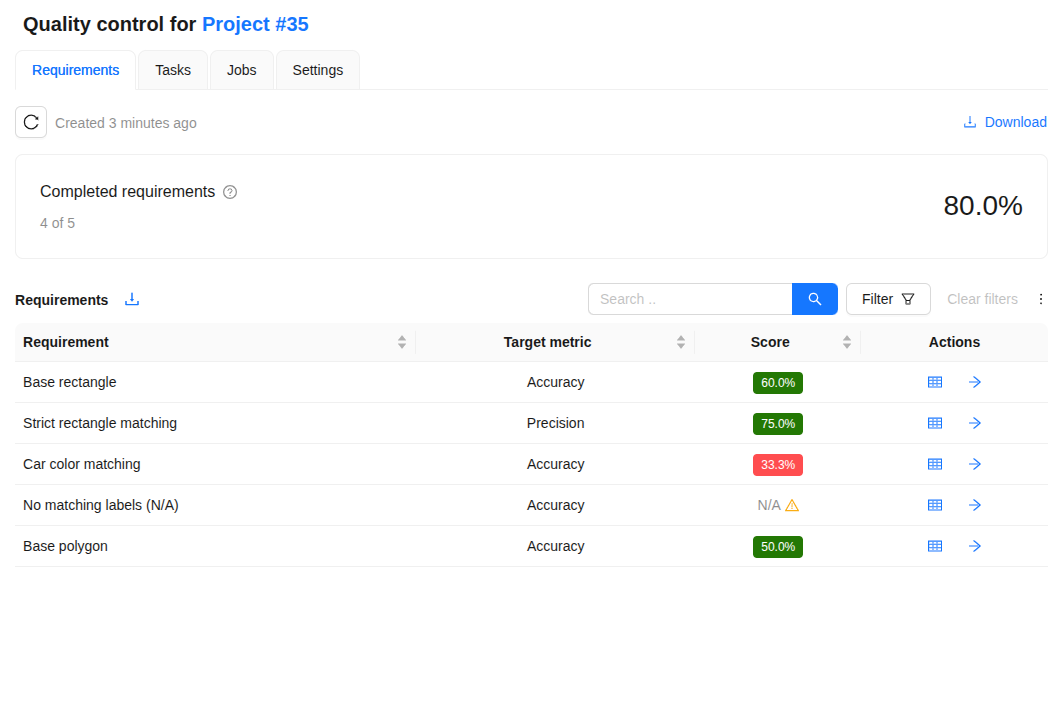
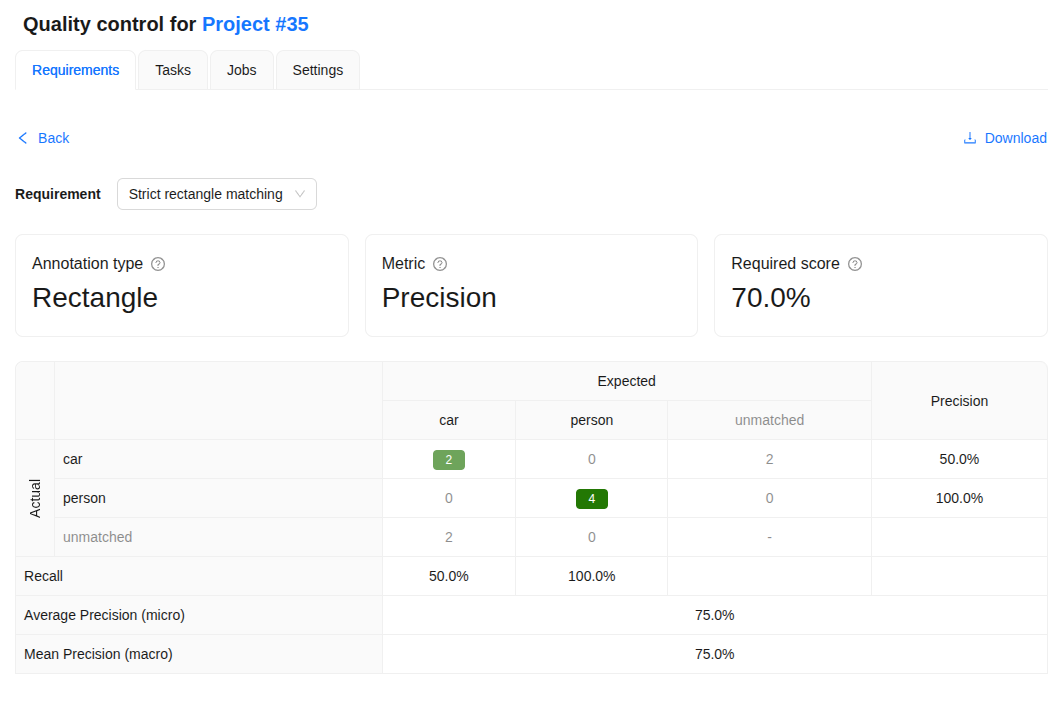
Use the confusion-matrix action next to a requirement to inspect its results, select another
requirement, or download the selected matrix as CSV or JSON.
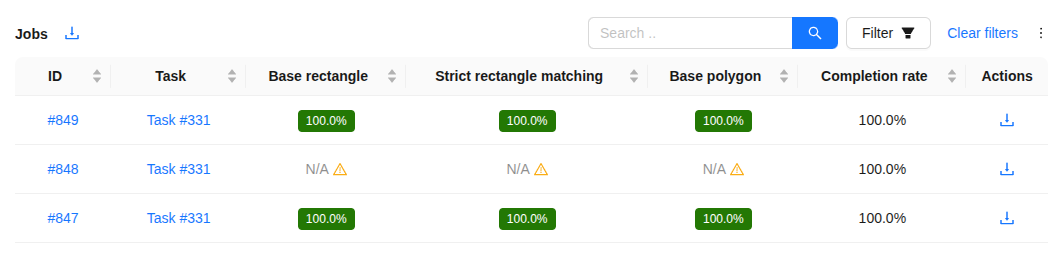
The Jobs tab lists evaluated jobs and their completion rate. It shows the visible
requirement scores; use the table controls to reveal other requirement columns, filter,
sort, or download the data. In a project, the Tasks tab provides the same
requirement-oriented overview for tasks. Use the arrow action in a task or requirement row
to open the related filtered list of jobs.
For tasks with a configured Ground Truth job, the Management tab controls validation frames and the Ground Truth job. The Settings tab is available for tasks and projects whether or not a report has been calculated.
Problem Reporting
All currently reported conflicts have error severity.
| Problem | Description |
|---|---|
| Missing annotation | No matching annotation found in the regular job annotations. Configured by the requirement’s comparison settings. |
| Extra annotation | No matching annotation found in the GT job annotations. Configured by the requirement’s comparison settings. |
| Mismatching label | A GT and a regular job annotations match, but their labels are different. |
| Mismatching direction | A GT and a regular lines match, but the lines have different direction. Configured by the requirement’s comparison settings. |
| Mismatching attributes | A GT and a regular annotations match, but their attributes are different. Configured by the requirement’s attribute comparison settings. |
| Mismatching groups | A GT and a regular annotation groups do not match. Configured by the requirement’s group matching settings. |
| Covered annotation | The visible part of a regular mask or polygon annotation is too small. The visibility is determined by arranging mask and polygon shapes on the frame in the specified z order. Configured by the requirement’s visibility settings. |
Quality Reports
Use Download in the report header to download the task or project quality report in JSON format. Each job row also provides a download action for its report. These files are useful for processing quality results in scripts.

Quality reports contain the requirement scores, metrics, and conflicts shown in the UI, along with detailed per-label and per-frame results.
Additional information on how to compute and use various metrics for dataset quality estimation is available here.
Reviewing GT conflicts
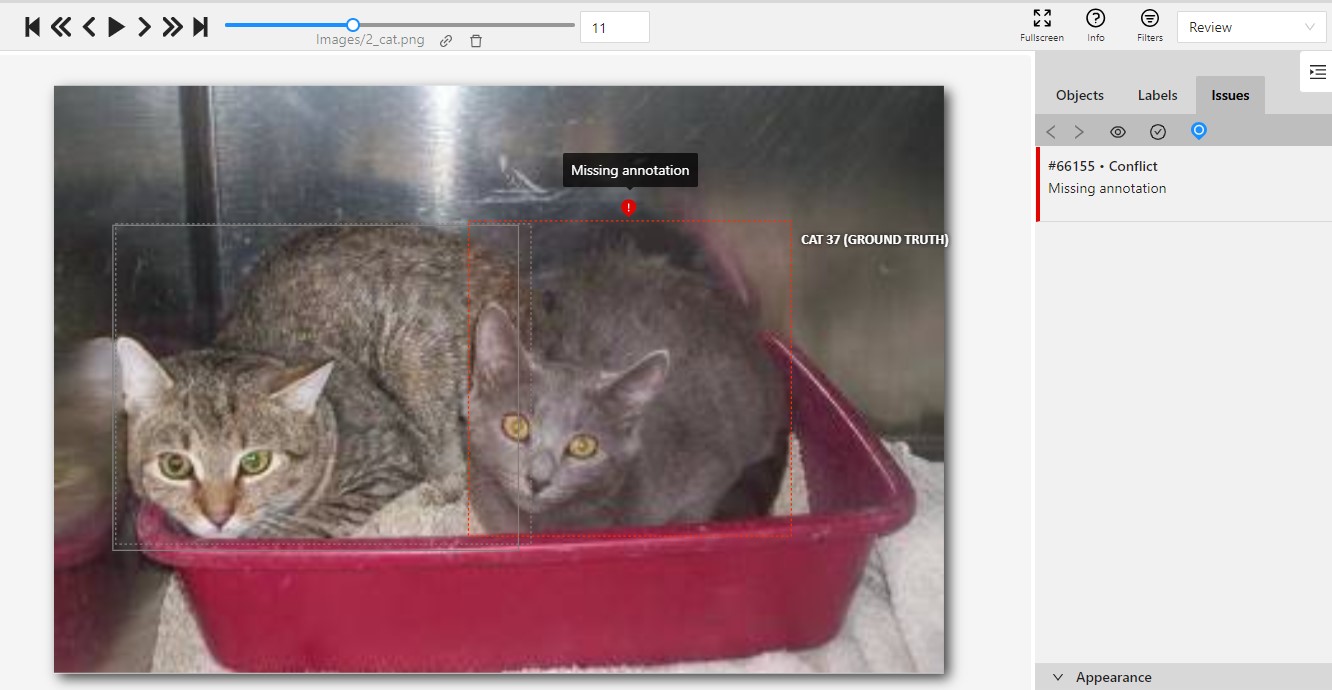
To see GT Conflicts in the CVAT interface, go to Review > Issues > Show ground truth annotations and conflicts.
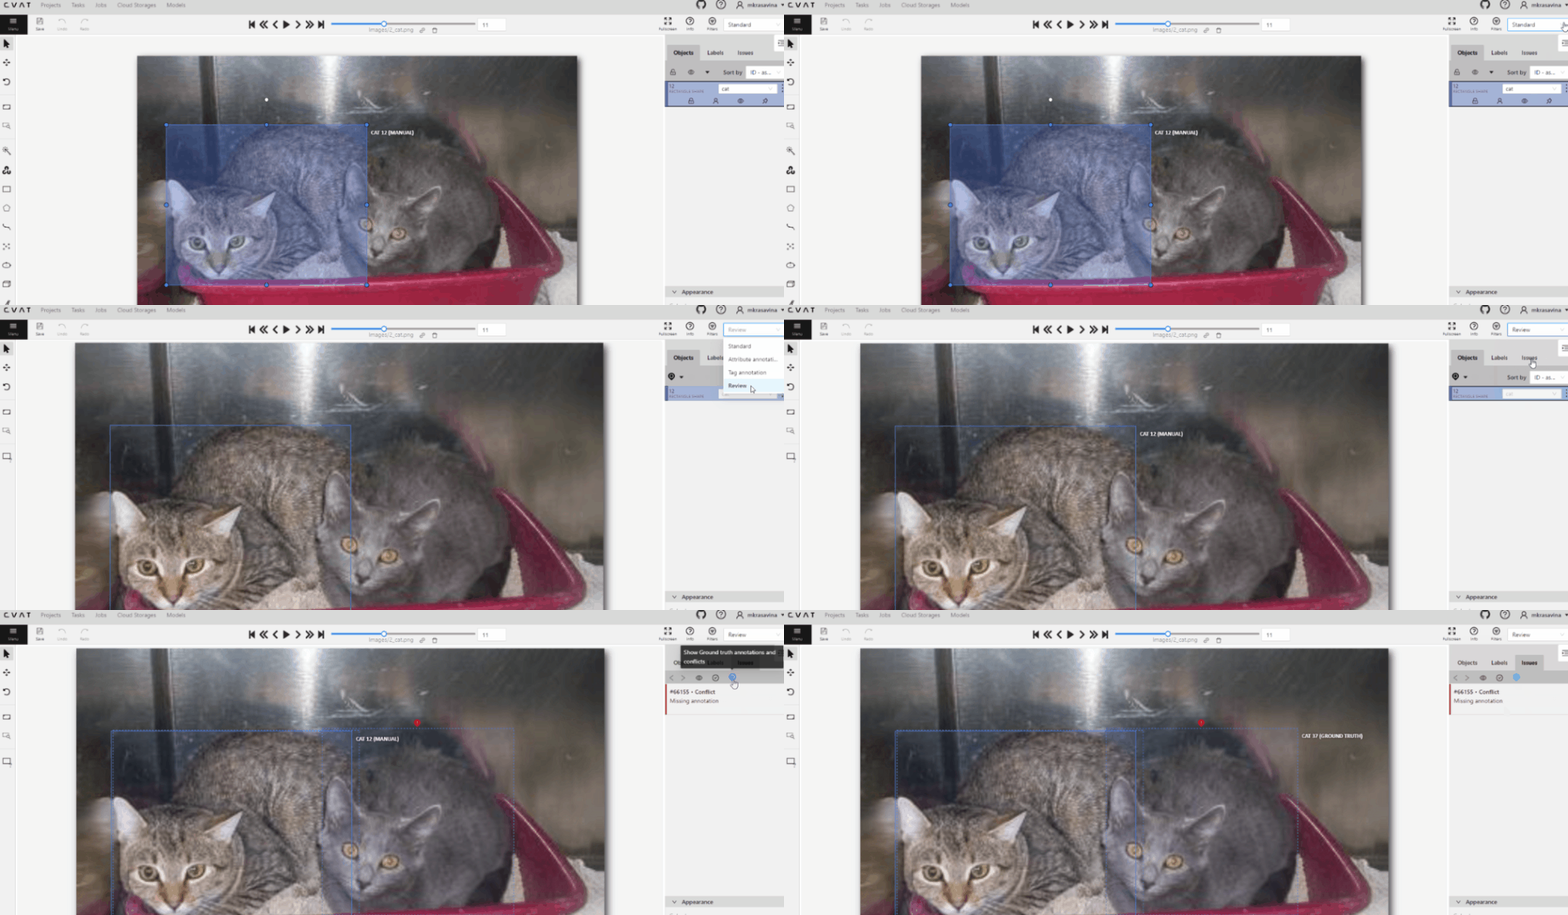
Ground Truth annotations are displayed with a dotted-line border.
The associated label and the (Ground Truth) marker are shown on hovering.
Upon hovering over an issue on the right-side panel with your mouse, the corresponding annotations are highlighted.
Use arrows in the Issue toolbar to move between GT conflicts.
To create an issue related to the conflict, right-click on the bounding box and from the menu select the type of issue you want to create.
Annotation quality & Honeypot video tutorial
This video demonstrates the process: